Xerox8010
Information
System
Hardware Reference
Xerox 8010 Information System
Hardware Reference
VP Series Reference Library Version 2.0
Xerox Corporation Product Education
701 South Aviation Boulevard ESCN-21S
EI Segundo, CA 90245
This publication was printed in June 1988 and is based on the VP
Series 2.0 software.
@1988, Xerox Corporation. All rights reserved.
WARNING: This equipment generates, uses, and can radiate radio frequency energy and, if not installed and used in accordance with the instructions manual, may cause interference to radio communications. It has been tested and found to comply with the limits for a Class A computing device pursuant to subpart
J
of part 15 of the FCC rules, which are designed to provide reasonable protection against such interference when operated in a commercial environment. Operation of this equipment in a residential area is likely to cause interference, in which case the user at his own expense will be required to take whatever measures may be required to correct the interference.Copyright protection claimed includes all forms and matters of copyrightable material and information now allowed by statutory or judicial law or hereinafter granted, including without limitation, material generated from the software programs which are displayed on the screen such as icons, screen displays, looks, and so forth.
Publication number: 610E12460
Printed in the United States of America.
Xerox0 , 8010, ViewPoint, and VP are trademarks of Xerox Corporation.
Changes are made periodically to this document. Changes, technical inaccuracies, and typographic errors will be corrected in subsequent versions.
Table of contents
1.
Introduction
1-1
2.
Components description
2-1
Standard components
2-1
Processor unit
2-1
Floppy disk drive
2-2
Display screen
2-2
Keyboard
2-2
Mouse
2-3
Optional components
2-4
Ethernet transceiver and controller
2-4
Draft printer
2-4
3.
Environmental/space requirements
3-1Positioning 8010 workstation equipment 3-1
Positioning the display screen 3-1
Positioning the keyboard
3-2
Positioning the mouse
3-3
Positioning the processor 3-3
Positioning the optional printer
3-3
Caring for 8010 workstation equipment
3-4
Weekly maintenance
3-4
Monthly maintenance
3-5
4.
Secure Information Device
4-1
Protecting and storing portable fixed-disk drives
4-1
Installing/removing portable fixed-disk drives
4-1
List of figures
2-1
8010 workstation components2-1
2-2
8010 pointing device (mouse)2-3
TABLE Of CONTENTS
HARDWARE REFERENCE
1.
Introduction
The 8010 Information System is a high-performance single-user workstation designed for network office environments.
This manual provides guidelines for setting up and maintaining the 8010 workstation equipment. This equipment includes a processor unit, display screen, keyboard, mouse, floppy disk drive, Ethernet transceiver and controller. Standard and optional components are also described.
After your Xerox Service Representative installs the hardware, refer to the ViewPoint 2.0 Software Installation manual to define the configuration and perform system diagnostics. Then you can install the ViewPoint (VP) desktop software.
XEROX 8010 INFORMATION SYSTEM
Standard components
Processor unit
2.
Components description
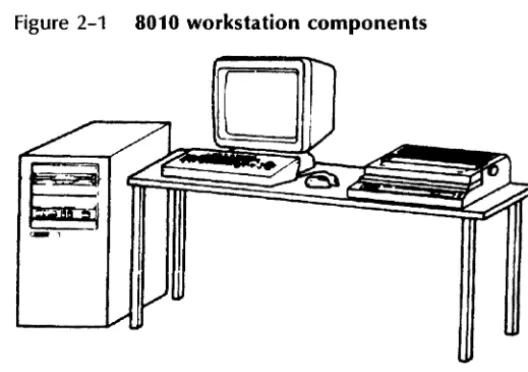
The 8010 workstation consists of four standard components: a processor, display screen, keyboard, and mouse. Figure 2-1 shows a typical system configuration including an optional printer. This chapter describes each component.
Figure 2-1 8010 workstation components
The processor is the part of the computer that contains the memory to store the information you enter. The power switch, indicator lights, and maintenance panel are on the front of the processor cabinet. Your 8010 processor may have one of three disk drives:
• 10-megabyte (does not support ViewPoint 2.0)
• 29-megabyte
• 42-megabyte
Two upgrade kits are available to provide a larger disk drive:
• 10 Mb to 42 Mb Rigid Disk Drive Upgrade Kit
• 29 Mb to 42 Mb Rigid Disk Drive Upgrade Kit
XEROX 8010 INFORMATION SYSTEM
Floppy disk drive
Display screen
Keyboard
2·2
Processor memory
The 8010 workstation has a minimum of 512 kilobytes of processing memory, with additional increments of 256 kilobytes available as options.
The floppy disk drive supports 8% -inch, sided, double-density floppy disks. You use the floppy disk drive to retrieve (read) information from a floppy disk to the 8010, as well as store (write) information from the 8010 to a floppy disk. In addition, you may use the floppy disk drive to load software on the 8010 workstation.
The 8010 workstation uses a 17 -inch bit mapped display screen, with a resolution of 80 dots per inch to provide excellent images of fonts and graphics. The usable screen area measures 10 inches vertically by 12.8 inches horizontally. With only minor scaling, the screen can display two full 8% by 11-inch pages (with 1-inch margins).
The keyboard is the primary input device for communicating with the 8010 workstation. The center section of the keyboard looks much like a typewriter. Surrounding the center section are special function keys. These clearly labeled function keys avoid the use of code keys found on many systems.
The keyboard has five major uses:
• To enter text
• To enter formatting characters, such as new paragraphs and tabs
• To enter speciaJ objects into a document, such as illustrations, equations, and footnotes
• To change the appearance of text, such as boldface, italic, and larger or smaller typeface
• To perform special functions, such as moving, copying, and deleting text
The keyboard is not hard-coded, which means that all key interpretations are under software control. The software programs you use can assign new meanings for the keys. For example, a program may remap the standard typewriter keyboard so you can enter Greek characters or math symbols.
Mouse
HARDWARE REFERENCE
COMPONENTS DESCRIPTION
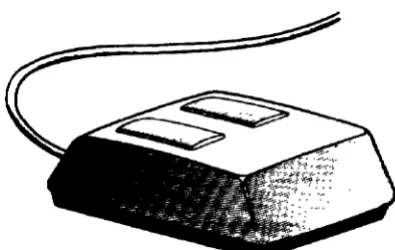
The small movable box attached to the keyboard is an electronic pointing device called a mouse (Figure 2-2). The 8010 uses this pointing device to guide a pointer on the screen, based on the motion of the mouse across a work surface. Use the mouse to
c;eled ohiprtc; nic;ol;lVpn - -- - -,- --- ----1---'-- 0 0 --- thp plprtrnoir npc;ktoo to hip"hlip"ht ---- --- - - - . ' -- -·-0----0---text, and perform commands. The pointer, which is generally represented by an arrow, takes on different shapes, depending on the function you are performing.
Figure 2-2 8010 pointing device (mouse)
The mouse contains two buttons. Use the left mouse button to select objects on the electronic desktop. Move the mouse until the pointer is over the desired object. Then, press the left mouse button. Use the right mouse button to extend selections.
When using the mouse for most operations, pressing a button down is a separate action from releasing the button. While the button is down, the 8010 often provides feedback about what will occur, but the operation does not start until you release the button. Thus, in most cases, if you press the button with the pointer in the wrong spot, you can move it to the correct spot before you release the button. The principal exception to this rule is in scrolling, where the action occurs as soon as you press the button.
The pointer always follows the mouse movement, regardless of the kind of processing the 8010 is completing. If you press the mouse button while the system is processing previous inputs, the system retains the request you made with the mouse and performs the action when the current processing is complete.
XEROX 8010 INfORMATION SYSTEM
Optional components
Ethernet transceiver and controller
Draft printer
2·4
Optional components of an 8010 workstation include the Ethernet transceiver and controller and the draft printer.
You can use the Ethernet transceiver and controller to connect workstations to the Ethernet network. The Ethernet network is a high-speed (10 million bits per second) communication link. Once it is connected, a workstation can perform operations such as sending mail to other networked workstations and communicating with laser printers and central files.
You can attach a dot-matrix printer to your workstation to produce printed documents containing graphics as well as text. See the section "P-32 CQI local Draft Printer" in the Workstation Peripherals for 6085/8010 volume of the VP Series Reference library for additional information on the draft printer.
3.
Environmental/
space requirements
Positioning 8010 workstation equipment
Positioning the display screen
HARDWARE REfERENCE
It is a good idea to take time to position the display screen, keyboard, pointer control, processor, and optional printer so the 8010 workstation is comfortable to use.
To make sure the Xerox Service Representative has enough room to access the display screen, position the screen so that there is at least 14 inches of space on each side.
After you position the display screen, consider other factors. The display screen is much like a television screen; it is hard to see clearly if light sources cause glare on the screen, if the contrast is not intense enough, or if the screen is located too close or too far away from you.
Scan the four questions below. If you answer "no" to a question, or if you are not sure whether your answer should be "yes" or "no," read the explanation following the question. This chapter gUides you in positioning your display for optimum viewing comfort.
Is the screen free of reflections from desk lamps and
windows?
If you have not logged on, the display screen should be entirely blank except for a bouncing white keyboard. (If you do not see the bouncing white keyboard, contact your System Administrator. )
Take a close look at the black surface of the screen. If desk lamps or windows reflect on the screen, reposition the display screen or the light sources to minimize the glare. Sometimes you can solve glare problems by deflecting light upward from window blinds and by dimming or moving desk lamps. If you cannot eliminate these sources, reposition the screen or the light sources so they reflect at the edge of the screen rather than in the center.
If a window is located behind the display screen, the bright background light may form a halo around the display screen and irritate your eyes. If there are blinds on the window, position them so the light deflects upward. If there are draperies, partially close them to reduce or eliminate glare.
XEROX 8010 INFORMATION SYSTEM
Positioning tfle keyboard
3-2
Is overhead lighting reflected on the screenl
Overhead lighting is a major source of glare because of its high intensity. You have the least control over this type of lighting because it is permanently positioned.
If there are fluorescent lights in the office, take a look at the way ,the tubes run in the fixtures. Aligning the display screen parallel to the tubes can help eliminate many of the light rays that strike the screen and reflect back into your eyes.
There are no hard and fast rules concerning how much overhead lighting is optimum with the display screen. Some 8010 users prefer to have their office lights dimmed or some lights eliminated; others prefer to have all lights in the office at high intensity.
What you finally decide to do depends on the sensitivity of your eyes to light. Try different arrangements until you are satisfied.
Is the contrast intense enoughl
When your eye perceives an object, what it is most aware of is the contrast at the edge of two areas. In the case of letters on a printed page or a display screen, your eyes need a sharp boundary between the edges of the letters and the background in order to read words easily. Beyond a certain level of sharpness, however, your eyes may become uncomfortable.
Adjust the 8010 display screen to the contrast level most comfortable for you with the intensity lever under the left side of the screen. Pull the lever toward you, to darken the background and the letters. Push the lever away from you, to lighten the background and the letters.
Press the space bar to display the Logon Option Sheet. Use the intensity lever to adjust the contrast.
Is the display screen located at a comfortable viewing
distance so the words on the screen can be read without
eye strainl
The ideal location for a display screen depends on your vision. Take a look at the Logon Option Sheet on the display screen. Is it clear? If it is blurred, move the display screen toward or away from you until it becomes clear.
You can place the keyboard directly in front of the display screen. The keyboard is connected to the processor with approximately 6 feet of cable so you can move it to any location that is comfortable for you.
The most comfortable keyboard height is one in which your upper arm is close to your body and your lower arm is parallel with the floor, with your hands lifted slightly so your fingers can travel easily over the keys.
Positioning the mouse
Positioning the processor
Positioning the optional printer
HARDWARE REFERENCE
ENVIRONMENTAl/SPACE REQUIREMENTS
Position the keyboard so there are 2 inches of space between the keyboard and the nearest wall, and approximately 1 square foot of space next to the keyboard for the mouse.
The mouse is attached to the keyboard by approximately 2 Y2 feet of thin cable. Depending on whether you are right- or left-handed, move the mouse to the side of the keyboard that is most convenient for you.
The cable leading from the mouse should face the display. If the cable is not facing the display, the pointer will move backward on the electronic desktop.
The mouse works best on a special pad from Xerox. If this plastic pad is not available, request one from your System Administrator. The mouse may not accurately position the pointer where you want it if you use it without a pad.
locate the processor unit so the front panel of the unit is accessible. The power switch, indicator lights, and maintenance panel are on the front of the processor.
There should be sufficient air movement around the processor so that the heat it produces does not damage it. The back of the processor must be at least 6 inches from the wall.
Additionally, position the processor so that the Xerox Service Representative can easily access it. Place the processor in an area 15 inches long by 12 inches wide or provide a clear area of the same dimensions in front of the processor, so the Service Representative can pull it out to work on it.
Finally, position the processor in a permanent location. Bumping or jarring it hard enough, even when it is turned off, can destroy the magnetic heads or the media inside.
Position the printer in a convenient location for inserting paper.
Allow 3 inches of space on each side and 6 inches of space behind it so there is sufficient air movement around it and the Xerox Service Representative has easy access.
XEROX 8010 INFORMATION SYSTEM
Caring for 8010 workstation equipment
Weekly maintenance
3·4
This section contains weekly and monthly maintenance requirements for the 8010 Information Processing System.
Clean the floppy disk drive heads
You should clean the floppy disk drive heads every fifth time you use the floppy disk drive. (If you use the floppy disk drive only five times a month, perform this procedure once each month.)
It is important to clean the magnetic heads on a regular basis since they are responsible for reading and writing data on the floppy disks. If the heads are not kept clean, they can accumulate deposits that cause scratching and erasure of data on the disks.
If a head cleaning kit is not available, contact your System Administrator.
Use the following procedure to clean the floppy disk drive heads with a Xerox head-cleaning kit. If you have a cleaning kit from another manufacturer, follow the directions from that manufacturer.
1. If you are logged on to the workstation, skip to step 2. Otherwise, from the bouncing keyboard, press the spacebar to display the Logon Option Sheet.
2. Remove the head-cleaning disk from its white dust jacket. If the head-cleaning disk has not been used before, remove the perforated tab from the black disk jacket. The disk is now prepared to clean the disk drive.
3. Move the cursor to the command line at top of the display. Hold down the left button on the mouse and position the highlight on the Test option. Release the button to select Test.
4. When the on-line diagnostics option sheet screen, select [Clean read/write heads]. message appears in the window: Please cleaning diskette.
appears on the The following insert a
head-5. Turn the head-cleaning disk over and dispense approximately half a teaspoon of the disk cleaning solution over the large cutout area.
6. Insert the head-cleaning disk into the floppy disk drive with the perforated tab facing upward, and close the drive door.
7. Select [Run]. The following message appears: Head cleaning in progress.
Monthly maintenance
HARDWARE REFERENCE
ENVIRONMENTAUSPACE REQUIREMENTS
The following messages appear:
Head cleaning completed.
Please remove the head-cleaning diskette from the unit.
Please select [Confirm) when this is done.
8. Press the floppy disk drive latch and remove the
head-cleaning disk. Select [Confirm).
9. Write a checkmark in the appropriate usage box on the disk.
Replace the head-cleaning disk in its white dust jacket.
Recap and replace the cleaning solution.
After 13 uses,
discard the disk.
Clean the display screen
lightly wipe your display screen with a damp cloth, or spray it
with window cleaner and wipe it dry.
CAUTION:
Do not allow any liquid to drip down into the
housing around the screen.
Clean the keyboard
Brush off the keyboard to keep dust from building up under the
keys.
XEROX 8010 INFORMATION SYSnM
4.
Secure Information Device
Xerox Secure Information Devices (SIDs) are portable fixed-disk drives for Xerox 8000 Network Systems. These disk drives ensure that, without a physical connection to the network, no one can intercept information you create, edit, print, mail, or store. The SID is designed to meet your needs within critical work areas involving secure or classified information.
Protecting and storing portable fixed-disk drives
SID portable fixed-disk drives are available in two sizes: 10- and 42-megabytes of storage capacity. You can attach one disk drive to your SID workstation processor to provide individualized storage for multiple users of one workstation processor. The processor can support only one portable fixed-disk drive at a time.
To prevent damage to a disk drive, follow these gUidelines:
• Handle the disk drive very carefully. If you need to move the disk drive, use the two rigid handles to carry it to its secure storage area. It weighs approximately 40 pounds.
• Do not drop a disk drive or strike it against other objects.
• Store the disk drive flat on a shelf in a clean environment. Be sure the shelf can hold the weight if you are going to stack disk drives.
In case of failure, the Xerox Service Representative turns the rigid disk over to you for disposal. This ensures the protection of your data on the failed disk drive.
Installing/removing portable fixed-disk drives
HARDWARE REfERENCE
Read through the following instructions entirely before attempting to install or remove a SID portable fixed-disk drive for the first time.
Installing a portable fixed-disk drive at a processor
To install a SID portable fixed-disk drive:
1. Place the disk drive on a tabletop or desktop near the processor. Do not place the disk drive on top of the processor. (It is not necessary to turn off the workstation processor.)
2. Seat the disk drive unit on its baseplate until it locks into place.
XEROX 8010 INfORMATION SYSnM
3. Attach the two interconnecting harnesses to the portable disk drive box. (This connects the disk drive unit to the processor. The cables have round connectors that allow them to fit only one way. Turn the outer ring two or three times to secure the connector in place.)
4. Power the SID disk drive on. You can now boot the processor by pressing the B RESET button.
Removing a portable fixed-disk drive from a processor
To remove a SID portable fixed-disk drive:
1. Power the SID disk drive off. (You can power off the disk drive unit with the workstation processor still on.)
2. Power down the workstation.
CAUTION: Do not pick the disk drive unit up while the power is on. If you pick up the disk drive before it completely stops, you may lose data.
3. Detach the interconnecting harnesses.
4. Use the two rigid handles to remove the disk drive unit from its tabletop or desktop baseplate.
5. Carefully carry the disk drive unit to its secure storage area.
Xerox Corporation
701 South Aviation Boulevard EI Segundo, CA 90245
XEROX® and all XEROX products mentioned in this publication are trademarks of XEROX CORPORA TlON. Product appearance and/or specifications subject to change without notice.