C
HAP
T
E
R
5
SHELTERS
A shelter can protect you from the sun, insects, wind, rain, snow, hot or cold temperatures, and enemy observation. It can give you a feeling of well-being. It can help you maintain your
will to survive.
In some areas, your need for shelter may take precedence over your needfor food and possibly even your need for water. For
example,
!
rolonged exposure to cold can cause excessive fa-tigue an weakness (exhaustion). An exhausted person may develop a "passive" outlook, thereby losing the will to survive..
SHELTER SITE SELECTION
When you are in a survival situation and realize that shelter is a high priority, start looking for shelter as soon as possible. As you do so, remember what you will need at the site. Two requisites
are-.
It must contain material to make the type of shelter you need..
It must be large enough and level enough for you to lie downcomfortably.
When you consider these requisites, however, you cannot ignore y'our tactical situation or your safety. You must also consider whether
the
site-.
Provides concealment from enemy observation..
Has camouflaged escape routes..
Is suitable for signaling, if necessary..
Provides protection against wild animals and rocks and dead trees that might fall..
Is free from insects, reptiles, and poisonous plants.You must ~lso remember the problems that could arise in your
environ-ment. For
mstance-.
Avoid flash flood areas in foothills..
Avoid avalanche or rockslide areas in mountainous terrain..
Avoid sites near bodies of water that are below the high water mark. In some areas, the season of the year has a strong bearing on the site you select. Ideal sites for a shelter differ in winter and summer. During cold winter months you will want a site that will protect you from the cold and wind, but will have a source of fuel and water. During summer months in the same area you will want a source of water, but you will want the site to be almost insect free.When considering shelter site selection, use the word BLISSas a guide. B - Blend in with the surroundings.
L - Low silhouette. I - Irregular shape.
S - Small.
.
TYPES OF SHELTERS
When looking for a shelter site, keep in mind the ty'p'eof shelter (protection) you need. However, you must also
consiaer-.
How much time and effort you need to build the shelter..
If the shelter will adequately protect you from the elements (sun, wind, rain, snow)..
If y.ouhave the tools to build it. If not, can you make improvised tools?.
If you have the type and amount of materials needed to build it. To answer these questions, you need to know how to make various types of shelters and what matenals you need to make them.Poncho Lean-To
It takes only a short time and minimal equipment to build this lean-to (Figure 5-1). You need a poncho,2 to 3 meters of rope or parachute suspension line, three stakes about 30 centimeters long, and two trees or two poles 2 to 3 meters apart. Before selecting the trees you will use or the location of your poles, check the wind direction. Ensure that the back of your lean-to will be into the wind.
To make the
lean-to-.
Tie off the hood of the poncho. Pull the drawstring tight, roll the hood longways, fold it mto thirds, and tie it off witfi tne drawstring..
Cut the rope in half. On one long side of the poncho, tie half of the rope to the comer grommet. Tie the other half to the other comer grommet..
Attach a drip stick (about a 10-centimeter stick) to each rope about 2.5 centimeters from the grommet. These drip sticks will keep rain-water from running down the ropes into the lean-to. Tying strings (about 10 centimeters long) to eaCh grommet along the poncho's top edge will allow the water to run to and down the lme without drip-ping into the shelter..
Tie the ropes about waist high on the trees (up'rights). Use a round turn and two half hitches with a quick-release kriot..
If
you plan to use the lean-to for more than one night, or you expect ram, make a center support for the lean-to. Make this support with a line. Attach one end 01 the line to the poncho hood and the other end to an overhanging branch. Make sure there is no slack in the line.Another method is to place a stick upright under the center of the lean-to. This method, nowever, will restrict your space and movements in the shelter.
For additional protection from wind and rain, place some brush, your rucksack, or other equipment at the sides of tIi.elean-to.
To reduce heat loss to the ground, place some type of insulating mate-rial, such as leaves or pine needles, inside your lean-to.
Note: When at rest, you lose as much as 80 percent of your body heat to the ground.
To increase your security from enemy observation, lower the lean-to's silhouette by making two changes. First, secure the support lines to the trees at knee height (not at waist height) using two knee-high sticks in the two center grommets (sides of lean-to). Second, angle tne poncho to the ground, securing it with sharpened sticks, as above.
.
Poncho Tent
This tent (Figure 5-2) provides a low silhouette. It also protects you from the elements on two sides. It has, however, less usable space and observation area than a lean-to, decreasing your reaction time to enemy detection. To make this tent you need a poncho, two 1.5- to 2.5-meter ropes, six sharpened sticks about 30 centimeters long, and two trees 2 to 3 meters apart.
To make the
tent-.
Tie off the poncho hood in the same way as the poncho lean-to..
Tie a 1.5- to 2.5-meter rope to the center grommet on each side of the poncho..
Tie the other ends of these ropes at about knee height to two trees 2 to 3 meters apart and stretcn the poncho tight..
Draw one side of the poncho tight and secure it to the ground pushing sharpened sticks through the grommets..
Follow the same procedure on the other side.If you need a center support, use the same methods as for the poncho lean-to. Another center support is an A-frame set outside but over
.
the center of the tent (Figure 5-3). Use two 90- to 120-centimeter-long sticks, one with a forked end, to form the A-frame. Tie the hood's draw-string to the A-frame to support the center of the tent.
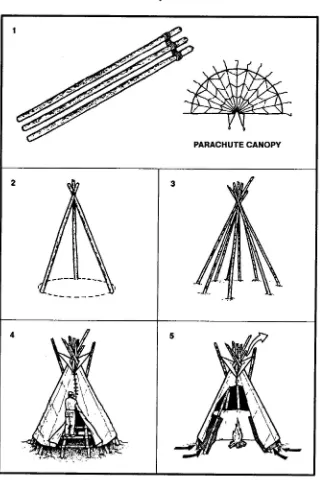
Three-Pole Parachute Tepee
If you have a parachute and three poles and the tactical situation allows, make a paracnute tepee. It is easy and takes very little time to make this tepee. It provides protection from the elements and can act as a sigI1al-ing device by enhancsigI1al-ing a small amount of light from a fire or canale. It is large enough to hold several people and their equipment and to allow sleepmg, cooKing,and storing firewood.
You can make this tepee using parts of or a whole personnel main or re-serve parachute canopy. If using a standard rersonnel parachute, you need three poles 3.5 to 4.5 meters long and about 5 centimeters in diameter.
To make this tepee (Figure
5-4)-.
Lay the poles on the ground and lash them together at one end..
Stand the framework up and spread the poles to form a tripod..
For more support, place additional poles against the tripod. Five or six additional poles work best, but do not lash them to the tripod..
PARACHUTE CANOPY
2 3
4 5
.
.
Determine the wind direction and locate the entrance 90 degrees or more from the mean wind direction..
Lay-out the parachute on the "backside" of the tripod and locate the bridle loop (nylon web loop) at the top (apex) of tne canopy..
Place the bridle loop over the top of a free-standing pole. Then place the pole back up against the tripod so that the canopy's apex is at the same height as the lashing on fue three poles..
Wrap the canopy-around one side of the tripod. The canopy should be of double thickness, as you are wrapping an entire paraChute. You need only wrap half of the tripod, as the remainder ofthe canopy will encircle tl1etripod in the opposite direction..
Construct the entrance by wrapping the folded edges of the canopy around two free-standing poles. You can then place the poles side by side to close the tepee's entrance..
Place all extra canopy underneath the tepee poles and inside to create a floor for the shelter..
Leave a 30- to 50-centimeter opening at the top for ventilation if you intend to have a fire inside the tepee.One-Pole Parachute Tepee
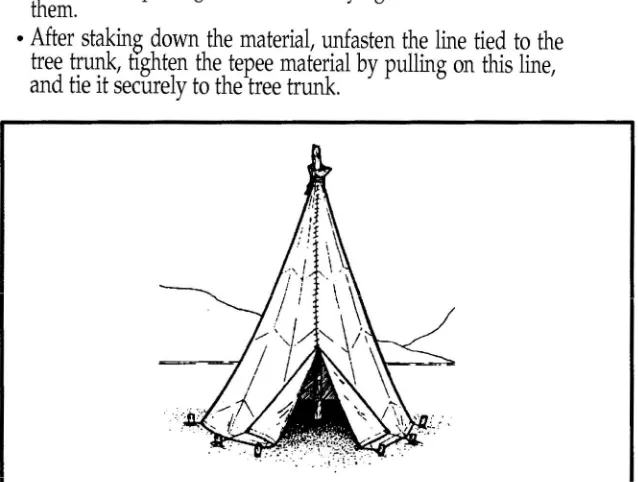
You need a 14-gore section (normally) of canopy, stakes, a stout center pole, and inner core and needle to construct tIns tepee. You cut the sus-pension lines except for 40- to 45-centimeter lengths at the canopy's lower lateral band.
To make this tepee (Figure
5-5)-.
Select a shelter site and scribe a circle about 4 meters in diameter on the ground..
Stake the parachute material to the ground using the lines remaining at the lower lateral band..
After deciding where to place the shelter door, emplace a stake and tie the first line (from the lower lateral band) securely to it..
Stretch the parachute material taut to the next line, emplace a stake on the scrilied line, and tie the line to it..
Continue the staking process until you have tied all the lines..
.
Then securely attach the material to the pole..
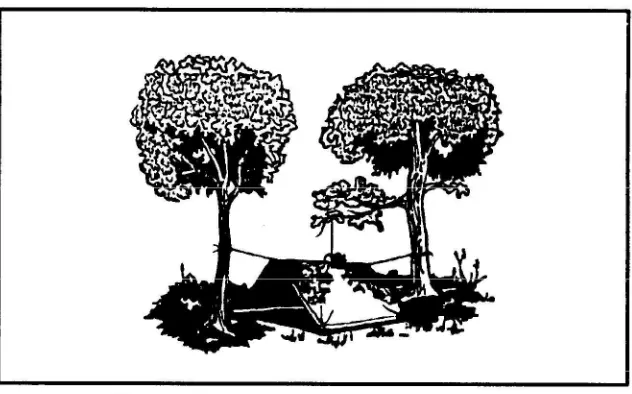
Using a suspension line (or inner core), sew the end gores together leaving 1 or 1.2 meters for a door.No-Pole Parachute Tepee
You use the same materials, except for the center pole, as for the one-pole parachute tepee.
To make this tepee (Figure
5-6)-.
Tie a line to the top of parachute material with a previously cut suspension line..
Throw the line over a tree limb, and tie it to the tree trunk..
Starting at the °2posite side from the door, emplace a stake on the scribed 3.5- to 4.3-meter circle..
Tie the first line on the lower lateral band..
Continue emplacing the stakes and tying the lines to them..
After staking down the material, unfasten the line tied to the tree trunk, ttghten the tepee material by pulling on this line,and tie it securely to the tree trunk.
.
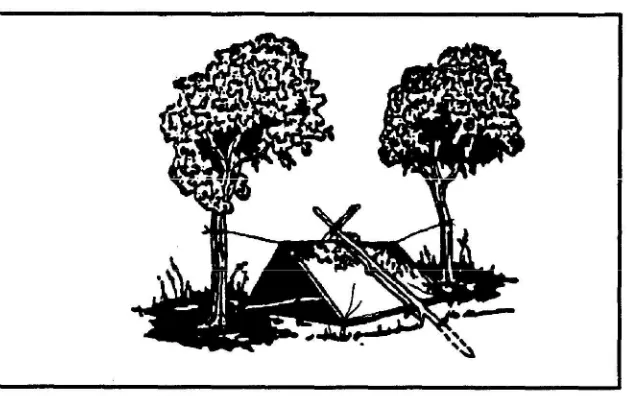
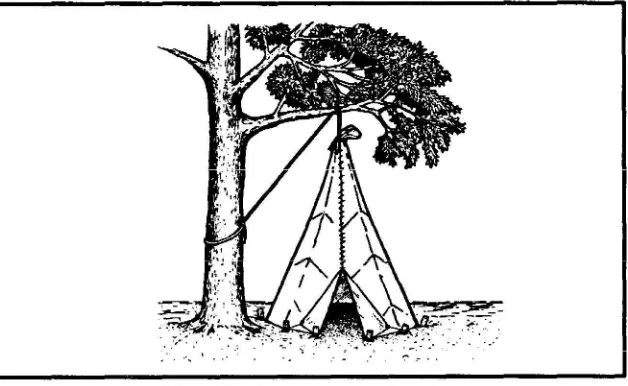
One-Man Shelter
A
one-man shelter you can easily make using a parachute requires a tree and three poles. One pole should be about 4.5 meters long and the other two about 3 meters rong.To make this shelter (Figure
5-7)-.
Secure the 4.5-meter pole to the tree at about waist height..
Lay the two 3-meter poles on the ground on either side of and in the same direction as the 4.5-meter pOle..
Lay the folded canopy over the 4.5 meter pole so that about the same amount of material hangs on both sides..
Tuck the excess material under the 3-meter poles, and spread it on the ground inside to serve as a floor..
Stake down or put a spreader between the two 3-meter poles at the shelter's entrance so tl1eywill not slide inward..
Use any excess material to cover the entrance.The parachute cloth makes this shelter wind resistant, and the shelter is small enough that it is easily warmed. A candle, used carefully, can keep the inside temperature comfortable. This shelter is unsatisfactory, how-ever, when snow is falling as even a light snowfall will cave it in.
.
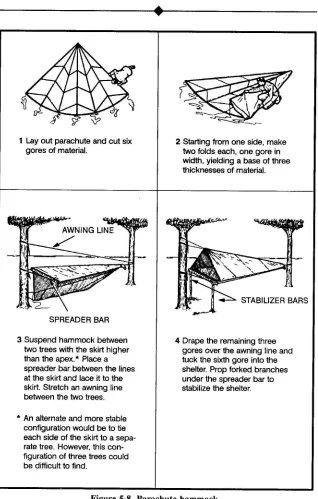
Parachute Hammock
You can make a hammock using 6 to 8 gores of parachute canopy and two trees about 4.5 meters apart (Figure 5-8).
Field-Expedient
Lean-To
If y'ou are in a wooded area and have enough natural materials, you can make a field-expedient lean-to (Figure 5-9) without the aid of tools or with only a knite. It takes longer to make this type of shelter than it does to make other types, but it will protect you from the elements.
You will need two trees (or upright poles) about
2
meters apart; one pole about2
meters long and 2.5 centimeters in diameter; five to eight poles about3
meters long and 2.5 centimeters in diameter for beams; cord or vines for securing the horizontal support to the trees; and other poles, saplings, or vines to crisscross the beams.To make this
lean-to-.
Tie the 2-meter pole to the two trees at waist to chest height. This is the horizontal support. If a standing tree is not available, construct a biped using Y-shaped sticks or two tripods..
Place one end of the beams (3-meter poles) on one side of the hori-zontal support. As with all lean-to type shelters, be sure to place the lean-to's backside into the wind.1 Layout parachute and cut six gores of material.
.
~-
~ \.
<==>---2 Starting from one side. make two folds each. one gore in width. yielding a base of three thicknesses of material.
SPREADER BAR
3 Suspend hammock between two trees with the skirt higher
than the apex.*Place a
spreader bar between the lines at the skirt and lace it to the skirt. Stretch an awning line between the two trees.
* An alternate and more stable configuration would be to tie each side of the skirt to a sepa-rate tree. However. this con-figuration of three trees could be difficult to find.
STABILIZER BARS
4 Drape the remaining three gores over the awning line and tuck the sixth gore into the shelter. Prop forked branches under the spreader bar to stabilize the shelter.
.
.
Crisscross saplings or vines on the beams..
Cover the framework with brush, leaves, pine needles, or grass, start-ing at the bottom and workstart-ing your way up like shstart-inglstart-ing..
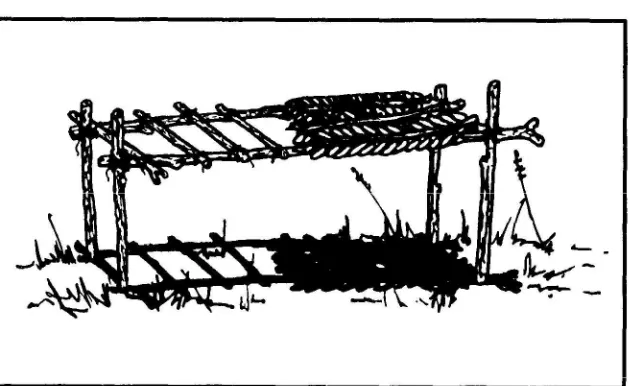
Place straw, leaves, pine needles, or grass inside the shelter for bedding.In cold weather, add to your lean-to's comfort by building a fire reflector wall (Fi~re 5-9). Drive four 1.5-meter-long stakes into the ground to support the wall. Stack green logs on top of one another between the support stakes. Form two rows of stacked logs to create an inner space witfiin the wall that you can fill with dirt. This action not only strength-ens the wall but makes it more heat reflective. Bind the top of the support stakes so that the green logs and dirt will stay in pIace.
With just a little more effort you can have a dryin,g rack. Cut a few 2-centimeter-diameter poles llength depends on tfie distance between the lean-to's horizontal support and ilie top of the fire reflector wall). Lay one end of the poles on the lean-to support and the other end on top of the reflector wall. Place and tie into place smaller sticks across these poles. You now have a place to dry cIothes, meat, or fish.
.
Swamp
Bed
In a marsh or swamp, or any area with standing water or continually wet ground, the swamp oed (Figure5-10) keeps you out of the water. When select~ngsuch a site, consider the weather, wind, tides, and available matenars.
To make a swamp
bed-.
Look for four trees clustered in a rectangle, or cut four poles (bam-boo is ideal) and drive them firmly into tne ground so they form a rectangle. They should be far enough apart and strong enough to support your height and weight, to mclude equipment..
Cut two poles that span the width o~the rectangle. They, too, must be strong enough to support your weight..
Secure these two poles to the trees (or poles). Be sure they are high enough above the ground or water to allow for tides and high water..
Cut additional poles that span the rectangle's length. Lay them across the two side poles, and secure them..
Cover the top of the bed frame with broad leaves or grass to form a soft sleeping surface..
Build a fire pad by laying clay, silt, or mud on one comer of the swamp bed and allow it to dry..
Another shelter designed to get you above and out of the water or wet ground uses the same rectangular configuration as the swamp bed. You very simply lay sticks and branches lengthwise on the inside of the trees (or poles) until there is enough materia1 to raise the sleeping surface above the water level.
Natural Shelters
Do not overlook natural formations that provide shelter. Examples are caves, rocky crevices, clumps of bushes, small depressions, farge rocks on leeward sides of hills, large trees with low-nanging limbs, and fallen trees with thick branches. However, when selecting a natural
formation-.
Stay away from low ground such as ravines, narrow valleys, or creek beds. Low areas collect the heayy cold air at nigN and are therefore colder than the surrounding hign ground. Thick;brushy, low ground also harbors more insects..
Check for poisonous snakes, ticks, mites, scorpions, and stinging ants..
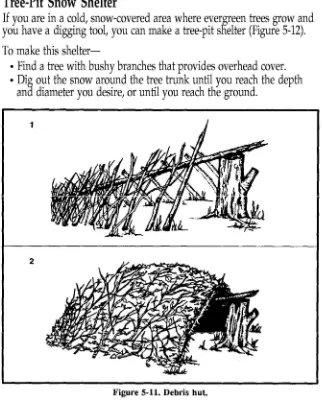
Look for loose rocks, dead limbs, coconuts, or other natural growth than could fall on your shelter.Debris Hut
For warmth and ease of construction, this shelter is one of the best. When shelter is essential to survival, build this shelter.
To make a debris hut (Figure
5-11)-.
Build it by making a tripod with two short stakes and a long ridgepole or by placing one end of a long ridgepole on top of a sturdy base..
Secure the ridgepole (pole running the length of the shelter) using the tripod method or DYanchoring it to a tree at about waist heigfit..
Prop large sticks along both sides of the ridgepole to create a wedge-snaped ribbing effect. Ensure the rib15ingis wide enough to accommodate your body and steep enough to slled moisture..
Place finer sticks and brush crosswise on the ribbing. These form a latticework that will keep the insulating material (grass, pine needles, leaves) from falling through the ribbing into the sleeping area..
Add light, dry, if possible, soft debris over the ribbing until the insu-lating material is at least 1 meter thick-the thicker the better..
.
At the entrance, pile insulating material that you can drag to you once inside the shelter to close the entrance or build a door..
As a final step in constructing this shelter, add shingling material or branches ~n top of ~he debris layer to prevent the insulating material from blowmg away m a storm.Tree-Pit Snow Shelter
If you are in a cold, snow-covered area where evergreen trees grow and you have a digging tool, you can make a tree-pit snelter (Figure5-12).
To make this
shelter-.
Find a tree with bushy branches that provides overhead cover..
Dig out the snow around the tree trunk until you reach the depth ana diameter you desire, or until you reach the ground.2
.
.
Pack the snow around the top and the inside of the hole to provide support..
Find and cut other evergreen boughs. Place them over the top of the p'it to give you additional overhead cover. Place evergreen boughs in the bottom of the pit for insulation.See Chapter 15 for other arctic or cold weather shelters.
Beach Shade Shelter
This shelter protects you from the sun, wind, rain, and heat. It is easy to make using natural materials.
To make this shelter (Figure
5-13)-.
Find and collect driftwood or other natural material to use as support beams and as a digging tool..
Select a site that is above the high water mark..
Scrape or dig out a trench running north to south so that it receives the least amount of sunlight. Make the trench long and wide enough for you to lie down comfortably.EVERGREEN BOUGHS
PACKED SNOW
PACKED SNOW
GROUND LEVEL
.
.
Mound soil on three sides of the trench. The higher the mound, the more space inside the shelter..
Lay supp'ort beams (driftwood or other natural material) that span the trench on top of the mound to form the framework for a roof..
Enlarge the shelter's entrance by digging out more sand in frontofit.
.
Use natural materials such as grass or leaves to form a bed inside the shelter.Desert Shelters
In an arid environment, consider the time, effort, and material needed to make a shelter. If you have material such as a poncho, canvas, or a parachute, use it along with such terrain features as rock outcropping, mounds of sand, or a depression between dunes or rocks to make your shelter.
Using rock
outcroppings-.
Anchor one end of y'our poncho (canvas, parachute, or other mate-rial) on the edge of the outcrop using rocKsor other weights..
Extend and anchor the other end of the poncho so it provides the best possible shade.---
---
~~.
In a sandyarea-.
Build a moundof
sand or use the sideof a
sand dune for one side of the shelter..
Anchor one end of the material on top of the mound using sand or other weights..
Extend and anchor the other end of the material so it provides the best possible shade.Note: If you have enough material, fold it in half and form a 3D-centimeter to 45-centimeter airspace between tTietwo halves. This airspace will reduce the temperature under the shelter.
A belowground shelter (Figure 5-14) can reduce the midday heat
as
much as 16 to 22 degrees C (30 to 40 degrees F). Building it, however,
-~~
::::---
----~
--
-.'
~~ ,,,,
"""'-Y--~'-
_r~-
~''--..
, ,< /'
PONCHO
.
requires more time
and effort than for other shelters. Since your physi-cal effort will make you sweat more and increase dehydration, construct it before the heat of the day.To make this
shelter-.
Find a low spot or depression between dunes or rocks. If necessary, dig a trench 45 to 60 centimeters deep and long and wide enough for you to lie in comfortably..
Pile the sand you take from the trench to form a mound around three sides..
On the open end of the trench, dig out more sand so you can get in and out of your shelter easily..
Cover the trench with your material..
Secure the material in place using sand, rocks, or other weights. If you have extra material, you can further decrease the midday tem-perature in the trench by securing the material 30 to 45 centimeters above the other cover. This layering of the material will reduce the inside temperature 11 to 22 degrees C (20 to 40 degrees F).Another ryre of belowground shade shelter is of similar construction, except all sides are open to air currents and circulation. For maximum protection, you need a minimum of two layers of parachute material (Fi~re 5-15). White is the best color to reflect heat; the innermost layer should be of darker material.
-=-45em ABOVE OR BELOW GROUND SURFACE (PREFERRED
FOR COOLEST TEMPERATURES)
CHAPTER
6
WATER
PROCUREMENT
Water is one of your most urgent needs in a survival situa-tion. You can't live long without it, especially in hot areas where you lose water rapidly through perspiration. Even in cold areas, you need a minimum of 2 liters of water each day to maintain efficiency.
More than three-fourths of your body is composed of
fluids. Your body loses fluid as a result of heat, cold, stress, and exertion. To function effectively, you must replace the fluid your body loses. So, one of your first goals is to obtain
.
WATER SOURCES
Almost any environment has water present to some degree. Figure 6-1 lists possi15lesources of water in vanous environments. It also provides information on how to make the water potable.
Note: If you do not have a canteen, a cup, a can, or other type of container, improvise onefrom plastic or water-resistant cloth. Shape the plastic or cloth into a bowl by' pleatmj{ it. Use pins or other suitable items-even your hands-to hold the pfeats.
Means of Obtaining and/or
Environment Source of Water Making Potable Remarks
Frigid areas Snow and ice Melt and purify. Do not eat without melt-ing! Eating snow and ice can reduce body tempera-ture and will lead to more dehydration.
Snow and ice are no purer than the water from which they come.
~!:tI il'A th!:tlt i~ nra\l in
""'''''
..., 11.11"'", ~'''''7 III
color or opaque is salty. Do not use it without de-salting it. Sea ice that is crystalline with a bluish
a 1: 1 ~ :- u vCC;:I.lid;:) IILLI'='::saIL III n..
At sea Sea Use desalter kit. Do not drink seawater without desalting.
Rain Catch rain in tarps or Iftarp or water-holding in other water-holding material has become en-material or containers. crusted with salt, wash it in
the sea before using (very littlesalt willremain on it).
Sea ice See remarks above for
frigid areas.
.
Means of Obtaining and/or
Environm~nt Source of Water Making Potable Remarks
Beach Ground Dig hole deep
enough to allow water to seep in; obtain rocks, build fire, and heat rocks; drop hot rocks in water; hold cloth over hole to absorb steam; wring water from cloth.
Altemate method if a con-tainer or bark pot is avail-able: Fill container or pot with seawater; build fire and boil water to produce steam; hold cloth over
container to absorb steam; wring water from cloth.
Desert Ground Dig holes deep
.
in valleys and low enough to allow water areas to seep in..
at foot of concave banks of dry river beads.
at foot of cliffsor rock outcrops.
At fi~.n_.. --r-' ---.-..rtAnrA~!::innbehind first sand dune of dry desert lakes
.
wherever you find damp surface sand.
wherever you findgreenvegetation
In asand dune belt, any
available water will be
found beneath the original
valley floor at theedge of dunes.
Cacti Cut off the top of a barrel cactus and mash or squeeze the pulp.
CAUTION: Do not eat pulp. Place pulp In mouth, suck out juice,
!tin'" l'Ilf!:"'!IIrl"l rUlln
u..-- - , ,...
Without a machete, cutting into a cactus is difficult and takes time since you must get past
+&,.,.""I,...t"\,.,. root ,.. ""ni o.~ "1° IUII~I ~UVII~ O)tJIIIOi;) and cut through the tough rind.
.
Means of Obtaining and/or
Environment Source of Water Making Potable Remarks
Desert
(,...nn+inllorl\
''''''11101'1'''''''''''/
Depressions or
100 1",... ;... .--lI.... IIVI'ICJ~ UII"""'n.",
Periodic rainfall may
"",II_+i I", ,... vUllo\';' III tJUV'1;;), ;;)~I-'
into fissures, or collect in holes in rocks.
Fissures in rock Insert flexible tubing and siphon water. If fis-sure is large enough, you can lower a con-tainer into it.
Porous rock Insert flexible tubing and siphon water.
Condensation on metal
Use cloth to absorb water, then wring water from cloth.
Extreme temperature vari-ations between night and day may cause condensa-tion on metal surfaces. Following are signs to watch for in the desert to help you find water:
.
All trails lead to water. You should follow in the direction in which the trails converge. Signs of camps, campfire ashes, animal droppings, and trampled terrain may mark trails..
Flocks of birds will circle over water holes. Some birds fly to water holes at1 I-.
&.T'-_:-uavvrl anu ::iUrI::it:H.I rltjll flight at these times is generally fast and close to the ground. Bird tracks or chirping sounds in the evening or early morning sometimes indi-cate that water is nearby.
Fluid Remarks
Alcoholic beverages Dehydrate the body and cloud judgment.
Urine Contains harmful body wastes. Is about 2 percent salt.
Blood Is salty and considered a food; therefore, requires additional body fluids to digest. May transmit disease.
Seawater Is about 4 percent salt. It takes about 2 liters of body fluids to rid the body of waste from 1 liter of seawater. Therefore, by drinking seawater you deplete your body's water supply, which can cause death.
.
If you do not have
a reliable
source to replenish your water supply, stay alert for ways in which your environment can help you.CAUTION
Do not substitute the fluids listed in Figure 6-2 for water.
Heavy dew can provide water. Tie rags or tufts of fine grass around your ankles and walk through dew-covered grass before sunrise. As the rags or grass tufts absorb the dew, wring the water into
a
container. Repeat the process until you havea
supply of water or until the dew is g~ne. Australian natives sometimes mop up as much as a liter an hour thIS way.Bees or ants going into
a
hole in a tree may point to a water-filled hole. Siphon the water with plastic tubing or scoop it up with an improvised dipper. You can also stuff cloth in The hole to absorb the water and then wring it from the cloth.Water sometimes gathers in tree crotches or rock crevices. Use the above procedures to get the water. In arid areas, bird droppings around a cracK in the rocks
may
indicate water in or near the crack.Green bamboo thickets are an excellent source of fresh water. Water from green bamboo is clear and odorless. To get the water, bend
a
green.
bamboo
stalk, tie it down, and cut off the top (Figure 6-3). The water will drip freely during the night. Old, cracked bamboo may contain water.CAUTION
Purify the water before drinking it.
Wherever you find banana or plantain trees, you can get water. Cut down the tree, leaving about a 30-centimeter stump, and scoop out the center of the stump so that the hollow is bowl-shaped. Water trom the roots will immediately start to fill the hollow. The first three fillings of water will be bitter, but succeeding fillings will be palatable. The stump (Figure 6-~)will supply water for up to four days. Be sure to cover it to keep out msects.
Some tropical vines can give you water. Cut a notch in the vine as high as you can reach, then cut the vine off close to the ground. Catch the dropping liquid in a container or in your mouth (Figure6-5).
CAUTION
Do not drink theliquid if it is sticky, milky, or bitter tasting.
.
The milk from green (unripe) coconuts is a good thirst quencher. How-ever, the milk from mature coconuts contains an oil that acts as a laxa-tive. Drink in moderation only.
In the American tropics you may find large trees whose branches sup-port air plants. These air plants may holcf a considerable amount of
Water wi!! fiU bow! from roots.
.
rainwater in their overlapping, thickly growing leaves. Strain the water through a cloth to remove insects ana aebris.
You can get water from plants with moist pulpy centers. Cut off a sec-tion of tne_plant and squeeze or smash the pulp so that the moisture runs out. Catch the liquid in a container.
Plant roots may provide water. Dig or p'ry the roots out of the ground, cut them into short pieces, and smash the pulp so that the mOlsture runs out. Catch the liquid in a container.
Fleshy leaves, stems, or stalks; such as bamboo, contain water. Cut or notcn the stalks at the base ot a joint to drain out the liquid.
The following trees can also provide water:
.
Palms. Palms, such as the buri, coconut, sugar, rattan, and nips,contain liquid. Bruise a lower frond and pull it down so the tree will "bleed" at the injury.
. Traveler'stree. Found in Madagascar, this tree has a cuplike sheath at the base of its leaves in which water collects.
CONTAINER TO CATCH WATER
~
.
.
Umbrella tree. The leaf bases and roots of this tree of western tropicalAfrica can provide water.
.
Baobab tree. This tree of the sandy plains of northern Australia and Africa collects water in its bottleIil<e trunk during the wet season. Freguently, you can find clear, fresh water in these trees after weeks of dry weatner.CAUTION
Do not. keep, the sap from plants longer than 24 hours. It begins fermenting, becommg aangerous as a water source.
STILL CONSTRUCTION
You can use stills in various areas of the world. They draw moisture from the ground and from plant material. You need certain materials to build a still, and you need time to let it collect the water. It takes about
24
hours to get 0.5 to 1 liter of water.Aboveground
Still
To make the aboveground still, you need a sunny slope on which to
place the still, a clear plastic bag, green leafy vegetatlOn, and a small
rock (Figure 6-6).
To make the
still-.
Fill the ba~ with air by turning the opening into the breeze or by "scooping air into the bag..
Fill the plastic bag half to three-fourths full of green leafy vegeta-tion. Be sure to remove all hard sticks or sharp spines that might puncture the bag.CAUTION
Do not use poisonous vegetation. It will provide poisonous liquid.
.
Place a small rock or similar item in the bag..
have
a p'ieceof tubing, a small straw, or a hollow reed, insert one
end in the mouth of the bag before you tie it securely. Then tie off or plug the tubing so that air will not escape. This tuoing will allow you to drain out condensed water without untying the bag.
.
Place the bag, mouth downhill, on a slope in full sunlight. Position the mouth 01 the bag slightly higher than the low point in the bag..
?ettle the bag in place so that the rock works itself into the low pointm thebag.
To get the condensed water from the still, loosen the tie around the bag s mouth and tip the ba,g so that the water collected around the rock will drain out. Then retie tfie mouth securely and reposition the still to allow further condensation.
Change the vegetation in the bag after extracting most of the water from it. This will ensure maximum output of water.
CLEAR PLASTIC BAG ONE-HALF TO THREE-FOURTHS FULL OF GREEN VEGETATION
/1//(//
DIRECT SUNLIGHT
~
I!(ff
/
~~~~R~~. OR.
Belowground
Still
To make a belowground still, you need a digging tool, a container, a clear plastic sheet, a drinking tube, and a rocK (Figure 6-7).
Select a site where you believe the soil will contain moisture (such as a dry stream bed or a low spot where rainwater has collected). The soil at this site should be easy to dig, and sunlight must hit the site most of the day.
To construct the
still-.
Dig a bowl-shaped hole about 1 meter across and 60 centimeters deep..
Dig a sump in the center of the hole. The sump's depth and perimeter will depend on the size of the contamer tnat you have to place in it. The bottom of the sump should allow the container to stand upright..
Anchor the tubing to the container's bottom by forming a loose over-hand knot in the tubing..
Place the container upright in the sump.SAND OR DIRT TO ANCHOR PLASTIC SHEET
~N:BE
~
~~!-- ~~!--
."
-'r
"'I
--
-:b-=-:" >r. CLEARPLAST"ICSHEET/, .
ROCK
.
.
Extend the unanchored end of the tubing up, over, and beyond the lip of the hole..
Place the plastic sheet over the hole, covering its edges with soil to hold it in place..
Place a rock in the center of the plastic sheet..
Lower the plastic sheet into the hole until it is about 40 centimeters below ground level.It now formsan inverted conewith the rock
at its apex. Make sure that the cone's apex is directly over y'our container. Also make sure the plastic cone does not touch the sides of the hole because the earth will absorb the condensed water.
.
Put more soil on the edges of the plastic to hold it securely in place and to prevent the loss of moisture..
Plug the tube when not in use so that the moisture will not evaporate.You can drink water without disturbing the still by using the tube as a straw.
You may want to use plants in the hole as a moisture source. If so, dig out additional soil from the sides of the hole to form a slope on whim to place the plants. Then proceed as above.
If polluted water is your only moisture source, dig a small trough outside the hole about 25 centimeters from the still's lip (Figure 6-8). Dig the trough about 25 centimeters deep and 8 centimeters wide. Pour tne pol-luted water in the trough. Be sure y.ou do not spill any polpol-luted water around the rim of the nole where the plastic sneet touChes the soil. The trough holds the polluted water and tfie soil filters it as the still draws it. The water then condenses on the plastic and drains into the container. This process works extremely well when your only water source is salt water.
You will need at least three stills to meet your individual daily water intake needs.
WATER PURIFICA nON
.
When possible, purify all water you got from vegetation or from the ground by using iodine or chlorine, or by boiling.
Purify water
by-.
Using water purification tablets. (Follow the directions provided.).
Placing 5 drops of 2 percent tincture of iodine in a canteen full of clear water. If the canteen is full of cloudy or cold water, use 10 drops. (Let the canteen of water stand for 30 minutes before drinKing.).
Boiling water for 1 minute at sea level, adding 1 minute for each additional 300 meters above sea level, or boil1or 10 minutes no matter where you are.By drinking nonpotable water you may contract diseases or swallow organisms that can harm you. Examples of such diseases or organisms
are-.
Dysentery. Severe, prolonged diarrhea with bloody stools, fever, andweakness.
.
Cholera. and t1fP~oid. You may be susceptible to these diseases regard-less of mocuIatlOns.WATER TROUGH FOR POLLUTED WATER
CONTAINER
.
.
Flukes. Stagnant, p'olluted water-especiallyin
tropical areas-{)ften contains brood flukes. If you swallow flukes, they will bore into the bloodstream, live as parasites, and cause disease..
Leeches.If you swallowa leech,it can hook onto the throat passage
or inside the nose. It will suck blood, create a wound, and move to another area. Each bleeding wound may become infected.
WATER FILTRATION DEVICES
If the water you find is also muddy, stagnant, and foul smelling, you can clear the
water-.
By placing it in a container and letting it stand for 12 hours..
By pouring it through a filtering system.Note: These procedures only clear the water and make it more palatable. You will have to purify
it.
To make a filtering system, place several centimeters or layers of filter-ing material such as sand, crushed rock, charcoal, or cloth in bamboo, a ho1low log, or an article of clothing (Figure6-9).
Remove the odor
from water by adding charcoalfrom your fire. Let the
water stand for 45 minutes before drinKing it.
~
W~
Ij
:;.l:ii.i>:,\,:;;;;""
~ "'~'~~fi:q::
i
Figure 6-9. Water filtering systems.t
'
!
~
,
I, I
'I J
I~ '1
1/
.~j
\I~~\
~~I~I\\
.
C
HAP
T
E
R
7
FIRE
CRAFT
In many survival situations, the ability to start a fire can make the difference between living and dying. Fire canful-fill many needs. It can provide warmth and comfort. It not
only cooks and preserves food, it also provides warmth in the form of heated food that saves calories our body nor-mally uses to produce body heat. You can usefire to purify water, sterilize bandages, signal for rescue, and provide protection from animals. It can be a psychological boost by providing peace of mind and companionship. You can also
usefire to produce tools and weapons.
.
Remember weigh your need for fire against your need to avoid enemy detection.
BASIC FIRE PRINCIPLES
To build a fire, it helps to understand the basic princirles of a fire. Fuel (in a nongaseous state) does not burn directly. When you apply heat to a fuel, it produces a gas. This gas, combined with oxygen m the air, burns.
Understanding the concept of the fire triangle is very important in correctly constructing ana maintaining a fire. The tnree sides of the triangle represent
air, heat,
and
fuel.
If you remove any of these, the fire
will go out. The correct ratio ot these components is very important for ~ fire to b~rn at its greatest capability. The only way to learn this ratio is to practice.
SITE
SELECTION
AND PREPARA TION
You will have to decide what site and arrangement to use. Before build-ing a fire
consider-.
The area (terrain and climate) in which you are operating..
The materials and tools available..
Time: how much time you have?.
Need: why you need a fire?.
Security: how close is the enemy? Look for a dry spotthat-.
Is protected from the wind..
Is suitably placed in relation to your shelter (if any)..
Will concentrate the heat in the direction you desire..
Has a sUPf
ly of wood or other fuel available. (See page 7-6 for types of matena you can use.).
If time allows, construct a fire wall using logs or rocks. This wall will
hel
r
to reflector direct the heat where you want it (Figure 7-1).Itwil also reduce flying sparks and cut down on the amount of wind blow.ing into.the fire.1-Iowever, you will need enough wind to keep
the fire burnmg.
CAUTION
Do not use wet or porous rocks as they may explode when heated.
In some situations, you may find that an underground fireplace will best meet your needs. It conceals the fire and serves well for cooking food. To make an underground fireplace or Dakota fire hole
(Figure7-2)-.
Dig a hole in the ground..
On the ~P'Yind side of this hole, poke or dig a large connecting hole for ventllatlOn..
Build your fire in the hole as illustrated.STRAIGHT FIRE WALL
L-SHAPED FIRE WALL
.
If you are in a snow-covered area, use green logs to make a dry base for your fire (Figure 7-3). Trees with wrist-sized trunks are easily Broken in extreme cold. Cut or break several green logs and lay them side by side on top of t0e snow. Add °!1e or two more layers. Lay the top layer of logs Opposite those below it.
25-30 em
20-25 em
Figure 7-2. Dakota fire hole.
.
FIRE MATERIAL SELECTION
You need three types of materials (Figure 7-4) to build a fire-tinder, kindling, and fuer
Tinder is dry material that ignites with little heat -a spark starts a fire. The tinder must be absolutely dry to be sure just a spark will ignite it. If you only have a device that generates sparks, charred cloth will be almost essential. It holds a sparK for long periods, allowing you to put tinder on the hot area to generate a smalr flame. You can make charred cloth by heating cotton cloth until it turns black, but does not bum. Once if is black, you must keep it in an airtight container to keep it dry. Prepare this clotfi.well in advance of any survival situation. Ada it to your individual survival kit.
Kindling is readily combustible material that you add to the burning tinder. Again, this material should be absolutely dry to ensure rapid burning. Kindling increases the fire's temperature so that it willlgnite
less combustible material.
Fuel is less combustible material that bums slowly and steadily once ignited.
HOW TO BUILD A FIRE
There are several methods for laying a fire, each of which has advan-tages. The situation you find yourself in will determine which fire to use.
Tepee
To make
this fire (Figure7-5),arrange the tinder and a few sticksof
kindling in the shape of a tepee or cone. Light the center. As the tepee bums, tne outside logs will fall inward, feeamg the fire. This type of fire bums well even with wet wood.
Lean-To
.
.Tinder Kindling Fuel
.
Birch bark.Shredded inner bark from cedar, chestnut, red elm trees
.
Fine wood shavings.
Dead grass, ferns, moss, fungi.
Straw.
Sawdust.
Veryfine pitchwood scrapings.
Dead evergreen needles.
Punk (the completely rotted portions of dead logs or trees).
Evergreen tree knots.
Bird down (fine feathers).
Down seed heads(milkweed, dry cattails,
bulrush, or thistle)
.
Fine, dried vegetable fibers.
Spongy threads of dead puffball.
Dead palm leaves.
Skinlike membrane lining bamboo.
Unt from pocket and seams.
Charred cloth.
Waxed paper.
Outerbamboo shavings.
Gunpowder.
Cotton.Unt
. Small twigs . Small strips of wood . Split wood
. Heavy cardboard . Pieces of wood removed
from the inside of larger pieces
.
Wood that has been doused with highly flammable materials, such as gasoline, oH, or wax.
Dry, standing wood and dry, dead branches.
Dry inside (heart) of fallen tree trunks and large branches.
Green wood that is finely split.
Dry grasses twisted intobunches
.
Peat dry enough to bum (this may be found at the top of undercut banks).
Dried animal dung.
Animal fats.
Coal, oil shale, or oil lying on the surface.
Cross-Ditch
To use this method (Figure7-5), scratch a cross about 30 centimeters in size in the ground. Dig the cross 7.5 centimeters deep. Put a large wad of tinder in the middle of the cross. Build a kindling pyramid aDove the tinder. The shallow ditch allows air to sweep under the tinder to provide a draft.
Pyramid
To lay this fire (Figure 7-5), place two small logs or branches parallel on the ground. Place a solid layer of small logs across the parallello~s. Add three or four more layers of logs or brancnes, each layer smaller than and at a right angle to the layer below it. Make a starter fire on top of the pyramid. As the starter fire burns, it will i~ite the logs below it. This gives you a fire that burns downward, requiring no attention during the mght.
TEPEE
...
,J'''
-~
-
~..
.
~~t-4---CROSS-DITCH
',~
AIIfIIl(
~IU---
uLEAN-TO
.." .
. ..to'.
l;:~"'..-'~/<"
I .'
'''''':'~';>r;ff:f;/:':':'{::':~':.~'':'~ :".'
.
PYRAMID
.
There are several other ways to lay a fire that are quite effective. Your situation and the material available in the area may make another method more suitable.
HOW TO LIGHT A FIRE
Always light your fire from the upwind side. Make sure to lay your tin-der, Kindlmg, and fuel so that your fire will burn as lon~ as you need it. Igniters provide the initial heat required to start the tinaer Durning. They fall into two categories: modem methods and primitive methods.
Modem Methods
Modem igniters use modem devices-items we normally think of to start a fire.
Matches
Make sure these matches are waterproof. Also, store them in a water-proof container along with a dependable striker pad.
Convex Lens
Use this method (Figure
7-6)
only on bright, sunny days. The lens can
come from binoculars, camera, telescopic sights, or magp.ifying glasses. Angle the lens to concentrate the sun s rays on the tinder. Hola the lens over the same spot until the tinder begins to smolder. Gently blow or fan the tinder into flame, and apply it to the fire lay.
Metal Match
Place a flat, dry leaf under JOur tinder with a portion exposed. Place the tip of the metal match on the dry leaf, holding the metal match in one hand and a knife in the other. Scrape your mife against the metal match to produce sparks. The sparks will nit the tinder. When the tinder starts to smolder, proceed as aDove.
Battery
Use a battery to generate a spark. Use of this method depends on the type of battery available. Attach a wire to each terminal. Touch the ends ofthe bare Wires together next to the tinder so the sparks will ignite it.
Gunpowder
.
tinder. A spark will ignite the powder. Be extremely careful when extracting the bullet from the case.
Primitive Methods
Primitive igniters are those attributed to our early ancestors.
Flint and Steel
The direct spark method is the easiest of the primitive methods to use. The flint ana steel method is the most reliabre of the direct spark meth-ods. Strike a flint or other hard, sharp-edged rock edge with a piece of carbon steel (stainless steel will not produce a good spark). This method requires a loose-jointed wrist and practice. When a spark has caught in the tinder, blow on it. The spark will spread and burst into flames.
Fire-Plow
The fire-plow (Figure 7-7) is a friction method of iwition. You rub a hardwood shaft against a softer wood base. To use this method, cut a
straight groove in the base andplow the blunt tip of the shaft up and
down
the groove.The
plowing action of the shaft pushes out small.
particles of wood fibers. Then, as you apply more pressure on each stroke, the friction ignites the wood particles.
Bow and Drill
The technique of starting a fire with a bow and drill (Figure 7-8) is sim-ple, but you must exert much effort and be persistent to produce a fire. You neea the following items to use this me1hod:
.
Socket. The socket is an easily grasped stone orf
iece of hardwood orbone with a slight depression ill one side. Use i to hold the drill in place and to apply downward pressure.
.
Drill. The drill should be a strai[ht, seasoned hardwood stick about2
centimeters in diameter and 25 centimeters long. The top end is round and the low end blunt (to produce more fnction)..
Fire board. Its size is up to y-ou.A
seasoned softwood board about 2.5 centimeters thick and 10 centimeters wide is preferable. Cut a depression about2
centimeters from the edge on one side of the board. On the underside, make a V-shaped cut from the edge of the board to the depression.~
~-.-~-~ ..~~<. ~~
;-..
,-- '", . ;.
SO~OOD?~..
HARDWOOD
.
.
Bow. The bow is a resilient, green stick about 2.5 centimeters indiameter and a string. The type of wood is not important. The bow-string can be any type of cordage. You tie the bowbow-string from one end of the bow to tfie other, wifhout any slack.
To use the bow and drill, first prepare the fire lay. Then place a bundle of tinder under the V-shaped cut m the fire board. Place one foot on the fire board. Loop the bowstring over the drill and place the drill in the precut depressIOn on the fire board. Place the socket, held in one hand, on the top of the drill to hold it in position. Press down on the drill and saw the Bow back and forth to twirl the drill (Figure 7-8). Once y.ouhave established a smooth motion, apply more downward pressure ana work the bow faster. This action wilr grmd hot black powder into the tinder, causing a spark to catch. Blow on the tinder until it ignites.
Note: Primitive fire-building methods are exhaustive and require practice to
ensure success.
SOCKET
~
Q
DRILL
CORD
.
HELPFUL HINTS
Use nonaromatic seasoned hardwood for fuel, if possible. Collect kindling and tinder along the trail.
Add insect repellent to the tinder. Keep the firewood dry.
Dry damp firewood near the fire.
Bank the fire to keep the coals alive overnight, Carry lighted punk, when possible.
Be sure the fire is out before leaving camp.