Information in this document is subject to change without notice. Examples provided are fictitious. No part of this document may be reproduced or transmitted in any form, or by any means, electronic or mechanical, for any purpose, in whole or in part, without the express written permission of Actuate Corporation.
© 2003 - 2014 by Actuate Corporation. All rights reserved. Printed in the United States of America. Contains information proprietary to:
Actuate Corporation, 951 Mariners Island Boulevard, San Mateo, CA 94404 www.actuate.com
The software described in this manual is provided by Actuate Corporation under an Actuate License agreement. The software may be used only in accordance with the terms of the agreement. Actuate software products are protected by U.S. and International patents and patents pending. For a current list of patents, please see http://www.actuate.com /patents.
Actuate Corporation trademarks and registered trademarks include:
Actuate, ActuateOne, the Actuate logo, Archived Data Analytics, BIRT, BIRT 360, BIRT Analytics, BIRT Data Analyzer, BIRT Performance Analytics, Collaborative Reporting Architecture, Dynamic Data Web, e.Analysis, e.Report,
e.Reporting, e.Spreadsheet, Encyclopedia, Interactive Viewing, OnPerformance, Performancesoft, Performancesoft Track, Performancesoft Views, Quite4Me, Quiterian, Report Encyclopedia, Reportlet, The people behind BIRT, X2BIRT, and XML reports.
Actuate products may contain third-party products or technologies. Third-party trademarks or registered trademarks of their respective owners, companies, or organizations include:
Mark Adler and Jean-loup Gailly (www.zlib.net): zLib. Apache Software Foundation (www.apache.org): Axis2, log4, Tomcat. Boost.org: Boost libraries, licensed under the Boost Software License. CURL (curl.haxx.se): Curl, licensed under a MIT/X derivate license. International Components for Unicode (ICU): ICU library. Marcin Kalicinski
(rapidxml.sourceforge.net): RapidXML, licensed under the Boost Software License. Bruno Lowagie and Paulo Soares: iTextSharp, licensed under the Mozilla Public License (MPL). Math.NET: Math.NET, licensed under the MIT/X11 License. Microsoft Corporation: Access Database Engine, SQL Server Express. opencsv team (sourceforg.net): opencsv.
openssl.org: OpenSSL, licensed under the OpenSSL license. qooxdoo.org: qooxdoo, licensed under the Eclipse Public License (EPL). Dave Scriven (svg.codeplex.com): SVG Rendering Engine, licensed under the Microsoft Public License. SQLAPI: SQLAPI++. sqlite.org: SQLite, public domain. stlsoft.org: STLSoft libraries, licensed under the BSD license. Matthew Wilson and Garth Lancaster (www.pantheios.org): Pantheios, licensed under a modified BSD license. All other brand or product names are trademarks or registered trademarks of their respective owners, companies, or organizations.
Contents
About
Using BIRT Analytics Loader
. . . v
Chapter 1
Introducing BIRT Analytics Loader . . . 1
About BIRT Analytics Loader . . . .2
Understanding BIRT Analytics Loader . . . .2
Understanding BIRT Analytics users . . . .3
Getting started . . . .3
Chapter 2
Working with projects . . . 5
About BIRT Analytics Loader projects . . . .6
Planning a project . . . .6
Understanding the FastDB repository . . . .7
Creating a new project . . . .7
Managing projects . . . .9
Laying out the feature tabs . . . 10
Running a load process . . . 10
Stopping the IIS service . . . 10
Stopping IIS using Services . . . 11
Stopping IIS using a command-line editor . . . 11
Running a project . . . 12
Using reports . . . 13
Synchronizing data . . . 13
Synchronizing data using BIRT Analytics Admin . . . .13
Synchronizing data using bashell . . . .17
Managing FastDB Engine accounts . . . 18
Chapter 3
Extracting data . . . . 19
About extracting data . . . 20
Connecting to data . . . 20
Connecting to databases . . . 20
Using native drivers . . . 21
Using ODBC drivers . . . 23
Connecting to files . . . .24
Uploading local files . . . 25
Uploading remote files . . . 26
Uploading files using a file list . . . .27
Updating data source definitions . . . 28
Creating a load process . . . 28
About transactions . . . 28
Setting load process options . . . 29
Creating a load transaction . . . 29
Mapping data from files . . . 30
Defining a target database . . . 30
Chapter 4
Managing data . . . .41
About managing data . . . 42
Understanding Explorer . . . 42
Refreshing the repository content . . . 43
Exploring table properties . . . 43
Exploring column properties . . . 43
Dropping database objects . . . 45
Understanding dynamic and permanent columns . . . 45
Understanding Links . . . 46
Chapter 5
Transforming data . . . .49
About transforming data . . . 50
Understanding Includes . . . 50
Understanding scripts . . . 51
Understanding Repository . . . 52
Using the text editor . . . 53
Creating new columns . . . 53
AGGREGATE . . . 53 DECODE . . . 55 DOMAIN . . . 57 EXPRESSION . . . 60 INUMERIC . . . 65 PARAMETRIC . . . 67 QUANTILE . . . 69 RANKING . . . 71
Managing data objects . . . 73
DROPCOLUMN . . . 73 DROPDATABASE . . . 73 DROPTABLE . . . 74 DROPLINK . . . 74 LINK . . . 75 MAKEPERMANENT . . . 76 RENAME . . . 77 Miscellaneous instructions . . . 77 EXPORT . . . 78 IFEXISTS . . . 81 IFLINKED . . . 82 INCLUDE . . . 83 PRINT . . . 84 VAR . . . 85
Chapter 6
Administering BIRT Loader . . . .87
About BIRT Loader administration . . . 88
Managing users . . . 88
Scheduling load processes . . . 89
Using External call . . . 91
Running projects using qLauncher . . . 92
Understanding the BIRT Loader internal database . . . 94
Copying a load project to a new location . . . 95
Creating a new database repository . . . 97
Copying a data repository to a new location . . . 98
Changing the repository content using the same location . . . 99
Adding a BIRT Analytics database to a repository . . . 99
Glossary . . . 101
A b o u t
U s i n g B I R T
A n a l y t i c s L o a d e r
BIRT Analytics is a web application, data repository, and set of web services that support analysis and forecasting of big data.
BIRT Analytics consists of three key components:
■ Actuate BIRT Analytics, a tool that is used to carry out dynamic analyses
■ BIRT Analytics Administration, a set of tools that supports administering access and privileges for each module and component of the BIRT Analytics product
■ BIRT Analytics Loader, a tool that extracts, transforms, and loads records from an external data source to FastDB, the BIRT Analytics data repository
Using BIRT Analytics Loader describes how to use Actuate BIRT Loader to collect data from various sources, transform the data depending on business needs, and load the data into a destination database.
This document is a guide for ETL (Extract, Transform, and Load) developers who understand basic concepts in working with data and are familiar with the data structure. Technical concepts and explanations about how to accomplish common activities are included in the following chapters. For more detailed information about any of the subjects discussed, see the complete set of Actuate documentation included with Actuate software or contact your database administrator.
Using BIRT Analytics Loader includes the following chapters:
■ About Using BIRT Analytics Loader. This chapter provides an overview of this guide.
■ Chapter 1. Introducing BIRT Analytics Loader. This chapter describes how to access and
log in to BIRT Analytics Loader.
■ Chapter 2. Working with projects. This chapter describes how to create and run projects to load data.
■ Chapter 3. Extracting data. This chapter describes how to create data connections and data
mappings.
■ Chapter 4. Managing data. This chapter explores the data elements, such as databases,
tables, and columns, and their properties.
■ Chapter 5. Transforming data. This chapter describes how to transform data.
■ Chapter 6. Administering BIRT Loader. This chapter describes how to manage users and schedule data load processes.
■ Glossary. This chapter provides definitions of terms used in the BIRT Analytics product and documentation.
C h a p t e r
1
Chapter 1
Introducing
BIRT Analytics Loader
This chapter contains:■ About BIRT Analytics Loader
■ Understanding BIRT Analytics Loader
About BIRT Analytics Loader
Business analytics depend on sufficient volumes of high-quality data. The difficulty in ensuring data quality is integrating and reconciling data across different systems, and then deciding what subsets of data to make available to the analysis tool.
BIRT Analytics Loader provides one, integrated tool for extracting, transforming, and loading (ETL) big data into BIRT Analytics. ETL pulls data from one, or multiple data sources and places it into another database, using the following three processes:
■ Extract reads data from a database.
■ Transform converts the extracted data from its previous form into the form required for placement in another database. The transformation process uses rules, or lookup tables, or combines the data with other data.
■ Load writes the data into the target database.
Use BIRT Analytics Loader to load big data for analysis. Use BIRT Analytics to analyze the data. Both tools run in a web browser, and ship as options in the Actuate BIRT Analytics product.
Understanding BIRT Analytics Loader
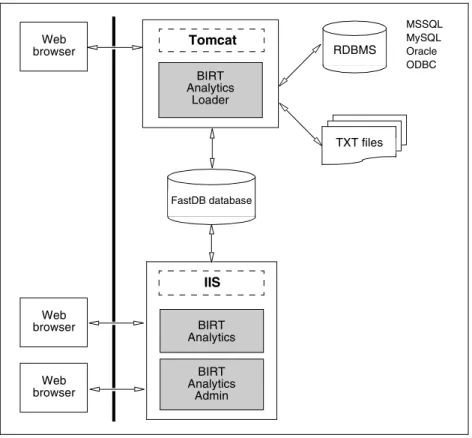
BIRT Analytics Loader is a web-based application you use to create and execute processes that build databases for data mining and reporting. Using BIRT Loader, you can schedule the load processes to run at convenient times. As the diagram in Figure 1-1 shows, BIRT
Analytics Loader is installed on a Tomcat web server.
Figure 1-1 Actuate BIRT Analytics architecture
FastDB database Web browser Web browser Web browser Tomcat BIRT Analytics Loader RDBMS BIRT Analytics Admin IIS BIRT Analytics TXT files MSSQL MySQL Oracle ODBC
BIRT Analytics Loader supports connections to different data sources, relational databases, and text files, using database native drivers and ODBC connectors. The application builds processes that extract, transform, and load data, storing it in a proprietary format in a FastDB database. Actuate FastDB database is a file system database, managed by the FastDB engine. The engine runs as a service, named Dubnium Service. You can create multiple databases and select which one to be active.
Use BIRT Analytics to analyze and report from this data. Use BIRT Analytics Administration tool to synchronize the data, imported by BIRT Loader, with BIRT Analytics. Both
applications, BIRT Analytics and BIRT Analytics Administration, are installed on a web server, Microsoft Internet Information Services.
Understanding BIRT Analytics users
There are four types of users in Actuate BIRT Analytics products:
■ BIRT Analytics users
Users who log in to BIRT Analytics to do data mining and analysis.
■ BIRT Analytics Administration users
Users who log in to BIRT Analytics Administration and manage access to objects, specify security filters, define password policies, browse logs, synchronize the database, specify password policies, and perform other security maintenance actions.
■ BIRT Analytics Loader users
Users who log in to BIRT Analytics Loader to create projects for loading external data into a FastDB analytical database.
■ FastDB Engine users
The FastDB Engine user is the internal account the Dubnium server uses to communicate with the Actuate FastDB database and the rest of the internal modules. This account provides an additional layer of security for protecting sensitive data. When you create a project for loading data you must provide the secure account used by the engine to access the data. For more information on administering the Dubnium server data security account, see “Managing FastDB Engine accounts” in Chapter 6, “Administering BIRT Loader.”
Getting started
Open BIRT Analytics Loader to create projects that build database loading processes. Actuate BIRT Analytics Loader installs as part of the Actuate BIRT Analytics product. For more information, see the BIRT Analytics installation guide.
To access BIRT Analytics Loader, you need a web browser.
How to log in to BIRT Analytics Loader
1 You open the BIRT Analytics Loader web application using a hyperlink or a web address similar to the following URL:
http://<webserver>:8080/qloader
where
■ <webserver>:8080 is the web server and TCP port that runs the BIRT Analytics Loader application. Alternatively, you can use an IP address instead of the web server name.
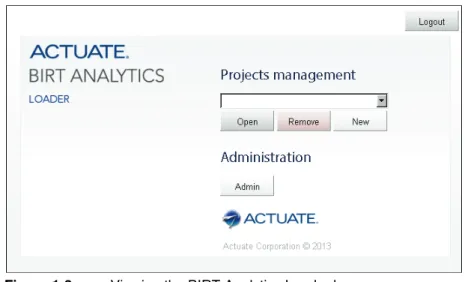
Figure 1-2 displays the BIRT Analytics Loader login page.
Figure 1-2 Logging in to Actuate BIRT Analytics
2 To log in, provide the following login credentials:
■ In User name, type the user name.
■ In Password, type the password associated with the user name.
By default, BIRT Analytics Loader provides an administrator user account, SYSTEM, with the password, PASSWORD. This user is stored into the dubnium.db sqlite database. The user can be modified by editing this database. For more information about dubnium.db sqlite database, see “Understanding the BIRT Loader internal database” in Chapter 6, “Administering BIRT Loader.”
3 Choose Sign in. The BIRT Analytics Loader home page associated with your login credentials appears, as shown in Figure 1-3.
Figure 1-3 Viewing the BIRT Analytics Loader home page
After logging in to BIRT Analytics Loader, you can start managing projects. You can choose a project to open, remove a project, or create a new one.
An administrator user, such as SYSTEM, sees the Administrator tab. Options to manage user privileges and schedule loading processes appear on Administrator.
How to log out of Actuate BIRT Analytics
Choose Logout to quit a user session of BIRT Analytics Loader.
When working on a project, you can log out by choosing the logout button on the top right corner of the page.
C h a p t e r
2
Chapter 2
Working with projects
This chapter contains:
■ About BIRT Analytics Loader projects
■ Planning a project ■ Creating a new project
■ Managing projects
■ Running a load process
■ Synchronizing data
About BIRT Analytics Loader projects
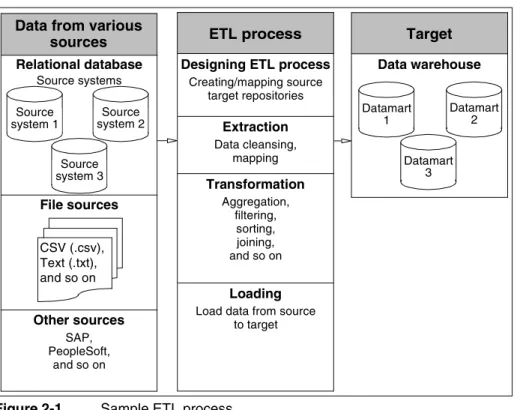
BIRT Analytics Loader organizes data loading activities into projects. Projects are logical descriptions of how you will extract, load, and transform the data into the target database. A BIRT Loader non-administrator user works with only the projects he creates. A project that completes a typical Extract, Transform, Load (ETL) process includes completing each of the following activities, as illustrated in Figure 2-1:
■ Defining data sources
■ Mapping the data
■ Defining the data transformation
■ Scheduling the load processes to run
Figure 2-1 Sample ETL process
Planning a project
Typically, there are three key players involved in building an ETL process: a database administrator, a data modeler, and an ETL developer. Sometimes, one person fills multiple roles. The key factor for success when creating an ETL process is to diligently plan the project before starting the ETL process development. Planning a project requires:
■ Knowing your data sources and completing a detailed mapping specification. A
successful ETL process depends entirely on a completed mapping specification.
■ Documenting how you are going to be extracting, cleansing, and transforming your data
sources to get to your database table definitions.
■ Establishing rules that define how to update database tables. This is an important factor in
the ETL design. Depending on the nature of the database, the update can be as simple as a data refresh, cleaning old data, and loading new data. In some occasions, the update could require appending data based on complex criteria such as keyed reads or joins against an
Data from various sources Relational database Source systems Source system 3 Source system 2 Source system 1 CSV (.csv), Text (.txt), and so on Other sources SAP, PeopleSoft, and so on File sources ETL process
Designing ETL process
Creating/mapping source target repositories Extraction Data cleansing, mapping Transformation Aggregation, filtering, sorting, joining, and so on Loading
Load data from source to target Target Datamart 2 Data warehouse Datamart 3 Datamart 1
existing dimension before writing the new or updated rows to a database table. Building these rules may potentially add days or weeks to your project timeline.
In the planning process you must define:
■ Input and output record layouts
■ The location of source and target files and databases ■ File and table sizing information
■ File and table volume information
■ Documentation on how the data will be transformed, if at all
Understanding the FastDB repository
BIRT Analytics Loader loads data into a FastDB database repository, operated by the FastDB Engine. When FastDB is installed, a default data repository is created in this path:
C:\Program files\BIRTAnalytics\dubnium\databases
You can use the same repository to create and store your databases. BIRT Analytics allows you to create a different location for your database repository and set up BIRT Loader to work with this location. For more information on how to create and set up a new data repository, see “Managing the repository” in Chapter 6, “Administering BIRT Loader.”
Creating a new project
When you log in to BIRT Analytics Loader for the first time, there are no existing projects, and the Open and Remove tabs are grayed out, as shown in Figure 2-2.
Figure 2-2 Creating a new project
BIRT Loader users can access only projects they create. A BIRT Loader administrator user can access all projects.
How to create a new project
1 To create a new project, you set the following parameters:
■ In Name, type the name of the project.
■ In IP, type the IP address of the web server where BIRT Analytics Loader is installed. ■ In Port, type the port number that the BIRT Analytics Loader application uses. The
default port number is 8105.
■ Choose SSL if a secure connection is used. In this case the default port number is 8106.
■ In User, type the FastDB Engine user. The default user is SYSTEM.
■ In Password, type the FastDB Engine user’s password. The default password is PASSWORD.
Figure 2-4 displays the settings of a project named MyFirstProject.
Figure 2-4 Setting up MyFirstProject
2 Choose OK to create the project. The Projects management page appears and the project name is in the drop-down list, as shown in Figure 2-5.
Managing projects
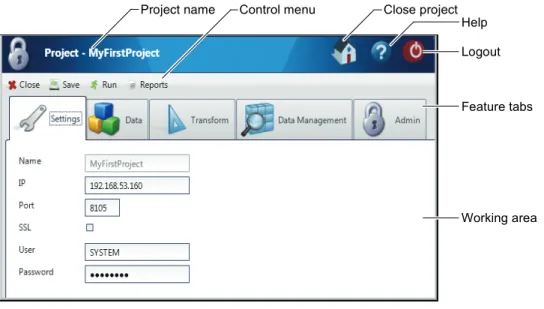
After opening a project using BIRT Analytics Loader, the project development page appears, as shown in Figure 2-6. The project page contains a top banner, a control menu, feature tabs, and work area. The top banner displays the project name and the logout link.
Figure 2-6 Developing a project
The control menu contains the following links, as shown in Table 2-1, used for managing a project.
The feature tabs contain links to the main project activities described in Table 2-2.
Table 2-1 Icons for the control menu
Icon Label Purpose
Close Closes the current project, after confirmation, and returns to the Projects management window.
Save Saves the project. To make any change effective, it is necessary to save data by choosing Save.
Run Executes the load process.
Reports Shows the load process log files.
Table 2-2 Icons for the feature tabs
Icon Label Purpose
Settings This tool allows changing the configuration parameters of the current project. These parameters are the same as those entered in Create new project. The project name cannot be changed.
Data The tool to set up the connections to the data sources and define the mappings to the tables in the target database.
Logout Project name Control menu
Feature tabs
Working area Close project
For security reasons, it is recommended that every user logs out before closing the browser.
Laying out the feature tabs
A tools menu provides customization options for the feature tabs in the user interface, as shown in Figure 2-7. These options support placing the tabs in different positions and displaying text, an icon, or both on each tab. To access these options, right-click any of the feature tabs.
Figure 2-7 Options for tool tab placement and text
Running a load process
You start a load process by using a project in BIRT Analytics Loader. Before running a project, you must create the data source connections and define the loading transactions and the data transformation scripts. To make the loaded data available to the BIRT Analytics users, you must synchronize the loaded database with the active database and grant access privileges to database users.
After defining the table mappings and all transactions in a load process, you can run the project to load the data. You can run a single or multiple transaction processes. You can run a process with or without data transformation.
The load process loads the data in the FastDB database, the same database that users analyze. To avoid inaccurate analysis, consider loading data when users are not logged in to the system.
To prevent user access to databases while a load process runs, stop the web server running the BIRT Analytics application. Alternatively, schedule the loading process to run at a time when users are offline. For more information on how to schedule a load process, check “Scheduling load processes” in Chapter 6, “Administering BIRT Loader.”
Stopping the IIS service
BIRT Analytics installs on Microsoft Internet Information Services (IIS). To prevent end users from logging in to BIRT Analytics, stop the web server on which BIRT Analytics runs, using either a command-line editor or Windows Services.
Data
Management
Allows the user to browse and explore the data in the target database, and create and remove links between data columns in tables.
Admin Supports administering the FastDB Engine users. An administrator can create a new engine user, change a password, and delete it. You must provide the following information: login name, password, password confirmation, and old password.
Table 2-2 Icons for the feature tabs (continued)
Icon Label Purpose
Positions
Stopping IIS using Services
You use Services to stop, start, or restart a service.
How to stop IIS using Services
1 In Windows➛Start, type:
services.msc
Services appears, as shown in Figure 2-8.
Figure 2-8 Stopping IIS using Services
2 In Services, select World Wide Web Publishing Service, then choose Stop from the context menu.
Stopping IIS using a command-line editor
To stop IIS from a command line, you use the Windows net command. You can also use these commands in batch processes if you need to automate the procedure.
How to stop IIS from a command line
1 Type cmd in Windows➛Start to open a command prompt.
2 In the command-line editor, type the following command, then press Enter.
net stop w3svc
A response indicates that the service has stopped, as shown in Figure 2-9.
Figure 2-9 Stopping IIS from a command-line prompt
3 To restart the service after the load process finishes, type the following command at the next command prompt, then press Enter:
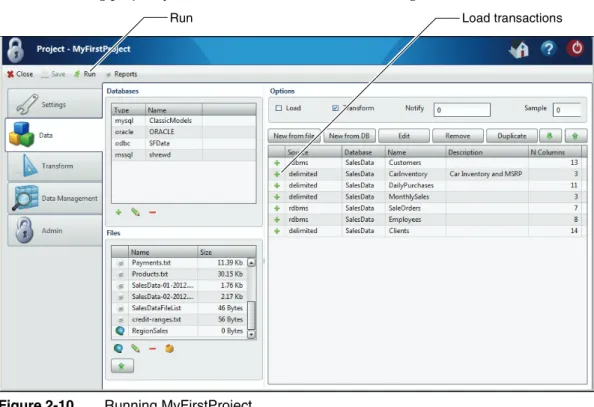
Running a project
To run a loading project, you must choose Run, as shown in Figure 2-10.
Figure 2-10 Running MyFirstProject
In the message that confirms whether you want to run the project, choose Yes. A list of database table names and the number of records loaded into each table appears in Running project, as shown in Figure 2-11.
Figure 2-11 Running project log
The Running project log provides information about the tables into which the data is loaded, and the number of the records that are loaded. To limit the number of message lines in the log, set a number of records for which a log entry is created, in Options—Notify. For loading processes requiring a long time, choose Run in background, to minimize the Running project window. You can work on a different project until the running project finishes.
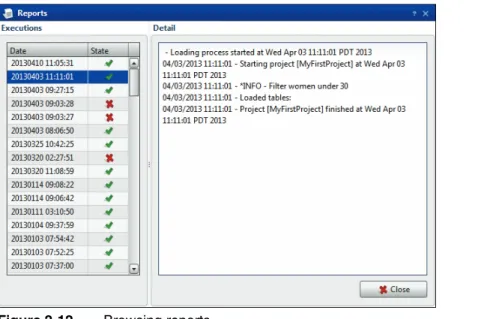
Using reports
To browse through the generated log files, select Reports from the control menu. The list of reports appear in Executions, as shown in Figure 2-12. Date displays a date and time when a project is executed. State displays the generation status. After selecting a date, the log content appears in Detail.
Figure 2-12 Browsing reports
Synchronizing data
Synchronizing data is the final step in the loading process. In BIRT Analytics, you can synchronize data two ways. You can use the BIRT Analytics Admin tool, or a command-line utility to automate the synchronization process.
Synchronizing data using BIRT Analytics Admin
The Synchronize option in BIRT Admin allows the administrator to update the application database to contain the most recent changes in the BIRT Analytics Engine repository. Execute this option after making a change in the analytical repository that alters the database
structure, such as the addition, modification, or deletion of a column, table, or other data object. Synchronizing is also required when you change the data, after increasing, reducing, or modifying the records in a database.
After synchronizing the data you must set the privileges for the users or groups to provide access to the database. In the BIRT Analytics security options list, the ACL to objects option allows the administrator to create, modify, or delete a security group or access control list (ACL) and manage privileges over database objects.
How to synchronize data using BIRT Analytics Admin
To do the synchronization you must have access to the BIRT Analytics Admin application.
1 Using your web browser, connect to the following site:
http://localhost/qadmin
Figure 2-13 Logging in to BIRT Analytics Admin
2 In Login, type SYSTEM. In Password, type PASSWORD. Choose Sign in. The BIRT Analytics Admin page appears, as shown in Figure 2-14.
Figure 2-14 Accessing the security administration
3 In BIRT Analytics Admin, choose Security. The Security page appears, as shown in Figure 2-15.
Figure 2-15 Accessing the synchronize settings
4 In Security, choose Synchronize.
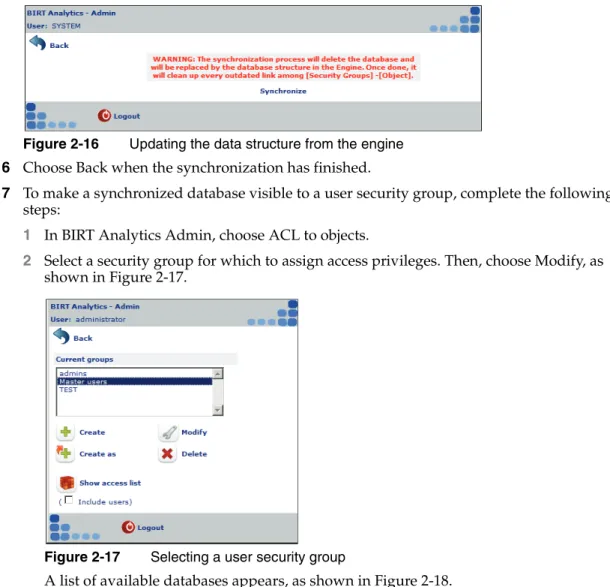
Figure 2-16 Updating the data structure from the engine
6 Choose Back when the synchronization has finished.
7 To make a synchronized database visible to a user security group, complete the following steps:
1 In BIRT Analytics Admin, choose ACL to objects.
2 Select a security group for which to assign access privileges. Then, choose Modify, as shown in Figure 2-17.
Figure 2-17 Selecting a user security group
4 To grant a group full access to a database, choose All for that database. The modifications appear in Updating group. For example, Figure 2-19 shows a group called Master users, modified to have all privileges for, or full access to, the SalesData database.
Figure 2-19 Updating group
5 Choose OK.
6 Choose Back.
How to verify functionality activation
To verify that all functionalities are activated for a user group, complete the following steps.
1 Choose a security role, as shown in Figure 2-20.
2 Select a user group, for example Administrators
3 Choose Modify.
Figure 2-20 Selecting the Administrators role
4 In Functionalities, de-select General. Then, select General, as shown in Figure 2-21.
5 Choose OK.
Figure 2-21 Selecting all functionalities
Synchronizing data using bashell
BIRT Analytics Loader provides a command-line tool named bashell that allows you to automate a synchronization process and run it in an unattended manner. Run bashell to synchronize an analytical database after loading data into FastDB. Table 2-3 lists the bashell parameters.
You can run bashell and authenticate with BIRT Analytics at the same time or you can create an encrypted authentication file and use it to automate the authentication. By default the authentication information is saved in a file named set.cfg.
How to run bashell
1 If you downloaded BIRT Analytics, open the 10-Tools folder and copy and paste the sub-folder named bashell and its contents to your desired folder.
2 Open a command prompt that is run as administrator in the bashell folder you created in the previous step.
3 Run the following command to synchronize the analytical database, where SYSTEM is an administrator user and PASSWORD is the password for that user:
bashell sync cacheoff site:http://localhost/qelectron user:SYSTEM -pwd:PASSWORD
How to create an authentication file
1 If you downloaded BIRT Analytics, open the 10-Tools folder and copy and paste the sub-folder named bashell and its contents to your desired folder.
2 Open a command prompt that is run as administrator in the bashell folder you created in the previous step.
3 Run the following command to create an encrypted authentication file, where SYSTEM is an administrator user and PASSWORD is the password for that user:
bashell -save -site:http://localhost/qelectron -user:SYSTEM -pwd:PASSWORD 4 Verify that the set.cfg file has been created in the bashell folder.
Once the set.cfg exists with a valid user and user password, you can use the tool without authenticating. For example you can run from command prompt or a batch file the following command to synchronize the analytical database and remove cache files:
Table 2-3 bashell parameters
Parameter Description
-site: <URL> Specifies the web services URL of the BIRT Analytics application. For example, -site:http://localhost/qelectron.
-user: <login name> Specifies the login name of the user who makes the request. It must be a valid administrator user in the BIRT Analytics application. -pwd: <password> Specifies the password of the user making the request.
-save Causes bashell to save the current settings in an encrypted file named set.cfg that can be used for future requests.
-sync Sends a request to the BIRT Analytics application to synchronize data.
-cacheoff Removes cache files.
Managing FastDB Engine accounts
Dubnium server uses an internal account to communicate with the FastDB database and the rest of the internal modules. This account provides a security layer that protects sensitive data. The administrator who runs a loading project must create the secure account and login credentials for the account. BIRT Loader passes a project’s user credentials to the FastDB Engine at run time. The engine authenticates the credentials against the existing secure database accounts. If an account does not exist or a password is not the same, a project fails to run and load data. This feature allows the system administrator to control user access to sensitive data by changing passwords or deleting FastDB Engine user accounts.
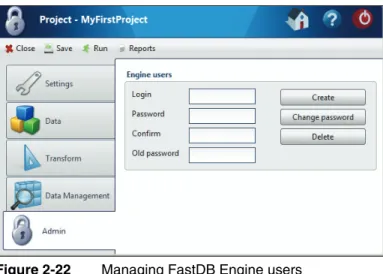
To manage FastDB Engine users, you use BIRT Loader Admin, as shown in Figure 2-22.
Figure 2-22 Managing FastDB Engine users
Use these Admin features to perform the following account creation tasks:
■ Create
Create a new user account.
■ Change password
Change a password of an existing user account.
■ Delete
Delete an existing user account.
To create and manage each FastDB Engine user, perform the following tasks in all of these fields:
■ Login
Define a user name.
■ Password
Define a password.
■ Confirm
Confirm the password. You use this property when you create a new user or change a password for an existing user.
■ Old password
C h a p t e r
3
Chapter 3
Extracting data
This chapter contains:
■ About extracting data
■ Connecting to data ■ Creating a load process
About extracting data
The load process is composed of two main steps: loading and transformation. The configuration of the load process is done in the Data module.
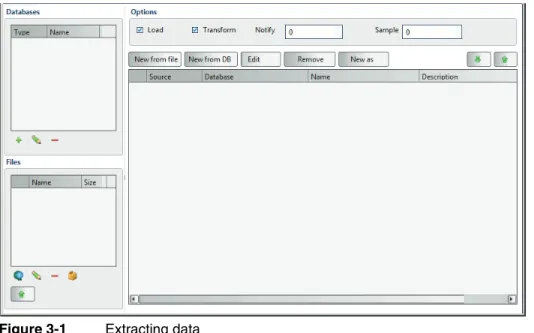
The Data page, as shown in Figure 3-1, is divided into three areas: Databases, Files, and Options. Databases and Files are places where you define the connections to the data sources. Options is the place where you define a load process. A load process consists of options that determine the way the load process runs, and transactions. A load transaction describes the data mappings between the input data and the tables in the target database. A load process may contain multiple transactions.
Figure 3-1 Extracting data
Connecting to data
BIRT Analytics Loader supports connections to relational databases and flat files. Data source connections are accessible across multiple projects associated with the same user. File
connections are associated only with the project where they are defined. You cannot share file connections across multiple projects.
Connecting to databases
You can create and name as many data source connections as a load process requires. The data sources can be of different types. For example, a load process can use data from a database and data from a flat file repository. Each type of data source requires different connection information.
BIRT Analytics Loader connects to databases using native and ODBC drivers. BIRT Loader supports native drivers for the following database types:
■ Microsoft SQL Server ■ MySQL Database Server
■ Oracle Database
BIRT Analytics Loader also supports connecting to a database using an ODBC driver. To connect to a database having a native driver type not supported by BIRT Analytics Loader, you must provide an ODBC driver and set up an ODBC connection that uses the ODBC diver. In BIRT Analytics Loader you can define a new data source, edit an existing one, or remove a data source, as shown in Figure 3-2.
Figure 3-2 Connection tools for database data sources
Using native drivers
Before creating a connection using a native driver make sure the driver is installed on your machine. For MySQL server for example, check if the path to the driver is in the System Path. To see the System Path, use Control Panel➛System➛Advanced System Settings
➛Environment Variables➛Path, as shown in Figure 3-3.
Figure 3-3 Editing Path variable
To create a data source connection you must provide the database connection information, as shown in Table 3-1. Contact your database administrator to obtain this information.
Table 3-1 Database connection properties
Property Description
Name The name of the database connection, which must be unique
Type The type of connection, selected from the values in the drop-down list Server The database server, which can be a machine name or an IP address Port The connection port
Add data source Edit data source Remove data source
How to connect to a database using a native driver
1 In Databases, choose the + sign. Datasource appears, as shown in Figure 3-4.
Figure 3-4 Using a native driver
2 In Datasource, define the following properties:
■ In Name, type a unique name. Using a name that describes the database content helps identify different databases you define as data sources.
■ In Type, select the source database type from the list of available types. In this example, mysql is the source database type.
■ In Server, type the name of the server that hosts the source database. In this example, an IP address identifies that server.
■ In Port, type the connection port. The mysql database installation in this example uses the default port 3306.
■ In User, type a valid user name defined for the source database.
■ In Password, type a valid password defined for the source database.
■ In Database, type the name of a database that contains source data.
■ In Driver, optionally type a native driver name, or type no characters. A connection
that uses a native driver requires no name.
3 Choose OK to create the named data source connection. A new data source connection name and type appear in Databases, as shown in Figure 3-5.
Figure 3-5 A data source connection that uses a native database driver
Password A valid password to connect to the database Database The name of the database
Driver The driver name, required for ODBC drivers only Connection
string
Custom connection properties, required for custom ODBC drivers only
Table 3-1 Database connection properties (continued)
Using ODBC drivers
Creating a connection using an ODBC driver is very similar to the native driver connections. The difference is that you must provide a driver name as a connection property. As well as the predefined ODBC data source types, a custom ODBC data source is available. To use the custom ODBC data source, you must type the required connection parameters as a text value. To determine the name of your ODBC driver, open Control Panel➛ODBC Data Source Administrator. The driver name appears in the Drivers tab, as shown in Figure 3-6.
Figure 3-6 Finding an ODBC driver name
How to connect to a database using an ODBC driver
1 In Databases, choose the + sign. Datasource appears.
In Datasource, define the following properties for a standard ODBC data source, as shown in Figure 3-7:
Figure 3-7 Using an ODBC driver
■ In Name, type a unique name. Using a name that describes the database content helps identify different databases you define as data sources.
■ In Type, select ODBC from the list of available connection types.
■ In Server, type the name of the server that hosts the source database. In this example, a
■ In Password, type a valid password defined for the source database. ■ In Database, type the name of a database that contains source data.
■ In Driver, type the driver name, as defined in the ODBC Data Source Administrator. In
this example, the name of the ODBC Microsoft SQL Server driver is SQL Server. Alternatively, for a custom ODBC data source, define the following properties, as shown in Figure 3-8:
Figure 3-8 Using a custom ODBC driver
■ In Name, type a unique name. Using a name that describes the database content helps
identify different databases you define as data sources.
■ In Type, select Custom ODBC from the list of available connection types. ■ In User, type a valid user name defined for the source database.
■ In Password, type a valid password defined for the source database. ■ In Database, type the name of a database that contains source data.
■ In Connection string, type the parameters required to connect to the custom data
source.
2 Choose OK to create the named data source connection. A new data source connection name and type appear in Databases, as shown in Figure 3-9.
Figure 3-9 Database connections
Connecting to files
BIRT Analytics Loader can access data from a text file, or flat file, that conforms to a defined and consistent structure. These files are typically generated by business systems and
applications that create logs. These files can also be spreadsheets saved as comma-separated values (CSV) files. Before using text file data in a load process, make sure the file uses a valid structure. The size of the text files is limited only by the limitations set by the operating system.
BIRT Analytics Loader supports the following options for defining flat file data sources:
■ Uploading a file from a local system
■ Uploading a file from a remote system ■ Uploading multiple files using a file list
Using BIRT Analytics Loader - Files, you manage data uploads from data files stored on local and remote systems, using the toolset shown in Figure 3-10.
Figure 3-10 Connection tools for flat file data sources
To prepare to access your text files you must know the file name and location.
Uploading local files
After selecting the file, it will be uploaded into the data folder of the load project. Because of network reasons there is a configurable maximum file size available.
How to upload a file from a local file system
1 In Files, choose the up arrow. File Upload appears, as shown in Figure 3-11.
Figure 3-11 Uploading a local file
2 In File Upload, navigate to the folder where the file is located.
3 Select the file and choose Open. The file appears in Files, as shown in Figure 3-12. The local file is stored in the data folder of the project.
Create new remote data provider Edit remote data provider Remove file
New file list
Figure 3-12 Creating a local file data source
Uploading remote files
The remote data provider option allows you to load files using a web address. You have to choose a name, the Uniform Resource Identifier (URI), and the HTTP method (GET, POST).
How to upload a file using URI
1 In Files, select the remote data provider icon. URI appears.
2 In URI, enter the following information, as shown in Figure 3-13:
■ In Name, type the name you want to assign to this data source.
■ In URI, type the URI, specifying the file location.
■ In Method, select the method for obtaining the file. Contact the file provider to identify the method.
■ In Parameters, enter parameters if needed.
❏ Choose + to add parameter. In Name, type the parameter name. In Value, enter the parameter value, as shown in Figure 3-13.
❏ To modify a parameter, select a column and change the entry.
❏ Choose - to remove a parameter.
Figure 3-13 Providing URI properties
Figure 3-14 Creating a remote file data source
Uploading files using a file list
On many occasions, due to a large data volume and file size restrictions, it is convenient to break the data into multiple files. In such cases you must use a file list to create a file data source and upload the data into a single table.
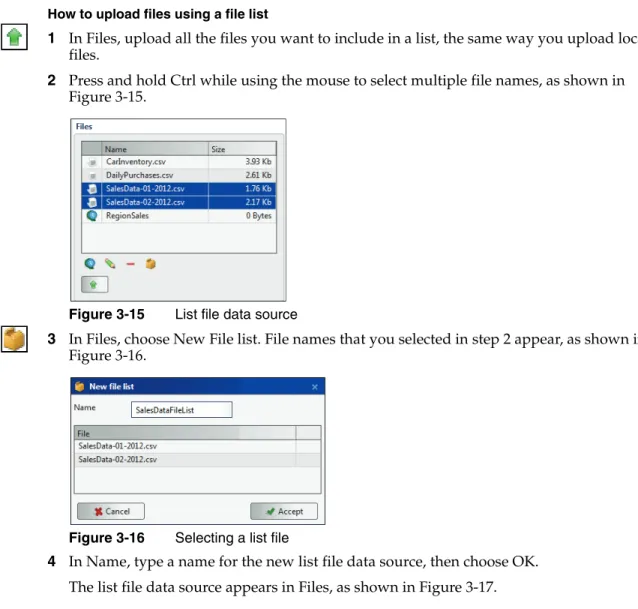
How to upload files using a file list
1 In Files, upload all the files you want to include in a list, the same way you upload local files.
2 Press and hold Ctrl while using the mouse to select multiple file names, as shown in Figure 3-15.
Figure 3-15 List file data source
3 In Files, choose New File list. File names that you selected in step 2 appear, as shown in Figure 3-16.
Figure 3-16 Selecting a list file
4 In Name, type a name for the new list file data source, then choose OK. The list file data source appears in Files, as shown in Figure 3-17.
Figure 3-17 Naming a list file data source
Updating data source definitions
You can modify the data source definitions by choosing the pencil icon. The changes in the data source definitions require an update of the related table definitions. Saving the changes displays a message, as shown in Figure 3-18, asking you to confirm the update.
Figure 3-18 Updating data source message
Creating a load process
BIRT Analytics Loader supports creating data load transactions, setting load process options, and running a set of transactions as a process. To create a load process, first create the transactions that load data. Then, set options that run the load process.
About transactions
A transaction includes all settings and data mappings required to load data into a single table. A load process executes multiple transactions. You must save any change that you make to a load process before executing the process. To save any change to a process, choose Save on the menu bar.
BIRT Analytics Options, for defining a process and tools for creating transactions, looks like the example shown in Figure 3-19.
Setting load process options
Use Options, shown in Figure 3-20, to select options that define a load process. Displayed settings that you save for each process execute when the process runs, as part of a data load project.
Figure 3-20 Defining load process options
Select or specify values for each option to execute the following process tasks:
■ Load
Select Load to execute all load transactions when a project runs.
■ Transform
Select Transform to execute all transformation scripts when a project runs. Define transformation rules using the Transformation tab.
■ Notify
Type a value that sets a trigger to write a log message each time the set number of records loads.
■ Sample
Specify the number of records loaded for each table.
Creating a load transaction
Creating a load transaction involves defining the mappings between the source and target data objects. Mapping is the definition of the relationship and data flow between source and target objects.
Before building an actual data map for the loading process, you have to define a data model for target even if it is not an actual database. It will help you understand the entities to which it belongs. Then it will be easier to find the similar entity in the source and map it to the target element. This is called building a logical data map model and you have to do it before you actually start mapping the data.
After you have built a data map model for ETL (Execute, Transform, Load), you have to analyze the data content, complete business rules for ETL process, integrate data sources to a single source, and only then build an actual data map.
BIRT Analytics Loader supports creating multiple load transactions per project, as shown in Figure 3-21.
You have the following choices when you create a load transaction:
■ New from file
Define a transaction that creates a table mapped to a flat file connection.
■ New from database
Define a transaction that creates a table mapped to a database.
■ Edit
Edit a load transaction.
■ Remove
Remove a load transaction.
■ Duplicate
Create a new transaction using an existing one.
Mapping data from files
The mapping process requires defining the source and the target data. The software allows you to validate the data connection and create the table column definitions. You can automatically import the target table structure from the source file or manually create the column definitions. When the table structure does not map the source file data precisely, the loading process cannot identify the data to load for each table column and finishes
unsuccessfully.
To map data from files you need to know how to do the following:
■ Defining a target database ■ Defining a source file format
■ Defining table columns
The example in “How to map data from a CSV file” provides more information about the mapping process.
Defining a target database
To define the target database and table, and the way the data is loaded, you must define the following information, as shown in Figure 3-22:
Figure 3-22 Creating a table mapping to a file
■ Database
■ Name
Type a unique name for a target data table.
■ Description
Optionally, type characters that describe the target data table.
■ Action
Select one of the following load operation types:
■ Create
Adds a new table and overwrites any content stored in an existing table, using the displayed table name.
■ Append
Adds records to any existing table that uses the displayed table name.
■ Overwrite
Choose this option when the loading transaction overwrites the target table.
■ Ignore
Choose this option when you must exclude the transaction from the load process.
Defining a source file format
Based on your knowledge of source file properties, select formatting properties that most closely match those of the source file. More accurately selecting source file properties minimizes manual definition of target table properties.
■ Type
Select the file type. The files can be flat, or delimited. The flat files do not have delimiters and qualifiers.
■ Encoding
Select an encoding type from the list. Table 3-2 lists and describes the file encoding types that BIRT Analytics supports.
Table 3-2 Supported encoding
Encoding Description
ASCII American Standard Code for Information Interchange
CP1252 Windows Latin-1
BIG5 Chinese character encoding method used in Taiwan, Hong Kong, and Macau for Traditional Chinese characters
BIG5-HKSCS Standard supplementary character set used for information exchange in Chinese between the public and the Hong Kong SAR Government
CP1252 Windows Latin-1
GB18030 Chinese government standard describing the required language and character support necessary for software in China
GB2312 Official character set of the People’s Republic of China, used for simplified Chinese characters
GBK An extension of the GB2312 character set for simplified Chinese characters, used in the People’s Republic of China
■ End Line
Select an end-of-line character from the list. Table 3-3 lists and describes the end-of-line characters and results supported by BIRT Analytics Loader.
■ File
Select a source file name from the list.
■ Delimiter
Select the character used to delimit or separate values in a delimited file only. The following delimiter characters are supported by BIRT Loader:
, ->| | : ; @ # " + - = '
■ Header
Select Header option if the source file includes information in a header. A file header contains multiple column names, each separated by a delimiter character.
■ Skip
In Skip, type a number that sets how many blank rows to insert between header
information and record information in a file. If you select Header option, 1 appears in Skip by default.
■ Offset
Define the initial position of each column when the file format is flat file. ISO-8859-3 Latin Alphabet No. 3
ISO-8859-4 Latin Alphabet No. 4 ISO-8859-5 Latin/Cyrillic Alphabet ISO-8859-6 Latin/Arabic Alphabet ISO-8859-7 Latin/Greek Alphabet ISO-8859-8 Latin/Hebrew Alphabet ISO-8859-9 Latin Alphabet No. 5 ISO-8859-13 Latin Alphabet No. 7 ISO-8859-15 Latin Alphabet No. 9
UTF8 8-bit UCS Transformation Format
UTF16 16-bit UCS Transformation Format, byte order identified by an optional byte-order mark
UTF16LE 16-bit Unicode Transformation Format, little-endian byte order UTF16BE 16-bit Unicode Transformation Format, big-endian byte order WINDOWS-1252 Windows Latin-1
Table 3-3 End-of-line characters and results
End-of-line character Result description
CRLF Carriage return and line feed
CR Carriage return only
LF Line feed only
Table 3-2 Supported encoding (continued)
■ Qualifier
Select a qualifier character. BIRT Loader supports the following qualifier characters:
" ' ~
Choose None, if the file format does not use a qualifier.
■ Wellformed
Select the Wellformed option to enforce verification that each record contains all columns.
Defining table columns
To automate defining the structure of a target data table, extract the data from a source data file, using Get columns. During extraction, Get columns adds column type and index information to each data element. You must review and edit, as necessary, the type and index information for every column. Consider removing the index from every column not strictly requiring an index. Removing unnecessary indexes speeds data load and analysis processes, but may limit performing aggregation and link operations. These operations require indexed columns.
■ View
Choose View to see the data in the file and check the connectivity to the file.
■ Get columns
Choose Get columns to get the column names and type automatically from the source file. To create a target data table manually, define each column using the New, Edit, Remove, and Duplicate options. While you edit the structure of a target data table, use Get columns to retrieve existing column information, then use Edit to make modifications. To create a new column, choose New, then provide information using Column Declaration, as shown in Figure 3-23.
Figure 3-23 Creating a new column
■ New
■ Creates a new column in the target table
■ Name
Enter the name of the column.
■ Description
■ Type
Enter the data type. The supported data types are described in Table 3-4.
■ Size
The size of the column in characters, or digits.
■ Format
The format of the columns of type Date, Datetime, and Time.
■ Decimals
The number of digits to the right of the decimal point, or comma. Applies for data of type Real.
■ Decimal separator
You can choose Point or Comma to visualize a decimal separator. Applies for data of type Real.
■ Indexed
Indicates if the column is an index.
■ Skip
Select Skip to exclude a new column from the load process.
■ Edit
Opens the Table Declaration editor for a single column.
■ Remove
Removes a column from the target table.
■ Duplicate
Creates a new column by copying the properties of an existing column.
How to map data from a CSV file
The following procedure assumes that you have created a data file connection. The procedure uses as an example, a CSV file having the following structure:
Table 3-4 Data types
Type Description
String A sequence of characters, up to 1024.
Integer Integer (whole number) data from -2^31 (-2,147,483,648) through 2^31 - 1 (2,147,483,647).
Longint Integer (whole number) data from -2^63 (-9,223,372,036,854,775,808) through 2^63-1 (9,223,372,036,854,775,807).
Real Floating precision number data with the following valid values: -3.40E + 38 through -1.18E - 38, 0 and 1.18E - 38 through 3.40E + 38. Date The default format is mm_dd_yyyy, where the date separator can
be slash (/), comma (,), period (.), or no separator.
Datetime Date and time data from January 1, 1400, through December 31, 9999, with an accuracy of three-hundredths of a second, or 3.33 milliseconds. The default format is yyyy_mm_dd_hh_MM_ss. Time The default format is hh_MM_ss.
PRODUCTNAME,QUANTITYINSTOCK,MSRP
1969 Harley Davidson Ultimate Chopper,7933,95.7 1952 Alpine Renault 1300,7305,214.3
1 In Options, choose New from file.
2 In Table Declaration, set properties for the target database, as shown in Figure 3-24.
1 In Database, type a database name. Alternatively, select an existing database name from the list of target databases.
2 In Name, type the name a target table to which you will map data. For example, CarInventory.
3 In Description, type characters that describe information the table will contain, such as Car Inventory and MSRP.
4 In Action, select Create.
5 Select Overwrite.
Figure 3-24 Defining file structure
3 Select options that match properties of the source file, as shown Figure 3-24.
1 In Type, select Delimited.
2 In Encoding, select ASCII.
3 Select Header. In this example, 1 appears in Skip. Edit the value in Skip to match the number of header rows in the source data file.
4 In End Line, select CrLf.
5 In File, select a source file name from the list.
6 In Delimiter, select comma (,).
7 In Qualifier, select ".
8 Select Wellformed.
4 Choose View to validate the data connection. The file content appears, as shown in Figure 3-25. Choose OK.
Figure 3-25 Viewing file content
5 Choose Get columns to import the file metadata.
During the metadata import process, Get columns reads column name information from the header row in the source file, determines a type for each column, and indexes each column.
Definitions for each new column created in the target table appear listed in Table Declaration, as shown in Figure 3-26.
Figure 3-26 Getting column definitions
6 To modify properties for a column, select a listed column definition and choose Edit.
1 In Column Declaration, select or modify any available properties.
2 To remove index information from a column, deselect Indexed.
3 To exclude a column from loading, select Skip.
4 Choose OK.
For example, change the type of the MSRP column from Integer to Real, and set the column to not indexed, as shown in Figure 3-27.
Figure 3-27 Editing column definition properties
7 To close a selected database table, in Table Declaration, choose OK.
8 In Project, choose Save. Choose Yes to confirm saving the script for the current project, as shown in Figure 3-28.
Figure 3-28 Saving a project
Mapping data from databases
Mapping data from a database requires that you define many of the same properties as those that you define for mapping data from files. To map data from a database, first define the target database, provide a target table name, and choose a database data source. If necessary, to review the procedure for setting these properties, see “Defining a target database,” earlier in this chapter. Next, define the data set to retrieve from the source database using Table Declaration, as described in Defining a data set. Selecting a database in Datasource provides the option to define a query that retrieves a data set.
The example in “How to map data from an Oracle data source” provides more information about this process.
Defining a data set
To define a data set you must provide a query and set options for the query.
■ Query
Defines a SQL query from a relational database data source. You can type a query manually, and use Get columns to retrieve the columns from the data set.
Alternatively, you can use View database structure to select tables and columns. Use Datasource to select tables and their columns, and specify the column order.
■ Options
Enter the options required by the connection drivers. For example, when loading data from an Oracle database, it is recommended to include a parameter, such as
PreFetchRows=10000.
The process of defining the target table structure is the same as the one discussed in “Defining table columns,” earlier in this chapter. While you edit the structure of a target data table, use
How to map data from an Oracle data source
This procedure assumes you have already created an Oracle database connection.
1 Define the target database and table.
1 In Options, choose New from DB. Table Declaration appears, as shown in Figure 3-29.
Figure 3-29 Declaring a table from a database
2 In Table Declaration, choose the target database from the drop-down list, as shown in Figure 3-30.
Figure 3-30 Mapping data from an Oracle database
3 In Name, specify the name of the target table.
4 In Description, enter the table description.
5 In Action, choose Create.
6 Select Overwrite.
2 Define the data set.
1 In Datasource, choose the database data source.
2 In Query, choose View database structure to build the query. Datasource appears.
❏ In Datasource, choose a table from the table drop-down list. The column names appear, as shown in Figure 3-31.
❏ Use + and - to add or remove columns, and the up and down arrows if you need to change the column order.
Figure 3-31 Using the query builder
3 In Options, specify any options you wish to pass to the data driver.
3 Choose View to validate the data connection and view the data. Query results appears, as shown in Figure 3-32.
Figure 3-32 Viewing data from a database
4 Choose Get columns to import the columns from the data set. The column definitions appear as shown in Figure 3-33. The types are determined automatically, and all columns are indexed by default. Get columns overwrites the existing data set, and discards your existing changes.
Figure 3-33 Getting the column definitions from the data set
Figure 3-34 Editing a Datetime column
1 Select the HIREDATE column and choose Edit.
2 In Type, select Date format.
3 In Format, select mm_dd_yyyy from the drop-down list.
4 Deselect Indexed. Choose OK.
C h a p t e r
4
Chapter 4
Managing data
This chapter contains:
■ About managing data
■ Understanding Explorer
■ Understanding dynamic and permanent columns
About managing data
BIRT Loader Data Management, shown in Figure 4-1, provides tools for exploring data and creating and maintaining links between tables. BIRT Analytics Loader connects directly to the database engine. You explore the structure of all databases currently stored in FastDB, without synchronizing, using BIRT Analytics Loader Explorer. Explorer displays data objects, such as databases, tables, columns and their properties, and the discrete values of each column. The Links tool creates and maintains links between tables.
Figure 4-1 Managing data in FastDB
Understanding Explorer
Use Explorer to select and browse database structures stored in FastDB. Explorer supports browsing of multiple database objects, such as databases, tables, and columns. Explorer also supports refreshing the list of database names, viewing properties of a selected table and viewing properties of a selected column, using the features shown in Figure 4-2.
Figure 4-2 Exploring data structures in FastDB
How to view data structures stored in FastDB
1 In BIRT Analytics Loader, choose Data Management, and then Explorer. The repository tree lists all database names currently stored in FastDB.
2 To view a list of tables in a database, in Repository, double-click a database name. The database link expands and lists all table names defined in the selected database.
3 To view a list of database columns, in Repository, double-click a table name. The table link expands and lists all column names defined in the selected table.
Refreshing the repository content
In Repository, choose Refresh to ensure that you see all databases, tables, and their columns currently stored in FastDB.
Exploring table properties
To view table properties, in Repository, select a table name, then choose View details. For a selected table, Table displays a value for each of the following table properties:
■ ID
Internal table identification number
■ Name
Table name
■ Full name
Full table name in format [Database].[Table]
■ Description
Table description
■ Rows
Number of rows in a table
■ Columns
Number of columns in a table
For example, Figure 4-3 shows all properties defined for the CarInventory table in the SalesData database.
Figure 4-3 Exploring table properties
Exploring column properties
To view column properties, in Repository, select a column name, then choose View details. For a selected column, Column displays Attributes and Discretes.
■ Name
A column name
■ Full name
Full column name in the following format:
[Database].[Table].[Column]
■ Type
Type of data (text, integer, and so on)
■ Discretes
Number of column’s discrete values
■ Rows
Number of rows in the database
■ Nulls
Number of column’s null values
■ Size
Column size
■ Indexed
Indicates if column is indexed
■ Derived
Indicates if the column is dynamic or permanent
For example, Figure 4-4 shows all properties defined for the Class Code column in the Household table.
Figure 4-4 Exploring properties of a permanent column
Discretes displays a value for each of the following column properties:
■ Value
Discrete value of the column
■ Count
■ Percentage
Percentile of the count number to the total number of records
For example, Figure 4-5 shows all discrete values defined for the Class Code column in the Household table.
Figure 4-5 Exploring discrete values of a permanent column
Dropping database objects
To drop databases, tables, or data columns, select the data object in the repository tree, and then choose Drop. Drop removes the data object from the FastDB database.
Understanding dynamic and permanent columns
BIRT Analytics uses the term dynamic column to describe a column that contains only a formula, but no data values. A formula consists of one or more expressions and operators. Using BIRT Analytics Loader, you can edit the formula that defines a dynamic column. To edit such a formula, you change any of the expressions or operators in the formula. You create a dynamic column using instructions known as transformation instructions. The dynamic columns appear as editable columns in BIRT Analytics.
For a dynamic column, the column property Derived displays the formula name of the translation instruction that you use to create the column. For example, Figure 4-6 shows the column properties for a dynamic column, [TotalInStock]. It was created using the translation instruction, Expression. The Derived property displays Expression.
BIRT Analytics uses the term permanent column to describe a column that contains data values. You typically load the data values in a permanent column from an external database. You can transform a dynamic column to a permanent column using the transformation instruction, MAKEPERMANENT. For more information about transformations, see Chapter 5, “Transforming data.”
Figure 4-6 Exploring properties for a derived column
Understanding Links
You link tables so that records from one table match related records from another. When you link, you are using a column that is common to both tables. BIRT Analytics uses the link to match up records from one table with those from the other. For example, if you use an Orders table and a Customers table, you link the tables so that each order from the Orders table can be matched up with the customer from the Customers table that made the order. In this example, the link assures that the data in each row of the report refers to the same order. Links, shown in Figure 4-7, displays final and transient links. Final are the links you create using the Links option or the transformation instruction, LINK. For more information on LINK, see “LINK” in Chapter 5, “Transforming data.” Transient links are automatically generated by the software for performance reasons. For example, the transient link, shown in Figure 4-7, gets created if you create a crosstab with [Customer].[Occupation] as a dimension and Count( Order Detail ) as a measure.
To clear the transient links, choose Remove all transient links.
How to create a new link
1 In Link, in From, select the database, table, and column from which the link starts.
2 In Link, in To, choose the database, table, and column to which the link goes, as shown in Figure 4-8.
Figure 4-8 Creating links
3 Choose New to create the link. Choose Yes in the message asking you to confirm. The new link appears in the list of links.
How to remove a link
1 In Link, in From, select the database, table, and column from which the link starts.
2 In Link, in To, choose the database, table, and column to which the link goes.
3 Choose Remove to drop the link. Choose Yes in the message asking you to confirm. The link disappears from the list of links.
C h a p t e r
5
Chapter 5
Transforming data
This chapter contains:
■ About transforming data
■ Creating new columns ■ Managing data objects
About transforming data
Transformation is the process of manipulating data. Any manipulation beyond copying is a transformation. Examples include cleansing, aggregating, and integrating data from multiple sources.
Transforming the data is executed after the load process is finished. The transformation script consists of one or more script files. The list of the script files is shown in Files, as shown in Figure 5-1. The Main file is the first file executed after data load. To access this file, you select Main