Virtual Reality Clothing Design
Wybe Westra
Bachelor Creative Technology — University of Twente
Supervisor: Job Zwiers — Critical observer: Khiet Truong
Abstract
This research looks at how to build an intuitive VR interface that allows designers to apply fabrics to a garment model. Four potential methods of interaction were implemented. A hand-based pick-ray, a head-based pick-ray with a timed click, a head-based pick-ray with a remote mouse and a touch-based method. After three user test and four iterations a final interface was made. The interface allowed for the changing of fabrics on a single garment, along with the ability to see the garment in different environments. The interface was found to be easy to learn by the test participants. Most participants found the hand-based pick-ray the most intuitive way of interacting and the touch-based method the least intuitive. The participants thought the application to be useful for professional designers. The environment changing was also seen as useful and realistic. Building an intuitive interface for VR clothing design is very possible. Future research could look into more complex design interactions such as the placing of buttons and decals. Multi-user editing is also a promising feature.
Contents
1 Introduction 5
1.1 Context . . . 5
1.2 Research Question . . . 5
1.3 Application . . . 5
2 State of the Art 7 2.1 VR interaction . . . 8
3 Ideation 10 3.1 Stakeholders . . . 10
3.2 Scope of garment design . . . 10
3.3 Workflow . . . 11
4 Specification 12 4.1 Requirements . . . 12
4.2 Features that will not be implemented . . . 13
5 Realization 14 5.0.1 Overview . . . 14
5.1 First iteration . . . 14
5.1.1 The VIVE . . . 14
5.1.2 Garment . . . 14
5.1.3 Interaction . . . 15
5.1.4 Outlining . . . 17
5.1.5 Fabric library . . . 18
5.1.6 User test . . . 18
5.2 Second iteration . . . 20
5.2.1 Interaction . . . 20
5.2.2 Interface placement . . . 21
5.2.3 Additional suggestions . . . 21
5.2.4 User test . . . 21
5.3 Third iteration . . . 22
5.3.1 Interaction . . . 22
5.3.2 Environment switching . . . 22
5.3.3 Interface placement . . . 23
5.3.4 Multi-user editing . . . 24
5.4 Final user test . . . 25
5.4.1 Method . . . 25
5.4.2 The garment . . . 25
5.4.3 Interaction . . . 26
5.4.4 Fabric library . . . 28
5.4.5 Environment switching . . . 29
5.4.6 Relative interface placement . . . 30
5.4.7 Opinions on professional use . . . 30
5.5 Final changes . . . 31
6 Discussion and future work 32
7 Conclusion 34
List of Figures
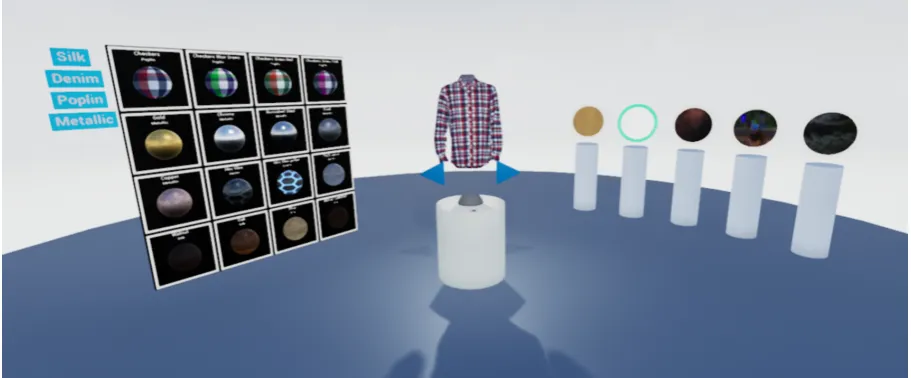
1 An overview of the final application. In the middle is the shirt the user will be editing. To the left the library of available fabrics, and to the right are the orbs that change the environment. . . 6 2 1996 VR Design Studio [14]. . . 8 3 An overview of the final application. In the middle is the shirt the user
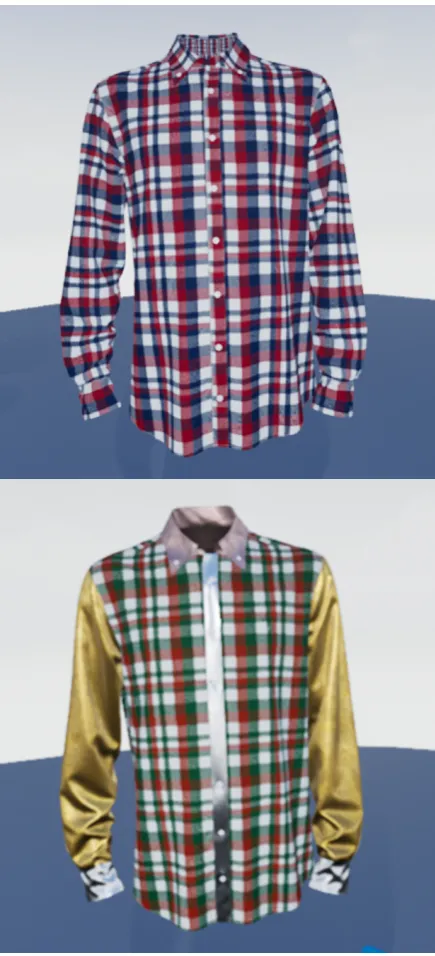
will be editing. To the left the library of available fabrics, and to the right are the orbs that change the environment. . . 14 4 Top: The default appearance of the shirt. Bottom: The same shirt, after
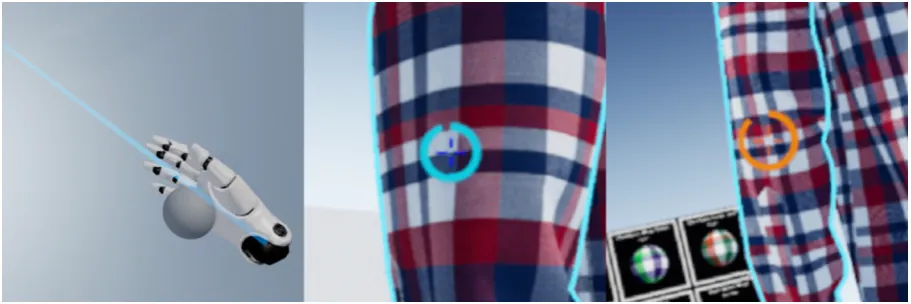
editing. . . 15 6 Pick ray interaction methods. Left: Hand based pick-ray. The blue line
will terminate at the surface of interactable objects, and turn fully opaque. The ball in the users hand will change it’s appearance to the fabric the user has selected. Middle and right: HMD based pick-ray. The crosshair indicates the object being looked-at. The circular progress bar indicates the time until the object is “clicked”. The HUD color shown on the left was discarded because of contrast issues. The HUD color shown on the right is the final color used in the application. . . 16 5 A closeup of the collar. At this distance the stitches are visible. At larger
distances they become quickly indistinguishable. . . 16 7 The two highlighting mechanisms. Top: Cilinder highlight obscuring and
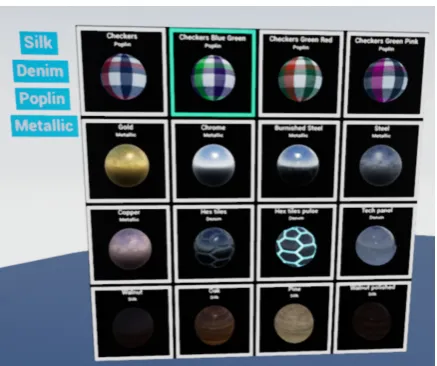
tinting the hovered item. Middle: Outline highlight. Bottom left: Outline works even with complex shapes. Bottom right: Outline draws on top of everything. Allowing the user to judge the shape of the hovered item even if it is partially obscured. . . 17 8 The fabric library as it appears in the application. The swatch outlined in
green is the one currently selected. The outline in the first iteration was blue, but this wasn’t distinct enough in color from the hover highlighting for it to be clear. . . 18 9 The users hands as they appear in the touch interaction. The blue orbs are
the actual interaction mediums. In the second iteration these were about twice as large as they are depicted here, but they have been scaled down after the tests. . . 20 10 Orbs used to select a different enviroment. The orbs use the same material
as the skysphre, causing them to be a “window” into the other environment. The green border shows the environment that is currently selected. . . 23 11 The shirt as seen in different environments. The left two panels show the
1
Introduction
1.1
Context
In the clothing industry, designing a new collection is a long and expensive process. Traditionally, sketches, fabric swatches and physical prototypes are used to create a new garment. However, creating custom fabric swatches or one-off prototype garments is expensive. Designers of large clothing design companies like PVH [1] currently use digital 2D design tools to create their designs. They use a 3D model of the garment they are working on as reference, but this model only shows the shape, and not the fabrics. They also have access to the previously mentioned expensive swatches of the available fabrics, but these should be kept in one piece and cannot be cut or sewed.
This creates a discord between the product the designers are working on, and the tools they use to do it. The finished product is a physical three dimensional garment. But the designers work in 2D, Their 3D model lacks the fabrics, and the swatches they have are expensive and cannot be experimented with.
1.2
Research Question
The aim of this research is to create an intuitive VR tool in which designers can work on a 3D version of the garment. The reasoning for the use of VR is the added immersion it can provide. When viewing a 3D garment on a monitor a lot of information is lost because the monitor only shows a 2D projection. Using VR would allow the designer to view the garment as if it was physically there, which could help in visualizing what the final physical garment would look like.
The main focus of the research is on the VR user interface and the users interaction with said interface. As the target group traditionally uses 2D drawing tools, the applica-tion cannot assume any prior knowledge about VR or 3D designing. The goal is therefore to make an interface that is simple, intuitive and easy to learn.
The main research question is therefore: How to build an intuitive VR interface that allows designers to design a 3D garment. To do this it is important to know what the clothing companies actually define as “design” and consequently, what the capabilities and affordances of the interface should be. Another question that needs to be answered is what would be an intuitive way to interact with a VR interface.
1.3
Application
Figure 1: An overview of the final application. In the middle is the shirt the user will be editing. To the left the library of available fabrics, and to the right are the orbs that change the environment.
2
State of the Art
There are numerous applications for the 3D design of clothing. Examples of these are: C-Design [2], TUKA3D [3] and VStitcher [4]. However, none of these applications includes a VR interface.
In the last decade, the focus of VR in the clothing industry seems to lay on the consumer end. It is for example used by TopShop to allow customers to virtually attend their fashion shows [5]. Completely virtual catwalks also exist [6]. Next to that, AR and VR are used for digital dressing rooms. These allow consumers to see how a garment would fit them without having to try it on, either in-shop, or online [7], [8].
These applications are backed by numerous researches into the measuring, fitting and simulating of 3D clothing. Vitali [9], [10] and her team built and tested a VR application that allowed tailors to take the measurements of a customer. Simulation and fitting is also a well-researched topic. Intui [11] researched dynamic clothing simulation around a hand detected in real-time. Zhang [12] and Decaudin [13] each researched ways to fit arbitrary clothing around arbitrary body shapes. Nowadays, professional clothing design applications like VStitcher [4] incorporate these kinds of simulations.
Research in VR clothing design goes all the way back to 1996. When a team led by Gray [14] developed a project called Virtuosi. It allowed clothing to be displayed and edited in VR, giving the user a voice interface to control everything from fabric to the pose of the mannequin. It even included fabric simulation and a VR catwalk. There is also mention of a potential video-conferencing package that could be used inside the application. Gray mentions that: “The technology is providing real opportunities to companies that are visionary enough to capitalize on its potential.” The datedness is visible both in the 3D environment as in the way the screen-shot is printed, as can be seen in figure 2. However, while it might not be mentioned in the paper, it gives the impression that this was absolutely state-of-the art technology back then. Either way, it is an impressive accomplishment.
Later, in 2004, another small VR clothing design application was developed. Keck-eisen [15] and his team built a system that allowed a designer to make or sew cuts in a virtual garment, which was then fitted to a virtual mannequin. The examples given in the paper look like the technique worked okay. This however was the full extent of the application, and no further research has been done with it.
When looking at more general VR design products, several applications have been developed in recent years. Google Tiltbrush [16], Facebook Quill [17] and ANIMVR [18] are VR drawing applications available today. Quill and ANIMVR even allow one to animate a drawing. Google Blocks [19], Gravity Sketch [20] and Oculus Medium [21] are applications more tailored to 3D sculpting. Clothing design has been done in these applications, Tiltbrush even includes a mannequin model for this purpose [22], but the resulting design is more a sketch than an actual clothing model. While the applications are nice for ideation, exporting a workable clothing pattern is not something that is achievable.
Figure 2: 1996 VR Design Studio [14].
techniques have the user interacting with a virtual environment from the outside. An example of this would be a display showing the virtual world in miniature. Egocentric interaction on the other hand places the user inside the virtual environment. Egocentric systems are found to be more immersive and easier to learn than exocentric systems because the virtual interactions are based on how humans interact naturally in the real world. VR systems using HMD’s almost always fall into the Egocentric category.
There are many different ways to approach egocentric interactions. Jung et al [24] subdivides Poupyrev’s classification into three categories.
Physical control: – This category includes techniques using buttons, dials, joysticks, steering wheels and most other tangible control devices. Physical controls have the ad-vantage of enhancing the users presence by being able to feel the controls. However they often lack a natural mapping between the controller and the interaction.
Virtual control: – Here the user interacts with objects by proxy. Examples are having a copy of a distant object appear close by, or virtually extending a users arms to allow them to reach over large distances. These techniques are flexible, but usually lack haptic feedback.
either hand or head, and grab interactions. Direct manipulation techniques are found to be most intuitive to use.
Argelauget and Andujar [25] compare a large set of direct and virtual interaction techniques for selecting objects. Ray casting selection is one of the more popular selection techniques. User tests showed that pointing techniques based on this resulted in better selection effectiveness than other 3D selection systems. However, they add that the lack of standard datasets for testing, along with the many different VR hardware setups, makes fair comparisons difficult. Testing several interaction methods in the context of a single VR system and task would likely give more accurate results. It was found that pointing interactions are susceptible to noise however, and either accurate position measurements or good filtering was found to be necessary if high precision was desired. An issue was encountered when there was a discrepancy between the location of the pointing ray origin, and the location of the users viewpoint. It could be unclear to the user why a certain object could not be pointed at using their hand when it was clearly visible to them, when in fact from the viewpoint of the hand there was another object in the way. This discrepancy was removed when the interaction ray was cast from the user’s eyes instead of their hand. Gehardt et al [26] tested several selection methods in the context of pie menu interactions and also concluded that the ray-casting method worked best.
3
Ideation
3.1
Stakeholders
There are multiple groups of stakeholders in this project. It is important to know who they are, what their interest is in the project, and how much influence they have.
Designers – The designers are the end users of the application. The way they do their job can be drastically influenced by how the application works and how steps are implemented. Their interest in the project is high. Their influence is also high.
They will probably want an application that is intuitive and comfortable to use, as they will potentially spend hours using it. Designers of PVH currently mostly using Adobe Illustrator [27] or Photoshop [28]. To make the transition as smooth as possible it might be beneficial to try to stay close to the work flows found in these applications.
The executives of the designers – The executives are the ones above the designers. They have a clothing company to run. They are the ones who judge the ultimate benefit of any large scale change made in the design process, and will also see changes in productivity or quality of work in the revenue made. Their interest in the project is high. Their influence is maybe even higher than that of the designers.
Retailers – This is the group that buys the garments of the clothing company for use in their retail stores. They ultimately decide whether a particular garment is sold in the stores yes or no. It likely does not matter too much how exactly the garments are designed, as long as the new collection is on time for the next season and of sufficient quality. However, telling them that the next season will be up for review earlier due to some sophisticated design process might be beneficial to the relationship with the clothing company. Their interest in the project is medium. Their influence is low.
Customers of the retailers – This group consists of the buyers of the designed garments. They are the ones who will ultimately wear the result of the design process. However, how exactly that design process works is not likely to be of large interest to this group, as long as the result of said process is of high quality. Their interest in the project is low. Their influence is low.
Pattern makers – These are the people who create the clothing patterns and 3D models that will be used in the application. They most likely already have a set work flow and output format which is used in the rest of the company. According to PVH, there is only a small amount of people in their company who are able to do this job. This is therefore a bit of an elite group. Their interest in the project will likely be low, as long as it doesn’t require their work flow to change. If this is the case their interest is high and their influence high as well.
3.2
Scope of garment design
Originally our idea was that designers would first start brainstorming on what kind of garment to make. Then they would sketch out the form of the garment and determine what fabrics, buttons and trims to use. After several prototypes, reviews and adjustments would the design be ready. Then the sewing patterns, fabrics and other details of the final design would be turned into a digital file which would then be sent to the factories for mass productions.
After meeting with representatives of PVH [1], who own and produce large brands like Tommy Hilfiger, it became clear that there was a big flaw in our idea of clothing design. In short: the designers don’t design the shape or sewing pattern of the garments. For large brands it is important that a medium sized jacket bought this season has the same fit as the medium sized jackets of the previous seasons. To achieve this they use the same clothing pattern for both seasons. The size, shape and stitching of the garments is therefore fixed, and the designers can most often not change those. The designers are instead concerned with things like which fabrics to use, where to place decals and trims, or maybe adding decorative buttons.
The fact that the shape of the garment cannot be edited is good news. The modifi-cation of a 3D object requires many complex interactions, which could quickly make the user interface large and difficult to intuitively grasp. With the knowledge of the design options it is decided to focus on the first step in the process after choosing the garment shape: The picking of fabrics.
Constraining the interaction like this has the benefit of keeping the amount of affor-dances presented to the user small. This allows the interface to be kept relatively simple, and keeps the learning curve for new users from skyrocketing.
3.3
Workflow
The designers currently work in Illustrator [27] or Photoshop [28]. These programs use a mouse and keyboard based interaction. The general workflow is to select a certain tool, and then use that tool on the canvas one is working on. Similarly with the colors, brushes and patterns: once selected they will stay selected until another item is selected instead. As mentioned in the stakeholder section, it might be easier for the designers to learn a new application if the workflow is similar. So that the user first selects a tool or fabric, and then uses that selected item until they select something else. One could instead argue that a VR application is so different in nature from a screen-based application that a significant re-learning of all the concepts involved will already be needed. And that the extra time needed to then learn a new type of workflow is negligible if the increase in ease or productivity with this new workflow is big enough.
Another potential workflow would be almost the reverse of the first: The user could select something they want to change, which then brings up a bunch of information about the selected thing. Then the user can change the parameters of this object, before de-selecting it or de-selecting another one.
4
Specification
The concepts from the ideation phase have been turned into list of requirements. This list represents the minimal requirements needed for a workable prototype. During the realization phase it may turn out that one or more requirements are counterproductive or not needed. New ideas can be added during the project if they are promising enough and if time and scope allows. After the list of requirements is a list of features that will definitely not be included in the application. This list is to help keep the application from getting too complex, and the research from going off track.
4.1
Requirements
It should display a 3D model of a garment in 1-to-1 scale.
– The user should be able to see, and edit, the garment from all sides.
– The garment should be divided in different sections. Each section should be able to receive a different fabric.
There should be a library of fabrics.
– This library should be a physical panel in the 3d space.
– The library should display all available fabrics, along with at least their name and type.
– The user should be able to use the current interaction method to select a fabric from the library.
– The library should highlight the fabric that is currently selected.
– The fabric should stay selected until a different fabric is selected.
The user interface should be the same regardless of the interaction method the user is in.
Object that are interactable by the user should be highlighted in some from when the user hovers over them.
There should be multiple methods of interaction.
– There should be an interaction method that uses pick-rays shot from the hands to select interactables.
* The pick-ray should be visible.
* The user should get haptic feedback when hovering over an interactable object.
– There should be an interaction method that uses a pick-ray shot from the front of the HMD.
* There should be some kind of crosshair that indicates to the user where the pick-ray is going.
* There should be a progress bar clearly visible to the user to indicate when the click is going to happen.
– The user does not have to be able to switch between the interaction methods themselves. But someone overseeing a user test should be able to do this.
4.2
Features that will not be implemented
Editing the 3D mesh of the garment. This includes things like lengthening the sleeves, or widening the collar.
Adding, moving or removing of buttons. Changing the material on the buttons. Editing of garment labels.
5
Realization
The goal of the research is to create a VR application for clothing designers. The main focus of this research is the user interface, and the users way of interacting with said interface. An iterative approach has been used during the project, with three major iterations. A user test has been done after each interaction. The results of that test are discussed and implemented in the next iteration.
5.0.1 Overview
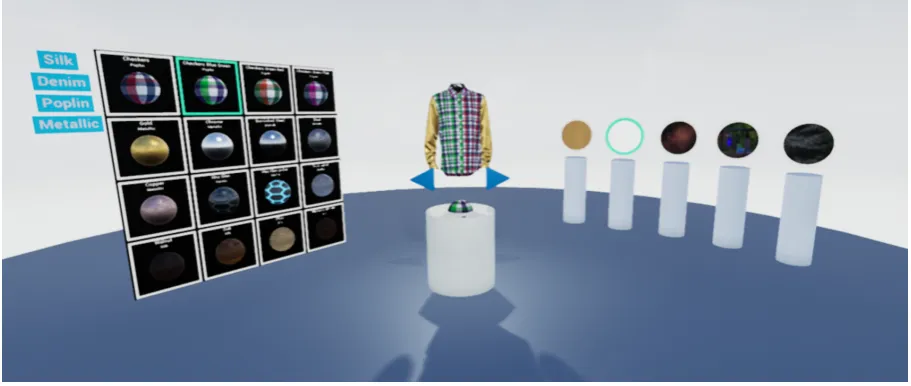
[image:15.595.70.526.283.472.2]The final result of the project can be seen in figure 3. In the middle of the frame is the shirt that the user can edit. On the left side is the library of fabrics that the user can pick from, along with the filters for the library. On the right side are the orbs to change the environment.
Figure 3: An overview of the final application. In the middle is the shirt the user will be editing. To the left the library of available fabrics, and to the right are the orbs that change the environment.
5.1
First iteration
The first iteration was based on the requirements laid out in the specification section. In this iteration most of the ground work was laid down. The application was programmed entirely within Unreal Engine 4.
5.1.1 The VIVE
The hardware used for the VR setup is the HTC VIVE [29]. This VR system allows for room-scale tracking and includes a separate controller for each hand.
Figure 4: Top: The default appearance of the shirt. Bottom: The same shirt, after editing. The central object of the application is the
editable garment. The model used has been supplied by PVH [1] and represents one of their shirts. The model already in-corporates the separate fabric panels that would be cut from fabric when making the real shirt. These can be directly used as the editable panels for the application. The model also includes the textures needed to display it’s fabric, extra panels to display the stitches and models for the buttons.
Figure 4 shows the garment as it ap-pears in the application. The top image is of the default fabrics, with the bottom version being after some editing. Adding a mannequin was considered, but dismissed for two reasons. The garment’s shape would not permit a mannequin to fill the sleeves, and the inside of the collar and shoulders have separate fabric patches that would not be reachable even if a man-nequin only filled the body. The stitching panels included in the garment model are also displayed, as can be seen in a closeup in figure 5. They are however difficult to make out when the user is at a normal dis-tance from the garment, due to the rela-tively small resolution of the VIVE.
The garment was placed on a white pedestal that can be seen in the final ver-sion, see figure 3. It quickly became clear that it mattered which way the garment was facing when the user first entered the application. Even though there is no man-nequin to represent a person, it still feels as if one is encroaching on someone if the gar-ment is facing away from the user. It was made sure that the user always started the application facing the front side of the
Figure 6: Pick ray interaction methods. Left: Hand based pick-ray. The blue line will terminate at the surface of interactable objects, and turn fully opaque. The ball in the users hand will change it’s appearance to the fabric the user has selected. Middle and right: HMD based pick-ray. The crosshair indicates the object being looked-at. The circular progress bar indicates the time until the object is “clicked”. The HUD color shown on the left was discarded because of contrast issues. The HUD color shown on the right is the final color used in the application.
but originating from the head. The mode is not changeable by the user in VR. During user tests the interaction mode was switched by the supervisor of the test.
Figure 5: A closeup of the collar. At this dis-tance the stitches are vis-ible. At larger distances they become quickly indis-tinguishable.
Hand-based interaction – A blue beam was used for the visualization of the hand-based pick-ray, as can be seen in figure 6. Originally, this beam would only appear when the user aimed at an interactable object. However, it became quickly apparent that it is hard to know where one is pointing if there is no beam. The beam is therefore always visible, and continues right through anything that is not interactable. When the user points at something interactable, the beam cuts off at the impact point, and turns bright blue to signify something can be done here. For a visual of this see any of the images in figure 7The user can confirm an interaction by pushing the trigger button on the controller. The ball that is visible in the hand will change it’s appearance to show the currently selected fabric.
Along with the change in appearance, the controller will also give a short haptic pulse to indicate to the user they now hover over an interactable. The jolt is short enough as to not distract the user, but sharp enough for the user to be aware of it’s presence. This should allow the user to “feel” the interactables, even if the user is looking in a different direction.
Figure 7: The two highlighting mechanisms.
Top: Cilinder highlight obscuring and tinting the hovered item. Middle: Outline highlight.
Bottom left: Outline works even with com-plex shapes. Bottom right: Outline draws on top of everything. Allowing the user to judge the shape of the hovered item even if it is partially obscured.
Head-based interaction – The head based interaction cannot use a beam, as it is rendered perpendicular to the users vision and is therefore invisible. Instead a crosshair was used that minimally ob-structs the users vision, as can be seen in figure 6. Because the interaction is sup-posed to be for headset-only VR systems, the user has no controllers to click to con-firm their selection. Instead, the beam will “click” an object if the user looks at it for a certain amount of time. To make the tim-ing clear, a circular progress bar was added that slowly filled up. At first, this bar ap-peared immediately when the user looked at something interactable. This however resulted in an annoying flickering when the user quickly moved their gaze over several objects at one. To remedy this, a grace timer was added before the circle appears. The grace time is 0.25 seconds. After that it takes 1.5 seconds to “click”.
The first version of the HUD was blue, see the middle picture of figure6. The color was quickly changed to orange however as it became apparent that the blue caused contrast issues with the buttons and the highlighting mechanism outlined in the fol-lowing section.
Additionally, the original version hov-ered at a distance of 1 meter from the users face. A quick test showed this caused se-vere eye strain when trying to select any-thing that was not at the exact same
dis-tance as the HUD. To remedy this, the HUD will stick to the surface of any object hit by the pick-ray, which makes their focus distances the same. The HUD will also scale itself so that it always has the same apparent size, regardless of it’s distance to the user.
5.1.4 Outlining
It is important for the user to know whether an object they are hovering over is interactable or not. Figure7shows the highlighting mechanism that was implemented for this purpose. To keep things consistent, every single interactable in the application uses this system.
given that the whole point of the application is to change and visualize fabrics. This version was therefore quickly discarded.
The system that is implemented in the final version draws an outline around the outer edges of the hovered object. Figure 7 shows that this system allows for the highlighting of complex shapes, such as the sleeve of the garment. Because it is an outline it does not change the appearance of the fabrics. And works even in crowded areas. It is drawn above everything else, as can be seen in the lower right of figure 7. This allows the user to judge the size and shape of a fabric panel even if it is partially obscured.
5.1.5 Fabric library
Figure 8: The fabric library as it appears in the application. The swatch outlined in green is the one currently selected. The outline in the first iteration was blue, but this wasn’t distinct enough in color from the hover highlighting for it to be clear.
Figure 8 shows the fabric library the user uses to pick the fabric they want to use. The library is 2 meters tall to allow for easy judgment of the fabrics. Several dif-ferent shapes were considered for the fabric swatches. Flat planes and cubes only allow the light to hit the fabric from a few angles, making it difficult to judge what the fab-ric would look like from a different angle. To make this easier, balls were chosen as the display shape. Additionally a spotlight was added to the library to make sure the fabrics had consistent lighting.
The text above each fabric shows it’s name, and the type of fabric it is. The but-tons on the left hand can be toggled and will filter the fabrics based on their types. In the first iteration the border around the swatch turned light blue to show that a fab-ric was selected.
The fabric library and the garment are placed facing each other, with the user in between. This so that the user can easily reach both interactables.
5.1.6 User test
The first short test was performed by the supervisor of the project, along with another bachelor student. The feedback was free-form: The subjects were asked to try out the application with both modes of interactions and made comments as they went.
[image:19.595.302.521.254.437.2]The head based interaction was perceived as slow. Moreover, it was also difficult to look at the garment without accidentally “clicking” and changing the fabric. Some sort of toggle switch was suggested to allow the user to look at something without clicking it. The users missed some kind of feedback about which fabric was selected. They could only get this information while looking at the fabric library, and not while looking at the shirt.
Interface placement – The relative placement of the fabric library and the shirt was perceived as being suboptimal. This because the users needed to turn 180 degrees between the library and the garment. Additionally the placement of the user in between both was described as feeling cramped.
Additionally it was found that the buttons for turning the garment were not always easily accessible. When the user walked halfway around the garment, the buttons would be on the other side. To then gain access to the buttons again the user would need to walk back around the garment, making the whole point of the turning buttons moot.
5.2
Second iteration
The second iteration implements several changes based on the result of the user test.
5.2.1 Interaction
Wireless mouse interaction – The perceived slowness of the head-based interaction could potentially be solved by shortening the time before it clicks. However, this could result in more accidental clicks. A button to enable or disable the editing would solve accidental clicking while viewing, because it would disable clicking altogether. But it wouldn’t help when editing, which is where the slowness is felt, and where accidental activations would happen.
[image:21.595.343.523.397.557.2]In the end it was decided to leave this interaction mode as-is for future user tests. Instead an additional interaction mode was added that was a hybrid between the hand-and head-based modes. This mode still used the head-based pick-ray, but instead of automatically clicking after a certain time, the user was given a wireless mouse to click with. This way the user can look at anything as long as they want to without accidentally activating anything. When they do want to interact this is immediate, as they can click when they decide to. The HUD was left intact, except for removing the progress bar, which was no longer needed.
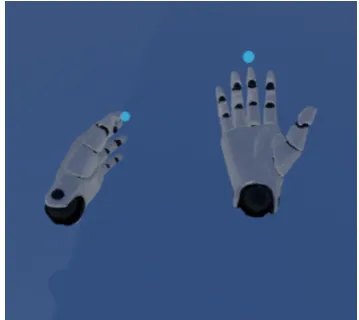
Figure 9: The users hands as they appear in the touch interaction. The blue orbs are the actual inter-action mediums. In the second it-eration these were about twice as large as they are depicted here, but they have been scaled down after the tests.
Touch interaction – This interaction mode does not have it’s origins in the feedback of the user tests. However it was considered prudent to test whether the pick-ray is indeed the best interaction mode for this kind of application. To this end a more physical interaction mode was implemented. In this mode the user has two orbs attached to their hands, as seen in 9. These orbs allow the same interac-tion as the pick-rays, including the haptic feedback, but instead of pointing and clicking, the user has to touch an interactable and then click. It was decided to still have the user click to confirm their selection, instead of just touching to be sufficient. This be-cause touch-only would allow users to accidentally activate objects that are not in their field of vision, the haptics will tell them when they hit it, but then they would already have interacted. Additionally the garment has several panels that are close to each other, which would make it hard to avoid acciden-tal activation in a touch-to-activate system. We did suspect that the teleportation will be necessary in this mode.
Fabric selection feedback – The feedback orb that floated in the hand was removed, because it
garment, so that the user can see their selected fabric in the same view as the garment they are going to apply it to.
5.2.2 Interface placement
To make the application feel less cramped, and to make interaction easier, the fabric library was rotated 90 degrees and moved back a bit. In this iteration the fabric library will be to the left of the users spawn position, with the garment directly in front of them. A change was made to make the buttons for turning the garment always available. Instead of being stationary, they will now always turn around the garment pedestal to face the user. This way, no matter where the user is, they will always be able to reach the buttons.
The rotation of the buttons had to be disabled in the touch-based interaction. Due to technical issues the system used to rotate the buttons made them transparent to the overlap detection used in that interaction mode.
5.2.3 Additional suggestions
An attempt was made to implement the suggested “wearing” system, as it could be beneficial to understanding the appearance of a garment if one can see it on themselves. However, it was quickly discovered that this is a big feature to implement. To make it look ok, the garment will have to be positioned somewhere underneath the users head, and follow the hands in a somewhat natural manner. This is further complicated by the fact that the garment model was not intended to be used in such a way. To do this properly one would have to use the users hands and head to figure out where their arms and body are located. Some VR games do this well, but this is not within the scope of this research.
The idea to change the stitching on the garment was not implemented, as it is outside of the intended scope of the application.
5.2.4 User test
The second user test was performed by representatives from HECLA [30]. The format was the same as the first user test.
Interaction – The hand-based pick-ray interaction was again felt to be intuitive to use. The haptics were thought to be useful and clear in their meaning. It was proposed to allow the user to select a different fabric with each hand.
The touch interaction was determined to be less intuitive than the hand-based inter-action. The feeling was that a selected fabric orb should stick to the hand that selected it, literally grabbing the orb. Additionally the fabric library was felt to be too big for use in this mode. The teleportation was indeed needed to reach both the fabric library and the garment.
that in both cases one has a device in their hands, but the hand-based interaction felt more intuitive.
Fabric selection feedback – The users did not specifically comment on the feedback orb that was added in the second iteration. It was observed however that it was clear in all the interaction modes which fabric was currently selected. In the third user test this will be more specifically asked.
Interface placement – The placement of the fabric library was still not optimal. The users expressed the desire to see the fabric library and the garment in one view. This to compare the fabrics in the library with the current state of the garment, so that they could make a better decision about which fabric to add. The default position of the user did not allow for this, so the users would have to teleport to a spot with a better view.
The fact that the rotation buttons always face the user was observed to be useful. Especially because the users deviated from the default standing location. Had the buttons not faced the user, they would not have been able to reach them. Especially because the desired standing location would have the buttons at almost 90 degrees to the user, which would make selecting these hard.
Additional suggestions – During the test it was brought up that designers make mood boards or collages to base their design on. It was proposed that they might want to bring their images into VR for reference. Additionally an option to change the entire environment was proposed.
Multi-user editing was brought up. The idea was to have multiple designers work on the same garment simultaneously. They could then discuss the design from the same building, or be all the way across the planet. This could also be used for brainstorming, as it would allow designers to bring across their ideas very clearly compared to if they had to sketch it out on paper or a whiteboard.
5.3
Third iteration
5.3.1 Interaction
Two suggestions were made: Selecting one fabric per hand, in the hand-based pick-ray mode. And having the fabrics be grabbable in the touch-based interaction mode. The current implementation of the application assumes only a single fabric can be selected at the same time. Allowing each interaction to have a different way of fabric selection will require a relatively large rewrite. Additionally it is desired to keep the interface the same between the different interaction modes, to be able to more accurately judge the interface and the interaction mode separately from each other. For this reason the double selection has not been implemented. However, it might be an interesting feature for future research.
5.3.2 Environment switching
Between the suggestions of adding images or changing the environment, the latter was the one we suspected would have the highest impact. It would set the scene for the garment to be worn in and at the same time display the power of immersion.
Figure 10: Orbs used to select a different enviroment. The orbs use the same material as the skysphre, causing them to be a “window” into the other environment. The green border shows the environment that is currently selected.
orb uses the material that will be applied to the sky when it would be selected. This has the interesting side-effect of making the orbs look like they are a hole in the sky into the other environment. The green border shows which environment is currently selected. This was added in the next iteration after it turned out it wasn’t clear which of the orbs was already selected. The environments available are from left to right: A wooden lounge, the default sky, a spacescape, a panorama of Shanghai, and a woodland scene. The environments were picked so that there would be a diverse set available.
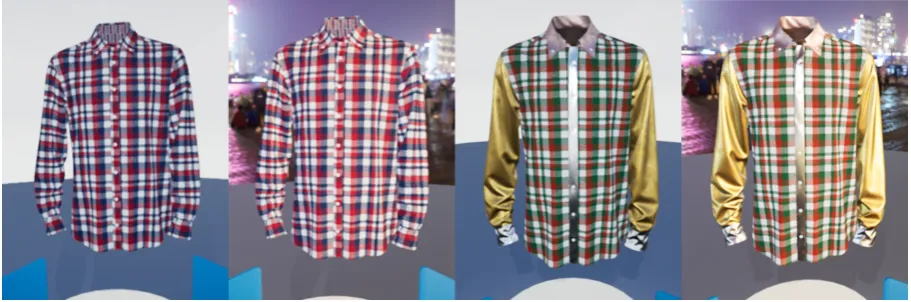
Apart from changing the appearance of the entire sky, the environments also affect the ambient lighting. Figure 11 shows this well. Both the default shirt and an edited one are depicted with the sky lighting, as well as in Shanghai. The difference in lighting has a drastic effect on the appearance of the fabrics. This should allow the user to better judge how light affects the appearance of the garment, and how it will look when worn in a different location.
5.3.3 Interface placement
Figure 11: The shirt as seen in different environments. The left two panels show the default design and the right two panels show the effect of the enviroment on an edited shirt. The change is especially noticable on the more reflective fabrics, like the golden sleeves.
5.3.4 Multi-user editing
5.4
Final user test
5.4.1 Method
The final user test is a more extensive one than the earlier two. Six people, five of which students, have participated in the test. The participants used the application for about twenty minutes. While they were using the application, a semi-structured interview was performed. The users were asked about several pre-determined topics, and were encouraged to voice any other remarks, questions or suggestions they might have. The topics that were asked about can be found in appendix A. During the test the participants got to use all four interaction modes sequentially, and were asked which had their preference and why. For the head-based interaction methods they put down the controllers.
5.4.2 The garment
Overall, the participants found the visuals of the garment to be quite realistic. They said they could get a good idea of how the garment would look like in real life by looking at the virtual model. The two spotlights aimed at the garment were perceived as useful, especially when a slightly darker environment was selected.
One participant commented that having a physics engine for the fabrics would be a nice feature, because a real garment would fold differently for different fabrics. He however correctly mentioned that this would be a complex and computationally intensive task, and that running it next to a VR application would most likely strain the computer.
Garment panels – The garment panels were overall easy to understand. All par-ticipants perceived the blue outlining as a useful and intuitive way of seeing where a particular garment panel ended and what shape it had.
However, several issues were encountered as well. The first issue was that most par-ticipants had trouble noticing the smaller garment panels. Especially the little strips of fabric on the sides of the cuffs were hard to find. One participant proposed a button that would highlight all the available garment panels at once. Another participant proposed to have large panels somehow show that they have smaller panels attached to them, maybe by subtly highlighting them as well when the ‘parent’ panel gets hovered.
The second issue was that it wasn’t clear which panels had two sides, and which didn’t. When hovering over the outside of the collar, it appears as if applying a fabric here will also apply it to the inside. Something which is not the case, because the inside of the collar is a separate piece of fabric. Additionally, because the inside collar is round and at the same time one-sided, it didn’t fully highlight when a participant hovered over it. The sides facing the participant would light up, but the areas which curved round the collar would not. This made it quite confusing to ascertain which fabric panel was where in the collar region.
them, they quickly understood what the buttons did. The participants mostly used the turning buttons to view a different side of the garment, instead of walking or teleporting around it.
One issue that got mentioned was that the buttons were located quite low. When the participants were editing the garment, the buttons tended to be either on the lower end of their viewpoint, or out of view entirely. This might be the reason why the participants didn’t notice the buttons on their own, as they simply didn’t see them. The positioning issue was especially noticeable with the head-based interaction methods, where the users had to look down at a relatively uncomfortable angle to reach the buttons.
A few participants asked about other transformations for the garment. One user proposed the ability to raise or lower the garment, for when one wants to work on the bottom rim. Another proposal was to be able to scale the garment, for easier editing of the small details.
5.4.3 Interaction
Workflow – The overall workflow of the application was easy to understand. Some users had to be told to select a fabric and then apply it to the garment, while others found it out themselves though trial and error. After that they understood the idea that a fabric stayed selected until another was picked.
During this test the suggestion was once again made to allow for the editing of the fabric panels themselves. In addition a participant asked about changing the materials on the garment buttons.
One user was changing the fabric of the whole garment to test the effect of the en-vironment. They proposed a button to quickly set the whole garment to the selected fabric. This could be useful for when the designer wants a different “default” fabric to start working from.
Hand-based pick-ray – As expected, the hand-based pick-ray was felt to be in-tuitive. After being told what they could do in the application, they understood this interaction method after one or two tries. How difficult they perceived aiming at an in-teractable to be, depended on the size of the object and the distance. The fabric library, or the larger garment panels were no problem. Clicking the smaller panels concentrated in the neck of the garment posed a slight challenge when attempted from a distance, but most participants managed it. This is most likely because keeping one’s hand that stable without physical support is hard. One participant who was familiar with VR mentioned having the same problem in other applications that used pick-rays for their interaction. When small scale interaction was needed, users simply moved their hands closer to the garment.
The haptics were perceived as useful and intuitive to understand. One participant mentioned that she liked the redundancy in the feedback, with both the blue outline and the haptics indicating an interactable.
One user asked whether each hand could have a different fabric selected. They didn’t see the use of having a second controller if they only could select one fabric at a time, but thought the single selection to be good for the applications purpose.
they have to walk or teleport towards the object that they want to interact with. When standing next to the fabric library a period of confusion follows where the participants try to figure out how to select a fabric. It doesn’t help that the fabric preview orbs only generate collision events when the interaction orb hovers over the outer shell. This caused part of the confusion, as pushing the selection orb entirely into the preview orb would cause the selection outline to disappear. The same issue happens with the environment selection orbs.
An additional problem was that the bottom few fabric swatches were hard to reach. The participant that tried this had to reach almost to the floor to get to them.
In comparison, the garment panels were easier to select. Especially the smaller panels were more easily selected using this method of interaction than with the pick-ray modes. According to one participant, this was because the selection orb was very close to the hand and therefore easier to hold steady than a long beam. The selection orb was determined to be too large however, as trying to select certain fabric panels in the collar would always catch at least one other fabric panel in the selection, which made the selection system confused about which one to highlight.
Part of the reason this interaction mode was unintuitive is because of the teleportation system. It takes a while for the participants to get to grips with the system of: “Hold thumbpad to make the teleport arc appear -¿ aim the arc at the ground where one wants to teleport -¿ release the thumbpad to confirm the teleport.” After understanding that, there is the option of turning ones view while teleporting, by moving the thumb over the round thumbpad. However, half of the time this rotation didn’t seem to work, which made the preview of the teleport arc and the actual location not align, which in turn made things even more confusing.
Most participants, when explained that pressing the thumb onto the thumbpad will start the teleportation, would promptly click the thumbpad instead of holding it. This causes them to teleport to the location they were pointing to at the moment, completely disorienting them in the process. This misunderstanding is likely in a large part due to the wording of the explanation.
Head-based pick-ray – The interaction using the head-based pick-ray was intuitive and, as expected, perceived to be slow. All participants got how the interaction worked within a few seconds. Interesting to note is that most of the participants moved their hands into a steady position after switching to this interaction mode. Some cupped their hands in front of them, others stood akimbo, but none had their hands hanging by their sides.
The participants found that the meaning of the HUD was clear. The crosshair was determined to be subtle, but still easily visible over most backgrounds. The orange color only failed to stand out over some of the more orange fabrics with wood patterns. The participant who mentioned this went on to say that it was still clear that the crosshair was there, as it was the only thing turning in sync with their head. The circular progress bar was also easily understood. None of the participants mentioned anything about the bar flickering, so it appears that the grace time before it appears works out well.
earlier, the turning buttons could be placed higher as neck-strain was mentioned several times. Having to look far up or down was mentioned as being undesirable. To this end it was also suggested to move the fabric library up for this interaction method, so that it’s center was at the average users eye height.
Selecting small garment panels was said to be relatively hard, as it is difficult to keep ones head steady for long. One user made a suggestion of allowing larger head movements after the timer reached one quarter of the way. That way, one would not need to hold ones head as steady, while still keeping the option of dismissing the interaction by turning the head away a larger distance.
Wireless mouse interaction – This interaction method was judged to be some-where in between the head-only interaction and the hand-based pick-rays. The speed was noticeably faster than the head-only integration method, and this method was also per-ceived as being more precise. Smaller garment panels were easier to hit, although several participants missed a panel by clicking when their head had just bobbed the crosshair next to the panel.
The participants understood this mode of interaction really quickly, but this is most likely due to them having used the head-only interaction beforehand. However, one par-ticipant who wasn’t very used to VR mentioned that this was the only interaction method that they would have immediately understood.
Difficulty in coordinating their head with their hand was mentioned by several par-ticipants. This interaction method was perceived as having to do two things at once: controlling ones head, and clicking with the hand at the right time. The coordination difficulty is likely what caused the participants to click panels they didn’t intend to click, and to miss the panels they wanted to click.
One participant brought up that it is not possible to have both the fabric library and the garment in one view, while selecting a fabric. This is because they have to move their head away to select. This is also an issue with the head-only interaction.
The participants preferences – When asked which interaction method they pre-ferred, most participants chose for the hand-based pick-ray. Reasons given where that they felt this was the most convenient and or intuitive interaction method.
Two participants preferred the based interaction methods. One choose the head-only interaction, because they found it was the most relaxed method. The other chose the head + mouse interaction, because they would have figured that interaction out on their own, partially because they were already accustomed to how a mouse works.
One hybrid interaction mode was also proposed. The idea was to have one hand have a pick-ray and the other a touch-orb. This way the ray could be used to select large or far away objects, and the orb could be used for selecting small things close by.
5.4.4 Fabric library
The fabric library seems to be quite intuitive to use. Most users understood how it functioned right after they selected their first fabric.
fact that the outline of a selected fabric swatch is blue, which is the same color as the highlighting for hovered interactables.
The orbs that displayed the fabrics were said to be large enough. One participant remarked that it was a good idea to use orbs instead of flat images, because that way the user can see the fabrics head-on no matter where they are standing. The black background of the library was said work quite well. Except in the case of the darker fabrics, such as the darker ‘wood‘ fabrics, which are harder to make out.
A common remark is that the fabric name and type are unreadable, even at quite small distances. However none of the participants found this to be hampering their interaction in any way. The participants appeared not to need the names or types of the fabrics and judged them on their visual appearance alone. However, a couple of fabrics were said to appear different on the garment than in the library, as the scale was different. These needed to be put on the garment to be judged visually.
The filter buttons are less intuitive than the rest of the library. Their function is not immediately clear to most users. Even after having switched several of them, some participants do not see exactly what the buttons do. They notice some fabrics disappear or re-appear when the button is clicked, but it does not seem to be clear when a button is on or off. One participant suggested using a traditional checkbox with text, rather than the current brightness changing buttons. Some participants asked whether there were scrolling buttons for the fabrics. This comment was prompted because bottommost fabric swatch clipped the ground, which made it’s preview orb invisible.
The spotlight aimed at the fabric library was seen as useful, especially in the darker environments such as the spacescape and the nature scene. When some filters were disabled one participant noted that there were weird circular shadows on the ground behind the fabric library. They stated that these shadows were confusing because this way it appeared that the global light was constantly coming from behind, which they observed to be false in most environments. As UI elements don’t cast shadows, and most of the fabric library is made up of these elements. It is suspected that the orbs used to display the fabrics are the culprits for these shadows.
5.4.5 Environment switching
The ability to change the environment was perceived as a flashy, and useful feature. Upon first selecting a different environment several users made a quiet cry of surprise and slight amazement. Along the lines of: “ooooh!”, “woooow!” or “eey!”. The participants then proceeded to try all the environments. After a while they settled on one which they tended to keep during the rest of the test. Shanghai seemed to be the most chosen environment. One participant mentioned choosing it because of it’s nice lighting. Another had at that moment created a very metallic looking garment, and thought it fit into the city scene.
The fact that changing the environment also changed the ambient lighting was at first not noticed. But after it was pointed out the change was found to be quite dramatic. The participants thought the lighting and the reflections to be realistic looking, and would be helpful when judging how a garment would look in different lighting conditions.
a city, but gives strange results for scenes with objects that should appear as if they are next to the viewer.
The environment switching orbs weren’t entirely clear. The participants could not see what the scene depicted before they saw the complete scene. One participant suggested changing the picture in the orbs to a snapshot of something characteristic to that scene, like the Shanghai tower for Shanghai. It was also not clear which of the environment orbs was currently selected. One user’s first choice of the orbs was the one they were currently in, which was quite confusing when clicking it did nothing.
5.4.6 Relative interface placement
It appears that this time, the relative placement of the fabric library and the garment was right. None of the participants had any issues with the default position the user spawns in. They did walk a bit closer to the garment when trying to select small garment panels, but apart from that they remained stationary. The fact that the fabric library and the garment could be seen in the same view was perceived as useful, to compare potential fabrics to the ones already on the garment. The only time the teleportation functionality was needed was with the touch-based interaction method.
The environment changing orbs were also easily reachable. Having these in the same view as the garment was less of a priority. However, this view was used by most partici-pants when they tried out the effect of the environment on the reflections on the garment. So it seems to be beneficial to have the environment orbs at hand where they are now.
A possible improvement became clear when switching from the touch-based interaction to one of the pick-ray based methods. It was not clear where the default user position was, so how to teleport to the sweet spot was not immediately obvious to the participants. It might be a good idea to have some sort of indication on the ground that shows that this is a good spot to stand in. Maybe even snap the teleport arc to it when it comes close.
5.4.7 Opinions on professional use
Most of the participants mentioned not being very versed in how professional designers work. Therefore this is their best guess.
Overall the opinion was that this application, or one like it, would be useful for pro-fessional designers. When it includes a particular companies library of garments, fabrics and specific environments, it would be a good tool to get a feel for how a garment would look in real life. For the designers, and anyone else that needs to know what the garment is going to look like.
The participants thought the environment switching would be a useful feature for professional designers. Who would be able to quickly see how their design would look in different lighting conditions. Extra environments that were proposed to help with this were: A clothing store, to see how the garment would look when being sold. And a catwalk, for previewing the garment in a fashion show.
5.5
Final changes
Due to constraints in the projects scope, only relatively easy to implement changes have been made in the final iteration.
The orbs used in the touch-interaction were found to be too big, so they have been scaled down to about half the size. The orbs in figure 9are the final size.
5.5.1 Interface changes
The fabric library was casting strange circular shadows. The culprit was indeed the fabric preview orb, which has had its ‘cast shadow’ setting set to ‘false’. This removes the shadows.
According to the user test, the rotation arrows have been moved slightly higher so they are more easily reachable.
Both the fabric swatches and the environment orbs were difficult to select in the touch-based interaction. This is fixed by adding a filled collision sphere into both kinds of orbs. This way, all of the orb generates collision events, in contrast to only the outer shell.
It wasn’t quite clear when looking at the fabric library, which fabric was selected. It also wasn’t clear which environment orb was selected. The borders of both interactables now turn light green when selected, to make the color distinct from the highlighting outline’s blue.
6
Discussion and future work
The goal of the research was to built an intuitive VR interface that allows designers to design a 3D garment. From the results of the last user test we can determine that this goal has indeed been achieved. The users could quickly grasp the possible actions they could take and how to preform them. The test participants were also of the opinion that the application would indeed be useful for professional designers. Especially if all the fabrics and garments of their particular company were available.
The garment and the fabrics presented were found to be quite realistic. The users were able to get a good idea of how the garment would look in real life. The participants said that the way the ambient light affected the garment was realistic. It is interesting to note that the users didn’t notice that a change in environment affected the light on the garment, until it was pointed out to them. This further supports the claim that the garment looks realistic, because the users would most likely have noticed something was off if the way the light hit it was not realistic.
The state of the art looked at intuitive ways of VR interaction, and it was suspected that pick-ray interaction would be the most intuitive. The pick-ray interactions were indeed found to be more intuitive than the touch-based interaction. Of the three pick-ray alternatives, most users preferred the hand-based interaction. How intuitive an interaction method feels appears to be influenced by how ‘in control’ the user feels. The head-based pick-ray methods and the touch-head-based methods both had, what I’d call “interaction accidents” happen. Sometimes a user would try to select one object, but accidentally select the object right next to it. Or a user would try to select an object, fail for a while, and then suddenly succeed in selecting the object without actually knowing why their fourth attempt worked. This feeling of having something happen, or not happen, without you knowing why, quickly makes an interaction method feel unintuitive and clumsy.
Even though pick-ray interaction was found to be more intuitive, there is no reason to write off the touch-based method. The problems that were perceived with this interaction method can mostly be explained by an incomparability with the interface. It is suspected that an this type of interaction would fare better with an interface that was specifically designed to only support this interaction. To give an example, the fabric library could be made much smaller, and placed in the left hand of the user. This would allow the user to access it without having to teleportation around, or reach down for the bottom swatches. This would be an interesting topic for potential future research to investigate.
Something that turned out more important than expected is the positioning of the interface. In VR one has six degrees of freedom when placing the interface. It turns out that this extra freedom makes it quite easy to place something in the wrong spot. For example: the fabric library had to be drastically moved three times before it was in a spot where it was usable from the users starting position. Another example are the turning buttons. When they didn’t turn towards the user, they were pretty much useless. Even then, they turned out to be placed too low, which caused the users to simply look over them and not notice their existence.
A recommendation for future research is to test the application with actual designers. Preferably from multiple clothing companies, because each company could have a different work flow. Another interesting option would be to implement other editing capabilities that designers might want to have. Examples could be the addition and edition of the buttons, or adding decals and trims. The challenge is then to keep the interface simple and easy to understand, as adding extra features can quickly bloat a programs interface. A feature that was suggested by the participants and that would raise the realism of the application, is the real time simulation of the fabrics. Having the shirt update how it folds and buckles when the user changes a panel would allow designers to understand the properties of the fabrics, without having to read it from a fact sheet somewhere. As good fabric simulations are currently computationally intensive, it will likely be a challenge to run the VR application and the background simulations at the same time. Compromises in simulation quality might have to be made.
7
Conclusion
References
[1] PVH. (2018). Pvh, [Online]. Available:https://www.pvh.com/(visited on 04/11/2018). [2] C-Design. (2018). C-design, [Online]. Available: https://www.cdesignfashion.
com/ (visited on 04/15/2018).
[3] TUKATECH. (2018). Tuka3d, [Online]. Available: https://www.tukatech.com/ 3D-fashion-design-software/TUKA3D (visited on 04/15/2018).
[4] Browzwear. (2018). Vstitcher - 3d fashion development, [Online]. Available:https: //browzwear.com/products/v-stitcher/ (visited on 04/15/2018).
[5] Inition. (2014). Topshop: Virtual reality catwalk show, [Online]. Available: https: //www.inition.co.uk/case_study/virtual-reality-catwalk-show-topshop/ (visited on 04/15/2018).
[6] B. Lang. (2014). Virtual reality ventures wants to revolutionize the fashion industry with vr, [Online]. Available: https : / / www . roadtovr . com / virtual reality -venture-revolutionize-fashion-industry-vr/ (visited on 04/15/2018).
[7] Zugara. (2009). Zugara’s virtual dressing room products, [Online]. Available:http: //zugara.com/virtual-dressing-room-technology (visited on 04/15/2018). [8] Spotless. (2018). Try before you buy - virtual fitting online, [Online]. Available:
https : / / www . spotless . co . uk / insights / try - before - you - buy/ (visited on 04/15/2018).
[9] A. Vitali, L. D’Amico, and C. Rizzi,Virtual tailor for garment design, English, ser. Lecture Notes in Computer Science (including subseries Lecture Notes in Artificial Intelligence and Lecture Notes in Bioinformatics). 2016, vol. 9740, pp. 653–661. [Online]. Available: www.scopus.com.
[10] A. Vitali and C. Rizzi, “A virtual environment to emulate tailor’s work,” English,
Computer-Aided Design and Applications, vol. 14, no. 5, pp. 671–679, 2017, Cited By :4. [Online]. Available: www.scopus.com.
[11] S. Inui, Y. Mesuda, and Y. Horiba, A virtual cloth manipulation system for clothing design, English, ser. Communications in Computer and Information Science. 2015, vol. 528, pp. 185–189. [Online]. Available: www.scopus.com.
[12] M. Zhang, L. Lin, Z. Pan, and N. Xiang, “Topology-independent 3d garment fitting for virtual clothing,” English, Multimedia Tools and Applications, vol. 74, no. 9, pp. 3137–3153, 2015, Cited By :3. [Online]. Available: www.scopus.com.
[13] P. Decaudin, D. Julius, J. Wither, L. Boissieux, A. Sheffer, and M. .-.-. Cani, “Vir-tual garments: A fully geometric approach for clothing design,” English, Computer Graphics Forum, vol. 25, no. 3, pp. 625–634, 2006, Cited By :106. [Online]. Available: www.scopus.com.
[16] Google. (2018). Tiltbrush, [Online]. Available: https : / / www . tiltbrush . com/ (visited on 04/15/2018).
[17] Facebook. (2018). Quill, [Online]. Available: https://quill.fb.com/ (visited on 04/15/2018).
[18] NVRMIND. (2018). Animvr, [Online]. Available: http : / / nvrmind . io / animvr (visited on 04/15/2018).
[19] Google. (2018). Introducing blocks, [Online]. Available: https://vr.google.com/ blocks/ (visited on 04/15/2018).
[20] G. Sketch. (2018). Gravity sketch, [Online]. Available:https://www.gravitysketch. com/ (visited on 04/15/2018).
[21] Oculus. (2018). Oculus medium, [Online]. Available: https://www.oculus.com/ medium/ (visited on 04/15/2018).
[22] J. Jonkind. (2016). The amsterdam vr company, [Online]. Available: http : / / www . amsterdamvrcompany . com / en / virtual - reality - meets - art/ (visited on 04/15/2018).
[23] I. POUPYREV and T. ICHIKAWA, “Manipulating objects in virtual worlds: Cat-egorization and empirical evaluation of interaction techniques,” Journal of Visual Languages & Computing, vol. 10, no. 1, pp. 19–35, 1999, issn: 1045-926X. doi: https://doi.org/10.1006/jvlc.1998.0112. [Online]. Available: http://www. sciencedirect.com/science/article/pii/S1045926X98901124.
[24] J. Jung, H. Park, D. Hwang, M. Son, D. Beck, J. Park, and W. Park, “A re-view on interaction techniques in virtual environments,” Proceedings of the 2014 International Conference on Industrial Engineering and Operations Management, pp. 1582–1590, 2014. [Online]. Available: https : / / www . semanticscholar . org / paper / A - Review - on - Interaction - Techniques - in - Virtual - Jung - Park / 6a75adb0d3d41b59c05a1fb54d940888b873d74c.
[25] F. Argelaguet and C. Andujar, “A survey of 3d object selection techniques for virtual environments,” Computers and Graphics (Pergamon), vol. 37, no. 3, pp. 121–136, May 2013, issn: 00978493.doi:10.1016/j.cag.2012.12.003. [Online]. Available: https://www.sciencedirect.com/science/article/pii/S0097849312001793? via%7B%5C%%7D3Dihub.
[26] S. Gebhardt, S. Pick, F. Leithold, B. Hentschel, and T. Kuhlen, “Extended pie menus for immersive virtual environments,” IEEE Transactions on Visualization and Computer Graphics, vol. 19, no. 4, pp. 644–651, Apr. 2013, issn: 10772626. doi: 10.1109/TVCG.2013.31. [Online]. Available:http://ieeexplore.ieee.org/ document/6479193/.
[27] Adobe. (2018). Adobe illustrator, [Online]. Available: https://www.adobe.com/ nl/products/illustrator.html (visited on 06/04/2018).
[28] ——, (2018). Adobe photoshop, [Online]. Available: https://www.adobe.com/nl/ products/photoshop.html (visited on 06/04/2018).
[29] HTC. (2018). Vive, [Online]. Available: https : / / www . vive . com/ (visited on 06/05/2018).
A
Interview topics
During the final user test the participants were asked to comment on the following topics. The garment.
The fabric-library.
The enviroment switching orbs. Interaction
– Intuitiveness.
– Speed.
– Comfortability.
– Ease of selecting large and small garment pieces.
– Haptics.
– HUD color and contrast.
– Head-based interaction click delay.
– Hover outlines.
– Their prefered interaction method. Feedback on the selected fabric.
Is teleportation needed?
The process of environment switching.
Usefullness and realism of environment switching.
Relative locations of the fabric library, garment and environment orbs. The garment rotation buttons.
The fabric filter buttons.
![Figure 2: 1996 VR Design Studio [14].](https://thumb-us.123doks.com/thumbv2/123dok_us/9716206.472606/9.595.68.525.74.411/figure-vr-design-studio.webp)