Users
Guide
. "
~._---0- _ '._~"",,::._._
The Poqet PC
1MPoqet C~mputer Corp. makes every effort to ensure the accuracy and completeness of this document. However, because our ongoing development efforts are
continually improving the capabilities of our products, we cannot guarantee the accuracy of the contents of this document. We disclaim liability for any changes, errors, or omissions herein.
No part of this document may be reproduced or distributed in any form without the prior written permission of Poqet Computer Corp.
Notice to Users
This equipment has been tested and found to comply with the limits for a Class B comput-ing device, pursuant to Subpart J of Part 15 of FCC Rules. Only computers and
peripher-als (computer input/output devices, terminperipher-als, printers, etc.) certified to comply with the
Class B limits may be attached to this equipment. Operation with noncertified computers or peripherals is likely to result in interference to radio and television reception.
This equipment generates and uses radio frequency energy for its operation and, if not in-stalled and used properly, that is, in strict accordance with the instruction manual, may cause interference to radio and television reception. It has been tested and found to com-ply with the RF emission limits for a Class B computing device, which is intended to
pro-vide reasonable protection against such interference in a residential installation. However,
there is no guarantee that interference will not occur in a particular installation. If this equipment does cause interference to radio or television reception, which can be deter-mined by turning this equipment off and on, the user is encouraged to try to correct the interference by one or more of the following measures:
Move the computing device away from the receiver being interfered with.
Relocate (turn) the computing device with respect to the receiver.
Reorient the receiver's antenna.
Disconnect and remove any I/O cables that are not being used (un terminated I/O cables are a potential source of high RF emission levels).
Note: The I/O cables that interconnect between this device and any peripheral (such as a disk drive, printer, etc.) must be shielded in order for this equipment to
meet Class B emission limits. Further, the Poqet PC Expansion Bus™ is a proprietary connector. Any cable built to be connected to The Poqet PC must
be shielded against RFI.
For additional help, consult your dealer for assistance. You may also find the following publication helpful: How to Identify and Resolve Radio-IV Interference Problems. This booklet is available from the U.S. Government Printing Office, Washington, D.C., 20402 - Stock No. 004--000-000345-4.
Poqet Software License Agreement
By opening this sealed package you are agreeing to be bound by the terms of this agree-ment. If you do not agree to the terms of this agreement, promptly return the unopened package and the accompanying items (including the computer, written materials, and binders or other containers) to the place you obtained them for a full refund.
1. Graut of License. Poqet Computer Corp. grants you the right to use one copy of the Software programs contained on the enclosed discs, if any, (the "Software") on The Poqet PC.
2. Title and Cot)yright. Title and full ownership rights to the Software remain with Poqet and/or other suppliers of the Software. The Software is protected by United States copyright laws and international treaty provisions. Therefore, you must treat the Software like any other copyrighted material (e.g., a book or musical recording) ~ that you may either (a) make one copy of the Software solely for backup or archival purposes, or (b) transfer the Software to a single hard disk provided you keep the original solely for backup or archival purposes. You may not copy the written materials accompanying the Software.
3. Imn. This license is effective until the year 2039 unless terminated by mutual agreement, or by default by you.
4. Other Restrictions. You may not rent or lease the Software, but you may transfer the Software and accompanying written materials on a permanent basis provided you retain no copies and the recipient agrees to the terms of this Agreement. You may not reverse engineer, decompile, or disassemble the Software.
5. Limited Warranty. This Limited Warranty is effective only if you complete and return the enclosed warranty registration card to Poqet.
a. Software Media: Poqet warrants the media containing the Software and
accompanying documentation against physical defects for a period of 90 days from the date of delivery to you.
IN NO EVENT WILL POQET BE LIABLE FOR ANY DAMAGES, INCLUDING ANY LOST PROFITS, LOST SAVINGS OR OTHER
INCIDENTAL OR CONSEQUENTIAL DAMAGES ARISING OUT OF THE USE OR INABILITY TO USE SUCH PRODUCT EVEN IF POQET HAS BEEN ADVISED OF THE POSSIBILITY OF SUCH DAMAGES.
SOFIW ARE PROGRAMS HOWEVER EMBODIED ARE PROVIDED "AS IS" AND POQET MAKES NO WARRANTY OR REPRESENTATION, WHETHER EXPRESSED OR IMPLIED, INCLUDING BUT NOT LIMITED TO THE IMPLIED WARRANTIES OF MERCHANTABILITY AND FITNESS FOR A PARTICULAR PURPOSE. WITH RESPECT TO ANY SOFIW ARE, ITS QUALITY, PERFORMANCE, MERCHANTABLITY, OR FITNESS FOR A PARTICULAR PURPOSE, YOU BEAR THE ENTIRE RISK AS TO QUALITY AND PERFORMANCE. SHOULD THE SOFIW ARE PROGRAMS PROVE DEFECTIVE FOLLOWING PURCHASE AFl'ER THE LIMITED WARRANTY PERIOD, YOU ASSUME THE ENTIRE COST OF ALL NECESSARY
SERVICING OR REPAIR.
This Limited Warranty is exclUSIve and may only modified in writing by Poqet. This warranty gives you specific legal rights which vary from state to state.
6. Claims Procedure. Any claim under this limited Warranty must be submitted to
Poqet at the address below. The Software should be insured, freight prepaid, and securely packaged. You must call for a Return Material Authorization Number (RMA) before shipping any Software, and include this number, a copy of your sales slip, and a description of the problem you are experiencing with the Software.
Poqet Computer Corp. 650 N. Mary Avenue Sunnyvale, CA 94086-2994 Attn: Warranty Service Dept.
Poqet Computer Limited Waterside Drive
Langley Business Park Landley, Berkshire SL3 6EZ England
44-753-580018
a. You acknowledge that the laws and regulations of the United States restrict the export and re-export of commodities and technical data of U.S. origin, including the Software and documentation in any medium. You agree that you will not export or re-export the Software or documentation in any form without the appropriate U.S. and foreign government licenses. You also agree that your obligations pursuant to this section shall survive and continue after any termination or expiration of rights under this Agreement.
8.
u.s.
Goyernment Restricted Riihts. The Software and documentation are provided to the U.S. government with restricted rights. Use, duplication, or disclosure by the Government is subject to restrictions as set forth in subparagraph (c) (1) (ii) of the Rights in Technical Data and Computer Software clause at 52.227-7013.Contractor/manufacturer is Poqet Computer Corp., 650 N. Mary Avenue, Sunnyvale, CA 94086-2994.
a. Use, reproduction or disclosure is subject to restrictions set forth in subparagraph (a) through (d) of the Commercial Computer Software - Restricted Rights clause at 52.227-19 and the limitations set forth in Poqet's standard Software license agreement. Unpublished - rights reserved under the copyright laws of the U.S.
Copyright@ 1989 Poqet Computer Corp.
9. ~. This agreement shall be governed in all respects by the laws of the State of California in as such laws are applied to agreements entered into and to be
performed entirely between California residents.
10. General. YOU ACKNOWLEDGE THAT YOU HA VB READ THIS AGREEMENT, UNDERSTAND IT, AND BY BREAKING THE SEALED PACKAGE AGREE TO BE BOUND BY ITS TERMS AND CONDITIONS. YOU FURTHER AGREE THAT THIS AGREEMENT IS COMPLETE AND EXCLUSIVE STATEMENT OF THE AGREEMENT BETWEEN POQET AND YOU WHICH SUPERSEDES ANY PROPOSAL OR PRIOR AGREEMENT, ORAL OR WRITTEN, AND ANY OTHER COMMUNICATIONS BETWEEN POQET AND YOU RELATING TO THE SUBJECT MATTER OF THIS AGREEMENT, AND THAT YOUR OBLIGATIONS UNDER THIS
Poqet PC'" Feotures
Table of Contents
Preface ... xiii
Chapter 1 Getting Started ... 1
Opening the Case ... 1
Power Supply ... 2
Drive Designators ... 4
Resetting the Poqet PC ... 5
Activating The Poqet PC with the I/O key ... 7
Replacing the Batteries ... 8
Memory Cards ... 9
Caring for Memory Cards ... 16
Chapter 2 Poqet Basics ... 1 7 The Display ... 17
The Indicator Line ... 18
The Keyboard ... 18
POQET Key Combinations ... 20
Other Indicators ... 23
Chapter 3 Using the Expansion Port ... 25
The Expansion Port ... 25
The Null ModemNNA Cable ... 26
Using The Poqet PC Serial Port. ... 28
Chapter 4 Built-in Programs ... 29
Chapter 5 PoqetLin k ... 33
Installing PoqetLink ... 34
Setting up the Virtual Network ... 35
File Transfer: Desktop to Poqet PC ... 37
File Transfer: Poqet PC to Desktop ... 38
Disconnecting ... 39
PoqetLink Basics ... 40
Using PoqetLink ... 42
Menu Summary ... 43
Chapter 6 PoqetTools ... 45
Starting ... 46
Selecting a PoqetTools Program ... 48
Changing Programs ... 49
PoqetTools Commands ... 50
Using the Menus ... 50
Saving PoqetTools Files ... 51
Leaving a Program ... 51
Exiting PoqetTools ... 52
Printing to a Serial Printer ... 52
Chapter 7 PoqetCalc ... .... 53
Configuring PoqetCalc ... 54
Performing a Calculation ... 54
Clearing an Entry ... 55
The Register ... 55
Menu Summary ... 56
Chapter 8 PoqetWrlte ... 59
Selecting Files ... 59
Editing Text ... 61
Chapter 9 PoqetSchedule ... 67
Basics ... 67
Starting ... 68
Locating Appointments ... 69
Using the Appointment Book ... 70
Setting an Alarm ... 72
To Do Lists ... 73
Reducing PoqetSchedule File Size ... 74
Loading PoqetSchedule Files ... 74
Menu Summary ... 75
Chapter 10 PoqetAddress ... 77
Starting ... 77
Searching PoqetAddress Contents ... 79
Updating the Address Book ... 81
Deleting an Address Book ... 81
Menu Summary ... 82
Chapter 11 PoqetTa I k ... 85
Starting ... 86
Accessing PoqetTalk ... 87
Sending a File ... 89
Receiving a File ... 91
Menu Summary ... 93
Appendix A Care and Maintenance ... 99
Battery Life ... 99
Booting ... 100
Protecting The Poqet PC ... 100
Appendix BUsing MS·DOS with The Poqet PC ... 1 01
File Management Basics ... 101 Booting The Poqet PC ... 103 The DISKCOPY command ... 105
Appendix C Troubleshootlng ... 1 07
Preface
Congratulations on your purchase of The Poqet PC™ computer. The Poqet PC is a uniquely small, lightweight, and powerful IBM PCGP XT -compatible computer complete with MS-DOSGP 3.30 and OW -BasicGP. While other portables are merely "luggable," The Poqet PC weighs only one pound and easily fits in a coat pocket or handbag.
In addition to innovations in weight and size, your Poqet PC also frees you from carrying bulky battery packs or restrictive power cords. The Poqet PC is completely powered by two AA batteries. Using advanced technology such as the unique Power Management software, these batteries will provide several weeks of computing use. Because AA batteries are available worldwide, replacing batteries is as simple as visiting your local grocery store. And, while you're changing the batteries, power is temporarily maintained, so you don't lose data.
Unlike other computers, The Poqet PC has continuous memory. So even if you turn it off, turning it on again instantly returns you to the program you were working in. You don't have to reboot or reenter any program commands.
The Poqet PC uses memory cards for data storage. Because these durable cards have no moving parts, The Poqet PC can access memory card data thousands of times faster than a traditional PC can access a floppy disk.
You'll enjoy being able to see either text or graphics clearly under a wide variety of lighting conditions, thanks to The Poqet PC's use of double supertwist technology in the display. The Poqet PC also provides screen indicators to keep you informed about the status of many of the
To assist you with the realities of day-to-day living, the built-in PoqetTools programs help you schedule appointments, perform calculations, write letters, keep track of important events, maintain an address book, and send or receive data by modem. The powerful
PoqetLink program lets you manage and move MS-DOS flIes within The Poqet PC or between your Poqet PC and another computer. You can even connect The Poqet PC to peripheral devices such as a modem or a printer or even to another computer.
Chapter 1
Getting Started
This chapter covers the basic steps necessary to correctly set up and use your Poqet PC. Although your Poqet PC is a fully functional
mM
XT -compatible computer, reading this chapter will help you become familiar with some of The Poqet PC's features that are not available on the traditional desktop PC.Opening the Case
Power
Supply
Your Poqet PC is powered by two AA alkaline batteries. AA batteries offer several advantages over traditional battery packs: They are lightweight, inexpensive, and available worldwide. The Poqet PC can operate several weeks on a single pair of these batteries.
Note: It is impossible to predict exact battery life, because the amount of power consumed during computer use can differ
significantly, depending on the computer application.
You'll need to put the AA batteries, which are included in the packaging, in your computer before using The Poqet PC. Locate the battery package and follow the instructions below to install your batteries.
Installing the BaHeries
If you are installing the AA batteries for the first time, you can take as much time as you need installing the batteries. If you are replacing the batteries, the charged capacitor will retain information for about 5 minutes before memory is lost. To change the batteries:
1. Press the 1/0 key to power-down The Poqet PC.
3. msen the two batteries as shoWn in Figure 2.
Fi8Ure 2 Installing the Batteries
4. Snap the cover back into place over the
battety
COIlJPlll1lnent.5 · If installing the batteries for the first time, press the reset button.
Drive Designators
Your Poqet PC uses standard drive designators for its four drives:
• Drive A, the left card drawer.
• Drive B, the right card drawer.
• Drive C, the bUilt-in ROM (Read Only Memory) drive, which contains MS-DOS 3.30, Poqet Utilities, GW-Basic, and the Poqet application programs. Because The Poqet PC boots from drive C, it is the default drive when you reset The Poqet PC. This information is stored on ROM and can't be overwritten. The MS-DOS write protect error message appears on the screen if you attempt to store data on drive C.
• Drive D, the built-in RAM drive contains 22K of RAM (Random Access Memory). You can store AUTOEXEC.BAT,
CONFIG.SYS, or other files on drive D to customize the system during the booting process (see page 103). Information contained on drive D is lost when the computer is reset.
Drive A
[image:19.544.125.418.328.496.2]Resetting The Poqet PC
You need to reset The Poqet PC only the fIrst time it is turned on or when you need to cold boot the computer. The reset button reboots the
computer and erases everything in system memory and on drive D. Even after you change batteries, you don't need to press reset unless the batteries completely discharge before they are changed.
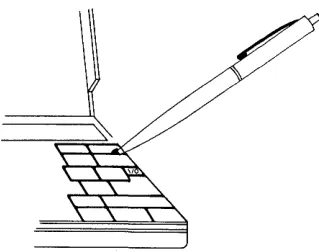
Because you will now be turning on your Poqet PC for the fIrst time, you will need to reset it. To do this, press the reset button, which is recessed in the lower right comer of the SCROLL LOCK key, located on the upper right-hand side of the keyboard. Press it with a small, blunt-tipped, object such as a ballpoint pen.
... Warning! Never use a sharp tool to press this recessed button because its use may pennanently damage the keyboard. Use an object with a small, blunt tip, such as a ballpoint pen.
[image:20.541.120.280.336.462.2]When the computer goes through its boot-up process, it automatically creates the default AUTOEXEC.BAT and CONFIG.SYS files and stores them on drive D. (Refer to Appendix B or your DOS manual for more information about these special DOS files.) Pressing the reset button is the equivalent of turning a desktop computer off and then on again using the power switch. If you want to warm boot, press the CTRL ALT DEL
key combination just as you would on any other IBM PC® compatible. When you pressed the reset button, The Poqet PC booted from drive C, which contains the Microsoft Disk Operating System (MS-DOS) as well as the Poqet application programs. Under normal operation, you will not have to reset The Poqet PC again.
Note: The Poqet PC will boot from drive C, even if the RAM or ROM card that contains MS-DOS is in drive A or B. To boot from a memory card in drive A, (which contains DOS) instead of drive C, hold down the POQET key while rebooting the computer. You may receive the following DOS error message while booting from a memory card:
Non-System disk or disk error
Replace and strike any key when ready
If you receive this message, press any key without holding the POQET
key to boot your computer from drive C. Now you are ready to:
• Use MS-DOS (described in detail in the Microsoft MS-DOS User's Guide and User's Reference).
• Run PoqetLink or the PoqetTools package of applications (described in the following chapters).
Activating The Poqet PC with the
1/0
key
The Poqet PC is activated by pressing the small I/O key, located in the right section of the keyboard just above the ENTER key. Use the I/O key any time you would normally want to turn your computer off. When The Poqet PC is active, pressing the I/O key merely switches it to a
low-power mode. This low-power mode halts the microcomputer's operation and deactivates the keyboard and screen to reduce battery consumption.
Because your Poqet PC does not completely turn off when you press the I/O key, it resumes whatever operation was in process when you
originally pressed this key. You will return to the program you were working in when you last used your computer without having to reboot or reenter any program commands. Calculations or operations that were in progress when you pressed I/O will continue from the same point, and any data in memory will remain exactly as you left it. This feature is particularly useful in environments where you are frequently interrupted or need to quickly access information, such as a phone number, while performing other tasks.
Don't confuse the I/O key with the reset button! They have two entirely different functions. The I/O key, located in the upper right corner of the keyboard, controls the power mode of The Poqet PC. The reset button cold boots the PC.
Replacing the BaHeries
The AA batteries should provide several weeks of computing use. When the batteries are running low, the status line (found directly below the screen) displays a bar above the battery symbol on the screen and the computer will beep once. At that point, your batteries will still be able to
provide power to your Poqet PC for about 5 hours of use.
When the batteries are about to fail completely, the status line indicators momentarily become a solid line across the width of the screen and the computer beeps once. At this point, the computer screen goes blank. You will not be able to use the computer until the batteries are replaced. If you press the I/O key to try to regain the screen display, the indicator line again displays the solid bar across the screen, but the screen will remain off. When this happens, you should replace the batteries as soon as possible to avoid losing the infonnation you have stored in system memory and on drive D. If you continue to try to use your computer without replacing the batteries, your Poqet PC will be unable to retain this information.
Preventing Loss of Data
Memory Cards
Your Poqet PC accesses and stores information on small, rigid silicon memory cards called RAM and ROM cards, that are approximately the size of a thick credit card. These c~Ids are functionally similar to a silicon hard drive. For data storage, you can use RAM cards, your desktop PC, or the built-in RAM disk accessed through drive designator D. (Use drive D only to temporarily store information, because data will be lost on this drive if the computer is reset.) You can access application programs either from ROM cards or from The Poqet PC's built-in ROM drive.
Loading and Removing Cards
The Poqet PC has two memory card drawers, one on each side of the computer underneath the keyboard (see Figure 5).You can use both RAM and ROM cards in either drive. If you've ever used floppy drives with an MS-DOS computer, then you already know how memory cards operate. The cards use standard MS-DOS commands and perform operations such as saving, copying, and listing data. The left card drawer is drive A, and the right drawer is drive B.
To insert or remove a card:
1. Press the I/O key to place your Poqet PC in the low-power mode. 2. Close The Poqet PC.
Figure 5 The Open Card Drawer
4. Remove any card already in the drawer by holding the side of the card, where the drawer has notches, and sliding the card up and out.
ii?OQET
5. Remove the new card from its protective sleeve and insert the card carefully into the drawer, using the following guidelines:
• The title label should be facing up.
• The end of the memory card that contains a pin connector should be placed into the drawer fIrSt. (The title label may also include an arrow showing which end goes in ftrst.)
• The caution label (which also provides room for you to list the card's contents) should be facing down.
£. Warning! The drawer is designed so that it is difftcult to insert the card backwards. However, inserting a card incorrectly and forcing the drawer shut may damage the card and The Poqet PC.
6. Press 1/0 again to bring the computer back to full-power mode.
RAM Cards
The RAM Card Battery
When a memory card is placed in a drawer, the status line lets you know the battery is running low by displaying a broken bar over the A or B symbol, where a solid bar normally appears. When this happens, you need to make a backup of this card and replace the battery, following the instructions below:
1. Copy all files contained on this RAM card to another drive-either to a second RAM card, to a desktop PC using PoqetLink, or to a floppy disk if you have a Poqet Floppy Disk Drive. (See Chapter 5, "PoqetLink," for more information on transferring flIes to your
desktop PC.) ·
2. Remove the RAM card from the card drawer.
3. The top of the memory card has a small rectangular switch that allows the battery holder to be removed. Slide the retainer toward the right (outer) comer of the card to unlock the battery card holder.
Note: If your memory card does not have a battery retainer switch, it
will have a small side hole in the top right comer of the card Use a paper clip or a similar object to push in the battery
retainer on the side of the card to unlock the holder. Use a small tool to avoid damage to the RAM card.
c~=====~-=~=~=---:;-·~-~==--_~
____
~
Figure 7 Location of the Battery Case
4. Pull the battery holder out of the RAM card.
Figure 8 Removing the Battery Holder
5. Remove the old battery from the holder and insert the fresh battery facing it in the same direction as it was removed.
Figure 9 Removing the Battery
6. Insert the holder back into the RAM card. Do not force the holder back into the card, it should slide in easily.
[image:28.541.113.260.76.209.2] [image:28.541.113.254.304.442.2]Formatting a RAM Card
RAM cards, like floppy and hard disks, must be formatted before they can store data. The FORMAT program contained on drive C is written specifically for formatting RAM cards. To format the RAM card, type one of the following DOS commands:
• If your memory card is in drive A (left drawer), type
FORMAT A: <ENTER>
• If your memory card is in drive B (right drawer), type FORMAT B: <ENTER>
The Poqet PC automatically formats the memory card to the correct capacity. You may have a 32K, 64K, I28K, or SI2K capacity memory card. If you need additional help, you can enter FORMAT /? to obtain additional information.
When you receive the prompt
Insert new card in drive A: and strike ENTER when ready
make sure you have entered the correct drive designator, then press ENTER. The formatting operation is nearly instantaneous. You can format additional cards by pressing Y at the DOS prompt and inserting another card into the drive.
Write Protecting a RAM Card
Write protection on the RAM card is enabled with a simple built-in write protect switch. You'll find this switch on the back corner of the card.
~ ~ - - --- - -- ---, ,
~~~~~~~---~~,~---~~ I ',~,--;, ~
~ ~~~
-~
1
1- _ _ _ _ _ _ _ _ _ _ _ _ _ _ j... _
1. Use a pin or the end of a paper clip to move the write protect switch.
2. Slide the switch toward the center of the case to write protect the RAM card; to remove the protection, slide the switch toward the edge of the card.
Making a Bootable Memory Card
If you are formatting a RAM card with more than 128K storage capacity, you can format the card as a system card that contains the MS-DOS files required to boot your Poqet PC. A bootable memory card must have a capacity of at least 128K, because MS-DOS occupies approximately 96K of RAM space. You will also have to copy the SYS.COM command, which is required to make a bootable card to drive D. The SYS.COM command is included on the Poqet Utilities diskette and can be copied to your Poqet PC using PoqetLink. (Instructions for using PoqetLink are found in Chapter 5 of this manual.)
To make a bootable card:
1. From the DOS prompt, enter
FORMAT A:
2. Make drive C active by entering
C:
3. Transfer the system files by entering:
SYS A:
4. Enter the copy command
COpy COMMAND.COM A:
To boot from a memory card containing MS-DOS, hold down the
ROM Cards
Read Only Memory (ROM) cards are similar to RAM cards, however, they are unable to store data created on your Poqet PC and they do not require batteries.
Your Poqet PC dealer has many programs available on ROM cards. Many of these cards allow The Poqet PC to execute their programs directly from the card This allows The Poqet PC to use significantly less of the system RAM to run the program compared to traditional
applications. The software documentation will tell you whether the program is ROM-executable or not. In addition to the advantage of saving memory when using programs contained on ROM cards, these programs operate at a much faster speed than other media.
.. Warning! Make sure you quit all active applications before removing a ROM card from the card drive.
Caring for Memory Cards
Although memory cards are durable, treat them with appropriate care as follows:
• Keep them in their protective sleeve when they're not in your Poqet PC (to keep out dust and dirt).
• A void prolonged exposure to direct sunlight and excessive heat. • Keep them dry. (Although they have been known to survive being
washed and dried with clothes, it's not recommended.) • Don't flex or try to bend a card.
• Do not force memory cards into the drawer.
Chapter 2
Poqet Basics
The Poqet PC has several features that infonn you of the computer's status and the functions currently in use. Many of these functions are indicated by screen symbols, which are discussed in detail in this chapter.
The Display
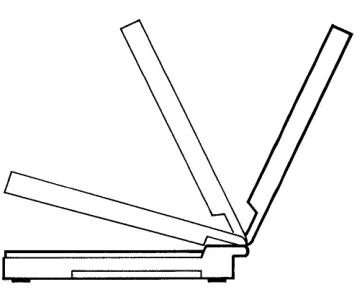
The unique full-screen display is highly visible under almost any lighting conditions. Once the case is open, you can tilt the display to obtain the clearest viewing position. The display will remain in that position until it is changed again.
[image:32.540.112.293.340.489.2]The Indicator Line
Seventeen symbols on the screen's indicator line show you the status of functions being performed by The Poqet PC. Some indicators are controlled by keys, whereas others are controlled by programs or The Poqet PC itself.
When an indicator is active, a dark bar appears in the indicator line above the appropriate symbol. When an indicator is off, the bar is not visible.
The Keyboard
Your Poqet PC has a complete ffiM PC-compatible keyboard with 77 keys in a standard QWERTY layout. It provides all the functions of a PC AT-enhanced keyboard. And, a unique POQET key controls many of your Poqet PC's special features.
The POQET Key
The POQET key, located to the left of the space bar, works with other keys to control unique features of your Poqet PC and also to implement some of the standard IBM PC AT keyboard keys. For example, it is used with F6 and F7 to adjust screen contrast. When pressed with the cursor keys, they become PGUP, PGDN, HOME, and END keys. The POQET key is also used with the ECS key to bring up the PoqetTools menu to access built-in programs.
Alphanumeric Keys
The keyboard provides all the functions of a standard AT-enhanced keyboard, including the function keys. The function keys FI through FlO are on the top row of the keyboard. Most of these have multiple functions, described in the following sections. The blue symbols on the template located directly above the function keys show the functions of these keys when they are used in combination with the POQET key. Two additional function keys (FII and Fl2) are available within some
applications and can be accessed using a combination of POQET FI and POQET F2.
The Numeric Keypad
The numeric keypad is embedded in the keyboard, providing a
Figure 13 The Numeric Keypad Area of the Keyboard
A bar in the status line above the NUM symbol darkens, showing you that the numeric keypad is active. To return these keys to their nonnal
functions, press POQET and FlO again.
POQET Key
Combinations
Table 2-1 Poqet Key Combinations
Function
PoqetTools
Fll
F12
o
Display Modes*
Power MgmtKey Combination
POQET ESC
POQET Fl
POQET F2
POQET F3
POQET F4
...-() Keyboard Lock POQET ."5
AcHon
Displays the built-in PoqetTools menu after you load PoqetTools into memory (see page 45).
Changes Fl to Flt.
Changes F2 to Fl2.
Switches between the CGA-compatible (graphics/text) display and MDA (text) modes. A bar above the circle symbol indicates that the current display mode is CGA. Before changing display modeSt exit the current application program.
Toggles The Poqet PC's internal Power Management software off and on. This software normally operates in a power-saving mode which prolongs battery life. If you experience problems running an application while the Power
Management software is ont press POQET F4 to
tum this feature off while you're running that program. Turning the Power Management software off greatly decreases the life of these batteries .
Table 2-1 Poqet Key Combinations
Function Key Combination Action
Contrast POQET F6 Adjusts the display contrast.
POQET F7 POQET F6 lightens the screen;
POQET F7 darkens the screen.
<J
Alarms POQET F8 Disables any alanns you have set with the PoqetSchedule program (see page 67).J
Key Click POQET F9 Controls whether or not the key click sounds. Thedark bar above the note symbol indicates that key click is on.
Num Lk POQET FlO Controls whether some alphanumeric keys change function to become a calculator-style keypad or function as alphanumeric keys. Similar to the keypad on some keyboards.
Two asterisk keys are available when the numeric keypad is off, and only one, between the / key and
SCROLL key, is available when the numeric keypad is on.
Break POQET Scr Lk Equivalent to the BREAK key.
Home POQET +- Equivalent to the HOME key.
Page Up POQET i Equivalent to the PGUP key.
Page Down POQET J, Equivalent to the PGDN key.
End POQET ~ Equivalent to the END key.
Sys Req POQET Sys Req Same function as on an AT-style keyboard. Usage
Other Indicators
The status line that is located at the bottom of the screen infonns you of the state of many of The Poqet PC's functions. A dark bar over the symbol indicates that function is active or enabled. For instance, a bar appears above the star when the Power Management software is active. The status line indicators described in this section do not correspond to a POQET key function.
ABeD Drive Indicators
A fully lit bar on the screen above one of the drive designators shows that the drive is currently being accessed The A or B drive letter changes to a broken bar when the RAM card's lithium battery becomes low. The figure below shows that the RAM card in drive A has a low battery and should be replaced.
111111111
-n-()ABCD~
Figure 14 Status Line Broken Bar
A Warning! If the entire status line across the bottom of the screen becomes dark, the AA batteries are about to fail
completely. Immediately stop using The Poqet PC and replace its batteries. The Poqet PC will protect the
Table 2-2 Status Une Indicators
Symbol Function Enabled
<J
Alarms The alann is enabled and will sound at the preset time.) Key Click The key click is active and will sound as the keyboard is pressed.
e
Alarm Indicates the alarm is ringing.G:=J
BaHery Chk The AA batteries need to be replaced.'*
Power Mgmt The Power Management software is active.o
Display Mode The display is set to CGA-compatible mode.ABC D DrIves
ii1
POQET KeyFn
{t Shift
OJ
Caps LockNum
o
Scroll LockDrive A is the card drawer on the left side; drive B is the right-hand drawer. Drive C is the internal ROM drive (containing MS-DOS); drive D is an internal24K RAM disk.
Indicates the POQET key is depressed with another key.
Indicates a function key is being pressed.
Indicates the SHIFf key is being pressed
Indicates that caps lock is on.
Indicates numeric (calculator) keypad is currently active.
Chapter 3 Using the Expansion Port
You can connect a wide variety of peripheral devices to your Poqet PC: printers, modems, floppy disk drives, etc. You can also connect The Poqet PC to your desktop PC to transfer information or flies back and forth between the computers. This chapter will explain the proper use of The Poqet PC expansion port when connecting your computer to these peripheral devices.
The Expansion Port
The expansion port, located on the back of the case, is your Poqet PC's link to the world. Several cables are available to connect a desktop computer, modem, parallel (Centronics-type) printer, or other peripheral device to The Poqet PC. To use the expansion port, remove the reusable protective plug.
£. Warning! Only cables manufactured by Poqet Computer Corp. should be attached to the expansion port
~
" \'
The Null ModemNNA Cable
The Poqet Null Modem/VNA cable you received with your computer is The Poqet PC's direct link to other computers. You should use this cable when copying flies to other computers using PoqetLink. (To use
PoqetLink, consult Chapter 5 for additional instructions.) The Null Modem/VNA cable can also be attached to peripheral devices using additional hardware. Contact your Authorized Poqet dealer for details. Remember to always place your Poqet PC in low-power mode (press the
1/0 key) before connecting any cable.
Connecting the Cable
To connect the Null Modem/VNA cable from your Poqet PC to your desktop computer, follow these steps:
1. Press the I/O key to place the computer in low-power mode. 2. Remove the protective plug from the expansion port.
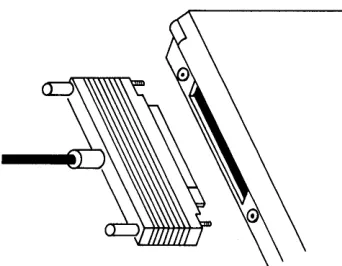
[image:42.540.122.293.227.360.2]3. Plug the cable's widest connector (a card edge connector) into the expansion port on the back of The Poqet PC's case. Make sure you insert the cable in the correct orientation.
Figure 17 Connecting the Cable to The Poqet PC
4. Tighten the thumbscrews on each side of the connector by turning them clockwise.
5. Select one of the two other connectors, depending on the number of pins in your desktop PC's serial port connector. If its serial port has a 25-pin connector, use the larger of the two remaining connectors. If your desktop port has 9 pins, connect the smaller connector.
Disconnecting Cables
When you are finished using a peripheral device, always remove any cable connected to The Poqet PC using the instructions below. Copy any system and drive D data you wish to keep on to a memory card. Place The Poqet PC in low-power mode by pressing the 1/0 key. Next, remove the cable by turning the thumbscrews counterclockwise and pulling the cable free. Press the press the CTRL ALT DEL key combination to reboot your Poqet PC, telling the computer that the peripheral device is no longer attached.
Using The Poqet PC Serial Port
The Null ModemNNA cable can connect your Poqet PC to a modem if you add a null modem adapter between the cable and the modem. Null modem cables can be purchased at most electronic stores.
1. Connect the Null ModemNNA cable to your Poqet PC as described in the previous section.
2. Connect the 25-pin connector of the Poqet Null ModemNNA cable to the null modem adapter.
3. Connect the other end of the null modem to the modem's built-in connector.
You can purchase a serial cable (which requires no adapter) from your Authorized Poqet Dealer. The serial cable also allows The Poqet PC to connect directly to a modem.
Chapter 4
Built-in Programs
The Poqet PC contains two application programs that can help you easily organize and keep track of your personal and business activities, and manage information generated with your Poqet PC programs. These programs are PoqetTools and PoqetLink.
PoqetLink manages files and directories and moves fues between any two PCs, such as your Poqet PC and your desktop computer.
PoqetTools contains several menu-driven application programs,
described in the following chapters. To run PoqetTools or PoqetLink on your desktop PC, the computers operating system should be MS-DOS 3.0 or higher.
Because built-in Poqet application programs execute directly from The Poqet PC's internal ROM, these two programs require only a fraction of the RAM space that similar programs occupy. Their execution speed is also significantly faster than typical resident programs.
PoqetTools Common Features
Menu Bar
The top line of the screen lists the main menu commands for each program. To select a command, press FlO, then move the highlight bar to the command with the cursor keys and press ENTER. After you select the command and see the pulldown menu, you can select an item from it by typing the first initial of the menu item or by moving the highlight bar to the item and pressing ENTER.
Note: You can also select some menu items with the ALT key and the first letter of the command-but only if the pulldown menu is not being displayed.
Status Line
The status line, located above the Poqet indicator line, lists keys that are recognized by the program. It also may indicate options you've selected for that program. Error messages may appear here, too.
Common Keys
Table 4-1 Common key combinations
Key Result
Fl Displays the help screen, which defines the operation of the commands for each menu and submenu.
FlO Selects the menu bar so that you can highlight a command. Or you can press ALT and the fIrst letter of the command.
i Moves the cursor up one line. Exceptions, such as the
appointment screen in PoqetSchedule, are shown on the status line.
PGUP
PGDN
HOME
TAB
SHIFT TAB
ESC
Moves the cursor down one line. Exceptions are shown on the status line.
In PoqetTools, usually moves the cursor to the left one character.
In PoqetTools, usually moves the cursor to the right one character.
Moves the cursor up one page during scrolling. Exceptions are shown on the status line.
Moves the cursor down one page during scrolling. Exceptions are POQET and PGDN shown on the status line.
Moves the cursor to the beginning of the file, line, or field. Exceptions are shown on the status line.
In PoqetTools, moves the cursor into the next field. When the cursor reaches the last field, it returns to the first field.
Exceptions are shown on the application's status line.
In PoqetTools, returns the cursor to the previous field. If the cursor is in the fIrst field, it returns to the last field. Exceptions are shown on the application's status line.
Chapter 5 PoqetLink
PoqetLink lets you easily manage MS-DOS files on your Poqet PC or mM PC-compatible computer. Equally important, PoqetLink also links The Poqet PC to another computer allowing you to manage the fues of both computers. The computer that manages the fues is called the client, whereas the computer being managed is called the server. PoqetLink establishes a link between the client and the server, accessing one drive at a time. It shows you the contents of each drive (directories,
subdirectories, and fues) and lets you manipulate, print, or view the files.
PoqetLink is assisted by another Poqet program called VNA. Like the other Poqet PC programs, the version that is built into The Poqet PC is written to run from ROM. Another version for your desktop PC is provided on floppy disks in both 3.5-inch and 5.25-inch disks. To use PoqetLink on your desktop PC, the computer must use MS-DOS 3.0 or higher as its operating system.
Installing PoqetLink
This section explains how to transfer fues between your Poqet PC and a desktop PC. Before you start to use PoqetLink, check the status line and make sure the battery symbol does not indicate that the AA batteries are running low. If the battery icon has a darkened bar over the status line symbol, the batteries must be replaced before PoqetLink can be used Consult Chapter 1 for instructions on replacing the AA batteries.
Getting ready to use PoqetLink takes only a few minutes. If you haven't already done so, you must install VNA and PoqetLink on your desktop PC. To do this, follow these steps:
1. Backup the floppy disk containing VNA.EXE and PQLINK.EXE (see the Microsoft MS-DOS User's Guide and User's Reference ).
2. Put the backup copy of the floppy disk containing PoqetLink and VNA in drive A of the desktop computer.
3. Type A: INSTALL and press ENTER. Follow the prompts of the Install program.
PoqetLink requires VNA to be installed on The Poqet PC before the program can run. The Poqet PC will nonna1ly have VNA installed when the computer is booted. However, if you remove VNA from your Poqet PC you can reinstall the program by typing VNA and pressing ENTER.
SeHing up the Virtual Network
The combination of client and server is called the Virtual Network Architecture. Follow the instructions below to set up the Virtual Network.
1. Connect the Poqet Null Modem/VNA cable between The Poqet PC and the serial port of your desktop PC (see page 27).
2. On The Poqet PC, type PQLINK /s and then press ENTER.
The Poqet PC is now the server.
3. On your desktop PC, load the Virtual Network Architecture by typing VNA and then pressing ENTER (VNA is loaded on The PoqetPC in the AUTOEXEC.BAT file).
4. Execute PoqetLink by typing PQLINK and pressing ENTER. The desktop PC will be the client.
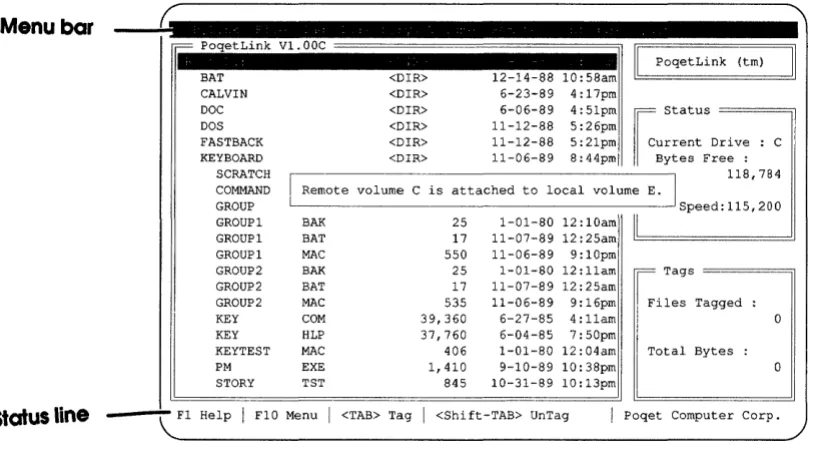
S. On the desktop PC, press AL T R to access the Remote menu, then press C to connect to The Poqet PC as a client. After a brief pause, you will see a message similar to the one below:
Menu bar
Status line
~
r= PoqetLink Vl.00C
II PoqetLink
~I
BAT <OIR> 12-14-88 10:58am CALVIN <OIR> 6-23-89 4:17pm
DOC <OIR> 6-06-89 4:51pm ~
Statu, DOS <OIR> 11-12-88 5:26pm
FASTBACK <OIR> 11-12-88 5:21pm lour rent Drive : C KEYBOARD <DIR> 11-06-89 8:44pm Bytes Free :
SCRATCH 118,784
COMMAND I Remote volume C is attached to local volume ~
GROUP ~ Speed:115,200
GROUP 1 BAR 25 1-01-80 12: lOam
Il
GROUP 1 BAT 17 11-07-89 12:25am GROUP 1 MAC 550 11-06-89 9:10pmGROUP2 BAR 25 1-01-80 12:11am = Tags GROUP2 BAT 17 11-07-89 12:25am
GROUP 2 MAC 535 11-06-89 9:16pm Files Tagged :
KEY COM 39,360 6-27-85 4:11am 0
KEY HLP 37,760 6-04-85 7:50pm
KEYTEST MAC 406 1-01-80 12:04am Total Bytes :
PM EXE 1,410 9-10-89 10:38pm 0
STORY TST 845 10-31-89 10:13pm
Fl Help I FlO Menu I <TAB> Tag I <Shift-TAB> UnTag I Poqet Computer Corp.
\..
Figure 18 Connecting PoqetLink to the Desktop PC
Press any key to remove the message from the screen. The volumes (drives) your computer are attached to may not be the same as those shown above. The remote volume shown is the default drive on The Poqet PC when you started PoqetLink. The local volume shown will be the frrst available drive designator on the desktop PC. If you are unsure which volume the remote volume (poqet PC) is attached to, press
AL T V to access the Volume command and press C to change volume.
[image:51.541.35.442.76.311.2]File Transfer: Desktop to The Poqet PC
PoqetLink is now able to manage your files on your desktop computer and Poqet PC. To copy files from the desktop PC to The Poqet PC, follow the instructions below.
1. If the remote volume attached is the local volume you wish to copy fues to, continue on to the next step. Remember, you cannot copy files to The Poqet PC in its current configuration because drive C is ROM. To use another volume on The Poqet PC, press ALT V
to access the Volume menu and press A to select Attach. Then, choose the volume you wish to use from the menu. You will see the message:
Remote volume D is attached to local volume G
Press any key to remove the message and continue. The remote volume shown is the volume you just chose. The local volume shown is the next available drive designator on the desktop PC. 2. Highlight the frrst file you wish to transfer and press TAD to tag it.
If the file is within a directory, highlight the directory containing the file and press INS. In the same manner, highlight and tag any additional fues to be transferred from the desktop computer to The Poq et PC.
When you've tagged all files to be transferred, press FlO to access
the menu bar. Next, press F to display the File menu, then press C to select Copy. You'll see the following prompt:
Copy to:_
3. Type the desired destination directory. To copy the files to a remote drive, type in the local volume letter of that drive, followed by a colon and the directory. For instance, to copy the selected files to the root directory of the desired remote drive, type:
G:\
If the message Drive not available is given, press any key to continue and select another drive.
To copy files from the Poqet PC to your desktop, consult the instructions in the following section. To exit PoqetLink, consult page 39, which shows the steps for disconnecting PoqetLink.
File Transfer: The Poqet PC to Desktop
PoqetLink also allows you to copy files from The Poqet PC to your desktop computer. To copy a file contained on The Poqet PC to your desktop PC, follow the instructions below.
1. If the remote volume attached is the local volume you wish to copy files to, continue on to the next step. To use another volume on The Poqet PC, press ALT V to access the Volume menu and press A to select Attach. Choose the volume you wish to use from the menu.
You will see the message:
Remote volume D is attached to local volume G Press any key to remove the message and continue. The remote volume shown is the volume you just chose. The local volume shown is the next available drive designator on the desktop PC.
2. Press ALT V to access the Volume menu and press C to select Change. Choose the volume containing the files you wish to copy from the menu. Note that if the volume is a remote volume, the local volume letter as a reminder will be displayed next to the volume letter, but in lower-case.
When you've tagged all files to be transferred, press FlO to access the menu bar. Next, press F to display the File menu, then press C to select Copy . You'll see the following prompt:
Copy t o : _
4. Type the desired destination directory. For instance, to copy the selected flIes to the root directory of drive C, type:
c:\
and press ENTER.
Disconnecting PoqetLink
To disconnect PoqetLink, press AL T R on your desktop PC to access the Remote menu. Then press D to disconnect the Virtual Network. On
The Poqet PC, press the ESC key. Within a couple of seconds, the main PoqetLink screen will be displayed You can now exit PoqetLink by pressing AL T Q and pressing Y.
Once you are fmished with PoqetLink, you may also want to remove VNA from your desktop computer or Poqet PC. Otherwise, VNA will require 35K of system memory of your desktop PC. To remove VNA from memory, type:
VNA /u and press ENTER.
PoqetLink Basics
Read through this section to familiarize yourself with some of the basic concepts that will help you understand how PoqetLink operates.
Drive Designator LeHers
Tagging Flies
Some PoqetLink functions (such as copy and delete) can affect multiple files and directories. The following principles apply to tagging (marking) directories and files:
• To tag a file, move the highlight bar over the file and press TAB.
To tag all of the files in a directory, highlight the directory name and press TAD.
• If a directory's files or subdirectories are displayed, the directory is open. A file must be displayed before it can be tagged.
• To open a directory, highlight the directory and press INS. To close a directory, highlight the directory, or any fue in that directory, and press DEL.
• If a directory is open, all of its files are treated as if they were displayed on the screen, even if there are too many to display at the same time.
• Tagged fues are indicated by an arrow to the left of their names. The main PoqetLink screen also tells you how many files have been tagged.
• PoqetLink does not tag directories. You must open the directory first, then tag the fues contained in the directory.
Using PoqetLink
While you're running PoqetLink, you'll use the keys listed in the following table.
Table 5-1 Poqetllnk Key Combinations
Key Action
INS Opens the highlighted directory and lists its contents. DEL Closes the highlighted directory.
ESC Quits PoqetLink while in server mode. TAB
SHIFT TAB
DEL
PGUP
PGDN
HOME END
i or J,
~or~
FI
FlO
Tags highlighted files to be moved, copied, or deleted. Untags the highlighted file by directory.
Closes the highlighted directory or the directory in which the highlighted file is located.
Moves the highlight bar to the top of the screen; if
pressed again, moves it to the top of the previous screen. Moves the highlight bar to the bottom of the screen; if
pressed again, moves it to the bottom of the next screen. Moves the highlight bar to the beginning of the file listing. Moves the highlight bar to the end of the file listing. Moves the highlight bar up or down one line of the file listing.
Moves the highlight bar to the previous or next directory on the drive.
Displays the help screen for using PoqetLink.
Displays the PoqetLink menu with the highlight bar in
Menu Summary
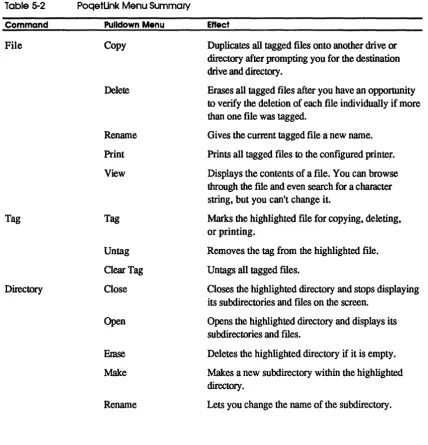
Table 5-2 Command File Tag DirectoryThe table below provides lists the commands available in PoqetLink and provides a brief description of their function.
PoqetUnk Menu Summary
Pulldown Menu
Copy Delete Rename Print View Tag Untag Clear Tag Close Open Erase Make Rename Effect
Duplicates all tagged files onto another drive or directory after prompting you for the destination drive and directory.
Erases all tagged files after you have an opportunity to verify the deletion of each file individually if more than one file was tagged.
Gives the current tagged file a new name.
Prints all tagged files to the configured printer.
Displays the contents of a file. You can browse through the file and even search for a chamcter string, but you can't change it.
Marks the highlighted file for copying, deleting, or printing.
Removes the tag from the highlighted file.
Untags all tagged files.
Closes the highlighted directory and stops displaying its subdirectories and files on the screen.
Opens the highlighted directory and displays its subdirectories and files.
Deletes the highlighted directory if it is empty.
Makes a new subdirectory within the highlighted directory.
Table 5-2
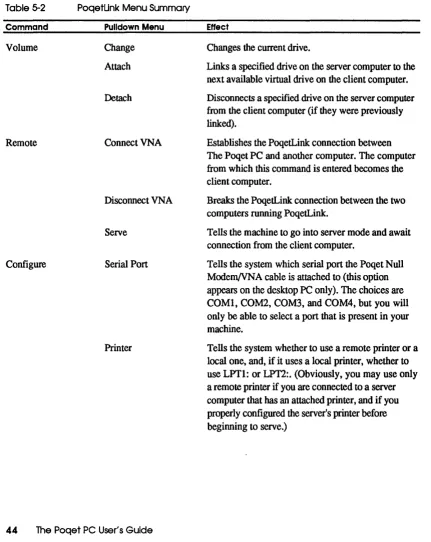
Command
Volume
Remote
Configure
PoqetUnk Menu Summary
Pulldown Menu Change Attach Detach ConnectVNA Disconnect VNA Serve Serial Port Printer Effect
Changes the current drive.
Links a specified drive on the server computer to the next available virtual drive on the client computer.
Disconnects a specified drive on the server computer from the client computer (if they were previously linked).
Establishes the poqetLink connection between The Poqet PC and another computer. The computer from which this command is entered becomes the client computer.
Breaks the PoqetLink connection between the two computers running PoqetLink.
Tells the machine to go into server mode and await connection from the client computer.
Tells the system which serial port the Poqet Null Modem/VNA cable is attached to (this option appears on the desktop PC only). The choices are COMl, COM2, COM3, and COM4, but you will only be able to select a port that is present in your machine.
Tells the system whether to use a remote printer or a local one, and, if it uses a local printer, whether to
Chapter 6 PoqetTools
PoqetTools allows you to perfonn basic tasks such as keeping a personal address book, perfororlng simple calculations, or writing a quick memo. PoqetTools is ROM resident, allowing you to access its programs at any time. These programs and their options include the following:
• PoqetCalc
• PoqetWrite
A standard, four-function calculator with memory and running tape.
A screen editor for writing and editing notes and memos.
• PoqetSchedule A calendar including an appointment scheduler, alarm, and To Do lists.
• PoqetAddress A personal address book for information about your friends, associates, and family members.
• PoqetTalk An easy-to-use communications program that allows you to access dial-up services and connect your Poqet PC to a modem or another computer system.
• Options Lets you configure The Poqet PC to set the default directory and path; control the key delay, repeat rate, and key click; and specify text or CGA mode. Any option setting will return to the default setting after the reset button is pressed.
Starting
PoqetTools is normally loaded in memory when The Poqet PC is booted up. PoqetTools can be removed from memory by moving the cursor to Exit Tools in the pop-up Tools menu and choosing Release Tools. To start PoqetTools after it has been released, type PQTOOLS and press
ENTER. This loads PoqetTools into memory and displays the main PoqetTools menu and copyright message box. The PoqetTools menu will now appear whenever you press POQET ESC.
Note: If you are using the KEYBOARD.SYS file for an international keyboard, the AUTOEXEC.BAT file must load the
KEYBOARD.SYS file before the PQTOOLS file or the PoqetTools menu will not appear when the POQET ESC key is pressed.
If you're going to use a serial printer with your PoqetTools programs, make sure that the proper mode is set in your AUTOEXEC.BAT file. For more information, refer to Appendix B.
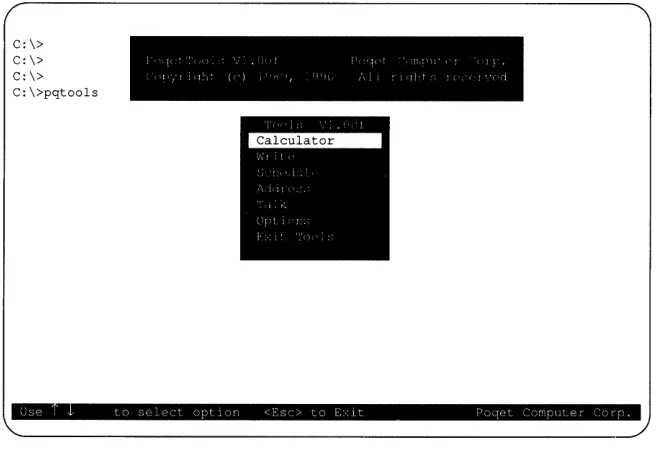
C:\> C:\> C: \>
C:\>pqtools
I 1 + ) \ . j I 1( 1 J 11 \ I I t . r j I I (1\ [" ( ( ) I I, () J l /\ l I ; I Il t ; ( \ ci
Use to select optIon <Esc> to E,lt Poqet Computer Corp.
Figure 19 The PoqetTools Screen
[image:62.540.106.434.86.315.2]Selecting a PoqetTools Program
There are two ways to select and start one of the PoqetTools programs shown in the main PoqetTools menu:
• Type the frrst unique letter of the program's name (for example, W
for PoqetWrite).
• Move the highlight cursor (using
i
or.!.) to the program's name on the main PoqetTools menu, then press ENTER.PoqetTools Options
The PoqetTools Options command allows you to change several attributes of The Poqet PC's operations. For instance, the Directory Setup allows you to customize the default drive and the default path. You may fmd this helpful if you want to automatically save data to drive other than drive D.
U sing the Cursor Setup command, the Options command also allows you to customize the cursor size to change its default appearance. To change the size of the cursor, select the Cursor Setup command and press ENTER. Once the Cursor Setup command is chosen, you are presented with two sets of numbers. The frrst number determines the top or starting point of the cursor, while the lower number represents the bottom or stopping point of the cursor. To lengthen the top of the cursor, press the up arrow (i) while the starting number is selected. The second number determines the bottom or stopping point of the cursor. Pressing the up arrow (i) causes the size of the cursor to increase. The changes to the cursor will appear as the arrow keys are pressed. When the cursor is the size you desire, press POQET F2 to save the changes. You will receive the prompt Save to DOS (yiN). Pressing Y saves the cursor keeping
Changing Programs
Each time you select a PoqetTools program, PoqetTools adds that
program's name (such as PoqetTalk) to a list. By keeping a sequential list of the PoqetTools programs you have selected, PoqetTools is able to return you to the preceding PoqetTools program when you quit the current program using the menu bar Quit command. For example, while you are using PoqetWrite, you might want to use PoqetCalc to make some calculations. When you quit PoqetCalc, PoqetTools remembers that you had not fmished using PoqetWrite and returns you to the operation being executed by PoqetWrite.
Each time you select one PoqetTools program while in the middle of another one, you add its name to the list. The list and the
PoqetTools Commands
Each PoqetTools program is controlled by the commands listed on the menu bar on the top line of the· screen. There are three ways to select a command:
• Press AL T together with the first letter of the command. The program will then display a corresponding pulldown menu related to that command. For instance, after you press AL T Q, the screen displays the pulldown menu that contains the Quit command. • Press FlO, then move the cursor to the pulldown menu desired and
select to the desired command using the arrow key. When the command is highlighted, press ENTER.
• Press FlO, then type the first letter of the top-level command. The program displays a pulldown menu related to that command.
Using the Menus
To leave a command's pulldown menu:
• Press ESC to leave the menu without executing the command. • Press ENTER to execute the command. If more commands or
options are required for this command, a submenu appears. To leave a pulldown submenu:
• Press ESC to return to the next higher pulldown menu without executing or modifying the submenu command or option. • Using the arrow key, move the cursor to highlight the desired
Saving PoqetTools Files
All the flIes generated by PoqetTools are created in a default data
directory. This directory can be deflned and modified by selecting Directory Setup after you choose Options in the main PoqetTools menu. Some applications allow you to override the default data directory by specifying a pathname.
P<XJ.etAddress, PoqetTalk, and PoqetWrite allow you to decide when to save your flIes. PoqetSchedule automatically saves each change you make. Backup flIes (named <current fl1ename.BAK» are created automatically by each PoqetTools program, except PoqetTalk.
Leaving a Program
To leave a PoqetTools program:
• Press POQET ESC to leave the PoqetTools application program temporarily allowing another program to be selected from the main P<XJ.etTools menu. The program you are leaving will be added to the list (described earlier), so PoqetTools will know which program to return to when the Quit command is entered. By using the main menu to return to this program, the program will be exactly as it was when you left it (provided, of course, you have not made any changes that would affect it).
• Select the Quit command on the menu bar. If you unintentionally execute the Quit command, you can immediately return to the program through the main PoqetTools menu without losing any of your work.
Exiting PoqetTools
There are three ways to exit PoqetTools:
1. From the main PoqetTools menu, select Exit Tools and press
ENTER. Now you can either keep the PoqetTools in memory (Leave Tools) or release them completely (Release Tools). 2. To leave PoqetTools in memory and return to the program you
were running when you started PoqetTools, press POQET ESC to display the PoqetTools menu, then press ESC to leave PoqetTools. 3. If you are using a PoqetTools program and it is the only
PoqetTools program open, you can select the· Quit command from the menu and type Y. This leaves PoqetTools in memory and returns you to the program you were running when you entered PoqetTools.
Note: If the option Release Tools is chosen, the POQET ESC key combination will not bring up the PoqetTools menu. To reaccess PoqetTools, type PQTOOLS at the DOS prompt.
Printing to a Serial Printer
The Poqet PC system is set to print to a parallel printer automatically. If you are printing to a serial printer, you will need to enter the following commands from the drive C prompt:
MODE LPTl:=COMl
MODE COMl:96,N,8,1,P
Chapter 7 PoqetCalc
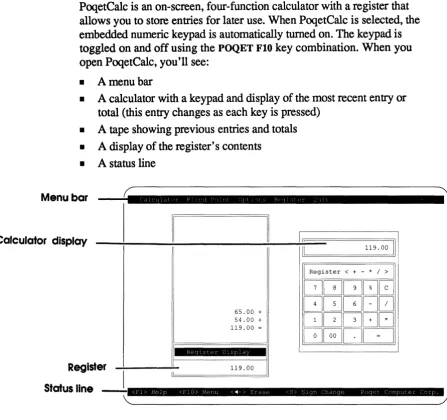
PoqetCalc is an on-screen, four-function calculator with a register that allows you to store entries for later use. When PoqetCalc is selected, the embedded numeric keypad is automatically turned on. The keypad is toggled on and off using the POQET FlO key combination. When you open PoqetCalc, you'll see:
• A menu bar
• A calculator with a keypad and display of the most recent entry or total (this entry changes as each key is pressed)
• A tape showing previous entries and totals
• A display of the register's contents
• A status line
Menu bar
,
...
"
,
..
•
Ii:alculator display
I
IIII 119.00 II
I Register < + - * / > I
GGG~0
65.00 +
GGGD0
54.00 +
GGG8[J
119.00 =
GBDD
!-=
•
I
er 119.00
Reglst
[image:68.543.27.475.116.536.2]Status line
--.l
<fl> H<?lp <flO> Menu <<4-> Erclse ,~> Slgn Chclnge puqpr Compclter Corp.Configuring PoqetCalc
PoqetCalc's Fixed Point command menu allows you to detennine where the decimal point will be placed. One choice is
calc
mode, in which you can control the decimal point location. The other choice is add mode, which automatically inserts the decimal point before the last two numbers entered-unless a decimal point is keyed manually. (The decimal point is displayed on the screen as you enter the math function to be performed.) For example, after selecting calc mode and entering 45, the register will display the number as 45.0000 (four decimal places assumed). But with add mode, the same entry will be displayed as 0.45 (as though you had entered the decimal point). In other words, an entry of 45.1 in calc mode will be displayed as 45.1000, and in add mode will be displayed as 45.10.Performing a Calculation
To perform a calculation using PoqetCalc, follow the steps below: 1. Enter the numbers (insert decimal points if needed).
2. Press one of the following keys to determine the math function to be performed:
+ addition - subtraction
*
multiplication / divisionNote: PoqetCalc recognizes the asterisk key on the upper right of the keyboard. Do not use the shifted 8 key as a multiplier.
The tape displays all the numbers entered so far, whereas the calculator display shows only the latest entry. The register display is still blank. 4. Press = or ENTER to end the calculation.
Clearing an Entry
If you make a mistake or want to clear all or part of the displays, or if the calculation causes an overflow error, you can press C to clear the current calculator display. You can also clear the calculator display using the Options menu, from which you can clear all entries or the calculator display alone.
The Register
PoqetCalc's register is similar to the memory on many calculators-it stores a result for use in later calculations. Table 7-1 includes directions for using the register.
Menu Summary
The table below provides lists the commands available in PoqetCalc and provides a brief description of their function.
Table 7-1 PoqetColc Menu Summary
Command Pulldown Menu
Fixed Point Add Mode
Calc Mode
Options
Clear Entry
Clear All
Erase Number
Sign Change
Effect
Assumes entries to two decimal places for financial calculations; automatically interprets the last two digits entered as decimal fractions unless you place a decimal point in the entry. Allows up to 12 digits to the left of the decimal point.
Allows up to 10 digits to the left of the decimal point and 4 to its right. You must insert the decimal point (if needed).
Erases (clears) the current entry from the calculator display.
Erases the current entry from the calculator display and the contents of the tape. Does not clear the register display.
Deletes from the calculator display the last number entered.
[image:71.541.59.476.137.583.2]