Sil'llLJ>.·J··_
,.
Owner
'
s
SIDEKICK
version 1
Owner's Handbook
Copyright
©
1 984 byBORLAND INTERNATIONAL Inc. 4113 Scotts Valley Drive
Scotts Valley, CA 95066
Copyright Notice
This software package and handbook are copyrighted ©1984 by BORLAND INTERNATIONAL Inc. All rights reserved worldwide. No part of this publication may be reproduced, transmitted, transcribed, stored in any retrieval system, or translated into any language by any means without the express written permission
of BORLAND INTERNATIONAL Inc., 4113 Scotts Valley Drive, Scotts Valley,
CA 95066, USA.
Single CPU License
The price paid for one copy of Sidekick licenses you to use the product on one CPU when and only when you have signed and returned the License Agree-ment printed in this book.
Disclaimer
Borland International makes no warranties as to the contents of this book and specifically disclaims any implied warranties of merchantability or fitness for any particular purpose. Borland International further reserves the right to make changes to the specifications of the program and contents of the manual without obligation to notify any person or organization of such changes.
RETURN THIS LICENSE AGREEMENT TO BORLAND INTERNATIONAL.
Program License Agreement
On the condition that you sign and return this license agreementto Borland International Inc., you are granted a non-exclusive and non-transferable license to use Sidekick on one CPU only. Failure to sign this agreement and still use the software is illegal.
I agree that Sidekick remains the property of Borland International Inc. and ac-cept that giving away or selling copies of Sidekick is theft of Borland's property and understand that this will be prosecuted by the lawyers of Borland International.
The Sidekick Handbook is, of course, my property but copyrighted by Borland In-ternationallnc.
Borland warrants that all material furnished by Borland constitutes an accurate original manufacture and will replace any such material proven to be defective, pro-vided that such defect is found and reported within ten days after purchase. Borland makes no other express or implied warranties with regard to performance or accuracy of Sidekick and pertaining documentation and specifically disclaims any implied warranties of fitness for any particular purpose. I agree that Borland shall not be held responsible for any consequential damages that I may possibly incur through the use of Sidekick, whether through Borland's negligence or not.
Termination of License. Any breach of one or more of the provisions of this
agreement by me shall constitute an immediate termination of this agreement. Nevertheless, I agree that in the event of such termination, all provisions of this agreement which protect the rights of Borland shall remain in force.
I hereby acknowledge that I have read this agreement, understand it and agree to be bound by its terms and conditions:
Name and signature: _ _ _ _ _ _ _ _ _ _ _ _ _ _ _ _ _ _ _ _ _ _ _ _
Address:
USER'S COPY
Program License Agreement
On the condition that you sign and return this license agreement to Borland International Inc., you are granted a non-exclusive and non-transferable license to use Sidekick on one CPU only. Failure to sign this agreement and still use the software is illegal.
I agree that Sidekick remains the property of Borland International Inc. and ac-cept that giving away or selling copies of Sidekick is theft of Borland's property and understand that this will be prosecuted by the lawyers of Borland International.
The Sidekick Handbook is, of course, my property but copyrighted by Borland In-ternationallnc.
Borland warrants that all material furnished by Borland constitutes an accurate original manufacture and will replace any such material proven to be defective, pro-vided that such defect is found and reported within ten days after purchase. Borland makes no other express or implied warranties with regard to performance or accuracy of Sidekick and pertaining documentation and specifically disclaims any implied warranties of fitness for any particular purpose. I agree that Borland shall not be held responsible for any consequential damages that I may possibly incur through the use of Sidekick, whether through Borland's negligence or not.
Termination of License. Any breach of one or more of the provisions of this
agreement by me shall constitute an immediate termination of this agreement. Nevertheless, I agree that in the event of such termination, all provisions of this agreement which protect the rights of Borland shall remain in force.
I hereby acknowledge that I have read this agreement, understand it and agree to be bound by its terms and conditions:
Name and signature: _ _ _ _ _ _ _ _ _ _ _ _ _ _ _ _ _ _ _ _ _ _ _ _
Address:
TABLE OF CONTENTS
INTRODUCTION ... 1
This is Sidekick ... 1
How to use Sidekick ... 3
Acknowledgements ... 3
Chapter 1 QUICK STARTER ... 5
Before Use ... 5
Files on Your Diskette ... 5
Getting Started ... 7
Activating Sidekick ... 7
Help ... ',' ... 9
Notepad ... 10
Calculator ... 15
Transferring Numbers from Calculator ... 17
calendar ... 1 9 Dialer ... 21
ASCII Table ... 24
Advanced Use ... 25
Returning To An Open Window ... 25
Getting Out-And Quickly Back In ... 27
Time and Date Stamping Notes ... 27
Chapter 2 NOTEPAD ... ... 29
The Notepad Command Line ... 30
The Status Line ... 32
Editing Commands ... 33
A Note on Control Characters ... 34
Cursor Movement Commands ... 35
Insert and Delete Commands ... 39
B lock Commands ... 40
Miscellaneous Editing Commands ... 43
Notepad vs. WordStar ... 48
WordStar Text Files ... 48
Graphics ... 48
Cursor Movement ... 48
Line Breaks and Page Breaks ... 49
Dot Commands ... 49
End Edit ... 49
line Restore ... 49
Tabulator ... 49
Auto Indent ... 49
Time and Date Stamping Notes ... 50
Print Block ... 50
Sort Block ... 50
Notepad vs. the TURBO Editor ... 51
Graphics ... 51
Time and Date Stamping Notes ... 51
Print Block ... 51
Sort Block ... 51
Chapter 3 CALCULATOR ... 53
Programming Keys with Numbers from Calculator ... 54
Chapter 4 CALENDAR ... 55
Chapter 5 DIALER ... 57
Chapter 6 ASCII TABLE ... 61
Chapter 7 SETUP ... .
63
Note file ... 63
Appointment calendar ... 64
Dialer ... 65
Appendixes
Appendix A
APPLICATION NOTES ... 67
The Autoexec.bat File ... 67
A Few Ideas... ... 68
Scenes From Our Lives ... 68
Scenes From the Life of a Salesman ... 70
Scenes From the Life of a Programmer ... 71
Killing Sidekick ... 73
Appendix B INSTALLATION ... 75
Screen Type ... 76
Notepad Commands ... 77
Notepad File Size ... 80
Modem ... 81
Colors ... 81
LIST OF FIGURES
1 -1 Sidekick Log-on Message ... 7
1-2 Sidekick Main Selection Window ... 8
1 -3 Help Window ... 9
1 -4 Notepad Window ... 10
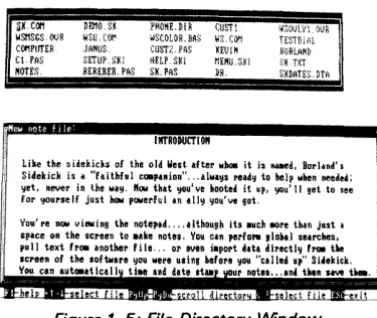
1-5 File Directory Window ... 12
1-6 Calculator Window ... 15
1 -7 Calendar Window ... 1 9 1-8 DialerWindow ... 21
1 -9 Notepad - Calculator - ASCII Table ... 25
1 -1 0 Back to the Notepad ... 26
2-1 NotepadWindow ... 29
2-2 Notepad Status Line ... 32
7 -1 Setup Window ... 63
8-1 Installation Main Menu ... 75
8-2 Screen Installation Menu ... 76
B-3 Color Installation ... 81
LIST OF TABLES
2 -1 Editing Command Overview ... 34INTRODUCTION
This is Sidekick
Sidekick is a lot of things, but first and foremost it is always there when you need it because it is right there in your computer's memory all thetime until you turn off the power or resetthe machine. No matter which other program you are using - word processor, data base, spreadsheet, BASIC, or whatever - Sidekick is always present 'underneath' it and may be activated immediately with a single keystroke. And what's more: your other program continues as if nothing happened when you return from Sidekick.
In short, Sidekick adds a new dimension to your computer - and to your daily work, to your life, even if you are a heavy computer user. It helps you organize your work and keeps your desk free of the eternal pile of paper notes, pencils, hand calculators, phone directories, and whatnot that gets lost all the time anyway.
Notepad
A full-screen WordStarlTURBO Pascal compatible text editor with special notepad features like easy data transfer from any other program, automatic time/date stamping of notes, etc.
Calculator
On-screen calculator performing as a normal pocket calculator, and offering special features for programmers.
CaLendar
Perpetual Calendar with daily appointment schedules.
Dialer
Automatic dialer which takes numbers from its own phone directory or directly from the screen. You may find the number with dBASE-II or any other database that you already have, and Sidekick will make the calli
ASCII table
Help
An on-line help system holds your hand whenever you need it.
Setup
Sidekick's various standard values may be changed to suit your every desire whenever you want - no complicated installation procedures necessary!
Sidekick makes full use of windows: each function uses its own separate window, and many windows may be present on the screen at the same time. When a window opens, it will cover some other information, but everything is still present underneath it:
H ow to use Sidekick
Sidekick is so easy to use that you almost don't need this handbook. On the other hand, the book is designed to let you get the most out of Sidekick, and to give you inspiration to the countless ways you may use it.
We suggest that you read the quick-starter in chapter 1. That will al-low you to get Sidekick running safely, and it will introduce you to its main facilities. Once you get going, you may want detailed information on one or more things, and you can then turn to the remaining chapters which describe each Sidekick window in detail.
Appendix A contains some ideas to the many ways you can use Side-kick. In there you may find inspiration to some uses of your own that we haven't thought of.
Acknowledgements
Throughout this book. reference is made to a number of trademarks: IBM and PC-DOS are registered trademarks of International Business Machine Corp. TURBO Pascal and Wordlndex-llare registered trademarks of Borland International Inc. WordStar and DataStar are registered trademarks of MicroPro International Corp. Smartmodem is a trademark of Hayes Micro-computer Products Inc.
QUICK STARTER
Chapter 1
QUICK STARTER
Before Use
Before using Sidekick you should, for your own protection, make a backup-copy of the distribution diskette. Although the distribution disk is 'copy protected', you can use a file copying program (COPY) to make the backup orto copy the Sidekick files onto your hard disk. When you first start Sidekick, however, the original distribution disk must be placed in either the A: or the B: drive. Once Sidekick is loaded, the diskette can be removed.
If you find this procedure too cumbersome, a special license for an unprotected version of Sidekick is available at a small extra charge. Also, special license arrangements are available for large-scale installations. Please give us a call.
Files on Your Diskette
In addition to the full Sidekick system, the distribution diskette contains various limited configurations which allow you to preserve memory while sacrificing some functions which you feel you can do without. This may be necessary on systems with limited memory capacity be-cause Sidekick, like the operating system, stays in memory and thus re-duces the memory available for other programs.
These files are on your disk:
SK.COM
The full Sidekick system with all features included.
SKN.COM
This system excl udes the Calendar, and thus contains: Notepad, Calculator, Dialer, and ASCII Table.
SKC.COM
Files on Your Diskette
SKM.COM
This is a minimum configuration, excluding Notepad, Calendar, and Dialer, and thus containing only Calculator and ASCII Table.
You need only have the one system you want to use present on your work disk.
It is a good idea to use the full system for starters. If you then run into memory problems, you may either add more memory to your com-puter or use one of the limited systems.
Throughout this manual we assume that you are using the full system. In the limited versions, some windows may have slightly different ap-pearances due to the excluded functions.
In addition to the various versions of Sidekick, the following files are on your disk:
SK.HLP
Contains the Sidekick help texts. This file may be left off your diskette when running Sidekick if you don't want to use the built-in help. If you want to use the help system, this file must be on the disk and directory from where you start Sidekick.
SKINST.COM
Installation program which lets you choose screen type, define the port to be used for the modem, change Sidekick's colors, and re-configure the commands of the Notepad editor. The use of this program is entirely optional, as all commonly used values are controlled from within Sidekick's Setup function.
READ-ME.SK
If present, this file contains the latest information on Sidekick.
Getting Started
Getting Started
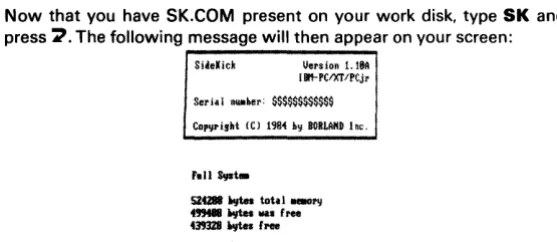
Now that you have SK.COM present on your work disk, type SK and
press~. The following message will then appear on your screen: SideJ(ick Vel's ion 1. 181\
I BlHC/l<T!PCjr
Serid _her: $$$$$$$$$$$$
... 11 Syst.
SZfZ88 ~ total _I'IJ
. " . . . ~ .... {tee
[image:18.416.87.366.83.204.2]439328 ~ ftee
Figure 1 -1: Sidekick Log-on Message
After the copyright notice, version number, etc. follows a description of the configuration. If you are running a limited version, it tells you which functions are included.
The last three lines contain information about your PC's memory. First you can see how much memory you have in total, then follows the memory available after DOS and other system stuff (buffers, drivers, spoolers, RAM disks, or what have you). The last line shows the amount of memory left after Sidekick was loaded. If this last figure is less than you need for your application program, you must either add more memory or use a limited Sidekick system.
Remember that if the documentation for your software says that it requires a minimum of 128 Kbytes, it normally means 128 Kbytes
tota/memory,
not 128 Kbytes free memory. As DOS and various system utilities, buffers, etc. use anywhere from 25 K and upwards, it is difficult to say how much free memory is really needed to run that particular software. If you're in doubt, just try it.Activating Sidekick
Sidekick is now resident in memory and stays there until you either turn off the computer or reset it. You may use the computer exactly as usual; fire up your spreadsheet or word processor, or even BASIC (disk BASIC, that is). and go to work. Anytime you need Sidekick, just press:
Activating Sidekick
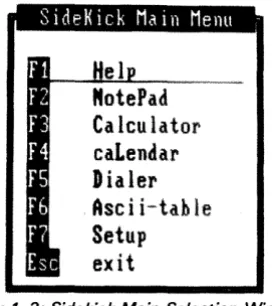
which means: hold down the Clrl and All keys at the same time. An alternative method is to hold down both shift keys at once. These are the two ways to activate Sidekick. The Sidekick main selection window now pops up in the middle of the screen:
SideKick Main Menu
[image:19.416.147.283.104.257.2]-MotePad
Calculator
caLendar
Dialer
Asc ii-tab le
Setup
exit
Figure 1 -2: Sidekick Main Selection Window
You may now select the window you want to use in either of three ways:
1) Enter the highlighted capital letter in the window name (in either upper or lower case, or with the Alt-key depressed).
2) Press the function key associated with the desired window (F1 through F7) .
3) Use the arrows to move the horizontal bar to the name of the desired window and press M'.
The first method, with the All key depressed, is recommended, for reasons we will explain later.
Help
Help
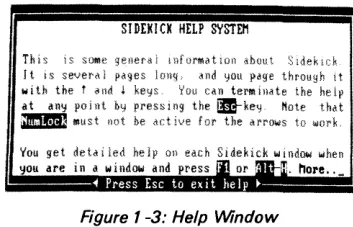
As this is the first time you activate Sidekick, the horizontal bar points at Help. If you press~, the Help window will be opened:
Sf DEKI
ex
HELP SYSTEMTh i $ 1 S some genera i I t sevei'd I
wi tll the t illl,j i
iI t a ny po j II t hy
' - M u s t not
lllf()l'Matwll about SJdekld
dna you j>ilg€
can terMinate the
the _key Hote thilt
for the arrows to wOl'k
[image:20.415.135.312.108.222.2]You get detai led help on each Sidekick window when you are in a window and press 1'11, hOJ'e. ,_
Figure 1 -3: Help Window
The help you get here is general help on the use of Sidekick. It is several pages long, and you page through it with the t and l keys. When you open a window, the context-sensitive help system will give you detailed help on whatever you are currently doing,
You exit the help text by pressing the Esc key.
The Esc key is used throughout Sidekick to exit whatever you are currently doing and return you to your previous activity. Esc will also close the window you leave.
Notepad
Notepad
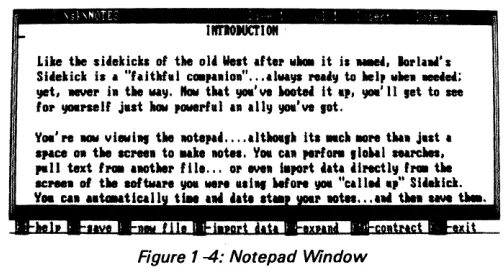
Now open the Notepad window. You may press n, N, Alt-N, F2, or move the bar with the arrows and press ~. We recommend pressing Alt-N (N, of course, is a mnemonic for Notepad, so it's easy to re-member).
The Notepad appears at the bottom of the screen:
Lib tile Ii •• kicks of tile 01. Welt 1ft., .... it il ... Iorl ... ·, Si •• kick ill "hitW.l co. ... ioll" ... I1 ... '" ... , to lIel, .. lIell ... ; !lilt. 1IMMt, ill tile
"''1.
flaw t .. t !IOIl'\II Mote4 it 'p, !lOll' 11,.t
to see10' !IOIll'Slllf jut'" ._rid III all¥ !IOIl'\II ,ot.
y.'" ....
viewi., tile IIOte ... lIt_.1I ita _cllllO" t ... jut a apace Oll tile screell to uke lOt ... YCMI cal,...,0l'Il
,ION' aearc:IIet. ,.11 text 1..-"ollie, til' ... 0' l1li1 i.po,t.au
.lrecti¥ Ire. tilesc .... of tile aoft.,.,1 !lOll WIN ali., WON !lOll "call" .... St •• ick.
Y .. Cal utauUcall tiM a .... " at I' 1IOtn ... tIIea awe ~.
Figure 1 -4: Notepad Window
The bottom line of the screen is the Sidekick command line which al-ways shows which function keys are available presently in the Note-pad, and what they do. F1 gives you on-line help on the Notepad; we'll look at the others below.
The top line of the Notepad window is th~ status line and shows the
name of the note file you are currently using, tells you where you are in the file, and displays the status of some of Notepad's features. You need not pay too much attention to all that right now.
You may now enter your text. Notepad is completely compatible with the TURBO Pascal editor, and almost identical to WordStar, so if you know any of these editors, you only need to read pages 48 and 51 which explain differences and extensions.
Otherwise, here's a quick run-down of what to do:
[image:21.414.84.336.149.285.2]Notepad
To move: You may move the cursor freely within the window using the arrows on the numeric keyboard, and the PgUp and PgDn keys scroll the page up and down, one windowful at a time.
Remember that the arrows and the other function keys on the numeric key-pad only work when NumLock is not active. Normally, the state of this key cannot be seen. In Sidekick, you can see the status of both NumLock and Scroll Lock in the lower right corner of the screen. A few Sidekick command lines may be obscured by the status message; if that happens just press the NumLock or Scroll Lock, and the text underneath appears.
To delete: You delete characters to the left of the cursor with the +-key (the one next to N umLock, not the one on the numeric keypad), and to the right of the cursor with the Del-key. Entire words to the right are deleted by pressing Ctrl-T, i.e. you hold down the Ctrl-key and then press T. Entire lines are deleted with Ctrl-Y.
To insert: Characters are normally inserted into the existing text whenever you write in the middle of a line. If you press the Ins-key, you switch to Overwrite mode, as indicated on the status line. Press-ing Ins again switches back to Insert mode. In Insert mode, you insert a line each time you press ~, and you may insert empty lines by press-ing Ctrl-N.
With these few commands, you can enter and edit your notes. Now let's turn to the function keys on the command line.
F2-Save.
This command saves the contents of your note file on disk. In order to let you switch disks freely, this is never done automatically, and you must therefore remember to Save your note file before you shut down the computer. You may also use Ctrl-K-D to save.
F3-New note file.
This command allows you to use another file than the standard file NOTES. When you press F2, the message:
Notepad
appears at the status line. You may press Esc to cancel the command, or enter a file name followed by:> to use another file. If you enter a file name, that file will be read into the notepad if it exists, otherwise it will be created.
If you have made changes to your current note file which have not been saved, you will be asked if you want to Save that file before overwriting it with the new file.
Now, what does pattern mean? It means that you may enter a file name containing wildcards. Now, what are wildcards?Well, wildcards are special characters which mean 'anything'. There are two such wildcards; asterisk:
*
and question mark: ? An asterisk means that any series of characters may be present here, and a question mark means that any single character may be present in this position. Let's look at some examples:*.*
Means files with any first name and any last name, i.e. all files.*.TXT
Means all files with any first name and the last name TXT.
77.7 Means all files with two-character first names and one-character last names.
And so on ad infinitum, we're sure you got the idea. You may set up any pattern, mixing asterisks, question marks, and text. When you en-ter such a paten-tern, what happens is that a window opens containing all file names matching that pattern:
DD10SK
wsu, COM
JAHUS SETUP. SXi
RERERER. PAS PHOHE.DIR WSCOLOR,BAS
CU~'T2. PAS
HELP .SKI
SX,PAS
I IITRODUCTI 011
Like the sidekicks of the old lIest after WhOM it is naad, Borl.nd's
Sidekick is a "faithful coapanion"" .always ready to help when needed; yet, never in the way, "ow that you've tooted it up, you'll get to see
, for yourself just how powerful an ally you've got,
Vou're _ viewing the notepad.,. ,ilthough its .uch anre than just a
[image:23.417.105.294.373.532.2]Notepad
If you just press
"2
in reply to the question, all files will be shown.You may now move freely among these file names using the arrow keys, and leaf through multiple-page directories with the PgUp and PgDn keys (as indicated on the new command line at the bottom of the screen). You select a file by placing the cursor at its name and pressing
"2.
You then return to the Notepad, and the new file will be read in. If you don't want to select any file, just press Esc, and you return to your old note file. In this way the command may be used just to view the direc-tory of your disk.
F4-lmport data from screen.
This is a v~ry exciting feature; it allows you to take text from the screen and put it into the Notepad! When you hit F4, the Notepad disappears, but don't be afraid, it will come back. The screen you now see is the one you had before you opened the Notepad window, and the cursor sits at the upper left corner. You may move it around on the screen with the arrows, and use the block marker commands K-B and Ctrl-K-K to mark any rectangular block of text:
Move the cursor to the beginning of the block you want to import to Notepad, hold down the Ctrl-key and type K and B to mark the block beginning (the upper left corner of the rectangular block). Now use the ~ and l keys to move the cursor to the end of the block, i.e. the lower right corner of the block. You'lI see the block being clearly marked on the screen as you move along.
You may press Ctrl-K-K, or just Esc, to end the block and return to the NotePad. Move to the pOint where you want to insert the block you just marked and press Ctrl-K·C for block copy. Voila - your marked text is moved into the note file.
Notepad
F9-Expand window.
When you press this key once, the arrow keys will move the borders of the Notepad window outwards, expanding its size. At this point, it is already at its maximum width, but you may expand it to fill the entire screen also in height. When you press F9 again, the arrows return to their normal use.
F1 O-Contract window.
When you press this key once, the arrow keys will move the borders of the Notepad window inwards, contracting its size. When you press F10 again, the arrows return to their normal use.
Esc Takes you out of Notepad to whence you came.
This is by no means all there is to be said about the Notepad, but you'll have to read chapter 2 for the full details. H ere, we will go on with the next window: the Calculator.
Calculator
Calculator
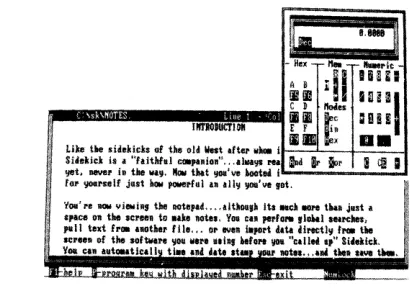
You are in the Notepad, and you need a Calculator. You could Escape your way out of Notepad and open the calculator window, of course, but there is an easier and better way: just press Alt-C, and the cal-culator pops up, with the Notepad remaining on the screen:
IIlTlOJUtTIOII
nnl
un
Like tile siiekicka of tile old West aft8l'1I,"* il---'-_-+_D_B_-I Sidekick is a "flitllfuJ C!*l'uio ... alwa'lC rea ! Cf! I
!PIt. never in tile .... ,. !loll tllat 1JOlI'\IIl hooted I .... - ... _ _ _ ... ~
t01' !PIIII'seif just how poiIel'ful an All~ lJOlI've 90t.
You're _ "iwiDg tile notepad .... althoa •• ita .. ck _ thaw J"st il
apace on the Icreel to .ake nottJ. Voa til pe1'f_ ,loMl aencileR,
pall text boa another file ... O~ evell ittport itta directl, t_ tile se.een of the $ohllne '.loa lIere nhs .. fore IJOlI "called al''' Siiekick.
[image:26.414.95.300.141.295.2]\' . . CID .,toutle. \I t hie ani hte ata, notel ... and l " l _we theu.
Figure 1 -6: Calculator Window
This is why we recommend the use of Alt-commands to open windows throughout Sidekick: you may enter an Alt-command anywhere in the system to open another window, although it is never shown on the command line. And all Alt-commands are mnemonics, depicting the names of windows:
H for Help, N for Notepad, C for Calculator, l for calendar, D for Dialer,
A for ASClltable, and S for Setup.
Calculator
When you activate the Calculator, the NumLock status is automatically
set, so you may use the numeric keypad to enter numbers.
If the Calculator obscures something on the screen that you need to see while using the Calculator, you easily move the window to any other position on the screen. Activate Scroll Lock and de-activate NumLock. Now use the arrow keys to move the window.
This technique is valid throughout Sidekick; the window in current use is moved around with the arrow keys when Scroll Lock is active.
The numeric field in the right part of the window shows you the keys available for decimal entry and calculation. Numbers are entered and calculation is performed exactly as you would write it on a piece of pa-per. Entries and intermediate results are shown in the display at the top of the window. The result of a calculation is obtained by pressing
=
or"'2.
You may use parentheses to change the order of calculation. An ex-ample:
equals 10, whereas
2*(3
+
4)equals 14. Six levels of parentheses are available. Each time you press a (, it will show up in the display, and each time you press ), the result of that parenthesis will be calculated and one ( will disappear from the display.
Any number on the display may be transferred to your application (or to Notepad) as explained later.
~ Deletes digits one at a time, from right to left.
E-Clear Entry
Clears the display, but not previous entries or intermediate results.
C-Clear
Calculator
Memory
The calculator's memory is accessed by pressing M (or m). After press-ing M, you must press:
C to clear the memory.
R to recall the number in memory to the display. The number in memory remains unchanged.
=
to put the number on the display into memory.+
to add the number on the display to the number in memory. to subtract the number on the display from the number in memory.*
to multiply the number in memory with the number on the display. / to divide the number in memory with the number on the display.When memory contains a number other than zero, an M will be shown in the display.
Modes
The calculator normally works in decimal mode, but pressing B or H
will switch to binary or hexadecimal mode. If that baffles you, don't worry; you won't need it. Decimal notation is the one we all know, and that is the standard notation of the Calculator. The use of Binary and Hexadecimal is discussed further in chapter 3 .
Transferring N umbers from Calculator
You will probably quite often want to use a number from the calculator somewhere else - in your spreadsheet, word processor, database, or in Notepad. You do this by 'programming' a key with the number, which simply means that you put the number into a key, and when you later press that key, the number comes out.
Press P to invoke programming. Then press the key into which you want to put the displayed number.
This may be any key, but of course it is practical to choose a key that you don't use for any other purpose, because as long as it holds a num-ber from the calculator, its normal function is suspended. Use for ex-ample a function key with Alt or Ctrl pressed at the same time.
Suppose that you have a number in the calculator display. Now press P
Calculator
If you want to remove the number from the key and return the key to its normal use, you return to the calculator and press P again. Now press C to clear all keys of any numbers you have put into them.
caLendar
caLendar
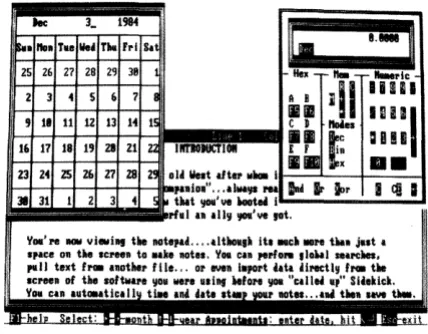
PressAlt-l, and the calendar pops up in the upper left corner of the screen. It will intially display June 1984, unless your PC's date is set to a later date.
he 3_ 1984 noa
ra.
lie. rM FI'I s.26 27 28 29 38 Hex "- "'I'lc
2 3 4 5 (, 7 II B
ill
lun
1111
11111
9 18 11 C
»
IIoiesIIIfIOJUCTIOII
1111
r:
QUE
16 17 18 E F
II
••
n 24 2S Z6 27 Id lint
.ft.,
118 i,.aioa" •.. &1111'11 l'II
lad
I' lor I dJ I38 31 1 2 tut IJOII' ue MotH i rflll .a ally IJOII' ue ,ot.
'10111.' re _ vi .. i", the not.,ad .. , . litho.,. its MIIcll MII\'e tua Ja.t • space Oll tile screen to •• ke lIOt ... 'lOll CAn perfo ... ,101.11 SlllI'Chet.
[image:30.415.115.329.115.282.2],Ill1 text ttea .lIOthel' ftle.,. 01' even i.pol't iat. iirectly f,.. the screen of the software YOII were IIsillf "'ore IJOII "cd! .. up" Siiekick. You cn autouticaU tiN ani dat. It.. r not ... tile. save • .
Figure 1-7: Calendar Window
You may now move through time: press ~ and -+ to change month and i and! to change year. The calendar covers 1901 through 2099
But more important: enter a date and press 7. A new window opens, containing an appointment schedule for that date. You may also just press 7; that will open the appointment calendar for the current day. You can enter a note about the day on the top line; the following lines are for appointments from
8
a.m. through8:30
p.m. in half-hour inter-vals. Move to the desired time using thei and! keys and enter your ap-pointment followed by 7. The PgUp and PgDn keys switch between page 1 and 2 of each day, and you may use ~ and -+ to change date.The function keys shown on the bottom line are used as follows:
F2-Name
caLendar
F3-Print
is used to print one day or a period of the current appointment calendar. You are asked to specify the first date and the last date. If you just press ~ when asked for first month, printing will start from the first appointment in the calendar. Then enter the last date you want to print. Again you may just press ~, and the date of the last appointment in the calendar will be printed.
F4-Print all
is used to print all appointments in the current appointment calendar.
F5-Delete
is used to delete one day or a period from the current appointment ca-lendar. The first and last date of this period must be specified. If you just press ~ when asked for first month, you will delete from the first
appointment in the calendar. Then enter the last date you want to de-lete. Again you may just press~, and yesterday's date will be chosen.
No more calendar for now; you may read on in chapter 4. Here we will go on to the next window: the Dialer. Again you may activate the Dialer while the calendar window is open, but we would like to demonstrate a very nice feature of the Dialer, so please Escape your way out of Sidekick.
Dialer
Dialer
The dialer turns your computer into an automatic dialer provided that you have a Hayes Smartmodem or compatible. 'My communications package does the same thing' you might say. Sure, but does it do it
while you are in the middle of your database, word processor, spread-sheet, or BASIC? Or does it pick phone numbers from any other pro-gram and dial them for you? Since we know the answers, we know you will use the Sidekick Dialer a lot.
Before using the dialer, you must tell Sidekick which port your modem is on. This is done with the installation program SKINST, see page 81.
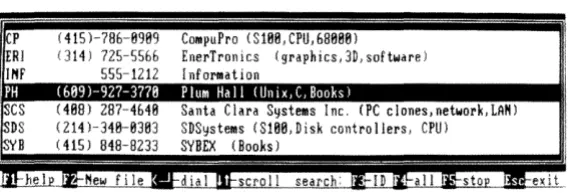
With Sidekick's main selection window on the screen, press Alt-D (or D or F5, if you prefer) to activate the Dialer. The first phone number on the screen is pointed out, and you can make the call by pressing ~.
(415)-7B6-8989 CompuPro (S188,CPU,6B888)
314) 725-5566 Enel"Tronics (graphics, 3D, software) 555-1212 Information
:.1
Santa C lara Systems Inc, (PC clones, network, LM!) SDSystems (S180,Disk controllers, CPU)
SYBEX (Books)
[image:32.415.75.360.276.372.2]sera! 1 search:
Figure 1-8: Dialer Window
Dialer
If you have more than one number on the screen that looks like a phone number, the first one will be chosen. You can then move to the next one by pressing ~. If you don't want to dial the number, but use the Dialer's own phone directory, you just press the space bar.
If the Dialer cannot find a valid phone number on the screen, it will load its own phone directory file if it is present.
The phone directory file must be a standard text file and may be prepared with the Notepad, with a database program, or with a Pascal or BASIC program of your own make. See chapter 5 for details of this file.
The default name of the phone directory file is PHONE.DIR, but you may choose another default name in the Setup window.
Once the file is loaded, it is displayed in the Dialer window, with a hori-zontal bar pointing at the first entry. You may scroll your file up and down using the arrow keys, and press ~ to dial when the desired num-ber is displayed in the bar. Or you may press one of the following keys:
F2-Newfile
This function key lets you specify a new phone directory file. The de-fault name is PHONE.DIR (unless you have changed the dede-fault value in the Setup window), but you can have as many different phone direc-tory files on your disk as you wish, and use F2 to switch between them.
F3-Search ID
When you want to call a particular person, you just need to press F3 and enter the person's ID. The 10 is anything starting in column one of each line in the phone directory - names or initials, for example. The dialer will then find the number in the directory, and you dial it by pressing ~.
F4-Search all
You press F4 to search the entire directory for any text (as opposed to search 10 which only searches for text starting in column one). This
Dialer
F5-Stop search
Stops a search and returns the t and! keys to their normal scroll func-tions.
ASCII Table
ASCII Table
Press Alt·A to open the ASCII Table window. This window shows the entire 256-character ASCII character set, 16 or 32 characters at a time. Use the arrows to leaf through the pages.
,The first two pages show 16 ASCII values at a time, in decimal and hexadecimal; they show the characters as they look on the PC's screen, and they tell you the control character value and mnemonic of each character.
The remaining pages display 32 characters at a time, with values in decimal and hexademical, and the characters as they are displayed on the screen.
Let us suppose that you are in BASIC, and you want to draw a nice frame on the screen. You'll use a series of
PRINI'
CHR$( .. )
statements, but what values should you use to produce vertical and horizontal lines, corners, etc? Activate Sidekick, open the ASCII Table, and leaf through it till you find the symbols you need (they are in the last part of the table, so you should start with leafing backwards with the +-or t keys).
You then find the values you need displayed right nexttothe symbols. This is not only easier than finding them in a book; the symbols on the screen also make it much easier to choose the right one, because this is the exact
symbol that your program will produce on the screen; not an almost-Iook-alike as you will find in a printed table.
That's it, folks. You can now use Sidekick to your heart's content. The Setup window is not covered here, as its use is entirely optional. It is used to change some of Sidekick's standard values, and save the changes, so that they become new standard values; you may for example save the current size and positions of your windows. But as long as you are satisfied with Sidekick as it is, you need not use the Setup window. Chapter 7 covers Setup in detail.
Advanced Use
Advanced Use
This section will show you how to speed up your use of Sidekick. Once you are familiar with the general way of opening and closing windows, you will want to use these techniques.
Returning To An Open Window
As you have learned, you may open a window either by selecting from the main selection window, or by entering an Alt-command from any window that is already open. And you close a window by Esccaping out of it. But suppose that you started with Notepad, then opened the Calculator window, and finally opened the ASCII Table:
8 88 11 HUL 1 81 'A SOH
2 82. "S STX
3 8 3 ' '( £TX
4 111. AD EOT Ilea
~:i:
:i
!~~
A B il~
I '7 II'? "G BEL Iiilll
!
au n
I
B 88
a
Af! as C D 110 ...1::!
I
:,~ ~
I I\'l'RODUCTI 011P ,
~~
=
D ! E
11 81! & AK VT
liD
~x • •12 8C' AL FF f the old West attel'lIhma i l - - . L . - - + - - - - I 13 8D f OM CR lui cmapanion ... alilays rea rDnd iir ~r ii OJ I
14 8£ n AN SO !j. lIoN that !jou've hooted
i---..
15 Sf*
AO Sf pOllel'ful an ally \lou've ,ot. IIVou're nOlI viewing the notepad .... although its auch lIOn thall jllst a il space on the screen to .ake notes. Vou CI1l pel'Iol'II glohal surelles, II pull text Irma another file ... 01' even laport data directl9 Il'mI tile I
screen of the sofwll'e YOI1 were utng hefol'e YOI1 "called up" Sidekick. i
[image:36.414.114.330.217.398.2]our notes ... and then s_ ta. I'
Figure 1-9: Notepad - Calculator -ASCII Table
You now want to get back to the Notepad. You may press Esc twice, of course, closing the ASCII Table and Calculator windows behind you. But you might need these windows on-screen when you return to the Notepad; for reference or because you want to import data from them to the Notepad:
Advanced Use
8 81! 1 81 2 82 I 3 83 , 4 84 •
S 85
6 Ilf. 7 87 •
8 88
@ NUL 'A SOH 'B STX 'c tiX 'v EOT
At EIN
Af Aex
AG BEL 'H BS
IIlTRODUCTIOM
Like tile sidekicks of the old West after wla it is RDe4. Borlalli's Sidekick is a "£althflll ccapAlIion" ... always read.., to llel, .. lie. Medei: ..,et. lIeIIer in the way. lIow that !Jou've booted it IIp. you'll get to see for yourself just how powerful an ally you've ,ot.
You're IIOW viewillg the notepad .... although its .uch Hre thai just a s,ace 011 tile screen to .ake note •. You CAlI perf ON gl0.al leUt.s. pull text frca another file ... 01' even IMport data directly froa tile screen oE the loftware you lieI" using before you "called liP" Sidekick. You CAlI autcaatica II tiMe And dat. st.. ou!' not ... alii tile •• we tI ...
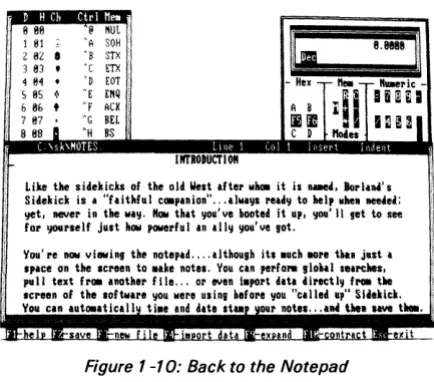
Figure 1-10: Back to the Notepad
If you press F4 to import data, the Notepad disappears, and the Calculator and ASCII Table become fully visible.
What has happened is that while the original sequence of open win-dowswas:
1 :Notepad - 2:Ca/culator - 3:ASCII Table
it has been changed to:
1 :Calculator - 2:ASCII Table - 3:Notepad
This means that when you now Escape from the Notepad, you return to the ASCII Table, then from ASCII Table to Calculator, and finally out of Sidekick.
[image:37.415.107.324.48.239.2]Advanced Use
Getting Out - And Quickly Back In
Let's assume you have a number of Sidekick windows open; you are in the middle of some complicated work. Now you need to return to your application for a while, but you would like to return to exactly the same setup of Sidekick's windows, without having to open them all again.
Just press Ctrl-Alt, and you return to the world outside Sidekick. You may now do whatever you need to do out there, and when you press Ctrl-Alt again to get back into Sidekick, you return to the exact same setup that you left.
Ctrl-Alt (or both Shift keys), used from within Sidekick, immediately returns you to the outside world, and the next time you press them, you are returned to where you left off.
Time and Date Stamping Notes
The Notepad has special features which automatically time and date stamp orders, notes on telephone conversations, or anything else that you need logged with time and date.
Simply enter the text
. LOG
in column one on line one of your note file. Whenever you open the Notepad window with such a file loaded, the cursor moves to the bottom of the file, and the time and date from the PC's clock is written into the file.
Advanced Use
NOTEPAD
Chapter 2
NOTEPAD
The Notepad is a full-screen text editor providing all the facilities of the
TURBO Pascal editor, and most of those of WordStar.lfyou are familiar with either of these editors, you need but little instruction in the use of the Notepad. There are a few minor differences, and the Notepad has a few extensions; these are discussed on pages 48 and 51. You should also read page 30 which deals with the function keys available in Notepad.
Using the Notepad is simple as can be: open the Notepad window by pressing Alt-N, and the Notepad appears:
C:\sk\I'!OT S Line 24 Col 28
3:58:11 12/3/1984
Here's a quick ex .. ple of how thi, works. At the .aaent, the notepad. Suppose you suddenly needed the calculator. Your calculator is ready and at your service.
Need the calendar? Alt-L will hriDg it right up. ~.
calculator and calendar on-screen at the Sale tiae.
[image:40.416.101.336.240.343.2],lI:beh
.wUY~,JI;:~"ilHJI::W.W~,hll..UMlJd .90nt.~M• •
,
Figure 2-1: Notepad Window
Text is entered on the keyboard just as if you were using a typewriter. To terminate a line, press the ~ key. When you have entered enough lines to fill the window, the top line will scroll out of the window, but don't worry, it is not lost, and you may page back and forth in your text with the editing commands described later.
Let us first take a look at the meaning of the command line at the
The Notepad Command line
The Notepad Command Line
The bottom line of the screen shows you which function keys you may use, and what they do. The following is a description of these function keys.
F1-Help
The help key will display detailed help about Notepad, provided that the help file SK.HLP is on the disk from where you started Sidekick.
F2-Save
Save the contents of your note file on disk. In order to let you switch disks freely, this is never done automatically, and you must therefore remember to save before you shut down the computer. The original file is unchanged, and is given the last name BAK. You may also use the WordStar command Ctrl-K-D to save.
F3-New note file
Define the name of a file to be used as note file. The default file name is NOTES (unless changed in Setup). When F2 is pressed, the message:
Enter note file name or pattern >
appears at the status line. Pressing Ctrl-U cancels the command; a file name followed by ~ defines a new note file name. This file will be read into the Notepad, if it exists, otherwise it will be created.
If changes in the current note file have been made since you saved your file last time, you are asked if the current note file should be saved be-fore being overwritten by the new file.
Instead of a file name, a pattern containing the normal wildcards: asterisk and question mark may be entered. This will cause a directory of all matching files to be displayed in a separate window.
If you just type ~ the entire directory will be shown.
The Notepad Command line
Notepad normally looks for its files on the directory you are currently using, unless you have chosen a different default directory in Setup (see chapter 7). You can work on files in other directories by specifying a path name in front of the file name on the standard DOS format:
\text\letters\myletter
specifies the file MYLETTER in the directory LETTERS which is a sub-directory to TEXT which is a sub-sub-directory to the root sub-directory.
F4-lmport data from screen
When F4 is pressed, the screen as it was before Notepad was opened appears. The arrow keys are now used to move the cursor around on the screen. A rectangular block may be marked with the block marker commands Ctrl-K-B and Ctrl-K-K.
Move the cursor to the beginning of the block you want to import to Notepad (Le. the upper left corner), hold down the Ctrl-key and type K and B to mark the block beginning. Now use the ~ and l keys to move the cursor to the end of the block, the lower right corner. The block is being marked on the screen as the cursor moves along.
You may mark the end of the block with Ctrl-K-K, but it is not neces-sary. Just press Esc, and you return to the NotePad. Move to the point where you want to insert the block you just marked and press Ctrl-K-C for block copy.
F9-Expand window
Pressed once, this key causes the arrow keys to move the borders of the Notepad window outwards, expanding its size, until they reach the edge of the screen, i.e. the maximum Notepad size is 23 lines by 78 characters. When pressed again, F9 returns the arrows to their normal use.
F1 O-Contract window
The Status line
The Status Line
The top line of the window is the status line containing the following information:
path X:FILENAME.TYP Line n Col n Insert Indent Graph
Figure 2 -2: Notepad Status line
path X :FI LENAM E.TYP
The directory, drive, name, and type of the file being edited.
Linen
Coin
Shows the number of the line containing the cursor counted from the start of the file.
Shows the number of the column containing the cursor counted from the left side of the screen.
Insert
Indicates that characters entered on the keyboard will be inserted at the cursor position, and existing text to the right of the cursor will move to the right as you write new text. Pressing Ins or Ctrl-V will instead activate the Overwrite-mode. Text entered on the keyboard will then overwrite characters under the cursor.
Indent
Indicates that auto-indentation is in effect. Switch off/on with Ctrl-Q-I.
Graph
Editing Commands
Editing Commands
As mentioned before, text is written as if you were using a typewriter, but as this is a computerized text editor, it offers you a number of edit-ing facilities which make text manipulation much easier than on paper.
The Notepad accepts a total of 48 commands to move the cursor around, page through the text, find and replace text strings, etc, etc. These commands can be grouped into the following four categories:
Cursor movement commands, I nsert and delete commands, Block commands, and Miscellaneous commands
Each of these groups contain logically related commands which will be described separately in following sections. The following table pro-vides an overview of the commands available:
CURSOR
MOVEMENI'COMMANDS:
Character left
Character right
Word left
Word right
Line up
Line down
Scroll up
Seroll down
Page up
Page down
INS:ERT
&!DELEI'E COMMANDS:
Insert mode on/off
Insert line
De lete 1 ine
Delete to end of line
To top of window
To top of file
To top of file
To end of file
To end of file with
time/date stamp
To left on line
To right on line
To beginning of block
To end of block
To last cursor position
Delete right word
Editing Commands
BLOCK COMMANDS:
Mark block begin
Mark block end
Mark single word
Copy block
Move block
Delete block
~ad
block from disk
Write block to disk
Hide/display block
Print block
Sort block
MISC. EDITING COMMANDS:
Endedit
Tab
Auto tab on/off
~storeline
Find
Find
eYereplace
~peat
last find
Control
char~cterprefix
Time/date sta.mp
Graphics on/off
Table 2-1: Editing Command Overview
In a case like this, the best way of learning is by doing; so open the Notepad window, specify a file (or use the standard file NOTES). Then use the commands as you read on.
Each of the following descriptions consists of a heading defining the command, followed by the default keystrokes used to activate the command. In some cases, there are two ways of giving a command: either the PC's function keys (arrows and such), or the WordStar
com-mands; both will be shown.
All commands may be re-defined to suit your taste, if you are used to a different editor. This is described on page 77 . The following descrip-tions of the commands assume the use of the WordStar compatible
keystrokes.
A Note on Control Characters
[image:45.416.61.356.77.240.2]Editing Commands
The Ctrl-key works like the shift keys: if you hold down a shift key and press A, you will get a capital A; if you hold down the Ctrl-key and press A, you will get a Control-A (Ctrl-A for short).
Cursor Movement Commands
The most basic thing to learn about an Notepad is how to move the cursor around in the window. The Notepad uses a special group of con-trol characters to do that, namely the concon-trol characters A, S, D, F, E, R,X, andC.
Why these? Because they are conveniently located close to the control key, so that your left little finger can rest on that while you use the middle and index fingers to activate the commands. Furthermore, the characters are arranged in such a way on the keyboard as to logically indicate their use. Let's examine the basic movements: cursor up, down, left, and right:
E
S D
X
These four characters are placed so that it is logical to assume that E moves the cursor up, X down, S to the left, and Ctrl-D to the right. And that is exactly what they do. Try to move the cursor around in the window with these four commands. As the PC keyboard has repeating keys, you may just hold down the control key and one of these four keys, and the cursor will move rapidly across the window.
Now let us look at some extensions of those movements:
E B
A S D F
X C
Editing Commands
Likewise with Ctrl-A and Ctrl-F: Ctrl-A moves to the left like Ctrl-S, but a whole word at a time, and Ctrl-F moves one word to the right.
The two last basic movement commands do not move the cursor but scrolls the entire window upwards or downwards in the file:
W E R
A S D FZ X C
Ctrl-W scrolls upwards in the file (the lines in the window move down), and Ctrl-Z scrolls downwards in the file (the lines in the win-dow move up).
Character left +- Ctrl-S
Moves the cursor one character to the left without affecting the character there. This command does not work across line breaks: when the cursor reaches the left edge of the window, it stops.
Character right Ctrl-D
Moves the cursor one character to the right without affecting the character there. This command does not work across line breaks: when the cursor reaches the right end of the window, the text starts scrolling horizontally until the cursor reaches the extreme right of the line, in column 125, where it stops.
Word left Ctrl-+- Ctrl-A
Moves the cursor to the beginning of the word to the left. A word is defined as a sequence of characters delimited by one of the following characters: Ispacel
< > , ; . ( ) []
A ,*
+ - /
$. This command works across line breaks.Word right Ctrl--+ Ctrl-F
Moves the cursor to the beginning of the word to the right. See the definition of a word above. This command works across line breaks.
Line up t Ctrl-E
Editing Commands
Line down Ctrl-X
Moves the cursor to the line below. If the cursor is on the second-to-Iast line, the window scrolls up one line.
Scroll up Ctrl-W
Scrolls up towards the beginning of the file, one line at a time (the entire window scrolls down). The cursor remains on its line until it reaches the bottom of the screen.
Scroll down Ctrl-Z
Scrolls down towards the end of the file, one line at a time (the entire window scrolls up). The cursor remains on its line until it reaches the top of the window.
Page up PgUp Ctrl-R
Moves the cursor one page up with an overlap of one line. The cursor moves one windowfulless one line backwards in the text.
Page down PgDn Ctrl-C
Moves the cursor one page down with an oVerlap of one line. The cur-sor moves one windowful less one line forwards in the text.
The commands discussed so far let you move freely around in your pro-gram text, and they are easy to learn and understand. Try to use them all for a while and see how natural they feel.
Once you master them, you will probably sometimes want to move more rapidly. The Notepad provides commands to move rapidly to the extreme ends of lines, to the beginning and end of the text, and to the last cursor position.
These commands require two characters to be entered: first a Ctrl-Q and then one of the following control characters: 5, D, E, X, R, and C. They repeat the pattern from before:
E R
S D
X C
Editing Commands
To left on line Home Ctrl-Q-S
Moves the cursor all the way to the left edge of the window (column one).
To right on line End Ctrl-Q-D
Moves the cursor to the end of the line, i.e. to the position following the last printable character on the line. Trailing blanks are always removed from all lines to preserve space.
To top of window Ctrl-Home Ctrl-Q-E
Moves the cursor to the top of the Notepad window.
To bottom of window Ctrl-End Ctrl-Q-X
Moves the cursor to the bottom of the Notepad window.
To top of file Ctrl-PgUp Ctrl-Q-R
Moves to the first character of the text.
To end of file Ctrl-pgDn Ctrl-Q-C
Moves to the last character of the text.
Finally the Ctrl-Q prefix with a a, K, 0, or
P
command allows you to jump far within the file:To beginning of block Ctrl-Q-a
Moves the cursor to the the position of the block begin marker set with Ctrl-K-a (hence the B). The command works even if the block is not displayed (see hide Idisplay block later), or the block end marker is not set.
To end of block Ctrl-Q-K
Moves the cursor to the position of the block end marker set with Clrl·K·K (hence the K). The command works even if the block is not displayed (see
hide/display block later), or the block begin marker is not set.
Editing Commands
To last cursor position Ctrl-Q-P
Moves to the last position of the cursor (the
P
being a mnemonic for Position). This command is particularly useful to move back to the last position after a Save operation or after a find or find/replace operation.I nsert and Delete Commands
These commands let you insert and delete characters, words, and lines. They can be divided into three groups: one command which controls the text entry mode (insert or overwrite), a number of simple com-mands, and one extended command.
Notice that the Notepad provides a 'regret' facility which lets you 'undo' changes as long as you have not left the line. This command (Ctrl-Q-L) is described on page 44.
Insert mode on/off Ins Ctrl-V
With this command you switch between insert and overwrite modes while entering text. The current mode is displayed in the status line at the top of the window.
Insert mode is the default value when the Notepad is activated, and it lets you insert new text into an existing text. The existing text to the right of the cursor simply moves to the right while you enter the new text.
Overwrite mode may be chosen if you wish to replace old text with new text. Characters entered then replace existing characters under the cur-sor.
Delete left character
This is not the left arrow on the numeric block, it is the key marked - in the top row next to NumLock, (it is often referred to as BackSpace). It moves one character to the left and deletes the character there. Any characters to the right of the cursor move to the left.
Editing Commands
Delete right word Ctrl-T
Deletes the word to the right of the cursor. A word is defined as a sequence of characters delimited by one of the following characters: Ispacel
< > , ; . ( ) [ ] .. '.
+ - /
$. This command works across line breaks, and may thus be used to remove line breaks.Insert line Ctrl-N
Inserts a line break at the cursor position. The cursor does not move.
Delete line Ctrl-Y
Deletes the line containing the cursor and moves any lines below one line up. The cursor moves to the left edge of the window. No provi-sion exists to restore a deleted line, so take care I
Delete to end of line Ctrl-Q-Y
Deletes all text from the cursor position to the end of the line.
A block of text is deleted with the delete block command Ctrl·K· Y described in the next section.
Block Commands
All block commands are extended commands (two characters each in the standard command definition)' and you may ignore them at first if you feel a bit dazzled at this point. Later on, when you feel the need to move, delete, or copy large chunks of text, you should return to this section.
Editing Commands
Mark block begin F7 Ctrl-K-B
This command marks the beginning of a block. The marker itself is not visible on the screen, and the block only becomes visibly marked when the End block marker is set. You may also use the Begin block marker as a reference point in your text, and jump directly to it with the Ctrl-Q-B command.
Mark block end
Fa
Ctrl-K-KThis command marks the end of a block. As above, the marker itself is not visible on the screen, and the block only becomes visibly marked when the Begin block marker is also set. You may also use the End
block marker as a reference point in your text, and jump directly to it
with the Ctrl-Q-K command.
Mark single word Ctrl-K-T
This command marks a single word as a block, and thus replaces the
Begin block - End block sequence which is a bit clumsy when marking
just one word. If the cursor is placed within a word, then this word will be marked; if not then the word to the left of the cursor will be marked. A word is defined as a sequence of characters delimited by one of the following characters: Ispacel
< > , ; . ( ) [
r
'*
+
-/$.
H ide/display block Ctrl-K-H
This command causes the visual marking of a block to be alternately switched off and on. Block manipulation commands (copy, move, delete, and write to a file) work only when the block is displayed. Block related cursor movements Uump to beginning/end of block) work whether the block is hidden or displayed.
Copy block Ctrl-K-C
This command places a copy of a marked and displayed block starting at the cursor position. The original block is left unchanged, and the markers are placed around the new copy of the block. This command is also used to move data from the screen into the Notepad, together with the F4 function key (import data).
Move block Ctrl-K-V
Editing Commands
Delete block Ctrl-K-Y
This command deletes a marked and displayed block. No provision exists to restore a deleted block, so take care I
Read block from disk Ctrl-K-R
This command is used to read a file into the current text at the cursor position, exactly as if it was a block that was moved or copied. The block read in is marked as a block. When you give this command, you are prompted for the name of the file to read. The file specified may be any legal filename. If you just hit
A?,
or specify a file pattern, you get a directory matching the pattern from which you can choose your file.Write block to disk Ctrl-K-W
This command is used to write a previously marked block to a file. The block is left unchanged, and the markers remain in place. When this command is issued, you are prompted for the name of the file to write to. If the file specified already exists, a warning is issued before the existing file is overwritten. If no block is marked, the command performs no operation, and no error message is issued. The file specified may be any legal filename. Avoid the use of files of the type .SAK, as it is used for Notepad backup files.
Print block Ctrl-K-P
This command is used to print the marked (and displayed) block on the printer. If no block is displayed, the entire file is printed.
Sort block Ctrl-K-S
Editing Commands
Miscellaneous Editing Commands
This section collects a number of commands which do not logically fall into any of the above categories. They are nonetheless important.
Save file F2 Ctrl-K-D
Tab
Saves the note file and gives the original file (if any) the last name
BAK.
~I Ctrl-I
There are no fixed tab positions in the Notepad. Instead, tab positions are automatically set to the beginning of each word on the line immediately above the cursor. This provides a very convenient automatic tabbing feature especially useful when making notes, because you often want to line up columns of related items.
Auto tab on/off Ctrl-Q-I
The auto tab feature provides automatic indentation. When active, the indentation of the current line is repeated on each following line, i.e. when you hit , the cursor does not return to column one but to the starting column of the line you just terminated. When you want to change the indentation, use any of the cursor right or left commands to select the new column. When auto tab is active, the message Indent is displayed on the status I ine, and when passive the message is removed. Auto tab is active by default.
Graphics on/off Ctrl-Q-G
Editing Commands
Restore line Ctrl-Q-L
Find
This command lets you regret changes made to a line as long as you have not left the line. The line is simply restored to its original contents
regardless of what changes you have made. But only as long as you re-main on the line; the second you leave it, changes are there to stay. For this reason, the Delete line (Ctrl-Y) command can regrettably only be
regretted, not resto

![Crystal structure of nitrido[5,10,15,20 tetrakis(4 methylphenyl)porphyrinato]manganese(V)](data:image/gif;base64,R0lGODlhAQABAIAAAP///wAAACH5BAEAAAAALAAAAAABAAEAAAICRAEAOw==)