Workshop on
Digital Libraries: Theory and Practice March, 2003
DRTC, Bangalore
Paper: S
Greenstone Digital Library Software (GSDL): A
Tutorial
Jaba Das
Documentation and Research Training Centre Indian Statistical Institute
Bangalore-560 059 email: [email protected]
Abstract
1.
INTRODUCTION
The Greenstone software runs under Unix, Windows and Mac (OS/X), and is distributed under the GNU public license. General users can download the software and set up a digital library system. Those with programming skills can extend and customize the system according to their own requirements.
2.
BUILDING A COLLECTION USING GSDL
You can choose any one operating system either Windows or Unix to build and maintain your collection on GSDL. For building collections we can take as an example CD-ROM or any Web page or any file from Hard disk of your local system. In this tutorial, we will see how to build a collection using both Windows and Unix. In fact, the two are very identical —one needs to go through the one that pertains to one’s system.
2.1. Collection Building in Windo ws
The first step in building a collection from the command line under Windows is to get at the “command prompt”. Once you are in DOS mode, enter:
cd “C:\Program Files\gsdl” (You need the quotation marks because of the space in Program Files.)
prompt will come like,
C:\Progra~1 \GSDL> Next, at the prompt type
C:\ Progra~1\GSDL>setup.bat
This batch file is needed to create the environment for running the Greenstone programs in different MS-DOS sessions. When you work in DOS mode, Setup.bat command is always needed. Now the GSDL environment will be set and you are in a position to make, build and rebuild collections. The first program is the Perl program mkcol.pl, whose name stands for “make a collection”. Run the program by typing
C:\ Progra~1\GSDL>perl –S mkcol.pl
This will list out the arguments to be used with the command. The only argument it lists is the ‘-creator’, which specifies who created the collection.
Let us now use the following command to create the initial files and subdirectories necessary for our digital library. Let us assign the collection the name test; now type,
C:\ Progra~1\GSDL>perl –S mkcol.pl –creator [email protected] test
Here, [email protected] is the email id of the creator of the collection, you can use your own id.
To view the newly created files, move to the newly created collection directory by typing C:\ Progra~1\GSDL>cd collect\test
you can list the content of this directory be typing ‘dir’ at the prompt.
There should be seven subdirectories: archives, building, etc, images, import, index and perllib.
Now we must populate the collection with sample documents. Supposing the source material for the test collection is in d:\xxx\jaba, then give the following command at the prompt:
Alternatively, in Windows you can select the contents of the jaba directory and drag them into the test collection’s import directory.
In the collection’s etc directory, there is a file called collect.cfg. It is the configuration file of the ‘test’collection. if you open the file, you can see it contains the following information
Creator [email protected] maintainer [email protected] public true
beta true
indexes document:text default index document:text
plugin ZIPPlug plugin GMLPlug plugin TEXTPlug plugin HTMLPlug plugin EMAILPlug plugin ArcPlug plugin RecPlug
classify AZList -metadata “Title” collectionmeta collectionname "test" collectionmeta iconcollection "" collectionmeta collectionextra "" collectionmeta .document:text "documents" Fig. 1
Now you are ready to “import” the collection. This is the process of bringing the documents into the Greenstone system, standardizing the document format, the way that metadata is specified, and the file structure in which the documents are stored. Type
C:\ Progra~1\GSDL\>perl –S import.pl test
This process takes about five minutes on a 1 GHz computer, and correspondingly longer on slower machines. Note that you do not have to be in either the collect or test directories when this command is entered; because GSDLHOME is already set by the initial ‘setup.bat’ command, the Greenstone software can work out where the necessary files are.
Now let’s make some changes to the collection configuration file to customize its appearance. First, give the collection a name. This will be treated by web browsers as the page title for the front page of the collection, and used as the collection icon in the absence of a picture. Change the line that reads collectionmeta collectionname "test" to something like collectionmeta collectionname "First Project". Add a description of your collection between the quotes of the line that reads collectionmeta collectionextra "". This is used as the about this collection text on the collection’s home page. You can add, “This collection is an experimental one for my project work.”
Fig. 2
The next step is to “build” the collection, which creates all the indexes and files that make the collection work. Type
C:\ Progra~1\GSDL\collect\test>perl –S buildcol.pl
at the command prompt for a list of collection-building options. Then type C:\ Progra~1\GSDL\collect\test>perl –S buildcol.pl test
Otherwise select the contents of the test collection’s building directory and drag them into the index directory. Alternatively, you can remove the index directory (and all its contents) by typing the command (If the current working directory is not test, type
cd "%GSDLHOME% \collect\test"
before going through the rd, ren and mkdir sequence above.)
rd /s index (on Windows NT/2000) deltree /Y index (on Windows 95/98)
and then change the name of the building directory to index with ren building index
mkdir building
in preparation for any future rebuilds.
You should be able to access the newly built collection from your Greenstone homepage. You will have to reload the page if you already had it open in your browser, or perhaps even close the browser and restart it (to prevent caching problems). Alternatively, if you are using the “local library” version of Greenstone you will have to restart the library program. To view the new collection, click on the image. The result should look something like Fig. 3.
Fig. 3
In summary then, the commands typed to produce the test collection are: cd C:\ Progra~1\gsdl # assuming default location setup.bat
perl –S mkcol.pl –creator [email protected] test cd “%GSDLHOME%\collect\test”
xcopy /s d:\xxx\jaba\* import # assuming D drive perl –S import.pl test
perl –S buildcol.pl test
rd /s index # on Windows NT/2000 deltree /Y index # on Windows 95/98 ren building index
You can build a collection of variety of documents like Word files, PDF files, email, image files, video files, MP3 files, HTML files, etc. In case of email files, the files must have the ‘.Email’ extension. In case of HTML files you need to keep all the interlinked files in one folder. In case of image or video or MP3 files there is no need to copy source files into ‘import‘directory. In this case first you have to keep all files into the ‘images’ directory of your collection. While in case of Word, emails and PDF files there is not much to be done, for documents like image files, video files, MP3 files and HTML files with hyperlinks, you have to change the ‘plug-in’ options in the collection configuration file, i.e. the ‘collect.cfg’ file. And also, you have to create a ‘metadata.xml’ file in ‘import’ directory to assign metadata to the images or the video clips or the audio clips. Assigning metadata to the documents of a collection and formatting the configuration file will be discussed in detail in later sections of this tutorial.
2.2. Collection Building in Unix
First change into the directory where Greenstone has been installed. For example, if Greenstone is installed under its default name at the top level of your home account you can move there by typing
cd ~/public_html/gsdl (/home/jaba/public_html/gsdl).
Next at the prompt, type
source setup.bash (if you’re running the BASH shell) source setup.csh (if you’re running the C shell)
If, later on in your command-line session with Greenstone, you wish to return to the top level Greenstone directory you can accomplish this by typing
cd $GSDLHOME
With the appropriate setup file sourced, we are now in a position to make, build and rebuild collections. The first program we will look at is the Perl program mkcol.pl, whose name stands for “make a collection.” First run the program by typing mkcol.pl to display a list of arguments to appear on the screen. The only required argument is creator, which is used to specify who built the collection.
Let us now use the command to create the initial files and directories necessary for our digital library. To assign the collection the name test, type
mkcol.pl –creator [email protected] test.
To view the newly created files, move to the newly created collection directory by typing cd $GSDLHOME/collect/test
You can list the contents of this directory by typing ls -l
There should be seven subdirectories: archives, building, etc, images, import, index and perllib.
If source material is in your hard disk, for instance, the source file “text” is under /home/jaba/text/, copy the contents of the /home/jaba/text directory into the GSDLHOME/collecttest/import directory. Type the command,
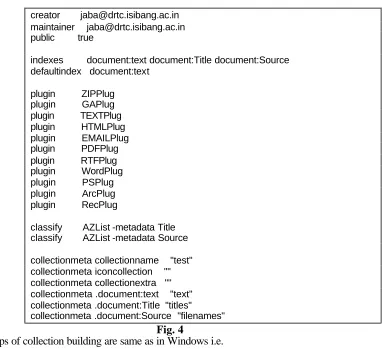
In the collection’s etc directory, there will be a file called collect.cfg. Open the file using a text editor like vim or vi, a popular editor on Linux.
cd collect/test/etc
vi collect.cfg (or) vim collect.cfg
It should look something like in Fig. 4,
creator [email protected] maintainer [email protected] public true
indexes document:text document:Title document:Source defaultindex document:text
plugin ZIPPlug plugin GAPlug plugin TEXTPlug plugin HTMLPlug plugin EMAILPlug plugin PDFPlug plugin RTFPlug plugin WordPlug plugin PSPlug plugin ArcPlug plugin RecPlug
classify AZList -metadata Title classify AZList -metadata Source
collectionmeta collectionname "test" collectionmeta iconcollection "" collectionmeta collectionextra "" collectionmeta .document:text "text" collectionmeta .document:Title "titles" collectionmeta .document:Source "filenames"
Fig. 4
Other steps of collection building are same as in Windows i.e.
import.pl test buildcol.pl test rm -r index/* mv building/* index
The following table presents the differences in building a collection in Windows and Unix.
Windows Unix
Run ‘setup.bat’ to make Greenstone programs available.
‘Source setup.bash’ or ‘Source setup.csh’ to make programs available.
Old collection index replaced by typing ‘rd /s index’ then ‘ren building index’ followed by ‘mkdir building’, or by using visual file manager.
Old collection index replaced by typing rm –r index/* then mv building/* index
3
ASSIGNING METADATA TO THE DOCUMENTS OF A COLLECTION
Metadata is descriptive information such as author, title, date, keywords, and so on that is associated with a document. Metadata is stored within <Metadata> tags, like,< Metadata name=”metadatatag”> value </ Metadata>
where, name is the attribute of the <Metadata> tag,
metadatatag can be title, author, or any other element of a metadata schema like Dublin core (DC) and
value is the data to which the metadata has to be assigned.
For example,
< Metadata name=”Title”> Theory of Library Classification</Metadata>
The Dublin Core metadata standard (1) is used for defining metadata types.
Metadata Name Metadata Tag Definition
Title Title A name given to the resource
Creator Creator An entity primarily responsible for making the content of the resource
Subject and keywords
Subject The topic of the content of the resource
Description Description An account of the content of the resource Publisher Publisher An entity responsible for making the resource
available
Contributor Contributor An entity responsible for making contributions to the content of the resource
Date Date The date that the resource was published or some other important date associated with the resource. Resource type Type The nature or genre of the content of the resource Format Format The physical or digital manifestation of the resource Resource identifier Identifier An unambiguous reference to the resource within a
given context: this is the object identifier or OID Source Source A reference to a resource from which the present
Resource is derived
Language Language A language of the intellectual content of the resource Relation Relation A reference to a related resource
Coverage Coverage The extent or scope of the content of the resource Rights management Rights Information about rights held in and over the
resource
Table 2 Elements/tags of Standard Metadata.
XML files are manually created for assigning the metadata to documents under import directory. If the ‘use_metadata_files’ option is specified, RecPlug uses an auxiliary metadata file called metadata.xml. For example see Fig. 5,
<?xml version="1.0" encoding="UTF-8" standalone="no"?>
<! DOCTYPE DirectoryMetadata SYSTEM http://greenstone.org/dtd/DirectoryMetadata/ 1.0/DirectoryMetadata.dtd">
<FileName>AA.PDF</FileName> <Description>
<Metadata name="Title">Informetrics:Scope, Definition, Methodology and Conceptual Questions</Metadata>
<Metadata name="Language" mode="accumulate">English</Metadata> <Metadata name="Subject" mode="accumulate">Informetrics</Metadata> <Metadata name="Creator" mode="accumulate">I K Ravichandra Rao</Metadata>
<Metadata name="Date" mode="accumulate">1998</Metadata> <Metadata name="AZList" mode="accumulate">T.1</Metadata> </Description>
</FileSet> </DirectoryMetadata>
Fig. 5
‘Metadata name’ is the specific tag or field. Sometimes metadata is multi-valued and new values accumulate, rather than overriding previous ones. The mode = accumulate should be used and it must be specified for every occur rence. The metadata.xml mechanism that is embodied in RecPlug is just one way of specifying metadata for documents. It is easy to write different plugins that accept metadata specifications in completely different formats.
3.1. Metadata for Multimedia Files
In case of image or video or mp3 files you have to create text file about your source file under import directory, then you can assign your metadata, as follows,
<?xml version="1.0" encoding="UTF-8" standalone="no"?> <!DOCTYPE DirectoryMetadata SYSTEM
"http://greenstone.org/dtd/DirectoryMetadata/1.0/DirectoryMetadata.dtd"> <DirectoryMetadata> <FileSet> <FileName>marilyn.txt</FileName> <Description> <Metadata name="Title">Marilyn</Metadata>
<Metadata name="Language" mode="accumulate">English</Metadata> <Metadata name="Subject" mode="accumulate">Photos</Metadata> <Metadata name="piclink" mode="accumulate">marilyn.jpg</Metadata>
<Metadata name="extlink" mode="accumulate">http://www.Clipart.com</Metadata> <Metadata name="AZList" mode="accumulate">T.1</Metadata>
</Description> </FileSet>
</DirectoryMetadata>
Fig. 6
4.
THE COLLECTION CONFIGURATION FILE
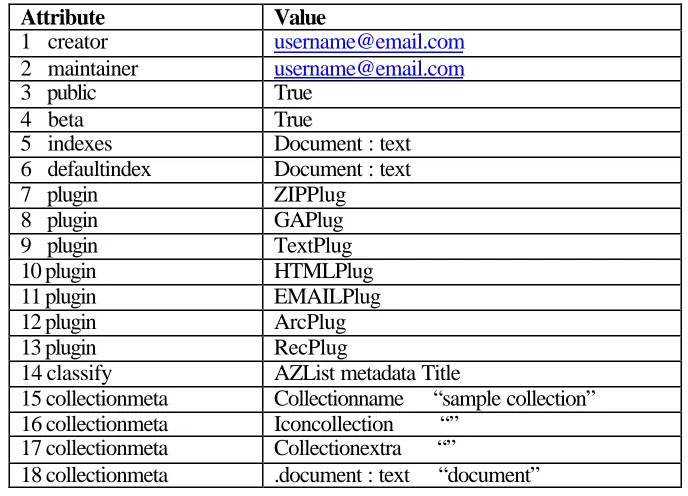
The collection configuration file governs the structure of a collection as seen by the user, to get the information of your collection and the way in which its documents are processed and presented. A simple collection configuration file is created when you run mkcol.pl, which records your E-mail address as the creator and maintainer.
Each line of the collection configuration file is essentially an “attribute, value” pair. Each attribute gives a piece of information about the collection that affects how it is supposed to look or how documents are to be processed.
The collection configuration file created by the mkcol.pl script, shown in Table 3 below, is a very simple one and contains a bare minimum of information. Lines 1 and 2 stem from the creator value supplied to the mkcol.pl program, and contain the E-mail addresses of the person who created the collection and the person responsible for maintaining it (not necessarily the same person).
Line 4 indicates whether the collection is beta or not (this also defaults to true, meaning that the collection is a beta release). Line 5 determines what collection indexes are created at build time: in this example only the document text is to be indexed. Indexes can be constructed at the document, section, and paragraph levels. They can contain the material in the text, or in any metadata—most commonly Title. The form used to specify an index is level:data. For example, to include an index of section titles as well, you should change line 5 to indexes document:text section:Title. More than one type of data can be included in the same index by separating the data types with commas. For example, to create a section-level index of titles, text and dates, the line should read indexes section:text,Title,Date.
The default index defined in line 6 is the default to be used on the collection’s search page.
Lines 7–13 specify which plugins to use when converting documents to Greenstone Archive format and when building collections from archive files. The Greenstone Archive format is a XML style document that marks documents into sections, and can hold metadata at the document or section level. The Greenstone archive files need nto be created manually. These are automatically created by the document processing plugins that are described in later sections.
Attribute Value
1 creator [email protected]
2 maintainer [email protected]
3 public True
4 beta True
5 indexes Document : text 6 defaultindex Document : text
7 plugin ZIPPlug
8 plugin GAPlug
9 plugin TextPlug
10 plugin HTMLPlug
11 plugin EMAILPlug
12 plugin ArcPlug
13 plugin RecPlug
14 classify AZList metadata Title
15 collectionmeta Collectionname “sample collection” 16 collectionmeta Iconcollection “”
17 collectionmeta Collectionextra “”
18 collectionmeta .document : text “document”
Table 3 Collection Configuration File Created by mkcd.pl
Line 14 specifies that an alphabetic list of titles is to be created for browsing purposes. Browsing structures are constructed by “classifiers”. Classifiers are discussed in detail in later sections.
collectionextra, which gives a stretch of text, surrounded by double quotes, describing the collection. This will be shown as the “About this collection” text. This simple collection configuration file does not include any examples of format strings, nor of the subcollection and language facilities provided by the configuration file.
If a collection contains documents in different languages, separate indexes can be built for each language. Language is a metadata statement; values are specified using the ISO 639 standard two-letter codes for representing the names of languages—for example, en is English, zh is Chinese, and mi is Maori. Since metadata values can be specified at the section level, parts of a document can be in different languages. For example, if the configuration file contained indexes section:text section:Title document:text paragraph:text languages en zh mi section text, section title, document text, and paragraph text indexes would be created in English, Chinese, and Maori for each—so twelve indexes altogether are created. Adding a couple of subcollections multiplies the number of indexes again. Hence, one has to be careful and guard against a index glut. (This index specification could be defined using the subcollection facility rather than the languages facility. However, since the syntax precludes creating subcollection of subcollections, it would then be impossible to index each language in the subcollections separately.)
4.5.1. Formatting the Configuration File
4.1.1. Formatting Greenstone lists in Configuration file
Format strings that control how lists look can apply at different levels of the display structure. They can alter all lists of a certain type within a collection (for example DateList), or all parts of a list (for example all the entries in the Search list), or specific parts of a certain list (for example, the vertical list part of an AZList classifier on title).
Following the keyword format is a two-part keyword, only one part of which is mandatory. The first part identifies the list to which the format applies. The list generated by a search is called Search, while the lists generated by classifiers are called CL1, CL2, CL3,… for the first, second, third,… classifier specified in collect.cfg. The second part of the keyword is the part of the list to which the formatting is to apply—either HList (for horizontal list, like the A-Z selector in an AZList), VList (for vertical list, like the list of titles under an AZList), or DateList.
For example:
format CL4VList ... applies to all VLists in CL4 format CL2HList ... applies to all HLists in CL2 format CL1DateList ... applies to all DateLists in CL1 format SearchVList ... applies to the Search Results list
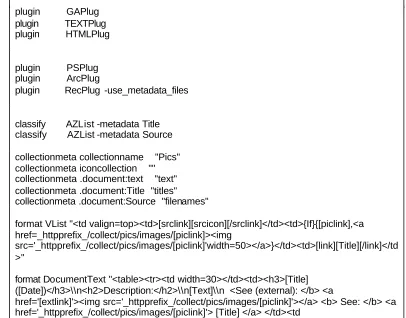
4.1.2. Formatting Configuration file for an image/video/audio collection
As stated in an earlier section, for image, video and audio files some of the plugin options in the configuration file collect.cfg have to be modified. For an image/video/audio collection,
-use_metadata_files is added to the RecPlug plugin. The example given in Fig. 7 is for an image collection.
creator [email protected] maintainer [email protected] public true
plugin GAPlug plugin TEXTPlug plugin HTMLPlug
plugin PSPlug plugin ArcPlug
plugin RecPlug -use_metadata_files
classify AZList -metadata Title classify AZList -metadata Source
collectionmeta collectionname "Pics" collectionmeta iconcollection "" collectionmeta .document:text "text" collectionmeta .document:Title "titles" collectionmeta .document:Source "filenames"
format VList "<td valign=top><td>[srclink][srcicon][/srclink]</td><td>{If}{[piclink],<a href=_httpprefix_/collect/pics/images/[piclink]><img
src='_httpprefix_/collect/pics/images/[piclink]'width=50></a>}</td><td>[link][Title][/link]</td >"
format DocumentText "<table><tr><td width=30></td><td><h3>[Title] ([Date])</h3>\\n<h2>Description:</h2>\\n[Text]\\n <See (external): </b> <a
href='[extlink]'><img src='_httpprefix_/collect/pics/images/[piclink]'></a> <b> See: </b> <a href='_httpprefix_/collect/pics/images/[piclink]'> [Title] </a> </td><td
width=300></td></tr></table>"
Fig. 7
Fig. 8
The same procedure is followed for audio and video clips. Only the audio/video source file is mentioned in href and src instead of the image file.
As for an HTML document collection, the only modification required in the collect.cfg is to add the line assoc_files to the plugin HTMLPlug to include all the associated files like .jpg, .gif, etc.
4.1. Plugins
Plugins are used to convert each source document depending on its format. A collection’s configuration file lists all plugins that are used when building it. During the import operation, each file or directory is passed to each plugin in turn until one is found that can process it—thus earlier plugins take priority over later ones. If no plugin can process the file, a warning is printed to standard error and processing passes to the next file. During building, the same procedure is used, but the archives directory is processed instead of the import directory.
GSDL has group collection plugins, collection specific plugins and general plugins. This tutorial describes few of the general plugins below:
HTMLPlug (*.htm, *.html; also .shtml, .shm, .asp, .php, .cgi)
• Nolinks: Nolinks do not trap links within the collection. This speeds up the import/build process, but any links in the collection will be broken.
• Description_tags: Description_tags interpret tagged document files.
• Metadata_fields: It takes a comma-separated list of metadata types (defaults to title) to extract. To rename the metadata in the Greenstone archive file, use tag<newname> where tag is the HTML tag sought and newname its new name.
• Hunt_creator_metadata: It finds as much metadata as possible about
authorship and put it in the Greenstone archive document as Creator metadata. It is needed to include Creator using the metadata_fields option.
• File_is_url: Use this option if a web mirroring program has been used to create the structure of the documents to be imported.
• Assoc_files : Gives a Perl regular expression that describes file types to be treated as associated files. The default types are .jpg, .jpeg, .gif, .png, .css. • Rename_assoc_files : Rename files associated with documents. During this
process the directory structure of any associated files will become much shallower (useful if a collection must be stored in limited space).
EMAILPlug (*.email)
EMAILPlug imports files containing E-mail, and deals with common Email formats such as are used by the Netscape, Eudora, and Unix mail readers. Each source document is examined to see if it contains an E-mail, or several E-mails joined together in one file under any directory, but file name should follow. Email extension, and if so its contents are processed. The plugin extracts Subject, To, From, and Date metadata. However, this plugin does not yet handle MIME-encoded E-mails properly—although legible, they often look rather strange.
ArcPlug
ArcPlug processes files named in the archives.inf, which is used to communicate between the import and build processes.
RecPlug
RecPlug recourses through a directory structure by checking to see whether a file name is a directory into the plugin pipeline. RecPlug accumulate the metadata.xml file. So, if you have metadata.xml file you have to assign this plugin such as –use_metadata_files which are presented in Fig. 7.
GAPlug (.xml)
GAPlug processes Greenstone archive files generated by import.pl. It is included by default in .xml file in archives directory.
5.
CREATING USER-DEFINED INDEXES
5.1. Creating Browsing Indexes Using Classifiers
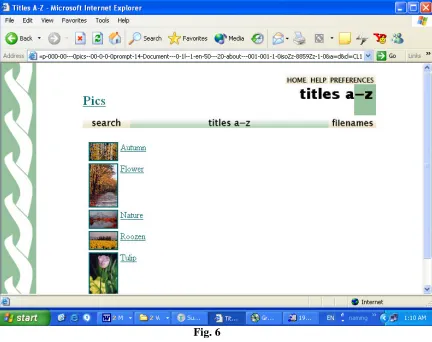
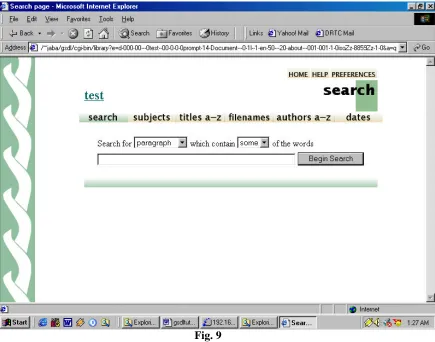
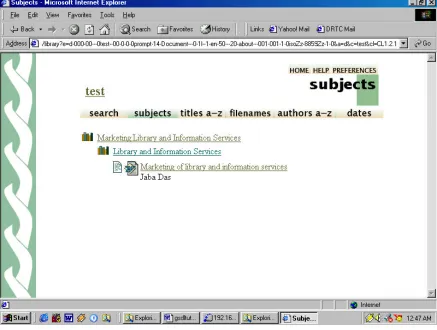
Classifiers are used to create browsing indexes for a collection. Classifiers are specified in the collection configuration file collect.cfg. A basic configuration file always includes classifiers for titles and filenames by default. This can be observed in the navigation bar near the top of the screenshot in Fig. 9 includes the titles a-z and filenames buttons. These functions are created automatically when you build the collection. You can also define new classifiers e.g. for subject or author or date or modify the existing ones according to your requirements. In this section we will see how to define subject, author and date classifiers.
Fig. 9
Fig. 10
As seen in Table 4 below the lines 17 and 18 i.e. classifiers for title and filenames are there by default. Now, let us see what modifications have to be done in the collect.cfg file to create author, subject and date indexes. A classifier line starts with the keyword classify and followed by the name of the classifier and any options. In the collect.cfg file you can include the following lines, below lines 17 and 18.
classify Hierarchy -hfile sub.txt -metadata Subject
in this line ‘Hierarchy’ is the classifier being used,which displays the subject headings in an hierarchical manner i.e. broader to narrower subject (see Fig. 11). The ‘-hfile’ gives the name of the file where the metadata hierarchy is defined, here ‘sub.txt’. the argument ‘metadata’ is used to mention the assigned metadata name i.e. Subject.
classify AZList -metadata Creator
in this line AZList is the classifier, which displays the author names in alphabetical order. The metadata name here is Creator.
4-- indexes section:text section:Title document:text document:Source document:Creator 5-- defaultindex section:text
6-- plugin ZIPPlug 7-- plugin GAPlug 8-- plugin TEXTPlug 9-- plugin HTMLPlug 10-- plugin EMAILPlug 11-- plugin PDFPlug 12-- plugin RTFPlug 13-- plugin WordPlug 14-- plugin PSPlug 15-- plugin ArcPlug
16-- plugin RecPlug -use_metadata_files
17-- classify AZList -metadata Title 18-- classify AZList -metadata Source
19-- classify Hierarchy -hfile sub.txt -metadata Subject 20-- classify AZList -metadata Creator
21-- format VList "<td
valign=top>[link][icon][/link]</td><td>[srclink][srcicon][/srclink]</td><td>[link][Title][/link]<b r>[Creator]</td>"
22-- format DocumentText "<table><tr><td width=50></td><td><h3>[Title]</h3> ([Date])\\n [Text]\\n[Title]</a> </td><td width=300></td><tr></table>"
23-- format DocumentText "<h3>[Title]</h3>\\n\\n<p>[Text]" 24-- format DocumentImages true
25-- format DocumentButtons "Expand Text|Expand Contents|Detach|Highlight"
26-- collectionmeta collectionname "test" 27-- collectionmeta iconcollection ""
28-- collectionmeta collectionextra "Experimental work" 29-- collectionmeta .document:Title "titles"
30-- collectionmeta .document:Source "filenames" 31-- collectionmeta .document:Creator "Author" 32-- collectionmeta .section:Title "section titles" 33-- collectionmeta .section:text "paragraph”
Fig. 11
5.2. Creating Search Index
Now let us see how to create a search index. We shall create search index for author, section and sub-section and paragraph of the documents. In case of author, not much is to be done. Only the line
collectionmeta .document:Creator "Author"
has to be added in the collect.cfg file as shown in the (Table 4), line 31. For title and filenames the lines
29-- collectionmeta .document:Title "titles" 30-- collectionmeta .document:Source "filenames"
Fig. 12
As seen in Fig. 12 the dropdown box displays the author, title and filenames indexes.
5.3. Section and Subsection
Fig. 13
So, Source files have to be edited as a HTML file structure for the section and subsections. The HTML plugin has a description_tags option that processes tags in the text like this:
<!---
<Section> <Description>
<Metadata name= ”Title”> </Metadata> </Description>
---> <!---
<Section>
<Description>
<Metadata name=”Title”> </Metadata> </Description>
--- >
( text of this section---)
<!----
<Section>
<Description>
<!--- </Section> ---- >
the <! --- --- > markers are used because they indicate comments in HTML. Thus these section tags will not affect document formatting. In the description part other kinds of metadata can be specified and you can include any subsection. Here Fig 14 is screenshot of modified HTML file.
Fig 14
Then, as in the case of author, add the following line to the collect.cfg file collectionmeta .section:Title "section titles"
6.
FINDING INFORMATION
Greenstone Digital Library provides easy browsing facility. User choose some searching keywords and click on search button. Search is provided by keywords.
back to the “about” page at any time, it is required to just clic k on the “collection” icon that appears at the top left side of all searching and browsing pages. Screen appears as shown below
Fig. 15
As an example this collection “test” is used to describe the different ways of finding information. Almost all icons are clickable. Several of these icons appear at the top of almost every page.
6.1. How to Find Information
There are 6 ways to find information in GSDL collection: • Search for particular words
• Access publications by subject • Access publications by title • Access publications by filename • Access publications by author • Access publications by date All these buttons are visible in Fig. 15
Fig. 16
Fig. 17
Fig. 18
Fig. 19
Fig. 20
Fig. 21
6.1.1. Keyword Search
From the search page, a query is given in these simple steps: 1. It should be specified what items users want to search
2. It should be decided whether users want to search for all or just some of the words 3. Type in the words users want to search for
Fig. 22
Fig. 23
6.2. Search terms
Whatever users type into the query box is interpreted as a list of words or "search terms." When a multi word term is given GSDL search alphabetically by the term given and also by adjacent terms and presents the results. It ignores punctuations marks in the query. For example, for the query
Library science education: India
Fig. 24
6.3. Que ry Type
There are two different kinds of query.
Fig. 25
• Queries for some of the words. Just lists some terms that are likely to appear in the documents users are looking for. Documents are displayed in order of how closely they match the query. When determining the degree of match the criteria used are:
o The more search terms a document contains, the closer it matches; o Rare terms are more important than common ones;
o Short documents match better than long ones.
Result of this type of search will be like Fig. 24. Users can use many search terms as a whole sentence, or even a whole paragraph. If it has to be specified only one term, documents will be ordered by its frequency of occurrence.
6.3.1. Scope of queries
In most collections users can choose different indexes to search. For example, there might be author or title indexes. Or there might be chapter or paragraph indexes. Generally, the full matching document is returned regardless of which index users search.
If documents are books, they will be opened at the appropriate place where the query terms occur.
6.4. Advanced Search Features
Fig. 26
After changing the preferences, do not use Back button of browser—that would undo the changes. Instead, click any of the buttons on the search/browse bar in the preference page.
6.4.1. Collection Preferences
Preferences are grouped under two types such as i) Presentation preferences and ii) Search preferences
6.4.1.1. Presentation Preferences
Some collections comprise several subcollections, which can be searched independently or together, as one unit. If so, the subcollections to include in the searches on the Preferences page can be selected.
6.4.1.1.1. Language Preferences
Fig. 27
6.4.1.1.2. Interface Format
All collections allow users to switch from the standard graphical interface format to a textual one. This is particularly useful for visually impaired users who use large screen fonts or speech synthesizers for output.
6.4.1.2. Search Preferences
6.4.1.2.1. Case Sensitivity and Stemming
When users specify search terms, it can be chosen whether upper and lower case must match between the query and the document: this is called “case sensitivity.”
It can be chosen whether to ignore word endings or not: this is called “stemming.” Under Search options on the Preferences page there is a pair of buttons labeled ignore case differences and upper/lower case must match; these control the case sensitivity of the queries.
Below is a pair of buttons labeled ignore word endings and whole word must match: these control stemming. For example, if the buttons ignore case differences and ignore word endings are selected, the query
African building will be treated the same as
africa builds
6.4.1.2.2. Phrase Searching
A phrase search Library and Information Service is given as
“Library and Information Service”
GSDL does first exact match for the phrase “Library and Information Service”. Later it also search by consistent terms and presents the results.
Phrase matches are case-insensitive if ignore case differences is set on the Preferences page.
6.4.1.2.3. Advanced Query Mode
In advanced query mode, which can be selected on the Preferences page, the queries for all of the words, described above, are actually Boolean queries. They consist of a list of terms joined by logical operators & (and), | (or), and ! (not). Absent operators between search terms are interpreted as & (and): thus a query without any operators returns documents that match all the terms.
If the words AND, OR, and NOT appear in the query they are treated as ordinary search terms, not operators. For operators users must use &, |, and !. In addition, parentheses can be used for grouping.
6.4.1.3. Using Search History
Fig. 28
7.
CONCLUSION
GSDL is an easy to use software. It can be used to create digital collections ranging from a small library to a large one. The facility of having a graphical user interface (Web browser) and command line interface is very advantageous. Advanced users, good at programming can develop a customized collection using the command line. But GSDL is not completely 100% perfect. It has some drawbacks also. Like, when a Web documents collection is built through the Web browser interface, it indexes all the hyperlinked files also, which makes it very cumbersome for the user to browse through the bulky list of files. But overall it is a very flexible software. And, a number of DLs have been developed using it, like the Project Gutenberg, the New Zealand Digital Library (NZDL).
8.
REFERENCES
1. Dublin Core Metadata Initiative. from http://dublincore.org/
2. New Zealand Digital Library. from http/www.nzdl.org/cgi-bin/library