FUNDAMENTAL PHOTODIODE CIRCUITS
Figures 1 and 2 show the fundamental photodiode circuits.
The circuit shown in Figure 1 transforms a photo-current produced by a photodiode without bias into a voltage. The output voltage (VOU T) is given as VOUT= 1P× RL. It is more or less proportional to the amount of incident light when VOUT < VOC. It can also be compressed logarithmically relative to the amount of incident light when VOUT is near VOC. (VOC is the open-terminal voltage of a photodiode).
Figure 1 (B) shows the operating point for a load resis-tor (RL) without application of bias to the photodiode.
Figure 2 shows a circuit in which the photodiode is reverse-biased by VCC and a photocurrent (IP) is trans-formed into an output voltage. Also in this arrangement,
the VOUT is given as VOUT = IP × RL. An output voltage proportional to the amount of incident light is obtained. The proportional region is expanded by the amount of VCC {proportional region: VOUT < (VOC + VCC)}. On the other hand, application of reverse bias to the photo-diode causes the dark current (Id) to increase, leaving a voltage of Id × RL when the light is interrupted, and this point should be noted in designing the circuit.
Figure 2 (B) shows the operating point for a load resistor RL with reverse bias applied to the photodiode.
Features of a circuit used with a reverse-biased pho-todiode are:
• High-speed response
• Wide-proportional-range of output
Therefore, this circuit is generally used.
Figure 1. Fundamental Circuit of Photodiode (Without Bias)
Figure 2. Fundamental Circuit of Photodiode (With Bias)
VOUT IP
RL EV
OP1-16 VOUT
RL EV1
EV2
EV3
EV1< EV2 < EV3 I
V
(A) (B)
IP
OP1-17 VCC
RL VOUT
VOUT R
L EV1
EV2
EV3
EV1< EV2 < EV3 I
V VCC
(A) (B)
EV
The response time is inversely proportional to the reverse bias voltage and is expressed as follows:
r = Cj × RL
Cj: junction capacitance of the photodiode
RL: load resistor
VD: diffusion potential (0.5 V - 0.9 V)
VR: Reverse bias voltage (negative value)
n: 2 - 3
PHOTOCURRENT AMPLIFIER CIRCUIT
USING THE TRANSISTOR OF
PHOTODIODE
Figures 3 and 4 show photocurrent amplifiers using transistors.
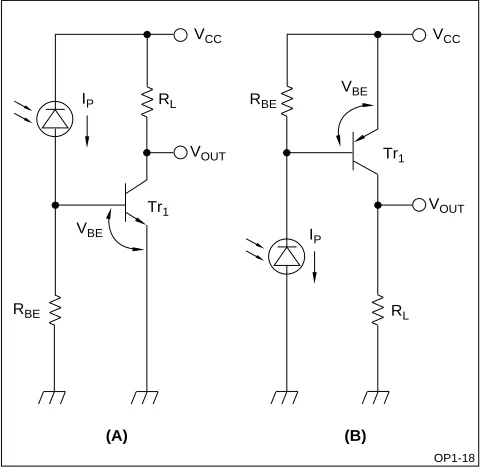
The circuit shown in Figure 3 are most basic combina-tions of a photodiode and an amplifying transistor. In the arrangement of Figure 3 (A), the photocurrent produced by the photodiode causes the transistor (Tr1) to decrease its output (VOUT) from high to low. In the arrangement of Figure 3 (B), the photocurrent causes the VOUT to increase from low to high. Resistor RBE in the circuit is effective for suppressing the influence of dard current (Id) and is chosen to meet the following conditions:
RBE < VBD/Id
RBE > VBE/{IP - VCC/(RL × hFE)}
Figure 4 shows simple amplifiers utilizing negative feedback.
In the circuit of Figure 4 (A), the output (VOUT) is given as:
VOUT = IP × R1 + IB × R1 + VBE
This arrangement provides a large output and rela-tively fast response.
The circuit of Figure 4 (B) has an additional transis-tor (Tr2) to provide a larger output current.
Cj= A V( D–VR) 1 n
---–
Figure 3. Photocurrent Amplifier Circuit using Transistor
IP
OP1-18 RBE
VCC
Tr1 RL
Tr1 RBE
VOUT
VBE
VBE
RL VCC
VOUT
IP
(A) (B)
R3
VCC
Tr2 R2
VCC
AMPLIFIER CIRCUIT USING
OPERATIONAL AMPLIFIER
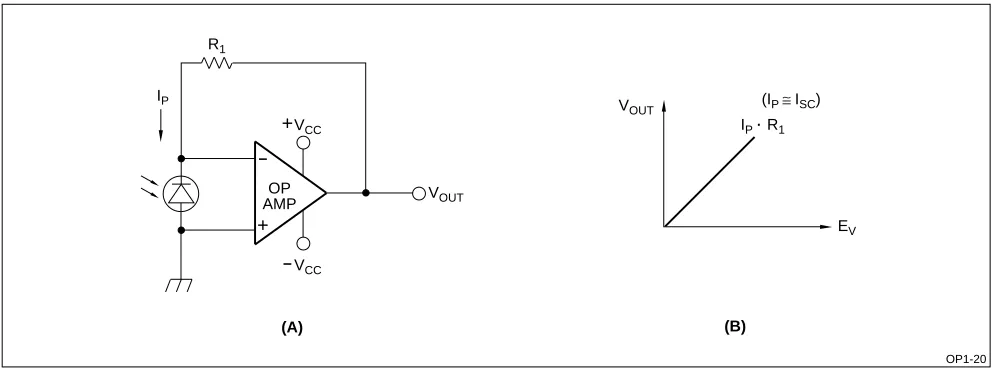
Figure 6 shows a photocurrent-voltage conversion circuit using an operational amplifier. The output volt-age (VOUT) is given as VOUT = IF × R1 (IP≅ ISC). The arrangement utilizes the characteristics of an opera-tional amplifier with two input terminals at about zero voltage to operate the photodiode without bias. The cir-cuit provides an ideal short-circir-cuit current (ISC) in a wide operating range.
Figure 6 (B) shows the output voltage vs. radiant intensity characteristics. An arrangement with no bias and high impedance loading to the photodiode pro-vides the following features:
• Less influence by dark current
• Wide linear range of the photocurrent relative to the radiant intensity.
Figure 5 shows a logarithmic photocurrent amplifier using an operating amplifier. The circuit uses a logarith-mic diode for the logarithlogarith-mic conversion of photocur-rent into an output voltage. In dealing with a very wide irradiation intensity range, linear amplification results in
a saturation of output because of the limited linear region of the operational amplifier, whereas logarithmic compression of the photocurrent prevents the satura-tion of output. With its wide measurement range, the logarithmic photocurrent amplifier is used for the expo-sure meter of cameras.
Figure 5. Logarithmic Photocurrent Amplifier using an Operational Amplifier
VCC
VOUT
+
OP AMP
+
VCC
OP1-21 LOG-DIODE (IS002)
Figure 6. Photocurrent Amplifier using an Operational Amplifier (Without Bias)
R1
VCC
VOUT
(A)
+
OP AMP
+
VCC
IP V
OUT
EV
(B)
(IP ≅ ISC)
IP . R1
LIGHT DETECTING CIRCUIT FOR
MODULATED LIGHT INPUT
Figure 7 shows a light detecting circuit which uses an optical remote control to operate a television set, air conditioner, or other devices. Usually, the optical remote control is used in the sunlight or the illumination of a fluorescent lamp. To alleviate the influence of such a disturbing light, the circuit deals with pulse-modula-tion signals.
The circuit shown in Figure 7 detects the light input by differentiating the rising and falling edges of a pulse signal. To amplify a very small input signal, an FET pro-viding a high input impedance is used.
COLOR SENSOR AMPLIFIER CIRCUIT
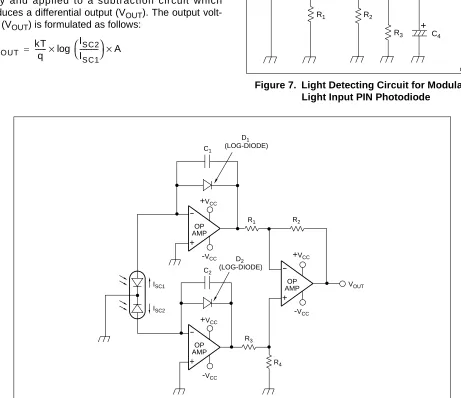
Figure 8 shows a color sensor amplifier using a semiconductor color sensor. Two short circuit currents (ISC1, ISC2) conducted by two photodiodes having dif-ferent spectral sensitivities are compressed logarithmi-cally and applied to a subtraction circuit which produces a differential output (VOUT). The output volt-age (VOUT) is formulated as follows:
Where A is the gain of the differential amplifier. The gain becomes A = R2/R1 when R1 = R3 and R2 = R4, then:
The output signal of the semiconductor color sensor is extremely low level. Therefore, great care must be taken in dealing with the signal. For example, low-biased, low-drift operational amplifiers must be used, and possible current leaks of the surface of P.W.B. must be taken into account.
VOUT kT q
---×log ISC2 ISC1
--- ×A
=
Figure 7. Light Detecting Circuit for Modulated Light Input PIN Photodiode
VOUT kT q
---×log ISC2 ISC1 --- R2
R1 ---×
=
VOUT
R1
OP1-22 PIN
PHOTODIODE
R2
R3 C4 C3
C1
VCC
C2 R5
+
+
R4
Tr1
+
OP AMP
+VCC
-VCC
D1
(LOG-DIODE) C1
R2
D R1
FUNDAMENTAL PHOTOTRANSISTOR
CIRCUITS
Figures 9 and 10 show the fundamental phototrans-istor circuits. The circuit shown in Figure 9 (A) is a com-mon-emitter amplifier. Light input at the base causes the output (VOUT) to decrease from high to low. The cir-cuit shown in Figure 9 (B) is a common-collector ampli-fier with an output (VOUT) increasing from low to high in response to light input. For the circuits in Figure 9 to operate in the switching mode, the load resistor (RL) should be set in relation with the collector current (IC) as VCC < RL × IC.
The circuit shown Figure 10 (A) uses a phototrans-istor with a base terminal. A RBE resistor connected between the base and emitter alleviates the influence of a dark current when operating at a high temperature. The circuit shown in Figure 10 (B) features a cascade connection of the grounded-base transistor (Tr1) so that the phototransistor is virtually less loaded, thereby improving the response.
AMPLIFIER CIRCUIT USING TRANSISTOR
Figure 11 shows the transistor amplifiers used to amplify the collector current of the phototransistor using a transistor (Tr1). The circuit in Figure 11 (A) increases the output from high to low in response to a light input. The value of resistor R1 depends on the input light intensity, ambient temperature, response speed, etc., to meet the following conditions:
R1 < VBE/ICEO,R1 > VBE/IC
Where ICBO is the dark current of phototransistor and IC is the collector current.
Figure 9. Fundamental Phototransistor Circuit (I)
VCC
IC RL
VOUT
(A)
VCC
RL VOUT
(B)
OP1-24
Figure 10. Fundamental Phototransistor Circuit (II)
Figure 11. Amplifier Circuit using Transistor
VCC
RL
VOUT
(A)
VCC
RL
VOUT
(B)
OP1-25 Tr1
RBE
OP1-26 (A)
VCC
R2
VOUT
Tr1 VBE
IE ≅ IC R1
IC
VCC
Tr1 R2
VOUT
VBE
MODULATED SIGNAL DETECTION CIRCUIT
Figure 12 shows the circuits used to detect a modu-lated signal such as an AC or pulse signal. The pho-totransistor has a base terminal with a fixed bias through resistors R1 and R2. An R4 emitter resistor maintains the DC output voltage constant. A modulated signal provides a base current through bypass capacitor C causing cur-rent amplification so that the signal is greatly amplified.
AMPLIFIER CIRCUIT USING
OPERATIONAL AMPLIFIER
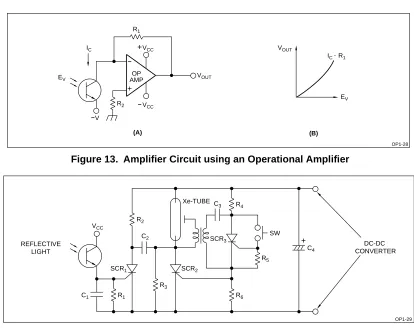
Figure 13 shows a current-voltage conversion circuit using an operational amplifier. Its output voltage (VOUT) is expressed as VOUT = IC × R1.
The current-voltage conversion circuit for the pho-totransistor is basically identical to that of the photo-diode, except that the phototransistor requires a bias. The circuit shown if Figure 13 (A) has a negative bias (-V) for the emitter against the virtually grounded col-lector potential. Figure 13 (B) shows the output voltage vs. irradiation intensity characteristics.
AUTO-STROBOSCOPE CIRCUIT
Figure 14 shows the auto-stroboscope circuit of the current cut type. This circuit is most frequently used because of advantages such as continuous light emis-sion and lower battery power consumption.
When the switch is in the ON-state, the SCR2 and SCR3 turn on to discharge capacitor C4 so that the xenon lamp is energized to emit light. The anode of the SCR2 is then reverse-biased, causing it to turn off and light emission of the xenon lamp ceases. The irradiation time is set automatically in response to variations in the collector current of the phototransistor. This follows the intensity of reflected light from the object and the value of C1 in the circuit. In other words, the irradiation time is long for a distant object, and short for a near object.
Figure 12. Modulated Signal Detection Circuit
VOUT
R4
OP1-27
R2 C
R2
VCC
R1
+
+
C R1
R3
VCC
VOUT
R3
R4
(A) (B)
Tr1
Figure 13. Amplifier Circuit using an Operational Amplifier
R1
VCC
VOUT
(A)
+
OP AMP
+
VCC
IC VOUT
EV
IC . R1
OP1-28
V R2
(B)
NORTH AMERICA EUROPE ASIA
SHARP Microelectronics of the Americas
5700 NW Pacific Rim Blvd., M/S 20 Camas, WA 98607, U.S.A.
Phone: (360) 834-2500
Telex: 49608472 (SHARPCAM) Facsimile: (360) 834-8903 http://www.sharpsma.com
SHARP Electronics (Europe) GmbH Microelectronics Division
Sonninstraße 3
20097 Hamburg, Germany Phone: (49) 40 2376-2286 Facsimile: (49) 40 2376-2232 http://www.sharpmed.com
LIFE SUPPORT POLICY
SHARP components should not be used in medical devices with life support functions or in safety equipment (or similiar applications where component failure would result in loss of life or physical harm) without the written approval of an officer of the SHARP Corporation.
LIMITED WARRANTY
SHARP warrants to its Customer that the Products will be free from defects in material and workmanship under normal use and service for a period of one year from the date of invoice. Customer's exclusive remedy for breach of this warranty is that SHARP will either (i) repair or replace, at its option, any Product which fails during the warranty period because of such defect (if Customer promptly reported the failure to SHARP in writing) or, (ii) if SHARP is unable to repair or replace, refund the purchase price of the Product upon its return to SHARP. This warranty does not apply to any Product which has been subjected to misuse, abnormal service or handling, or which has been altered or modified in design or construction, or which has been serviced or repaired by anyone other than Sharp. The warranties set forth herein are in lieu of, and exclusive of, all other warranties, express or implied. ALL EXPRESS AND IMPLIED WARRANTIES, INCLUDING THE
WARRANTIES OF MERCHANTABILITY, FITNESS FOR USE AND FITNESS FOR A PARTICULAR PURPOSE, ARE SPECIFICALLY EXCLUDED. In no event will Sharp be liable, or in any way responsible, for any incidental or consequential economic or property damage.
The above warranty is also extended to Customers of Sharp authorized distributors with the following exception: reports of failures of Products during the warranty period and return of Products that were purchased from an authorized distributor must be made through the distributor. In case Sharp is unable to repair or replace such Products, refunds will be issued to the distributor in the amount of distributor cost.
SHARP reserves the right to make changes in specifications at any time and without notice. SHARP does not assume any responsibility for the use of any circuitry described; no circuit patent licenses are implied.
SHARP Corporation
Electronic Components & Devices 22-22, Nagaike-Cho, Abeno-Ku Osaka 545-8522, Japan Phone: (81) 6-6621-1221 Facsimile: (81) 6117-725300