HP A9890A Smart Array 6402 Controller
Installation Guide
HP-UX, Linux, Windows & OpenVMS
Manufacturing Part Number: A9890-96016 February 2007
Printed in USA
Legal Notices
The information in this document is subject to change without notice.
Hewlett-Packard makes no warranty of any kind with regard to this manual, including, but not limited to, the implied warranties of merchantability and fitness for a particular purpose. Hewlett-Packard shall not be held liable for errors contained herein or direct, indirect, special, incidental or consequential damages in
connection with the furnishing, performance, or use of this material. Warranty
A copy of the specific warranty terms applicable to your Hewlett-Packard product and replacement parts can be obtained from your local Sales and Service Office.
U.S. Government License
Proprietary computer software. Valid license from HP required for possession, use or copying. Consistent with FAR 12.211 and 12.212, Commercial Computer Software, Computer Software Documentation, and Technical Data for Commercial Items are licensed to the U.S. Government under vendor's standard commercial license. Trademark Notices
UNIX® is a registered trademark in the United States and other countries, licensed exclusively through The Open Group
Contents
1. Smart Array 6402 Controller HP-UX Installation
Smart Array 6402 Controller Components. . . 6
Smart Array 6402 HP-UX Installation Prerequisites . . . 7
Preparing for the Smart Array 6402 Controller Installation . . . 8
Installing Smart Array 6402 Controller Hardware (Offline). . . 9
Installing Smart Array 6402 Controller Hardware (Online). . . 9
Smart Array 6402 HP-UX Software Installation . . . 10
Locating Software for the Smart Array 6402 Controller . . . 10
Installing Software for Smart Array 6402 Controller. . . 10
Install the Software After HP-UX Installation . . . 10
Verifying the Installation . . . 12
Setting up a Smart Array 6402 Controller As a Boot Device . . . 13
Array Configuration Limitations . . . 13
Offline Configuration of HP-UX 11i v1 Using Ignite-UX . . . 13
Using ORCA (IA Platforms Only) . . . 15
2. Smart Array 6402 Controller Linux Installation
Smart Array 6402 Controller Components. . . 18Smart Array 6402 Linux Installation Prerequisites . . . 19
Smart Array 6402 Linux Quick Installation . . . 20
Install Smart Array 6402 Controllers . . . 20
Installing the Linux Driver . . . 22
Installing the Controller Prior to Linux Install . . . 22
Installing the Controller with Linux Installed . . . 22
Using ORCA . . . 23
ORCA Limitations . . . 23
Configuring Your Logical Boot Drive . . . 23
3. Smart Array 6402 Controller Windows Installation
Smart Array 6402 Controller Components. . . 26Smart Array 6402 Windows Installation Prerequisites. . . 27
Smart Array 6402 Windows Quick Installation . . . 28
Installing the Smart Array 6402 Controller . . . 28
Smart Array 6402 Windows Software Installation . . . 29
Install Smart Array 6402 Software . . . 29
4. Smart Array 6402 Controller OpenVMS Installation
Smart Array 6402 Controller Components. . . 32Smart Array 6402 OpenVMS Installation Prerequisites. . . 33
Smart Array 6402 OpenVMS Quick Installation . . . 34
Install Smart Array 6402 Controllers . . . 34
Smart Array 6402 OpenVMS Software Installation . . . 36
Installing the Smart Array Controller to a System Running OpenVMS . . . 36
Installing the Smart Array Controller as a Boot Device . . . 36
Using ORCA . . . 38
Contents
Configuring Your Logical Boot Drive . . . 38 Issues and Restrictions . . . 39 Issues and Restrictions Awareness . . . 39
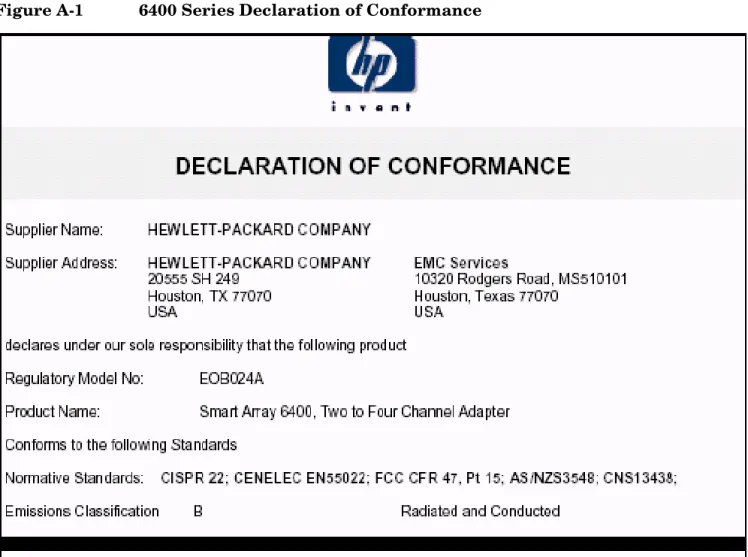
A. Declaration of Conformance
1
Smart Array 6402 Controller HP-UX
Installation
Smart Array 6402 Controller Components
Smart Array 6402 Controller Components
Figure 1-1
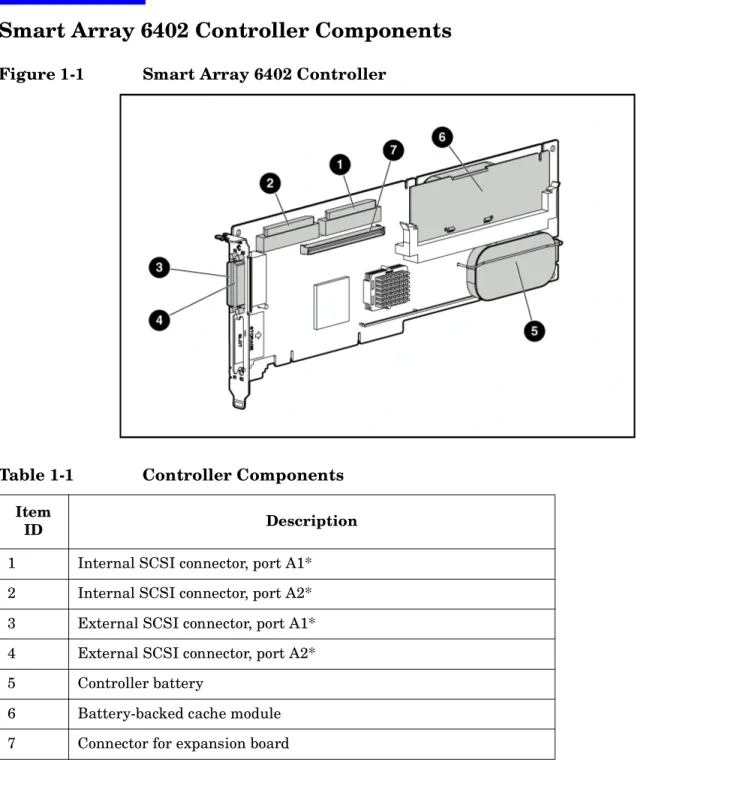
Smart Array 6402 Controller
NOTE Do not use both the internal and external connectors on one port simultaneously. The card will not function if both connectors on one port are used.
Table 1-1
Controller Components
Item
ID Description
1 Internal SCSI connector, port A1* 2 Internal SCSI connector, port A2* 3 External SCSI connector, port A1* 4 External SCSI connector, port A2* 5 Controller battery
6 Battery-backed cache module 7 Connector for expansion board
Smart Array 6402 HP-UX Installation Prerequisites
Smart Array 6402 HP-UX Installation Prerequisites
Before installing the Smart Array 6402 controller, ensure that the following hardware and software prerequisites are met:
• Check the RAID-01 (ciss) HP Smart Array Controller Driver Release Notes for your HP-UX version for known problems or other information needed for installation. These documents are available in the “Smart Array (RAID)” section of http://docs.hp.com/en/netcom.html.
• Confirm that the Smart Array 6402 controller and software are supported on the HP server with the version of HP-UX that you are using; see the HP Smart Array RAID Controllers Support Matrix located in the “Smart Array (RAID)” section of http://docs.hp.com/en/netcom.html for more information.
• Check the HP server’s documentation to determine if additional tools are required for component installation at http://docs.hp.com.
• Check the HP server’s documentation for specific instructions on controller installation. • Check your system hardware documentation to determine if OL* or OLAR are supported.
— For detailed instructions and information on using the OL* feature, see Interface Card OL* Support Guide for 11i v2 or later.
— For detailed instructions and information on using the OLAR feature, see Configuring HP-UX for Peripherals for 11i v1.
— For detailed information about slots in entry-level Integrity servers, see the I/O Slot Matrix - Entry Level Integrity Servers in the System Administration section of http://docs.hp.com/en/hw.html. — You can view, download, or print all documentation from http://docs.hp.com.
• Confirm that you have the Smart Array 6402 controller software bundle (RAID-01). This bundle is included on CD or available on the web at http://www.software.hp.com.
• Confirm that HP-UX super-user privileges are available; they are necessary to complete the installation. • Confirm that the /usr/bin, /usr/sbin, and /sbin directories are in your PATH by logging in as root and
using the echo $PATH command.
• Take note of the configuration of the system before adding/removing components.
For more information about the required operating system versions, see the RAID-01 (ciss) HP Smart Array Controller Driver Release Notes.
Preparing for the Smart Array 6402 Controller Installation
Preparing for the Smart Array 6402 Controller Installation
WARNING Before installing a Smart Array 6402 Controller in a server, backup all data. This step is mandatory if the disks were not previously configured on a Smart Array Controller, because the data format will not be recognized and the existing data will not be preserved.
CAUTION In systems using external data storage, be sure that the server is the first unit powered down and the last unit to be powered back up. Doing this ensures that the system will not
erroneously mark the disk drives as FAILED.
WARNING To reduce the risk of personal injury or damage to the equipment, consult the safety information and user documentation provided with your server before attempting installation.
Many computers are capable of producing energy levels that are considered hazardous. These computers are intended to be serviced by qualified personnel trained to deal with those hazards. Do not remove enclosures or attempt to bypass any interlocks that may be provided for the purpose of removing these hazardous conditions.
CAUTION Electrostatic discharge (ESD) can damage electronic components. Be sure that you are properly grounded before continuing the installation procedure.
The Smart Array Controllers contain electronic components that can easily be damaged by small amounts of static electricity. To avoid damage, follow these guidelines:
• Store the controller in its antistatic plastic bag until you are ready to install it • Work in a static-free area, if possible
• Handle the controller only by the edges. Do not touch electronic components or electrical traces
• If you must lay the controller down, place it on a non-conductive mat or surface Before beginning installation, and without removing the Smart Array Controller from its antistatic bag, inspect the controller for any signs of obvious damage, such as chipped or loose components. Contact HP if the controller is damaged.
Installing Smart Array 6402 Controller Hardware (Offline)
Installing Smart Array 6402 Controller Hardware (Offline)
Step 1. Power off the system.
• If the system is running, shut it down.
• Wait for the system to shut down completely, and then power off the system. • Power off any peripheral devices that are attached to the server.
• Unplug the AC power cord(s) from the outlet, and then from the server and peripheral devices.
Step 2. Access the system controller bay.
• Open the system to gain access to the PCI backplane.
Step 3. Install the controller.
• Insert the controller into the fastest-performance PCI slot available. For detailed information about slots in entry-level Integrity servers, see the I/O Slot Matrix - Entry Level Integrity Servers in the System Administration section of http://docs.hp.com/en/hw.html.
• Slide the controller edge-connector into the PCI slot until it is fully seated. • Secure the controller.
Step 4. Reassemble the system.
Step 5. Power on the system.
• Power on any peripheral devices that are attached to the server. • Power on the system.
Installing Smart Array 6402 Controller Hardware (Online)
If your system has one or more slots that support OL* or OLAR — and you want to use OL* or OLAR to install the controller in one of those slots — follow these steps:
Step 1. Confirm that the latest version of the ciss driver (Smart Array Controller software) is installed on your system. See the “Verifying the Installation” section in the HP Smart Array 6400 Series Controller Support Guide.
Step 2. Install the Smart Array Controller in your HP-UX system according to the procedure described in the latest edition of the Interface Card OL* Support Guide for 11i v2 or later, or Configuring HP-UX for Peripherals for 11i v1. These documents can be viewed or downloaded at
http://docs.hp.com, or a hard copy can be ordered from HP.
TIP To improve performance, install the Smart Array Controller in a PCI-X 133 MHz slot or available PCI 4X slot.
NOTE See the HP Smart Array Controller Support Matrix, located in the “Smart Array (RAID)” section of http://docs.hp.com/en/netcom.html, to find out if your server supports OL* or OLAR.
Smart Array 6402 HP-UX Software Installation
Smart Array 6402 HP-UX Software Installation
Locating Software for the Smart Array 6402 Controller
The driver, utilities and manpages for the Smart Array 6402 controller are located at the HP Software Depot. • Go to http://www.software.hp.com
• Search for “A9890A”. • Click Receive for Free.
• Select the HP-UX version that your system is running, and fill-out the customer information form. Then click Next.
• In the “Documents” column next to the “Download Software” column, click on “Download/Installation Instructions” for additional information.
• Click on the depot that corresponds with the OS you are running to download the driver, utilities and manpages for the Smart Array Controllers.
NOTE HP recommends that you install the latest version of the Smart Array 6400 Series Controller firmware. For current firmware recommendations, see the HP Smart Array RAID Controllers Support Matrix. For instructions on how to obtain and install adapter firmware, see the HP Smart Array 6400 Series Support Guide. These documents are available in the “Smart Array (RAID)” section of http://docs.hp.com/en/netcom.html.
Installing Software for Smart Array 6402 Controller
The driver, utilities and manpages for the Smart Array 6402 Controller are contained in the RAID-01 bundle located in the downloaded depot. They can be installed using the Software Distributor (SD). The SD is a tool for installing software on HP-UX host systems; it can also be used to remove software from HP-UX host systems.
The instructions for using the SD to install or remove the driver, utilities and manpages for the Smart Array 6402 Controller can be downloaded at http://software.hp.com.
The RAID-01 bundle is composed of several files that will be copied to the appropriate directories on the host system. User space utilities can be viewed in the /opt/raidsa/bin directory.
Install the Software After HP-UX Installation
Here are the steps to load the Smart Array 6402 software, using the HP-UX swinstall program.
Step 1. Log on to the system as root.
Step 2. Insert the software media into the appropriate drive. If the software is being loaded from a CD-ROM, go to step 3; otherwise, go to step 4. The software can also be located at
Smart Array 6402 HP-UX Software Installation
Step 3. Mount the CD-ROM drive by using the System Administration Manager (SAM). • Run SAM using the following command:
$ sam
NOTE System Administration Manager (SAM) is deprecated in HP-UX 11i v3, and replaced by System Management Homepage (SMH). When you start SAM, the SMH command is automatically called. For more information, see the smh(1M) man page.
• Select Disk and File System
• Select Disk Devices
• Select the CD-ROM drive that contains your software media • Select Mount from the Actions Menu
• Specify the mount directory and deselect the At Every System Boot option
Step 4. Run the swinstall program using the following command: $ /usr/sbin/swinstall
This opens the Software Selection window.
Step 5. Change the Source Depot Type and Source Host Name, if necessary, and enter the software location in the Source Depot Path field. If installing from CD-ROM, the software location is the mount directory. Select the OK button to return to the Software Selection window.
Step 6. The Software Selection window now contains a list of available software to install.
Step 7. Highlight the Smart Array 6402 software, for example:
RAID-01 B.11.23.02 RAID SA; Supptd HW=A7143A/A9890A/A9891A
Choose Mark for Install from the Actions menu; this chooses the highlighted software.
Step 8. From the Actions menu, select the Install... menu. This begins product installation and opens the
Install Analysis window.
Step 9. Click OK in the Install Analysis window when the Status field displays a Ready message.
Step 10. Click YES in the Confirmation window to start software installation.
When the processing is finished, the Status field displays a Ready message. Select Done. The
Note window opens.
Step 11. Click OK in the Note window to reboot. The user interface disappears and the system reboots. When the system comes back up, log on to the system as root and view the
/var/adm/sw/swagent.log and /var/adm/sw/swinstall.log files to view error or warning messages that may have occurred during the installation.
Step 12. Verify that all installed Smart Array 6402 controllers have a software state of CLAIMED, by running the ioscan -fnC ext_bus |grep ciss command.
Verifying the Installation
Verifying the Installation
After the system reboots, verify that the installation was successful by following these steps:
Step 1. Issue the swlist command:
swlist
If the Smart Array Controller is installed correctly, the generated output will look similar to the following:
When running HP-UX 11i v1 the generated output will look like this: RAID-01 B.11.11.03 RAID SA; Supptd HW=A7143A/A9890A/A9891A
When running HP-UX 11i v2 the generated output will look like this: RAID-01 B.11.23.02 RAID SA; Supptd HW=A7143A/A9890A/A9891A
When running HP-UX 11i v3 the generated output will look like this: RAID-01 B.11.31.01 RAID SA; Supptd HW=A7143A/A9890A/A9891A
Step 2. Issue the ioscan -kfnd ciss command:
ioscan -kfnd ciss
If the Smart Array Controller software is installed correctly, the generated output will look similar to this:
# ioscan -kfnd ciss
Class I H/W Path Driver S/W State H/W Type Description ========================================================================
ext_bus 4 0/3/1/0/4/0 ciss CLAIMED INTERFACE PCI-X SmartArray 6404 RAID Controller /dev/ciss4
ext_bus 7 0/3/1/0/5/0 ciss CLAIMED INTERFACE PCI-X SmartArray 6404 RAID Controller /dev/ciss7
ext_bus 6 0/5/1/0/4/0 ciss CLAIMED INTERFACE PCI-X SmartArray 6402 RAID Controller /dev/ciss6
Setting up a Smart Array 6402 Controller As a Boot Device
Setting up a Smart Array 6402 Controller As a Boot Device
The Smart Array 6402 Controller can be set up as a boot device.
NOTE For PA-RISC systems, use Ignite/UX and saconfig to create the logical drives. For Integrity systems, use the Option ROM Configuration for Arrays (ORCA) to create the logical drives.
Array Configuration Limitations
For the most efficient use of drive space, do not mix drives of different capacities within the same array. The configuration utility treats all physical drives in an array as if they have the same capacity as the smallest drive in the array. The excess capacity of any larger drives is wasted because it is unavailable for data storage.
The probability that an array will experience a drive failure increases with the number of physical drives in the array. If you configure a logical drive with RAID 5, keep the probability of failure low by using no more than 14 physical drives in the array.
Offline Configuration of HP-UX 11i v1 Using Ignite-UX
To set up a Smart Array 6402 Controller as a boot device, you must install HP-UX 11i v1 on one of the controller’s logical drives. For PA systems follow this procedure:
Step 1. Start Ignite-UX from the HP-UX 11i v1 Core OS Install and Recovery Media. The Ignite-UX “Welcome” screen displays:
Welcome to Ignite-UX!
Use the <tab> key to navigate between fields, and the arrow keys within fields. Use the <return/enter> key to select an item.
Use the <return/enter> or <space-bar> to pop-up a choices list. If the menus are not clear, select the "Help" item for more information.
Hardware Summary: System Model: 9000/800/A500-5X
+---+---+---+ [ Scan Again ] | Disks: 3 (204.6GB) | Floppies: 0 | LAN cards: 1 |
| CD/DVDs: 0 | Tapes: 0 | Memory: 4096Mb |
| Graphics Ports: 0 | IO Buses: 7 | CPUs: 1 | [ H/W Details ] +---+---+---+
[ Install HP-UX ] [ Run a Recovery Shell ] [ Advanced Options ]
[ Reboot ] [ Help ]
Step 2. Select “Run a Recovery Shell”. The “Recovery Shell” screen displays:
NOTE: Creating the second RAM disc and mounting on /dev ... * Generating device file for the second ramdisc... * Loading mkfs to make a file system...
version 4 layout
Setting up a Smart Array 6402 Controller As a Boot Device
unlimited inodes, largefiles not supported 15625 data blocks, 14529 free data blocks
1 allocation units of 32768 blocks, 32768 data blocks last allocation unit has 15625 data blocks
* Loading mount to mount/dev/ram1 file system... * Mounting /dev/ram1 file system succeeded! * Copying /dev.old files back to /dev succeeds! * Loading insf to create disk device files... * Creating disk device files...
* Loading in a shell...
NOTE: Pushing a shell, you will have to use "reboot" to reboot the system when done. Use the "loadfile" command to bring in more commands as you need them.
#
Step 3. At the recovery shell prompt, enter:
loadfile -l INSTCMDS/opt/raidsa/bin/ciss_insf
# loadfile -l INSTCMDS /opt/raidsa/bin/ciss_insf
#
Step 4. At the next prompt, enter:
/opt/raidsa/bin/ciss_insf
and verify that the device file for the Smart Array 6402 Controller has been created. # /opt/raidsa/bin/ciss_insf
Installing special file for Smart Array 6402
/dev/ciss3 installed
#
Step 5. At the prompt enter:
loadfile -l INSTCMDS /opt/raidsa/bin/saconfig
# loadfile -l INSTCMDS /opt/raidsa/bin/saconfig
#
Step 6. Configure the array(s) and logical drive(s) following the instructions for the saconfig configuration utility. The entire path /opt/raidsa/bin/saconfig /dev/cissX needs to be entered for saconfig to run.
Step 7. Once the logical drive(s) and array(s) have been configured, exit the recovery shell by entering
reboot at the prompt. The system will reboot and you will be returned to the Boot Console Handler (BCH) prompt.
Step 8. At the BCH prompt, start Ignite-UX from the HP-UX 11i v1 Core OS Install and Recovery Media. The Ignite-UX “Welcome” screen displays (see Step 1).
Setting up a Smart Array 6402 Controller As a Boot Device
Step 10. Select the kind of installation (Guided or Advanced) you want to do.
The installation starts, and the Ignite-UX graphical interface (GUI) appears.
Step 11. Under the “Basic” tab, select the configuration to use according to the HP-UX system you are using.
Step 12. Still under the “Basic” tab, for the root disk for the installation, select the Smart Array 6402 logical drive you want to install the HP-UX operating system on.
Step 13. Continue with (and finish) the installation as usual.
Step 14. Once the installation has completed, you can boot from that Smart Array 6402 logical drive.
Using ORCA (IA Platforms Only)
This section describes how to use ORCA, a simple ROM-based configuration utility that runs on all Integrity Servers. For IA or Integrity systems follow this procedure:
Configuring Your Logical Boot Drive
When using an HP Smart Array controller as your boot controller, use the Option Rom Configuration for Arrays (ORCA) utility to configure your logical boot drive. The ORCA utility can only be accessed when the system is booting.
Step 1. Press the F8 key when the prompt appears on the screen during boot to start ORCA and configure your logical boot drive.
Step 2. Select the Create Logical Drive
Step 3. Use the Arrow keys, Spacebar, and Tab key to navigate around the screen and set up the logical drive, including an online spare drive if one is required.
NOTE You cannot use ORCA to configure one spare drive to be shared among several arrays.
Step 4. Press the Enter key to accept the settings
Step 5. Press the F8 key to confirm the settings and save the new configuration. After several seconds, the Configuration Saved screen is displayed.
NOTE Pressing F8 at the ORCA prompt may not start ORCA on all terminals. If ORCA does not start when F8 is pressed, reboot and use esc 8 at ORCA prompt to start ORCA.
2
Smart Array 6402 Controller Linux
Installation
Smart Array 6402 Controller Components
Smart Array 6402 Controller Components
Figure 2-1
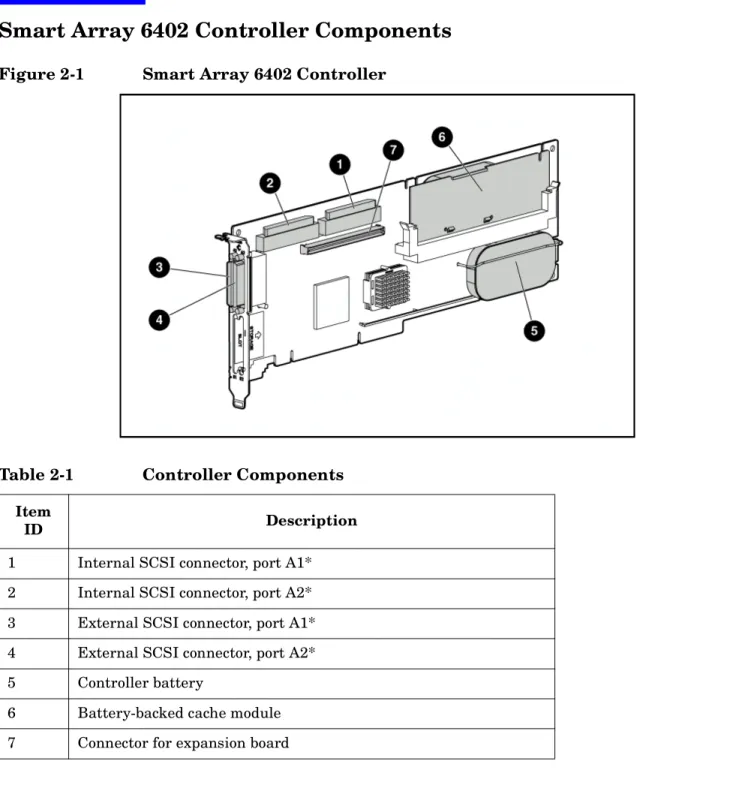
Smart Array 6402 Controller
NOTE Do not use both the internal and external connectors on one port simultaneously. The card will not function if both connectors on one port are used.
Table 2-1
Controller Components
Item
ID Description
1 Internal SCSI connector, port A1* 2 Internal SCSI connector, port A2* 3 External SCSI connector, port A1* 4 External SCSI connector, port A2* 5 Controller battery
6 Battery-backed cache module 7 Connector for expansion board
Smart Array 6402 Linux Installation Prerequisites
Smart Array 6402 Linux Installation Prerequisites
Before installing the Smart Array 6402 controller, ensure that the following hardware and software prerequisites are met:
• Check the Linux Support Notes for known problems or issues having to do with this card. These documents are available at: http:// www.docs.hp.com/linux.
• Confirm that the Smart Array 6402 controller is supported in your specific Linux-Integrity configuration. Configuration support information is available at:
http://www.hp.com/products1/serverconnectivity/storagesnf2/raid160/specifications/
• Check the HP Integrity server documentation at http://www.docs.hp.com to determine if additional tools may be required for installation.
• For specific instructions on controller installation, see system-specific documentation on "installing mass storage IO cards" for the applicable HP Integrity server(s).
Smart Array 6402 Linux Quick Installation
Smart Array 6402 Linux Quick Installation
This chapter contains Linux installation information for the RAID Smart Array 6402, A9890A controller.
Install Smart Array 6402 Controllers
CAUTION Smart Array 6402 controllers contain electronic components that can easily be damaged by small amounts of electricity. To avoid damage, follow these guidelines:
• Store controllers in their anti-static plastic bags until installation. • Work in a static-free area, if possible.
• Handle controllers by the edges only. Do not touch electronic components or electrical traces.
• Use a grounding wrist strap.
• Use a suitable ground—any exposed metal surface on the computer chassis.
Installing Controller For External Storage
The controller comes pre-configured. You do not have to set any jumpers or connectors.
NOTE Do not connect a SCSI cable to an external SCSI port without either disabling the card using OLAR or powering down the system. Adding the SCSI cable by hot-plugging it can cause bus errors, or possibly the controller to lock up, and in rare cases, electrical damage.
Step 1. Access the system controller bay
• If the system is running, shut it down.
• Wait for the system to shut down completely, and then power off the system. • Open the system to gain access to the PCI backplane.
• For better performance, insert the controller into the highest performance PCI slot available.
Step 2. Install the controller
• Slide the controller edge-connector into the PCI slot until it is fully seated. • Secure the controller.
Step 3. Reassemble the System
WARNING When connecting the Smart Array 6402 controller to HP DS2100, DS2110, and/or DS2300 storage devices, the SCSI data transfer rate must be set to U160 or slower to avoid possible data integrity issues. Use the offline (EFI) configuration tool for the Smart Array 6402 controller to set the transfer rate.
Smart Array 6402 Linux Quick Installation
NOTE Do not connect a SCSI cable to an external SCSI port without powering down the system. Adding a SCSI cable by hot-plugging it can cause bus errors, or possibly controller lock up, and in rare cases, electrical damage.
Connecting Controller For Internal Storage
NOTE Do not use the internal connector and the external connector on the same channel simultaneously.
Step 1. Power down the system and open any access panels and covers giving you access to the internal SCSI cabling and the PCI slots.
Step 2. Install the Smart Array PCI-X RAID card (A9890A) in a full-length PCI slot. There may be a specific slot required on your server, please see your server documentation for details.
Step 3. Remove the SCSI cable(s) connecting the internal disks to the built-in SCSI controller.
Step 4. Route the new SCSI cables(s) from the internal disks to the SmartArray cards.
Step 5. Replace access panels and covers
CAUTION Do not operate the server for long periods without the access panel installed. Operating the server without the access panel results in improper airflow and improper cooling that can lead to thermal damage.
CAUTION Do not use hot-pluggable drives and non-hot-pluggable drives on the same SCSI bus.
NOTE Drives grouped in the same array should all have the same storage capacity to avoid wasted disk space.
NOTE If additional cables are required, order by the option kit number.
Table 2-2
Supported Internal SCSI Cables
Server Length Option Kit Number Cable Assembly
Number
rx2600 Single Port 49 cm / 19 in. A9827A A7231-63024
Installing the Linux Driver
Installing the Linux Driver
Here are the steps to load the Smart Array 6402 driver with Linux.
Installing the Controller Prior to Linux Install
Here are the steps to load the Smart Array 6402 driver prior to installing the operating system:
Step 1. Install the controller using the instructions provided in Linux portion of this guide.
Step 2. Boot the system
Step 3. Go through the normal OS installation process.
Installing the Controller with Linux Installed
This section describes the steps necessary to load the Smart Array 6402 driver on an Integrity server running the Linux operating system.
NOTE Linux will recognize that the controller is present in the system and will load the correct driver automatically.
Step 1. Install the controller using the instructions provided in Linux portion of this guide.
Step 2. Run the following command upon rebooting the system in order to ensure that the driver gets properly loaded for the controller.
RedHat Linux:
The hardware detection functionality in RedHat Linux will find the controller and properly configure the system files. Run the following command to ensure the driver gets properly loaded: # mkinitrd -f /boot/efi/efi/redhat/initrd-$(uname -r).img $(uname -r)
SUSE Linux:
The hardware detection functionality in SUSE Linux will find the controller and properly configure the system files. Run the following command to ensure the driver gets properly loaded:
# mkinitrd -k /boot/vmlinux -i/boot/initr
Step 3. Run the following command to validate that the driver has been loaded and is active: # lsmod | grep cciss
Using ORCA
Using ORCA
This section describes how to use ORCA, a simple ROM-based configuration utility that runs on all operating systems.
ORCA Limitations
For the most efficient use of drive space, do not mix drives of different capacities within the same array. The configuration utility treats all physical drives in an array as if they have the same capacity as the smallest drive in the array. The excess capacity of any larger drives is wasted because it is unavailable for data storage.
The probability that an array will experience a drive failure increases with the number of physical drives in the array. If you configure a logical drive with RAID 5, keep the probability of failure low by using no more than 14 physical drives in the array.
Configuring Your Logical Boot Drive
When using an HP Smart Array controller as your boot controller, use the Option Rom Configuration for Arrays (ORCA) utility to configure your logical boot drive. The ORCA utility can only be accessed when the system is booting.
Step 1. Press the F8 key when the prompt appears on the screen during boot to start ORCA and configure your logical boot drive.
Step 2. Select the Create Logical Drive
Step 3. Use the Arrow keys, Spacebar, and Tab key to navigate around the screen and set up the logical drive, including an online spare drive if one is required.
NOTE You cannot use ORCA to configure one spare drive to be shared among several arrays.
Step 4. Press the Enter key to accept the settings
Step 5. Press the F8 key to confirm the settings and save the new configuration. After several seconds, the Configuration Saved screen is displayed.
NOTE Newly created logical drives are invisible to the operating system. To make the new logical drives available for data storage, format them using the instructions given in the operating system documentation.
3
Smart Array 6402 Controller Windows
Installation
Smart Array 6402 Controller Components
Smart Array 6402 Controller Components
Figure 3-1
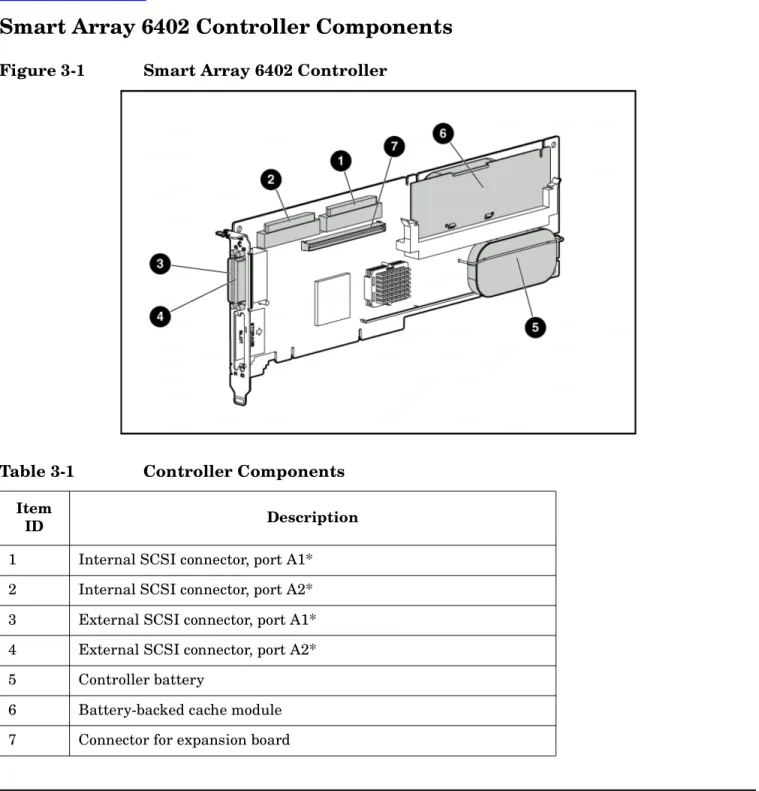
Smart Array 6402 Controller
NOTE Do not use both the internal and external connectors on one port simultaneously. The card will not function if both connectors on one port are used.
Table 3-1
Controller Components
Item
ID Description
1 Internal SCSI connector, port A1* 2 Internal SCSI connector, port A2* 3 External SCSI connector, port A1* 4 External SCSI connector, port A2* 5 Controller battery
6 Battery-backed cache module 7 Connector for expansion board
Smart Array 6402 Windows Installation Prerequisites
Smart Array 6402 Windows Installation Prerequisites
Before installing the Smart Array 6402 controller, ensure that the following hardware and software prerequisites are met:
• Check the Smart Array 6402 Release Notes available at http://www.docs.hp.com in the Networking & Communications section for known problems or other information needed for installation.
• Confirm that the Smart Array 6402 controller and software is supported on the HP Integrity server and IO slot chosen, see Smart Array 6402 Controller Support Matrix located in the Smart Array 6402 Support Guide, available at http://www.docs.hp.com in the Networking & Communications section for more information.
• Check the HP Integrity server’s documentation to determine if additional tools may be required for component installation at http://www.docs.hp.com.
• For specific instructions on controller installation, see system-specific documentation on “installing mass storage IO cards” for each type of HP Integrity server that Smart Array 6402 controller will be installed into.
• See your system hardware documentation to determine if OL* is supported. For detailed information about OL*, see the Interface Card OL* Support Guide. You can view, download, or print it from http://www.docs.hp.com.
• Smart Array 6402 controller software media is available. It is included on CD or available on the web through http://www.software.hp.com.
• Confirm that the Windows operating system is the correct version.
Smart Array 6402 Windows Quick Installation
Smart Array 6402 Windows Quick Installation
This chapter provides Windows installation information for the RAID Smart Array 6402, A9890A controller. The procedure for installing the controller can be split into several phases. The sequence in which you must perform the phases depends on the type of server.
CAUTION Smart Array 6402 controllers contain electronic components that can easily be damaged by small amounts of electricity. To avoid damage, follow these guidelines:
• Store controllers in their anti-static plastic bags until installation. • Work in a static-free area, if possible.
• Handle controllers by the edges only. Do not touch electronic components or electrical traces.
• Use a grounding wrist strap.
• Use a suitable ground—any exposed metal surface on the computer chassis.
Installing the Smart Array 6402 Controller
The controller comes pre-configured. You do not have to set any jumpers or connectors.
Step 1. Access the system controller bay
• If the system is running, shut it down.
• Wait for the system to shut down completely, and then power off the system. • Open the system to gain access to the PCI backplane.
• For better performance, insert the controller into the highest performance PCI slot available.
Step 2. Install the controller
• Slide the controller edge-connector into the PCI slot until it is fully seated. • Secure the controller and reassemble the system.
Smart Array 6402 Windows Software Installation
Smart Array 6402 Windows Software Installation
The following sections summarize the recommended sequence of phases for each situation. For more information about any phase of the installation procedure, refer to the HP Smart Array 6402 Series Controllers User Guide on the Documentation CD in the controller kit.
NOTE If you are installing the Smart Array 6402 controller for internal storage, please refer to the “Internal Cabling Guide for the HP Smart Array 6400 Series Controller” document included on the Documentation CD.
Install Smart Array 6402 Software
Use the steps in this section to configure your HP Smart Array as the boot controller. After the OS
installation is complete, the HP Array Configuration Utility (ACU) can be used to configure the rest of your logical drives.
Step 1. When using an HP Smart Array controller as your boot controller, use the Option Rom
Configuration for Arrays (ORCA) utility to configure your logical boot drive. The ORCA utility can only be accessed when the system is booting. Press the F8 key when the prompt appears on the screen during boot to start ORCA and configure your logical boot drive. Refer to the HP Smart Array 6402 Series Controllers User Guide (available on the HP Smart Setup media) for details on using the ORCA utility.
NOTE FOR CELL-BASED SYSTEMS: The Smart Array Option ROM must be loaded manually the first time during both manual or software pre-load installations. This can be done at the EFI shell by executing a search all command at the EFI prompt. The F8 prompt will appear. Continue with the configuration without resetting the system.
Step 2. Once the logical boot drive is configured, exit ORCA, select the EFI Shell [Built-in] from the EFI Boot Manager, then type reset. The OS installation can proceed after the reboot is complete. If you are performing a manual installation and using the Smart Array 6402 as your boot controller, you must load an OEM boot driver: Launch the EFI-Based Setup Utility (EBSU). Instructions on how to launch the EBSU are provided in the, HP Integrity Server Essentials Foundation Pack, HP Smart Setup Installation Poster for Microsoft Windows in the Manual OS Installation section. Select Load OEM Boot Driver by pressing the “b” key. Select the appropriate controller at the prompt to load the boot driver, then exit EBSU.
NOTE For remote access, the Telnet and Hyperterminal applications on Windows NT4 and Windows 2000 do not correctly map the ASCII string for the function keys. To enter the configuration utility during POST, press the “Esc” key immediately followed by pressing “8” after the Smart Array banner is displayed on the remote console. An alternative to using built-in Windows tools is to use putty, a utility provided on Smart Setup.
Step 3. Install the operating system.
Step 4. When installing additional Smart Array controllers, ensure each controller has been updated to the latest revision of the driver. Refer to the Smart Array Release Notes for instructions on how to do this.
Smart Array 6402 Windows Software Installation
Step 5. Install the Array Configuration Utility (ACU) from the Smart Setup CD. Again, refer to the Smart Array Release Notes for instructions.
Step 6. Install the Management Agents.
4
Smart Array 6402 Controller OpenVMS
Installation
Smart Array 6402 Controller Components
Smart Array 6402 Controller Components
Figure 4-1
Smart Array 6402 Controller
NOTE Do not use both the internal and external connectors on one port simultaneously. The card will not function if both connectors on one port are used.
Table 4-1
Controller Components
Item
ID Description
1 Internal SCSI connector, port A1* 2 Internal SCSI connector, port A2* 3 External SCSI connector, port A1* 4 External SCSI connector, port A2* 5 Controller battery
6 Battery-backed cache module 7 Connector for expansion board
Smart Array 6402 OpenVMS Installation Prerequisites
Smart Array 6402 OpenVMS Installation Prerequisites
Before installing the Smart Array 6402 controller, ensure that you have the following software and firmware: • OpenVMS Version V8.2-1 (or later) for Integrity servers.
• TCP/IP Version 5.5 or later.
• Smart Array firmware Version 2.58 or later. Refer to the http://www.hp.com website to download Version 2.58 firmware. From the HP website, choose Software and Driver Downloads. Once on this page, enter the product number of your smart array controller, and choose Download Driver and Software (firmware). • HP Insight Management Agents for OpenVMS V3.3 or later and any prerequisite software. Software
documentation and downloads can be obtained from the following website: http://h71000.www7.hp.com/openvms/products/mgmt_agents/.
• HP Array Configuration Utility (ACU-XE) for Integrity Servers Version 6.4 or later and any prerequisite documentation. Software documentation and downloads can be obtained from the following website: http://h71000.www7.hp.com/openvms/products/mgmt_agents/.
Also make sure that you review the following documentation:
• Check the Smart Array 6402 Release Notes available at http://www.docs.hp.com in the IO Cards and Networking Software section for known problems or other information needed for installation.
• Confirm that the Smart Array 6402 controller and software are supported on the HP Integrity server and I/O slot chosen. Refer to the Smart Array 6402 Controller Support Matrix located
Smart Array 6402 OpenVMS Quick Installation
Smart Array 6402 OpenVMS Quick Installation
This chapter contains the installation of HP A9890A PCI-X 2-Channel RAID SA SCSI Controller (Smart Array 6402).
Install Smart Array 6402 Controllers
CAUTION Smart Array 6402 controllers contain electronic components that can easily be damaged by small amounts of electricity. To avoid damage, follow these guidelines:
• Store controllers in their anti-static plastic bags until installation. • Work in a static-free area, if possible.
• Handle controllers by the edges only. Do not touch electronic components or electrical traces.
• Use a grounding wrist strap.
• Use a suitable ground—any exposed metal surface on the computer chassis.
Installing Controller For External Storage
The controller comes pre-configured. You do not have to set any jumpers or connectors.
NOTE Do not connect a SCSI cable to an external SCSI port without either disabling the card using OLAR or powering down the system. Adding the SCSI cable by hot-plugging it can cause bus errors, or possibly the controller to lock up, and in rare cases, electrical damage.
Step 1. Access the system controller bay
• If the system is running, shut it down.
• Wait for the system to shut down completely, and then power off the system. • Open the system to gain access to the PCI backplane.
• For better performance, insert the controller into the fastest performance PCI slot available.
Step 2. Install the controller
• Slide the controller edge-connector into the PCI slot until it is fully seated. • Secure the controller and reassemble the system.
Connecting Controller For Internal Storage
This section provides information on how to connect the Smart Array 6402 controller for internal storage. For more information on cable routing review the latest edition of the Smart Array (A9890A) Cable Routing on docs.hp.com.
Step 1. Power down the system and open any access panels and covers giving you access to the internal SCSI cabling and the PCI slots.
Smart Array 6402 OpenVMS Quick Installation
Step 2. Install the Smart Array PCI-X RAID card (A9890A) in a full-length PCI slot. There may be a specific slot required on your server, please see your server documentation for details.
Step 3. Remove the SCSI cable(s) connecting the internal disks to the built-in SCSI controller.
Step 4. Route the new SCSI cables(s) from the internal disks to the Smart Array cards.
Step 5. Replace access panels and covers
CAUTION Do not operate the server for long periods without the access panel installed. Operating the server without the access panel results in improper airflow and improper cooling that can lead to thermal damage.
WARNING To reduce the risk of personal injury or damage to the equipment, consult the safety information and user documentation provided with your server before attempting installation.
Many computers are capable of producing energy levels that are considered hazardous. These computers are intended to be serviced by qualified personnel trained to deal with those hazards. Do not remove enclosures or attempt to bypass any interlocks that may be provided for the purpose of removing these hazardous conditions.
Smart Array 6402 OpenVMS Software Installation
Smart Array 6402 OpenVMS Software Installation
Installing the Smart Array Controller to a System Running OpenVMS
Step 1. Install the controller according to the instructions in the section titled Install Smart Array 6400 Controller.
Step 2. Make sure your Smart Array firmware is Version 2.58 or later. Refer to the http://www.hp.com website to download Version 2.58 firmware. From the HP website, choose Software and Driver Downloads. Once on this page, enter the product number of your smart array controller, and choose Download Driver and Software (firmware).
Step 3. Web based utilities are provided for monitoring and configuring the smart array controller and the attached storage running with OpenVMS. The monitoring function is made available as part of the HP Insight Management Agents kit for OpenVMS Version 3.3. After you have installed the
controller, you need to install HP Insight Management Agents for OpenVMS V3.3. Software documentation and downloads can be obtained from the following website:
http://h71000.www7.hp.com/openvms/products/mgmt_agents/
Step 4. Online controller array configuration and maintenance functions are provided using the SA6400A Array Configuration Utility for Smart Array Controllers (ACU-XE) Version 6.4. The ACU-XE utility is installed separately from the HP Insight Management Kit, but requires the facilities provided by the Management kit. You can download the HP Array Configuration Utility for Integrity Servers Version 6.4 from the following website:
http://h71000.www7.hp.com/openvms/products/mgmt_agents/.
The Smart Array Configuration Utility is fully compatible with HP Insight Management Agents for OpenVMS Version 3.3.
Installing the Smart Array Controller as a Boot Device
Use the following steps to install the smart array controller prior to installing the operating system. When using an HP Smart array controller as your boot controller, use the Option Rom Configuration for Arrays (ORCA) utility to configure your logical boot drive. The ORCA utility can only be accessed when the system is booting. Refer to the Section below titled Using Orca for instructions on how to use this ROM-based utility.
Step 1. Power down the system.
Step 2. Install the controller according to the instructions in the section titled Install Smart Array 6400 Controller.
Step 3. Power up the system.
Step 4. During initialization verify that your firmware is at 2.58. If you need firmware Version 2.58, refer to the http://www.hp.com website to download Version 2.58 firmware, and choose Software and Driver Downloads. Enter the product number for your smart array controller and choose Download Driver and Software (firmware).
Step 5. Start the Orca program. See the Section (below) titled Using Orca.
Step 6. Exit out of Orca after configuring drives. The system will continue to initialize other devices in the system.
Smart Array 6402 OpenVMS Software Installation
Step 7. Once you are at the Boot menu, you are ready to install OpenVMS. Refer to the HP OpenVMS Upgrade and Installation manual for complete instructions on installing OpenVMS Version 8.2-1. The drivers for the smart array 6402 and 6404 controllers are included in the OpenVMS Version 8.2-1 software.
Step 8. After installing OpenVMS, install HP TCP/IP Version 5.5 or later, which is included on your OpenVMS media.
Step 9. Web based utilities are provided for monitoring and configuring the smart array controller and the attached storage running with OpenVMS. The monitoring function is made available as part of the HP Insight Management Agents kit for OpenVMS Version 3.3. After you have installed the
controller and OpenVMS, you need to install HP Insight Management Agents for OpenVMS V3.3. Refer to the following website for the Insight Management Agents Version 3.3 software downloads and documentation on how to monitor the smart array:
http://h71000.www7.hp.com/openvms/products/mgmt_agents/.
Step 10. Online controller array configuration and maintenance functions are provided using the SA6400A Array Configuration Utility for Smart Array Controllers (ACU-XE) Version 6.4. The ACU-XE utility is installed separately from the HP Insight Management Kit, but requires the facilities provided by the Management kit. You can download the HP Array Configuration Utility for Integrity Servers Version 6.4 from the following website:
http://h71000.www7.hp.com/openvms/products/mgmt_agents/. The Smart Array Configuration Utility is fully compatible with HP Insight Management Agents for OpenVMS Version 3.3.
Using ORCA
Using ORCA
This section describes how to use ORCA, a simple ROM-based configuration utility that runs on all operating systems.
ORCA Limitations
For the most efficient use of drive space, do not mix drives of different capacities within the same array. The configuration utility treats all physical drives in an array as if they have the same capacity as the smallest drive in the array. The excess capacity of any larger drives is wasted because it is unavailable for data storage.
The probability that an array will experience a drive failure increases with the number of physical drives in the array. If you configure a logical drive with RAID 5, keep the probability of failure low by using no more than 14 physical drives in the array.
Configuring Your Logical Boot Drive
When using an HP Smart Array controller as your boot controller, use the Option Rom Configuration for Arrays (ORCA) utility to configure your logical boot drive. The ORCA utility can only be accessed when the system is booting.
NOTE When using terminal emulators that do not correctly map to the function keys, press Esc 8 keys, instead of the F8 key to enter the configuration utility after the Smart Array banner is displayed.
Step 1. Press the F8 key when the prompt appears on the screen during boot to start ORCA and configure your logical boot drive.
Step 2. Select the Create Logical Drive
Step 3. Use the Arrow keys, Spacebar, and Tab key to navigate around the screen and set up the logical drive, including an online spare drive if one is required.
NOTE You cannot use ORCA to configure one spare drive to be shared among several arrays.
Step 4. Press the Enter key to accept the settings
Step 5. Press the F8 key to confirm the settings and save the new configuration. After several seconds, the Configuration Saved screen is displayed.
NOTE Newly created logical drives are invisible to the operating system. To make the new logical drives available for data storage, format them using the instructions given in the operating system documentation.
Issues and Restrictions
Issues and Restrictions
Issues and Restrictions Awareness
• In order to use the smart array controllers, A9890A and A9891A, with OpenVMS, you must ensure that your smart array controllers are running Version 2.58 firmware. Refer to the http://www.hp.com website to download Version 2.58 firmware. From the HP website, choose Software and Driver Downloads. Once on this website, enter the product number of your smart array controller, and choose Download Driver and Software (firmware).
• For smart array controller restrictions and limitations, review the HP Smart Array 6400 Series Controller Support Guide which can be found at the following website: http://docs.hp.com.
• When reporting errors or issues, the System Event Analyzer (SEA) in the WEBES diagnostic suite incorrectly identifies the SA6400 Smart Array cards as SA5304 cards. This will be corrected in a future release.