VMware Horizon FLEX Administration
Guide
Horizon FLEX 1.5
This document supports the version of each product listed and
supports all subsequent versions until the document is
replaced by a new edition. To check for more recent editions
of this document, see
http://www.vmware.com/support/pubs
.
You can find the most up-to-date technical documentation on the VMware Web site at: http://www.vmware.com/support/
The VMware Web site also provides the latest product updates.
If you have comments about this documentation, submit your feedback to: [email protected]
Copyright © 2014, 2015 VMware, Inc. All rights reserved. Copyright and trademark information.
VMware, Inc. 3401 Hillview Ave. Palo Alto, CA 94304 www.vmware.com
Contents
VMware Horizon FLEX Administration Guide 5
1
Introducing Horizon FLEX 7
Horizon FLEX Components 7 About Mirage 8
Horizon FLEX Architecture 8
Horizon FLEX System Requirements 10 Horizon FLEX Network Requirements 10 Supported Host and Guest Operating Systems 11
2
Installing Horizon FLEX 13
Horizon FLEX Installation Overview 13
Installing and Configuring Mirage Components for Horizon FLEX 14 Create a Download Folder for Horizon FLEX Virtual Machine Packages 15 Set Up a Certificate for the Horizon FLEX Server by Using OpenSSL 15 Configure the IIS SSL Server Certificate for the Horizon FLEX Server 16 Configure Active Directory Settings 16
Test the Horizon FLEX Admin Console Connection 17 Installing the Horizon FLEX Client for End Users 18
Create a Mass Deployment Package to Install Fusion Pro 18 Provide a Player Pro Installation Package to End Users 18 Run an Unattended Player Pro Installation 19
3
Setting Up Certificates for Horizon FLEX Virtual Machines 21
Creating a Trusted Certificates List 21 About the PEM Format 22
Creating PEM-Format Certificates 22
Create and Import the Trusted Certificates List File 23 Updating Certificates on the Server 24
Using Self-Signed Certificates 24
Install a Self-Signed Certificate on a Windows Computer 24 Install a Self-Signed Certificate on a Mac 25
Using Internal CA Certificates 27
Install an Internal Root CA Certificate on a Windows Computer 27 Install an Internal Root CA Certificate on a Mac 28
4
Creating and Deploying Horizon FLEX Virtual Machines 31
Horizon FLEX Virtual Machine Deployment Overview 31 Create a Source Virtual Machine in Fusion Pro 32
Create a Source Virtual Machine in Workstation (Not included in Horizon FLEX ) 33 Install the Mirage Client In a Source Virtual Machine 34
Prepare a Source Virtual Machine to Join an Active Directory Domain 35 Compress a Source Virtual Machine Package 36
Register a Source Virtual Machine with the Horizon FLEX Policy Server 37 Creating Policies and Entitlements 38
Configure a General Policy for a Horizon FLEX Image 38 Configure a USB Device Policy for a Horizon FLEX Image 40
Configure a Custom USB Device Policy for a Horizon FLEX Image 41 Update a Policy for a Deployed Horizon FLEX Image 42
Entitle a Horizon FLEX Image 43
Create a URI to Deploy a Horizon FLEX Virtual Machine 44
5
Managing Horizon FLEX Virtual Machines 47
Manage Horizon FLEX Virtual Machines 47
6
Maintaining the Horizon FLEX System 49
Upgrade from Previous Horizon FLEX Versions 49
VMware Horizon FLEX Administration Guide
The VMware Horizon FLEX Administration Guide describes how to install and administer VMware Horizon® FLEX™.
Intended Audience
This information is intended for anyone who wants to install Horizon FLEX. The information is written for experienced Windows system administrators who are familiar with virtual machine technology.
Introducing Horizon FLEX
1
Horizon FLEX is a policy-based, containerized desktop solution that enables IT administrators to create, secure, and manage local desktops for end users. End users work within a restricted virtual machine, called a Horizon FLEX virtual machine, on their own computers. Because Horizon FLEX virtual machines are stored locally, on end-user computers, corporate applications are accessible to offline users.
This chapter includes the following topics:
n “Horizon FLEX Components,” on page 7 n “Horizon FLEX Architecture,” on page 8
n “Horizon FLEX System Requirements,” on page 10 n “Horizon FLEX Network Requirements,” on page 10 n “Supported Host and Guest Operating Systems,” on page 11
Horizon FLEX Components
Horizon FLEX is a combination of VMware components, including Mirage, Fusion Pro, and Player Pro. VMware Mirage® for
Horizon FLEX
The Mirage Server that is used by Horizon FLEX. The server provides Horizon FLEX virtual machine management. You can manage, back up, and patch virtual machines by using the Mirage for Horizon FLEX layering technology. Use of Mirage for Horizon FLEX is optional. You can also use other image management tools to manage Horizon FLEX virtual machines. Horizon FLEX Policy
Server
The standard Mirage server with an extension that includes Horizon FLEX-specific functionality. The Horizon FLEX Policy Server is activated after you apply the Horizon FLEX license to Mirage for Horizon FLEX.
Horizon FLEX Admin Console
The Web management user interface for the Horizon FLEX Policy Server. The Horizon FLEX Admin Console is located in the Mirage Web Manager component. You use the Horizon FLEX Admin Console to perform virtual machine management tasks, including the following:
n Manage an inventory of virtual machines
n Browse a list of users and groups in the Active Directory service n Entitle users and groups to one or more virtual machines n Specify virtual machine policies for a given entitlement
n Prevent users from accessing virtual machines by using remote lock n Examine virtual machine details and status at any time
Horizon FLEX Client The client software that end users use to download the Horizon FLEX virtual machines to their local computers. The clients include VMware Fusion® Pro for Mac computers and VMware Player Pro™ for Windows computers. Fusion Pro and Player Pro are included in the Horizon FLEX package. One license key is provided for both Fusion Pro and Player Pro.
Horizon FLEX Virtual Machine
The virtual machine that end users run on their own computers. You use Fusion Pro to create source virtual machines for Horizon FLEX virtual machines. Fusion Pro is included in the Horizon FLEX package. A Horizon FLEX server can support up to 1,000 users.
NOTE You can also use VMware Workstation™ to create source virtual machines. Workstation is not included in the Horizon FLEX package.
About Mirage
Mirage is integral to the operation and use of Horizon FLEX virtual machines. Horizon FLEX uses a subset of the features available in Mirage:
n Mirage Server
n Mirage Management Server n Mirage Web Manager
n Mirage Management Console
This document does not describe all of the information pertaining to Mirage. For complete information about Mirage, see the Mirage documentation at https://www.vmware.com/support/pubs/mirage_pubs.html.
Horizon FLEX Architecture
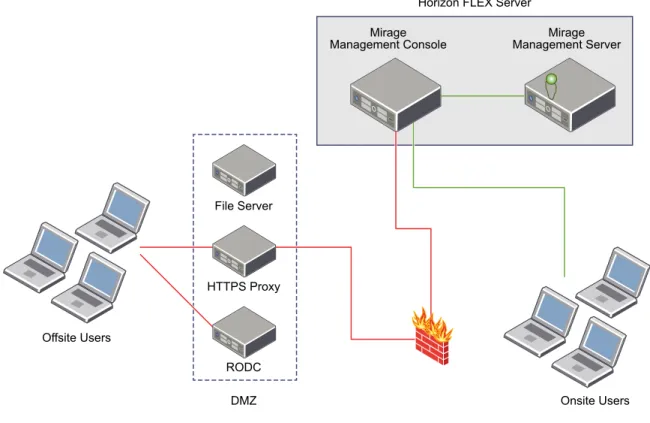
A typical Horizon FLEX deployment includes the Horizon FLEX server, a file server, an HTTPS proxy, a read-only domain controller (RODC), and offsite and onsite end-user systems.
Figure 1‑1. Sample Horizon FLEX Deployment Without Mirage Offsite Users DMZ File Server HTTPS Proxy RODC Onsite Users Horizon FLEX Server
Mirage
Management Console Management ServerMirage
Horizon FLEX Server
The Horizon FLEX server is composed of the Horizon FLEX Admin Console and the Horizon FLEX Policy Server. The Horizon FLEX server provides the following functionality.
n Assigns Horizon FLEX virtual machines to users and groups from a directory service n Maintains a record of Horizon FLEX virtual machines in use by individual users
n Provides security certificate management to ensure the secure and trusted communication between the
deployed Horizon FLEX virtual machines and the Horizon FLEX server.
n Enforces policy settings to the client
n Enables modification of policy settings for a given user and Horizon FLEX virtual machine combination n Monitors Horizon FLEX virtual machine status
The Mirage Management Console is the graphical user interface used for scalable maintenance, management, and monitoring of deployed endpoints. The Mirage Web Manager mirrors Mirage Management Console functionality.
By default, port 7443 is used by the Horizon FLEX Policy Server for external access, and port 8443 is used by the Mirage Management Server to communicate with the Horizon FLEX Policy Server. You must configure your firewall policies to allow the required ports. For a complete list of ports used by Mirage, see the Mirage documentation at https://www.vmware.com/support/pubs/mirage_pubs.html.
File Server
A file server stores the TAR files that contain the source virtual machine files for Horizon FLEX virtual machines. The file server is located inside the DMZ.
HTTPS Proxy
An HTTPS proxy enables offsite end-user systems to reach the Mirage Management Console. The HTTPS proxy is inside the DMZ.
RODC
An RODC enables office end-user systems to log in to their Horizon FLEX virtual machines and join the Active Directory domain for the first boot up of the VM. An RODC is required only if you are allowing outside users to log in without using a VPN. The RODC is inside the DMZ.
Horizon FLEX System Requirements
Each product in the Horizon FLEX package has certain system requirements. Mirage for
Horizon FLEX
The system requirements for Horizon FLEX 1.5 are the same as for Mirage 5.4. See the Mirage documentation at
https://www.vmware.com/support/pubs/mirage_pubs.html.
Fusion Pro Horizon FLEX 1.5 uses Fusion Pro 7.1.2 as the client software for Mac clients. Horizon FLEX 1.5 is not compatible with earlier versions of Fusion Pro. For Fusion Pro hardware and software requirements, see the VMware Horizon
FLEX User Guide.
Player Pro Horizon FLEX 1.5 uses Player Pro 7.1.2 as the client software for Windows clients. Horizon FLEX 1.5 is not compatible with earlier versions of Player Pro.
For Player Pro hardware and software requirements, see the VMware Horizon
FLEX User Guide.
Workstation Horizon FLEX 1.5 is compatible with Workstation 11.1.2. You can use Workstation to create and open a source virtual machine, but Workstation cannot download a Horizon FLEX virtual machine.
Workstation is not included in the Horizon FLEX installation package. For Workstation hardware and software requirements, see the Workstation documentation at https://www.vmware.com/support/pubs/ws_pubs.html.
Horizon FLEX Network Requirements
Horizon FLEX enables end users to run corporate applications even when they are disconnected from the network. Horizon FLEX virtual machines are stored locally for a complete desktop experience that does not require a network connection.
A network connection is required between the Horizon FLEX Policy Server and the Horizon FLEX Client in the following circumstances:
n For the initial download of the Horizon FLEX virtual machine to the user's local computer.
n To register a Horizon FLEX virtual machine that was provided on a USB device or deployed on the
user's local computer.
n To receive Horizon FLEX virtual machine restriction and policy updates.
When you register a source virtual machine for a Horizon FLEX virtual machine, you specify a download location URL for virtual machine package. The download folder must be accessible to end user computers for end users to download virtual machines.
Supported Host and Guest Operating Systems
The local computer on which end users use the Horizon FLEX Client must have a supported host operating system. A Horizon FLEX virtual machine must use a supported guest operating system.
Supported Host Operating Systems
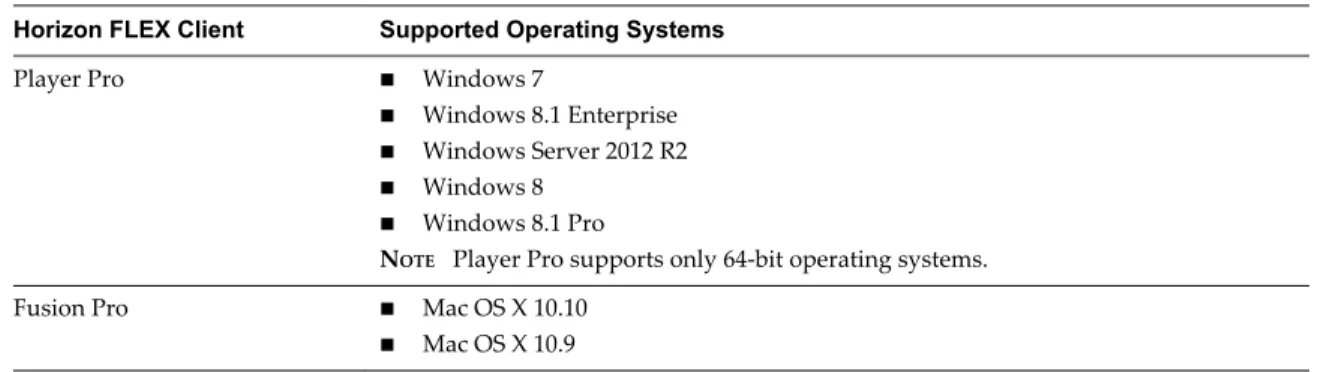
Your end users can run the Horizon FLEX Client and access their Horizon FLEX virtual machine by using a physical computer that has one of the following operating systems.
Table 1‑1. Supported Host Operating Systems
Horizon FLEX Client Supported Operating Systems
Player Pro n Windows 7
n Windows 8.1 Enterprise n Windows Server 2012 R2 n Windows 8
n Windows 8.1 Pro
NOTE Player Pro supports only 64-bit operating systems.
Fusion Pro n Mac OS X 10.10
n Mac OS X 10.9
Supported Guest Operating Systems
A Horizon FLEX virtual machine can contain one of the following guest operating systems.
n Windows 7 n Windows 8.1 n Windows XP n Windows Server 2012 R2 n Windows 2012 n Ubuntu 14.04
Installing Horizon FLEX
2
The Horizon FLEX installation involves installing the Horizon FLEX server and client components, creating folders to store Horizon FLEX virtual machines, preparing Active Directory, setting up certificates, and creating and deploying Horizon FLEX virtual machines.
This chapter includes the following topics:
n “Horizon FLEX Installation Overview,” on page 13
n “Installing and Configuring Mirage Components for Horizon FLEX,” on page 14 n “Create a Download Folder for Horizon FLEX Virtual Machine Packages,” on page 15 n “Set Up a Certificate for the Horizon FLEX Server by Using OpenSSL,” on page 15 n “Configure the IIS SSL Server Certificate for the Horizon FLEX Server,” on page 16 n “Configure Active Directory Settings,” on page 16
n “Test the Horizon FLEX Admin Console Connection,” on page 17 n “Installing the Horizon FLEX Client for End Users,” on page 18
Horizon FLEX Installation Overview
Horizon FLEX is a combination of VMware components, including Mirage, Fusion Pro, and Player Pro. The Horizon FLEX installation involves installing each of these components and performing additional
Horizon FLEX-specific tasks. For a successful Horizon FLEX deployment, you must understand the sequence of required tasks.
Before you install Horizon FLEX, verify that it meets all of the hardware and software requirements, that you have valid licenses, and that you have downloaded the Horizon FLEX component installers from the VMware Horizon FLEX product download page.
You install the Horizon FLEX by performing these steps: 1 Install the Mirage system.
See “Installing and Configuring Mirage Components for Horizon FLEX,” on page 14. 2 Set up certificates for Horizon FLEX virtual machines.
See Chapter 3, “Setting Up Certificates for Horizon FLEX Virtual Machines,” on page 21. 3 Create a download folder for storing your Horizon FLEX virtual machine packages.
See “Create a Download Folder for Horizon FLEX Virtual Machine Packages,” on page 15.
4 Add a virtual directory in IIS for your Horizon FLEX virtual machine download folder and edit the site bindings.
See “Configure the IIS SSL Server Certificate for the Horizon FLEX Server,” on page 16. 5 (Optional) Configure Horizon FLEX to synchronize entities in only a selected Active Directory
organizational unit (OU).
See “Configure Active Directory Settings,” on page 16. 6 Test the connection to the Horizon FLEX Admin Console.
See “Test the Horizon FLEX Admin Console Connection,” on page 17.
7 Install a Horizon FLEX Client on each end-user host, or instruct end users to install a Horizon FLEX Client on their own computers.
See “Installing the Horizon FLEX Client for End Users,” on page 18. 8 Create and deploy Horizon FLEX virtual machines.
See Chapter 4, “Creating and Deploying Horizon FLEX Virtual Machines,” on page 31.
Installing and Configuring Mirage Components for Horizon FLEX
The first Horizon FLEX installation step is to install and configure the Mirage system. The Horizon FLEX package includes the following components:
n VMware Mirage for FLEX (the Mirage Core Software) n Mirage PowerCLI for Windows
n Mirage Gateway Appliance Software
Download the installation files from the Horizon FLEX Server product download page. The Mirage deployment involves the installation of the following components.
1 Mirage Management Server 2 Mirage Server
3 Mirage Management Console 4 Mirage Web manager
To install and configure the Mirage system, follow the installation instructions in the Mirage documentation at https://www.vmware.com/support/pubs/mirage_pubs.html.
When you install the Mirage system, you must select certain options for the Horizon FLEX server to operate correctly.
n The Mirage Server and Mirage console are only required if you are installing the Mirage client in the
source virtual machines.
n If placing the virtual machine images on the same system as the Horizon FLEX Server, place the images
in the IIS "Default Web" server.
n The Web Management Server and the Mirage Management Server should be installed on the same
server. However, the SQL server should be installed on a separate server.
n During Mirage server installation, choose SSL for the Mirage server transport. SSL is required to use the
Mirage Gateway feature for external access and management of Horizon FLEX systems. Before configuring the Mirage Server for SSL, you must install the server SSL certificate.
n Before you install the Mirage Web Manager, verify that .NET Framework 4.0 is installed on the server. n The Mirage Management Server must run as a user who has Active Directory read permissions. If you
plan to join Horizon FLEX virtual machines to an Active Directory domain, the Mirage Management Server must run as a user who has domain join permissions.
Create a Download Folder for Horizon FLEX Virtual Machine Packages
During the Horizon FLEX virtual machine deployment process, you compress your source virtual machine packages into TAR (.tar) format so that end users can easily download their Horizon FLEX virtual
machines. You must create a download folder for storing these TAR files. Procedure
1 Create the download folder on the Horizon FLEX server or on another server.
The download folder does not need to be on the Horizon FLEX server, but the files it contains must be downloadable without any authentication challenge.
2 Assign permissions to the download folder so that users can download the files that it contains. 3 (Optional) Share the download folder with an administrative group, such as Horizon FLEX Admins.
This can be an administrative group for users to manage Horizon FLEX deployments.
This step can make it easier to register your source virtual machines with the Horizon FLEX Policy Server.
What to do next
Create a virtual directory in IIS to allow the Horizon FLEX virtual machines to be downloaded to end-user systems. See “Configure the IIS SSL Server Certificate for the Horizon FLEX Server,” on page 16.
Set Up a Certificate for the Horizon FLEX Server by Using OpenSSL
You can create a self-signed certificate for the Horizon FLEX server by using OpenSSL. Prerequisites
The OpenSSL configuration file is created on the Mirage Gateway Server. See the Mirage documentation at https://www.vmware.com/support/pubs/mirage_pubs.html.
Procedure
1 At the OpenSSL command prompt, create a certificate: $ openssl req -new -days expiration time
-x509 -newkey rsa:2048 - keyout key filename -outcertificate filename -nodes
expiration time represents the number of days that the certificate should be valid, key filename represents
the filename for the key, and certificate filename represents the new certificate name.
A self-signed certificate and a private key are generated. The certificate uses a 2048-bit RSA key and does not protect the key with a passphrase.
2 When prompted, enter the country name, state name, locality, organization name, and organizational unit name.
3 In the Common Name text box, enter the host name of the Horizon FLEX server to be protected. This text box must be completed.
4 Enter the email address.
The self-signed certificate and associated private key are generated.
5 If the private key must be in .pfx format , enter the following command by using the certificate name
and key filename generated in the previous steps:
$ openSSL pkcs12 -export -outoutput pfx filename -inkey key filename -in certificate name A new password-protected .pfx file is generated that can be deployed on any device that requires .pfx
certificates instead of PEM certificates.
Configure the IIS SSL Server Certificate for the Horizon FLEX Server
You must configure the IIS SSL server certificate for the Horizon FLEX server to set the certificate chain from the Horizon FLEX server to the Horizon FLEX virtual machines.
Prerequisites
n Install Mirage for Horizon FLEX. See “Installing and Configuring Mirage Components for Horizon
FLEX,” on page 14.
n Install the Server SSL Certificate on the Mirage server. See the Mirage documentation at
https://www.vmware.com/support/pubs/mirage_pubs.html
n Configure certificate authentication for your Horizon FLEX virtual machines. See Chapter 3, “Setting
Up Certificates for Horizon FLEX Virtual Machines,” on page 21.
n Create a download folder for your Horizon FLEX virtual machine packages. See “Create a Download
Folder for Horizon FLEX Virtual Machine Packages,” on page 15. Procedure
1 Open IIS Manager.
2 Navigate to VMware Mirage Management Web Site and select rvm. 3 Right-click rvm and select Add Virtual Directory.
4 Type a name in the Alias text box, browse to the folder that you created to contain the Horizon FLEX virtual machine packages, and click OK.
5 Navigate to the root node, the connection node defined for the Mirage server. 6 On the Mirage Home page under IIS, double click Server Certificates.
The IIS SSL server certificates window opens. 7 Click Import in the right column.
This step imports the created SSL certificate and assigns a key to identify the certificate. 8 Select VMware Mirage Management Web Site and click Edit Bindings in the right column. 9 Set the HTTPS port to use your Horizon FLEX server certificate and click OK.
Configure Active Directory Settings
When you entitle a Horizon FLEX virtual machine, you add users and groups from your existing Active Directory infrastructure to the entitlement. By default, Horizon FLEX synchronizes your entire Active Directory infrastructure with the Horizon FLEX database. You can optionally configure Horizon FLEX to synchronize only a specific organization unit (OU).
Prerequisites
Install Mirage for Horizon FLEX. See “Installing and Configuring Mirage Components for Horizon FLEX,” on page 14.
Procedure
1 Start the Horizon FLEX Admin Console.
a In a Web browser, enter https://WebManagerServer:7443/rvm, where WebManagerServer is the DNS
name or IP address of the host where the Mirage Web Manager is installed. b Enter the user name and password of a domain account that has access to Mirage. c Click Login.
2 In the Horizon FLEX Admin Console, click the General System Settings icon and click Active
Directory Settings.
3 Type the OU to synchronize in the Organizational Unit text box.
As you begin to type in the text box, the available OUs in your Active Directory infrastructure appear in a drop-down menu and you can select the appropriate OU.
4 Click OK to save the OU setting.
The Horizon FLEX server validates the OU to verify that it exists and is accessible.
The Horizon FLEX server synchronizes the Active Directory entities that belong only to the OU that you selected, including entities that belong to any child OUs of the selected OU.
Any time you configure a new OU, the Horizon FLEX server deletes the previously synchronized entities from the database and starts a new full synchronization process.
You can configure the policy for client virtual machines so that the power-on password matches the user's Active Directory password after first startup. See “Configure a General Policy for a Horizon FLEX Image,” on page 38.
Test the Horizon FLEX Admin Console Connection
You can verify your Horizon FLEX deployment by testing the Horizon FLEX Admin Console connection. Prerequisites
n Install Mirage for Horizon FLEX. See “Installing and Configuring Mirage Components for Horizon
FLEX,” on page 14.
n Configure certificate authentication. See Chapter 3, “Setting Up Certificates for Horizon FLEX Virtual
Machines,” on page 21. Procedure
1 Start the Horizon FLEX Admin Console.
a In a Web browser, enter https://WebManagerServer:7443/rvm, where WebManagerServer is the DNS
name or IP address of the host where the Mirage Web Manager is installed. b Enter the user name and password of a domain account that has access to Mirage. c Click Login.
2 Verify that the Horizon FLEX Admin Console page appears correctly.
The Images, Policies, Entitlements, and Virtual Machines buttons should be visible in the left navigation panel.
Installing the Horizon FLEX Client for End Users
End users must have the Horizon FLEX Client software installed on their local computers before they can download the Horizon FLEX virtual machines. Supported clients included in the Horizon FLEX package are Fusion Pro for Mac OS X machines and Player Pro for Windows machines.
You can create a mass deployment to install the Horizon FLEX Client on many systems at one time, or you can instruct end users to obtain the Horizon FLEX Client from the VMware Web site and install it
themselves. You can also run an unattended Player Pro installation on multiple Windows machines.
Create a Mass Deployment Package to Install Fusion Pro
You can create a Fusion Pro mass deployment package to install Fusion Pro on any number of end-user Macs. You can use standard package deployment tools, including Apple Remote Desktop Admin, to deploy the mass deployment package.
When you configure the mass deployment package, specify your Horizon FLEX license key in the [Volume License] section of the Deploy.ini file and place a copy of the Fusion Pro application in the
00Fusion_Deployment_Items folder.
You can use the optional connectAtStartupURL parameter in the [Locations] section of the Deploy.ini file to
specify a user name and the host name of your Horizon FLEX server, for example:
connectAtStartupURL = vmware-rvm://[email protected]:7443
If no virtual machines are installed on the user's Mac when the user launches Fusion Pro, the Connect dialog box opens and the Server and Username text boxes are prepopulated with the host name and user name that you specified in the connectAtStartupURL parameter.
For step-by-step information about creating a mass deployment package, see the VMware knowledge base article at http://kb.vmware.com/kb/2058680.
Provide a Player Pro Installation Package to End Users
You can install Player Pro on end user machines and deploy Horizon FLEX virtual machines by creating a uniform resource identifier (URI). Using a URI, you can create an email that contains a link that the end user can click to connect to a server and download the Player Pro installer. When installation is complete, the end user is prompted to connect to a server and download a Horizon FLEX virtual machine.
If Player Pro is already installed, you can create a URI to deploy a Horizon FLEX virtual machine only. See “Create a URI to Deploy a Horizon FLEX Virtual Machine,” on page 44
Prerequisites
n Give the end user a password for the server and the Player Pro license key for use with Horizon FLEX.
Procedure
1 Construct a URI to create a customized Player Pro installation and deployment package. The command line has the following structure:
VMware-player-x.x.x-xxxxxxx.exe /v PLAYER_RVM_URI="vmware-rvm://[email protected]:7443
Specify the version and build number of the Player Pro .exe file. username is the user's login name and
myserver.com is the host name of the server. You must include vmware-rvm:// and :7443 in the server
address. Do not include http or https in the server address.
2 Enter link text in an email and enter hyperlink information for the URI.
You can use any email system to send the link. However, because the format of the URI is not recognized as a standard URL, you must manually enter the hyperlink information.
3 Create an email for the user and enter some link text. For example: Your Pro Player Installer File
4 Select the link text, right-click the selected text, and select Hyperlink. 5 Select Link to: Existing File or Web Page.
6 Enter the URI in the Address text box.
For example: vmware-rvm://[email protected]:7443
The link is now active. 7 Click OK.
8 Send the email to the user.
If no virtual machines are installed on the user's computer when the user starts Player Pro, the Connect to Server dialog box opens. The Server and Username text boxes are prepopulated with the values that you specified in the URI. The user enters a password and connects to the server to download a Horizon FLEX virtual machine.
Run an Unattended Player Pro Installation
You can use the unattended installation feature of the Microsoft Windows Installer (MSI) to install Player Pro on several Windows hosts without having to respond to wizard prompts. This feature is convenient in a large enterprise.
Prerequisites
n Verify that the host system meets the host system requirements.
n Verify that the host computer has version 2.0 or later of the MSI runtime engine. This version of the
installer is available in versions of Windows beginning with Windows XP and is available from Microsoft. See the Microsoft Web site for more information.
Procedure
1 Log in to the host system as the administrator user or as a user who is a member of the local Administrators group.
If you log in to the domain, the domain account must also be a local administrator. 2 Extract the administrative installation image from the Player Pro setup file.
The setup filename is similar to VMware-player-xxxx-xxxx.exe, where xxxx-xxxx is the version and build
number.
For example: setup.exe /s /e install_temp_path 3 Enter the installation command on one line.
These examples show the options that you can add to the command.
VMware-player-x.x.x-xxxxxx.exe /s /nsr /v "EULAS_AGREED=1
INSTALLDIR=""path_to_program_directory"" ADDLOCAL=ALL DISABLE_AUTORUN=0 QUICKLAUNCH_SHORTCUT=0 SERIALNUMBER=""xxxxx-xxxxx-xxxxx-xxxxx-xxxxx"" "
VMware-player-x.x.x-xxxxxx.exe /s /v EULAS_AGREED=1 SERIALNUMBER="xxxxx-xxxxx-xxxxx-xxxxx-xxxxx"
VMware-player-x.x.x-xxxxxx.exe /s /nsr /v EULAS_AGREED=1 REMOVE=NAT SERIALNUMBER="xxxxx-xxxxx-xxxxx-xxxxx-xxxxx"
You can use the optional/nsr command to prevent the target machine from rebooting silently.
You can use the optional INSTALLDIR property to specify a file path for the installation that is different from the default location.
NOTE The quotation marks around the file path are important. All the MSI arguments are passed with the /v option. The outer quotation marks group the MSI arguments and the inner quotation marks put a quotation mark in that argument.
Setting Up Certificates for
Horizon FLEX Virtual Machines
3
Before you create and deploy Horizon FLEX virtual machines, you must set up certificates to ensure that end users can successfully download and use their virtual machines.
VMware recommends that you use a certificate that is issued by a certificate authority (CA), such as Entrust or Go Daddy, or a third-party certificate, on your Horizon FLEX server. If you are using a self-signed certificate or a certificate from an internal CA instead of a generally trusted certificate, you must take steps to ensure that the certificate is trusted on all end-user computers that will download and use Horizon FLEX virtual machines.
For information about setting up certificates in Mirage for the Horizon FLEX Server, see the Mirage documentation at https://www.vmware.com/support/pubs/mirage_pubs.html.
This chapter includes the following topics:
n “Creating a Trusted Certificates List,” on page 21 n “Using Self-Signed Certificates,” on page 24 n “Using Internal CA Certificates,” on page 27
Creating a Trusted Certificates List
You can create a list of trusted certificates for Horizon FLEX virtual machines and import the list to the Horizon FLEX Policy Server. When you use a trusted certificates list, you do not need to install certificates on end-user hosts.
Using a list of trusted certificates can prevent malicious users from creating their own self-signed certificates for the same hostname and adding those certificates to their host's list of trusted certificates.
When you configure the Horizon FLEX Policy Server to use a trusted certificates list, the client host ignores the host's list of certificates and uses the trusted certificates list to verify server connections instead. If the client host cannot verify a certificate by using the trusted certificates list, the server connection fails. If the trusted certificates list is empty in the source virtual machine, Player Pro and Fusion Pro authenticate against the host's list of trusted certificates.
To create the trusted certificates list, you export each certificate to a separate file and then concatenate all of the files into a single file. You use the Horizon FLEX Admin Console to import the concatenated certificates file to the Horizon FLEX Policy Server.
You must export certificates in Privacy Enhanced Mail (PEM) format. On Windows systems, the PEM certificate encoding is called Base-64 encoded X.509 (.CER). Only PEM-encoded certificates are supported. No other certificate format (DER, Serialized Certificate Store/SST, PKCS #12/PFX, PKCS #7/P7B) is accepted.
About the PEM Format
The PEM format is a standard certificate format that is Base64 encoded. An example of a PEM-format certificate is as follows:
---BEGIN CERTIFICATE---MIIDojCCAwugAwIBAgIJAMLM0CJRzPyzMA0GCSqGSIb3DQEBBQUAMIGTMQswCQYD VQQGEwJVUzETMBEGA1UECBMKQ2FsaWZvcm5pYTESMBAGA1UEBxMJUGFsbyBBbHRv MS8wLQYDVQQKEyZWTXdhcmUsIEluYy4gLSBXb3Jrc3RhdGlvbiBTU0wgVGVzdGlu ZzEqMCgGA1UEAxMhV29ya3N0YXRpb24gQ2VydGlmaWNhdGUgQXV0aG9yaXR5MB4X DTExMDcxNTAyMjY0OFoXDTE1MDcxNDAyMjY0OFowgZMxCzAJBgNVBAYTAlVTMRMw EQYDVQQIEwpDYWxpZm9ybmlhMRIwEAYDVQQHEwlQYWxvIEFsdG8xLzAtBgNVBAoT JlZNd2FyZSwgSW5jLiAtIFdvcmtzdGF0aW9uIFNTTCBUZXN0aW5nMSowKAYDVQQD EyFXb3Jrc3RhdGlvbiBDZXJ0aWZpY2F0ZSBBdXRob3JpdHkwgZ8wDQYJKoZIhvcN AQEBBQADgY0AMIGJAoGBAL/tBlngiEkCK7ssCBe8lZ30FlIHmpECmwEm3AaID1C0 lncb+LdRt2AmmQiknXBPxGBGyRNRNnashrzp1XXR/wL2b2AybT7NX+P/XSH2srDb cGGCTNa/bwh/ArcirTLCjRwY55lAAH9xwzortRYR84IBJQpHzxcopTSI9o4ZVIqx AgMBAAGjgfswgfgwHQYDVR0OBBYEFMoT527dtvlgR1EzYK4EnQHS6T2ZMIHIBgNV HSMEgcAwgb2AFMoT527dtvlgR1EzYK4EnQHS6T2ZoYGZpIGWMIGTMQswCQYDVQQG EwJVUzETMBEGA1UECBMKQ2FsaWZvcm5pYTESMBAGA1UEBxMJUGFsbyBBbHRvMS8w LQYDVQQKEyZWTXdhcmUsIEluYy4gLSBXb3Jrc3RhdGlvbiBTU0wgVGVzdGluZzEq MCgGA1UEAxMhV29ya3N0YXRpb24gQ2VydGlmaWNhdGUgQXV0aG9yaXR5ggkAwszQ IlHM/LMwDAYDVR0TBAUwAwEB/zANBgkqhkiG9w0BAQUFAAOBgQBcoiwDWGWXzI+j 0gG/7BNzpNHzR1RGAF4nB9JrnCYWvB313kgYDMHogfiAoQchsu/py/OYBYVRjjFJ YVaTJ7DVl/3Gpk3+tcdJfEmqIz76PVWfWbTnhuJEMYrMM4W06B/K2cs24bkZtcXQ h8b4FYTVCg/l6TP5SWgei4VWgRfxgA== ---END
CERTIFICATE---When you create a trusted certificates list, you concatenate multiple PEM-format certificates into a single file. Line endings are auto-detected. The following example shows the format of a concatenated certificates list that contains two certificates.
---BEGIN CERTIFICATE---<base64 content here> ---END ---BEGIN CERTIFICATE---<base64 content here> ---END
CERTIFICATE---Creating PEM-Format Certificates
You can create PEM-format certificates by downloading the certificate from the CA's Web site or by exporting the certificates from a host system.
For example, you can download certificates for Verisign from the Symantec Web site at https://www.symantec.com/page.jsp?id=roots.
Export a PEM-Format Certificate From a Mac
You can export a PEM-format certificate from a Mac. Prerequisites
Become familiar with how to use Keychain Access on a Mac. For more information, see the Apple Support Web site at http://support.apple.com.
Procedure
1 On the Mac, open Keychain Access. 2 From the sidebar, select System Roots. 3 Locate the certificate to export. 4 Select File > Export Items.
5 Select a location to save the certificate and select the Privacy Enhanced Mail (.pem) file format.
Export a PEM-Format Certificate From a Windows System
You can export a PEM-format certificate from a Windows system. On Windows, the PEM certificate encoding is called Base-64 encoded X.509 (.CER).
Prerequisites
Become familiar with how to use Certificate Manager on a Windows system. For more information, see the Microsoft TechNet Web site at http://technet.microsoft.com.
Procedure
1 On the Windows system, open Certificate Manager (certmgr.exe).
2 Right-click the certificate to export and select All Tasks > Export. 3 Select options in the Certificate Export Wizard.
a Select Base-64 encoded X.509 (.CER) for the file export format.
For the certificate to work with Horizon FLEX, you must choose this option. b Provide a location to save the certificate and a file name.
c Review the settings you selected and click Finish. The certificate file is saved to the location you indicated.
Create and Import the Trusted Certificates List File
After you export your PEM-format certificates, you must construct the trusted certificate list and import the certificates list file to the Horizon FLEX Policy Server.
Prerequisites
Export each certificate in PEM format. See “Creating PEM-Format Certificates,” on page 22. Procedure
1 To create the trusted certificates list file, concatenate each PEM-format certificate file into a single file. You can use the cat command, or you can copy and paste the contents of the certificate files into a text
file. You can safely edit Base64 content in a text editor.
For example: $ cat mycert1.pem mycert2.pem mycert3.pem > list.pem
2 Start the Horizon FLEX Admin Console.
a In a Web browser, enter https://WebManagerServer:7443/rvm, where WebManagerServer is the DNS
name or IP address of the host where the Mirage Web Manager is installed. b Enter the user name and password of a domain account that has access to Mirage. c Click Login.
3 In the Horizon FLEX Admin Console, click the General System Settings icon and select Certificates.
4 Click Import, browse to the trusted certificates list file, and click Open to import the file.
Updating Certificates on the Server
When a certificate expires, and a new certificate has an expiration date that is set far into the future, you can add the new certificate as a second certificate to the trusted certificates list in the Horizon FLEX Policy Server.
Adding the new certificate to the trusted certificates list enables all Horizon FLEX virtual machines to download the new certificate. Then, when the certificate switch occurs, all of the Horizon FLEX virtual machines that received the new list of certificates can connect to the Horizon FLEX server and you can remove the old trusted certificate from the policy file.
If you change the server certificate after the Horizon FLEX virtual machines have already been registered and run, then your end users need to verify that the changed certificate is trusted by Fusion Pro or Player Pro. If the new server certificate is self-signed, the Horizon FLEX client does not report the instance status correctly to the Horizon FLEX server. The end user should open the Horizon FLEX virtual machine and click Connect to connect to the server. If the end user receives the
Invalid security certificate
error message, the end user should confirm with you to verify the certificate is valid and if so, select the
Always trust this host with this certificate check box and click Connect Anyway.
Using Self-Signed Certificates
If you do not configure the self-signed certificate into the source virtual machine being prepared, you must install the certificate on each end-user host for Horizon FLEX virtual machines to function correctly. If the list of certificates is empty in the policy file, Player Pro and Fusion Pro will fall back to authenticating against the host's list of trusted certificates.
If you include the self-signed certificate of a source virtual machine on the Horizon FLEX Policy Server, and you configure or install the self-signed certificate for the Horizon FLEX Client (either in the source virtual machine's policy file or in the host's list of trusted certificates), you do not need to install the certificate on end-user hosts when certificate updates are required, for example, when a certificate expires.
For information about configuring certificates into a source virtual machine, see “Create a Source Virtual Machine in Fusion Pro,” on page 32.
For information about creating a trusted certificates list and importing it to the Horizon FLEX Policy Server, see “Creating a Trusted Certificates List,” on page 21.
For information about updating certificates, see “Updating Certificates on the Server,” on page 24.
Install a Self-Signed Certificate on a Windows Computer
To install a self-signed certificate on a Windows host, you export the certificate from your Horizon FLEX server and import it to the Windows computer.
Prerequisites
n Become familiar with how to install and use the MMC Certificates snap-in on a Windows system. For
more information, go to the Windows TechNet Web site at http://technet.microsoft.com.
Procedure
1 Export the self-signed certificate from your Horizon FLEX server.
a On the Horizon FLEX server, start MMC (mmc.exe), add the Certificates snap-in for a computer
account, and manage certificates for the local computer. b Select File > Add/Remove Snap-in.
c Click the Certificates snap-in and click Add.
d On the Certificates snap-in display, select Computer account and click Next. This setting is required by the Horizon FLEX server.
e Select Local Computer and click Finish and then OK.
f In the left navigation pane, expand Certificates (Local Computer).
g Right-click on Trusted Root Certification Authorities and select All Tasks > Import. The Certificate Import Wizard opens.
h Click Next.
i Browse for the root certificate file and click Next.
j Select Place all certificates in the following store: Trusted Root Certification Authorities and click Next, then click Finish.
k Right-click on Intermediate Root Certification Authorities and select All Tasks > Import . l The Certificate Import Wizard opens.
m Browse for the root certificate file and click Next.
n Select Place all certificates in the following store: Intermediate Root Certification Authorities and click Next, then click Finish.
o Repeat steps m. and n. for each intermediate certificate to be installed. p Navigate to Trusted Root Certification Authorities > Certificates. q Select and export the self-signed certificate.
Export the certificate in DER-encoded binary X.509 (.CER) format. 2 Copy the self-signed certificate to the client Windows computer. 3 Import the self-signed certificate to the client Windows computer.
a On the Windows computer, start MMC (mmc.exe).
b Add the Certificates snap-in for the computer account and manage certificates for the local computer.
c Import the self-signed certificate into Trusted Root Certification Authorities > Certificates. The self-signed certificate is now trusted for all users.
Install a Self-Signed Certificate on a Mac
To install a self-signed certificate on a Mac host, you export the certificate from your Horizon FLEX server and import it to the Mac.
Prerequisites
n Become familiar with how to install and use the MMC Certificates snap-in on a Windows system. For
more information, go to the Windows TechNet Web site at http://technet.microsoft.com.
n Become familiar with how to use Keychain Access on a Mac. For more information, go to the Apple
Support Web site at http://support.apple.com.
n Install Windows IIS.
Procedure
1 Export the self-signed certificate from your Horizon FLEX server.
a On the Horizon FLEX server, start MMC (mmc.exe), add the Certificates snap-in for a computer
account, and manage certificates for the local computer. b Select File > Add/Remove Snap-in.
c Click the Certificates snap-in and click Add.
d On the Certificates snap-in display, select Computer account and click Next. This setting is required by the Horizon FLEX server.
e Select Local Computer and click Finish and then OK.
f In the left navigation pane, expand Certificates (Local Computer).
g Right-click on Trusted Root Certification Authorities and select All Tasks > Import. The Certificate Import Wizard opens.
h Click Next.
i Browse for the root certificate file and click Next.
j Select Place all certificates in the following store: Trusted Root Certification Authorities and click Next, then click Finish.
k Right-click on Intermediate Root Certification Authorities and select All Tasks > Import . l The Certificate Import Wizard opens.
m Browse for the root certificate file and click Next.
n Select Place all certificates in the following store: Intermediate Root Certification Authorities and click Next, then click Finish.
o Repeat steps m. and n. for each intermediate certificate to be installed. p Navigate to Trusted Root Certification Authorities > Certificates. q Select and export the self-signed certificate.
Export the certificate in DER-encoded binary X.509 (.CER) format. 2 Copy the self-signed certificate to the Mac.
3 Import the self-signed certificate on the Mac.
a Double-click the self-signed certificate to open it in Keychain Access. The self-signed certificate appears in login.
b Copy the self-signed certificate to System.
You must copy the certificate to System to ensure that it is trusted by all users and local system processes, including the virtual machine (vmware-vmx) processes in Fusion Pro.
c Open the self-signed certificate in System, expand Trust, select Use System Default, and save your changes.
d Reopen the self-signed certificate in System, expand Trust, select Always Trust, and save your changes.
e Delete the self-signed certificate from login.
Using Internal CA Certificates
If you use a certificate from an internal CA instead of from a commercial CA such as Entrust or Go Daddy, and you do not configure the certificate into the source virtual machine being prepared, you must install the root CA certificate on each end-user host for Horizon FLEX virtual machines to function correctly.
NOTE Because the server certificate is signed by the root CA, you do not need to import the server certificate to end-user hosts.
If the list of certificates is empty in the policy file, Player Pro and Fusion Pro will fall back to authenticating against the host's list of trusted certificates.
If you include the internal CA certificate of a source virtual machine on the Horizon FLEX Policy Server, and you configure or install the certificate for the Horizon FLEX Client (either in the source virtual machine's policy file or in the host's list of trusted certificates), you do not need to install the root CA certificate on end-user hosts when certificate updates are required, for example, when a certificate expires.
For information about configuring certificates into a source virtual machine, see “Create a Source Virtual Machine in Fusion Pro,” on page 32.
For information about creating a trusted certificates list and importing it to the Horizon FLEX Policy Server, see “Creating a Trusted Certificates List,” on page 21.
For information about updating certificates, see “Updating Certificates on the Server,” on page 24.
Install an Internal Root CA Certificate on a Windows Computer
To install an internal root CA certificate on a Windows host, you export the certificate from your Horizon FLEX server and import it to the Windows computer.
Prerequisites
n Become familiar with how to install and use the MMC Certificates snap-in on a Windows system. For
more information, go to the Windows TechNet Web site at http://technet.microsoft.com.
n Obtain and install an internal CA certificate. You can use the Windows MMC Certificates snap-in to
request a certificate.
n Install Windows IIS.
Procedure
1 Export the root CA certificate from your Horizon FLEX server.
a On the Horizon FLEX server, start MMC (mmc.exe), add the Certificates snap-in for a computer
account, and manage certificates for the local computer. b Select File > Add/Remove Snap-in.
c Click the Certificates snap-in and click Add.
d On the Certificates snap-in display, select Computer account and click Next. This setting is required by the Horizon FLEX server.
e Select Local Computer and click Finish and then OK.
f In the left navigation pane, expand Certificates (Local Computer).
g Right-click on Trusted Root Certification Authorities and select All Tasks > Import. The Certificate Import Wizard opens.
h Click Next.
i Browse for the root certificate file and click Next.
j Select Place all certificates in the following store: Trusted Root Certification Authorities and click Next, then click Finish.
k Right-click on Intermediate Root Certification Authorities and select All Tasks > Import. l The Certificate Import Wizard opens.
m Browse for the root certificate file and click Next.
n Select Place all certificates in the following store: Intermediate Root Certification Authorities and click Next, then click Finish.
o Repeat steps m. and n. for each intermediate certificate to be installed. p Navigate to Trusted Root Certification Authorities > Certificates. q Select and export the root CA certificate.
Export the certificate in DER-encoded binary X.509 (.CER) format. 2 Copy the root CA certificate to the Windows computer.
3 Import the root CA certificate to the Windows computer. a On the Windows computer, start MMC (mmc.exe).
b Add the Certificates snap-in for the computer account and manage certificates for the local computer.
c Import the root CA certificate into Trusted Root Certification Authorities > Certificates. The root CA certificate is now trusted for all users.
Install an Internal Root CA Certificate on a Mac
To install an internal root CA certificate on a Mac host, you export the certificate from your Horizon FLEX server and import it to the Mac.
Prerequisites
n Become familiar with how to install and use the MMC Certificates snap-in on a Windows system. For
more information, go to the Windows TechNet Web site at http://technet.microsoft.com.
n Become familiar with how to use Keychain Access on a Mac. For more information, go to the Apple
Support Web site at http://support.apple.com.
n Install Windows IIS.
Procedure
1 Export the root CA certificate from your Horizon FLEX server.
a On the Horizon FLEX server, start MMC (mmc.exe), add the Certificates snap-in for a computer
account, and manage certificates for the local computer. b Select File > Add/Remove Snap-in.
d On the Certificates snap-in display, select Computer account and click Next. This setting is required by the Horizon FLEX server.
e Select Local Computer and click Finish and then OK.
f In the left navigation pane, expand Certificates (Local Computer).
g Right-click on Trusted Root Certification Authorities and select All Tasks > Import. The Certificate Import Wizard opens.
h Click Next.
i Browse for the root certificate file and click Next.
j Select Place all certificates in the following store: Trusted Root Certification Authorities and click Next, then click Finish.
k Right-click on Intermediate Root Certification Authorities and select All Tasks > Import. l The Certificate Import Wizard opens.
m Browse for the root certificate file and click Next.
n Select Place all certificates in the following store: Intermediate Root Certification Authorities and click Next, then click Finish.
o Repeat steps m. and n. for each intermediate certificate to be installed. p Navigate to Trusted Root Certification Authorities > Certificates. q Select and export the root CA certificate.
Export the certificate in DER-encoded binary X.509 (.CER) format. 2 Copy the root CA certificate to the Mac.
3 Import the root CA certificate on the Mac.
a Double-click the root CA certificate to open it in Keychain Access. The root CA certificate appears in login.
b Copy the root CA certificate to System.
You must copy the certificate to System to ensure that it is trusted by all users and local system processes, including the virtual machine (.vmx) processes in Fusion.
c Open the root CA certificate, expand Trust, select Use System Defaults, and save your changes. d Reopen the root CA certificate, expand Trust, select Always Trust, and save your changes. e Delete the root CA certificate from login.
Creating and Deploying
Horizon FLEX Virtual Machines
4
You can create multiple Horizon FLEX virtual machines and entitle those virtual machines to a variety of end users, including Mac users. Users can be connected or disconnected from the enterprise network when they use their Horizon FLEX virtual machines. When you create a source virtual machine for a
Horizon FLEX virtual machine, you must select certain options for the virtual machine to function correctly with Horizon FLEX.
You can use Fusion Pro or Workstation (not included in the Horizon FLEX package) to create a source virtual machine.
This chapter includes the following topics:
n “Horizon FLEX Virtual Machine Deployment Overview,” on page 31 n “Create a Source Virtual Machine in Fusion Pro,” on page 32
n “Create a Source Virtual Machine in Workstation (Not included in Horizon FLEX),” on page 33 n “Install the Mirage Client In a Source Virtual Machine,” on page 34
n “Prepare a Source Virtual Machine to Join an Active Directory Domain,” on page 35 n “Compress a Source Virtual Machine Package,” on page 36
n “Register a Source Virtual Machine with the Horizon FLEX Policy Server,” on page 37 n “Creating Policies and Entitlements,” on page 38
n “Create a URI to Deploy a Horizon FLEX Virtual Machine,” on page 44
Horizon FLEX Virtual Machine Deployment Overview
To deploy a Horizon FLEX virtual machine, you perform tasks in a specific order. 1 Create and configure a source virtual machine.
See “Create a Source Virtual Machine in Fusion Pro,” on page 32 or “Create a Source Virtual Machine in Workstation (Not included in Horizon FLEX),” on page 33.
2 (Optional) Prepare the source virtual machine to join an Active Directory domain. See “Prepare a Source Virtual Machine to Join an Active Directory Domain,” on page 35. 3 Compress the source virtual machine package and save it in your download directory.
See “Compress a Source Virtual Machine Package,” on page 36.
4 Register the source virtual machine with the Horizon FLEX Policy Server.
5 Create a policy for the Horizon FLEX image and entitle the image to your Active Directory users and groups.
See “Creating Policies and Entitlements,” on page 38.
6 (Optional) Create a URI to deploy the Horizon FLEX virtual machine. See “Create a URI to Deploy a Horizon FLEX Virtual Machine,” on page 44.
Create a Source Virtual Machine in Fusion Pro
You can use Fusion Pro to create a source virtual machine for a Horizon FLEX virtual machine. When you create a source virtual machine, you must set encryption and restriction information so that the virtual machine functions correctly with Horizon FLEX.
You can also use Workstation to create a source virtual machine. Workstation is not included in the Horizon FLEX package.
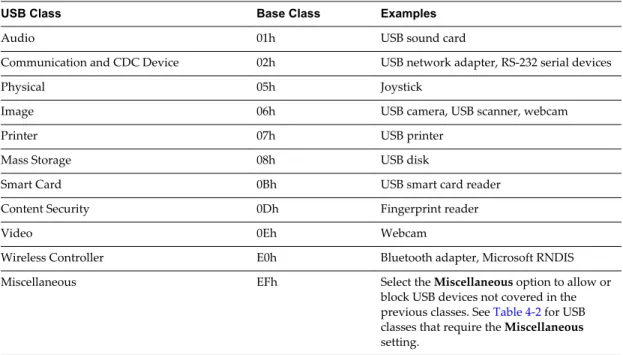
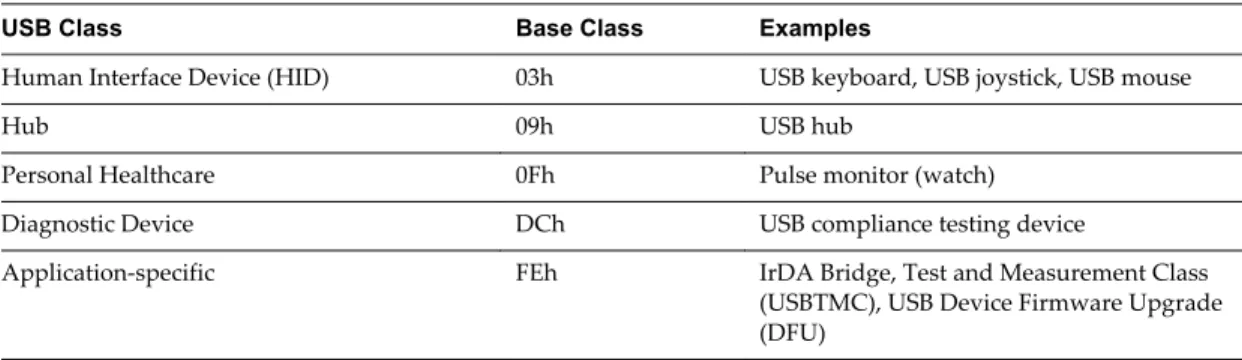
If you enable USB device use, drag and drop, and copy and paste features when you create the virtual machine, you can set policies in the Horizon FLEX Admin Console to enable or disable these features for end users. However, if you disable these features when you create the virtual machine, you cannot override the virtual machine settings to enable the features by setting policies.
Prerequisites
n Become familiar with how to create a virtual machine in Fusion Pro. See the Fusion documentation at
https://www.vmware.com/support/pubs/fusion_pubs.html.
n Become familiar with the supported guest operating systems for Horizon FLEX virtual machines. See
“Supported Host and Guest Operating Systems,” on page 11.
n Install Fusion Pro with a Horizon FLEX license key .
Procedure
1 Open Fusion Pro and create a virtual machine.
Select a guest operating system that is supported for Horizon FLEX virtual machines. Configure the virtual machine for distribution to your end users.
2 From the Virtual Machine Library, select the new virtual machine and select Settings > Encryption &
Restrictions.
3 Select Enable Encryption and set a password for opening the virtual machine.
The password must be six characters or longer. You must give this encryption password to your end users to enable them to open the virtual machine.
You must retain the encryption password. You cannot access the virtual machine without this password.
4 Check Enable Restrictions and set a password for editing the restrictions on the virtual machine. This password should be different than the virtual machine encryption password.
You must retain the restrictions password. You cannot edit the restrictions on the virtual machine without this password.
5 Click Configure.
The restrictions configuration window opens. 6 Set the Restriction Type to Managed.
You must set the restriction type to Managed to distribute and use the virtual machine with Horizon FLEX.
7 Type the URL of the Horizon FLEX server on which you intend to host the virtual machine in the
Restrictions Management Server text box.
8 Click Check Server to verify the Horizon FLEX server URL.
9 (Optional) To add trusted certificates to the virtual machine, click the + button and navigate to the location of each certificate file.
If you add certificates to the virtual machine, the Horizon FLEX Client uses the certificates in the virtual machine and does not use the certificates on the host. To do certificate control and setup on the Horizon FLEX Policy Server for all Horizon FLEX virtual machines, leave the certificates box blank.
10 Click Save.
11 Click the Lock icon to prevent further changes to the restrictions of the virtual machine. You can edit restrictions for the virtual machine by using the restrictions password. What to do next
If you intend to join the Horizon FLEX virtual machine to an Active Directory domain, prepare the virtual machine to join the domain. See “Prepare a Source Virtual Machine to Join an Active Directory Domain,” on page 35.
To install the Mirage client in the source virtual machine, see “Install the Mirage Client In a Source Virtual Machine,” on page 34.
Create a Source Virtual Machine in Workstation (Not included in
Horizon FLEX )
You can use Workstation 11 to create a source virtual machine for a Horizon FLEX virtual machine. Workstation is not included in the Horizon FLEX package. A Horizon FLEX license key for Workstation is not required.
Prerequisites
n Review how to create a virtual machine in Workstation. See the Workstation documentation at
https://www.vmware.com/support/pubs/ws_pubs.html
n Review the supported guest operating systems for Horizon FLEX virtual machines. See “Supported
Host and Guest Operating Systems,” on page 11.
n Install Workstation.
Procedure
1 Open Workstation and create a virtual machine. 2 Install the guest OS.
Select a guest operating system that is supported for Horizon FLEX virtual machines. Configure the virtual machine for distribution to your end users.
3 Encrypt and restrict the virtual machine. Select the virtual machine and select VM > Settings. 4 On the Options tab, select Access Control.
5 Click Encrypt, type an encryption password, and click Encrypt.
The encryption password is required to gain access to the virtual machine. It does not prevent the user from changing the virtual machine configuration. Turn on restrictions and enter a password to prevent the user from changing the virtual machine configuration.
IMPORTANT Record the encryption password you use. If you forget the password, Workstation does not provide a way to retrieve it.
Workstation begins encrypting the virtual machine. After the encryption process is complete, you can set a restrictions password.
6 Select the Enable Restrictions check box and set a password for editing the restrictions on the virtual machine.
Set a different password than the virtual machine encryption password.
You must retain the restrictions password. You cannot edit the restrictions on the virtual machine without this password.
7 Set the Restriction Type to Managed.
You must set the restriction type to Managed to distribute and use the virtual machine with Horizon FLEX.
8 Enter the URL of the Horizon FLEX server on which you intend to host the virtual machine in the
Restrictions Management Server text box.
9 Click Check Server to verify the Horizon FLEX server URL.
10 (Optional) To add trusted certificates to the virtual machine, click the Manage Certificates icon and navigate to the location of each certificate file.
If you add certificates to the virtual machine, the Horizon FLEX Client uses the certificates in the virtual machine and does not use the certificates on the host. To do certificate control and setup on the Horizon FLEX Policy Server for all Horizon FLEX virtual machines, leave the certificates box blank.
11 Click Save. What to do next
If you intend to join the Horizon FLEX virtual machine to an Active Directory domain, prepare the virtual machine to join the domain. See “Prepare a Source Virtual Machine to Join an Active Directory Domain,” on page 35.
To install the Mirage client in the source virtual machine, see “Install the Mirage Client In a Source Virtual Machine,” on page 34.
Install the Mirage Client In a Source Virtual Machine
If the source virtual machine has a Windows guest operating system, you can install the Mirage client in the virtual machine. Installing the Mirage client is optional.
If you install the Mirage client in a source virtual machine, you can select disaster recovery scenarios when you entitle the virtual machine. For example, you can select an option to make the Mirage server create a CVD for the Horizon FLEX virtual machines that the end user downloads. Mirage periodically synchronizes end-user data into the datacenter based on the selected Mirage policy. You can use this data to restore the CVD or access files on the virtual machine by using the Mirage File Portal in the main Mirage Management Console.
In the Mirage Management Console, configure Mirage to create new CVDs whenever an end user downloads and logs into a new Horizon FLEX virtual machine. In the CVD Auto Creation settings, enable the Enable Automatic CVD Creation setting. See the VMware Mirage Administrator's Guide for more information.
Prerequisites
n Create the source virtual machine. See “Create a Source Virtual Machine in Fusion Pro,” on page 32 or
“Create a Source Virtual Machine in Workstation (Not included in Horizon FLEX),” on page 33.
n Obtain the VMware Mirage Installation Guide for Mirage client installation instructions.
Procedure
1 In Fusion Pro, start the source virtual machine and log in to the guest operating system. 2 Install the latest version of VMware Tools.
a From the menu bar, select Virtual Machine > Install VMware Tools. b Click Next to progress through the installation.
c Select Complete, unless you need to exclude certain features of VMware Tools, and click Next. d Click Install.
e When the installation finishes, click Yes to restart the virtual machine. 3 Install the Mirage client.
4 In the Mirage Management Console, verify that the endpoint appears as Pending Assignment. 5 Power off the source virtual machine in Mirage while it is in Pending Assigning state.
Do not provide the username and password, and do not register the source virtual machine at the Mirage client prompt. If you do register the source virtual machine with Mirage, the Horizon FLEX virtual machine will be duplicated when the end user accesses it.
Prepare a Source Virtual Machine to Join an Active Directory Domain
If you intend to join a Horizon FLEX virtual machine to a specific Active Directory domain, you must prepare the source virtual machine to join the domain before you register it with the Horizon FLEX Policy Server.
Prerequisites
n Create a source virtual machine. See “Create a Source Virtual Machine in Fusion Pro,” on page 32 or
“Create a Source Virtual Machine in Workstation (Not included in Horizon FLEX),” on page 33.
NOTE Do not install Windows 7 Home edition or a non-Windows guest operating system in the source virtual machine. You cannot join a Windows 7 Home edition operating system or a non-Windows guest operating system to a domain.
n Verify that you have the administrator password for the source virtual machine.
n In the Horizon FLEX Admin Console, set the policy for the virtual machine to join the Active Directory
domain. The Horizon FLEX administrator account must have permission to create objects in the Active Directory.
n An RODC must be installed in the DMZ.
n Configure the Active Directory to support the domain join.
Procedure
1 In Fusion Pro, start the source virtual machine and log in to the guest operating system. 2 (Optional) Turn off Windows update.
3 Install the latest version of VMware Tools.
a From the menu bar, select Virtual Machine > Install VMware Tools. b Click Next to progress through the installation.
c Select Complete, unless you need to exclude certain features of VMware Tools, and click Next. d Click Install.
e When the installation finishes, click Yes to restart the virtual machine.
4 Run install-rvmsetup.cmd as an administrator to install the VMware RVM Setup Service in the source
virtual machine.
The VMware RVM Setup Service performs the domain join operation. install-rvmsetup.cmd is
included with VMware Tools.
5 Open the Windows Services snap-in (services.msc) and verify that the VMware RVM Setup Service
startup type is set to Automatic. 6 Shut down the source virtual machine.
The VMware RVM Setup Service starts the next time you boot up the source virtual machine.
Compress a Source Virtual Machine Package
You must compress the source virtual machine package in TAR (.tar) format so that end users can easily
download the virtual machine. A virtual machine package (sometimes called a bundle) includes all of the virtual machine files that are required to run a virtual machine.
Prerequisites
n Create the source virtual machine. See “Create a Source Virtual Machine in Fusion Pro,” on page 32 or
“Create a Source Virtual Machine in Workstation (Not included in Horizon FLEX),” on page 33.
n Create and configure a download folder for your Horizon FLEX virtual machine packages. See “Create
a Download Folder for Horizon FLEX Virtual Machine Packages,” on page 15 and “Configure the IIS SSL Server Certificate for the Horizon FLEX Server,” on page 16.
Procedure
1 If the source virtual machine is running, shut it down.
2 In Fusion Pro or Workstation, navigate to the source virtual machine.
3 Select File > Export to TAR and export the source virtual machine package to a TAR file.
Remove any spaces from the TAR file name. Removing spaces from the file name can make it easier to connect to the download URL for the virtual machine.
4 Export the TAR file to your Horizon FLEX virtual machine packages download folder. What to do next
Register the source virtual machine with the Horizon FLEX Policy Server. See “Register a Source Virtual Machine with the Horizon FLEX Policy Server,” on page 37.