EMC
Avamar
Version 7.1Administration Guide
302-000-828 REV 04
Published January, 2015
EMC believes the information in this publication is accurate as of its publication date. The information is subject to change without notice.
The information in this publication is provided as is. EMC Corporation makes no representations or warranties of any kind with respect to the information in this publication, and specifically disclaims implied warranties of merchantability or fitness for a particular purpose. Use, copying, and distribution of any EMC software described in this publication requires an applicable software license.
EMC², EMC, and the EMC logo are registered trademarks or trademarks of EMC Corporation in the United States and other countries. All other trademarks used herein are the property of their respective owners.
For the most up-to-date regulatory document for your product line, go to EMC Online Support (https://support.emc.com). EMC Corporation
Hopkinton, Massachusetts 01748-9103
1-508-435-1000 In North America 1-866-464-7381 www.EMC.com
11 13 15
Introduction 19
EMC Avamar system overview... 20
Avamar server... 20
Avamar clients... 23
User interfaces...24
Data Domain system support... 27
Data deduplication...27
Security and networking...28
Encryption...28
IPv4 and IPv6 support... 28
Avamar Administrator 31 Overview of Avamar Administrator...32
Installing Avamar Administrator... 32
Installing Avamar Administrator on Microsoft Windows... 32
Installing Avamar Administrator on Linux... 33
Upgrading Avamar Administrator...34
Uninstalling Avamar Administrator... 34
Editing Avamar Administrator client preferences... 34
Setting a session time-out for Avamar Administrator... 35
Starting Avamar Administrator...36
Starting Avamar Administrator from Avamar Enterprise Manager... 36
Avamar Administrator dashboard... 38
Launcher buttons... 38
System Information panel... 39
Activities panel... 41
Capacity panel... 42
Critical Events panel...43
Avamar Administrator user interface elements... 43
Status bar... 43
Navigation tree features... 46
Mouse shortcuts... 47
Client Management 49 Overview of Avamar clients...50
Client domains...50
Creating a domain...51
Editing domain information...51
Deleting a domain...52
Client registration...52
Figures Tables Preface Chapter 1
Chapter 2
Chapter 3
Client-side registration...52
Registering a client in Avamar Administrator... 53
Batch client registration... 53
Activating a client...56
Client paging...56
Pageable clients...56
Non-pageable clients... 57
Editing client paging settings... 58
Editing client information... 58
Viewing client properties...59
Enabling and disabling a client... 60
Moving a client to a new domain... 60
Retiring a client... 61
Deleting a client... 61
User Management and Authentication 63 Overview of Avamar user accounts... 64
User authentication...64
Avamar internal authentication... 65
Directory service authentication... 65
Enterprise authentication...74
How Avamar authenticates users and assigns roles... 75
Roles...75
Administrator roles... 76
Operator roles...76
User roles...78
Adding a user to a client or domain... 79
Editing user information... 80
Deleting a user... 81
Backup 83 Performing on-demand backups...84
Performing an on-demand backup of a client... 84
Performing an on-demand group backup...85
Scheduling backups...85
Datasets... 86
Schedules...91
Retention policies... 96
Groups...101
Enabling scheduled backups... 109
Monitoring backups... 110
Canceling backups...110
Managing completed backups... 111
Finding a completed backup to manage... 111
Validating a backup... 112
Changing the expiration date for a backup... 112
Changing the retention type for a backup... 113
Viewing backup statistics...114
Deleting a backup... 115
Restore and Recovery 117 Restoring data from a backup...118
Finding a backup...118
Chapter 4
Chapter 5
Restoring to the original location...120
Restoring to a different location... 121
Restoring to multiple locations...122
Monitoring restores...123
Canceling restores...123
Windows client system recovery...124
Red Hat and CentOS Linux system recovery... 124
Reconstructing the partition table... 124
Preparing the target recovery client... 125
Performing system recovery of a RedHat or CentOS Linux client...126
Troubleshooting system recovery of a RedHat or CentOS Linux client ... 130
SUSE Linux system recovery... 130
Reconstructing the partition table... 130
Preparing the target recovery client... 132
Performing system recovery of a SUSE Linux client... 132
Troubleshooting system recovery of a SUSE Linux client...136
Oracle Solaris system recovery... 137
Preparing for Oracle Solaris system recovery... 137
Performing system recovery of an Oracle Solaris client... 138
Server Administration 141 Server shutdown and restart... 142
Shutting down the server... 142
Restarting the server... 142
Stopping the MCS... 143
Starting the MCS... 143
Getting MCS status... 143
Stopping the EMS... 144
Starting the EMS... 144
Stopping the Avamar Desktop/Laptop server... 144
Starting the Avamar Desktop/Laptop server... 144
Getting Avamar Desktop/Laptop server status...144
Suspending and resuming server activities... 145
Suspending and resuming backups and restores... 145
Suspending and resuming scheduled operations...145
Suspending and resuming maintenance activities...145
Managing client sessions...145
Monitoring client sessions... 145
Viewing a detailed client session log...146
Creating a Zip file for EMC Customer Support... 147
Canceling a client session...148
Resetting a client... 148
Managing client agents and plug-ins... 148
Adding a build record...149
Editing version or build records...149
Deleting a build record...150
Disabling all client initiated activations...150
Disabling all client initiated backups...150
Backup and maintenance windows... 150
Editing the backup and maintenance windows...152
Checkpoints...152
Creating a checkpoint... 153
Deleting a checkpoint... 153
Rolling back to a checkpoint... 153
Chapter 7
Clearing a data integrity alert... 155
Generating and installing a server license... 155
Obtaining assigned license keys... 155
Generating a license key information file...156
Generating a permanent license key file...156
Installing and activating a license... 157
Managing services... 158
Changing server passwords and OpenSSH keys... 159
MCS configuration settings... 160
Backing up MCS data... 161
Restoring MCS data...162
Reverting to the default MCS configuration settings... 163
Using network address translation (NAT)... 164
Editing network settings for a single-node server...165
Adding a custom security notification for web browser logins...165
Viewing and editing server contact information... 166
Server Monitoring 167 Recommended daily server monitoring...168
Monitoring activities... 168
Activity Monitor details... 168
Monitoring server status and statistics... 170
Server Monitor tab... 171
Server Management tab... 173
Event monitoring...181
Event notifications... 182
Event profiles...184
Viewing events in the Event Monitor...189
Viewing the event catalog... 190
Acknowledging system events... 191
Customizing error events...191
Server monitoring with syslog... 191
Configuring local syslog... 192
Configuring remote syslog...193
Server monitoring with SNMP... 196
Configuring server monitoring with SNMP...197
Viewing Avamar server log files... 199
Audit logging...200
Viewing the Audit Log...201
Automatic notifications to EMC Customer Support...202
Email Home... 202
ConnectEMC... 203
Verifying system integrity... 207
Capacity Management 209 Viewing capacity utilization...210
Capacity limits and thresholds... 210
Capacity forecasting...211
Viewing a graph of capacity utilization and forecasting...211
Average daily change rates...212
Viewing the average daily change rate for an Avamar server... 212
Viewing the average daily change rate for clients... 212
Customizing capacity limits and behavior...213
Editing capacity settings for Avamar Administrator...213
Chapter 8
Editing capacity settings for Avamar Enterprise Manager...214
Replication 217 Overview of Avamar replication... 218
Types of replication...218
Replication scheduling...219
Replication authentication... 220
Location of replicated backups on the destination server... 220
Retention of replicated backups...221
Replication with Data Domain systems...221
Restore of replicated backups... 222
Configuring policy-based replication... 222
Replication destinations... 222
Replication groups... 224
Configuring cron-based replication...229
Configuring cron-based replication with Avamar Administrator...229
Configuring cron-based replication with Avamar Enterprise Manager ... 230
Performing on-demand replication... 232
Performing on-demand replication from the Replication window.... 232
Performing on-demand replication from the Policy window... 232
Performing command line replication... 233
Command reference...233
CLI examples...243
Monitoring replication...244
Monitoring replication in Avamar Administrator...244
Monitoring cron-based replication in Avamar Enterprise Manager.. 245
Canceling a replication activity...245
Restoring replicated backup data... 246
Server Updates and Hotfixes 249 Overview of the Avamar server software update process...250
Avamar Downloader Service...250
AvInstaller and Avamar Installation Manager...251
System Maintenance in Avamar Enterprise Manager... 251
Installing and configuring the Avamar Downloader Service...252
Avamar Downloader Service installation requirements... 252
Downloading the Avamar Downloader Service software...252
Installing the Avamar Downloader Service software...253
Defining an outbound rule for Microsoft Windows 7 hosts...253
Configuring the Avamar Downloader Service... 254
Updating the Avamar Downloader Service software...256
Uninstalling the Avamar Downloader Service... 256
Downloading new packages from the EMC repository... 256
Managing the Avamar Downloader Service...257
Viewing a list of packages available for download...257
Verifying connectivity with the EMC repository...257
Monitoring Avamar Downloader Service status...257
Stopping and restarting the Avamar Downloader Service monitor...259
Troubleshooting Avamar Downloader Service issues... 259
Downloading and installing packages on the Avamar server...260
Viewing a list of installation packages on the Avamar server... 261
Deleting packages from the Avamar server... 262
Viewing the history of installations...263
Chapter 10
Chapter 11
Avamar Enterprise Manager 265
Overview of Avamar Enterprise Manager...266
Comparison of Avamar Enterprise Manager with other Avamar user interfaces...266
Web browser security...266
Session time-outs... 266
Logging in to Avamar Enterprise Manager...267
Avamar Enterprise Manager dashboard...267
General system information... 268
Capacity information...269
Data protected information... 270
Backup information...270
Adding an Avamar system in Avamar Enterprise Manager...271
Viewing system status...272
Last Contacted... 272
General server status information... 273
Data Domain system information... 276
Garbage collection information... 277
Last Checkpoint... 278
Last Validated Checkpoint... 278
Replication...279
System Activity...279
Viewing capacity information... 280
Viewing policy information... 280
Running reports... 281
Managing cron-based replication... 281
Managing server updates and hotfixes... 282
Starting Avamar Client Manager... 282
Avamar Client Manager 285 Overview of Avamar Client Manager... 286
Connection security... 286
Apache web server authentication... 286
Editing the session time-out period...286
Increasing the JavaScript time-out period... 287
Avamar Client Manager configuration properties... 288
Starting Avamar Client Manager... 289
Global tools... 289
Selecting a server...290
Filters...290
Viewing details... 296
Exporting data...296
Setting the entries per page limit... 296
Viewing tool tips... 297
Overview... 297
Server Summary...297
Dashboard... 298
Clients... 301
Client and server tools... 301
Add Clients... 307
Registered Clients... 312
Activated Clients... 312
Failed Clients... 315
Idle Clients...315
Chapter 12
Upgrade Clients... 316
Policies... 318
Adding clients to a group... 319
Removing clients from a group... 319
Viewing a group's dataset policy... 319
Viewing a group's retention policy...320
Viewing a group's schedule policy...320
Queues... 320
Canceling a task...321
Logs... 321
Viewing the client log after upgrading an Avamar client...322
Clearing all log entries in a section...322
Avamar Desktop/Laptop 323 Overview of Avamar Desktop/Laptop...324
Requirements for Avamar Desktop/Laptop... 325
Client computer requirements... 325
Web browser requirements... 326
Network requirements...327
Avamar client software installation...327
Supported systems management tools... 328
Push installation on Windows computers...328
Push installation on Macintosh computers...329
Local client installation... 330
Avamar client software uninstall... 330
Avamar Desktop/Laptop user authentication... 331
Pass-through authentication... 331
LDAP authentication...332
NIS authentication... 334
Avamar authentication...334
Mixed authentication... 335
Avamar Desktop/Laptop user interfaces...335
Client UI... 335
Web UI... 337
Backup with Avamar Desktop/Laptop...341
On-demand backups...341
Scheduled backups... 344
Allowing users to add data to backups...345
Restore with Avamar Desktop/Laptop... 345
Finding data to restore... 345
Restore types... 346
Restore requirements...346
Restore limits...348
Restore of replicated backups... 349
Client backup and restore activity history... 349
Editing the Avamar Desktop/Laptop properties file...349
Avamar Desktop/Laptop properties...349
Client log locations... 351
Data Domain System Integration 353 Overview of Data Domain system integration...354
Architecture of Avamar with Data Domain...354
File system backups on a Data Domain system... 355
Application backups on a Data Domain system... 356
Chapter 14
Chapter 15
VMware instant access...356
Checkpoints on a Data Domain system... 356
Data Domain system streams...357
Replication with Data Domain systems...357
Monitoring and reporting Data Domain system status... 358
Security with Data Domain system integration...358
Data migration to a Data Domain system...358
Preparing to add a Data Domain system... 359
System requirements for Data Domain system integration...359
Creating a DD Boost user account... 361
Adding a Data Domain system...361
Command Shell Server Logins 365 User accounts... 366
Starting command shell sessions...366
Switching user IDs...366
Using sudo...367
Prefixing commands with sudo...367
Spawning a sudo Bash subshell...367
Plug-in Options 369 How to set plug-in options...370
Backup options...370
Restore options...372
375 Appendix A
Appendix B
Avamar server nodes, stripes, and objects...20
Avamar server functional block diagram... 22
Avamar client agent and plug-ins...23
Data deduplication... 27
Avamar Administrator dashboard... 38
Avamar Administrator status bar...43
Navigation tree features...46
Avamar domain example... 50
Users in Avamar domains... 64
Schedule start time, end time, and duration... 92
Default backup and maintenance windows...151
Multi-node server configuration with NAT...164
Example replication domain structure...220
Avamar Enterprise Manager dashboard... 267
View after uploading the example CSV file... 310
Avamar architecture with a Data Domain system...355 1
2 3 4 5 6 7 8 9 10 11 12 13 14 15 16
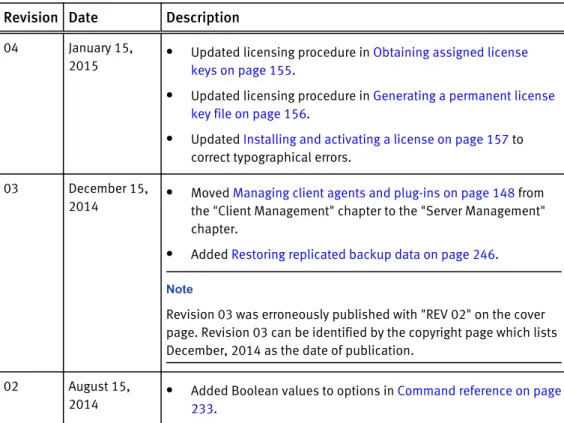
Revision history... 15
MCS functions... 22
Supported plug-ins...24
Comparison of supported enterprise management user interfaces...25
Dashboard launcher buttons... 38
System State fields on the Avamar Administrator dashboard... 39
Backup job fields in the Avamar Administrator dashboard... 41
System alerts in the Critical Events panel...43
Launcher shortcut icons on the status bar...44
Scheduler and backup dispatching status messages...44
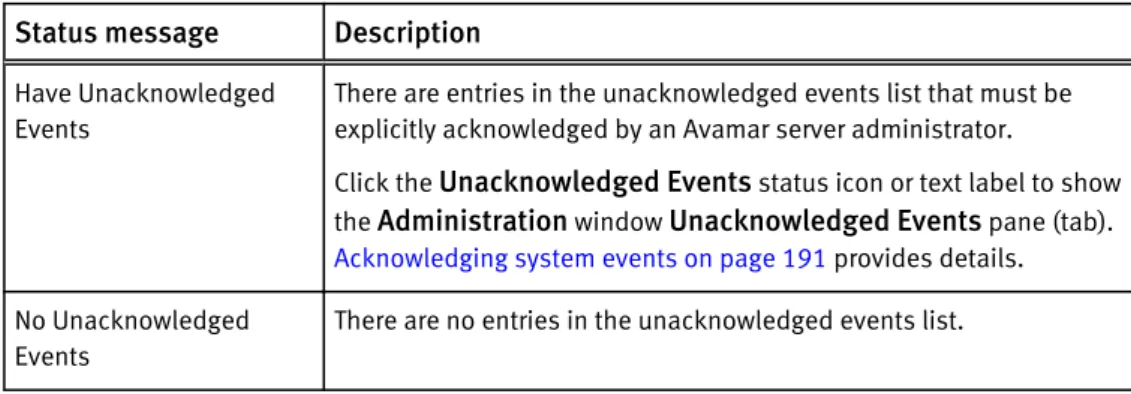
Status messages for unacknowledged events...45
Operational status messages for Avamar or Data Domain... 45
Attributes for each entry in a clients definition file... 54
Avamar user account information... 64
Error messages during directory service configuration'...68
Key/value pair rules for ldap.properties... 70
Key/value pairs in ldap.properties ... 70
Administrator roles... 76
Operator roles... 77
User roles... 78
Directories excluded from Default Dataset backups ... 87
Directories excluded from Unix Dataset backups ...87
Directories excluded from Windows Dataset backups ... 88
Schedule types...91
Schedule catalog...93
Basic retention settings... 97
Retention policy catalog... 98
VMware groups...102
Target locations for system recovery backups of an Oracle Solaris client...137
Session Monitor tab properties...146
Avamar server maintenance activities...151
Checkpoint states...153
Default live file directory for MCS configuration files... 161
MCS backup timestamp files... 161
System monitoring tools and tasks... 168
Activity Monitor details... 169
Avamar tab details in the Server Monitor... 171
Data Domain tab details in the Server Monitor... 172
Data display based on selections on the Server Management tab... 173
Bytes Protected Summary properties on the Server Management tab...174
Server properties on the Server Management tab...174
Module properties on the Server Management tab ...176
Node properties on the Server Management tab... 176
Partition properties on the Server Management tab... 178
Data Domain system properties on the Server Management tab...179
Event information... 182
Mappings of syslog fields to Avamar event data...192
Capacity limits and thresholds ...210
Capacity forecast icons...211
Account options for the avrepl command...233
Logging options for the avrepl command... 234 1 2 3 4 5 6 7 8 9 10 11 12 13 14 15 16 17 18 19 20 21 22 23 24 25 26 27 28 29 30 31 32 33 34 35 36 37 38 39 40 41 42 43 44 45 46 47 48 49 50 51
Replication options for the avrepl command... 235
Avamar-only advanced options for the avrepl command... 237
Numeric plug-in descriptors...240
Required options for the avrepl command... 243
Installation requirements for the Avamar Downloader Service...252
Avamar Downloader Service monitor status messages ...258
Status icons for the Last Contacted column in Avamar Enterprise Manager... 268
Status icons for the Status column in Avamar Enterprise Manager... 269
Status icons for used capacity in Avamar Enterprise Manager... 270
Status icons for forecast capacity in Avamar Enterprise Manager... 270
Backup status icons in Avamar Enterprise Manager... 271
Status icons for the Last Contacted column in Avamar Enterprise Manager... 272
Status icons for the Avamar Server field in Avamar Enterprise Manager...273
Capacity forecast status icons in Avamar Enterprise Manager... 275
Capacity usage status icons in Avamar Enterprise Manager... 275
All Unack. Events status icons in Avamar Enterprise Manager... 275
Unacknowledged hardware event status icons in Avamar Enterprise Manager... 276
Data Domain system status icon in Avamar Enterprise Manager...276
Garbage collection status icons in Avamar Enterprise Manager...277
Last checkpoint status icons in Avamar Enterprise Manager... 278
Status icons for last validated checkpoint in Avamar Enterprise Manager... 279
Replication status icons in Avamar Enterprise Manager... 279
Scheduler status icon in Avamar Enterprise Manager...280
Avamar Client Manager configuration properties...288
Characters not allowed in search strings...291
Columns on the Server Summary page...298
Server information on the Server panel... 299
Settings on the Advanced tab of Client Details...304
Failed client filters... 315
Avamar Desktop/Laptop hardware requirements... 326
Supported web browsers forAvamar Desktop/Laptop... 327
Environment variables for launching a web browser in Avamar Desktop/Laptop... 327
Avamar Desktop/Laptop network requirements... 327
Avamar Desktop/Laptop client UI functionality... 336
Avamar Desktop/Laptop web UI functionality... 337
Datasets for single-click on-demand backups...341
Supported values for the restrictBackupsPerDay property...343
Avamar Desktop/Laptop data restore filtering...346
Requirements to restore from a different computer with Avamar Desktop/Laptop... 347
Avamar Desktop/Laptop property settings...350
Available client logs... 351
Paths to logs on Windows computers ...351
Paths to logs on Windows computers ...352
Data Domain system requirements... 359
Backup plug-in options...370
Restore plug-in options...373 52 53 54 55 56 57 58 59 60 61 62 63 64 65 66 67 68 69 70 71 72 73 74 75 76 77 78 79 80 81 82 83 84 85 86 87 88 89 90 91 92 93 94 95 96 97
As part of an effort to improve its product lines, EMC periodically releases revisions of its software and hardware. Therefore, some functions described in this document might not be supported by all versions of the software or hardware currently in use. The product release notes provide the most up-to-date information on product features.
Contact your EMC technical support professional if a product does not function properly or does not function as described in this document.
Note
This document was accurate at publication time. Go to EMC Online Support (https:// support.EMC.com) to ensure that you are using the latest version of this document.
Purpose
This guide describes how to configure, administer, monitor, and maintain the Avamar system.
Audience
The information in this guide is primarily intended for system administrators who are responsible for maintaining servers and clients on a network, as well as operators who monitor daily backups and storage devices.
Revision history
The following table presents the revision history of this document.
Table 1 Revision history
Revision Date Description
04 January 15, 2015
l Updated licensing procedure in Obtaining assigned license
keys on page 155.
l Updated licensing procedure in Generating a permanent license
key file on page 156.
l Updated Installing and activating a license on page 157 to
correct typographical errors. 03 December 15,
2014
l Moved Managing client agents and plug-ins on page 148 from
the "Client Management" chapter to the "Server Management" chapter.
l Added Restoring replicated backup data on page 246.
Note
Revision 03 was erroneously published with "REV 02" on the cover page. Revision 03 can be identified by the copyright page which lists December, 2014 as the date of publication.
02 August 15, 2014
l Added Boolean values to options in Command reference on page
233.
Table 1 Revision history (continued)
Revision Date Description
l Updated the explanation of replication configuration scenarios
with a Data Domain system in Replication with Data Domain systems on page 221.
l Provided details on plug-in options and clarified scenarios with
multiple backup types when changing the expiration setting for a replicated backup in Creating a replication group on page 224. 01 June 11, 2014 Initial release of Avamar 7.1.
Related documentation
The following EMC publications provide additional information:
l EMC Avamar Compatibility and Interoperability Matrix l EMC Avamar Release Notes
l EMC Avamar Operational Best Practices
l EMC Avamar and EMC Data Domain System Integration Guide l EMC Avamar Reports Guide
l All EMC Avamar client and plug-in user guides Special notice conventions used in this document
EMC uses the following conventions for special notices:
NOTICE
Addresses practices not related to personal injury.
Note
Presents information that is important, but not hazard-related.
Typographical conventions
EMC uses the following type style conventions in this document:
Bold Use for names of interface elements, such as names of windows, dialog boxes, buttons, fields, tab names, key names, and menu paths (what the user specifically selects or clicks)
Italic Use for full titles of publications referenced in text Monospace Use for:
l System code
l System output, such as an error message or script l Pathnames, file names, prompts, and syntax l Commands and options
Monospace italic Use for variables Monospace bold Use for user input
| Vertical bar indicates alternate selections - the bar means “or” { } Braces enclose content that the user must specify, such as x or y or z ... Ellipses indicate nonessential information omitted from the example
Where to get help
The Avamar support page provides access to licensing information, product documentation, advisories, and downloads, as well as how-to and troubleshooting information. This information may enable you to resolve a product issue before you contact EMC Customer Support.
To access the Avamar support page:
1. Go to https://support.EMC.com/products. 2. Type a product name in the Find a Product box. 3. Select the product from the list that appears. 4. Click the arrow next to the Find a Product box.
5. (Optional) Add the product to the My Products list by clicking Add to my products in the top right corner of the Support by Product page.
Documentation
The Avamar product documentation provides a comprehensive set of feature overview, operational task, and technical reference information. Review the following documents in addition to product administration and user guides:
l Release notes provide an overview of new features and known limitations for a
release.
l Technical notes provide technical details about specific product features,
including step-by-step tasks, where necessary.
l White papers provide an in-depth technical perspective of a product or products
as applied to critical business issues or requirements. Knowledgebase
The EMC Knowledgebase contains applicable solutions that you can search for either by solution number (for example, esgxxxxxx) or by keyword.
To search the EMC Knowledgebase:
1. Click the Search link at the top of the page.
2. Type either the solution number or keywords in the search box.
3. (Optional) Limit the search to specific products by typing a product name in the
Scope by product box and then selecting the product from the list that appears. 4. Select Knowledgebase from the Scope by resource list.
5. (Optional) Specify advanced options by clicking Advanced options and specifying values in the available fields.
6. Click the search button. Online communities
Visit EMC Community Network at http://community.EMC.com for peer contacts, conversations, and content on product support and solutions. Interactively engage online with customers, partners and certified professionals for all EMC products. Live chat
To engage EMC Customer Support by using live interactive chat, click Join Live Chat
on the Service Center panel of the Avamar support page.
Service Requests
For in-depth help from EMC Customer Support, submit a service request by clicking
Create Service Requests on the Service Center panel of the Avamar support page.
Note
To open a service request, you must have a valid support agreement. Contact your EMC sales representative for details about obtaining a valid support agreement or with questions about your account.
To review an open service request, click the Service Center link on the Service Center panel, and then click View and manage service requests.
Facilitating support
EMC recommends that you enable ConnectEMC and Email Home on all Avamar systems:
l ConnectEMC automatically generates service requests for high priority events. l Email Home emails configuration, capacity, and general system information to
EMC Customer Support.
Your comments
Your suggestions will help us continue to improve the accuracy, organization, and overall quality of the user publications. Send your opinions of this document to
Please include the following information:
l Product name and version
l Document name, part number, and revision (for example, 01) l Page numbers
Introduction
This chapter includes the following topics:
l EMC Avamar system overview...20 l Data deduplication...27 l Security and networking...28
EMC Avamar system overview
An EMC® Avamar® system is a client/server network backup and restore solution that
consists of one or more Avamar servers and the network servers or desktop clients that back up data to those servers. The Avamar system also provides centralized management through the Avamar Administrator graphical management console software application.
Avamar server
Avamar is a hard-disk based IP network backup and restore solution. Avamar servers manufactured by EMC use internal hard disk storage. An Avamar server is a logical grouping of one or more nodes that is used to store and manage client backups. Hardware manufacturers typically call their equipment servers (for instance, the Dell PowerEdge 2950 server). In the context of an Avamar system, this equipment is called a node. An Avamar node is a self-contained, rack-mountable, network-addressable computer that runs Avamar server software on the Linux operating system.
A stripe is a unit of disk drive space managed by Avamar to ensure fault tolerance. In the Avamar system, an object is a single instance of deduplicated data. Each Avamar object inherently has a unique ID. Objects are stored and managed within stripes on the Avamar server.
Figure 1 Avamar server nodes, stripes, and objects
All Avamar servers store client backups and also provide essential processes and services required for client access and remote system administration.
Avamar servers are available in either single-node or scalable multi-node configurations. For the most part, when using Avamar Administrator management console software, all Avamar servers look and behave the same. The main differences among Avamar server configurations are the number of nodes and disk drives reported in the server monitor. Documenting specific differences in Avamar server hardware configurations is beyond the scope of this guide. Whenever specific limitations and best practices for certain
configurations are known, they are noted. However, these occasional notes should not be considered definitive or exhaustive. Consult your EMC sales representative or an EMC reseller for additional information about specific hardware.
Nodes
The primary building block in any Avamar server is a node. Each node is a self-contained, rack-mountable, network-addressable computer that runs Avamar server software on the Linux operating system.
Nodes can also contain internal storage in the form of hard disk drives. If the node is configured with internal storage (that is, a single-node server), it is internally mirrored to provide robust fault tolerance.
There are three types of nodes.
Utility node
A utility node is dedicated to scheduling and managing background Avamar server jobs. In scalable multi-node Avamar servers, a single utility node provides essential internal services for the server:
l Management Console Server (MCS) l cronjob
l External authentication l Network Time Protocol (NTP) l Web access
Because utility nodes are dedicated to running these essential services on multi-node Avamar servers, they cannot be used to store backups. Single-node Avamar servers combine all of the features and functions of utility and storage nodes on a single node.
Storage nodes
Storage nodes are nodes that store backup data. Multiple storage nodes are configured with multi-node Avamar servers based upon performance and capacity requirements. You can add storage nodes to an Avamar server over time to expand performance with no downtime.
Avamar clients connect directly with Avamar storage nodes. Client connections and data are load balanced across storage nodes.
NDMP Accelerator
An NDMP Accelerator node is a specialized node that uses NDMP to provide data protection for certain NAS devices, including the EMC Celerra® IP storage systems and
Network Appliance filers.
Avamar server functional blocks
The major Avamar server functional blocks include the data server, Management Console Server (MCS), and the Enterprise Manager Server (EMS). The following figure illustrates the interaction of these components.
Figure 2 Avamar server functional block diagram
Data server
When performing a backup, restore, or validation, Avamar backup clients communicate directly with the data server. All scheduled backups are initiated by the MCS scheduler.
Management Console Server (MCS)
The Management Console Server (MCS) provides centralized administration (scheduling, monitoring, and management) for the Avamar server. The MCS also runs the server-side processes used by the Avamar Administrator graphical management console.
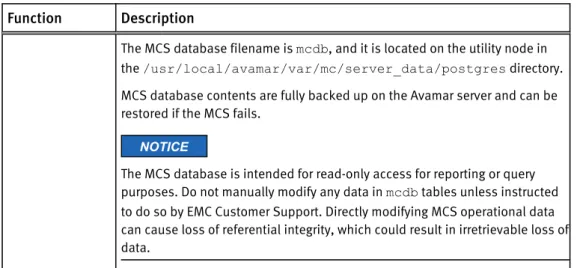
The following table provides details on the functions that the MCS provides.
Table 2 MCS functions
Function Description
Client registry Controls client registration and activation. Account
management
Used to create and manage domains, clients, users, and groups. Reporting Used to create and export system reports. The EMC Avamar Reports Guide
provides more information.
Events Displays system events and activities. Scheduler/
dispatcher
Controls when backup and restore operations occur, or if the operations can be queued for processing.
PostgreSQL database
Stores Avamar server data.
PostgreSQL is an open architecture. Information in the MCS database is accessible through any PostgreSQL-compliant ODBC interface.
Table 2 MCS functions (continued)
Function Description
The MCS database filename is mcdb, and it is located on the utility node in the /usr/local/avamar/var/mc/server_data/postgres directory. MCS database contents are fully backed up on the Avamar server and can be restored if the MCS fails.
NOTICE
The MCS database is intended for read-only access for reporting or query purposes. Do not manually modify any data in mcdb tables unless instructed to do so by EMC Customer Support. Directly modifying MCS operational data can cause loss of referential integrity, which could result in irretrievable loss of data.
Enterprise Manager Server (EMS)
The Avamar Enterprise Manager Server (EMS) provides essential services required to display Avamar server information and provides a mechanism for managing Avamar servers by using a standard web browser. The EMS also communicates directly with MCSs, which are an integral part of all Avamar systems in an enterprise.
Avamar clients
Avamar provides client software for various computing platforms. Each client comprises a client agent and one or more plug-ins.
Figure 3 Avamar client agent and plug-ins
Agents
Avamar agents are platform-specific software processes that run on the client and communicate with the Management Console Server (MCS) and any plug-ins installed on that client.
Plug-ins
There are two types of Avamar plug-ins:
l File system plug-ins are used to browse, back up, and restore files or directories on a
specific client file system.
l Application plug-ins support backup and restore of databases or other special
applications.
The following table lists the file system and application plug-ins that Avamar supports.
Table 3 Supported plug-ins
Type of plug-in Supported file systems and applications
File system l Free BSD l HP-UX l IBM AIX l Linux l Mac OS X
l Microsoft Windows
l Microsoft Windows Volume Shadow Copy Service (VSS) l SCO Open Server
l SCO UnixWare l Oracle Solaris l VMware
Application l IBM DB2 l Lotus Domino l Microsoft Exchange l Microsoft Hyper-V
l Microsoft Office SharePoint Server (MOSS) l Microsoft SQL Server
l NDMP for NAS devices, including EMC Celerra IP storage systems and
Network Appliance filers
l Oracle
l SAP with Oracle l Sybase ASE
Client compatibility requirements are available in the EMC Avamar Compatibility and Interoperability Matrix on EMC Online Support at https://support.EMC.com. The requirements in the matrix include supported operating systems and application versions.
The Avamar file system client and the plug-ins that you install on the host must have the same version number.
User interfaces
Several user interfaces are available in the Avamar system to facilitate management and monitoring.
Avamar Administrator
Avamar Administrator is a graphical management console software application that is used to remotely administer an Avamar system from a supported Windows client computer.
Avamar Enterprise Manager
Avamar Enterprise Manager is a web-based multi-system management console
application that provides centralized Avamar system administration capabilities for larger businesses and enterprises. With Avamar Enterprise Manager, you can monitor all Avamar systems in the enterprise from a single web browser session.
An integrated dashboard provides an “at-a-glance” view that enables you to assess the operational status of each Avamar system and determine if backups are completing successfully.
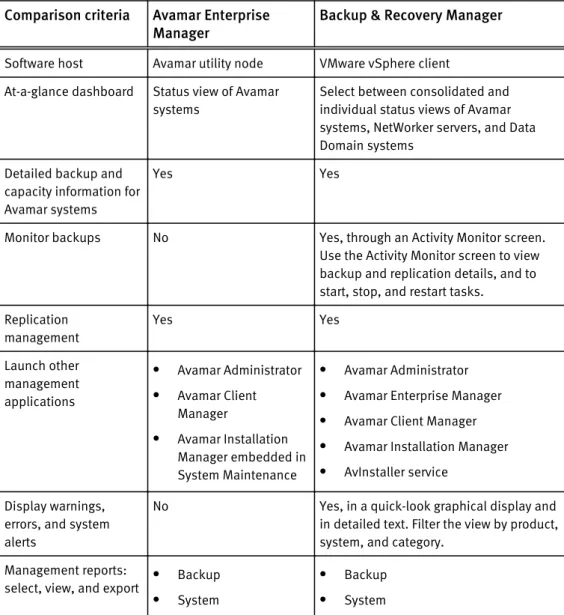
EMC Backup & Recovery Manager
Like Avamar Enterprise Manager, Backup & Recovery Manager manages all Avamar systems in the enterprise. However, Backup & Recovery Manager additionally has an integrated user interface to manage the enterprise’s NetWorker servers and Data Domain backup targets.
The following table provides an overview comparison of the enterprise management capabilities of both products. The comparison focuses on Avamar-specific features and does not include the features in Backup & Recovery Manager that are specific to NetWorker servers and to Data Domain backup targets.
Table 4 Comparison of supported enterprise management user interfaces
Comparison criteria Avamar Enterprise
Manager Backup & Recovery Manager
Software host Avamar utility node VMware vSphere client At-a-glance dashboard Status view of Avamar
systems
Select between consolidated and individual status views of Avamar systems, NetWorker servers, and Data Domain systems
Detailed backup and capacity information for Avamar systems
Yes Yes
Monitor backups No Yes, through an Activity Monitor screen. Use the Activity Monitor screen to view backup and replication details, and to start, stop, and restart tasks.
Replication management Yes Yes Launch other management applications
l Avamar Administrator l Avamar Client
Manager
l Avamar Installation
Manager embedded in System Maintenance
l Avamar Administrator l Avamar Enterprise Manager l Avamar Client Manager l Avamar Installation Manager l AvInstaller service
Display warnings, errors, and system alerts
No Yes, in a quick-look graphical display and in detailed text. Filter the view by product, system, and category.
Management reports: select, view, and export
l Backup l System
l Backup l System
Table 4 Comparison of supported enterprise management user interfaces (continued)
Comparison criteria Avamar Enterprise
Manager Backup & Recovery Manager l Configuration
The Backup & Recovery Manager product documentation provides complete details on the user interface.
Avamar Client Manager
Avamar Client Manager is a web-based management application that provides centralized Avamar client administration capabilities for larger businesses and enterprises. Avamar Client Manager facilitates the management of large numbers of Avamar clients.
Avamar Client Manager works with Avamar clients on a supported native operating system and Avamar clients on a supported operating system running in a VMware virtual machine. Avamar Client Manager cannot work with Avamar clients through virtual center, virtual machine, or virtual proxy configurations. The Avamar Client Manager UI displays supported Avamar clients and hides all unsupported clients.
Avamar Desktop/Laptop
Avamar Desktop/Laptop is a version of the Avamar client software that adds enhanced features for enterprise desktop and laptop computers.
The Avamar Desktop/Laptop features are designed to improve the functionality of Avamar client for Windows and Macintosh desktops and laptops. Many of the features are also supported on qualifying Linux computers.
Avamar Desktop/Laptop functionality is available through two user interfaces:
l The client local user interface (client UI) is installed on the client computer when you
install either the Avamar Client for Windows or the Avamar Client for Mac OS X. With the client UI, an Avamar icon appears in the notification area ("system tray") on Windows computers or on the menu bar on Mac computers. Right-click the icon on Windows or click the icon on Mac to open the client menu, which provides access to backup, restore, program settings, and logs.
l Use the web browser user interface (web UI) to start an on-demand backup or restore,
view backup and restore activity for a client computer, or configure other backup settings for a client computer.
Avamar Installation Manager
The Avamar Installation Manager user interface is part of the AvInstaller software that EMC Customer Support installs on the utility node during an Avamar server software installation or upgrade. Avamar Installation Manager facilitates the process of installing and upgrading the Avamar server.
Avamar Downloader Service
The Avamar Downloader Service manages the process of checking for and downloading Avamar server software updates. The Avamar Downloader Service software runs on a stand-alone Microsoft Windows server that allows network access to EMC sites on the Internet and to all Avamar servers at a site.
Avamar Web Restore
Avamar Web Restore provides access to the following functionality:
l Download Avamar client software.
l View Avamar product documentation that is stored on the Avamar server.
NOTICE
The most up-to-date Avamar product documentation is available on EMC Online Support.
Data Domain system support
You can store backups on either the Avamar server or an EMC Data Domain® system.
Backup metadata is stored on the Avamar server.
Before you can store backups on a Data Domain system, you must add the Data Domain system to the Avamar configuration by using Avamar Administrator. Then you select the Data Domain system in the plug-in options when you perform an on-demand backup or when you create a dataset for a scheduled backup. You can also use the command line interface (CLI) to perform backups to a Data Domain system.
The steps to restore backups are the same whether you restore from the Avamar server or a Data Domain system. The restore process determines the location of the backup and restores the backup.
Data deduplication
Data deduplication is a key feature of the Avamar system. Data deduplication ensures that each unique sub-file, variable length object is stored only once across sites and servers.
During backups, Avamar client software examines the client file system and applies a data deduplication algorithm that identifies redundant data sequences and breaks the client file system into sub-file, variable length data segments. Each data segment is assigned a unique ID.
The client software then determines whether this unique ID has already been stored on the Avamar server. If this object resides on the Avamar server, a link to the stored object is referenced in the backup.
Once an object has been stored on the server, it never has to be re-sent over the network, no matter how many times it is encountered on any number of clients. This feature significantly reduces network traffic and provides for greatly enhanced storage efficiency on the server.
Figure 4 Data deduplication
Security and networking
The following sections provide an overview of key Avamar security and networking features. The EMC Avamar Product Security Guide provides full details on product security and network configuration.
Encryption
Avamar can encrypt all data sent between clients and the server “in flight.”
To provide enhanced security during client/server data transfers, Avamar supports two levels of “in-flight” encryption: medium and high.
You can set the encryption level on a client-by-client basis in client properties, or for an entire group of clients in group properties. You also can disable “in-flight” encryption entirely.
Each individual Avamar server can also be configured to encrypt data stored on the server “at rest.” The decision to encrypt all data stored in an Avamar server is typically a one-time decision that is made when the server is initially deployed at a customer site.
IPv4 and IPv6 support
Internet Protocol (IP) is a set of communication rules for routing traffic across networks to addressable devices like Avamar system components. The Avamar system supports both Internet Protocol Version 4 (IPv4) and IPv6 address notation.
IPv4 notation
IPv4 notation is displayed as four octets, that is 1- to 3-digit base 10 numbers in a range of 0 to 255. Each octet is separated by periods and represents 8 bits of data for a total address space of 32 bits.
A subnet mask identifies a range (a subnet) of IP addresses on the same network. For Avamar purposes, the subnet mask is /24, representative of a 255.255.255.0 netmask. An example IPv4 address and subnet mask is10.99.99.99/24.
IPv4 notation cannot be abbreviated. If an octet has zero (0) value, it is indicated by a 0.
IPv6 notation
IPv6 notation is displayed as 16 octets, that is 2-digit hexadecimal (base 16) numbers in a range of 00 to FF. Octets are combined by pairs into eight groups separated by colons, each group representing 16 bits of data for a total address space of 128 bits.
For Avamar purposes, the subnet mask (called prefix in IPv6) is /64.
An example IPv6 address and prefix is 2001:0db8:85a3:0042:1000:8a2e: 0370:7334/64.
As for a group with zero (0) value, IPv6 notation is different from IPv4 in that it can be abbreviated. For example, the following is a valid IPv6 address and prefix:
2001:db8:abcd:0012::0/64.
Avamar IP configurations
In the Avamar user interface, an IP address may be displayed in either IPv4 or IPv6 notation. The type notation you see is dependent on how that particular component was initially configured when the hardware and software were installed.
IPv4 and IPv6 are not interoperable. They operate in separate stacks (that is, parallel, independent networks).
Avamar can be set up in a dual stack configuration. In that case, each Avamar component may have an IPv4 address, an IPv6 address, or both (one primary and the other
secondary). The Avamar user interface may display a component's primary address or both dual stack addresses. So if you see the following IP address for a particular device, it is configured as dual stack: 10.99.99.99/24,2001:db8:abcd:0012::0/64.
Avamar Administrator
This chapter includes the following topics:
l Overview of Avamar Administrator...32 l Installing Avamar Administrator... 32 l Upgrading Avamar Administrator...34 l Uninstalling Avamar Administrator... 34 l Editing Avamar Administrator client preferences... 34 l Setting a session time-out for Avamar Administrator... 35 l Starting Avamar Administrator...36 l Starting Avamar Administrator from Avamar Enterprise Manager... 36 l Avamar Administrator dashboard... 38 l Avamar Administrator user interface elements... 43
Overview of Avamar Administrator
Avamar Administrator is a graphical management console software application that is used to remotely administer an Avamar system from a supported Windows or Linux client computer.
You can install Avamar Administrator on a computer and launch the software from the desktop icon or a command shell, or you can launch Avamar Administrator from Avamar Enterprise Manager.
Avamar Administrator is the primary user interface for monitoring and configuring the Avamar system. You can monitor backup, restore, and system maintenance activities, as well as configure backup policies, manage clients and user accounts, and configure other system settings.
You can administer one Avamar system at a time from Avamar Administrator.
The Avamar Administrator dashboard appears when you log in to Avamar Administrator. The dashboard provides an at-a-glance view of Avamar system status, as well as access to all functionality through menus and launcher buttons.
Installing Avamar Administrator
You can install Avamar Administrator on supported Microsoft Windows and 64-bit Linux platforms.
Details on support for specific operating system versions is available in the EMC Avamar Compatibility and Interoperability Matrix on EMC Online Support at https://
support.EMC.com.
Installing Avamar Administrator on Microsoft Windows
Procedure
1. Log in to the computer on which you are installing Avamar Administrator. 2. Open a web browser and type the following URL:
http://Avamar_server
where Avamar_server is the DNS name or IP address of the Avamar server. The EMC Avamar Web Restore page appears.
3. Click Downloads.
4. Click + next to the Windows (32 bit) folder.
5. Click + next to the Microsoft Windows Vista, 7, 8, 8.1, Microsoft Windows Server 2008 folder.
6. Locate the Java Runtime Environment (JRE) install package, which is typically the last entry in the folder.
7. If the JRE on the client computer is older than the JRE hosted on the Avamar server, download and install the newer JRE from the Avamar server:
a. Click the jre-version-windows-i586-p install package, where version is the JRE version.
b. Open the installation file, or download the file and then open it from the saved location.
c. Follow the onscreen instructions to complete the JRE installation.
8. Click the AvamarConsoleMultiple-windows-x86-version.exe install package, where version is the Avamar Administrator software version.
Avamar Administrator is only available as a 32-bit application. However, it will also run on 64-bit Windows computers.
9. Open the installation file, or download the file and then open it from the saved location.
10.Follow the onscreen instructions to complete the Avamar Administrator software installation.
Installing Avamar Administrator on Linux
Procedure
1. Log in to the computer on which you are installing Avamar Administrator. 2. Open a web browser and type the following URL:
http://Avamar_server
where Avamar_server is the DNS name or IP address of the Avamar server. The EMC Avamar Web Restore page appears.
3. Click Downloads.
4. Click + next to the Linux for x86 (64 bit) folder. 5. Click + next to the Red Hat Enterprise Linux 4 folder.
6. Locate the JRE RPM install package, which is typically the last entry in the folder. 7. If the JRE on the client computer is older than the JRE hosted on the Avamar server,
then download the install package to a temporary folder such as /tmp.
The install package filename is jre-version-platform.rpm, where version is the JRE version and platform is the computing platform.
8. Download the AvamarConsole-linux-rhel4-x86_64-version.rpm install package to a temporary install folder such as /tmp.
Use the Red Hat Enterprise Linux 4 install packages for all supported Linux versions. 9. Open a command shell and log in as root on the computer where the software will be
installed.
10.Change directory to the temporary folder to which you downloaded the install packages by typing a command such as cd /tmp.
11.If you downloaded a JRE, install it by typing rpm -ivh jre-version-platform.rpm.
12.Follow the onscreen instructions to complete the JRE installation.
13.Install Avamar Administrator by typing rpm -ih AvamarConsole-linux-rhel4-x86_64-version.rpm
The install process prompts you to run avsetup_mcc to configure Avamar Administrator.
14.Configure Avamar Administrator by typing /usr/local/avamar/version/bin/ avsetup_mcc.
The configuration process prompts you to specify the location of the JRE installation. 15.Press Enter to accept the default install location.
The configuration process prompts you to specify the root directory of the Avamar software.
16.Press Enter to accept the default install location. A confirmation message appears.
Upgrading Avamar Administrator
You can upgrade Avamar Administrator on either Microsoft Windows or Linux computers. Procedure
l You can install multiple versions of Avamar Administrator on the same Microsoft
Windows computer. If you install Avamar Administrator on a computer where it is already installed, select a destination folder carefully during the installation procedure:
n To keep an older version, select a different installation folder.
n To directly upgrade the Avamar Administrator installation, select the same
installation folder. The two versions are identified by their full version numbers.
l To upgrade the Avamar Administrator software on the Linux platform, uninstall the
previous version and install the new software. Use of the Linux software upgrade command (rpm -Uh) is not supported.
Uninstalling Avamar Administrator
You can uninstall Avamar Administrator from either a Microsoft Windows or a Linux computer.
Before you begin
Close any open Avamar Administrator sessions. Otherwise, the uninstall process may not complete successfully, which can complicate future installation of Avamar Administrator. Procedure
l On a Microsoft Windows computer, open the Windows Start menu and select Programs > EMC Avamar > Administrator > version > Uninstall, and then click OK on the confirmation message.
l On a Linux computer:
a. Open a command shell and log in as root.
b. Determine the package name by typing rpm -qa | grep Av.
c. Type rpm -e AvamarConsole-version, where AvamarConsole-version is the Avamar Administrator install package.
Editing Avamar Administrator client preferences
You can edit some Avamar Administrator client preferences directly in Avamar Administrator. However, a number of preferences are only available for editing in the
mcclient.xml client preferences file. Procedure
2. Open install_dir/var/mc/gui_data/prefs/mcclient.xml in a text editor, where install_dir is the Avamar Administrator installation directory. 3. Edit the preference elements.
4. Save and close the file.
The changes take effect the next time that you start Avamar Administrator.
Setting a session time-out for Avamar Administrator
An Avamar Administrator session remains active until a user closes the application by choosing Exit from the menu. To protect the assets available through Avamar
Administrator, set a session time-out value. The value applies to all Avamar Administrator sessions connected to the Avamar server.
After you set a session time-out value, Avamar Administrator monitors the UI for activity. When Avamar Administrator detects no mouse or keyboard activity within the UI for the number of minutes set in the time-out value, it shuts down all processes, closes all windows, and displays the Inactive dialog box.
Procedure
1. Open a command shell and log in by using one of the following methods:
l For a single-node server, log in to the server as admin. l For a multi-node server:
a. Log in to the utility node as admin. b. Load the admin OpenSSH key by typing:
ssh-agent bash
ssh-add ~admin/.ssh/admin_key
c. When prompted, type the admin_key passphrase and press Enter. 2. Stop the Management Console Server (mcs) service by typing dpnctl stop mcs.
3. Change the working directory to /usr/local/avamar/var/mc/server_data/ prefs by typing cd /usr/local/avamar/var/mc/server_data/prefs.
4. Open mcserver.xml in a plain text editor. 5. Find the <node name="mon"> entry.
6. Edit the value of the <entry key="consoleInactiveMinutesToReport" value="n" /> entry within the <node name="mon"> entry, where n is the session time-out value in minutes.
7. Save the change and close the text editor. 8. Start the MCS and the scheduler by typing:
dpnctl start mcs dpnctl start sched
9. Close the command shell.
Avamar Administrator uses the new session time-out value the next time that you open Avamar Administrator and connect with the Avamar server.
Starting Avamar Administrator
These steps explain how to start Avamar Administrator when it is installed on a local computer. You also can launch Avamar Administrator from an Avamar Enterprise Manager session.
Before you begin
Ensure that a minimum of 512 MB of system RAM is available on the local computer. Otherwise, Java heap errors may occur when you start Avamar Administrator. Procedure
1. Launch Avamar Administrator:
l On Microsoft Windows platforms, double-click the Avamar Administrator icon on
the Windows desktop.
l On Linux platforms, open a command shell and type mcgui.
The login window appears.
2. In the User Name box, type a username.
To access all Avamar Administrator functionality, the account associated with this username must be assigned the role of Administrator. Other roles provide reduced functionality.
To authenticate by using the internal authentication system, type only a username. To authenticate by using the enterprise authentication system (deprecated) or directory service authentication, type username@server, where username is the username and
server is the fully qualified domain name of the authentication server.
If you use the format username@server for the username, then the system attempts to authenticate the user by using enterprise authentication. If authentication with enterprise authentication fails, then the system attempts to authenticate the user by using directory service authentication.
3. In the Password box, type the password for the user account. 4. In the Domain Name box, type the Avamar domain to log in to:
l To log in to the root domain, use the default entry of a single slash (/) character. l To log in to a specific domain or subdomain, type the domain path by using the
syntax /domain/subdomain1/subdomain2.
5. In the Administrator Server box, type the IP address or DNS name of the Avamar server to log in to.
Note
To prepopulate the Administrator Server and Domain Name boxes with a specific Avamar server and domain every time that you start Avamar Administrator, click
Options and type that server name and domain in the Default Administrator Server
and Default Domain boxes, respectively. 6. Click Log On.
The Avamar Administrator dashboard appears.
Starting Avamar Administrator from Avamar Enterprise Manager
You can launch Avamar Administrator directly from an Avamar Enterprise Manager session. Avamar Enterprise Manager uses the Java Webstart technology from Sun
Microsystems to start Avamar Administrator. Webstart is an environment for automatic download of the latest version of an application from the Web. By incorporating this technology into Avamar Enterprise Manager, you no longer have to manually install individual versions of Avamar Administrator software to maintain an Avamar system in the enterprise.
Before you begin
l Install Java Runtime Environment (JRE):
1. Open a web browser and type the following URL:
http://Avamar_server
where Avamar_server is the DNS name or IP address of the Avamar server. The EMC Avamar Web Restore page appears.
2. Click Downloads.
3. Click + next to the Windows (32 bit) folder.
4. Click + next to the Microsoft Windows Vista, 7, 8, 8.1, Microsoft Windows Server 2008 folder.
5. Click the link for the JRE install package, which is typically the last entry in the folder, and download or open the installation file.
6. Follow the onscreen instructions to complete the JRE installation.
l Ensure that you are using the correct version of the Java Web Start Launcher:
1. In Windows Explorer, select Tools > Folder Options. 2. In the Folder Options dialog box, select the File Types tab.
3. In the Registered file types list, select the JNLP file type and click Change. 4. In the Open With dialog box, click Browse, and then navigate to the directory
where JRE 1.5.x is installed.
5. In the bin folder, select javaws.exe and click Open. 6. Click Apply on the Folder Options dialog box.
NOTICE
Under certain circumstances, stale Java temporary Internet files can cause errors when attempting to launch Avamar Administrator from an Avamar Enterprise Manager session. If this occurs on Windows computers, open the Windows Start menu and select Control Panel > Java. In the Temporary Internet Files area of the Java Control Panel, click Delete Files. A confirmation message appears. Ensure that all temporary Internet file types are selected and click OK.
Procedure
1. Open a web browser and type the following URL:
http://Avamar_server/em
where Avamar_server is the DNS name or IP address of the Avamar server that hosts the EMS.
The login page appears. 2. Select Administrator.
3. In the User Name box, type the username for the Avamar administrative user account. 4. In the Domain Name box, type the Avamar domain to log in to:
l To log in to the root domain, use the default entry of a single slash (/) character. l To log in to a specific domain or subdomain, type the domain path by using the
syntax /domain/subdomain1/subdomain2.
5. From the Administrator Server list, select the Avamar server to manage. 6. Click Launch.
7. If a security warning appears, click Yes to proceed with the login. The Avamar Administrator login window appears.
8. In the Password box, type the password for the Avamar administrative user account. 9. Click Log On.
The Avamar Administrator dashboard appears.
Avamar Administrator dashboard
The Avamar Administrator dashboard provides an at-a-glance view of Avamar system status, as well as access to all functionality through menus and launcher buttons. The dashboard appears when you log in to Avamar Administrator.
Figure 5 Avamar Administrator dashboard
Launcher buttons
The dashboard launcher buttons invoke persistent windows to perform tasks in Avamar Administrator.
Table 5 Dashboard launcher buttons
Button Window Available tasks in the window
Policy Policy Create and manage groups, datasets, schedules, and retention policies. Backup & Restore Backup, Restore and
Manage
Perform on-demand backups and restores, and manage completed backups.
Table 5 Dashboard launcher buttons (continued)
Button Window Available tasks in the window
Administration Administration Create and manage domains, clients, users, system events, and services. Activity Activity Monitor backup, restore, backup
validation, and replication activity. Server Server Monitor server activity and client
sessions.
Replication Replication Configure policy-based replication.
System Information panel
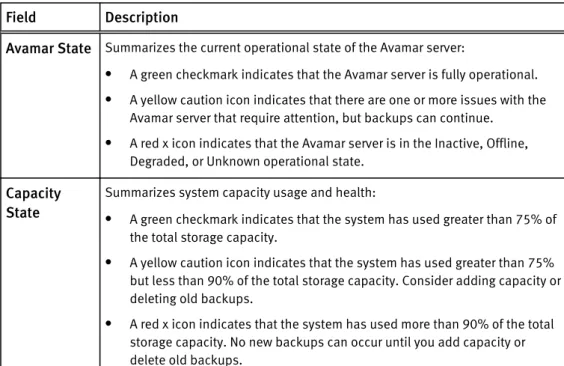
The System Information panel on the Avamar Administrator dashboard provides an overview of important system statistics.
System State
The System State icon provides a status indicator for overall system status:
l A green checkmark icon indicates that the system is fully operational.
l A yellow caution icon indicates that there is an issue with the system that requires
attention, but backups can continue.
l A red x icon indicates that there is a problem with the system that requires immediate
attention. Backups cannot occur until you resolve the problem.
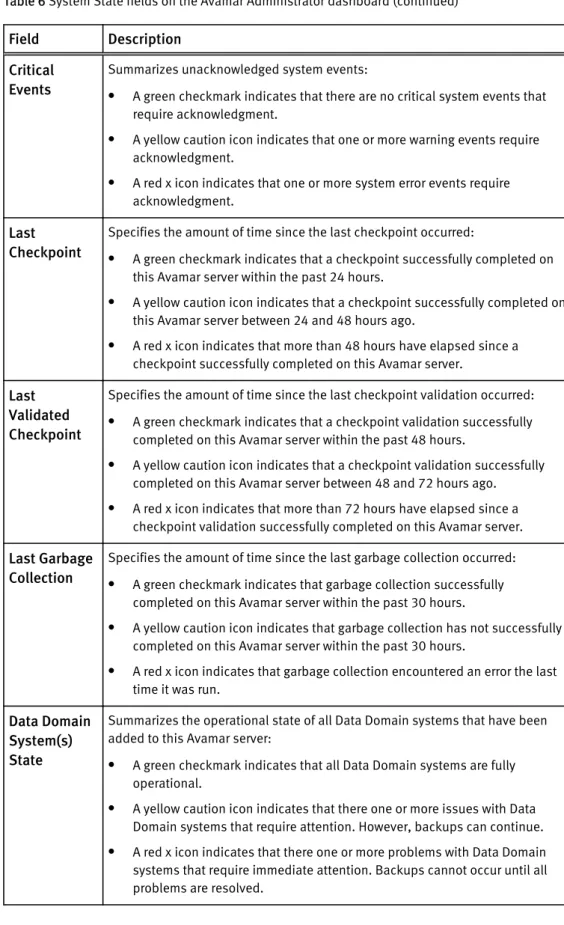
Click the arrow icon next to the System State field to view more detailed system state information. The following table provides details about system state information in the dashboard.
Table 6 System State fields on the Avamar Administrator dashboard
Field Description
Avamar State Summarizes the current operational state of the Avamar server:
l A green checkmark indicates that the Avamar server is fully operational. l A yellow caution icon indicates that there are one or more issues with the
Avamar server that require attention, but backups can continue.
l A red x icon indicates that the Avamar server is in the Inactive, Offline,
Degraded, or Unknown operational state.
Capacity State
Summarizes system capacity usage and health:
l A green checkmark indicates that the system has used greater than 75% of
the total storage capacity.
l A yellow caution icon indicates that the system has used greater than 75%
but less than 90% of the total storage capacity. Consider adding capacity or deleting old backups.
l A red x icon indicates that the system has used more than 90% of the total
storage capacity. No new backups can occur until you add capacity or delete old backups.
Table 6 System State fields on the Avamar Administrator dashboard (continued)
Field Description Critical
Events
Summarizes unacknowledged system events:
l A green checkmark indicates that there are no critical system events that
require acknowledgment.
l A yellow caution icon indicates that one or more warning events require
acknowledgment.
l A red x icon indicates that one or more system error events require
acknowledgment.
Last Checkpoint
Specifies the amount of time since the last checkpoint occurred:
l A green checkmark indicates that a checkpoint successfully completed on
this Avamar server within the past 24 hours.
l A yellow caution icon indicates that a checkpoint successfully completed on
this Avamar server between 24 and 48 hours ago.
l A red x icon indicates that more than 48 hours have elapsed since a
checkpoint successfully completed on this Avamar server.
Last Validated Checkpoint
Specifies the amount of time since the last checkpoint validation occurred:
l A green checkmark indicates that a checkpoint validation successfully
completed on this Avamar server within the past 48 hours.
l A yellow caution icon indicates that a checkpoint validation successfully
completed on this Avamar server between 48 and 72 hours ago.
l A red x icon indicates that more than 72 hours have elapsed since a
checkpoint validation successfully completed on this Avamar server.
Last Garbage Collection
Specifies the amount of time since the last garbage collection occurred:
l A green checkmark indicates that garbage collection successfully
completed on this Avamar server within the past 30 hours.
l A yellow caution icon indicates that garbage collection has not successfully
completed on this Avamar server within the past 30 hours.
l A red x icon indicates that garbage collection encountered an error the last
time it was run.
Data Domain System(s) State
Summarizes the operational state of all Data Domain systems that have been added to this Avamar server:
l A green checkmark indicates that all Data Domain systems are fully
operational.
l A yellow caution icon indicates that there one or more issues with Data
Domain systems that require attention. However, backups can continue.
l A red x icon indicates that there one or more problems with Data Domain
systems that require immediate attention. Backups cannot occur until all problems are resolved.
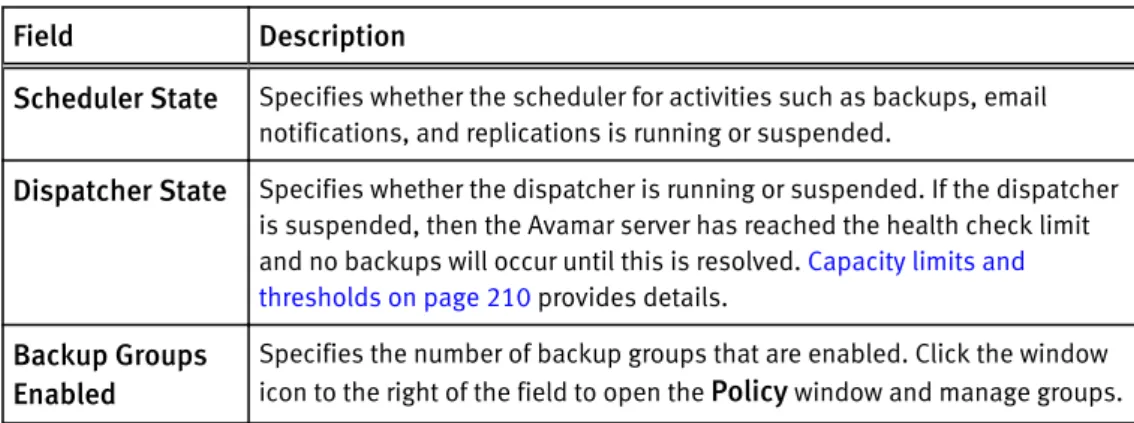
Scheduler State
The Scheduler State field indicates whether scheduled activities are running or