IBM Tivoli Storage Manager for Virtual Environments
Version 7.1.3
Data Protection for Microsoft Hyper-V
Installation and User's Guide
IBM Tivoli Storage Manager for Virtual Environments
Version 7.1.3
Data Protection for Microsoft Hyper-V
Installation and User's Guide
Note:
Before you use this information and the product it supports, read the information in “Notices” on page 77.
Second edition (September 2015)
This edition applies to version 7, release 1, modification 3 of Tivoli Storage Manager for Virtual Environments: Data Protection for Microsoft Hyper-V (product number 5725-A44) and to all subsequent releases and modifications until otherwise indicated in new editions.
Contents
About this publication
. . . ..
v
Who should read this publication . . . .. v
Publications . . . .. v
New for Data Protection for Microsoft Hyper-V Version 7.1.3 . . . .. v
Chapter 1. Protection for Microsoft
Hyper-V virtual machines . . . ..
1
Incremental forever backup strategy . . . . .. 3
Snapshot management with Windows PowerShell 4 Documentation resources . . . .. 4
Hyper-V backup support limitations . . . . .. 6
Chapter 2. Installing Data Protection for
Microsoft Hyper-V . . . ..
7
Determine system requirements . . . .. 7
Determine which features to install . . . .. 7
Install Data Protection for Microsoft Hyper-V features with default settings . . . .. 8
Install the backup-archive client (data mover) .. 8
Install the Tivoli Storage Manager recovery agent 10 Installing in silent mode . . . .. 12
Uninstalling Data Protection for Microsoft Hyper-V 12 Uninstalling Data Protection for Microsoft Hyper-V with the Microsoft Windows Installer Tool . . .. 13
Chapter 3. Configuring Data Protection
for Microsoft Hyper-V . . . ..
15
Creating and modifying the client options file . .. 15
Configuring Data Protection for Microsoft Hyper-V in a cluster environment . . . .. 17
Configuring the Tivoli Storage Manager recovery agent GUI . . . .. 19
Manually configuring an iSCSI device . . . .. 23
Chapter 4. Command reference . . ..
25
Reading syntax diagrams . . . .. 25
Backup VM. . . .. 27
Expire . . . .. 32
Query VM . . . .. 33
Restore VM . . . .. 36
Chapter 5. Options reference . . . ..
39
Dateformat . . . .. 39
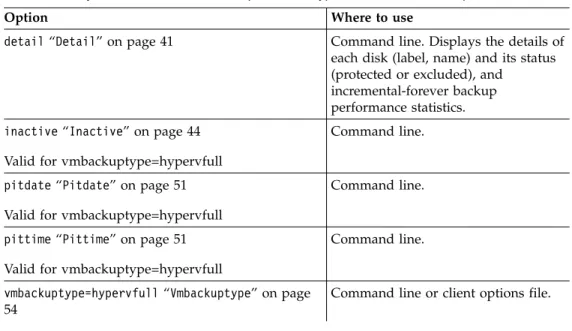
Detail . . . .. 41
Domain.vmfull . . . .. 41
Filelist . . . .. 43
Inactive . . . .. 44
Include.vm . . . .. 45
Mode. . . .. 46
Mbobjrefreshthresh . . . .. 47
Mbpctrefreshthresh . . . .. 48
Noprompt . . . .. 49
Numberformat. . . .. 49
Pick. . . .. 50
Pitdate. . . .. 51
Pittime. . . .. 51
Timeformat . . . .. 52
Vmbackdir. . . .. 53
Vmbackuptype. . . .. 54
Vmctlmc. . . .. 54
Vmmaxparallel . . . .. 55
Vmmc. . . .. 57
Chapter 6. Mount and file restore . ..
59
Tivoli Storage Manager recovery agent configurations . . . .. 59
Snapshot mount overview . . . .. 60
Mount guidelines . . . .. 61
File restore overview . . . .. 61
File restore guidelines . . . .. 63
Restoring one or more files . . . .. 63
Chapter 7. Tivoli Storage Manager
recovery agent commands . . . . ..
67
Mount . . . .. 67
Set_connection . . . .. 70
Help. . . .. 71
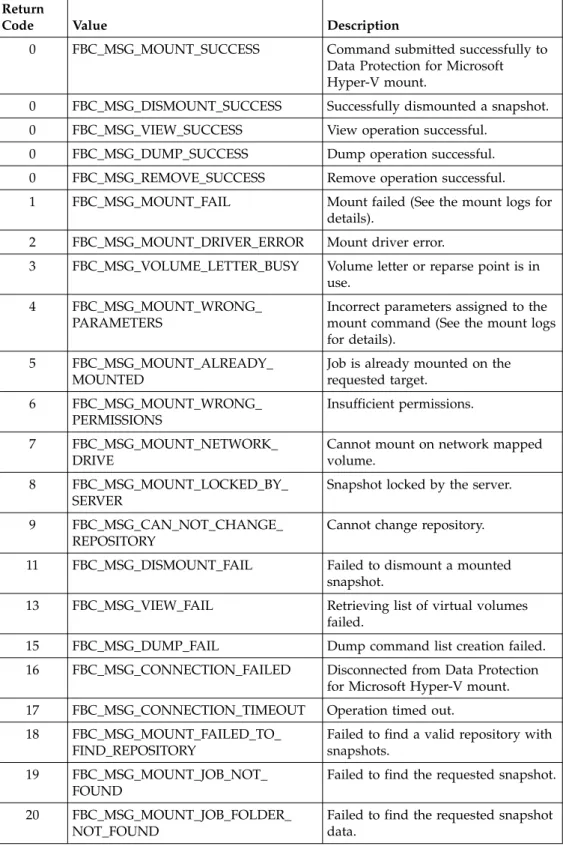
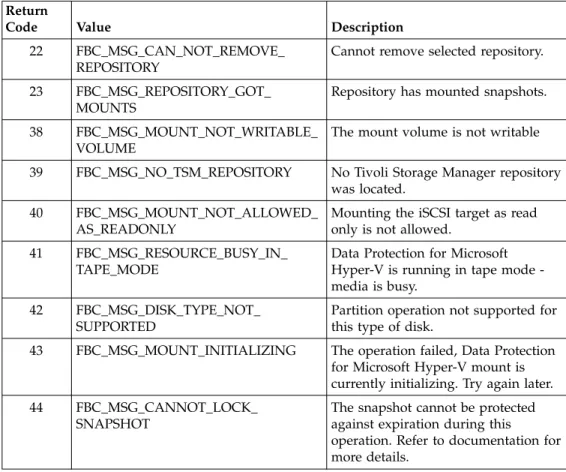
Recovery Agent command-line interface return codes . . . .. 72
Appendix. Accessibility features for the
Tivoli Storage Manager product family . 75
Notices
. . . ..
77
Glossary . . . ..
81
Index . . . ..
83
About this publication
This publication provides overview, planning, and user instructions for IBM®
Tivoli®Storage Manager for Virtual Environments: Data Protection for Microsoft
Hyper-V.
Who should read this publication
This publication is intended for administrators and users who are responsible for implementing a backup solution with Tivoli Storage Manager for Virtual
Environments: Data Protection for Microsoft Hyper-V in one of the supported environments.
In this publication, it is assumed that you have an understanding of the following applications:
v Microsoft Hyper-V Server 2012 or Microsoft Hyper-V Server 2012 R2 v Tivoli Storage Manager backup-archive client
v Tivoli Storage Manager server
Publications
The Tivoli Storage Manager product family includes IBM Tivoli Storage
FlashCopy®Manager, IBM Tivoli Storage Manager for Space Management, IBM Tivoli Storage Manager for Databases, and several other storage management products from IBM.
To view IBM product documentation, see http://www.ibm.com/support/ knowledgecenter.
New for Data Protection for Microsoft Hyper-V Version 7.1.3
IBM Tivoli Storage Manager for Virtual Environments: Data Protection for Microsoft Hyper-V Version 7.1.3 contains updates, which include
maintenance-related changes.
New and changed information in this product documentation is indicated by a vertical bar (|) to the left of the change.
The language packages are now merged into the base package. Because the file merge is handled programmatically, no action is required on your part.
From the Tivoli Storage Manager Operations Center, you can view front-end and back-end capacity usage to estimate compliance with license entitlements. Important: Data Protection for Microsoft Hyper-V must be at the latest level for the Operations Center to present complete data.
Chapter 1. Protection for Microsoft Hyper-V virtual machines
IBM Tivoli Storage Manager for Virtual Environments: Data Protection for Microsoft Hyper-V is a licensed product that provides storage management services for virtual machines in a Microsoft Hyper-V environment. IBM Tivoli Storage Manager for Virtual Environments: Data Protection for Microsoft Hyper-V is referred to as Data Protection for Microsoft Hyper-V throughout this document. Data Protection for Microsoft Hyper-V integrates Tivoli Storage Manager for Virtual Environments virtualization protection with the Tivoli Storage Manager Backup-Archive Client to protect Microsoft Hyper-V virtual machines on Microsoft Windows Server 2012 or 2012 R2 systems.
Back up Hyper-V virtual machines
Data Protection for Microsoft Hyper-V creates an incremental forever full or incremental forever incremental backup of Hyper-V virtual machines in VHDX disk format. The virtual machine is backed up to the Tivoli Storage Manager server. Microsoft Volume Shadow Copy Service (VSS) is used to take a consistent snapshot of the virtual machine.
You can back up Hyper-V virtual machines that exist on a local disk, a SAN-attached disk, or cluster shared volume. For example, you can back up virtual machines that are stored on Cluster Shared Volumes (CSV) in a Hyper-V cluster environment or on Server Message Block (SMB) file shares that are on a remote system. You can back up any guest operating systems that are hosted by the Hyper-V server on remote shares, regardless of whether the guest operating system is supported by Tivoli Storage Manager.
The following backup types are supported for Microsoft Hyper-V virtual machines in VHDX disk format:
Incremental forever full backup
Creates a backup of snapshot disk data to the Tivoli Storage Manager server.
Incremental forever incremental backup
Creates a snapshot of the blocks that changed since the last incremental forever full backup.
For more information, see “Hyper-V backup support limitations” on page 6.
Restore an entire Hyper-V virtual machine
Each Hyper-V virtual machine backup is restored from the Tivoli Storage Manager server as a single entity. You can restore any guest operating systems that are hosted by the Hyper-V server regardless of whether the guest operating system is supported by Tivoli Storage Manager.
A Data Protection for Microsoft Hyper-V restore operation ensures that the same block on the production disk is only restored once. Older backup versions expire according to the Tivoli Storage Manager server management class policy that is associated with the virtual machine.
© Copyright IBM Corp. 2011, 2015
1
| | | | | | | | | | | | | | | | | | | | | |
Restore an entire Hyper-V virtual machine to an alternative
location
You can restore a Hyper-V virtual machine to an alternate virtual machine name, to an alternate location on the Hyper-V host, or both. You can also restore a Hyper-V virtual machine to a different Hyper-V host. However, to restore the virtual machine to a different host, you must run the restore operation from the Hyper-V host where the virtual machine is being restored to.
Restore a file from a Hyper-V virtual machine
Use this restore method when only one or more files must be restored. The files are manually copied from a mounted virtual machine disk that is accessed through an iSCSI target or partition. This method requires the Tivoli Storage Manager recovery agent to be installed.
Policy management at the virtual machine level
Storage requirements for Hyper-V virtual machine backups are determined by Tivoli Storage Manager server management classes. You can set different policies for different virtual machines. Although the default management class determines storage characteristics for all Hyper-V backups, you can override the default management class or specify a management class to use for the Hyper-V control files.
User interfaces
Complete all Data Protection for Microsoft Hyper-V backup, restore, and query tasks with the backup-archive client Java GUI or backup-archive command-line client. To restore one or more files from a Hyper-V virtual machine, use the Tivoli Storage Manager Recovery Agent GUI.
Incremental forever backup strategy
An incremental forever backup strategy minimizes backup windows while providing faster recovery of your data.
Data Protection for Microsoft Hyper-V provides a backup strategy called incremental forever. This backup solution requires only one initial full backup. Afterward, an ongoing (forever) sequence of incremental backups occurs. The incremental forever backup solution provides these advantages:
v Reduces the amount of data that goes across the network.
v Reduces data growth because all incremental backups contain only the blocks that changed since the previous backup.
v No comparison with the backup target is needed since only changed blocks are identified.
v Minimizes impact to the client system. v Reduces the length of the backup window.
v No need to schedule an initial full backup as a separate schedule: the first issue of an incremental forever backup automatically defaults to an incremental forever full backup.
In addition, the restore process is optimized, as only the latest versions of blocks that belong to a restored backup are restored. Since the same area on the
production disk is recovered only one time, the same block is not written to multiple times. As a result of these advantages, incremental forever is the preferred
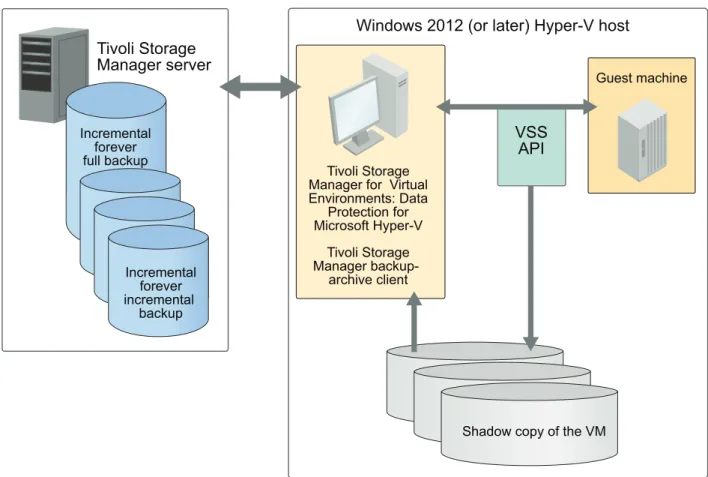
Windows 2012 (or later) Hyper-V host
Incremental forever full backup
Tivoli Storage
Manager server
Incremental forever incremental
backup
Tivoli Storage Manager for Virtual Environments: Data
Protection for Microsoft Hyper-V
Tivoli Storage Manager
backup-archive client
VSS
API
Shadow copy of the VM
Guest machine
Figure 1. High-level overview of Tivoli Storage Manager for Virtual Environments: Data Protection for Microsoft Hyper-V environment
backup strategy.
Snapshot management with Windows PowerShell
On a Microsoft Hyper-V system, you can use Windows PowerShell “cmdlets” to remove (undo) snapshots that were created by Tivoli Storage Manager for a Hyper-V virtual machine.
You can use these cmdlets only on the Hyper-V system; you cannot remove snapshots from the Microsoft System Center Virtual Machine Manager.
Hyper-V systems issue cautionary messages to discourage you from editing virtual hard disks that contain snapshots, or virtual hard disks that are associated with a chain of differencing (incremental-forever) snapshots. Instead, use the cmdlets to manage snapshots to minimize the risk of data loss.
For a list of cmdlets that are available for Hyper-V, go to http://
technet.microsoft.com/en-us/library/hh848559.aspx and read the information for the available cmdlets. Use the Get-VMSnapshotcmdlet with the -SnapshotType Recoveryparameter to retrieve snapshots for a virtual machine. Use the
Remove-VMSnapshot cmdlet to remove a snapshot. Removing a snapshot merges the information that the snapshot wrote to the snapshot differences file (the AVHDX file) back to the virtual machine hard disk (the VHDX file).
Documentation resources
Data Protection for Microsoft Hyper-V provides several components to assist with protecting your virtual machines. As a result, multiple documentation resources are provided to assist with specific tasks.
Table 1. Data Protection for Microsoft Hyper-V documentation resources
Documentation Contents Location
Tivoli Storage Manager for Virtual Environments Version 7.1.3: Data Protection for Microsoft Hyper-V Installation and User's Guide
Overview information, strategy planning, installation, configuration, back up and restore scenarios, and command-line reference.
IBM Knowledge Center at Protection for Microsoft Hyper-V virtual machines (http://www.ibm.com/ support/knowledgecenter/ SS8TDQ_7.1.3/ve.hv/ c_ve_hv_overview.html)
Table 1. Data Protection for Microsoft Hyper-V documentation resources (continued)
Documentation Contents Location
Online help for IBM Tivoli Storage Manager backup-archive
command-line client Version 7.1.3
Back up and restore tasks related to Hyper-V guests virtual machines.
Start the Tivoli Storage Manager backup-archive command line client using either of the following methods:
v On the Windows system, go to
Start> Apps by name > Tivoli
Storage Manager>
Backup-Archive Command Line.
v Open an Administrator command prompt window and change to the backup-archive client installation directory (cd "C:\Program
Files\tivoli\tsm\baclient"). Run dsmc.exe.
Access the help by using either of the following methods:
v After you start the command line client, at the "tsm" prompt, enter helpto display the table of contents for the help.
v To display the help in its own window, open an Administrator command prompt window and change to the backup-archive client installation directory (cd
"C:\Program Files\tivoli\tsm\ baclient"). Run dsmc.exe helpto display the help table of contents. You can also append a topic title to the command to display help for a topic. For example, dsmc help optionsdisplays the help topic that describes how to use client options; dsmc help backup vm displays the help for the backup vm command.
Table 1. Data Protection for Microsoft Hyper-V documentation resources (continued)
Documentation Contents Location
Online help for IBM Tivoli Storage Manager backup-archive GUI Version 7.1.3
Back up and restore tasks related to Hyper-V guests virtual machines.
Start the Tivoli Storage Manager backup-archive GUI client using either of the following methods:
v On the Windows system, go to
Start> Apps by name > Tivoli
Storage Manager>
Backup-Archive GUI.
v Open an Administrator command prompt window and change to the backup-archive client installation directory (cd "C:\Program
Files\tivoli\tsm\baclient"). Run dsm.exe.
Access the help using either of the following methods:
v Select the help icon and click Help
Topicsor Getting started.
v You can also press the F1 key to open the Help Topics help.
Hyper-V backup support limitations
Before you attempt a backup operation, be aware that certain limitations apply. Data Protection for Microsoft Hyper-V does not back up a Hyper-V virtual machine that uses physical disks. The entire virtual machine (including virtual disks) is skipped and the backup operation fails.
Data Protection for Microsoft Hyper-V supports incremental forever full backup and incremental forever incremental backup of Microsoft Hyper-V virtual machines in VHDX disk format only. To create an image backup of the full virtual machine in VHD or VHDX disk format, use the Tivoli Storage Manager backup-archive client without Tivoli Storage Manager - Data Protection for Microsoft Hyper-V installed on the system. Issue the backup-archive client dsmc backup vm vmname
-vmbackuptype=hypervfull -mode=full command to create an image backup of all objects on a Microsoft Hyper-V virtual machine VHD or VHDX disk. Optionally, convert .vhd files to .vhdx format according to instructions available in Microsoft documentation.
The Microsoft Windows Management Instrumentation (WMI) Service (winmgmt) must be running on the systems where Data Protection for Microsoft Hyper-V, Tivoli Storage Manager backup-archive client, and Tivoli Storage Manager recovery agent are installed. Operations fail if the WMI Service is not running. Therefore, do not turn off the WMI Service.
Hyper-V configurations from Windows Server 2012 R2 are not compatible with Windows Server 2012. As a result, a restore operation from Windows Server 2012 R2 to Windows Server 2012 fails. However, a restore operation from Windows Server 2012 to Windows Server 2012 R2 succeeds. For more information, see the following Microsoft Knowledge Base article: http://support.microsoft.com/kb/ 2868279. | | | | | | | | | |
Chapter 2. Installing Data Protection for Microsoft Hyper-V
Determine system requirements
Data Protection for Microsoft Hyper-V requires 500 MB of disk space for installation and a supported operating system.
Data Protection for Microsoft Hyper-V requires the Hyper-V role to be installed on the Microsoft Windows Server 2012 or 2012 R2 system.
For detailed Data Protection for Microsoft Hyper-V software and hardware requirements, see Data Protection for Microsoft Hyper-V Requirements at http://www.ibm.com/support/docview.wss?uid=swg21679294.
Determine which features to install
Review the features that are available to install.
The following features are available to install with the Tivoli Storage Manager for Virtual Environments: Data Protection for Microsoft Hyper-V product DVD or download image:
v Data Protection for Microsoft Hyper-V product code
Provides virtualization protection for Microsoft Hyper-V virtual machines. Tip: The Data Protection for Microsoft Hyper-V product code is installed with every feature.
To install the Data Protection for Microsoft Hyper-V product code, follow the steps in “Install Data Protection for Microsoft Hyper-V features with default settings” on page 8.
v Tivoli Storage Manager backup-archive client
When you offload backup workloads, the backup-archive client runs the operation on the backup server and "moves" the data to the Tivoli Storage Manager server. This client is referred to as the data mover.
To install the backup-archive client, follow the steps in “Install the backup-archive client (data mover)” on page 8.
v Tivoli Storage Manager recovery agent
Provides virtual mount and file restore capability.
To install the Tivoli Storage Manager recovery agent, follow the steps in “Install the Tivoli Storage Manager recovery agent” on page 10.
Install Data Protection for Microsoft Hyper-V features with
default settings
Install Data Protection for Microsoft Hyper-V and the backup-archive client (data mover) without modifying features or installation directories.
About this task
To install Data Protection for Microsoft Hyper-V with default settings, complete the following steps:
Procedure
1. Either insert the Tivoli Storage Manager for Virtual Environments: Data Protection for Microsoft Hyper-V product DVD into the DVD drive or download the image from IBM Passport Advantage®.
2. To start the installation program, double-click the DVD\x64\Setup.exefile. Choose the language for the installation process, then click Next.
3. On the Welcome to the InstallShield Wizard for Tivoli Storage Manager for Virtual Environments: Data Protection for Hyper-V suite page, click Next. 4. On the License Agreement page, read the terms of the license agreement. Click
I accept the terms in the license agreement. If you do not accept the terms of the license agreement, the installation ends. Click Next
5. On the Installation Type page, the installation process begins immediately after you click Typical Installation. You cannot change your selection once the installation process begins. If you are sure that you want to install Data Protection for Microsoft Hyper-V and the backup-archive client (data mover) without modifying features or installation directories, click Typical Installation. Tip: The installation process might take several minutes to complete.
6. On the Install Wizard Completed page, click Finish to exit the wizard.
Results
Data Protection for Microsoft Hyper-V and the Tivoli Storage Manager backup-archive client (data mover) are now installed.
What to do next
Before you attempt a backup or restore operation, complete the tasks described in “Creating and modifying the client options file” on page 15.
Install the backup-archive client (data mover)
Install the backup-archive client and modify features or installation directories.
Before you begin
v The backup-archive client runs the operation on the backup server and "moves" the data to the Tivoli Storage Manager server. This client is referred to as the data mover.
v The Data Protection for Microsoft Hyper-V product code is also installed with this feature.
Procedure
1. Either insert the Tivoli Storage Manager for Virtual Environments: Data Protection for Microsoft Hyper-V product DVD into the DVD drive or download the image from IBM Passport Advantage.
2. To start the installation program, double-click the DVD\x64\Setup.exe file. Choose the language for the installation process, then click Next.
3. On the Welcome to the InstallShield Wizard for Tivoli Storage Manager for Virtual Environments: Data Protection for Hyper-V suite page, click Next. 4. On the License Agreement page, read the terms of the license agreement.
Click I accept the terms in the license agreement. If you do not accept the terms of the license agreement, the installation ends. Click Next
5. On the Installation Type page, click Advanced Installation. 6. On the Advanced Installation page, the installation process begins
immediately after you click Install the Tivoli Storage Manager
backup-archive client (data mover). You cannot change your selection after the installation process begins. If you are sure that you want to install the backup-archive client (data mover), click Install the Tivoli Storage Manager backup-archive client (data mover).
7. On the Welcome to the InstallShield Wizard for Tivoli Storage Manager for Virtual Environments: Data Protection for Microsoft Hyper-V page, click Next. 8. On the Destination Folder page, specify where to install the software (Data
Protection for Microsoft Hyper-V). You can accept the default location that is shown in the Destination Folder field or click Change to specify another location. Click Next after you make your selection.
9. On the Ready to Install the Program page, click Install to begin installing your selected components (Data Protection for Microsoft Hyper-V).
10. On the Install Wizard Completed page, click Finish to exit the wizard. Data Protection for Microsoft Hyper-V is installed. The InstallShield Wizard begins installing the data mover.
11. On the Location to Save Files page, specify where to save the data mover files. You can accept the default location that is shown in the Save files in folder field or click Change to specify another location. Click Next after you make your selection.
12. On the Welcome to the InstallShield Wizard for Tivoli Storage Manager Client page, click Next.
13. On the Destination Folder page, specify where to install the software. You can accept the default location that is shown in the Install IBM Tivoli Storage Manager Client to field or click Change to specify another location. Click Next after you make your selection.
14. On the Setup Type page, select one of the following the types: Typical or Custom.
v Typical
A typical installation installs the following features:
– The backup-archive client GUI files (needed to use the Java™GUI)
– The backup-archive client web files (needed to use the web client) – The client API files (as needed by your client and operating system) v Custom
A custom installation selects the same files as a typical installation.
However, you can accept the default location that is shown in the Install to field or click Change to specify another location. Click Space to view required disk space.
Click Next after you make your selection.
15. On the Ready to Install the Program page, click Install to begin installing your selected backup-archive client (data mover) features.
Tip: After you click Install, the installation process might take several minutes to complete.
16. On the Install Wizard Completed page, click Finish to exit the wizard.
Results
The Tivoli Storage Manager backup-archive client (and Data Protection for Microsoft Hyper-V) are now installed.
What to do next
Before you attempt to back up a Hyper-V virtual machine, complete the tasks described in “Creating and modifying the client options file” on page 15.
Install the Tivoli Storage Manager recovery agent
Install the Tivoli Storage Manager recovery agent for virtual mount and file restore operations.
Before you begin
v The Tivoli Storage Manager recovery agent installation requires the system to be restarted. Therefore, to avoid possible issues that are related to restarting the Hyper-V host system, do not install the Tivoli Storage Manager recovery agent on the Hyper-V host system.
v TCP ports 22(SSH default port) and 3260(iSCSI default port) must be open and available before you install the Tivoli Storage Manager recovery agent. To check the port status, opening a command prompt and issue the following commands: netstat -np TCP | find "22"
netstat -np TCP | find "3260"
v The Data Protection for Microsoft Hyper-V product code is also installed with this feature.
About this task
To install the Tivoli Storage Manager recovery agent, complete the following steps on a virtual machine or other system that is not the Hyper-V host system:
Procedure
1. Either insert the Tivoli Storage Manager for Virtual Environments: Data Protection for Microsoft Hyper-V product DVD into the DVD drive or download the image from IBM Passport Advantage.
2. To start the installation program, double-click the DVD\x64\Setup.exe file. Choose the language for the installation process, then click Next.
If you already completed a Typical Installation, the Program Maintenance page displays after you double-click the DVD\x64\Setup.exefile:
a. On the Program Maintenance page, click Modify.
b. On the Custom Setup page, click Tivoli Storage Manager recovery agent, then click Install.
3. On the Welcome to the InstallShield Wizard for Tivoli Storage Manager for Virtual Environments: Data Protection for Hyper-V suite page, click Next. 4. On the License Agreement page, read the terms of the license agreement.
Click I accept the terms in the license agreement. If you do not accept the terms of the license agreement, the installation ends. Click Next.
5. On the Installation Type page, click Advanced Installation. 6. On the Advanced Installation page, the installation process begins
immediately after you click Install the Tivoli Storage Manager recovery agent. You cannot change your selection once the installation process begins. If you are sure that you want to install the recovery agent, click Install the Tivoli Storage Manager recovery agent.
Tip: The installation process might take several minutes to complete. 7. On the Welcome to the InstallShield Wizard for Tivoli Storage Manager for
Virtual Environments: Data Protection for Microsoft Hyper-V page, click Next. 8. On the Destination Folder page, specify where to install the software. You can
accept the default location that is shown in the Destination Folder field or click Change to specify another location. Click Next after you make your selection.
9. On the Ready to Install the Program page, click Install to begin installing your selected components
10. On the Install Wizard Completed page, click Finish to exit the wizard. 11. On the Welcome to the InstallShield Wizard for Tivoli Storage Manager for
Virtual Environments page, click Next.
12. On the Software License Agreement page, read the terms of the license agreement. Click I accept the terms in the license agreement. If you do not accept the terms of the license agreement, the installation ends. Click Next. 13. On the Custom Setup page, you can click Space to view required disk space.
Click Change to specify where to install this feature. The following user interfaces install:
v Tivoli Storage Manager recovery agent GUI
v Tivoli Storage Manager recovery agent command-line interface (RecoveryAgentShell.exe )
Click Next after you make your selection.
14. On the Ready to Install the Program page, click Install to begin installing your selected components.
v You are prompted to install the IBM Virtual Volume driver. This driver is used for mount operations. Click Install to install the driver. If you do not install the driver now, you are prompted again to install it when you attempt to mount a volume.
v TCP ports 22(SSH default port) and 3260(iSCSI default port) must be open and available to complete the installation process. Click OK.
15. On the Tivoli Storage Manager for Virtual Environments InstallShield Wizard Completed page, click Finish to exit the wizard. You must restart your system after installation completes.
Results
The Tivoli Storage Manager recovery agent (and Data Protection for Microsoft Hyper-V) are now installed.
What to do next
Before you attempt to mount a backed up Hyper-V virtual machine disk to restore a file, complete the tasks described in “Configuring the Tivoli Storage Manager recovery agent GUI” on page 19.
Installing in silent mode
Install all Tivoli Storage Manager for Virtual Environments and data mover features silently on a single system from the product DVD, or other installation media.
About this task
Restriction: All features are installed to their default location. You cannot silently install Tivoli Storage Manager for Virtual Environments and data mover features to a non-default location.
Procedure
1. Either insert the Tivoli Storage Manager for Virtual Environments product DVD into the DVD drive or download the image from IBM Passport Advantage. 2. From a command prompt window, use the cdcommand to change to one of
the following folders:
v If you downloaded the product image from Passport Advantage, go to
<extract folder>TSM4VE_WIN.
v If you inserted the product DVD into the DVD drive, go to <DVD>\. 3. Enter one of the following command:
setup.exe /silent
4. Restart the system after installation completes.
Note: The following message displays the first time that you mount a volume:
The Virtual Volume Driver is not yet registered. Recovery Agent can register
the driver now. During registration, a Microsoft Windows Logo warning may be displayed. Accept this warning to allow the registration to complete.
Do you want to register the Virtual Volume Driver now?
You must register the Virtual Volume Driver to proceed with Tivoli Storage Manager recovery agent operations.
Uninstalling Data Protection for Microsoft Hyper-V
The process for uninstalling Data Protection for Microsoft Hyper-V is the same for a new installation and for an upgraded version.
Before you begin
Restriction: You must unmount all virtual volumes before uninstalling Tivoli Storage Manager recovery agent. Otherwise, these mounted virtual volumes cannot be unmounted after Tivoli Storage Manager recovery agent is reinstalled.
2. On the Uninstall or change a program page, select IBM Tivoli Storage Manager for Virtual Environments: Data Protection for Microsoft Hyper-V and click Uninstall.
3. On the Uninstall or change a program page, select IBM Tivoli Storage Manager Clientand click Uninstall.
4. On the Uninstall or change a program page, select IBM Tivoli Storage Manager Recovery Agent and click Uninstall.
Uninstalling Data Protection for Microsoft Hyper-V with the Microsoft
Windows Installer Tool
Uninstall Data Protection for Microsoft Hyper-V from a Microsoft Windows Server Core with the Microsoft Windows Installer Tool.
Procedure
1. Locate the Data Protection for Microsoft Hyper-V UninstallStringin the
Wow6432Noderegistry path. For example:
[HKEY_LOCAL_MACHINE\SOFTWARE\Wow6432Node\Microsoft\Windows\CurrentVersion\ Uninstall\{060612C6-E661-4502-ADD0-AF912CDB02C9}]
2. Run the following command:
C:\"C:\Program Files (x86)\InstallShield Installation Information\ {060612C6-E661-4502-ADD0-AF912CDB02C9}\Setup.exe" -remove -runfromtemp
Chapter 3. Configuring Data Protection for Microsoft Hyper-V
After successfully installing Data Protection for Microsoft Hyper-V, you must configure the client before performing any backup and restore operations. You must also configure the Tivoli Storage Manager recovery agent to restore individual files.
Creating and modifying the client options file
The client options file is an editable text file that contains configuration
information for the backup-archive client options that are used for Data Protection for Microsoft Hyper-V operations.
About this task
The first time that you start the Windows Backup-Archive Client GUI, the installation program searches for an existing client options file, called dsm.opt. If this file is not detected, a client options file configuration wizard starts and prompts you to specify initial client configuration settings. When the wizard completes, it saves the information that you specified in the dsm.opt file. By default, the dsm.optfile is saved to C:\Program Files\Tivoli\TSM\baclient.
The options file must contain the following information to communicate with the server:
v The VMBACKUPType HYPERVFULL option must be specified.
v The host name or IP address of the Tivoli Storage Manager server.
v The port number that the server listens on for client communications. A default port number is configured by the client options file configuration wizard. You do not need to override this default port number unless your server is
configured to listen on a different port.
v Your client node name. The node name is a name that uniquely identifies your client node. The node name defaults to the short host name of the computer that the client is installed on.
Additional client options can be specified, as needed.
Note: Client options can also be set on the server in a client option set. Client options that are defined on the server in a client option set override client options that are set in the client options file.
A sample options file is copied to your disk when you install the backup-archive client. The file is called dsm.smp. By default, the dsm.smpfile is copied to
C:\Program Files\Tivoli\TSM\config\. You can view the contents of this file to see examples of different options and how they are specified. The file also contains comments that explain syntax conventions for include lists, exclude lists, and wildcard use. You can also use this file as a template for your client options file by editing it and saving it as dsm.opt in the C:\Program Files\Tivoli\TSM\baclient
directory.
After the initial client options file is created, you can modify the client options by adding or changing the options as needed. You can modify the dsm.optfile in any of the following ways:
v By running the client options file configuration setup wizard v By using the client preferences editor
v By editing the dsm.optfile with a text editor program, such as Notepad Perform the following steps to modify the client options:
Procedure
1. Select a method to modify the file.
Method Steps
Setup wizard The configure wizard opens automatically when the backup-archive client is installed for the first time. If the wizard does not open automatically, complete the following steps:
1. Click Start > All Programs > Tivoli
Storage Manager> Backup-Archive
GUI.
2. Select Utilities > Setup Wizard > Help
me configure the TSM Client Options File. On-screen text and online help is available to provide guidance as you navigate through the wizard panels. This client options file configuration wizard offers limited choices and configures only the most basic options.
Preferences editor 1. Click Start > All Programs > Tivoli Storage Manager> Backup-Archive
GUI.
2. Select Edit > Client Preferences. Select the tabs in the preferences editor to set client options. Specify the options in the dialog boxes, drop down lists, and other controls. Online help is provided. Click the question mark (?) icon to display the help topics for the online help for the tab that you are editing. You can set more options in the preferences editor than you can set in the setup wizard.
Edit the dsm.opt file 1. Edit the dsm.optfile by using a plain text
editor. Each of the options is described in detail in the documentation in Chapter 5, “Options reference,” on page 39. This method is the most versatile way to set client options because not all options can be set in the client options file
configuration wizard or in the preferences editor.
2. To comment out a setting, insert an asterisk (*) as the first character on the line that you want to comment out. Remove the asterisk to make the commented option active. 2. Save the changes.
a. Changes made in the client options file configuration wizard and in the preferences editor are saved and recognized by the client when the wizard completes, or when you exit the preferences editor.
b. If you edit the client options file with a text editor while the client is running, you must save the file and restart the client so the changes are detected.
3. Verify that your configuration is complete by making sure that you can view the virtual machines in your environment:
v To verify your configuration with the Tivoli Storage Manager backup-archive command line client, issue the dsmc show vmcommand. A list of virtual machines that are available for backup displays.
v To verify your configuration with the Tivoli Storage Manager backup-archive GUI, click Actions > Backup VM. In the Backup Virtual Machine window, expand the Hyper-V VMs node to show the virtual machines that are available for backup.
If you can view the virtual machines in your environment, you are ready to back up your virtual machines as described in “Backup VM” on page 27.
What to do next
If you plan to run backup and restore operations in a cluster, complete the tasks described in “Configuring Data Protection for Microsoft Hyper-V in a cluster environment” before you attempt a backup or restore operation.
Configuring Data Protection for Microsoft Hyper-V in a cluster
environment
Configuration consists of updating the dsm.opt files and registering the nodes for each physical server in the cluster.
Before you begin
You can use the Hyper-V failover clustering feature to allow Hyper-V virtual machines to fail over from one cluster node to another cluster node when an outage occurs. For information about installing this feature, and for information that describes how to set up a cluster configuration for Hyper-V virtual machines, see the Microsoft documentation for Hyper-V and your operating system.
In a failover cluster configuration, you can ensure that the Hyper-V virtual machines are backed up to (and restorable from) a single Tivoli Storage Manager server container, regardless of which cluster node is backing them up. You
implement this configuration by creating a proxy relationship, on the Tivoli Storage Manager server, to allow each physical server node (NODENAMEoption) to perform operations on behalf of a node that serves as a container on the Tivoli Storage Manager server (ASNODENAMEoption). You can move virtual machines within the cluster and still back up data to the same container.
About this task
Before you begin, assign a unique node name for each physical server in the cluster (for example, Host1, Host2). Next, assign a node name that is the Tivoli Storage Manager server container for all the virtual machine backups in the cluster (for example, clusternode).
Procedure
Complete Step 1 through Step 3 on the Tivoli Storage Manager server:
1. Log on to the Tivoli Storage Manager server and start an administrative client session in command line mode:
dsmadmc -id=admin -password=admin
2. Issue the REGISTER NODEcommand to register each physical server node in the cluster, and the cluster node, to the Tivoli Storage Manager server.
For this example, you register the following nodes: REGISTER NODE HOST1 <password for HOST1>
REGISTER NODE HOST2 <password for HOST2>
REGISTER NODE CLUSTERNODE <password for CLUSTERNODE>
The ASNODENAMEvalue (CLUSTERNODE) identifies a container on the Tivoli Storage Manager server where files are stored that were backed up by the physical server nodes in the cluster.
3. Issue the GRANT PROXYNODE command to grant proxy authority to each physical server node in the cluster. This proxy authority allows each physical server node in the cluster to back up files to the CLUSTERNODE.
For this example, you register the following proxy authority:
a. This command allows HOST1 to perform operations on behalf of CLUSTERNODE:
GRANT PROXYNODE TARGET=CLUSTERNODE AGENT=HOST1
b. This command allows HOST2 to perform operations on behalf of CLUSTERNODE:
GRANT PROXYNODE TARGET=CLUSTERNODE AGENT=HOST2
Complete Step 4 through Step 6 on each physical server node in the cluster: 4. Install and configure the Tivoli Storage Manager backup-archive client on each
physical server node in the cluster.
For detailed instructions, see the following contents:
v “Install the backup-archive client (data mover)” on page 8 v “Creating and modifying the client options file” on page 15
5. Identify each physical server node with a unique nodename, and set the
NODENAMEoption in the dsm.opt file on each physical server node in the cluster. For this example, assume that you specified the following values for the
NODENAMEoption:
v In the dsm.opt file on Host1, you specified NODENAME HOST1
v In the dsm.opt file on Host2, you specified NODENAME HOST2
6. Set the ASNODENAMEoption in the dsm.opt file on each physical server node in the cluster.
v The ASNODENAMEvalue must be the same in all dsm.opt files in the cluster. v The ASNODENAMEvalue must not match any NODENAMEvalue in any dsm.opt
files in the cluster.
For this example, assume that you specified the following values for the
ASNODENAMEoption:
v In the dsm.opt file on Host1, you specified ASNODENAME CLUSTERNODE
Results
When either of the nodes (HOST1, HOST2) backs up data to the Tivoli Storage Manager server, the backups are stored in the container named CLUSTERNODE. Both nodes (HOST1, HOST2) can back up or restore data from that Tivoli Storage Manager server container.
Example
For example, when this command is issued on HOST2, it performs an incremental forever full backup of virtual machine VM1 (owned by HOST2) to a Tivoli Storage Manager server container identified by CLUSTERNODE:
dsmc backup vm VM1 -vmbackuptype=hypervfull -mode=iffull -asnode=clusternode
Configuring the Tivoli Storage Manager recovery agent GUI
Instructions about how to set up the Tivoli Storage Manager recovery agent GUI for mount and file restore operations is provided.
Before you begin
These configuration tasks must be completed before you attempt an operation in the Tivoli Storage Manager recovery agent GUI.
Procedure
1. Log on to the system where you want to restore files. Tivoli Storage Manager recovery agent must be installed on the system.
2. Click Select TSM server in the Tivoli Storage Manager recovery agent GUI to connect to a Tivoli Storage Manager server.
Specify the following options: Server address
Enter the IP address or host name of the Tivoli Storage Manager. Server port
Enter the port number that is used for TCP/IP communication with the server. The default port number is 1500.
Node access method: Asnodename
Select this option to use a proxy node to access the virtual machine backups that are in the target node. The proxy node is a node that is granted "proxy" authority to perform operations on behalf of the target node.
Typically, the Tivoli Storage Manager administrator uses the grant proxynodecommand to create the proxy relationship between two existing nodes.
If you select this option, complete the following steps:
a. Enter the name of the target node (the node where the virtual machine backups are located) in the Target Node field.
b. Enter the name of the proxy node in the Authentication node field. c. Enter the password for the proxy node in the Password field. d. Click OK to save these settings and exit the Tivoli Storage Manager
information dialog.
When you use this method, the Tivoli Storage Manager recovery agent user knows only the proxy node password, and the target node password is protected.
Fromnode
Select this option to use a node with access limited only to the snapshot data of specific virtual machines in the target node.
Typically, this node is given access from the target node that owns the virtual machine backups by using the set accesscommand:
set access backup -TYPE=VM vmdisplayname mountnodename
For example, this command gives the node named myMountNode the authority to restore files from the virtual machine named myTestVM: set access backup -TYPE=VM myTestVM myMountNode
If you select this option, complete the following steps:
a. Enter the name of the target node (the node where the virtual machine backups are located) in the Target Node field. b. Enter the name of the node that is given limited access in the
Authentication nodefield.
c. Enter the password for the node that is given limited access in the Passwordfield.
d. Click OK to save these settings and exit the Tivoli Storage Manager information dialog.
When you use this method, you can see a complete list of backed-up virtual machines. However, you can restore only those virtual machine backups to which the node was granted access. In addition, the snapshot data is not protected from expiration on the server.
Direct Select this option to authenticate directly to the target node (the node where the virtual machine backups are located).
If you select this option, complete the following steps:
a. Enter the name of the target node (the node where the virtual machine backups are located) in the Authentication node field. b. Enter the password for the target node in the Password field. c. Click OK to save these settings and exit the Tivoli Storage Manager
information dialog. Use Password access generate
When this option is selected and the password field is empty, the Tivoli Storage Manager recovery agent authenticates with an existing
password that is stored in the registry. If not selected, you must manually enter the password.
To use this option, you must first manually set an initial password for the node to which the option applies. You must specify the initial password when you connect to the Tivoli Storage Manager node for the first time by entering the password in the Password field and selecting the Use Password access generate check box.
However, when you use the local data mover node as the
Authentication node, the password might already be stored in the registry. As a result, select the Use Password access generate check box and do not enter a password.
Tivoli Storage Manager recovery agent queries the specified server for a list of protected virtual machines, and shows the list.
3. Set the following mount, backup, and restore options by clicking Settings: Virtual Volume write cache
The Tivoli Storage Manager recovery agent that is running on the backup proxy host saves data changes on a virtual volume in the write cache. By default, the write cache is enabled and the maximum cache size is 90% of the available space for the selected folder. To prevent the system volume from becoming full, change the write cache to a path on a volume other than the system volume.
Folder for temporary files
Specify the path where data changes are saved. The write cache must be on a local drive and cannot be set to a path on a shared folder.
Cache size
Specify the size of the write cache. The maximum allowed cache size is 90% of the available space for the selected folder. Restriction: To prevent any interruption during restore processing, exclude the write cache path from all antivirus software protection settings.
Data Access
Specify the type of data to be accessed. If you are using an offline device (such as tape or virtual tape library), you must specify the applicable data type.
Storage type
Specify one of the following storage devices from which to mount the snapshot:
Disk/File
The snapshot is mounted from a disk or file. This device is the default.
Tape The snapshot is mounted from a tape storage pool. When this option is selected, it is not possible to mount multiple snapshots.
VTL The snapshot is mounted from an offline virtual tape library. Concurrent mount sessions on the same virtual tape library are supported.
Note: When the storage type is changed, you must restart the service for the changes to take effect.
Disable expiration protection
During a mount operation, the snapshot on the Tivoli Storage Manager server is locked to prevent it from expiring during the operation. Expiration might occur because another snapshot is added to the mounted snapshot sequence. This value specifies whether to disable expiration protection during the mount operation.
v To protect the snapshot from expiration, do not select this option. This option is cleared by default. The snapshot on the Tivoli Storage Manager server is locked and the snapshot is protected from expiration during the mount operation.
v To disable expiration protection, select this option. The snapshot on the Tivoli Storage Manager server is not locked and the snapshot is not protected from expiration during the mount operation. As a result, the snapshot might expire during the mount operation. This expiration can produce unexpected results and negatively impact the mount point. For example, the mount point can become unusable or contain errors. However, expiration does not affect the current active copy. The active copy cannot expire during an operation.
When the snapshot is on a target replication server, the snapshot cannot be locked because it is in read-only mode. A lock attempt by the server causes the mount operation to fail. To avoid the lock attempt and prevent such a failure, disable expiration protection by selecting this option.
Read Ahead size (in 16-KB blocks)
Specify the number of extra data blocks that are retrieved from the storage device after a read request is sent to a single block. The default values are as follows:
v Disk or file: 64 v Tape: 1024 v VTL: 64
The maximum value for any device is 1024. Read Ahead cache size (in blocks)
Specify the size of the cache where the extra data blocks are stored. The default values are as follows:
v Disk or file: 10000 v Tape: 75000 v VTL: 10000
Since each snapshot has its own cache, make sure to plan how many snapshots are mounted or restored simultaneously. The cumulative cache size cannot exceed 75000 blocks.
Driver timeout (seconds)
This value specifies the amount of time to process data requests from the file system driver. If processing is not completed in time, the request is canceled and an error is returned to the file system driver. Consider increasing this value when you
experience timeouts. For example, timeouts might occur when the network is slow, the storage device is busy, or multiple mount sessions are being processed. The default values are as follows:
v Disk or file: 60 v Tape: 180 v VTL: 60
Click OK to save your changes and exit the Settings.
4. Verify that each Tivoli Storage Manager server node (that was specified with the Asnodenameand Fromnodeoptions) allows backups to be deleted. The Tivoli Storage Manager recovery agent creates unused temporary objects during operations. The BACKDELete=Yesserver option allows these objects to be
a. Log on to the Tivoli Storage Manager server and start an administrative client session in command-line mode:
dsmadmc -id=admin -password=admin -dataonly=yes b. Enter this command:
Query Node <nodename> Format=Detailed
Make sure the command output for each node includes the following statement:
Backup Delete Allowed?: Yes
If this statement is not included, update each node with this command: UPDate Node <nodename> BACKDELete=Yes
Run the Query Nodecommand again for each node to verify that each node allows backups to be deleted.
Manually configuring an iSCSI device
This procedure describes how to configure a Windows system that is used during an iSCSI mount operation. The snapshot is mounted from Tivoli Storage Manager server storage.
Before you begin
Review the following iSCSI requirements before you proceed with this task: v During an iSCSI mount, an iSCSI target is created on the Tivoli Storage Manager
recovery agent system. You can connect to the iSCSI target from any system to create a volume that contains the backup data. Also, you can then mount this volume from another system.
v iSCSI initiator is required on any system that must connect to the iSCSI target. v Make sure that an iSCSI initiator is installed on the system where the data is to
be restored.
v Microsoft iSCSI Initiator is not required on the Tivoli Storage Manager recovery agent system.
Review the following disk and volume requirements before you proceed with this task:
v If a volume spans several disks, you must mount all the required disks. When mirrored volumes are used, mount only one of the mirrored disks. Mounting one disk prevents a time-consuming synchronization operation.
v If multiple dynamic disks were used on the backup system, these disks are assigned to the same group. As a result, Windows Disk Manager might consider some disks as missing and issue an error message when you mount only one disk. Ignore this message. The data on the backed up disk is still accessible, unless some of the data is on the other disk. This issue can be solved by mounting all the dynamic disks.
About this task
Complete these tasks to configure the Windows system that is used during an iSCSI mount operation:
Procedure
1. On the Tivoli Storage Manager recovery agent system, open port 3260in the LAN firewall and the Windows client firewall. Record the iSCSI initiator name on the system where data is to be restored.
The iSCSI initiator name is shown in the iSCSI initiator configuration window of the Control Panel. For example:
iqn.1991-05.com.microsoft:hostname
2. Complete these tasks on the system where the Tivoli Storage Manager recovery agent (or iSCSI target) is installed:
a. Start the Tivoli Storage Manager recovery agent GUI. Complete the Select TSM server and Select snapshot dialogs and click Mount.
b. In the Choose mount destination dialog, select Mount an iSCSI target. c. Create a target name. Make sure that it is unique and that you can identify
it from the system that runs the iSCSI initiator. For example: iscsi-mount-tsm4ve
d. Enter the iSCSI Initiator name that was recorded in Step 1 and click OK. e. Verify that the volume you just mounted is displayed in the Mounted
Volumes field.
3. Locate and start the iSCSI Initiator program on the initiator system that was selected in Step 1:
a. Connect to the iSCSI target:
1) In the Targets tab, enter the TCP/IP address of the Tivoli Storage Manager recovery agent (iSCSI target) used in Step 2 in the Target: dialog. Click Quick Connect.
2) The Quick Connect dialog shows a target that matches the target name that was specified in Step 2c. If it is not already connected, select this target and click Connect.
b. On the initiator system, go to Control Panel > Administrative Tools > Computer Management> Storage > Disk Management.
1) If the mounted iSCSI target is listed as Type=Foreign, right-click Foreign Disk and select Import Foreign Disks. The Foreign Disk Group is selected. Click OK.
2) The next screen shows the type, condition, and size of the Foreign Disk. Click OK and wait for the disk to be imported.
3) When the disk import completes, press F5 (refresh). The mounted iSCSI snapshot is visible and contains an assigned drive letter. If drive letters are not automatically assigned, right-click the required partition and select Change Drive Letters or Paths. Click Add and select a drive letter.
4. Open Windows Explorer (or other utility) and browse the mounted snapshot for a file restore operation.
5. After the file is restored, complete these tasks:
a. Disconnect each iSCSI target by using the iSCSI Initiator Properties dialog. b. Dismount the volume from Step 2 by selecting the volume in the Tivoli
Chapter 4. Command reference
The following sections contain detailed information about each of the client commands that are used for Data Protection for Microsoft Hyper-V operations. Issue these commands from the Tivoli Storage Manager backup-archive command line client. Start the command line client using either of the following methods on the Windows system:
v Go to Start > Apps by name > Tivoli Storage Manager > Backup-Archive Command Line.
v Open an Administrator command prompt window and change to the
backup-archive client installation directory (cd "C:\Program Files\tivoli\tsm\
baclient"). Run dsmc.exe.
To complete these tasks from the Tivoli Storage Manager backup-archive GUI, start the backup-archive GUI client using either of the following methods on the
Windows system:
v Go to Start > Apps by name > Tivoli Storage Manager > Backup-Archive GUI. v Open an Administrator command prompt window and change to the
backup-archive client installation directory (cd "C:\Program Files\tivoli\tsm\
baclient"). Run dsm.exe.
Access related GUI task help using either of the following methods: v Select the help icon and click Help Topics or Getting started. v You can also press the F1 key to open the Help Topics help.
Reading syntax diagrams
To read a syntax diagram for entering a command, follow the path of the line. Read from left to right and from top to bottom.
v The ►►───symbol indicates the beginning of a syntax diagram.
v The ───►symbol at the end of a line indicates that the syntax diagram continues on the next line.
v The ►───symbol at the beginning of a line indicates that a syntax diagram continues from the previous line.
v The ───►◄symbol indicates the end of a syntax diagram.
Syntax items, such as a keyword or a variable, can be: v On the line (required element)
v Above the line (default element) v Below the line (optional element)
Symbols
Enter these symbols exactly as they appear in the syntax diagram. v * Asterisk
v { } Braces v : Colon v , Comma
v = Equal Sign v - Hyphen v () Parentheses v . Period v Space
v " quotation mark v 'single quotation mark
Variables
Italicized lowercase items such as <var_name> indicate variables. In this example, you can specify a <var_name> when you enter the cmd_namecommand.
►► cmd_name <var_name> ►◄
Repetition
An arrow returning to the left means that the item can be repeated. A character within the arrow means that you must separate repeated items with that character.
►► ▼ ,
repeat ►◄
A footnote (1) by the arrow refers to a limit that tells how many times the item can be repeated.
►► ▼ ,
(1)
repeat ►◄
Notes:
1 Specify repeat up to 5 times.
Required choices
When two or more items are in a stack and one of them is on the line, you must specify one item.
In this example, you must choose A, B, or C. ►► cmd_name A
B C
►◄
Optional choices
When an item is below the line, that item is optional. In the first example, you can select A or nothing at all.
►► cmd_name A
►◄
When two or more items are in a stack below the line, all of them are optional. In the second example, you can choose A, B, C, or nothing at all.
►► cmd_name A B C
►◄
Repeatable choices
A stack of items followed by an arrow returning to the left indicates that you can select more than one item, or in some cases, repeat a single item.
In this example, you can select any combination of A, B, or C.
►► ▼
, cmd_name A
B C
►◄
Defaults
Defaults are above the line. The default is selected unless you override it, or you can select the default explicitly. To override the default, include an option from the stack below the line.
In this example, A is the default. Select either B or C to override A.
►►
A cmd_name
B C
►◄
Backup VM
Use the Backup VMcommand to back up Hyper-V virtual machines.
You can back up Hyper-V guests that exist on a local disk, a SAN-attached disk, a cluster shared volume, or guests that exist on a remote file server share. Remote file server shares must be on a Windows Server 2012 (or newer) system. In addition, remote file shares must be Server Message Block (SMB) 3.0 with the File Server VSS Agent Service installed on the server.
You must specify the backup mode to use when backing up a virtual machine by adding the -mode parameter on the command line. The following modes can be specified:
IFFull Incremental-forever-full mode. In this mode, a snapshot of all used blocks
on a virtual machine’s disks are backed up to the server. The backup includes configuration information, and all of the disks.
IFIncremental
Incremental-forever-incremental. In this mode, a snapshot is created of the blocks that have changed since the last incremental forever backup, whether full or incremental. The backup includes configuration information, and all of the disks.
Syntax
►►
IFIncremental
Backup VM vmname -VMBACKUPType = HYPERVFULL -MODE =
IFFull
►
►
-VMBACKUPUPDATEGUID -PREview -DETail options
►◄
Parameters
vmname
Specify the name of the virtual machine that you want to back up; the name is case-sensitive. To specify multiple virtual machines, use the
domain.vmfull option.
Wildcards can be used in virtual machine names. -VMBACKUPType
Optional parameter for backing up a Hyper-V virtual machine. The default is the value that is required for Hyper-V backups:
-VMBACKUPType=HYPERVFULL. -VMBACKUPUPDATEGUID
This option updates the globally unique identifier (GUID) for the virtual machine that you are backing up. This parameter is intended for use only in the following scenario:
You want to restore an already backed up virtual machine named ORION. But, before you shut down and replace the copy of ORION that is running in your production environment, you want to verify the configuration of the restored virtual machine before you use it to replace the existing ORION.
1. You restore the ORION virtual machine and give it a new name: dsmc restore vm Orion -vmname=Orion2
2. You update and verify the ORION2 virtual machine and determine that it is ready to replace the existing virtual machine that is named
ORION.
3. You power down and delete ORION.
4. You rename ORION2 so it is now named ORION.
5. The next time that you backup ORION, by using either an
incremental-forever full, or incremental-forever-incremental backup, you add the -VMBACKUPUPDATEGUID parameter to the backup vmcommand. This option updates the GUID, on the Tivoli Storage Manager server, so the new GUID is associated with the stored backups for the ORION virtual machine. The chain of incremental backups is preserved; there is no need to delete existing backups and replace them with new backups.
-PREView
This parameter displays additional information about a virtual machine, including the labels of the Hyper-V virtual hard disks (VHDX) that are in the virtual machine.
When you issue the -previewoption, the backup operation does not start. You must issue the backup command without the -previewoption to start the backup operation.
-DETail
This parameter displays detailed information about a virtual machine. Use this option with -previewto view more details about the disks that are involved in the backup operation.
When you issue the -detail option, the backup operation does not start. You must issue the backup command without the -detail option to start the backup operation.
Example commands
This command starts an incremental-forever-incremental backup of a Hyper-V virtual machine that is named "VM1":
dsmc backup vm VM1 -vmbackuptype=hypervfull -mode=ifincremental
This command starts an incremental-forever-incremental backup of a Hyper-V virtual machine that is named "VM3":
dsmc backup vm VM3 -vmbackuptype=hypervfull -mode=ifincremental -preview
In the command output, the -previewparameter displays the VHDX labels in the virtual machine:
VM Name: VM3
Domain Keyword: all-vm
Mode: Incremental Forever - Incremental Target Node Name: NODE1
Data Mover Node Name: NODE1 Cluster Resource: Yes Disk[1]
Name: c:\ClusterStorage\Volume1\Hyper-V\VM3\VM3.VHDX
Capacity: 40.00 GB
Size: 9.09 GB
Full Backup: included Incremental Backup: excluded
Disk Type: VHDX
Number of Subdisk: 1 Disk[2]
Name: c:\ClusterStorage\Volume3\Hyper-V\VM3\VM3-DISK2.VHDX
Capacity: 127.00 GB
Size: 4.00 MB
Full Backup: included Incremental Backup: excluded
Disk Type: VHDX
Number of Subdisk: 1
When the -detailparameter is specified with the -previewparameter, the VHDX labels and their subdisks are shown:
VM Name: VM3
Domain Keyword: all-vm
Mode: Incremental Forever - Incremental Target Node Name: NODE1
Data Mover Node Name: NODE1 Cluster Resource: Yes Disk[1]
Name: c:\ClusterStorage\Volume1\Hyper-V\VM3\VM3.VHDX
Capacity: 40.00 GB
Size: 9.09 GB
Full Backup: included Incremental Backup: excluded
Disk Type: VHDX
Number of Subdisk: 1 Subdisk[1]
Name: c:\ClusterStorage\Volume1\Hyper-V\VM3\VM3_9B26166-9C3E.avhdx
Capacity: 40.00 GB
Size: 1.25 GB
Full Backup: included Incremental Backup: included
Disk Type: AVHDX
Disk[2]
Name: c:\ClusterStorage\Volume3\Hyper-V\VM3\VM3-DISK2.VHDX
Capacity: 127.00 GB
Size: 4.00 MB
Full Backup: included Incremental Backup: excluded
Disk Type: VHDX
Number of Subdisk: 1 Subdisk[1]
Name: c:\ClusterStorage\Volume3\Hyper-V\VM3\VM3-Disk2_243D063-9CD9.avhdx
Capacity: 127.00 GB
Size: 4.00 MB
Full Backup: included Incremental Backup: included
Disk Type: AVHDX
Options file examples
In this example, the domain.vmfulloption specifies these virtual machines: domain.vmfull BigVM,myGentoox64,HPV2VM3-OLD,Local10
This command starts an incremental-forever-incremental backup of all Hyper-V virtual machines specified in the domain.vmfulloption. It also displays preview information about each virtual machine:
dsmc backup vm -vmbackuptype=hypervfull -mode=iffull -preview The following output is shown: