GE Security U.S.
T 888 GE SECURITY (1 888 437 3287) F 561 998 6224
Asia
T 852 2907 8108 F 852 2142 5063 Australia T 61 3 9259 4700 F 61 3 9259 4799 Europe T 32 2 725 11 20 F 32 2 721 86-13 Latin America T 305 593 4301 F 305 267 4300 www.gesecurity.com
© 2008 General Electric Company All Rights Reserved.
460585001E/01-08
Model 940 Proximity Reader
without the prior written consent from GE. Document number/460585001E (January 2008).
Disclaimer THE INFORMATION IN THIS DOCUMENT IS SUBJECT TO CHANGE WITHOUT NOTICE. GE ASSUMES NO RESPONSIBILITY FOR INACCURACIES OR OMISSIONS AND SPECIFICALLY DISCLAIMS ANY LIABILITIES, LOSSES, OR RISKS, PERSONAL OR OTHERWISE, INCURRED AS A CONSEQUENCE, DIRECTLY OR INDIRECTLY, OF THE USE OR APPLICATION OF ANY OF THE CONTENTS OF THIS DOCUMENT. FOR THE LATEST DOCUMENTATION, CONTACT YOUR LOCAL SUPPLIER OR VISIT US ONLINE AT WWW.GESECURITY.COM.
This publication may contain examples of screen captures and reports used in daily operations. Examples may include fictitious names of individuals and companies. Any similarity to names and addresses of actual businesses or persons is entirely coincidental.
Trademarks
and patents GE and the GE monogram are registered trademarks of General Electric. Model 940 Proximity Reader product and logo are trademarks of GE Security. Other trade names used in this document may be trademarks or registered trademarks of the manufacturers or vendors of the respective products. Intended use Use this product only for the purpose it was designed for; refer to the data sheet
and user documentation. For the latest product information, contact your local supplier or visit us online at www.gesecurity.com.
FCC
compliance This equipment has been tested and found to comply with the limits for a Class A digital device, pursuant to part 15 of the FCC Rules. These limits are designed to provide reasonable protection against harmful interference when the equipment is operated in a commercial environment. This equipment generates, uses, and can radiate radio frequency energy and, if not installed and used in accordance with the instruction manual, may cause harmful inter-ference to radio communications.
You are cautioned that any changes or modifications not expressly approved by the party responsible for compliance could void the user's authority to operate the equipment.
i
Contents
Introduction . . . 1
Safety. . . 2
Radio interference . . . .2
Electrostatic discharge (ESD) precaution . . . .2
Product features . . . 3
System requirements. . . 4
Technical specifications . . . 5
Parts list . . . 6
Installation overview . . . 7
Mounting the reader . . . 8
Configuring the reader . . . 12
Supervised F/2F . . . .12
Unsupervised F/2F or Wiegand 4001 . . . .12
Connect the reader to the micro . . . 13
Pinouts . . . .14
Wiring diagrams. . . .15
Testing the reader . . . 22
Indicators . . . .23
Regulatory approvals . . . 24
CE . . . .24
Figures
Figure 1. Off-the-wall tamper activation... 9
Figure 2. Recommended additional mounting instructions for off-the-wall tamper switch activation9 Figure 3. Model 940 reader - Gang box mounting...10
Figure 4. Model 940 reader - Direct wall mounting...11
Figure 5. Model 940 Reader ...13
Figure 6. Supervised F/2F wiring diagram ...16
Figure 7. Unsupervised F/2F wiring diagram ...18
Figure 8. Wiegand wiring diagram ...20 Figure 9. Typical installation (Internal to the micro)
using shielded cable/drain wire25 Figure 10. Typical installation (External to the micro)
using shielded cable/drain wire25
Figure 11. Proprietary burglar alarm unit accessory configuration 27
Introduction 1
Introduction
This manual is an installation guide for the GE Model 940
proximity reader which features two-state supervision that
continuously monitors for closed and open circuit conditions at
door contacts and request to exit (REX) connections. An internal
tamper switch automatically alerts security personnel if the reader
is violated. This supervision ensures that security personnel are
immediately notified if someone tampers with the reader or a
door is breached. Upon an alert, the reader is taken off-line to
prevent a breach at that access point.
This GE proximity card reader also offers expanded hassle-free
contactless convenience when entering and exiting secure
facilities. A new reader optimization technology automatically
adjusts to a wide range of installation environments to provide
consistent read range performance no matter where or on what
the reader is mounted. It automatically detects and optimizes the
credential read field, even in challenging environments with
metal surfaces. By optimizing the GE 940 proximity card reader,
to any metal or non-metal environment, cardholders experience
consistent reader performance, regardless of location or
Safety
Radio interference
Electrostatic discharge (ESD) precaution
WARNING: This is an FCC Class A product. In a domesticenvironment, this product may cause radio interference, in which case, the user may be required to take adequate measures.
WARNING: Circuit board components are vulnerable to damage by electrostatic discharge (ESD). ESD can cause immediate or subtle damage to sensitive electronic parts. An electrostatic charge can build up on the human body and then discharge when you touch a board. A discharge can be produced when walking across a carpet and touching a board, for example. Before handling any board, make sure you dissipate your body’s charge by touching ground. This discharges any static electricity build-up.
Product features 3
Product features
The GE Model 940 Proximity Perfect
TMreader combines the
convenience of contactless proximity technology with flexibility
of operation.
The GE Model 940 Reader offers:
•
State-of-the-art architecture.
•
The ability to read all ISO ProxLite
TM, ProxLite, and
Entrée badges and key tags.
1•
Supervised F/2F communications with 2-state Door/REX
supervision.
•
Unsupervised F/2F communications.
•
40-bit Wiegand (4001 and 4002) format output.
•
Reader to micro cable lengths up to 3,000 feet (914.4
meters).
•
Weather-resistant housing for outdoor use.
•
12 VDC operation.
•
A clear, logical user interface with tri-color LED and
beeper.
•
Rugged molded ABS construction with backplate.
•
Cover removal and off-the-wall tamper detection.
1. The new Model 940 reader (single LED) does not support Proximity Perfect cards.
System requirements
Host software • Secure Perfect® Edition 3.0 or later • Picture Perfect™ 1.7 or later Microcontrollers • Micro/5-PX with 2RP or 8RP • Micro/5-PXN with 2RP or 8RP • M5PXNplus
• Micro/PX-2000 • Micro/PXN-2000 • M2000PXNplus • M3000PXNplus
Micro firmware • For Micro/5-PX, Micro/5-PXN, Micro/PX-2000 and Micro/PXN-2000:
Secure Perfect: 3.1.0.6 or later Picture Perfect: 1.7.0 or later Badge and keytag
formats
• CASI ProxLite • Entrée • ISO ProxLite
Note: Proximity Perfect credentials, which were discontinued in 2001, are not supported.
Technical specifications 5
Technical specifications
For UL compliant installation notes, refer to
UL listed
installations
on page 26
Operating temperature range
-31 F (-35 C) to +150 F (+66 C) Relative humidity 5% to 95% (non-condensing) Physical dimensions
(HxWxD) 4.75" (121 mm) x 2.9" (74 mm) x 0.90" (23 mm)
Index of protection IP51
Input voltage range 10 to 15 VDC (measured at the reader) Reader power
consumption 85 mA @ 12 VDC or 95 mA @ 15 VDC
Cable specifications Belden 8725 or equivalent, 20 AWG minimum, shielded pairs
Maximum cabling distancea
a. The maximum cabling distance of 3,000 ft (914.4 meters) is influenced by a number of factors including wire gauge and reader power requirements.
3000 ft (914 m) @ 12 VDC with 20 AWG cable
Read range ProxLite: up to 6 inches
ISO ProxLite: up to 5 inches ProxLite Keytag: up to 3 inches
Operating modes Supervised F/2F
Unsupervised F/2Fb Wiegand 40-bitb
b. Operating the reader in this mode, requires a programming card for set up. Refer to“Configuring the reader” on page 12 for more information.
Agency approvals FCC Class A
Parts list
•
Model 940 Reader with backplate (gray or black)
•
Optional installation wrench
Refer to the GE price list for part numbers and ordering
information.
Installation overview 7
Installation overview
The following steps are general instructions for installing the 940
reader. Each step is explained in further detail in the sections that
follow.
1. Mount the reader.
Refer to “Mounting the reader” on page 8.
2. Configure the reader
Refer to “Configuring the reader” on page 12.
3. Connect the reader.
Refer to “Connect the reader to the micro” on page 13.
4. Test the reader.
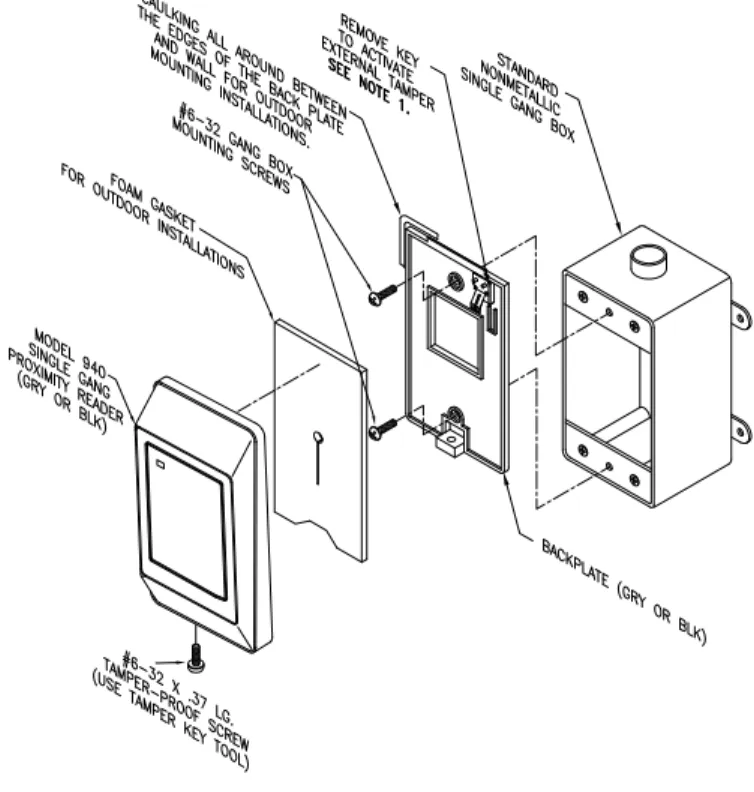
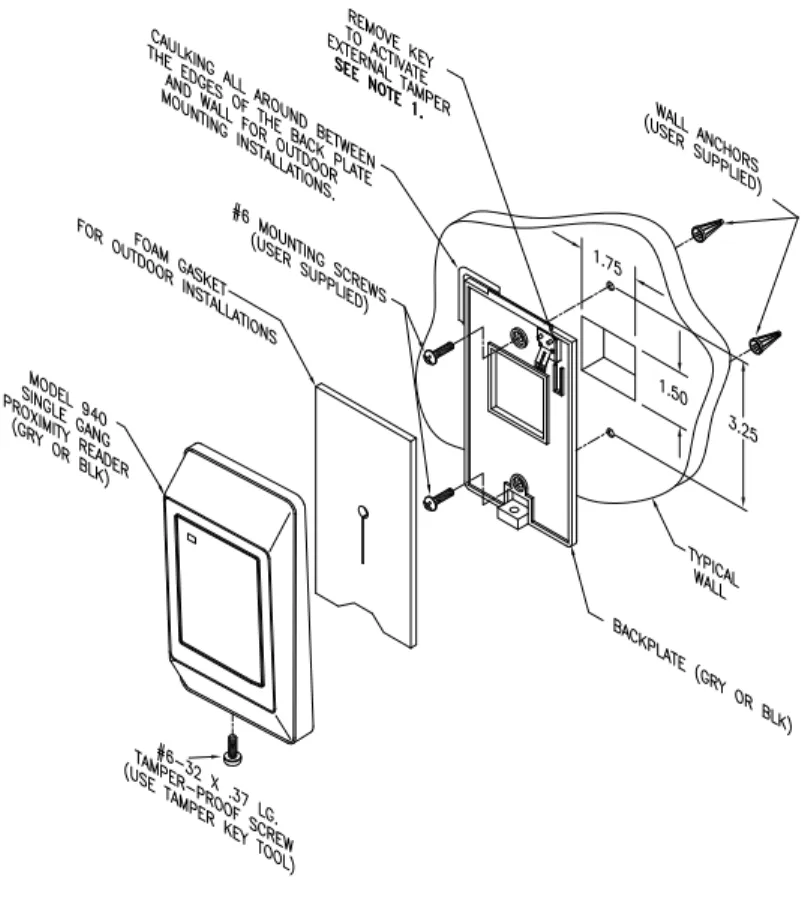
Mounting the reader
The reader comes with a backplate suitable for mounting directly
onto standard U.S. electrical gang boxes. The reader may also be
mounted directly onto a hollow wall.
Important:
•
Readers should not be mounted within three feet of a
computer terminal. Some terminals radiate electrical
noise that may reduce the effective maximum read range.
•
An installer-supplied gasket should be used to form a
weather-resistant seal between the mounting surface and
the inside of the reader for outdoor installations. The
gasket should be located on the inside surface of the
reader’s plastic backplate. For outdoor installations,
where the reader is mounted in direct exposure to
weather, a bead of silicone caulking should be applied
between the reader and the wall to prevent water from
entering the back of the reader.
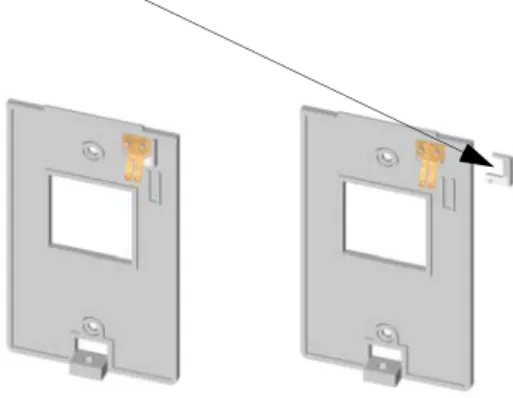
Off-the-wall tamper feature:
The readers are equipped with an
off-the-wall tamper feature.
•
To activate this feature, remove the key on the backplate
prior to mounting as shown in
Figure 1.
•
To mount the reader, in addition to the standard gang box
or direct wall mounting instructions, see
Figure 2.
Note: In order for this feature to work properly, the reader mounting surface must be flush with the backplate.
For Gang Box mounting instructions, see
Figure 3.
For Direct Wall mounting instructions, see
Figure 4.
Mounting the reader 9
Figure 1. Off-the-wall tamper activation
Figure 2. Recommended additional mounting instructions for off-the-wall tamper switch activation
To activate the off-the-wall tamper feature, remove the key on the backplate prior to mounting.
Mounting the reader 11
Configuring the reader
Supervised F/2F
For supervised F/2F operation, no further configuration is
required.
Unsupervised F/2F or Wiegand 4001
For unsupervised F/2F or Wiegand 40-bit format output, you
must configure the reader using the Reader Configuration Card
Kit. Refer to the documentation included in the kit for detailed
instructions. The kit can be ordered at no cost from the GE
Security price list.
Connect the reader to the micro 13
Connect the reader to the micro
The Model 940 Reader is supplied with a convenient removable
9-pin connector as shown in
Figure 5below.
Refer to the following sections for more information on
connecting the reader:
• “Pinouts” on page 14 • “Wiring diagrams” on page 15
•
“CE/FCC compliance” on page 25
Figure 5. Model 940 Reader
WARNING: It is important to ensure all connections are made prior to applying power.
Removable 9-pin connector Pin 1
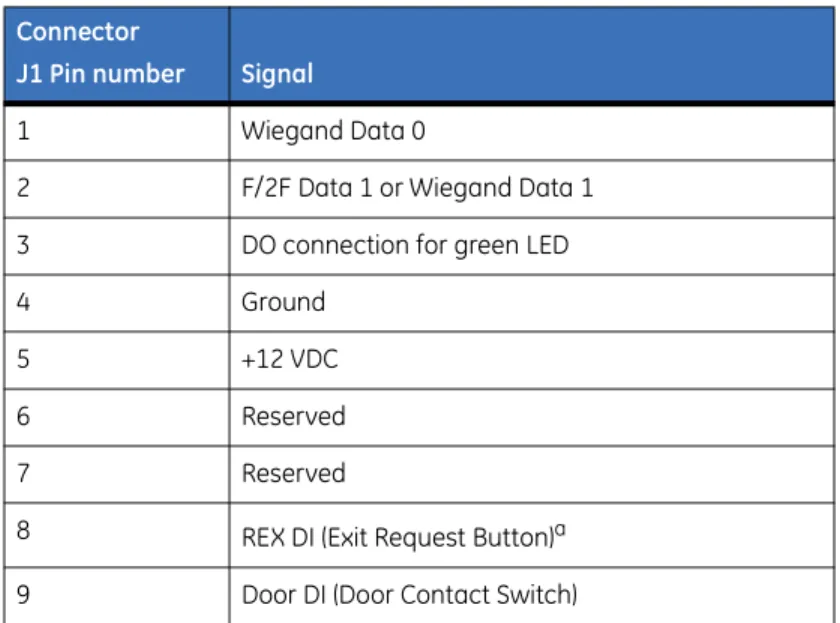
Pinouts
The table below shows the pinouts for connecting the reader to
the microcontroller. Connector J1, pin 1 is to the right as you
view the connector from behind the reader. See
Figure 5, “Model 940 Reader,” on page 13.Table 1. Pinouts Connector
J1 Pin number Signal
1 Wiegand Data 0
2 F/2F Data 1 or Wiegand Data 1
3 DO connection for green LED
4 Ground
5 +12 VDC
6 Reserved
7 Reserved
8 REX DI (Exit Request Button)a
a. Refer to “UL listed installations” on page 26.
Connect the reader to the micro 15
Wiring diagrams
See the following wiring diagrams for details on connecting the
reader to the microcontroller:
•
“Supervised F/2F wiring diagram” on page 16.
•
“Unsupervised F/2F wiring diagram” on page 18.
•
“Wiegand wiring diagram” on page 20.
Connect the reader to the micro 17 No te : 1 A 4 70 oh m, 1/ 2W , pu ll-u p r esisto r may be re qu ired betw ee n + 12 VDC a nd RE ADER D AT A 1 . T he pull -up r esi st or sh ou ld be in st
alled at th
e mi cr oc on tr ol le r’ s t erm inal bl oc k. R ef er t o the appr op riate mi cr oc on tr ol ler man ual f or inst allat io n r equi remen ts. 2 Sh ielded cabl e is re quir ed. Co nnect all s hields to gether at th e m icr o o r p
anel end usi
ng 14-A W G w ire . Do no t m ake s hi el d co nn ect ions at th e re ad er . 3 Ref er t
o the appr
op riat e m icr oc on tr ol ler ma nual to det er m in e wheth er th is co nnecti on is req ui red fo r p rop er d oor s w itch op er at io n. 4 Blo ck ing d io de may be typ e 1N 581 7 o r G
E part num
be r 521 224 001 ( in cl ude d w ith re ad er ). Th e di od e m ust be ins tall ed in a s ecu re lo ca tio n, no t accessi ble thr ou
gh the r
eader re mo va l. 5 Pr ot ec tio n di od es m ust be 1N4 002 , 1 N 40 03, o r 1N4 004 fo r the do or str ik e as se mbl y. 6 Fuse, po wer s upply , d oo r s tri ke, d io des, an d re lay ar e pr ov ided by th e in stal ler . 7 If the do or co nt act switch is n ot u sed, co nn ect re ader pi n 9 d ire ctly to gr ound. 8 Requ est t o e xit (R EX ) t erm inal s o n th e re ader ar e no t to be c on nect ed fo r U L list ed inst alla tio ns.
Connect the reader to the micro 19 No te : 1 A 47 0 o hm, 1/ 2W , pul l-up r es isto r m
ay be r
equi
red between +1
2 VD C and R EADER D AT
A 1. Th
e pu ll-up re sisto r sho ul d be in stal le
d at the
mic ro co nt ro lle r’ s te rm in al blo ck . R ef er to th e ap pr op riat e mic ro co nt ro lle r m anua l f or in stal lati on re quir em en ts . 2 Shi el
ded cable is r
equ
ired.
C
on
nect all shi
elds t
oget
her at the micr
o or pan el en d us ing 1 4-A W G w ire . D o no t mak e shield co nnect io
ns at the r
eader . 3 Ref er to th e a ppr op riat e mi cr oc on tr ol le r manu al fo r s pec ifi c wir ing deta ils. 4 Blo ck in g d io de m ay be type 1N5 817 o r G E par t n umbe r 5 212 2400 1 ( inc lu de d w ith r eade r). The di od e mu st be in st
alled in a secur
e lo cat io n, no t acce ss ibl e th ro ugh th e re ader r em ov al. 5 Pr ot ec tio n d io de s mu st be 1 N 40 02, 1N 400 3, o r 1 N 40 04 f or th e do or s tri ke asse m bly. 6 Fuse, po wer sup ply, do or str ik e, dio
des, and r
el
ay ar
e pr
ov
ided by the ins
tall er . 7 Reques t t o exi t (R EX ) t er m in al s on t he r ead er ar e not to be connect ed for U L l is te d in st al la tio ns .
Connect the reader to the micro 21 No te : 1 Two 470 o hm , 1/ 2W , pull -up r esi st or s m ay be re quir ed be tw een +12 V D
C and RE
AD ER D AT A 1 and D AT A 0. The pu ll-u p r esi st or sho ul
d be ins
tall
ed at t
he micr oc on tr ol le r’ s t erm ina l blo ck . Ref er to the appr op riat e m icr oc on tr oller ma nual fo r ins tall atio n r equ irem ents. 2 Shiel ded ca ble is re qui red. Co nn ec t a ll shiel ds t ogeth er
at the micr
o o r panel end us ing 14 -A W G wir e. Do no t mak e sh ield co nnecti on
s at the r
eader . Do no t pair W ieg and D AT
A 1 and D
AT A 0. 3 Ref er to th e ap pr opr iat e m icr oc ont rol le r m anua l f or s pec ifi c wi ring det ai ls . 4 Bl oc kin g dio de m ay be ty pe 1N58 17 o r G E pa rt nu mbe r 52 122 400 1 (inc lud ed w ith re ade r). Th e di od e mus t be in sta lle
d in a se
cu re lo ca tio n, no t a cc ess ible thr ough the re ad er re mo va l. 5 Pr ot ec tio n d io de s mus t be 1 N 400 2, 1N4 003 , o r 1 N 400 4 f or th e do or st rik e asse mb ly. 6 Fu se, po w er supp ly, do or str ik e, d io de s, an d r elay a re pr ov id
ed by the inst
aller . 7 Reques t t o exi t (R EX ) t er m in al
s on t
he r eader a re no t t o be connect ed fo
r UL l
is ted i ns tal la tio ns .
Testing the reader
Follow the steps below to verify that the reader is working
correctly.
1. Check the following:
•
Proper cabling and electrical connections exist
between the reader and the microcontroller.
•
The microcontroller is properly configured and the
proper version of firmware is installed.
•
The reader is properly mounted.
2. Close the tamper switch by joining the reader and
backplate so that the tamper alarm is not activated or by
ensuring the reader is securely mounted.
3. Apply power to the reader and verify that the power-on
self test completes as described in the section
“Indicators” on page 23.
4. Verify that the reader is not beeping and that the red LED
is not flashing. If either of these two conditions exist,
refer to the section
“Indicators” on page 23.
5. Verify proper reader operation as follows:
a.
Select a known good test badge. Be sure that the
badge is properly enrolled in the host system.
b. Ensure that the door is closed and latched. This is the
first step to verify that the reader strike relay is wired
properly.
WARNING: It is important to ensure all connections are made prior to applying power.
Testing the reader 23
c.
Present a card to the reader. Observe that the reader
behaves as described in the section
“Indicators” on page 23.
d. Observe that the green LED turns on, indicating a
valid access has been granted by the host.
e.
Open the door. This verifies that the reader strike
relay operates properly.
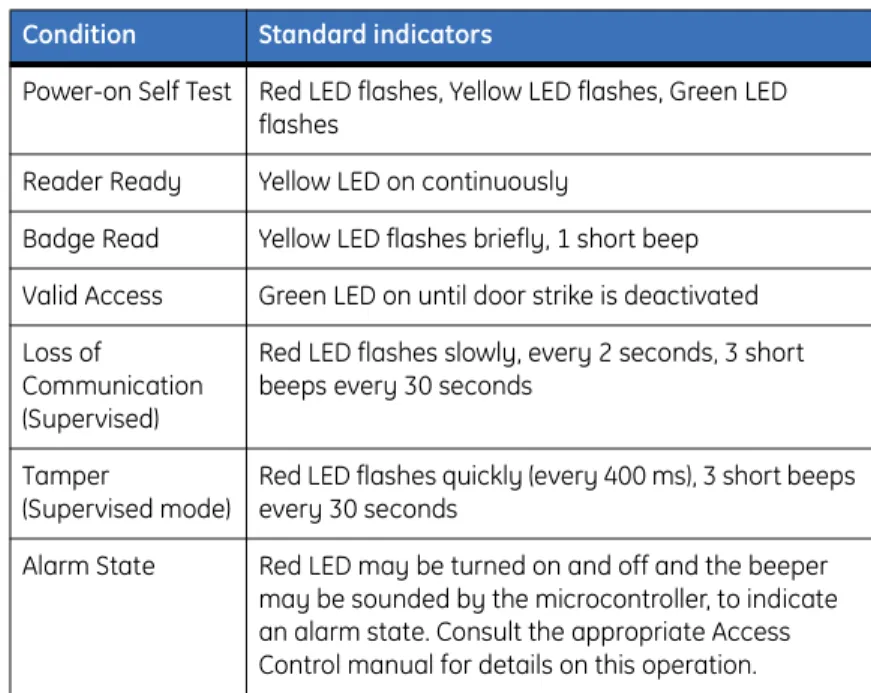
Indicators
A tri-color LED (red, yellow, and green), and a beeper are
incorporated into the reader and operate as indicated in the
following table:
Table 2. Indicators
Condition Standard indicators
Power-on Self Test Red LED flashes, Yellow LED flashes, Green LED flashes
Reader Ready Yellow LED on continuously
Badge Read Yellow LED flashes briefly, 1 short beep Valid Access Green LED on until door strike is deactivated Loss of
Communication (Supervised)
Red LED flashes slowly, every 2 seconds, 3 short beeps every 30 seconds
Tamper
(Supervised mode)
Red LED flashes quickly (every 400 ms), 3 short beeps every 30 seconds
Alarm State Red LED may be turned on and off and the beeper may be sounded by the microcontroller, to indicate an alarm state. Consult the appropriate Access Control manual for details on this operation.
Regulatory approvals
CE
Manufacturers
Declaration of Conformity
For
Product Identification: 430084001/2
Model/type: Model 940 BOM revision level :T Category (description): Proximity Reader
Brand: GE Security
Manufacturer: GE Security Suite 100
791 Park of Commerce Blvd. Boca Raton, Florida 33487 USA
EU Representative: GE Security B.V. Kelvinstraat 7 6003 DH Weert The Netherlands
Equipment class identifier (RF products falling under the scope of R&TTE)
Means of Conformity:
We declare under our sole responsibility that this product is in conformity with Directive 93/68/ EEC (Marking) and/or complies with the essential requirements and all other relevant provisions of the 1999/5/EC (R&TTE) based on test results using harmonized standards in accordance with the Directives mentioned.
Concerning R&TTE
EMC Safety Radio
A sample of the prod-uct has been tested by:
PSE
12955 Bellamy Brothers Blvd.
Dade City, FL 33525 PSE
12955 Bellamy Brothers Blvd.
Dade City, FL 33525 PSE
12955 Bellamy Brothers Blvd.
Dade City, FL 33525 Test report reference 07F256I
07F255I 03P375 03F375C
Applied standards EN50130-4 (1995)
+A1(1998) +A2(2003) EN60950-1 (2001) EN300-330 v1.3.1(2001/2006)
Regulatory approvals 25
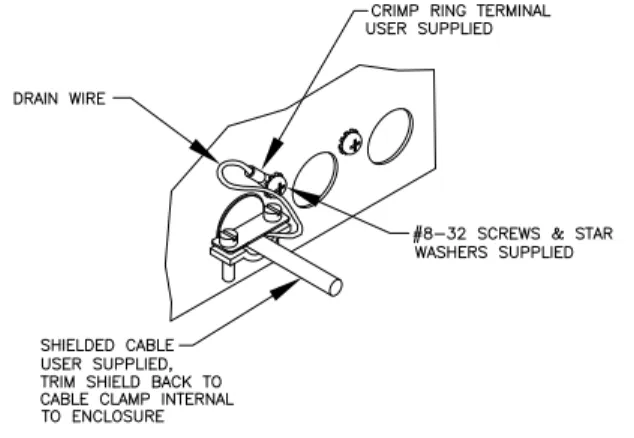
CE/FCC compliance
To make the Model 940 Reader installation CE and FCC
compliant, the cable connecting the reader to the micro must have
its shield grounded at the micro, according to one of the methods
specified in the figures below.
Note: Do not make shielded connections at the reader.
Figure 9. Typical installation (Internal to the micro) using shielded cable/drain wire
Figure 10. Typical installation (External to the micro) using shielded cable/drain wire
UL
The following are the results of the UL evaluation of the Model
940 reader:
•
Operating Temperature Range: +32 F (+0 C) to +120 F
(+49 C)
•
Relative Humidity: 85%
•
The Model 940 reader was evaluated by UL for indoor
use only.
•
Request to exit (REX) terminals on the reader are not to
be connected for UL listed installations.
•
The Model 940 reader, used in conjunction with Picture
Perfect and an OH Receiver, can be used as a Proprietary
Burglar Alarm Unit Accessory when configured as
shown in
Figure 11.
Regulatory approvals 27
Figure 11. Proprietary burglar alarm unit accessory configuration
1 Model 940 Reader: See Figure 6, Supervised F/2F wiring diagram on page 16 for wiring the Model 940 to the Micro/5.
2 Micro/5: See the Micro/5 Installation Manual and the NX-8E Control Panel Installation and Startup Manual for wiring the Micro/5 to the NX-8E keypad.
3 NX-8E panel: Connect to the OH2000E Receiver using a dial-up
connection.
Note: The NX-8E keypad must be installed adjacent to the Model 940 reader in order to be UL compliant.
4 OH2000E Receiver: Connect to the Picture Perfect server, using a serial line RS-232 connection.
Note: The OH2000 E receiver must be installed adjacent to the Picture Perfect host in order to be UL compliant.
5 Picture Perfect Server running one or more instances of the oh_receiver
interface.
1
2
3
4
Regulatory approvals 29
Transition Series i
Contents
Overview...1
Safety...2
Electrostatic discharge (ESD) precaution ...2
Radio Interference ...2
Waste Electrical and Electronic Equipment...2
Product features ...3
System compatibility specifications ...4
Technical specifications ...5
Physical Dimensions...6
Installing the reader...7
Mounting the reader base...7
Removing the cover ...8
Connecting the reader...12
Cable conductors ...12
Wiring diagrams ...13
Configuring the reader...30
Setup card summary ...31
Using configuration cards...31
Using feature cards...32
Resetting the reader to a known state ...33
Testing the reader...34
Indicators ...35
GE indicators ...35
HID indicators ...35
4002 (40-bit format) ...43
5502 (55-bit format) ...45
6400 (64-bit format) ...47
Regulatory approvals...49
UL...49
CE ...50
F 561 998 6224 Asia
T 852 2907 8108 F 852 2142 5063 Australia T 61 3 9259 4700 F 61 3 9259 4799 Europe T 32 2 725 11 20 F 32 2 721 86-13 Latin America T 305 593 4301 F 305 267 4300 www.gesecurity.com
© 2008 General Electric Company All Rights Reserved.