Nidhi Chaudhary
Lucas Costi
Russell Dickenson
Sande Gilda
Vikram Goyal
Eamon Logue
Darrin Mison
Scott Mumford
David Ryan
Misty Stanley-Jones
Keerat Verma
Tom Wells
JBoss Enterprise Application
Platform 6.1
Development Guide
For Use with Red Hat JBoss Enterprise Application Platform 6
Edition 1
For Use with Red Hat JBoss Enterprise Application Platform 6
Edition 1
Nidhi Chaudhary Lucas Costi Russell Dickenson Sande Gilda Vikram Goyal Eamon Logue Darrin Mison Scott Mumford David Ryan Misty Stanley-Jones Keerat Verma Tom WellsCopyright © 2014 Red Hat, Inc..
This document is licensed by Red Hat under the
Creative Commons Attribution-ShareAlike 3.0 Unported
License
. If you distribute this document, or a modified version of it, you must provide attribution to Red
Hat, Inc. and provide a link to the original. If the document is modified, all Red Hat trademarks must be
removed.
Red Hat, as the licensor of this document, waives the right to enforce, and agrees not to assert, Section
4d of CC-BY-SA to the fullest extent permitted by applicable law.
Red Hat, Red Hat Enterprise Linux, the Shadowman logo, JBoss, MetaMatrix, Fedora, the Infinity Logo,
and RHCE are trademarks of Red Hat, Inc., registered in the United States and other countries.
Linux ® is the registered trademark of Linus Torvalds in the United States and other countries.
Java ® is a registered trademark of Oracle and/or its affiliates.
XFS ® is a trademark of Silicon Graphics International Corp. or its subsidiaries in the United States
and/or other countries.
MySQL ® is a registered trademark of MySQL AB in the United States, the European Union and other
countries.
Node.js ® is an official trademark of Joyent. Red Hat Software Collections is not formally related to or
endorsed by the official Joyent Node.js open source or commercial project.
The OpenStack ® Word Mark and OpenStack Logo are either registered trademarks/service marks or
trademarks/service marks of the OpenStack Foundation, in the United States and other countries and
are used with the OpenStack Foundation's permission. We are not affiliated with, endorsed or sponsored
by the OpenStack Foundation, or the OpenStack community.
All other trademarks are the property of their respective owners.
Abstract
This book provides references and examples for Java EE 6 developers using Red Hat JBoss Enterprise
Application Platform 6 and its patch releases.
. . . .
. . . .
. . . .
Table of Contents
Preface
1. Document Conventions
1.1. Typographic Conventions
1.2. Pull-quote Conventions
1.3. Notes and Warnings
2. Getting Help and Giving Feedback
2.1. Do You Need Help?
2.2. Give us Feedback
Chapter 1. Get Started Developing Applications
1.1. Introduction
1.1.1. About Red Hat JBoss Enterprise Application Platform 6 (JBoss EAP 6)
1.1.2. About the Use of EAP_HOME in this Document
1.2. Prerequisites
1.2.1. Become Familiar with Java Enterprise Edition 6
1.2.1.1. Overview of EE 6 Profiles
1.2.1.2. Java Enterprise Edition 6 Web Profile
1.2.1.3. Java Enterprise Edition 6 Full Profile
1.2.2. About Modules and the New Modular Class Loading System used in JBoss EAP 6
1.2.2.1. Modules
1.2.2.2. Overview of Class Loading and Modules
1.3. Set Up the Development Environment
1.3.1. Download and Install JBoss Developer Studio
1.3.1.1. Setup the JBoss Developer Studio
1.3.1.2. Download JBoss Developer Studio 5
1.3.1.3. Install JBoss Developer Studio 5
1.3.1.4. Start JBoss Developer Studio
1.3.1.5. Add the JBoss EAP 6 Server to JBoss Developer Studio
1.4. Run Your First Application
1.4.1. Replace the Default Welcome Web Application
1.4.2. Download the Quickstart Code Examples
1.4.2.1. Access the Quickstarts
1.4.3. Run the Quickstarts
1.4.3.1. Run the Quickstarts in JBoss Developer Studio
1.4.3.2. Run the Quickstarts Using a Command Line
1.4.4. Review the Quickstart Tutorials
1.4.4.1. Explore the helloworld Quickstart
1.4.4.2. Explore the numberguess Quickstart
Chapter 2. Maven Guide
2.1. Learn about Maven
2.1.1. About the Maven Repository
2.1.2. About the Maven POM File
2.1.3. Minimum Requirements of a Maven POM File
2.1.4. About the Maven Settings File
2.2. Install Maven and the JBoss Maven Repository
2.2.1. Download and Install Maven
2.2.2. Install the JBoss EAP 6 Maven Repository
2.2.3. Install the JBoss EAP 6 Maven Repository Locally
2.2.4. Install the JBoss EAP 6 Maven Repository for Use with Apache httpd
2.2.5. Install the JBoss EAP 6 Maven Repository Using Nexus Maven Repository Manager
2.2.6. About Maven Repository Managers
12
12
12
13
14
14
14
15
16
16
16
16
16
16
16
16
17
17
17
18
19
19
19
19
19
20
20
25
25
26
26
26
26
29
29
29
34
43
43
43
43
43
44
45
45
45
46
46
47
48
. . . .
. . . .
. . . .
. . . .
2.3. Use the Maven Repository
2.3.1. Configure the JBoss EAP Maven Repository
2.3.2. Configure the JBoss EAP 6 Maven Repository Using the Maven Settings
2.3.3. Configure the JBoss EAP 6 Maven Repository Using the Project POM
2.3.4. Manage Project Dependencies
JBoss JavaEE Specs Bom
JBoss BOM and Quickstarts
JBoss Client BOMs
Chapter 3. Class Loading and Modules
3.1. Introduction
3.1.1. Overview of Class Loading and Modules
3.1.2. Class Loading
3.1.3. Modules
3.1.4. Module Dependencies
3.1.5. Class Loading in Deployments
3.1.6. Class Loading Precedence
3.1.7. Dynamic Module Naming
3.1.8. jboss-deployment-structure.xml
3.2. Add an Explicit Module Dependency to a Deployment
3.3. Generate MANIFEST.MF entries using Maven
3.4. Prevent a Module Being Implicitly Loaded
3.5. Exclude a Subsystem from a Deployment
3.6. Class Loading and Subdeployments
3.6.1. Modules and Class Loading in Enterprise Archives
3.6.2. Subdeployment Class Loader Isolation
3.6.3. Disable Subdeployment Class Loader Isolation Within a EAR
3.7. Reference
3.7.1. Implicit Module Dependencies
3.7.2. Included Modules
3.7.3. JBoss Deployment Structure Deployment Descriptor Reference
Chapter 4. Global Valves
4.1. About Valves
4.2. About Global Valves
4.3. About Authenticator Valves
4.4. Configure a Web Application to use a Valve
4.5. Configure a Web Application to use an Authenticator Valve
4.6. Create a Custom Valve
Chapter 5. Logging for Developers
5.1. Introduction
5.1.1. About Logging
5.1.2. Application Logging Frameworks Supported By JBoss LogManager
5.1.3. About Log Levels
5.1.4. Supported Log Levels
5.1.5. Default Log File Locations
5.2. Logging with the JBoss Logging Framework
5.2.1. About JBoss Logging
5.2.2. Features of JBoss Logging
5.2.3. Add Logging to an Application with JBoss Logging
5.3. Logging Profiles
5.3.1. About Logging Profiles
5.3.2. Specify a Logging Profile in an Application
Chapter 6. Internationalization and Localization
48
48
49
53
54
54
55
56
58
58
58
58
58
59
60
60
61
61
61
63
64
65
67
67
67
67
68
68
71
76
77
77
77
77
77
78
79
81
81
81
81
81
81
82
83
83
83
83
85
85
86
87
. . . .
6.1. Introduction
6.1.1. About Internationalization
6.1.2. About Localization
6.2. JBoss Logging Tools
6.2.1. Overview
6.2.1.1. JBoss Logging Tools Internationalization and Localization
6.2.1.2. JBoss Logging Tools Quickstart
6.2.1.3. Message Logger
6.2.1.4. Message Bundle
6.2.1.5. Internationalized Log Messages
6.2.1.6. Internationalized Exceptions
6.2.1.7. Internationalized Messages
6.2.1.8. Translation Properties Files
6.2.1.9. JBoss Logging Tools Project Codes
6.2.1.10. JBoss Logging Tools Message Ids
6.2.2. Creating Internationalized Loggers, Messages and Exceptions
6.2.2.1. Create Internationalized Log Messages
6.2.2.2. Create and Use Internationalized Messages
6.2.2.3. Create Internationalized Exceptions
6.2.3. Localizing Internationalized Loggers, Messages and Exceptions
6.2.3.1. Generate New Translation Properties Files with Maven
6.2.3.2. Translate an Internationalized Logger, Exception or Message
6.2.4. Customizing Internationalized Log Messages
6.2.4.1. Add Message Ids and Project Codes to Log Messages
6.2.4.2. Specify the Log Level for a Message
6.2.4.3. Customize Log Messages with Parameters
6.2.4.4. Specify an Exception as the Cause of a Log Message
6.2.5. Customizing Internationalized Exceptions
6.2.5.1. Add Message Ids and Project Codes to Exception Messages
6.2.5.2. Customize Exception Messages with Parameters
6.2.5.3. Specify One Exception as the Cause of Another Exception
6.2.6. Reference
6.2.6.1. JBoss Logging Tools Maven Configuration
6.2.6.2. Translation Property File Format
6.2.6.3. JBoss Logging Tools Annotations Reference
Chapter 7. Enterprise JavaBeans
7.1. Introduction
7.1.1. Overview of Enterprise JavaBeans
7.1.2. EJB 3.1 Feature Set
7.1.3. EJB 3.1 Lite
7.1.4. EJB 3.1 Lite Features
7.1.5. Enterprise Beans
7.1.6. Overview of Writing Enterprise Beans
7.1.7. Session Bean Business Interfaces
7.1.7.1. Enterprise Bean Business Interfaces
7.1.7.2. EJB Local Business Interfaces
7.1.7.3. EJB Remote Business Interfaces
7.1.7.4. EJB No-interface Beans
7.2. Creating Enterprise Bean Projects
7.2.1. Create an EJB Archive Project Using JBoss Developer Studio
7.2.2. Create an EJB Archive Project in Maven
7.2.3. Create an EAR Project containing an EJB Project
7.2.4. Add a Deployment Descriptor to an EJB Project
7.3. Session Beans
7.3.1. Session Beans
87
87
87
87
87
87
87
88
88
88
88
88
88
88
89
89
89
90
91
92
92
93
94
94
95
95
96
97
97
98
99
101
101
102
103
104
104
104
104
104
105
105
105
106
106
106
106
106
106
106
109
111
113
114
114
. . . .
. . . .
7.3.2. Stateless Session Beans
7.3.3. Stateful Session Beans
7.3.4. Singleton Session Beans
7.3.5. Add Session Beans to a Project in JBoss Developer Studio
7.4. Message-Driven Beans
7.4.1. Message-Driven Beans
7.4.2. Resource Adapters
7.4.3. Create a JMS-based Message-Driven Bean in JBoss Developer Studio
7.5. Invoking Session Beans
7.5.1. Invoke a Session Bean Remotely using JNDI
7.5.2. About EJB Client Contexts
7.5.3. Considerations When Using a Single EJB Context
7.5.4. Using Scoped EJB Client Contexts
7.5.5. Configure EJBs Using a Scoped EJB Client Context
7.5.6. EJB Client Properties
7.6. Container Interceptors
7.6.1. About Container Interceptors
7.6.2. Create a Container Interceptor Class
7.6.3. Configure a Container Interceptor
7.6.4. Change the Security Context Identity
7.6.5. Pass Additional Security For EJB Authentication
7.6.6. Use a Client Side Interceptor in an Application
7.7. Clustered Enterprise JavaBeans
7.7.1. About Clustered Enterprise JavaBeans (EJBs)
7.8. Reference
7.8.1. EJB JNDI Naming Reference
7.8.2. EJB Reference Resolution
7.8.3. Project dependencies for Remote EJB Clients
7.8.4. jboss-ejb3.xml Deployment Descriptor Reference
Chapter 8. Clustering in Web Applications
8.1. Session Replication
8.1.1. About HTTP Session Replication
8.1.2. About the Web Session Cache
8.1.3. Configure the Web Session Cache
8.1.4. Enable Session Replication in Your Application
8.2. HttpSession Passivation and Activation
8.2.1. About HTTP Session Passivation and Activation
8.2.2. Configure HttpSession Passivation in Your Application
8.3. Cookie Domain
8.3.1. About the Cookie Domain
8.3.2. Configure the Cookie Domain
8.4. Implement an HA Singleton
Chapter 9. CDI
9.1. Overview of CDI
9.1.1. Overview of CDI
9.1.2. About Contexts and Dependency Injection (CDI)
9.1.3. Benefits of CDI
9.1.4. About Type-safe Dependency Injection
9.1.5. Relationship Between Weld, Seam 2, and JavaServer Faces
9.2. Use CDI
9.2.1. First Steps
9.2.1.1. Enable CDI
9.2.2. Use CDI to Develop an Application
9.2.2.1. Use CDI to Develop an Application
114
114
115
115
117
117
117
118
119
119
121
122
123
124
125
129
129
129
130
132
137
144
144
144
145
145
145
146
147
150
150
150
150
150
151
154
154
155
156
156
157
157
166
166
166
166
166
166
166
167
167
167
168
168
. . . .
9.2.2.2. Use CDI with Existing Code
9.2.2.3. Exclude Beans From the Scanning Process
9.2.2.4. Use an Injection to Extend an Implementation
9.2.3. Ambiguous or Unsatisfied Dependencies
9.2.3.1. About Ambiguous or Unsatisfied Dependencies
9.2.3.2. About Qualifiers
9.2.3.3. Use a Qualifier to Resolve an Ambiguous Injection
9.2.4. Managed Beans
9.2.4.1. About Managed Beans
9.2.4.2. Types of Classes That are Beans
9.2.4.3. Use CDI to Inject an Object Into a Bean
9.2.5. Contexts, Scopes, and Dependencies
9.2.5.1. Contexts and Scopes
9.2.5.2. Available Contexts
9.2.6. Bean Lifecycle
9.2.6.1. Manage the Lifecycle of a Bean
9.2.6.2. Use a Producer Method
9.2.7. Named Beans and Alternative Beans
9.2.7.1. About Named Beans
9.2.7.2. Use Named Beans
9.2.7.3. About Alternative Beans
9.2.7.4. Override an Injection with an Alternative
9.2.8. Stereotypes
9.2.8.1. About Stereotypes
9.2.8.2. Use Stereotypes
9.2.9. Observer Methods
9.2.9.1. About Observer Methods
9.2.9.2. Fire and Observe Events
9.2.10. Interceptors
9.2.10.1. About Interceptors
9.2.10.2. Use Interceptors with CDI
9.2.11. About Decorators
9.2.12. About Portable Extensions
9.2.13. Bean Proxies
9.2.13.1. About Bean Proxies
9.2.13.2. Use a Proxy in an Injection
Chapter 10. Java Transaction API (JTA)
10.1. Overview
10.1.1. Overview of Java Transactions API (JTA)
10.2. Transaction Concepts
10.2.1. About Transactions
10.2.2. About ACID Properties for Transactions
10.2.3. About the Transaction Coordinator or Transaction Manager
10.2.4. About Transaction Participants
10.2.5. About Java Transactions API (JTA)
10.2.6. About Java Transaction Service (JTS)
10.2.7. About XA Datasources and XA Transactions
10.2.8. About XA Recovery
10.2.9. About the 2-Phase Commit Protocol
10.2.10. About Transaction Timeouts
10.2.11. About Distributed Transactions
10.2.12. About the ORB Portability API
10.2.13. About Nested Transactions
10.3. Transaction Optimizations
10.3.1. Overview of Transaction Optimizations
168
168
170
170
170
171
171
172
173
173
173
175
175
175
175
175
176
178
178
178
178
179
180
180
180
181
181
181
182
182
183
184
185
185
185
185
187
187
187
187
187
187
188
188
188
188
189
189
189
190
190
190
191
191
191
. . . .
10.3.2. About the LRCO Optimization for Single-phase Commit (1PC)
10.3.3. About the Presumed-Abort Optimization
10.3.4. About the Read-Only Optimization
10.4. Transaction Outcomes
10.4.1. About Transaction Outcomes
10.4.2. About Transaction Commit
10.4.3. About Transaction Roll-Back
10.4.4. About Heuristic Outcomes
10.4.5. JBoss Transactions Errors and Exceptions
10.5. Overview of JTA Transactions
10.5.1. About Java Transactions API (JTA)
10.5.2. Lifecycle of a JTA Transaction
10.6. Transaction Subsystem Configuration
10.6.1. Transactions Configuration Overview
10.6.2. Transactional Datasource Configuration
10.6.2.1. Configure Your Datasource to Use JTA Transactions
10.6.2.2. Configure an XA Datasource
10.6.2.3. Log in to the Management Console
10.6.2.4. Create a Non-XA Datasource with the Management Interfaces
10.6.2.5. Datasource Parameters
10.6.3. Transaction Logging
10.6.3.1. About Transaction Log Messages
10.6.3.2. Configure Logging for the Transaction Subsystem
10.6.3.3. Browse and Manage Transactions
10.7. Use JTA Transactions
10.7.1. Transactions JTA Task Overview
10.7.2. Control Transactions
10.7.3. Begin a Transaction
10.7.4. Nest Transactions
10.7.5. Commit a Transaction
10.7.6. Roll Back a Transaction
10.7.7. Handle a Heuristic Outcome in a Transaction
10.7.8. Transaction Timeouts
10.7.8.1. About Transaction Timeouts
10.7.8.2. Configure the Transaction Manager
10.7.9. JTA Transaction Error Handling
10.7.9.1. Handle Transaction Errors
10.8. ORB Configuration
10.8.1. About Common Object Request Broker Architecture (CORBA)
10.8.2. Configure the ORB for JTS Transactions
10.9. Transaction References
10.9.1. JBoss Transactions Errors and Exceptions
10.9.2. JTA Clustering Limitations
10.9.3. JTA Transaction Example
10.9.4. API Documentation for JBoss Transactions JTA
Chapter 11. Hibernate
11.1. About Hibernate Core
11.2. Java Persistence API (JPA)
11.2.1. About JPA
11.2.2. Hibernate EntityManager
11.2.3. Getting Started
11.2.3.1. Create a JPA project in JBoss Developer Studio
11.2.3.2. Create the Persistence Settings File in JBoss Developer Studio
11.2.3.3. Example Persistence Settings File
11.2.3.4. Create the Hibernate Configuration File in JBoss Developer Studio
191
192
192
192
192
192
193
193
193
194
194
194
194
195
195
195
196
196
197
198
205
205
206
207
211
211
211
212
213
213
214
215
216
216
217
220
221
221
221
222
223
223
223
223
226
228
228
228
228
228
228
228
231
232
232
11.2.3.5. Example Hibernate Configuration File
11.2.4. Configuration
11.2.4.1. Hibernate Configuration Properties
11.2.4.2. Hibernate JDBC and Connection Properties
11.2.4.3. Hibernate Cache Properties
11.2.4.4. Hibernate Transaction Properties
11.2.4.5. Miscellaneous Hibernate Properties
11.2.4.6. Hibernate SQL Dialects
11.2.5. Second-Level Caches
11.2.5.1. About Second-Level Caches
11.2.5.2. Configure a Second Level Cache for Hibernate
11.3. Hibernate Annotations
11.3.1. Hibernate Annotations
11.4. Hibernate Query Language
11.4.1. About Hibernate Query Language
11.4.2. HQL Statements
11.4.3. About the INSERT Statement
11.4.4. About the FROM Clause
11.4.5. About the WITH Clause
11.4.6. About Bulk Update, Insert and Delete
11.4.7. About Collection Member References
11.4.8. About Qualified Path Expressions
11.4.9. About Scalar Functions
11.4.10. HQL Standardized Functions
11.4.11. About the Concatenation Operation
11.4.12. About Dynamic Instantiation
11.4.13. About HQL Predicates
11.4.14. About Relational Comparisons
11.4.15. About the IN Predicate
11.4.16. About HQL Ordering
11.5. Hibernate Services
11.5.1. About Hibernate Services
11.5.2. About Service Contracts
11.5.3. Types of Service Dependencies
11.5.4. The ServiceRegistry
11.5.4.1. About the ServiceRegistry
11.5.5. Custom Services
11.5.5.1. About Custom Services
11.5.6. The Bootstrap Registry
11.5.6.1. About the Boot-strap Registry
11.5.6.2. Using BootstrapServiceRegistryBuilder
11.5.6.3. BootstrapRegistry Services
11.5.7. The SessionFactory Registry
11.5.7.1. SessionFactory Registry
11.5.7.2. SessionFactory Services
11.5.8. Integrators
11.5.8.1. Integrators
11.5.8.2. Integrator use-cases
11.6. Bean Validation
11.6.1. About Bean Validation
11.6.2. Hibernate Validator
11.6.3. Validation Constraints
11.6.3.1. About Validation Constraints
11.6.3.2. Create a Constraint Annotation in the JBoss Developer Studio
11.6.3.3. Create a New Java Class in the JBoss Developer Studio
233
234
234
236
238
238
239
241
243
243
243
244
244
247
247
248
248
249
249
250
251
252
253
253
254
254
255
257
259
260
261
261
261
261
262
262
262
262
263
263
264
264
265
265
265
265
265
266
267
267
267
267
267
267
269
. . . .
11.6.3.4. Hibernate Validator Constraints
11.6.4. Configuration
11.6.4.1. Example Validation Configuration File
11.7. Envers
11.7.1. About Hibernate Envers
11.7.2. About Auditing Persistent Classes
11.7.3. Auditing Strategies
11.7.3.1. About Auditing Strategies
11.7.3.2. Set the Auditing Strategy
11.7.4. Getting Started with Entity Auditing
11.7.4.1. Add Auditing Support to a JPA Entity
11.7.5. Configuration
11.7.5.1. Configure Envers Parameters
11.7.5.2. Enable or Disable Auditing at Runtime
11.7.5.3. Configure Conditional Auditing
11.7.5.4. Envers Configuration Properties
11.7.6. Queries
11.7.6.1. Retrieve Auditing Information
Chapter 12. JAX-RS Web Services
12.1. About JAX-RS
12.2. About RESTEasy
12.3. About RESTful Web Services
12.4. RESTEasy Defined Annotations
12.5. RESTEasy Configuration
12.5.1. RESTEasy Configuration Parameters
12.6. JAX-RS Web Service Security
12.6.1. Enable Role-Based Security for a RESTEasy JAX-RS Web Service
12.6.2. Secure a JAX-RS Web Service using Annotations
12.7. RESTEasy Logging
12.7.1. About JAX-RS Web Service Logging
12.7.2. Configure a Log Category in the Management Console
12.7.3. Logging Categories Defined in RESTEasy
12.8. Exception Handling
12.8.1. Create an Exception Mapper
12.8.2. RESTEasy Internally Thrown Exceptions
12.9. RESTEasy Interceptors
12.9.1. Intercept JAX-RS Invocations
12.9.2. Bind an Interceptor to a JAX-RS Method
12.9.3. Register an Interceptor
12.9.4. Interceptor Precedence Families
12.9.4.1. About Interceptor Precedence Families
12.9.4.2. Define a Custom Interceptor Precedence Family
12.10. String Based Annotations
12.10.1. Convert String Based @*Param Annotations to Objects
12.11. Configure File Extensions
12.11.1. Map File Extensions to Media Types in the web.xml File
12.11.2. Map File Extensions to Languages in the web.xml File
12.11.3. RESTEasy Supported Media Types
12.12. RESTEasy JavaScript API
12.12.1. About the RESTEasy JavaScript API
12.12.2. Enable the RESTEasy JavaScript API Servlet
12.12.3. RESTEasy Javascript API Parameters
12.12.4. Build AJAX Queries with the JavaScript API
12.12.5. REST.Request Class Members
12.13. RESTEasy Asynchronous Job Service
269
271
271
272
272
272
272
272
273
273
273
275
275
275
276
276
279
279
283
283
283
283
283
285
285
287
287
288
289
289
289
290
290
290
291
293
293
296
297
297
297
298
299
299
305
305
305
306
306
306
307
307
308
309
310
. . . .
. . . .
12.13.1. About the RESTEasy Asynchronous Job Service
12.13.2. Enable the Asynchronous Job Service
12.13.3. Configure Asynchronous Jobs for RESTEasy
12.13.4. Asynchronous Job Service Configuration Parameters
12.14. RESTEasy JAXB
12.14.1. Create a JAXB Decorator
12.15. RESTEasy Atom Support
12.15.1. About the Atom API and Provider
Chapter 13. JAX-WS Web Services
13.1. About JAX-WS Web Services
13.2. Configure the webservices Subsystem
13.3. JAX-WS Web Service Endpoints
13.3.1. About JAX-WS Web Service Endpoints
13.3.2. Write and Deploy a JAX-WS Web Service Endpoint
13.4. JAX-WS Web service Clients
13.4.1. Consume and Access a JAX-WS Web Service
13.4.2. Develop a JAX-WS Client Application
13.5. JAX-WS Development Reference
13.5.1. Enable Web Services Addressing (WS-Addressing)
13.5.2. JAX-WS Common API Reference
Chapter 14. Identity Within Applications
14.1. Foundational Concepts
14.1.1. About Encryption
14.1.2. About Security Domains
14.1.3. About SSL Encryption
14.1.4. About Declarative Security
14.2. Role-Based Security in Applications
14.2.1. About Application Security
14.2.2. About Authentication
14.2.3. About Authorization
14.2.4. About Security Auditing
14.2.5. About Security Mapping
14.2.6. About the Security Extension Architecture
14.2.7. Java Authentication and Authorization Service (JAAS)
14.2.8. About Java Authentication and Authorization Service (JAAS)
14.2.9. Use a Security Domain in Your Application
14.2.10. Use Role-Based Security In Servlets
14.2.11. Use A Third-Party Authentication System In Your Application
14.3. Security Realms
14.3.1. About Security Realms
14.3.2. Add a New Security Realm
14.3.3. Add a User to a Security Realm
14.4. EJB Application Security
14.4.1. Security Identity
14.4.1.1. About EJB Security Identity
14.4.1.2. Set the Security Identity of an EJB
14.4.2. EJB Method Permissions
14.4.2.1. About EJB Method Permissions
14.4.2.2. Use EJB Method Permissions
14.4.3. EJB Security Annotations
14.4.3.1. About EJB Security Annotations
14.4.3.2. Use EJB Security Annotations
14.4.4. Remote Access to EJBs
14.4.4.1. About Remote Method Access
310
310
311
312
314
314
316
316
317
317
317
321
321
323
326
326
331
337
337
338
342
342
342
342
342
343
343
343
343
344
344
344
344
345
346
349
351
353
360
360
361
361
362
362
362
362
363
363
364
368
368
368
369
369
. . . .
. . . .
. . . .
. . . .
14.4.4.2. About Remoting Callbacks
14.4.4.3. About Remoting Server Detection
14.4.4.4. Configure the Remoting Subsystem
14.4.4.5. Use Security Realms with Remote EJB Clients
14.4.4.6. Add a New Security Realm
14.4.4.7. Add a User to a Security Realm
14.4.4.8. About Remote EJB Access Using SSL Encryption
14.5. JAX-RS Application Security
14.5.1. Enable Role-Based Security for a RESTEasy JAX-RS Web Service
14.5.2. Secure a JAX-RS Web Service using Annotations
14.6. Secure Remote Password Protocol
14.6.1. About Secure Remote Password Protocol (SRP)
14.6.2. Configure Secure Remote Password (SRP) Protocol
14.7. Password Vaults for Sensitive Strings
14.7.1. About Securing Sensitive Strings in Clear-Text Files
14.7.2. Create a Java Keystore to Store Sensitive Strings
14.7.3. Mask the Keystore Password and Initialize the Password Vault
14.7.4. Configure JBoss EAP 6 to Use the Password Vault
14.7.5. Store and Retrieve Encrypted Sensitive Strings in the Java Keystore
14.7.6. Store and Resolve Sensitive Strings In Your Applications
14.8. Java Authorization Contract for Containers (JACC)
14.8.1. About Java Authorization Contract for Containers (JACC)
14.8.2. Configure Java Authorization Contract for Containers (JACC) Security
14.9. Java Authentication SPI for Containers (JASPI)
14.9.1. About Java Authentication SPI for Containers (JASPI) Security
14.9.2. Configure Java Authentication SPI for Containers (JASPI) Security
Chapter 15. Single Sign On (SSO)
15.1. About Single Sign On (SSO) for Web Applications
15.2. About Clustered Single Sign On (SSO) for Web Applications
15.3. Choose the Right SSO Implementation
15.4. Use Single Sign On (SSO) In A Web Application
15.5. About Kerberos
15.6. About SPNEGO
15.7. About Microsoft Active Directory
15.8. Configure Kerberos or Microsoft Active Directory Desktop SSO for Web Applications
Chapter 16. Development Security References
16.1. jboss-web.xml Configuration Reference
16.2. EJB Security Parameter Reference
Chapter 17. Supplemental References
17.1. Types of Java Archives
Revision History
370
371
371
379
379
380
380
380
380
382
382
382
383
384
384
385
387
387
389
391
393
393
394
395
395
395
397
397
398
398
399
401
402
402
402
407
407
410
412
412
414
Preface
1. Document Conventions
This manual uses several conventions to highlight certain words and phrases and draw attention to specific pieces of information.
In PDF and paper editions, this manual uses typefaces drawn from the Liberation Fonts set. The
Liberation Fonts set is also used in HTML editions if the set is installed on your system. If not, alternative but equivalent typefaces are displayed. Note: Red Hat Enterprise Linux 5 and later include the Liberation Fonts set by default.
1.1. Typographic Conventions
Four typographic conventions are used to call attention to specific words and phrases. These conventions, and the circumstances they apply to, are as follows.
Mono-spaced Bold
Used to highlight system input, including shell commands, file names and paths. Also used to highlight keys and key combinations. For example:
To see the contents of the file m y_next_bestselling_novel in your current working directory, enter the cat m y_next_bestselling_novel command at the shell prompt and press Enter to execute the command.
The above includes a file name, a shell command and a key, all presented in mono-spaced bold and all distinguishable thanks to context.
Key combinations can be distinguished from an individual key by the plus sign that connects each part of a key combination. For example:
Press Enter to execute the command.
Press Ctrl+Alt+F2 to switch to a virtual terminal.
The first example highlights a particular key to press. The second example highlights a key combination: a set of three keys pressed simultaneously.
If source code is discussed, class names, methods, functions, variable names and returned values mentioned within a paragraph will be presented as above, in m ono-spaced bold. For example:
File-related classes include filesystem for file systems, file for files, and dir for directories. Each class has its own associated set of permissions.
Proportional Bold
This denotes words or phrases encountered on a system, including application names; dialog-box text; labeled buttons; check-box and radio-button labels; menu titles and submenu titles. For example:
Choose System → Preferences → Mouse from the main menu bar to launch Mouse
Preferences. In the Buttons tab, select the Left-handed m ouse check box and click Close to switch the primary mouse button from the left to the right (making the mouse suitable for use in the left hand).
To insert a special character into a gedit file, choose Applications → Accessories →
Character Map from the main menu bar. Next, choose Search → Find… from the Character Map menu bar, type the name of the character in the Search field and click Next. The character you sought will be highlighted in the Character T able. Double-click
this highlighted character to place it in the T ext to copy field and then click the Copy button. Now switch back to your document and choose Edit → Paste from the gedit menu bar.
The above text includes application names; system-wide menu names and items; application-specific menu names; and buttons and text found within a GUI interface, all presented in proportional bold and all distinguishable by context.
Mono-spaced Bold Italic or Proportional Bold Italic
Whether mono-spaced bold or proportional bold, the addition of italics indicates replaceable or variable text. Italics denotes text you do not input literally or displayed text that changes depending on
circumstance. For example:
To connect to a remote machine using ssh, type ssh username@ domain.name at a shell prompt. If the remote machine is exam ple.com and your username on that machine is john, type ssh john@ exam ple.com.
The m ount -o rem ount file-system command remounts the named file system. For example, to remount the /hom e file system, the command is m ount -o rem ount /hom e. To see the version of a currently installed package, use the rpm -q package command. It will return a result as follows: package-version-release.
Note the words in bold italics above: username, domain.name, file-system, package, version and release. Each word is a placeholder, either for text you enter when issuing a command or for text displayed by the system.
Aside from standard usage for presenting the title of a work, italics denotes the first use of a new and important term. For example:
Publican is a DocBook publishing system.
1.2. Pull-quote Conventions
Terminal output and source code listings are set off visually from the surrounding text. Output sent to a terminal is set in m ono-spaced rom an and presented thus:
books Desktop documentation drafts mss photos stuff svn books_tests Desktop1 downloads images notes scripts svgs
package org.jboss.book.jca.ex1;
import javax.naming.InitialContext;
public class ExClient {
public static void main(String args[]) throws Exception
{
InitialContext iniCtx = new InitialContext(); Object ref = iniCtx.lookup("EchoBean"); EchoHome home = (EchoHome) ref;
Echo echo = home.create(); System.out.println("Created Echo");
System.out.println("Echo.echo('Hello') = " + echo.echo("Hello")); }
}
1.3. Notes and Warnings
Finally, we use three visual styles to draw attention to information that might otherwise be overlooked.
Note
Notes are tips, shortcuts or alternative approaches to the task at hand. Ignoring a note should have no negative consequences, but you might miss out on a trick that makes your life easier.
Important
Important boxes detail things that are easily missed: configuration changes that only apply to the current session, or services that need restarting before an update will apply. Ignoring a box labeled “Important” will not cause data loss but may cause irritation and frustration.
Warning
Warnings should not be ignored. Ignoring warnings will most likely cause data loss.
2. Getting Help and Giving Feedback
2.1. Do You Need Help?
If you experience difficulty with a procedure described in this documentation, visit the Red Hat Customer Portal at http://access.redhat.com. Through the customer portal, you can:
search or browse through a knowledgebase of technical support articles about Red Hat products. submit a support case to Red Hat Global Support Services (GSS).
access other product documentation.
Red Hat also hosts a large number of electronic mailing lists for discussion of Red Hat software and technology. You can find a list of publicly available mailing lists at
to access the list archives.
2.2. Give us Feedback
If you find a typographical error, or know how this guide can be improved, we would love to hear from you. Submit a report in Bugzilla against the product JBoss Enterprise Application Platform 6 and the component doc-Developm ent_Guide. The following link will take you to a pre-filled bug report for this product: https://bugzilla.redhat.com/.
Fill out the following template in Bugzilla's Description field. Be as specific as possible when describing the issue; this will help ensure that we can fix it quickly.
Document URL:
Section Number and Name:
Describe the issue:
Suggestions for improvement:
Additional information:
Chapter 1. Get Started Developing Applications
1.1. Introduction
1.1.1. About Red Hat JBoss Enterprise Application Platform 6 (JBoss EAP 6)
Red Hat JBoss Enterprise Application Platform 6 (JBoss EAP 6) is a fast, secure, powerful middleware platform built upon open standards, and compliant with the Java Enterprise Edition 6 specification. It integrates JBoss Application Server 7 with high-availability clustering, powerful messaging, distributed caching, and other technologies to create a stable and scalable platform.The new modular structure allows for services to be enabled only when required, significantly increasing start up speed. The Management Console and Management Command Line Interface remove the need to edit XML configuration files by hand, adding the ability to script and automate tasks. In addition, it includes APIs and development frameworks that can be used to develop secure, powerful, and scalable Java EE applications quickly.
Report a bug
1.1.2. About the Use of EAP_HOME in this Document
In this document, the variable EAP_HOME is used to denote the path to the JBoss EAP 6 installation. Replace this variable with the actual path to your JBoss EAP 6 installation.
Report a bug
1.2. Prerequisites
1.2.1. Become Familiar with Java Enterprise Edition 6
1.2.1.1. Overview of EE 6 Profiles
Java Enterprise Edition 6 (EE 6) includes support for multiple profiles, or subsets of APIs. The only two profiles that the EE 6 specification defines are the Full Profile and the Web Profile.
EE 6 Full Profile includes all APIs and specifications included in the EE 6 specification. EE 6 Web Profile includes a subset of APIs which are useful to web developers.
JBoss EAP 6 is a certified implementation of the Java Enterprise Edition 6 Full Profile and Web Profile specifications.
Section 1.2.1.2, “Java Enterprise Edition 6 Web Profile” Section 1.2.1.3, “Java Enterprise Edition 6 Full Profile” Report a bug
1.2.1.2. Java Enterprise Edition 6 Web Profile
The Web Profile is one of two profiles defined by the Java Enterprise Edition 6 specification. It is designed for web application development. The other profile defined by the Java Enterprise Edition 6 specification is the Full Profile. See Section 1.2.1.3, “Java Enterprise Edition 6 Full Profile” for more details.
Java EE 6 Web Profile Requirements
Java Platform, Enterprise Edition 6
Java Web Technologies
JSP 2.2 and Expression Language (EL) 1.2 JavaServer Faces (JSF) 2.0 (JSR 314) Java Standard Tag Library (JSTL) for JSP 1.2
Debugging Support for Other Languages 1.0 (JSR 45)
Enterprise Application Technologies
Contexts and Dependency Injection (CDI) (JSR 299) Dependency Injection for Java (JSR 330)
Enterprise JavaBeans 3.1 Lite (JSR 318) Java Persistence API 2.0 (JSR 317)
Common Annotations for the Java Platform 1.1 (JSR 250) Java Transaction API (JTA) 1.1 (JSR 907)
Bean Validation (JSR 303) Report a bug
1.2.1.3. Java Enterprise Edition 6 Full Profile
The Java Enterprise Edition 6 (EE 6) specification defines a concept of profiles, and defines two of them as part of the specification. Besides the items supported in the Java Enterprise Edition 6 Web Profile ( Section 1.2.1.2, “Java Enterprise Edition 6 Web Profile”), the Full Profile supports the following APIs. JBoss Enterprise Edition 6 supports the Full Profile.
Items Included in the EE 6 Full Profile
EJB 3.1 (not Lite) (JSR 318)
Java EE Connector Architecture 1.6 (JSR 322) Java Message Service (JMS) API 1.1 (JSR 914) JavaMail 1.4 (JSR 919)
Web Service Technologies
Jax-RS RESTful Web Services 1.1 (JSR 311)
Implementing Enterprise Web Services 1.3 (JSR 109)
JAX-WS Java API for XML-Based Web Services 2.2 (JSR 224) Java Architecture for XML Binding (JAXB) 2.2 (JSR 222) Web Services Metadata for the Java Platform (JSR 181) Java APIs for XML-based RPC 1.1 (JSR 101)
Java APIs for XML Messaging 1.3 (JSR 67) Java API for XML Registries (JAXR) 1.0 (JSR 93)
Management and Security Technologies
Java Authentication Service Provider Interface for Containers 1.0 (JSR 196) Java Authentication Contract for Containers 1.3 (JSR 115)
Java EE Application Deployment 1.2 (JSR 88) J2EE Management 1.1 (JSR 77)
Report a bug
1.2.2. About Modules and the New Modular Class Loading System used in JBoss
EAP 6
1.2.2.1. Modules
A Module is a logical grouping of classes used for class loading and dependency management. JBoss EAP 6 identifies two different types of modules, sometimes called static and dynamic modules. However the only difference between the two is how they are packaged. All modules provide the same features.
Static Modules
Static Modules are predefined in the EAP_HOME/m odules/ directory of the application server. Each sub-directory represents one module and contains one or more JAR files and a
configuration file (m odule.xm l). The name of the module is defined in the m odule.xm l file. All the application server provided APIs are provided as static modules, including the Java EE APIs as well as other APIs such as JBoss Logging.
Example 1.1. Example module.xml file
<?xml version="1.0" encoding="UTF-8"?>
<module xmlns="urn:jboss:module:1.0" name="com.mysql">
<resources>
<resource-root path="mysql-connector-java-5.1.15.jar"/>
</resources>
<dependencies>
<module name="javax.api"/>
<module name="javax.transaction.api"/>
</dependencies> </module>
The module name, com .m ysql, should match the directory structure for the module.
Creating custom static modules can be useful if many applications are deployed on the same server that use the same third party libraries. Instead of bundling those libraries with each application, a module containing these libraries can be created and installed by the JBoss administrator. The applications can then declare an explicit dependency on the custom static modules.
Dynamic Modules
Dynamic Modules are created and loaded by the application server for each JAR or WAR deployment (or subdeployment in an EAR). The name of a dynamic module is derived from the name of the deployed archive. Because deployments are loaded as modules, they can
configure dependencies and be used as dependencies by other deployments.
Modules are only loaded when required. This usually only occurs when an application is deployed that has explicit or implicit dependencies.
Report a bug
1.2.2.2. Overview of Class Loading and Modules
JBoss EAP 6 uses a new modular class loading system for controlling the class paths of deployed applications. This system provides more flexibility and control than the traditional system of hierarchical class loaders. Developers have fine-grained control of the classes available to their applications, and can configure a deployment to ignore classes provided by the application server in favour of their own. The modular class loader separates all Java classes into logical groups called modules. Each module can define dependencies on other modules in order to have the classes from that module added to its own class path. Because each deployed JAR and WAR file is treated as a module, developers can control the contents of their application's class path by adding module configuration to their application. The following material covers what developers need to know to successfully build and deploy
Report a bug
1.3. Set Up the Development Environment
1.3.1. Download and Install JBoss Developer Studio
1.3.1.1. Setup the JBoss Developer Studio
1. Section 1.3.1.2, “Download JBoss Developer Studio 5” 2. Section 1.3.1.3, “Install JBoss Developer Studio 5” 3. Section 1.3.1.4, “Start JBoss Developer Studio” Report a bug
1.3.1.2. Download JBoss Developer Studio 5
1. Go to https://access.redhat.com/.
2. Select Downloads → Red Hat JBoss Middleware → Downloads. 3. Select JBoss Developer Studio from the dropbox.
4. Select the appropriate version and click Download. Report a bug
1.3.1.3. Install JBoss Developer Studio 5
Prerequisites:
Section 1.3.1.2, “Download JBoss Developer Studio 5”
Procedure 1.1. Install JBoss Developer Studio 5
1. Open a terminal.
2. Move into the directory containing the downloaded .jar file. 3. Run the following command to launch the GUI installer:
java -jar jbdevstudio-build_version.jar 4. Click Next to start the installation process.
5. Select I accept the term s of this license agreem ent and click Next. 6. Adjust the installation path and click Next.
Note
If the installation path folder does not exist, a prompt will appear. Click Ok to create the folder.
7. Choose a JVM, or leave the default JVM selected, and click Next. 8. Add any application platforms available, and click Next.
9. Review the installation details, and click Next. 10. Click Next when the installation process is complete.
11. Configure the desktop shortcuts for JBoss Developer Studio, and click Next. 12. Click Done.
Report a bug
1.3.1.4. Start JBoss Developer Studio
Prerequisites:
Section 1.3.1.3, “Install JBoss Developer Studio 5”
Procedure 1.2. Command to start JBoss Developer Studio
1. Open a terminal.
2. Change into the installation directory.
3. Run the following command to start the JBoss Developer Studio: [localhost]$ ./jbdevstudio
Report a bug
1.3.1.5. Add the JBoss EAP 6 Server to JBoss Developer Studio
These instructions assume this is your first introduction to JBoss Developer Studio and you have not yet added any JBoss EAP 6 servers.
Procedure 1.3. Add the server
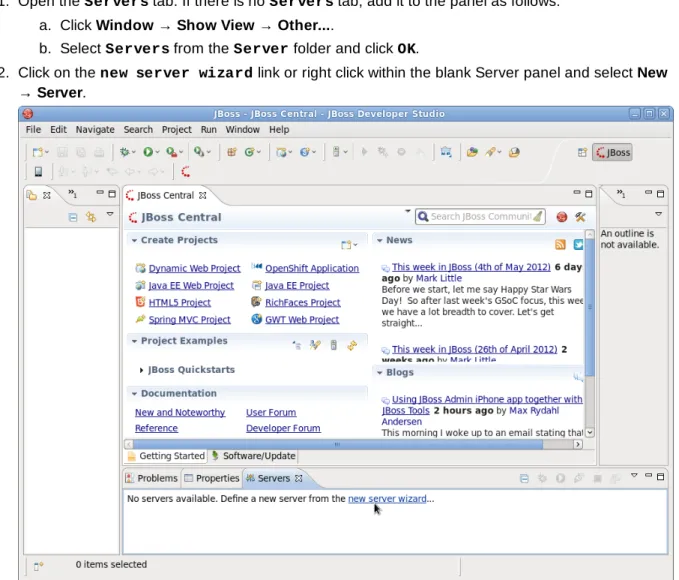
1. Open the Servers tab. If there is no Servers tab, add it to the panel as follows: a. Click Window → Show View → Other....
b. Select Servers from the Server folder and click OK.
2. Click on the new server wizard link or right click within the blank Server panel and select New → Server.
3. Expand JBoss Enterprise Middleware and choose JBoss Enterprise Application
Platform 6.x.Then click Next.
Figure 1.2. Choose server type
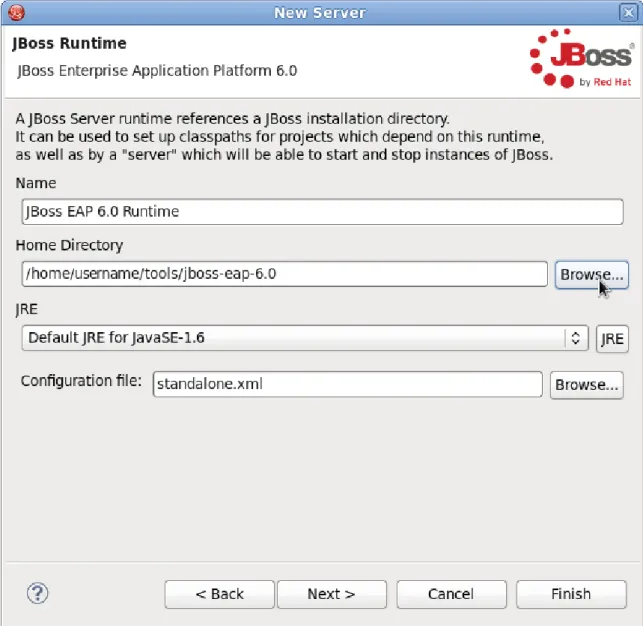
Figure 1.3. Browse to server install
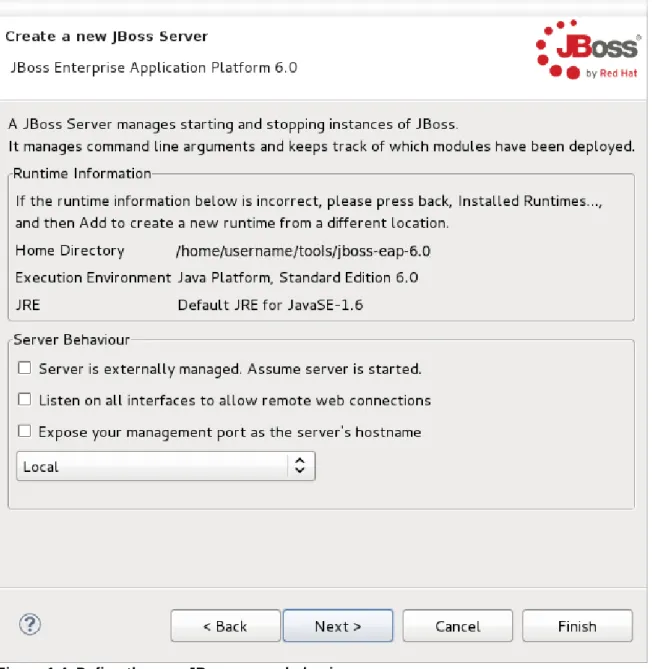
5. On this screen you define the server behavior. You can start the server manually or let JBoss Developer Studio manage it for you. You can also define a remote server for deployment and determine if you want to expose the management port for that server, for example, if you need connect to it using JMX. In this example, we assume the server is local and you want JBoss Developer Studio to manage your server so you do not need to check anything. Click Next.
Figure 1.4. Define the new JBoss server behavior
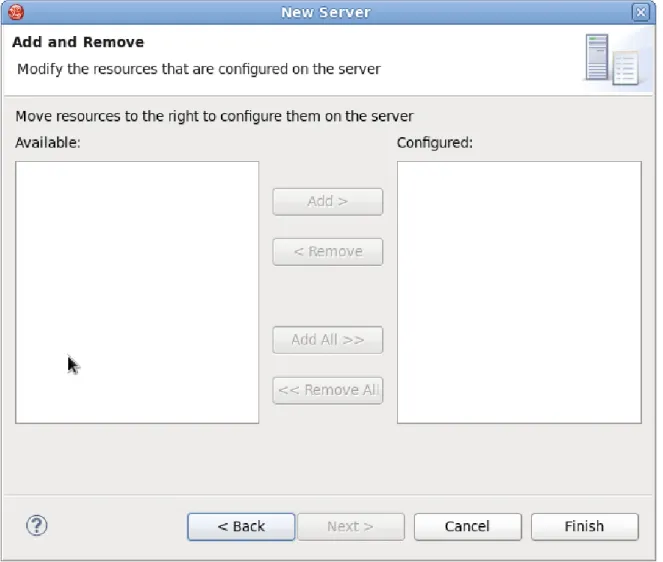
6. This screen allows you to configure existing projects for the new server. Because you do not have any projects at this point, click Finish.
Figure 1.5. Modify resources for the new JBoss server
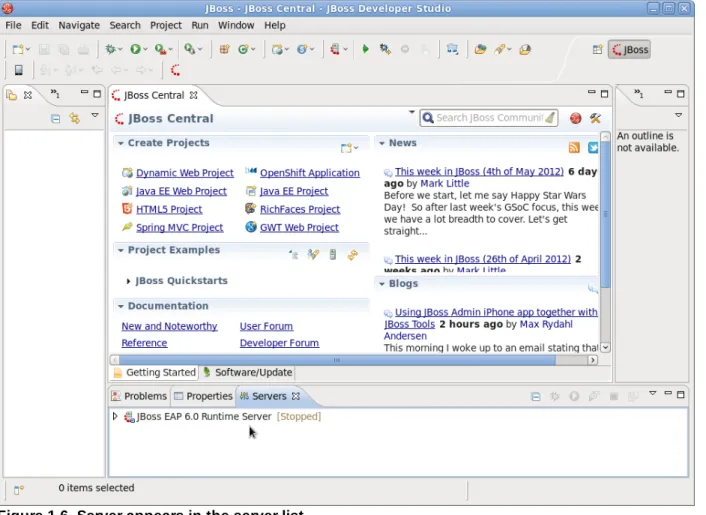
Result
Figure 1.6. Server appears in the server list
Report a bug
1.4. Run Your First Application
1.4.1. Replace the Default Welcome Web Application
JBoss EAP 6 includes a Welcome application, which displays when you open the URL of the server at port 8080. You can replace this application with your own web application by following this procedure.
Procedure 1.4. Replace the Default Welcome Web Application With Your Own Web Application
1. Disable the Welcome application.
Use the Management CLI script EAP_HOME/bin/jboss-cli.sh to run the following command. You may need to change the profile to modify a different managed domain profile, or remove the /profile=default portion of the command for a standalone server.
/profile=default/subsystem=web/virtual-server=default-host:write-attribute(name=enable-welcome-root,value=false)
2. Configure your Web application to use the root context.
To configure your web application to use the root context (/) as its URL address, modify its jboss-web.xm l, which is located in the MET A-INF/ or WEB-INF/ directory. Replace its <context-root> directive with one that looks like the following.
<jboss-web>
<context-root>/</context-root> </jboss-web>
3. Deploy your application.
Deploy your application to the server group or server you modified in the first step. The application is now available on http://SERVER_URL:PORT/.
Report a bug
1.4.2. Download the Quickstart Code Examples
1.4.2.1. Access the Quickstarts Summary
JBoss EAP 6 comes with a series of quickstart examples designed to help users begin writing applications using the Java EE 6 technologies.
Prerequisites
Maven 3.0.0 or higher. For more information on installing Maven, refer to http://maven.apache.org/download.html.
Section 2.1.1, “About the Maven Repository”
Section 2.2.3, “Install the JBoss EAP 6 Maven Repository Locally”
Section 2.3.2, “Configure the JBoss EAP 6 Maven Repository Using the Maven Settings”
Procedure 1.5. Download the Quickstarts
1. Open a web browser and access this URL:
https://access.redhat.com/jbossnetwork/restricted/listSoftware.html?product=appplatform. 2. Find "Quickstarts" in the list.
3. Click the Download button to download a Zip archive containing the examples. 4. Unzip the archive in a directory of your choosing.
Result
The JBoss EAP Quickstarts have been downloaded and unzipped. Refer to the README.m d file in the top-level directory of the Quickstart archive for instructions about deploying each quickstart.
Report a bug
1.4.3. Run the Quickstarts
1.4.3.1. Run the Quickstarts in JBoss Developer Studio
Procedure 1.6. Import the quickstarts into JBoss Developer Studio
Each quickstart ships with a POM (Project Object Model) file that contains project and configuration information for the quickstart. Using this POM file, you can easily import the quickstart into JBoss Developer Studio.
1. If you have not done so, Section 2.3.2, “Configure the JBoss EAP 6 Maven Repository Using the Maven Settings”.
3. From the menu, select File → Import.
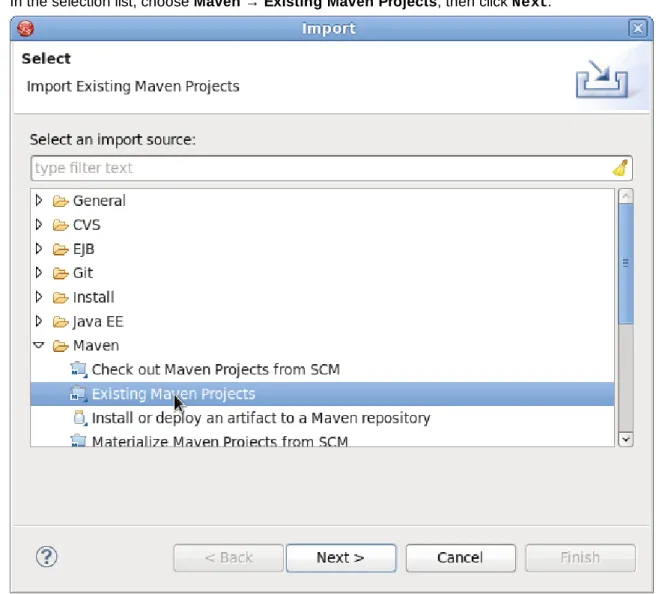
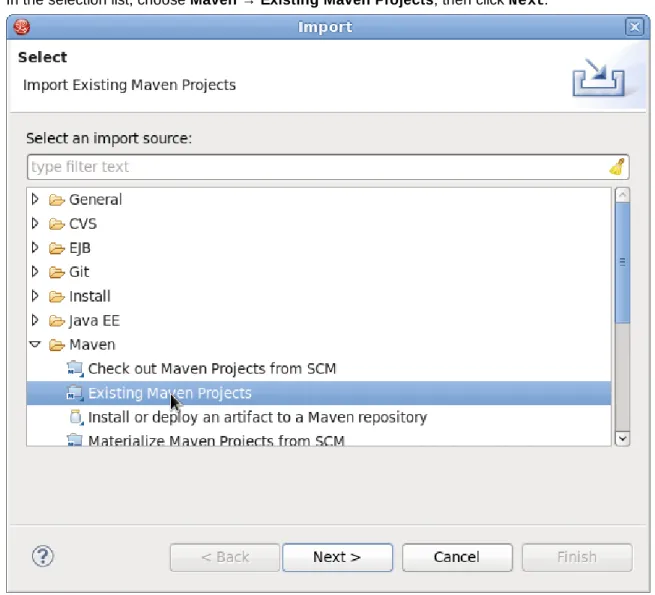
4. In the selection list, choose Maven → Existing Maven Projects, then click Next.
Figure 1.7. Import Existing Maven Projects
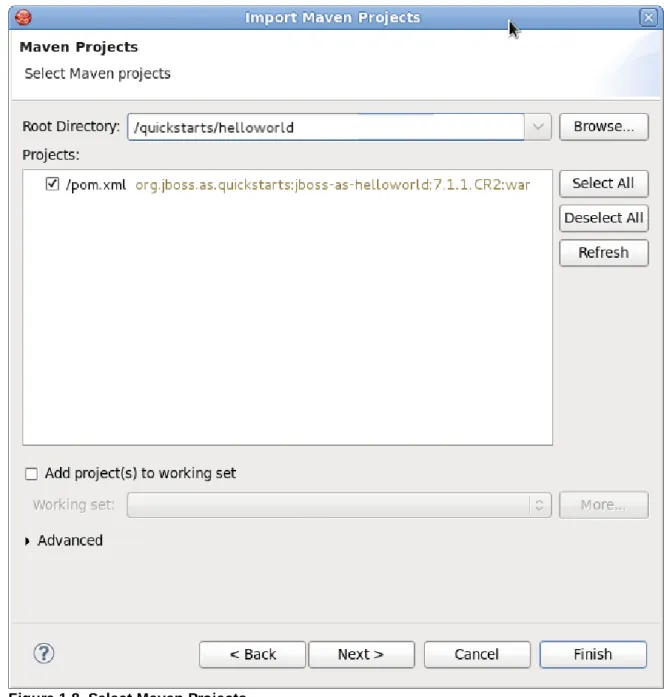
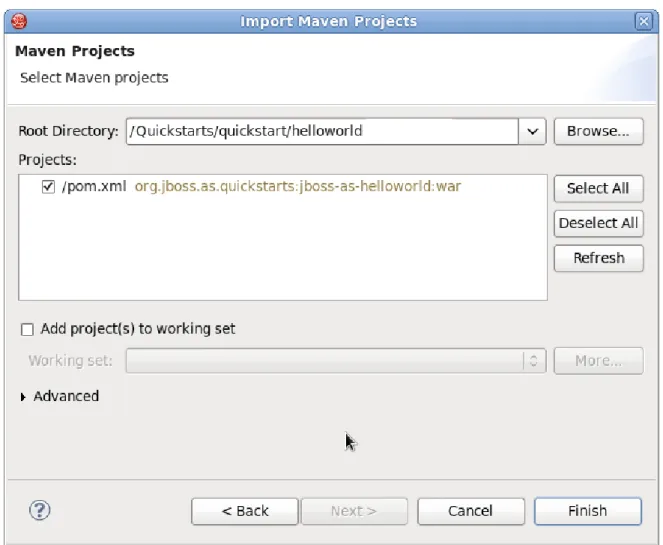
5. Browse to the directory of the quickstart you want to import and click OK. The Projects list box will be populated with the pom .xm l file of the selected quickstart project.
Figure 1.8. Select Maven Projects
6. Click Next, then click Finish.
Procedure 1.7. Build and Deploy the helloworld quickstart
The helloworld quickstart is one of the simplest quickstarts and is a good way to verify that the JBoss server is configured and running correctly.
1. Open the Servers tab. To add it to the panel: a. Click Window → Show View → Other....
b. Select Servers from the Server folder and click Ok.
2. Right click on helloworld in the Project Explorer tab, and select Run As → Run on
Server.
3. Select the JBoss EAP 6.0 Runtim e Server server and click Next. This should deploy the helloworld quickstart to the JBoss server.
4. To verify that the helloworld quickstart was deployed successfully to the JBoss server, open a web browser and access the application at this URL: http://localhost:8080/jboss-as-helloworld
Report a bug
1.4.3.2. Run the Quickstarts Using a Command Line
Procedure 1.8. Build and Deploy the Quickstarts Using a Command Line
You can easily build and deploy the quickstarts using a command line. Be aware that, when using a command line, you are responsible for starting the JBoss server if it is required.
1. Review the README file in the root directory of the quickstarts.
This file contains general information about system requirements, how to configure Maven, how to add users, and how to run the Quickstarts. Be sure to read through it before you get started. It also contains a table listing the available quickstarts. The table lists each quickstart name and the technologies it demonstrates. It gives a brief description of each quickstart and the level of experience required to set it up. For more detailed information about a quickstart, click on the quickstart name.
Some quickstarts are designed to enhance or extend other quickstarts. These are noted in the Prerequisites column. If a quickstart lists prerequisites, you must install them first before working with the quickstart.
Some quickstarts require the installation and configuration of optional components. Do not install these components unless the quickstart requires them.
2. Run the helloworld quickstart.
The helloworld quickstart is one of the simplest quickstarts and is a good way to verify that the JBoss server is configured and running correctly. Open the README file in the root of the
helloworld quickstart. It contains detailed instructions on how to build and deploy the quickstart and access the running application
3. Run the other quickstarts.
Follow the instructions in the README file located in the root folder of each quickstart to run the example.
Report a bug
1.4.4. Review the Quickstart Tutorials
1.4.4.1. Explore the helloworld Quickstart Summary
The helloworld quickstart shows you how to deploy a simple Servlet to JBoss EAP 6. The business logic is encapsulated in a service which is provided as a CDI (Contexts and Dependency Injection) bean and injected into the Servlet. This quickstart is very simple. All it does is print "Hello World" onto a web page. It is a good starting point to make sure you have configured and started your server properly. Detailed instructions to build and deploy this quickstart using a command line can be found in the README file at the root of the helloworld quickstart directory. Here we show you how to use JBoss Developer Studio to run the quickstart.
Procedure 1.9. Import the helloworld quickstart into JBoss Developer Studio
If you previously imported all of the quickstarts into JBoss Developer Studio following the steps here Section 1.4.3.1, “Run the Quickstarts in JBoss Developer Studio”, you can skip to the next section.
1. If you have not done so, Section 2.3.2, “Configure the JBoss EAP 6 Maven Repository Using the Maven Settings”.
2. If you have not done so, Section 1.3.1.3, “Install JBoss Developer Studio 5”. 3. Section 1.3.1.4, “Start JBoss Developer Studio”.
5. In the selection list, choose Maven → Existing Maven Projects, then click Next.
Figure 1.9. Import Existing Maven Projects
6. Browse to the QUICKSTART_HOME/quickstart/helloworld/ directory and click OK. The Projects list box is populated with the pom .xm l file from the helloworld quickstart project.
Figure 1.10. Select Maven Projects
7. Click Finish.
Procedure 1.10. Build and Deploy the helloworld quickstart
1. If you have not yet configured JBoss Developer Studio for JBoss EAP 6, you must Section 1.3.1.5, “Add the JBoss EAP 6 Server to JBoss Developer Studio”.
2. Right click on jboss-as-helloworld in the Project Explorer tab, and select Run As →
Figure 1.11. Run on Server
3. Select the JBoss EAP 6.0 Runtim e Server server and click Next. This deploys the helloworld quickstart to the JBoss server.
4. To verify that the helloworld quickstart was deployed successfully to the JBoss server, open a web browser and access the application at this URL: http://localhost:8080/jboss-as-helloworld
Procedure 1.11. Examine the Directory Structure
The code for the helloworld quickstart can be found in the QUICKSTART_HOME/helloworld
directory. The helloworld quickstart is comprised a Servlet and a CDI bean. It also includes an empty beans.xml file which tells JBoss EAP 6 to look for beans in this application and to activate the CDI.
1. The beans.xm l file is located in the WEB-INF/ folder in the src/m ain/webapp/ directory of the quickstart.
2. The src/m ain/webapp/ directory also includes an index.htm l file which uses a simple meta refresh to redirect the user's browser to the Servlet, which is located at http://localhost:8080/jboss-as-helloworld/HelloWorld.
3. All the configuration files for this example are located in WEB-INF/, which can be found in the src/m ain/webapp/ directory of the example.
4. Notice that the quickstart doesn't even need a web.xm l file!
The package declaration and imports have been excluded from these listings. The complete listing is available in the quickstart source code.
1. Review the HelloWorldServlet code
The HelloWorldServlet.java file is located in the
src/m ain/java/org/jboss/as/quickstarts/helloworld/ directory. This Servlet sends the information to the browser.
27. @WebServlet("/HelloWorld")
28. public class HelloWorldServlet extends HttpServlet {
29.
30. static String PAGE_HEADER = "<html><head /><body>";
31.
32. static String PAGE_FOOTER = "</body></html>";
33.
34. @Inject
35. HelloService helloService;
36.
37. @Override
38. protected void doGet(HttpServletRequest req, HttpServletResponse resp) throws ServletException, IOException {
39. PrintWriter writer = resp.getWriter();
40. writer.println(PAGE_HEADER);
41. writer.println("<h1>" + helloService.createHelloMessage("World") +
"</h1>"); 42. writer.println(PAGE_FOOTER); 43. writer.close(); 44. } 45. 46. }
Table 1.1. HelloWorldServlet Details
Line Note
27 Before Java EE 6, an XML file was used to register Servlets. It is now much cleaner. All you need to do is add the @ WebServlet annotation and provide a mapping to a URL used to access the servlet.
30-32 Every web page needs correctly formed HTML. This quickstart uses static Strings to write the minimum header and footer output.
34-35 These lines inject the HelloService CDI bean which generates the actual message. As long as we don't alter the API of HelloService, this approach allows us to alter the implementation of HelloService at a later date without changing the view layer. 41 This line calls into the service to generate the message "Hello World", and write it out
to the HTTP request. 2. Review the HelloService code
The HelloService.java file is located in the
src/m ain/java/org/jboss/as/quickstarts/helloworld/ directory. This service is very simple. It returns a message. No XML or annotation registration is required.
9. public class HelloService {
10.
11. String createHelloMessage(String name) {
12. return "Hello " + name + "!";
32. }
33. }
34.
Report a bug
1.4.4.2. Explore the numberguess Quickstart Summary
This quickstart shows you how to create and deploy a simple application to JBoss EAP 6. This application does not persist any information. Information is displayed using a JSF view, and business logic is
encapsulated in two CDI (Contexts and Dependency Injection) beans. In the num berguess quickstart, you get 10 attempts to guess a number between 1 and 100. After each attempt, you're told whether your guess was too high or too low.
The code for the num berguess quickstart can be found in the QUICKSTART_HOME/num berguess directory. The num berguess quickstart is comprised of a number of beans, configuration files and Facelets (JSF) views, packaged as a WAR module.
Detailed instructions to build and deploy this quickstart using a command line can be found in the README file at the root of the num berguess quickstart directory. Here we show you how to use JBoss Developer Studio to run the quickstart.
Procedure 1.13. Import the num berguess quickstart into JBoss Developer Studio
If you previously imported all of the quickstarts into JBoss Developer Studio following the steps in the following procedure, Section 1.4.3.1, “Run the Quickstarts in JBoss Developer Studio”, you can skip to the next section.
1. If you have not done so, perform the following procedures: Section 1.3.1.3, “Install JBoss Developer Studio 5”
2. Section 1.3.1.4, “Start JBoss Developer Studio” 3. From the menu, select File → Import.
Figure 1.12. Import Existing Maven Projects
5. Browse to the QUICKSTART_HOME/quickstart/num berguess/ directory and click OK. The Projects list box is populated with the pom .xm l file from the num berguess quickstart project. 6. Click Finish.
Procedure 1.14. Build and Deploy the num berguess quickstart
1. If you have not yet configured JBoss Developer Studio for JBoss EAP 6, you must do the following: Section 1.3.1.5, “Add the JBoss EAP 6 Server to JBoss Developer Studio”.
2. Right click on jboss-as-num berguess in the Project Explorer tab, and select Run As →
Run on Server.
3. Select the JBoss EAP 6.0 Runtim e Server server and click Next. This deploys the num berguess quickstart to the JBoss server.
4. To verify that the num berguess quickstart was deployed successfully to the JBoss server, open a web browser and access the application at this URL: http://localhost:8080/jboss-as-numberguess
Procedure 1.15. Examine the Configuration Files
All the configuration files for this example are located in WEB-INF/ directory which can be found in the src/m ain/webapp/ directory of the quickstart.
1. Examine the faces-config file
version of Facelets is the default view handler in JSF 2.0, so there's really nothing that you have to configure. JBoss EAP 6 goes above and beyond Java EE here. It will automatically configure the JSF for you if you include this configuration file. As a result, the configuration consists of only the root element: 03. <faces-config version="2.0" 04. xmlns="http://java.sun.com/xml/ns/javaee" 05. xmlns:xsi="http://www.w3.org/2001/XMLSchema-instance" 06. xsi:schemaLocation=" 07. http://java.sun.com/xml/ns/javaee> 08. http://java.sun.com/xml/ns/javaee/web-facesconfig_2_0.xsd"> 09. 10. </faces-config>
2. Examine the beans.xml file
There's also an empty beans.xm l file, which tells JBoss EAP 6 to look for beans in this application and to activate the CDI.
3. There is no web.xml file
Notice that the quickstart doesn't even need a web.xm l file!
Procedure 1.16. Examine the JSF Code
JSF uses the .xhtm l file extension for source files, but serves up the rendered views with the .jsf extension.
Examine the home.xhtml code