TV-1080P-30HT
TV-1080P-60HT
User Manual
Manual version V1.0
CATALOG
NOTICE...3
1. OVERVIEW...5
1.1 PRESENTATION...5
1.2 PRODUCT STANDARD...6
2. ACCESSORY AND INSTALLATION...7
2.1 MAIN ACCESSORY...7
2.2 PHYSICAL INTERFACE...7
2.3 INSTALLATION...8
3. OPERATING INSTRUCTIONS...8
3.1 RUNNING STATUS...8
3.2 HARDWARE CONTROL...9
3.2.1 Start up...9
3.2.2 One key to enroll...9
3.2.3 One key to speech...10
3.3 WEB CONTROL...10
3.3.1 Join in meeting...10
3.3.1.1 Login server...10
3.3.1.2 Join meeting...11
3.3.2 Operations...12
3.3.2.1 Features...12
3.3.2.2 Members...18
3.3.2.3 Screen layout...21
3.3.2.4 Messages...22
3.3.2.5 Parameters...23
3.3.2.6 Auxiliary screen...26
3.3.3 Exit system...26
3.3.4 advanced settings...27
3.3.4.1 Video input settings...28
3.3.4.2 Video output settings...29
3.3.4.3 Image adjustment...29
3.3.4.4 Video loopback test...30
3.3.4.5 Audio device selection...30
3.3.4.6 Audio playback test...30
3.3.4.7 Audio loopback test...31
3.3.4.8 Qos settings...31
3.3.4.9 GK settings...32
3.3.4.10 Local IP settings...32
3.3.4.11 Password settings...33
3.3.4.15 Exit advanced settings...34
3.3.5 H323 Call...35
3.3.5.1 Call and response...35
3.3.5.2 H323 Calling...37
3.3.5.3 Quit H323 call...38
4. MAINTENANCE AND TROUBLESHOOTING...38
4.1. MAINTENANCE...38
Notice
In order to using the equipment right and safely, please read the notice first and follows them in strictly.
Basic requirements
In the procedure of equipment storage, transportation, using, must keep it dry, and avoid fierce collision.
Please don’t disassemble equipment. Go to the specified maintenance station if breakdown.
Without any authorization, no facilities and personal can make some changes in equipment’s structure, safety and design.
Please follow the rules and laws when using the equipment, and respect others’ rights.
Environment requirements
Please keep equipment in ventilated, none-direct lighted location.
Please avoid equipment from water or humid area.
Please put equipment in stable work platform and strictly follow the installation rule from manufacture.
Please don’t put any objects above equipment and keep 10 cm radiation space around equipment and the top.
Please don’t put any flammable objects around equipment, such as foamed material and etc.
Please keep equipment away from heat source and fire spots, such as electric heater, candles and etc.
Please keep equipment away from strong magnetic fielded or strong electric fielded machines, such as microwaves, refrigerators, cell phones and etc.
Usage notice
Please don’t let children to play any equipment and small parts, so to avoid danger from swallow.
off all the cables, such as electric source, video cable and ect, and contact specified maintenance station.
Please avoid foreign objects like metal to go into equipment by ventilation hole.
Please keep hands dry when to plug in or off the cables.
Please don’t step into, stretch, or bend the equipment cables, in case to cause breakdowns.
Please don’t use outworn and old cables.
Please power off then in lightning weather, and plug off all the cables to avoid lightning damage.
Please power off if not use for a long time.
Please power off and plug off all the cables immediately and contract specified maintenance station if some usual situation happen, such as smoke, unusual sound, smell from equipment.
Please don’t scrape and wear out equipment enclosure. Falling paint material may cause allergic or abnormal equipment functioning, like short circuit by falling paint. Clean notice
Before cleaning, please stop using equipment by power off and plug off all the cables, such as power line and etc.
In the procedure of cleaning, please avoid cleaning equipment enclosure by cleaning solution or any sprayed cleanser.
Environment Protection
Please don’t dump any broken equipment or batteries in garbage can. Please follow the local laws of how to handle equipment packing material, ran-out batteries, broken equipment, and support recycling.
1. Overview
The ITC HD Video Conference Terminal User manual is suitable for the management who need to configure HD video conference system, use HD video conferencing terminals product customization and exclude system failure.
This manual is mainly suitable for the following people:
HD video conferencing system management
HD video conferencing system technical support engineer
HD video conferencing system users
1.1 Presentation
ITC HD video conference terminal is a separated design high-end conference terminal, designed specifically for high-end conference rooms, equipped with superior audio and video processing performance and superior low bandwidth adaptation, to bring you the most true HD communication experience.
Reliable: ITC video conference terminal adopts high reliable design of embedded Linux system, can realize stable operation of 7*24 hours.
Easy to use: Reserved last meeting configuration, with two shortcut keys “one key to enroll”, “one key to speech”, don’t need professional conference manager. The mobile devices like tablet PC, mobile phone are supported to control terminal.
High definition: Support 1080P HD video conference.
Items Standard
Working voltage 100VAC~240VAC
Main frequency 50~60HZ
Max power 30W
Environment temperature 5℃~35℃(working); -20℃~60℃(storage)
Humidity 10%~80%(working); 0%~95%(storage)
Noise <40dBA
Output resolution 1920*1080@60,1280*720@60
DVI input resolution 1080P60(recommend),1080P50/30/25,720P60/50,1366*76 8@60,1280*1024@60,1024*768@60,800*600@60
VGA input resolution 1920*1080@60(recommend),1366*768@60,1280*1024@6 0,1280*720@60,800*600@60
Network interface 10/100Base-T
Control interface RS232
Weight 2.1kg
Size(length, width and height)
324mm*220mm*40mm
2. Accessory and installation
2.1 Main accessory
Accessory Model Quantity
HD video conference TV-1080P-60HT/TV-1080P-30HT 1
Power adapter GM602-120500 1
HDMI cable 1
DVI cable 1
RS232 cable 1
User Manual 1
Figure 2- 1 Main accessory
2.2 Physical interface
Figure 2- 2 Physical interface
Power switch: Turn on power switch after turning on power supply, terminal begin to boot.
Reset to defaults button: Press down about 10 second, the terminal reset to the factory setting.
Power input: +12 DC power input, with standard power adapter.
2*DVI_I input: Support digital and analog signals input. DVI_I1 is main stream and DVI_I2 is assist stream in default, support arbitrary switching.
DVI_D+HDMI output: Main screen and Auxiliary screen output, HDMI is main screen in default, also HDMI can take audio output.
Serial port: Connect to the camera used to control.
Network interface: 10/100Base-T, connect to the network.
2.3 Installation
Figure 2- 3 Cable connection
Terminal conventional cable connection, choose one from microphone and the mixer to connect.
3. Operating instructions
3.1 Running status
Figure 3- 1 State light Power light: Red light when power is on.
Running light: The green light. Keep flashing when working, not bright or normally on means terminal does not work properly or terminal is booting.
otherwise means terminal does not join in the meeting.
“One key to speech”: Button light normally on means terminal is in loop back testing or terminal has got speech right, not bright means terminal has not get speech right.
3.2 Hardware control
3.2.1
Start up
Figure 3- 2 Idle screen
Connect the power adapter to terminal and turn on power switch, and wait about half minute main screen will show idle screen, IP address and status will be show in bottom of main screen.
3.2.2
One key to enroll
Figure 3- 3 Shortcut keys
Press “one key to enroll” button, terminal will join in the meeting or exit meeting speedy.
Join in the meeting: Press this button when the terminal is standing by or has registered to the server success, the terminal will join in the “fast meeting”.
Exit the meeting: Press this button when the terminal is in meeting, the terminal will exit the meeting and back to the idle status.
“One key to enroll” is available only if the terminal had ever been registered to the server. It is not available when the terminal is in H323 calling or advanced setting.
3.2.3 One key to speech
In meeting: Get or gives up speaking right in free mode, apply for speaking right to chairman in chairman mode and wait for chairman`s approval.
Standing by: The terminal will runs video and audio loopback test if you press this button down.
3.3 Web control
Enter the IP address of the terminal in the browser of your PC or mobile device, and then you can see the terminal web control page.
3.3.1 Join in meeting
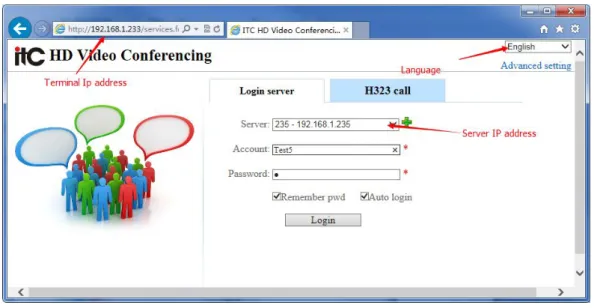
3.3.1.1 Login server
Figure 3- 4 Login interface
Choose MCU server IP address in Web control page, enter your account and password, and then click the login button.
Server: Select the server IP address through drop-down list. Click “ ” to add server IP address to drop-down list.
Remember pwd: Remember your account and password. You do not need to enter your password in next login.
Auto login: The terminal will auto login in next start up using the account and password you login last time.
Figure 3- 5 Meeting list
You can see all current meeting information in meeting list after login server.
3.3.1.2 Join meeting
Figure 3- 6 Join in the meeting
Figure 3- 7 Meeting control
You can see “Features” “members” “Screen layout” “Message” “Parameters” and “Auxiliary screen” when you are in meeting.
3.3.2 Operations
3.3.2.1 Features
Figure 3- 8 Features
Figure 3- 9 Apply chairman
Click “ ”to apply for being chairman of meeting, and enter chairman password if necessary. The meeting mode will become “chairman mode”
You can apply for being chairman of meeting only if the meeting is in “Free mode”. Only one terminal can be chairman in meeting
Figure 3- 10 Features
The chairman can control the whole venue, including screen layout, speech, video parameters, PTZ control, and send banners or rolling news, also can kick out some
Click“ ”to give up chairman. 2. Invite join
Figure 3- 11 Invite join
You can see the terminals which have registered to server and do not join in the meeting, click “ ” to invite terminal to join in the meeting.
3. Chairman sync
Click “ ” to start chairman sync, the screen of all terminals in the meeting will be the same with chairman terminal and only chairman can switch screen layout Click “ ” to stop chairman sync.
4. Chairman spoke
Click“ ” to start chairman spoke, all terminal except chairman can only see the main stream video from chairman terminal and cannot switch screen layout, but chairman can see all videos.
Only the chairman of the meeting can use “invite join”, “chairman sync”, “chairman spoke”.
5. Video polling
Figure 3- 12 Video polling
Click “ ” and set polling window, polling time to start video polling. The terminal will takes turns to show all main stream of terminal in polling window by polling time
Video polling can be available only if the number of main screen template windows less than the number of terminals attending the meeting.
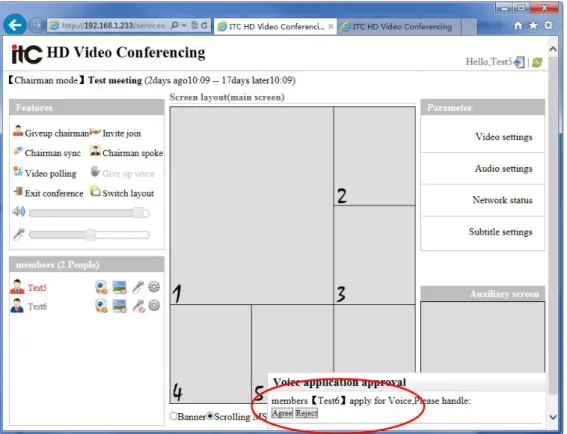
Figure 3- 13 Approval
Click “ ” to apply speaking right. You will get speaking right after the chairman agrees your application. If the meeting is in free mode, you will get speaking right directly.
Click “ ” to give up speaking right.
A meeting can only have a maximum of 5 terminal has speaking right.
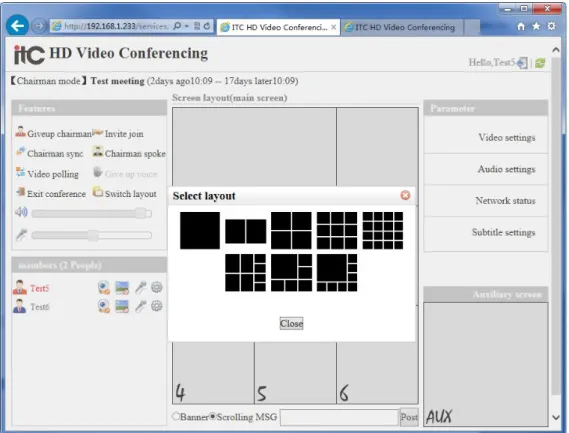
Figure 3- 14 Switch layout
Click “ ” to switch the main screen layout template. 8. Volume adjustment
Adjust the terminal audio input volume and output audio volume.
Figure 3- 15 Volume adjustment
9. Exit conference
Figure 3- 16 Members
This part shows the number and names of the members in meeting, and chairman’s name and icon are red. In the right side, it shows the main stream, assist stream, voice and remote control
1. Main stream and assist stream
Click the icon of the main stream “ ” and assist stream“ ” to show the main stream or assist stream video to the window of screen layout, also you can close the showing video. 2. Voice
Click the voice icon“ ” to give up or apply speaking right, If the meeting is in free mode, you will get speaking right directly.
3. Remote control 1) PTZ control
Figure 3- 17 PTZ control
Control the pan, tilt, zoom of cameras at this part. The chairman of meeting can control all cameras which have opened the right of remote control, and the others can only control the local camera.
2) Video settings
3) Kick out
Figure 3- 19 Kick out
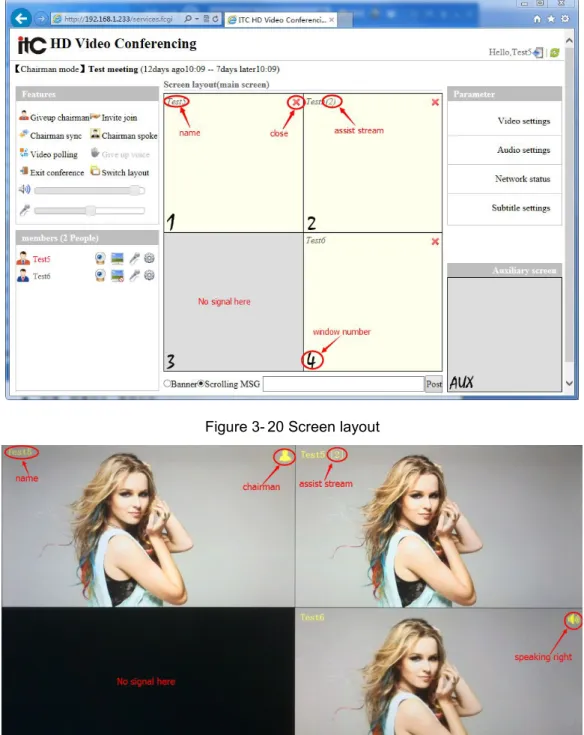
3.3.2.3 Screen layout
Figure 3- 20 Screen layout
Figure 3- 21 Main screen display
Set the main screen output display at this part. You can open or close the video from the “Members” on the left side, also you can close the video with clicking “ ”.
3- 22 Drag video
Use your left mouse to drag the video from a window to anther to realize the video display window switch.
3.3.2.4 Messages
Figure 3- 23 Messages
The chairman of the meeting can sends Banners or rolling news to the main screen of all terminals.
Figure 3- 24Messages
3.3.2.5 Parameters
Figure 3- 25 Parameters
This part includes video settings, audio settings, network status, and subtitle setting. 1. Video settings
Figure 3- 26 Video settings
Set the local main stream and assist stream encoding resolution, frame rate, bit rate and whether to enable network adaptive.
Resolution: The higher the setting, the clearer display.
Network adaptive: Reduce the video encoding parameters automatically or not when the network condition is bad.
Part of recommended minimum bit rate setting of resolution: 1080P60: ≥2048kbps; 1080P30: ≥1024kbps; 1080P15≥512kbpss 720P60: ≥1024kbps; 720P30: ≥512kbps
720*576@60: ≥512kbps 2. Audio settings
Figure 3- 27 Audio settings
Set the terminal audio coding parameters.
Echo cancellation: To eliminate the echo from microphone and speaker in the meeting.
Noise suppression: To reduce background noise.
Automatic gain: To adjust input audio volume automatically.
Silence detection: Stop encoding when there is no sound, to reduce the amount of network data.
Figure 3- 28 Network status
View the current network status of main stream, assist stream and audio transceiver 4. Subtitle setting
Figure 3- 29Subtitle setting
Set the main screen output display subtitle like banners, rolling news and name of the venue.
Figure 3- 30 Auxiliary screen
Set auxiliary screen output of terminal, using the left mouse button to drag the video from main screen to auxiliary screen window. Click “ ” to close auxiliary screen output.
3.3.3 Exit system
Figure 3- 31 Exit system
3.3.4 advanced settings
Figure 3- 32 Enter advanced settings
Click “advanced settings” on the top right corner of the login page to enter advanced settings. The default password is “1”.Suggest to change after login.
Figure 3- 34 3.3.4.1 Input settings
Main stream, assist stream port: Select the DVI port as the main, auxiliary stream input. The DVI_I1 is main stream in default.
Main stream, assist stream frame rate: Need to be the same as the actual input frame rate of the camera signal. Set to 60 when the signal comes from your PC. The factory default is 60.
Main stream, assist stream mode: Need to be the same as the actual input color space of your camera. Set to RGB when the signal comes from your PC. The factory default is RGB.
Camera
Device model: According to the actual camera model to select. Allow remote control: Whether to allow controlling by the web page. Rotate speed: Set the rotational speed of your camera.
Baud rate: Must be the same with your camera setting. The factory default is 9600.
3.3.4.2 Video output settings
Figure 3- 35 Output settings
Main screen, auxiliary screen port: Select the output port of main screen and auxiliary screen. The HDMI is the main screen in factory default.
Main screen, auxiliary screen resolution: Set the main screen and auxiliary screen resolution is 1920*1080 or 1280*720. The factory default is 1920*1080 both.
3.3.4.3 Image adjustment
Figure 3- 36 Image adjustment
Figure 3- 37 Video loop back test
The main screen shows the main, assists stream video and software version information, the auxiliary screen shows main stream video in video loop back testing.
3.3.4.5 Audio device selection
Figure 3- 38 Device selection
Input, output device: Set the audio input and output port. The factory default is microphone input and Line-out output.
Phantom power: Enable the Phantom power or not.
3.3.4.6 Audio playback test
Figure 3- 39 Playback test
3.3.4.7 Audio loopback test
Figure 3- 40 Audio loopback test
The audio output port (Line-out or HDMI) will output the audio input from the audio input port (Line-in or Microphone).
3.3.4.8 Qos settings
Figure 3- 41 Qos settings
Figure 3- 42 GK settings
Registered GK: You can call the other terminal using the Serial number or Registered name, your calling will parse and transfer by the registration server.
Server address: GK registered server address.
Serial number: The other terminal which has registered GK to the same server can call you using the serial number if you have registered GK successfully.
Registered name: The other terminal which has registered GK to the same server can call you using the registered name if you have registered GK successfully.
Set the IP address of your terminal, the factory default is DHCP enable
3.3.4.11
Password settings
Figure 3- 44 Password settings
Set the password to enter advanced settings, the factory default password is “1”.
3.3.4.12
Reboot
Figure 3- 45 Reboot
Reboot your terminal.
3.3.4.13
Restore factory settings
Figure 3- 46 Restore factory settings
Figure 3- 47 About
About ITC HD video conferencing and the manufacturer information
3.3.4.15
Exit advanced settings
Figure 3- 48 Exit advanced settings
3.3.5 H323 Call
3.3.5.1 Call and response
Figure 3- 49 H323 Call
Click “ ” on the login page to enter H323 mode.
Address: Enter the IP address of the terminal you need to call, you can select from the address book, incoming call or outgoing call records. If your terminal has registered GK to server, you can use the serial number or registered name to call other terminal which has registered GK to the same server.
Address book: Click “ ”to add IP address to the address book.
Figure 3- 50 Calling
Click “ ” to call the remote terminal. If the remote terminal is on line and standing by, the answering prompt box will pop up on lower right corner of the web login page.
If the remote terminal is off line, in meeting or in advanced setting, H323 call connection cannot be set up.
3.3.5.2 H323 Calling
Figure 3- 52 H323 Calling
Main screen: You can click the icon in the left side to open or close the local and remote video, or drag the video from one window to anther using you left mouse, also you can drag the video to auxiliary screen. And the main screen can be set to one split or two split.
Send assist stream: Set the local terminal whether to send the assist stream, if not, the remote terminal cannot view your assist stream.
Video settings: Set the local Video coding parameters, including the resolution, frame rate and bitrate.
Figure 3- 53 Quit H323 call
Click “ ” to stop H323 call
4. Maintenance and troubleshooting
4.1. Maintenance
To make sure the meeting system makes up by terminal and peripheral equipment can work normally, the meeting manager should regularly check whether the terminal working environment is meet requirements, video and audio cable and communication cable connection is normal.
Working environment the manager should check.
Environment Item Terminal requirement
Working temperature 5℃~35℃
Working humidity 10%~80% (no condensation)
When the working environment is out of the terminal environmental requirements, suggest to power off the terminal first and power on after the environmental is improved.
4.2. Troubleshooting
Common failure causes and elimination methods: Failure
phenomenon Possible reasons Solution
The power indicator light is not bright
1.The terminal power adapter disconnect
2.Power switch is off 3. Internal fault
1.Connect the power adapter 2.Turn on the power switch 3. Professional maintenance personnel
“One key to enroll” does not work
1.The terminal never login the server or the server is off line 2.The terminal is in advanced setting
3. User accounts have been occupied
1.Login the server first , make sure the server is on line, and verify the IP address
2.Exit the advanced setting first 3. Replace the other account to login
Login the terminal web fail
1. Control equipment and terminal is not in the same network segment
2. The network cable connection error or loose
1. Change the network connection of the terminal and control devices, to make it in the same network segment
2. Reconnect the terminal network cable
No sound output
1. Terminal audio port selection does not agree with the actual use
2. Audio cable connection is loose
1.Select the right audio port in advanced settings
2. Reconnect the audio cable
Camera cannot be remote controlled
1. Camera remote control is not open
2. Control cable connection error,
1.Open the camera remote control in advanced settings
Terminal output display abnormal such as no output display, color error or blinking.
1.The input signal resolution is not supported
2. Input signal color types do not agree with Settings
3. Video cable connection is loose
1. Change the input signal resolution that the terminal support.
2.Change the input signal color type and plug the signal source 3. Reconnect the video cable