GeneMapper
®
Software
Version 3.7
GeneMapper
®
Software
Version 3.7
Information in this document is subject to change without notice. Applied Biosystems assumes no responsibility for any errors that may appear in this document. This document is believed to be complete and accurate at the time of publication. In no event shall Applied Biosystems be liable for incidental, special, multiple, or consequential damages in connection with or arising from the use of this document.
Notice to Purchaser: License Disclaimer.
Purchase of this software product alone does not imply any license under any process, instrument or other apparatus, system, composition, reagent or kit rights under patent claims owned or otherwise controlled by Applera Corporation, either expressly, or by estoppel.
GeneMapper Software has not undergone specific developmental validation for human identification applications. Human identification laboratories analyzing single-source or parentage samples which choose to use GeneMapper Software for data analysis should perform their own developmental validation studies.
ABI PRISM, Applied Biosystems, GeneMapper, GeneScan, and SNaPshot are registered trademarks, and the AB Design, Applera, GeneMapper, GeneScan, SNPlex, and ZipChute are trademarks of Applera Corporation or its subsidiaries in the U.S. and/or certain other countries.
AFLP is a registered trademark of Keygene N.V.
AppleScript and Macintosh are registered trademarks of Apple Computer, Inc.
This product includes software developed by the Apache Software Foundation (http://www.apache.org/). Copyright © 1999-2000 The Apache Software Foundation. All rights reserved.
This product includes software developed by the ExoLab Project (http://www. exolab.org/). Copyright 2000 © Intalio Inc. All rights reserved.
JNIRegistry is Copyright © 1997 Timothy Gerard Endres, ICE Engineering, Inc., http://www.trustice.com. Microsoft Windows NT and Microsoft Excel are registered trademarks of Microsoft Corporation. Oracle is a registered trademark of Oracle Corporation.
All other trademarks are the sole property of their respective owners.
Applera Corporation is committed to providing the world’s leading technology and information for life scientists. Applera Corporation consists of the Applied Biosystems and Celera Genomics businesses.
Part Number 4359413 Rev. B 10/2004
Contents
Preface
How to Use This Guide . . . ix How to Obtain More Information . . . x Contacting Applied Biosystems . . . x
Chapter 1
Getting Started
New Features in the GeneMapper® Software . . . 1-2
Before You Install the GeneMapper® Software . . . 1-3
Compatible Instruments and Software . . . 1-4 Oracle Database License Agreement . . . 1-5 GeneMapper® Software Workflow . . . 1-6
Logging In to the Software for the First Time . . . 1-7 Logging In to and Out of the Software . . . 1-9 Window Elements . . . 1-12 GeneMapper Window . . . 1-12 GeneMapper Manager . . . 1-13 Panel Manager . . . 1-14 Cluster Plot Manager (SNPlex System Only) . . . 1-15 Cluster Plots . . . 1-16 Report Manager . . . 1-20
DRAFT
September 24, 2004 4:04 pm, 4359413_TOC.fm
vi GeneMapper® Software v.3.7 User Guide
Overview . . . 2-2 Access Control . . . 2-3 Administration Tool . . . 2-4 Creating a New User . . . 2-8 Creating a New Profile . . . 2-10 Security Settings on Multiple Computers . . . 2-12 Audit . . . 2-13 Audit Map Configuration . . . 2-17 Audit History Viewer . . . 2-21
Chapter 3
Archiving Data
Overview . . . 3-2 Archiver Functions . . . 3-3 Archiving Data . . . 3-6 Archiving and Restoring Overview . . . 3-7 Creating and Submitting an Archive Request . . . 3-8 Restoring Data . . . 3-10 Searching for Objects to Archive . . . 3-11 Searching for Objects to Restore . . . 3-13 Viewing Archive Locations . . . 3-15 Viewing Archive Requests and Restore Requests . . . 3-16
Chapter 4
Software Functions
Genotyping Algorithms . . . 4-2 Peak Detection . . . 4-3 Optimizing Peak Detection Sensitivity . . . 4-6 Slope Thresholds for Peak Start and Peak End Parameters . . . 4-10 Slope Threshold Example . . . 4-12 Size-Match/Size-Calling Algorithm . . . 4-14 Size-Calling Methods for Classic and Advanced Modes . . . 4-15 Allele-Calling Algorithm . . . 4-21 Component-Based Quality Values (PQV) . . . 4-23 Process Quality Value Determination . . . 4-24
Chapter 5
Example Workflows
General Analysis Workflow . . . 5-2 AFLP System Analysis Workflow . . . 5-3 LOH Analysis Workflow . . . 5-6 Microsatellite Analysis Workflow . . . 5-9 OLA Analysis Workflow . . . 5-11 SNaPshot® System Analysis Workflow . . . 5-13
SNPlex™ System Workflow . . . 5-17
Glossary
Preface
How to Use This Guide
Purpose of This
Guide
The GeneMapper® Software v.3.7 User Guide provides procedures
for using the software features.
Audience
This guide is intended for trained laboratory personnel. AppliedBiosystems is not liable for damage or injury that results from use of this guide by unauthorized or untrained parties.
Text Conventions
This guide uses the following conventions:• Boldindicates user action. For example:
Type 0, then press Enter for each of the remaining fields. • Italic text indicates new or important words and is also used for
emphasis. For example:
Before analyzing, always prepare fresh matrix.
• A right arrow () separates successive commands you select from a drop-down or shortcut menu. For example:
Select FileOpenSpot Set.
Right-click the sample row, then select View FilterView All Runs.
User Attention
Words
Two user attention words appear in Applied Biosystems user documentation. Each word implies a particular level of observation or action as described below:
Note: Provides information that may be of interest or help but is not critical to the use of the product.
IMPORTANT! Provides information that is necessary for proper operation, use, or best practices for the GeneMapper® Software.
DRAFT
September 24, 2004 3:58 pm, 4359413_Preface.fm
x GeneMapper® Software v.3.7 User Guide
How to Obtain More Information
Related
Documentation
• The GeneMapper® Software features online help that you can
access by pressing F1 on the keyboard, selecting Help
Contents and Index, or clicking in the toolbar of the GeneMapper window.
• GeneMapper® Software v.3.7 Installation Guide (P/N 4359289).
Contacting Applied Biosystems
How to Obtain
Services and
Support
For the latest services and support information for all locations, go to
http://www.appliedbiosystems.com, then click the link for Support.
At the Services and Support page, you can:
• Search through frequently asked questions (FAQs) • Submit a question directly to Technical Support
• Order Applied Biosystems user documents, MSDSs, certificates of analysis, and other related documents
• Download PDF documents
• Obtain information about customer training • Download software updates and patches
In addition, the Services and Support page provides access to worldwide telephone and fax numbers to contact Applied Biosystems Technical Support and Sales facilities.
Send Us Your
Comments
Applied Biosystems welcomes your comments and suggestions for improving user documents. You can e-mail your comments to:
Contacting Applied Biosystems
Troubleshooting
Checklist
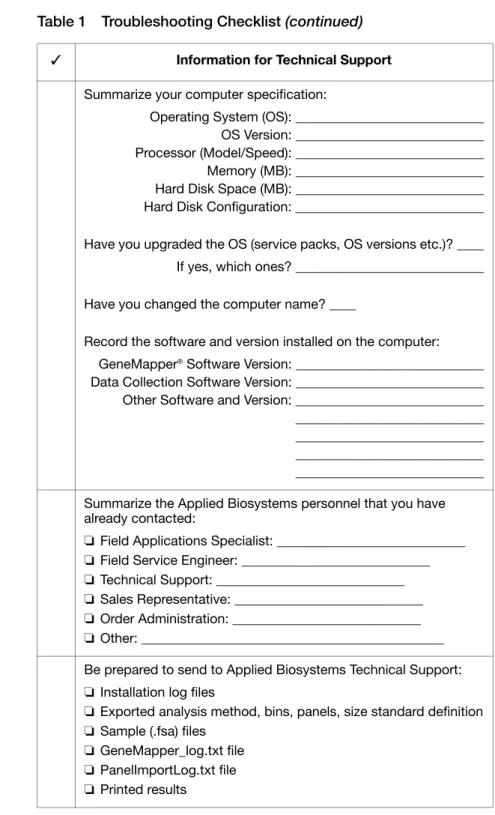
Please complete the checklist before contacting Technical Support. Table 1 Troubleshooting Checklist
✓ Information for Technical Support Briefly summarize the problem:
Have you been able to repeat the problem? _________ If yes, list the steps that you perform:
1. 2. 3. 4. 5. 6. 7. 8.
Summarize the information for your instrument:
Model: ____________________________ Capillary Length: ____________________________ Capillary Lot Number: ____________________________ Run Module: ____________________________ Dye Set: ____________________________ Status of Data Collection Services: ____________________________ Indicate the configuration of your GeneMapper® Software:
❏ Instrument
❏ Remote Autoanalysis
❏ Standalone
Summarize the information for the chemistries you are using: Chemistry Kit/Reagent: ____________________________
DRAFT
September 24, 2004 3:58 pm, 4359413_Preface.fm
xii GeneMapper® Software v.3.7 User Guide
Summarize your computer specification:
Operating System (OS): ____________________________ OS Version: ____________________________ Processor (Model/Speed): ____________________________ Memory (MB): ____________________________ Hard Disk Space (MB): ____________________________ Hard Disk Configuration: ____________________________ Have you upgraded the OS (service packs, OS versions etc.)? ____ If yes, which ones? ____________________________ Have you changed the computer name? ____
Record the software and version installed on the computer: GeneMapper® Software Version: ____________________________
Data Collection Software Version: ____________________________ Other Software and Version: ____________________________ ____________________________ ____________________________ ____________________________ ____________________________ Summarize the Applied Biosystems personnel that you have already contacted:
❏ Field Applications Specialist: ____________________________
❏ Field Service Engineer: ____________________________
❏ Technical Support: ____________________________
❏ Sales Representative: ____________________________
❏ Order Administration: ____________________________
❏ Other: _____________________________________________ Be prepared to send to Applied Biosystems Technical Support:
❏ Installation log files
❏ Exported analysis method, bins, panels, size standard definition
❏ Sample (.fsa) files
❏ GeneMapper_log.txt file
❏ PanelImportLog.txt file
❏ Printed results
Table 1 Troubleshooting Checklist (continued) ✓ Information for Technical Support
1
Getting Started
1
This chapter covers:
New Features in the GeneMapper® Software . . . .1-2
Before You Install the GeneMapper® Software . . . .1-3
Compatible Instruments and Software . . . .1-4 Oracle Database License Agreement . . . .1-5 GeneMapper® Software Workflow . . . .1-6
Logging In to the Software for the First Time. . . .1-7 Logging In to and Out of the Software . . . .1-9 Window Elements . . . .1-12 GeneMapper Window . . . .1-12 GeneMapper Manager. . . .1-13 Panel Manager. . . .1-14 Cluster Plot Manager (SNPlex System Only) . . . .1-15 Cluster Plots . . . .1-16 Report Manager. . . .1-20
DRAFT
September 24, 2004 4:20 pm, 4359413_CH_GettingStarted.fm
1-2 GeneMapper® Software v.3.7 User Guide
New Features in the GeneMapper
®Software
Version 3.7 of the GeneMapper® Software features improved stability
and the following functional enhancements:
• Analysis support for loss of heterozygosity (LOH) microsatellite assays and amplified fragment length polymorphism (AFLP®)
system assays • Custom plot colors
• Dynamic expansion of the number of columns based on the number of alleles
• Multiple marker selection • Improved allele calling features
– New Model allele calling clustering algorithm for the SNPlex™ system analysis method
– New methods for deleting ranges of alleles – Removable allele labels
– Single-click deletion of alleles • Improved peak calling
– Addition of undetected peaks on-the-fly
– Automatic flagging of peaks that occur between adjacent markers (or allele size ranges)
• New Report Manager feature for:
– Generating multi-column, custom reports from the data in the sample and genotype tables
– Performing basic comparative analysis of the data in the sample and genotype tables
– Printing or exporting the customized reports
• New Report Table Settings feature for saving and reusing the settings used to create report tables in the Report Manager • Synchronization of data in tables and plots
Before You Install the GeneMapper® Software
Before You Install the GeneMapper
®Software
Computer
Requirements
Note: See the GeneMapper® Software v.3.7 Installation Guide
(P/N 4359289) for a detailed explanation of the system requirements.
Note: The Dell 340 computer that Applied Biosystems ships with the Applied Biosystems 3730/3730xl DNA Analyzers is sufficient to run the GeneMapper® Software but does not provide optimal performance.
Microprocessor
Compatibility
GeneMapper® Software is not compatible with the following processors:
• Dual-processors
• Intel® Xeon™ processors
Hard Drive
Partitioning
For optimal performance of the GeneMapper® Software, partition the
hard drives on your computer.
Component Optimum* Requirements Minimum† Requirements Computer • Intel Pentium® IV processor, 2.4 GHz
• 1 GB of RAM
• Two 120-GB hard drives • 20/48✕ IDE CD-ROM
• 10/100 NIC with RWU (internal)
• Intel Pentium® processor, 733 MHz
• 512 MB of RAM • 20/48✕ IDE CD-ROM
• 10/100 NIC with RWU (internal)
Monitor • 800 × 600 pixels size • 17-inch color monitor
• 800 × 600 pixels size • 17-inch color monitor Operating
System
One of the following operating systems: • Microsoft Windows® 2000
Professional Operating System, Service Pack 4 or higher • Microsoft Windows® XP
Professional Operating System, Service Pack 1 or higher
Microsoft Windows® 2000
Professional Operating System, Service Pack 3
*The Optimum Requirements column lists the requirements that are recommended and supported by Applied Biosystems.
†The Minimum Requirements column lists the lowest specifications that permit the installer to install the GeneMapper® Software. The minimum requirements may not provide optimal performance. Applied
DRAFT
September 24, 2004 4:20 pm, 4359413_CH_GettingStarted.fm
1-4 GeneMapper® Software v.3.7 User Guide
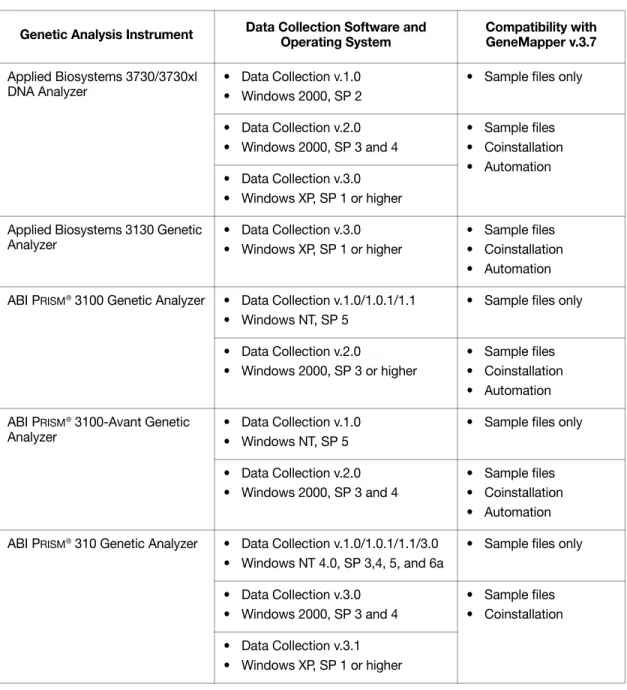
Compatible Instruments and Software
Table 1-1 Compatibility matrix of GeneMapper® Software v3.7, Applied Biosystems instruments, Windows Operating Systems, and versions of the Data Collection Software
Genetic Analysis Instrument Data Collection Software and Operating System
Compatibility with GeneMapper v.3.7 Applied Biosystems 3730/3730xl
DNA Analyzer
• Data Collection v.1.0 • Windows 2000, SP 2
• Sample files only
• Data Collection v.2.0 • Windows 2000, SP 3 and 4
• Sample files • Coinstallation • Automation • Data Collection v.3.0
• Windows XP, SP 1 or higher Applied Biosystems 3130 Genetic
Analyzer
• Data Collection v.3.0 • Windows XP, SP 1 or higher
• Sample files • Coinstallation • Automation ABI PRISM ® 3100 Genetic Analyzer • Data Collection v.1.0/1.0.1/1.1
• Windows NT, SP 5
• Sample files only
• Data Collection v.2.0
• Windows 2000, SP 3 or higher
• Sample files • Coinstallation • Automation ABI PRISM ® 3100-Avant Genetic
Analyzer
• Data Collection v.1.0 • Windows NT, SP 5
• Sample files only
• Data Collection v.2.0 • Windows 2000, SP 3 and 4
• Sample files • Coinstallation • Automation ABI PRISM ® 310 Genetic Analyzer • Data Collection v.1.0/1.0.1/1.1/3.0
• Windows NT 4.0, SP 3,4, 5, and 6a
• Sample files only
• Data Collection v.3.0 • Windows 2000, SP 3 and 4
• Sample files • Coinstallation • Data Collection v.3.1
Oracle Database License Agreement
Oracle Database License Agreement
About the
Database
The GeneMapper® Software uses an Oracle™ database to store all
project-related data. In addition to serving as a common data repository, the database provides user authentication, robust and scalable data management, and flexible archive capabilities via the utilities provided with the GeneMapper® Software.
Database Access
Applied Biosystems does not support access to the Oracle databasethrough any means other than the GeneMapper® Software.
User Access
The Oracle™ database version included with the GeneMapper®Software v.3.7 is an embedded license database. This license allows access to the database for up to five named users at any given time. If you want to accommodate more than five named users, you can purchase either additional GeneMapper® Software licenses, or
additional Oracle-named user privileges and thereby, honor Applied Biosystems’ agreement with the Oracle™ corporation.
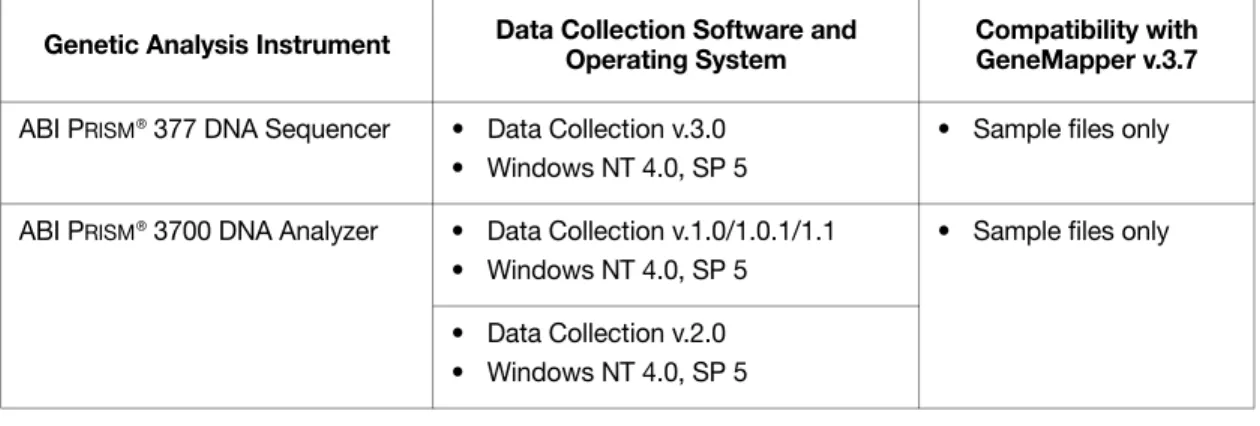
ABI PRISM ® 377 DNA Sequencer • Data Collection v.3.0
• Windows NT 4.0, SP 5
• Sample files only
ABI PRISM ® 3700 DNA Analyzer • Data Collection v.1.0/1.0.1/1.1
• Windows NT 4.0, SP 5
• Sample files only
• Data Collection v.2.0 • Windows NT 4.0, SP 5
Table 1-1 Compatibility matrix of GeneMapper® Software v3.7, Applied Biosystems instruments, Windows Operating Systems, and versions of the Data Collection Software
Genetic Analysis Instrument Data Collection Software and Operating System
Compatibility with GeneMapper v.3.7
DRAF
T
pt emb e r 2 4 , 2 0 0 4 4: 20 pm, 43 594 13 _CH_Get tingSt ar te d. fm Getting Started G eneMa pper ® Softwar e v .3.7 U s er Gu ideGeneMapper®Software
Secondary database Delete CD Log Analyze Projects Table settings Plot settings Export to *.ser, *.txt Print Apply Apply Create,
import, or edit
Apply panels Examine Results Set Up Fragment Analysis Samples plot Genotypes plot Samples table Genotypes table Cluster plot Raw data Size standards Sample files DNA analyzers .fsa Create, import, or edit Projects Projects Kits, panels, markers, bins Kits, panels, binsets Analysis methods Size standards SNP sets Table settings Plot settings Analysis methods Size standards SNP sets GeneMapper Database Import/export Import/ export Import/ export Auditing Access Control Archive GeneMapper Manager Panel Manager
Logging In to the Software for the First Time
Logging In to the Software for the First Time
Installation
For installation procedures, refer to the GeneMapper® Software v.3.7Installation Guide (P/N 4359289).
Note: When installing the GeneMapper® Software, log into the
computer as the administrator and into the local domain. IMPORTANT! Do not log on to the network.
Logging in for the
First Time
The first time that you log into the software, use the default user name and change the password.
Do not misplace the password for the default user account. If the password is lost before additional user accounts are created, then the GeneMapper® Software will be inaccessible and all
data it contains unrecoverable.
To log in to the GeneMapper® Software for the first time: 1. In the Login to GeneMapper dialog box:
a. Enter the following: User Name: gm
Password: password
DRAFT
September 24, 2004 4:20 pm, 4359413_CH_GettingStarted.fm
1-8 GeneMapper® Software v.3.7 User Guide
2. In the Password Change Required dialog box, click OK to change the password for the default user account.
The password for the default user account is pre-expired and must be changed on first login.
3. Click OK to display the Change Password dialog box.
4. Type a new password, retype the new password to confirm it, then click OK.
5. Two license agreements are displayed during the first login. Click
Logging In to and Out of the Software
Logging In to and Out of the Software
Logging in to
Software
1. In the desktop, double-click (GeneMapper v.3.7) or select StartAll ProgramsApplied Biosystems
GeneMapperGeneMapper v.3.7 to start the software.
2. Select your user name from the User Name drop-list or, if your name is not listed, type it in.
If you do not have a User Name, request a user name and/or password from the Administrator. If you are the Administrator, use:
– User Name: Administrator
– Password: Administrator
If your password is pre-expired, you are prompted to create a password when you click OK.
3. Enter your password.
IMPORTANT! Applied Biosystems recommends changing the password for the Administrator user account after installing the software.
4. Click OK.
Note: If you unsuccessfully attempt to log in to the software more times than allowed by your password policy, your account becomes “suspended.” To activate a suspended user account, either wait the
DRAFT
September 24, 2004 4:20 pm, 4359413_CH_GettingStarted.fm
1-10 GeneMapper® Software v.3.7 User Guide
Connecting to a
New Host
1. Click New Host on the Login to GeneMapper dialog box.
2. In the New Host dialog box:
The New Host dialog box allows you to connect to GeneMapper® Software databases on other computers.
a. In the Host Name field, enter the machine name or IP address of the database host.
The window displays the new database host and its user names list. If the GeneMapper® Software cannot connect to
the database host you entered, the error message: “You have entered an invalid host” is displayed. Click OK to exit, then reenter the database host information.
b. Select the appropriate machine type. c. ClickOK.
IMPORTANT! If at any point the network connection is interrupted or lost, the GeneMapper®
Software will become unusable. To restore the connection, exit the software and restart it using a user account that belongs to the Admin user group.
Logging In to and Out of the Software
Logging Out
You can close the GeneMapper® Software in three ways:• Select FileLogout
• Select FileExit
• Click (the Close button).
When you log out of the GeneMapper® Software with a GeneMapper
project that has unsaved changes, you are prompted to save or discard the changes you made since the last time you updated the project.
If you close the GeneMapper® Software using the FileLogout
command, the login window reopens after you select either “Yes” or “No”. GeneMapper® Software closes completely if you use either the
DRAFT
September 24, 2004 4:20 pm, 4359413_CH_GettingStarted.fm
1-12 GeneMapper® Software v.3.7 User Guide
Window Elements
GeneMapper Window. . . 1-12 GeneMapper Manager . . . 1-13 Panel Manager . . . 1-14 Cluster Plot Manager (SNPlex System Only) . . . 1-15 Report Manager . . . 1-20
GeneMapper Window
Figure 1-1 GeneMapper Window
Figure 1-2 GeneMapper Window Toolbar New Project
Open Project
Save Project
Add Samples to Project Export Table
Display Cluster Plots
Display Plots
Size Match Editor
Analysis Method Editor Panel Manager
Analyze
GeneMapper Manager Low Quality to Top
Current Settings Selector
Help
Print Find
myScience Table Setting Editor
GeneMapper Manager
GeneMapper Manager
Use the GeneMapper Manager (Figure 1-3) to create, view, delete, edit, duplicate (using Save As), import, and export:
• Projects
• Analysis Methods • Table Settings • Plot Settings
• Cluster Plot Settings • Matrices
• Size Standards
• SNP Sets (for analyzing SNPlex™ system only)
• Report Settings
DRAFT
September 24, 2004 4:20 pm, 4359413_CH_GettingStarted.fm
1-14 GeneMapper® Software v.3.7 User Guide
Panel Manager
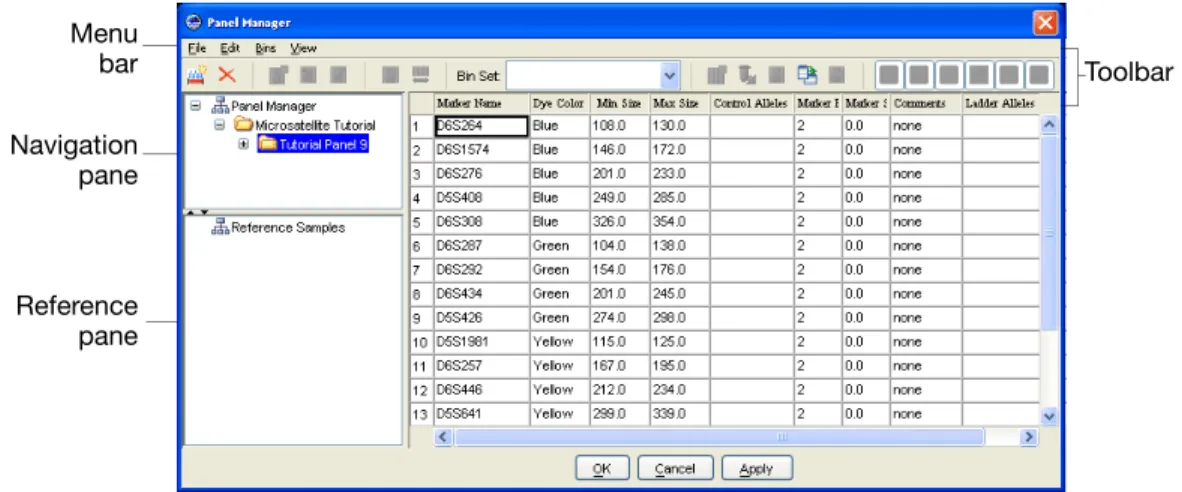
Use the Panel Manager to create, edit, import, export, and view kits, panels, bin sets, markers, bins, and reference data. To open the Panel Manager, click (Panel Manager) in the GeneMapper window toolbar (or select ToolsPanel Manager).
Figure 1-4 Panel Manager
Panel Manager
Toolbar
The active buttons on the toolbar vary according to which items (kits, panels, bin sets, markers, bins, or reference data) are selected and viewed.
Figure 1-5 Panel Manager Toolbar
Toolbar Navigation
pane
Reference pane Menu
bar
Clear
Add Bin
Bin Set Selector
New Kit/ New Panel/New Marker Edit Bin
Show/Hide Project Alleles Full View
Delete Bin
New Bin Set
Add Reference Data Auto Bin
Panel Reference Data
Cluster Plot Manager (SNPlex System Only)
Cluster Plot Manager (SNPlex System Only)
You can display the cluster plot from the samples table or the genotypes table. The table that you use to access the cluster plot affects which electropherogram plot is accessible from the Cluster Plot Manager. The cluster plot displays for each marker:
• Cluster Plots: Scatter plot of the homozygous, heterozygous, and undetermined genotype calls for selected samples and controls • SNP Table: Information, results, and confidence values for
each SNP
• Cluster Plot Genotypes Table: Information, results, and quality values for samples
Opening the
Cluster Plot
Manager
Click (Display Cluster Plots) to open the Cluster Plot Manager.
Figure 1-6 Cluster Plot Manager
Procedures that
Use the Cluster
Plot Manager
SNP Table
Genotypes Table
Cluster Plot
• Adjusting the Cluster Plot Manager panes • Adjusting the
cluster plot graph
• Displaying electropherogram plots
• Exporting data • Filtering/Finding
• Hiding samples • Omitting samples
from clustering • Printing
DRAFT
September 24, 2004 4:20 pm, 4359413_CH_GettingStarted.fm
1-16 GeneMapper® Software v.3.7 User Guide
Cluster Plots
Cartesian Cluster
Plot
In the cartesian cluster plot, samples are plotted according to the corresponding peak height. The peak height for:
• Allele 1 is plotted along the x-axis • Allele 2 is plotted along the y-axis
The following symbols indicate the genotype calls for the samples and genotype clusters at different locations in the cartesian cluster plot.
Polar Cluster Plot
In the polar cluster plot, the (x, y) coordinate from the linear cluster plotis converted to (log r, θ), where r equals the orientation of the coordinate from the origin (in radians), and θ equals the angle from the x-axis.
• Log10 (intensity) is plotted along the x-axis • Angle in radians is plotted along the y-axis
The following symbols indicate the genotype calls for the samples and genotype clusters at different locations in the polar cluster plot:
Symbol Genotype Plot Location
Allele 1 homozygote Along the x-axis Heterozygote Along the diagonal Allele 2 homozygote Along the y-axis
Control Along the appropriate homozygote axis No-Template Control Linear intensity
Uncalled N/A
Symbol Genotype Plot Location
Allele 1 homozygote Closest to x-axis
Heterozygote Above Allele 1 homozygotes Allele 2 homozygote Above heterozygotes No-Template Control Close to origin
x2+y2
Cluster Plots
SNP Table
The SNP table, located in the upper left side of the Cluster Plot Manager,shows information, results, and confidence values for each SNP.
Note: Depending on the settings that you use, not all columns will be visible.
Cluster Plot
Genotypes Table
The Cluster Plot Genotypes table, located in the lower left of the Cluster Plot Manager, shows information, results, and quality values for the samples after selecting a SNP in the SNP table.
Column Description
(Analysis Status)
• Analyzed ( )
• Requires reanalysis ( ) • Unanalyzed ( )
SNP • Name of the SNP tested in the SNPlex™ assay.
• Comes from the SNP set used to analyze the samples Marker Name of the marker from the panel file used to analyze
the samples
Run Name Name of the run from the .fsa file
Panel Name Name of the panel file used to analyze the samples Dye Color of the dye on the ZipChute™probe used to detect
the SNP
Allow Autocall Check box for displaying samples in the cluster plot: • Select for the software to make the calls based on the
clustering algorithm.
• Deselect to make the calls manually.
Column Description
(Analysis Status)
• Sample is analyzed ( )
• Sample is omitted from analysis ( ) • Sample file not found ( )
DRAFT
September 24, 2004 4:20 pm, 4359413_CH_GettingStarted.fm
1-18 GeneMapper® Software v.3.7 User Guide
Note: Depending on the settings that you use, not all columns will be visible.
A1 • If A1: Sample contains at least one copy of Allele 1 • If A2: Sample is Allele 2 homozygous
A2 • If A1: Sample is Allele 1 homozygous
• If A2: Sample contains at least one copy of Allele 2 Height 1 Peak height for Allele 1
Height 2 Peak height for Allele 2 CV Clustering CV
GQ Genotype Quality
Omit Select to omit a sample from clustering
Hide Select to hide a sample from the cluster plot view Run Name Name of the run folder created by the data collection
software at the time the sample was run AE Allele Edit
OS Offscale PQV
PHR Peak Height Ratio PQV LPH Low Peak Height PQV SPU Spectral Pull-Up PQV
AN Allele Number PQV
BD Broad Peak PQV
XTLK Crosstalk PQV
Cluster Plots
Adjusting the
Cluster Plot
Manager
You can adjust the size of the tables and plots using the:
• Dark gray bar to the left of the cluster plot to adjust the size of the cluster plot.
• Light gray bar between the SNP table and genotypes table to adjust the size of tables.
To adjust a pane:
1. Position the cursor over a sizing bar until the cursor changes to sizing arrows.
2. Drag the sizing arrows to adjust the size of the panes. To restore the default view, click the sizing bar.
To display or hide the cluster plot using the dark gray bar to the left of the cluster plot, click the:
• Upper black triangle to display the cluster plot only. • Lower black triangle to hide the cluster plot. Adjusting the Cluster Plot Graph Settings
1. Right-click the cluster plot, then select Graph Settings. 2. Select the type of cluster plot to view: Cartesian or Polar. 3. Set the scale for the x-axis and the y-axis.
• Select Auto Scale for the software to scale each plot to the maximum x and y values obtained for the marker.
• Deselect Auto Scale and enter Minimum and Maximum values to view for all plots.
4. Click OK to activate the cluster plot settings.
Zooming In and Out of the Cluster Plot (Cartesian Plot Only)
To zoom in: Select (Zoom In) in the toolbar, click the plot, then draw a box around the samples to view more closely.
To zoom out: Select (Zoom Out) in the toolbar, then click the plot until you obtain the desired view.
DRAFT
September 24, 2004 4:20 pm, 4359413_CH_GettingStarted.fm
1-20 GeneMapper® Software v.3.7 User Guide
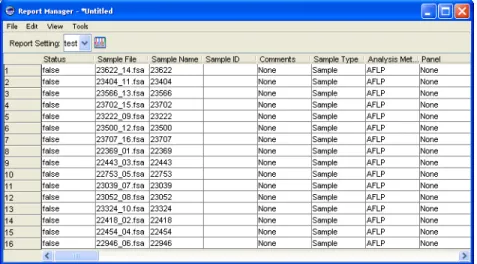
Report Manager
Use the Report Manager (Figure 1-7) to create, print, export, and modify reports generated from project data.
2
Software Access Control and
Auditing
2
This chapter covers:
Overview . . . .2-2 Access Control . . . .2-3 Administration Tool . . . .2-4 Creating a New User . . . .2-8 Creating a New Profile . . . .2-10 Security Settings on Multiple Computers . . . .2-12 Audit . . . .2-13 Audit Map Configuration . . . .2-17 Audit History Viewer . . . .2-21
DRAFT
September 24, 2004 4:20 pm, 4359413_CH_ControllingAccess.fm
2-2 GeneMapper® Software v.3.7 User Guide
Overview
Administrator’s
Function
The administrator sets up the security and audit features for all users of GeneMapper® Software:
1. Select ToolsSecurity Manager to start the Access Control tool for:
• Creating, duplicating, and deleting users (see page 2-8) • Editing user properties (see page 2-9)
• Setting password policies (see page 2-4)
• Creating, duplicating, and deleting user profiles (see page 2-10)
2. Select ToolsAudit ManagerSettings to start the Audit Map Configuration tool:
• Selecting which events to audit in GeneMapper® Software
(see page 2-18)
• Selecting the auditing mode (see page 2-19)
3. Select ToolsAudit ManagerReport to start the Audit History Viewer for:
• Searching for and viewing audit events (see page 2-22) Do not misplace the administrator password. If the administrator password is lost, access control must be reset, resulting in the loss of all users and profiles.
Access Control
Access Control
Overview
Access Control allows an administrator to control who can accessspecific features and functions of the GeneMapper® Software.
Functional
Access Control
A user’s access to functions is not controlled by membership in user groups. Instead, each function is enabled or disabled in an object called a User Profile. Each user is assigned a single user profile, allowing administrators to control data and function access independently.
DRAFT
September 24, 2004 4:20 pm, 4359413_CH_ControllingAccess.fm
2-4 GeneMapper® Software v.3.7 User Guide
Administration Tool
Description
The Administration Tool allows an administrator to manage thecreation and deletion of: • Users
• Profiles • Applications
An administration user is always associated with the Administration User Group and cannot be deleted. And, only one administrator is allowed to modify Access Control data at one time.
Do not misplace the administrator password. If the administrator password is lost, access control must be reset, resulting in the loss of all users and profiles.
Type Selection
In the left Tree pane, Users or Applications are types. When youselect a type, the List of Users pane displays a list of identifiers of the type selected.
IMPORTANT! Do not remove any applications from the default list in the left Tree pane.
Administration Tool
Name Selection
When you select (click) a name, properties of that name appear in theUser Properties pane.
Note: If you select EULA (End User License Agreement), the license agreement is displayed the next time the user is authenticated.
Properties Panes
Access control identifiers have an additional drop-list labeled,“Control Security Group”. This defines the security group for control of access to the corresponding access control data itself within the Administrative Tool.
The identifiers under access control are: • User
• Profile
When a reserved (undeletable) identifier is selectable, a label in the Properties pane indicates this (see the specific Property panes below).
DRAFT
September 24, 2004 4:20 pm, 4359413_CH_ControllingAccess.fm
2-6 GeneMapper® Software v.3.7 User Guide
List Panes
Working with List panes:• In a List pane, clicking a column header sorts the rows in the table in case-sensitive alphabetic order. Clicking the column header again sorts in reverse alphabetic order.
Figure 2-1 Sorting rows in the List pane
• The column width can be widened or shortened. When widening or shortening the column width, no sorting occurs.
• In security groups, each cell in the Security Group column is configured to be a drop-list.
Administration Tool
Commands
Toolbar CommandsTool tip Help text appears when you place the cursor over a button in the toolbar.
Menu Bar Commands
Each command has a corresponding menu item. Each menu item has a unique mnemonic. The mnemonics are an underlined letter or number Table 2-1 Description of Toolbar Commands
Icon Description
Save commits changes in the Admin Tool to data store and is accessible from the menu bar, keyboard shortcut, or toolbar. Reload refreshes the Admin Tool with the content of the data store and is accessible from the menu bar, keyboard shortcut, or toolbar. You can exit by the upper-right-corner button or by selecting FilesExit. If you have updated memory but have not yet committed changes to data store, a dialog box prompts you to save the changes. You can click Yes, No, or Cancel.
Duplicates the selected indentifier. Duplicate is accessible from the menu bar and toolbar.
Locates the name specified in the text field in the navigation pane.
Prints all or some identifiers in various formats selected from the dialog box shown below.
DRAFT
September 24, 2004 4:20 pm, 4359413_CH_ControllingAccess.fm
2-8 GeneMapper® Software v.3.7 User Guide
Creating a New User
1. Click (New User).
2. In the Create User dialog box, click Next.
3. In the Configure page, click Next. 4. In the Summary page, click Finish. 5. Click Save.
Creating a New User
User Properties
A user must be assigned to a Profile. Profiles allow the administratorto grant or deny a user the right to access functions.
When one user is selected in the navigation pane, the user profile is displayed in the User Properties page and the User Details page.
Note: When a user is deleted, the user name is not displayed although it is permanently stored in the database; it cannot be used again.
Note: In the User Details page, the administrator can change the status of a user to Inactive to block access by the user.
DRAFT
September 24, 2004 4:20 pm, 4359413_CH_ControllingAccess.fm
2-10 GeneMapper® Software v.3.7 User Guide
Creating a New Profile
1. Click (New Profile).
Creating a New Profile
3. In the Configure page, complete: a. Profile properties
b. Select OIR (override inherited rights) and/or Execute.
Execute: Give access to the function to any user assigned to this Profile.
OIR: Overrides inherited rights. Any lower level in the hierarchy inherits the access rights of the node above it. To override the inherited defaults, select OIR. This allow the administrator to grant or deny the groups’ ability to execute a specific function on a lower level of the hierarchy tree. 4. Click Next. The Summary page displays the properties and
associations of the new profile name.
5. Click Finish to complete the creation of a new User Profile Name.
DRAFT
September 24, 2004 4:20 pm, 4359413_CH_ControllingAccess.fm
2-12 GeneMapper® Software v.3.7 User Guide
Security Settings on Multiple Computers
1. Select ToolsSecurity Manager.
2. In the System Authentication dialog box, enter your login name and password, then click OK.
3. In the Access Control Administration window, select
FileExport Database. 4. Save as a <fn>.acc file.
5. On the computer from which you want to import the file: a. Select FileImport Database.
b. Double-click the <fn>.acc file.
Note: The imported settings replace the current security settings on the importing computer.
Audit
Audit
Purpose
Audit trails maintain a history of data changes made by the user.IMPORTANT! Upon installation of the GeneMapper® Software, the
auditing feature is OFF by default. Consequently, changes to projects, analysis methods, and panels are not recorded until the feature is activated.
Description
There are three basic categories of data changes:• Project changes
• Analysis methods changes • Panels changes
Data Changes
that Generate
Audits
An audit is generated when data are changed in a project, analysis method, or a panel. The events within them that generate an audit.
Audited
Object An audit record is generated when you ... Projects • Create, delete, or rename a project
• Add or delete a run • Add or delete a sample • Overwrite a GQ value
• Add, delete, or modify an allele Analysis
Methods
• Add an analysis method
• Change any analysis parameter values • Delete an analysis method
Panels • Add, delete, or rename a panel • Add, delete, modify a marker • Add or delete a bin set • Add, delete, or modify a bin
• Add, delete, or rename a chemistry kit
Note: Deleting a kit is recorded as one audit record. When you delete a kit, all panels, markers, and bin sets
associated with that kit are deleted as well, but they do not generate any individual audit records.
DRAFT
September 24, 2004 4:20 pm, 4359413_CH_ControllingAccess.fm
2-14 GeneMapper® Software v.3.7 User Guide
Reason For
Change
When a change occurs and auditing is required, the Reasons For Change dialog box opens to display:
• The attribute that was changed, created, or deleted. • The old and new values, if applicable.
• A text box where you enter the reason for the change, click OK
to save changes to the attribute and the audit data.
Note: When auditing is ON, the software always generates audit records.
Audit
Reading Audit
Records
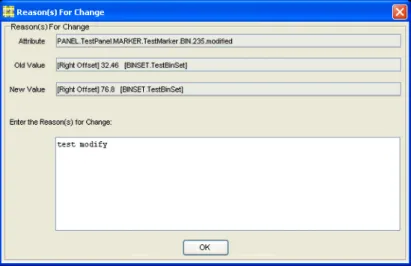
Use the descriptions in the table below to interpret the audit records. Example 1: Modify Bin
Refer to Table 2-2, “Text Box Description: Modify Bin,” for
descriptions of the text boxes in the Reason(s) for Change dialog box.
Figure 2-3 Reason(s) for Change: Modify Bin Table 2-2 Text Box Description: Modify Bin
Text Box Example (from Figure 2-3) Definition
Attribute PANEL.TestPanel.MARKER.TestMarker. BIN.235.modified
BIN 235, in marker named TestMarker, in panel named TestPanel, is modified
Old Value [Right Offset] 32.46 [BINSET.TestBinSet] The attribute Right Offset was 32.46 and the bin is in bin set TestBinSet
New Value [Right Offset] 76.8 [BINSET.TestBinSet] The attribute Right Offset is now 76.8 and the bin is in bin set TestBinSet
DRAFT
September 24, 2004 4:20 pm, 4359413_CH_ControllingAccess.fm
2-16 GeneMapper® Software v.3.7 User Guide
Example 2: To Rename an Allele 1. Open an analyzed project. 2. Open the Samples Plot. 3. Rename an allele.
Refer to Table 2-3, “Text Box Description: Rename Allele,” for descriptions of the text boxes in the Reason(s) for Change dialog box.
Figure 2-4 Reason(s) for Change: Rename Allele
Table 2-3 Text Box Description: Rename Allele
Text Box Example (from Figure 2-4) What it Means
Attribute RUN.Microsatellite.SAMPLE.C006_E01
9_Run_C006_2002-05-10_205_07.fsa.ALLELE.test.modified
Allele named test in sample named
C006_E019_Run_C006_2002-05-10_205_07.fsa, in run named MicroSatellite is modified
Old Value test [KIT.Microsatellite Tutorial PANEL.Tutorial Panel
9.MARKER.D6S264]
Allele was named test, in marker D6S264, in panel Tutorial Panel 9, in kit named
MicroSatellite Tutorial
New Value newName [KIT.Microsatellite Tutorial PANEL.Tutorial Panel
9.MARKER.D6S264]
Allele is now named newName in marker D6S264, in panel Tutorial Panel 9, in kit MicroSatellite Tutorial
Audit Map Configuration
Audit Map Configuration
Overview
The Audit Map Configuration Tool is used to manage Audit Maps.Audit Maps are used to control how auditing is performed on a given data type.
With the Audit Map Configuration Tool:
• You can set the audit states of an audit attribute to On, Off, or Silent.
• All changes to audit maps are saved automatically. There is no SAVE command.
• The Audit Map Configuration tool checks if an application is known by the Security component. If Security does not know about the application, the application does not start.
Note: Any changes you make to an audit map do not take effect until you restart the GeneMapper® Software.
Accessing the
Audit Map
Configuration
Tool
To access the Audit Map Configuration tool:
1. In the GeneMapper window, select ToolsAudit ManagerSetting.
2. In the System Authentication dialog box, type your login name and password, then click OK to display the Audit Map
DRAFT
September 24, 2004 4:20 pm, 4359413_CH_ControllingAccess.fm
2-18 GeneMapper® Software v.3.7 User Guide
Audit Map
Configuration
Functions
To selectively or collectively:
• Enable or disable all the attributes in an audit map – Select or deselect a cell in the Enabled column in the Audit Map Objects page.
• Change the audit state of an attribute – Select a different audit state in a cell under the State column in the Attributes page. Audit states are: On, Off, or Silent.
• Sort a row – Click a column header.
Note: Disabled Audit Maps (Enabled column) display their attribute list in italics.
Audit Map Configuration
Commands
The following table lists the commands you can perform in the AuditMap Configuration Tool.
Table 2-4 Audit Map Configuration Tool Commands
Menu Command Function
File Visual Print Displays the Print dialog box. Visual Print
Preview
Displays the Print Preview dialog box.
Exit Exits the Audit Map Configuration application. Auditing On Select auditing to be turned on for the Audit
Map Configuration.
When a change is made to an Audit Map’s enabled state or when a change is made to the state of an attribute, auditing occurs, and A Reason For Change (RFC) dialog box opens. Note: When the RFC dialog box opens and you:
• Click OK – The map or attribute state changes and an Audit Record is created. • Click Cancel – The map or attribute state
does not change.
Silent When a change is made to an Audit Map’s enabled state or when a change is made to the state of an attribute, auditing occurs. Although the RFC dialog box does not open, a ‘silent’ Audit Record is created.
Settings Password Policies
Displays Password Policies for modifying the rules that determine password format, password lifetime, password reusability, and failed login attempts.
Change Password
Displays Change Password for changing the password of the selected user account. Note: You must know the existing password of a user account to change the password for it.
DRAFT
September 24, 2004 4:20 pm, 4359413_CH_ControllingAccess.fm
2-20 GeneMapper® Software v.3.7 User Guide
Changing the
State of An Audit
Map
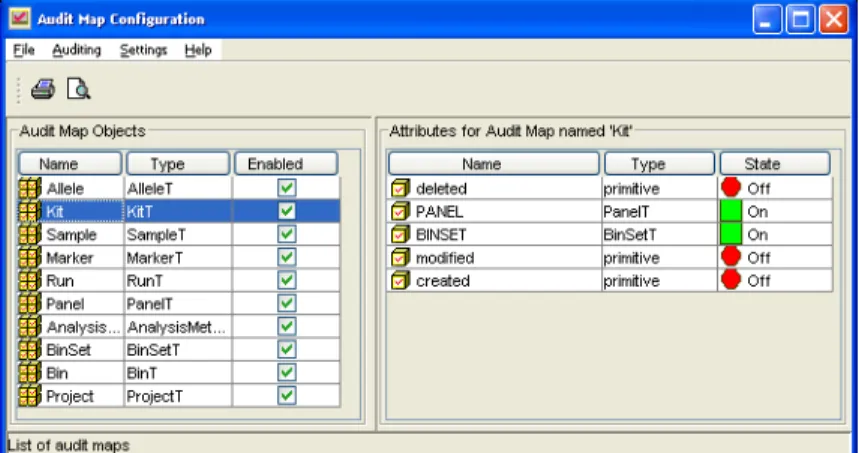
Initially, the Audit Map Attributes are turned off. To turn them on, click the Audit Map Object and then turn on the attributes
individually.
An audit map may contain another audit map as its attribute. For example, in the illustration below, the Kit map contains a Panel attribute (Panel is of a type PanelT map).
To change the state of the Panel audit map:
1. In the Audit Map Objects pane (left), click the Kit folder. 2. In the Access to Audit map pane (right), select PanelAttribute. 3. Click the panel State, then select one:
• Off – No Attributes in Panel are audited.
• On/Silent – All attributes in the Panel are audited based on the Panel audit map.
IMPORTANT! If the attribute type is not primitive, the ON state does not guarantee that the object is audited. You need to go to the Audit Map Object of the specified type and turn on all the relevant attributes.
For example, in the graphic below, the Audit Map Object, Kit, has attributes BINSET and PANEL which are types of BinSetT and PanelT. To enable or disable auditing for BINSET and PANEL, you need to go to the BinSet and the Panel Audit Map Objects to change the state of their attributes.
Audit Map Object is Kit Attributes for Kit Type of Attribute
Audit History Viewer
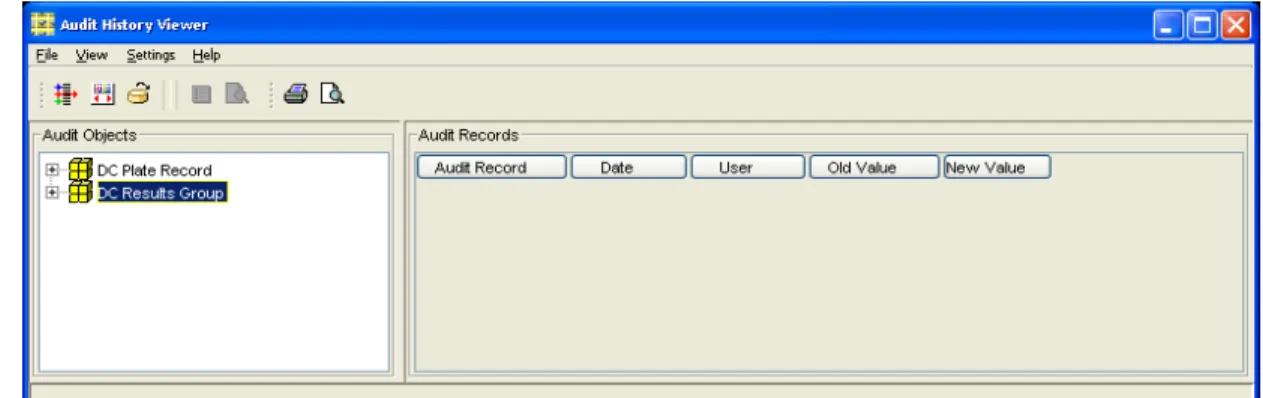
Audit History Viewer
Overview
The Audit History Viewer is used to view historical audit data. Thistool is used as a read-only viewer for audit records. The tool provides data filtering so that audit records can be viewed in different formats. Audit records that you can view with the Audit History Viewer are:
• Date and time the audit record was created • The user who triggered the audit event • The attribute that was changed
• The old and the new values • The reason for the change
Note: The audit records are stored in a permanent data store.
DRAFT
September 24, 2004 4:20 pm, 4359413_CH_ControllingAccess.fm
2-22 GeneMapper® Software v.3.7 User Guide
Viewing an Audit
History
1. In the Audit Objects pane, expand the objects tree until the object of interest is displayed.
2. Highlight an object and then click (Detail Panel) to display the audit record details.
Note: Click the column headers to sort the read-only records columns.
Audit History Viewer
Filter Command
The filter allows you to categorize audit history records.To use the Filter command: 1. Click (Filter).
2. In the Filter Audit Records pane, enter search criteria in the applicable text boxes.
You can filter audit records by: • Name
• Date (and, before or after a date or between two dates) • User name
• Matching whole words • Case
DRAFT
September 24, 2004 4:20 pm, 4359413_CH_ControllingAccess.fm
2-24 GeneMapper® Software v.3.7 User Guide
Commands
Table 2-5 Audit History CommandsMenu Command Function
File Reload Reloads the audit record display with the most recent data from the database
Report Prints all or some identifiers in various formats selected from the dialog box shown below.
Print Preview
Displays the Print Preview dialog box for the printed report.
Page Setup
Displays the Page Setup dialog box.
Visual Print Preview
Displays the Print Preview dialog box for the selected object.
Visual Print Displays the Print dialog box for the selected object.
Exit Exits the Audit History Viewer application. View Filter Displays the filter pane on the top of the frame
when selected. It allows the user to specify criteria that limit the amount of audit records in the Audit Record table.
Details Panel
Displays the details of the audit record.
Settings Password Allows you to change your password. Help Opens Help and the About dialog box for the Audit Map
3
Archiving Data
3
This chapter covers:
Overview . . . .3-2 Archiver Functions . . . .3-3 Archiving Data . . . .3-6 Archiving and Restoring Overview. . . .3-7 Creating and Submitting an Archive Request . . . .3-8 Restoring Data. . . .3-10 Searching for Objects to Archive . . . .3-11 Searching for Objects to Restore. . . .3-13 Viewing Archive Locations. . . .3-15 Viewing Archive Requests and Restore Requests. . . .3-16
DRAFT
September 24, 2004 4:21 pm, 4359413_CH_ArchivingData.fm
3-2 GeneMapper® Software v.3.7 User Guide
Overview
The GeneMapper® Software Archiver allows you to remove data from
a production database and move it to offline storage, such as a hard drive, a CD ROM, or other storage media. After data is archived, you can restore it to the original database. Specifically, you can use the archiver to:
• Search for the objects that you want to archive • Archive projects and audit objects
• Restore data to original database • View the archive history of objects
Starting the
Archiver
Application
To start the Archiver application, from the GeneMapper window, select ToolsArchiver.
Exiting the
Archiver
Application
Archiver Functions
Archiver Functions
Archiver functions are available from the menu bar or the toolbar, which remains the same no matter what the Archiver context. Shortcut menus are available from the various panes. The functions available in a shortcut menu vary depending on the pane, object, or item you pick. To display a shortcut menu, right-click the pane, object, or item.
Archiver Toolbar
The toolbar consists of buttons representing functions that are alsoavailable from commands in the menu bar. These functions are based on standard Windows® operating system (OS) conventions.
Toolbar
Button Description
Corresponding Command in Menu Bar
Save: Updates the archiver database. FileSave
Cut: Deletes a field, and stores it in temporary memory. EditCut or, Ctrl+X
Copy: Copies a field. EditCopy or,
Ctrl+C
Paste: Pastes a field to the cursor location. EditPaste or, Ctrl+V
Home: Clears the working area. None
View Archive Requests: Lets you view in the working area all the archive requests that have ever been made and display archive requests by request ID, by the contents of the request, and by its status.
ViewArchive Requests
View Archive Locations: Lets you view in the working area all the locations to which objects have been archived and display archive locations by location ID and by the contents of the location.
ViewArchive Locations
Process Archive Request: Commences all archive requests.
DRAFT
September 24, 2004 4:21 pm, 4359413_CH_ArchivingData.fm
3-4 GeneMapper® Software v.3.7 User Guide
Resizing Panes
You can change the amount of space a pane uses by dragging thedivider between panes, for example, between the working area and search panes. When you exit Archiver, it saves the state and size of each pane, so that the next time you log on, the window appears as it did when you exited.
Navigator Pane
The navigator pane is the starting point for most archiver activities. Itmay contain any of the objects that the application knows about. You can populate the navigator pane in two ways: Select an object from the shortcut menu or search for the object.
In the following illustration, the navigator pane displays the object archiver as a node. A node is an object that has no parents. After you select objects from the shortcut menu in the navigator pane, the object archiver becomes a folder and the objects that you selected become roots.
Clearing the
Navigator Pane
After you have performed a number of searches, the navigator pane may become congested. You can clear the results of these previous searches.
To clear the navigator pane:
1. In the navigator pane, right-click the Object Archiver folder to display the shortcut menu.
2. Select Clear All. All objects are removed and the Object Archiver folder displays as a node.
Displaying
Objects in the
Navigator Pane
You can expand and contract all the folders in the navigator pane in one step.
To expand all folders in the navigator pane:
• In the navigator, select the Object Archiver folder, then select Expand All from the shortcut menu.
To contract all folders in the navigator pane:
• In the navigator, select the Object Archiver folder, then select Collapse All from the shortcut menu.
Archiver Functions
Rearranging
Columns
Archiver allows you to rearrange columns in the working area. Rearranged columns appear only in the current view. The default settings will appear when you next open the window.
To rearrange columns:
• In the pane where you want to change the order of the columns, click and hold any column heading, then drag it left or right. The columns will change position. See Figures 3-1 and 3-2.
Figure 3-1 View Archive Requests default column layout
DRAFT
September 24, 2004 4:21 pm, 4359413_CH_ArchivingData.fm
3-6 GeneMapper® Software v.3.7 User Guide
Searching
The Archiver search lets you find archivable objects. The Archiverhas date range fields that allow you to search for objects based on dates and times. The search function is case sensitive.
The Archiver search pane is dynamic; The fields that are displayed depend on the object for which you are searching. The objects found are displayed in the navigator pane.
There are many fields in the search pane that allow you to browse a list of valid entries. The Browse button ( ) in the field indicates that a list is available.
Archiving Data
1. Open the Archiver Client window by selecting ToolsArchiver. 2. Search for objects to archive.
3. Create and submit an archive request.
4. Process all submitted requests by selecting ProcessProcess Requests.
All objects in the archive request are saved to the output directory in the format dictated by the archived object.
After Archiving
Data
After archiving data, you can:
• View archive requests and restore requests • View archive locations
• Restore data
Archived Object Output
Project .xml file + data folder
Archiving and Restoring Overview
Archiving and Restoring Overview
What is Archiving?
The GeneMapper® Software can export objects from the database to.xml file(s) for storage and backup. You can save the .xml file to another hard drive, a network location, or a storage media such as a CD. The output of the archived object varies depending on the type of object you archive. The following table lists the objects stored by the database that can be archived, and the format of their output.
Types of
Archiving
• Destructive Archive (default) – Removes the data from the database after the data is successfully archived. The purged data can be restored to the database.
• Nondestructive Archive – Creates an archive without removing the data from the database. You cannot restore a nondestructive archive to the database. This is the only option for archiving Markers.
When to Archive
The Database Manager dialog box lists the available database space.A notification appears when the database is nearly full.
What is
Restoring?
The GeneMapper® Software allows you to restore archived objects
(.xml files) to the database. You can restore data only to the original database from which it was archived, and only data that was archived
destructively.
IMPORTANT! Before restoring data to the database, archived data must be returned to the output directory specified in the original archive request.
Types of
Restoring
• Restore with editing option – Restores objects to the GeneMapper® Software so that you can edit them.
• Restore with no editing option – (Disabled) Not applicable to the GeneMapper® Software.
Archived Object Output
Project .xml file + data folder
DRAFT
September 24, 2004 4:21 pm, 4359413_CH_ArchivingData.fm
3-8 GeneMapper® Software v.3.7 User Guide
Creating and Submitting an Archive Request
Before You Begin
If you have not already done so:• Open the Archiver Client window by selecting
ToolsArchiver.
• Search for objects to archive.
Creating and
Submitting an
Archive Request
1. In the navigation pane (left), search for, then select objects to archive:
• To select a single object, click the object.
• To select multiple objects, Shift-click to select contiguous objects or Ctrl-click to select non-contiguous objects. 2. In the navigation pane, right-click the selected object or one of
the selected objects, then select Add New Archive Request. The Archive Request appears in the Working Area (lower right). 3. Type a Name and Description for the Archive Request.
4. For the Output Directory, click to navigate to and select a network path or drive, then click Open.
5. Type a Media Label and Media Location.
Note: Media Label and Media Location are for reference purposes only, and are not part of the archive.
6. Select or deselect the following options:
Nondestructive Archive - Select to archive the data without removing it from the database. Deselect to archive and remove the data from the database so that the data can be restored later.
Forced Restore - (Disabled) Not Applicable
Zipped Output - Select to compress the .xml file into a zipped file.
IMPORTANT! Do not unzip the zipped data when restoring the Zipped Output data to the database.
Use Checksum - Select to monitor the output file for any changes during the restore. Archiver notifies you if the file has been modified.
Creating and Submitting an Archive Request
Structured Output - Select to structure the output file as an XML tree.
Streamed Output - Select to flatten the output file. IMPORTANT! Applied Biosystems recommends using the Streamed Output option when submitting an archive request for projects containing greater than 36 samples. Otherwise, the process request could fail.
Keep History - (Disabled) Not Applicable
Checksum Binaries - Select to monitor the output file and any attachments (such as BLOB and BFILEs) for changes during the restore. Archiver notifies you if the file or attachment has been modified.
7. To remove an object from the list before submitting, right-click the object, then select Remove from Request.
8. Select FileSave to submit the archive request to the queue. 9. Process all submitted requests by selecting ProcessProcess