Patching and Security Guide
October 2012
1 Introduction to the Patch Management Component
7
About the Patch Management component . . . 7
Patching workflow . . . 7
About patch signature files . . . 8
About patch packages . . . 9
About patch testing and security . . . 9
About the patch testing environment . . . 9
About assessment testing . . . 10
About deployment testing . . . 10
Best practices for patching . . . 10
Review patches before deploying them . . . 10
Test patches before deploying them . . . 10
Use labels to organize machines and patches . . . 11
Use either Windows Update or the K1000 to patch Windows operating systems . . . . 11
Minimize downtime during patching . . . 11
Notify users when machines are being patched . . . 12
Set time limits on patching jobs to reduce impact on users . . . 12
Use Replication Shares to optimize network resources . . . 12
Find information on the Dell KACE Knowledge Base . . . 13
Use ITNinja.com to connect with other IT professionals . . . 13
2 Subscribing to and Downloading Patches
15
About patch subscription and downloads . . . 15Applications that the K1000 is contracted to support . . . 15
Overview of first-time patch-subscription workflow . . . 16
Gathering information about installed operating systems and applications. . . 17
Subscribing to patches . . . 17
Selecting patch download settings . . . 20
Viewing available patches . . . 23
Viewing patch download status . . . 24
3 Creating and Managing Patching Schedules
25
About scheduling critical OS patches for desktops and servers . . . 25Workflow for critical OS patches for desktops and servers. . . 26
About scheduling critical patches for laptops . . . 26
Workflow for critical patches for laptops . . . 26
About scheduling non-critical patches . . . 27
About using Smart Labels for patching . . . 27
Creating Smart Labels for patches . . . 28
Creating a Smart Label for critical OS patches . . . 28
Creating a Smart Label for new patches. . . 29
Creating Smart Labels for machines . . . 30
Creating a Smart Label for desktops. . . 30
Creating a Smart Label for servers . . . 31
Editing patchschedules. . . 43
Monitoring patching status. . . 44
Viewing patch status . . . 44
Viewing patch status by machine . . . 44
Searching for individual packages within patches. . . 44
Viewing patch reports . . . 45
Viewing unscheduled patches . . . 45
Managing patch rollbacks . . . 46
Determining whether a patch can be rolled back . . . 46
Undoing the last patching job . . . 46
4 Managing Patch Inventory
49
Prerequisites . . . 49Viewing the Patch Listing page . . . 49
Information on the Patch Listing page . . . 50
Patch status . . . 50
Detection and deployment status . . . 51
Patch Cache Size . . . 51
Marking patches as inactive . . . 52
Hiding patches that do not meet subscription criteria . . . 52
Viewing patch information for computers in Inventory. . . 53
Viewing patching statistics. . . 53
Viewing the patch log . . . 54
5 Deploying and Managing the Dell KACE Secure Browser
55
About Dell KACE Secure Browser. . . 55Available versions of Secure Browser. . . 56
System software requirements . . . 56
Manually downloading and installing Secure Browser . . . 56
Downloading and distributing Secure Browser from the appliance . . . 56
Adding Secure Browser to the Software Library . . . 60
Creating a Secure Browser Software Library item . . . 60
Managing Secure Browser Using the K1000. . . 62
Exporting the Isolation Configuration file. . . 62
Generating a custom Secure Browser MSI package . . . 63
Centrally managing Secure Browser settings . . . 64
Controlling when users can use Secure Browser . . . 65
Controlling which websites users can visit . . . 65
Restoring Secure Browser to its original configuration . . . 66
Shutting down Secure Browser on a managed machine. . . 66
Additional resources . . . 67
6 Using OVAL Security Features
69
Using OVAL security checks . . . 69Understanding OVAL definitions . . . 69
Viewing OVAL definitions . . . 70
About OVAL test definitions . . . 70
Running OVAL tests . . . 71
Using labels to restrict OVAL tests . . . 71
Understanding OVAL updates . . . 71
Configuring OVAL Settings . . . 71
Specifying OVAL settings . . . 72
Using the Vulnerability Report . . . 75
Accessing OVAL vulnerability reports . . . 75
Applying a label to affected machines . . . 75
Viewing OVAL Computer Reports . . . 75
Accessing OVAL Computer Reports. . . 76
Creating security policies. . . 76
Creating Windows-based security policies . . . 76
Creating Enforce Internet Explorer Settings scripts . . . 76
Creating Enforce XP SP3 Firewall Settings scripts . . . 78
Creating Enforce Disallowed Programs Settings scripts . . . 79
Creating Enforce McAfee AntiVirus Settings scripts. . . 80
Configuring McAfeeSuperDAT Updater scripts . . . 82
Creating Enforce Symantec AntiVirus Settings scripts. . . 82
Creating Quarantine Policy scripts . . . 84
Creating the Lift Quarantine Action scripts . . . 85
Creating Mac OS-based security policies . . . 85
Creating Enforce Firewall Settings scripts . . . 85
Creating Enforce Parental Controls scripts . . . 86
Creating Enforce Security Settings scripts . . . 86
7 Using SCAP
89
Overview . . . 89SCAP supported platforms . . . 89
Definitions . . . 90
More about SCAP (Secure Content Automation Protocol) . . . 91
About benchmarks. . . 91
How a SCAP scan works. . . 92
Overview of the SCAP Scan tab . . . 93
Viewing benchmarks . . . 94
Importing and loading a benchmark . . . 94
SCAP scan scheduling . . . 95
Editing a SCAP scan schedule . . . 96
Viewing the resolved XCCDF files . . . 96
Viewing the OVAL timestamp . . . 97
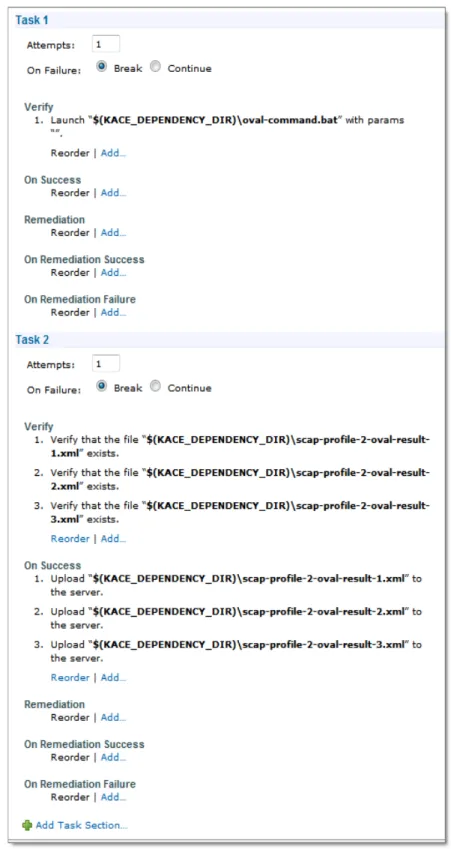
Viewing script tasks . . . 97
SCAP scan results. . . 100
Introduction to the Patch
Management Component
This section provides an overview of the K1000 Management Appliance Patch Management component.
Topics in this section:
•
About the Patch Management component on page 7•
Patching workflow on page 7•
About patch signature files on page 8•
About patch packages on page 9•
About patch testing and security on page 9•
Best practices for patching on page 10About the Patch Management component
The Patch Management component enables you to detect and deploy the latest important security patches and software updates to the Windows and Macintosh machines you manage. This increases security and protects your machines and network from vulnerabilities.
Patching workflow
The patching workflow includes these tasks:
1. Subscribing to the patches that you want to download. If the Organization component is installed on your appliance, you set subscription settings for each organization
separately. Additional workflow details are available for first-time patch subscription. See Subscribing to patches on page 17.
2. Selecting patch download settings on the K1000 Settings: Patching page. See Selecting patch download settings on page 20.
3. Creating Smart Labels to group machines for patching and patches for deployment. See Creating Smart Labels for patches on page 28.
The Patch Management component is supported on machines running Windows and Macintosh operating systems only. Patch Management is not available for machines running Linux operating systems.
4. Creating patching schedules to detect and deploy packages. If the Organization component is installed on your appliance, you create patch schedules for each organization separately. See Creating patch schedules on page 33.
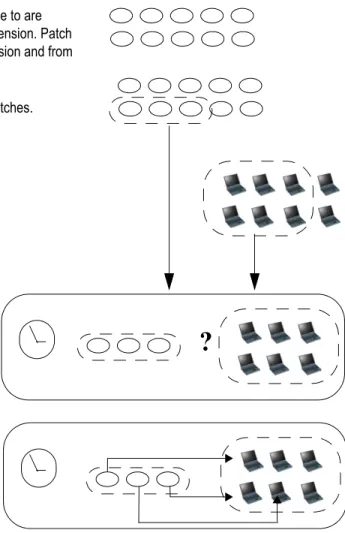
Figure 1-1 illustrates this workflow.
Figure 1-1: Patching workflow
About patch signature files
Patch signature files include the security bulletins and other files that define patches; they do not include the patch packages that are used to install patches. Patch signature files are downloaded from Lumension according to the subscription and download options you select. For more information on downloading patch signature files, see Selecting patch download settings on page 20.
Signature files for patches you subscribe to are downloaded to the appliance from Lumension. Patch packages are downloaded from Lumension and from software vendors.
Smart Labels select machines to patch. Smart Labels group the downloaded patches.
Machines that need the patch are detected according to a schedule.
Patches are deployed to machines according to a schedule.
About patch packages
Patch packages are the files required to install patches. Patch packages are downloaded from Lumension according to the subscription and download options you select. In some cases, patch packages are also downloaded directly from vendors, such as Microsoft and Adobe. There are two options for downloading patch packages:
•
Downloading only those patches that you need: You can choose to download only those packages that have been detected as required by machines you manage. This reduces download time and disk space, because the appliance downloads only those packages that are detected as required. In addition, you can choose to automatically remove patches after a specified period of time if detect results show that they are not needed.•
Maintaining a full cache of patches: You can choose to maintain a full cache of packages regardless of whether they are required by the machines you manage or not. This keeps packages available for quick deployment, but it requires more download time and disk space than downloading only those packages that you need.For more information about package download options, see Selecting patch download settings on page 20.
About patch testing and security
Dell KACE partners with Lumension Security, Inc. to provide safe, timely, and high-quality patch signatures for all major operating systems and many popular applications.
Before patch signatures are made available to the appliance, Lumension performs the following security checks:
•
Verification of patch metadata produced by each content development team.•
Validation of patch installation and uninstallation processes.•
Confirmation that the patch does not disrupt the stability of the targeted operating systems and applications.In addition, Dell KACE performs sanity checks on patch feeds after Lumension security checks are complete. For more information, search for Lumension at www.kace.com.
About the patch testing environment
Built-in Lumension security uses VMware ESX, vCenter Lab Manager, and custom hardware bench testing. Testing methods include:
•
Verification that patch-naming conventions comply with Lumension policy.•
Verification that patch content supports the replication process. Each patch created by the content team is validated with the Symantec Ghost Solution Suite distribution and Update Server products.About assessment testing
Assessment testing verifies that:
•
An applicable non-patched machine shows as applicable and not patched.•
A patched machine shows as installed and not applicable.•
No false positives exist in the detection of the digital fingerprint.•
Patch content is compliant with mandatory baselines.•
Vulnerability is correctly displayed in the Update Server.•
All Smart Label, filtering, sorting, and other visual features are functioning properly.About deployment testing
Deployment testing verifies that:
•
The package is deployable.•
The suppress-reboot functionality works.•
The uninstallation functionality works.•
On-demand package caching works.•
Automatic deployment scheduling works.•
Agent package download works.•
CRC checksum ensures package integrity.•
The Agent automatically runs assessment after patch deployment.•
The Agent restarts automatically after reboot.Best practices for patching
Dell KACE recommends the following best practices for patching.
Review patches before deploying them
Review new patches before you deploy them to machines. Create a filter to display new active patches that have been downloaded to the K1000 Management Appliance within a specific time period. For instructions, search for article 814 on the Dell KACE Knowledge Base http://www.kace.com/support/resources/kb/category.
Test patches before deploying them
Test patches on selected machines before deploying them to all machines. This ensures that patches do not break anything before they are widely deployed.
•
Machines whose users are technically sophisticated and can communicate problems effectively.•
Machines that have access to the systems and software that reflect the working environment.For a thorough test, machines should function normally for at least a week after being patched. If no problems are reported after a week, the patch can be deployed to the remaining machines on the network.
Use labels to organize machines and patches
You can use Smart Labels to automatically group machines by type, such as laptop, desktop, and server. In addition, you can use Smart Labels to automatically group patches by
importance, such as critical operating system patches and lower priority patches for other applications. You can then create patching schedules to match each type of machine and patch. For more information, see:
•
Creating Smart Labels for patches on page 28•
Creating and Managing Patching Schedules on page 25.Use either Windows Update or the K1000 to patch
Windows operating systems
There are two options for patching Windows operating systems on managed machines:
•
Use Windows Update: Windows Update is a Microsoft feature that downloads andinstalls updates to Windows operating systems. If you enable Windows Update on managed machines, use the K1000 Patch Management component only to detect Windows operating system patches, not to deploy them. Patches will be deployed by Windows Update.
•
Use the K1000: You can download and deploy patches for Windows operating systems using the K1000 Patch Management component. If you do this, disable Windows Update on managed machines, because patches will be deployed by the K1000.Minimize downtime during patching
Schedule patch deployment during periods when machine use is lower to minimize downtime. Keep in mind that machine use varies depending on the machine type:
•
Servers: These require careful and well-publicized upgrades. When patching servers, you might need to plan ahead by several weeks.•
Desktops: These have more flexible options for patching because they are often left running when they are not in use.The K1000 appliance enables you to create a policy that specifies whether or not managed machines use Windows Update. For more information, see the Scripting section of the K1000 Administrator Guide.
•
Laptops: These are the most difficult to patch because they are often only available to patch while being used.For more information about creating patch schedules for each type of machine, see:
•
About scheduling critical OS patches for desktops and servers on page 25•
About scheduling critical patches for laptops on page 26Notify users when machines are being patched
Be sure to notify users when the machines they use are being patched. This is especially important if machines need to be restarted as part of the patching process. There are several ways to inform users of patching schedules:
•
Send email or use other messaging systems: Notify users in advance through email and other messaging systems outside the appliance Administrator Interface. This is especially useful when patching might prevent access to critical systems, such as servers, for a period of time.•
Send an alert message from the appliance: Use the appliance Administrator Interface to create an alert and broadcast it to all machines or to selected machines. These alerts can be used to remind users that patching is about to start. For more information on creating alerts, see the reporting section of the K1000 Administrator Guide.•
Provide alerts during patching: When you schedule patching, choose to alert users before patching, and prompt users before rebooting their machines. You can also enable users to snooze or postpone reboots if necessary. For more information, see Creating patch schedules on page 33.For more information about scheduling patching for various machines, see:
•
About scheduling critical OS patches for desktops and servers on page 25•
About scheduling critical patches for laptops on page 26Set time limits on patching jobs to reduce impact on
users
Patching jobs can require extensive bandwidth and resources. To reduce the impact on users, you can set time limits on patching jobs. For example, you could configure patching jobs to start at 4:00 AM and stop at 7:00 AM. Any patching jobs that are in progress at 7:00 AM are suspended. Jobs resume where they left off when the next scheduled patching job begins. For more information, see Creating patch schedules on page 33.
Use Replication Shares to optimize network
resources
Use Replication Shares to optimize network resource requirements and download time. Replication Shares are machines that keep copies of files for distribution, which can be useful for K1000 client machines that are deployed across multiple geographic locations. For example, using a Replication Share, a machine in New York could download patch files from another machine at the same office, rather than downloading those files from a K1000 in Los
Angeles. For more information on setting up and using Replication Shares, see the K1000 Administrator Guide.
Find information on the Dell KACE Knowledge Base
Dell KACE has a Knowledge Base of articles about the K1000 Management Appliance, which you can access at http://www.kace.com/support/resources/kb/category. The Knowledge Base is continually updated with solutions to real-world K1000 Management Appliance problems that administrators encounter. To view patching articles, go to the Knowledge Base and search for Security.
Use ITNinja.com to connect with other IT
professionals
Sponsored by Dell KACE, ITNinja.com (formerly AppDeploy.com) is a product-agnostic IT-focused community website. It is the Internet’s leading destination for IT professionals to share information and ask questions about system-management related topics. The website provides a question and answer section, a blogging platform, and integration with the K1000 Management Appliance through AppDeploy Live.
Subscribing to and Downloading
Patches
This section explains how to subscribe to patches and schedule patch downloads to the appliance.
•
About patch subscription and downloads on page 15•
Overview of first-time patch-subscription workflow on page 16•
Gathering information about installed operating systems and applications on page 17•
Subscribing to patches on page 17•
Selecting patch download settings on page 20•
Viewing available patches on page 23•
Viewing patch download status on page 24About patch subscription and downloads
Patch subscription is the process of selecting the operating systems and applications for which you want to receive patches. If the Organization component is enabled on your appliance, you select subscription settings for each organization separately.
After you subscribe to patches, the K1000 Management Appliance downloads them according to the schedule you set for the appliance.
When patches are downloaded, you can test and deploy them. You can choose to automatically deploy patches as well, but this is recommended for low-risk or time-important patches only.
For more information, see:
•
Selecting patch download settings on page 20.•
Creating Smart Labels for patches on page 28.Applications that the K1000 is contracted to support
Dell KACE has contractual agreements with the following software vendors for downloading patches to the K1000 Management Appliance:
•
Adobe Acrobat and Reader software•
The McAfee family of antivirus software•
Mozilla Firefox•
The Machine Associates eTrust family of antivirus software•
Microsoft Office applications•
Apple applications, such as QuickTime, iTunes, and iLife software•
Applications in Java environments•
TrendMicro applicationsOverview of first-time patch-subscription workflow
Patch detection signatures and patch packages are not downloaded to the appliance by default; you must subscribe to the patches you want and then schedule a time to download them.
To save network bandwidth and disk space, Dell KACE recommends that you download patch definition signatures first because they are much smaller in size than patch packages. Then you can detect the patches that you need, and select the download settings that work best for your network.
This is the first-time patch-subscription workflow:
1. Gather information: Identify the operating systems, language packages, and applications installed on machines you manage so that you know what you need to subscribe to. You can find this information on the appliance Summary page as well as by running reports. See Gathering information about installed operating systems and applications on page 17.
2. Select initial patch subscription settings: Subscribe to the operating systems and languages required by the machines you manage. See Subscribing to patches on page 17. 3. Download patch detection signatures: Patch detection signatures are smaller files
that can be downloaded quickly and do not require much disk space. Download the patch detection signatures of the patches you subscribe to. This enables you to view available patches and identify the patch packages you want to download later. See Selecting patch download settings on page 20.
4. Run a detect-only patching job: Schedule a Detect-only patching job to identify the patches required by machines you manage. This is a one-time operation that shows how large the first patching job is going to be and indicates how to allocate resources based on system availability for patch installations and reboots. To do this, create a patching schedule that detects patches on all machines. See Creating patch schedules on page 33. 5. Select patch package download settings: After you have identified the patch
packages that you need, set a time for package downloads to occur. See Selecting patch download settings on page 20.
Gathering information about installed operating
systems and applications
Before you subscribe to patches, gather information about the operating systems, language packages, and software installed on machines you manage so that you know what you need to subscribe to.
To gather information about installed operating systems and applications
1. If applicable, select an organization in the drop-down list in the top-right corner of the page.
2. Click Home.
The K1000 Summary page appears.
3. Scroll to the bottom of the Summary page, then click View Details.
The K1000 Summary Details page appears. The Computer Statistics table shows the operating systems of managed machines.
4. In the Software Statistics table, click Software Titles.
The appliance runs a report that displays the software installed on managed machines. For more information on running reports, see the reporting section of the K1000
Administrator Guide.
Subscribing to patches
Subscribe to patches and configure download settings as described in this section.
To subscribe to patches
1. If applicable, select an organization in the drop-down list in the top-right corner of the page.
2. Click Security.
The Patch Management page appears. 3. Click Subscription Settings.
The K1000 Settings: Patch Subscription page appears. 4. Click Edit Mode.
Before you subscribe to and download patches, identify the operating systems and applications installed on machines you manage, and verify patching requirements. For more information, see Overview of first-time patch-subscription workflow on page 16.
5. Select the operating systems of the machines you manage. The following example shows all the Windows Vista, Windows XP operating systems selected. Current Platforms
updates after you save the settings.
6. Specify the following settings:
Option Description
Languages The languages of the machines that you manage. To
select multiple languages, press the Ctrl or
Command key then click the languages you want to select.
Download Application Patches
(Optional) Include software patches and OS patches in your subscription.
Note: Some application patches have the ability to install applications on machines as well as update applications that are already installed on machines. To prevent the application from being installed on machines that do not already have it, you can create a Smart Label to identify machines that have the application. You can then use that label to schedule patch deployment and apply the patch only to machines that already have the application installed.
Include Software Installers
(Optional) Subscribe to software installers in addition to application updates.
Software installers are used to deploy applications to any machine regardless of whether an earlier version installed.
If you want to deploy application updates only to machines that already have the application installed, do not select this option.
If you subscribe to software installers, you might want to:
• Exclude these patches from other patching labels • Create a separate set of labels and patch
schedules to selectively deploy certain applications using the full installers. On the Patch Listing page, the word Software
appears in the Impact column for software installers. For application updates that do not include installers, the word Critical or Recommended appears in the
Impact column. Limit Patch Download to
Selected Labels
(Optional) Download only those patches that match the selected labels. This is important if disk space is limited; if the total disk space required for selected patches exceeds the space available on the K1000, patches cannot be downloaded.
Note: If the appliance runs out of disk space, the message, No space available appears when you click Update Patching in the Update Patches from KACE section.
Hide Disabled Patches on Patch Listing
(Optional) Prevent disabled patches, which are patches that do not meet the platform, language, label and other subscription criteria, from being displayed on the Patch Listing page.
Allow Detect of Disabled Patches
(Optional) Enable the appliance to identify disabled patches when it runs a Detect job. If this option is selected, the signatures for disabled patches are downloaded for detection purposes only. Patches cannot be deployed unless they meet subscription criteria.
Automatically Inactivate All New Patches
(Optional) Mark new patches as Inactive. This prevents patches from being deployed automatically, and enables you to test patches before they are deployed. If this option is not selected, patches that match a Deploy schedule are automatically deployed. Automatically Inactivate
Superseded Patches
(Optional) Mark superseded patches with a red X on the Patch Listing page.
7. Click Save.
The selected operating systems and languages appear in bold below the selection fields. Selected patches are downloaded automatically at the next scheduled download time. After the next download, patches that were previously downloaded, but that were identified on the Patch Listing page with a gray X because they did not match subscription settings, appear with a red X if they now match subscription settings.
Selecting patch download settings
The patches you subscribe to are downloaded to the appliance according to the settings you choose. Be aware that the first patch download might use a large amount of network bandwidth.
To schedule patch downloads
1. If the Organization component is enabled on the appliance, select System in the drop-down list in the top-right corner of the page, then click K1000 Settings. Otherwise, click Settings.
The K1000 Settings: ControlPanel page appears. 2. Click Patch Settings.
The K1000 Settings: Patching page appears. 3. Click Edit Mode.
4. Select Download New Patch Signatures options. Patch signatures include the security bulletins and other files that define patches downloaded from Lumension.
This section explains how to schedule patch downloads. To schedule patch detection and deployment for the machines you manage, see Creating and Managing Patching Schedules on page 25.
Option Description
Disable download of patch detection signatures
Prevent the downloading of patch signatures.
Download every Select day to download patch detection signatures every day, or select a day of the week to download once a week. Select the time to start the download. Time is displayed in 24-hour clock format, where 1 is 1:00 AM and 23 is 11:00 PM.
Note: When setting up patch downloads, timing is important. The appliance activity log is created at 12:30 AM, and maintenance tasks occur between 1:00 and 1:30 AM. Dell KACE recommends that you schedule patch downloads to occur after the log and maintenance tasks are complete, which is about 3:00 AM.
5. Select Package Download Options. Packages include the installers that are required to install the patches, and they are downloaded directly from vendors such as Microsoft and Adobe.
6. In the Package Download Schedule section, select one of the following: Download on the nth
of Every Month or on a Specific Month at HH:MM AM/PM
Select the day of the month to download patch detection signatures on a monthly basis.
Option Description
Disable download of patch deployment packages
Prevent the downloading of patch packages.
Maintain full cache of subscribed packages on K1000
Maintain a full cache of subscribed packages on your K1000 Management Appliance. This downloads all deployment packages to which you subscribe without verifying that your environment actually needs them. It is important for some environments to maintain a full cache. For example, if you select the Offline Target or Online Source optionin step 8 below, full caching is required.
For more information about subscription settings, see Subscribing to patches on page 17.
Determine packages to download using detect results
Allow the appliance to determine which packages to download based on the results of Detect jobs. If a patch detection signature has been detected as Not Patched on any managed machine, the patch package is downloaded. If no managed machines are detected as Not Patched, no packages for this patch are downloaded.
Option Description
Run after signature download
Download packages after the signatures have been downloaded. This option is not available if package download is disabled in the Package Download Options
section.
Run every Specify the frequency with which signatures and packages are downloaded. This option is available only if Determine packages to download using detect results in the Package Download Options section is selected.
7. In the Stop Download Of Patches section, select one of the following:
8. Select Offline Update Options to specify what to do if your K1000 Management Appliance is offline when the update process is scheduled to start.
9. Specify the following settings:
Option Description
Allow download of patches to complete
Allow downloads to complete no matter how long it takes. If you select this option, the appliance continues
downloading patches until the download process is complete.
In addition, the appliance performs validation checks and downloads required patch detection signatures and packages, as specified by detect results and package download settings.
Do not download patches between
Specify a time period during which patch detection signatures cannot be downloaded. For example, use an early morning stop time to prevent the process from using a large amount of network bandwidth during working hours.
If you select this option, the appliance stops patch downloads at the specified time. It does not start patch downloads again until the next specified patch download time. When the download resumes, it starts up where it left off. Downloads that are incomplete might not appear on the Patch Listing page.
Option Description
Not Enabled Whether Offline Update Options are enabled or disabled. Select this option if the appliance is connected to the Internet and can download patches directly.
Offline Target The Offline Target to use if the appliance is not connected to the Internet and you want to upload the patch files from a local directory. If you have a K1000 appliance that is connected to the Internet, you can configure that appliance as an Offline Source. Then you can manually copy the patch files from the Offline Source Patches file share to the following directory on the Offline Target: \\k1000_host\patches.
Online Source Whether the appliance is used as a source for a different appliance. When this option is selected, patch files are downloaded to the appliance’s Patches file share.
Option Description
Update Patches from KACE Click Update Patching to immediately download the patches to which you have subscribed,
10. Click Save Patch Settings.
Viewing available patches
After you have downloaded patch detection signatures, you can review the available patches and set appropriate patch download filters to download only the patches you need. For example, you might have only one antivirus application installed on your network, so you do not need patches from both McAfee and Symantec. In the subscription settings, you could exclude one or the other.
To view available patches
1. If applicable, select an organization in the drop-down list in the top-right corner of the page.
2. Click Security.
The Patch Management page appears. 3. Click Patch Listing.
The Patch Listing page appears.
4. To search for patches, click the Advanced Search tab above the list on the right. The Advanced Searchpanel appears.
5. In the Patch Type menu, select Application. 6. Click Search.
Delete All Patch files Click Delete All Patch Files to immediately remove all patch files from the appliance. This can be useful if you no longer need any patches and you want to quickly reclaim the disk space they used. Cache Cleanup Options
Automatically purge unused patches from cache after: ___ days
Purge Active patches that have been detected as not patched and that have not been deployed in the specified number of days. This helps to reduce the amount of disk space required for patches on the appliance.
Note: Inactive and Disabled patches are automatically removed from the cache when the patch download runs.
Viewing patch download status
After you have scheduled patch downloads you can view download status.
To view patch download status
1. If applicable, select an organization in the drop-down list in the top-right corner of the page.
2. Click Security.
The Patch Management page appears. 3. Click Patch Listing.
The Patch Listing page appears. 4. Do one of the following:
• In the View by drop-down list in the top-right corner of the page, select Download Status > DownloadedorDownload Status > NotDownloaded.
• Click the Advanced Search tab above the list on the right, then use the Download Status drop-down list to search.
Creating and Managing Patching
Schedules
This section describes how to manage patching schedules that detect, deploy, and rollback patches to which you subscribe. For information on subscribing to patches, see Subscribing to and Downloading Patches on page 15.
Topics in this section:
•
About scheduling critical OS patches for desktops and servers on page 25•
About scheduling critical patches for laptops on page 26•
About scheduling non-critical patches on page 27•
About using Smart Labels for patching on page 27•
Creating Smart Labels for patches on page 28•
Creating Smart Labels for machines on page 30•
Creating patch schedules on page 33•
Editing patchschedules on page 43•
Monitoring patching status on page 44•
Viewing patch reports on page 45•
Viewing unscheduled patches on page 45•
Managing patch rollbacks on page 46About scheduling critical OS patches for desktops
and servers
This section explains how to automatically install critical OS patches on desktops and servers.
Desktops are usually less crucial than servers and less mobile than laptops, so it is easier to schedule a time to patch them. Usually, you can schedule routine updates for the early morning hours before users arrive.
Servers run critical services that your organization requires. Schedule patching for servers in advance and warn users of the temporary service outages that patching requires. Push server patches in the early morning hours or other times when the fewest number of users require the server resources.
Workflow for critical OS patches for desktops and
servers
•
Identify desktops: Create a Smart Label that identifies all machines that aredesktops. This excludes servers and laptops. See Creating a Smart Label for desktops on page 30.
•
Identify servers: Create a Smart Label that identifies all servers. Creating a Smart Label for desktops on page 30.•
Identify critical OS patches: Create a Smart Label that identifies all critical OS patches. See Creating a Smart Label for critical OS patches on page 28.•
Schedule detect and deploy actions: Schedule a detect and deploy job that identifies whether the machines in the Smart Label need to be updated, deploys critical patches to them, and forces a reboot if required. See Creating patch schedules on page 33.•
Deploy patches individually to servers: Schedule a job that deploys patches to servers as needed. See Creating patch schedules on page 33.•
Notify users: When you schedule patching, be sure to notify users of the schedule so that they know when the machines they use are being patched. This is especially important if machines need to be restarted and might be unavailable as part of the patching process. You can notify users by sending email and other messaging services outside the appliance Administrator Interface. For more information, see Notify users when machines are being patched on page 12.About scheduling critical patches for laptops
Because laptops are often powered off or disconnected from the network, it can be difficult to find a good time to patch them. The two most popular choices for patching laptops are at the start of the business day or during lunch time. Most Dell KACE customers patch laptops using two schedules, one for detecting and one for deploying.
Workflow for critical patches for laptops
To set up automatic detect and deploy actions:
•
Identify critical patches: Create a patch Smart Label to automatically identify critical patches for laptops. See Creating Smart Labels for patches on page 28.•
Schedule Detect actions: Create and run a schedule to periodically detect criticalpatches on laptops. See Creating patch schedules on page 33.
•
Schedule Deploy actions: Create and run a schedule to periodically deploy critical patches on laptops. See Creating patch schedules on page 33.•
Check patching status: Periodically check patching status using reports and the patch. See Viewing unscheduled patches on page 45.About scheduling non-critical patches
To schedule non-critical patches:
•
Detect patches: Create a patching schedule to detect patches on all machines to determine the size of the patching job. See Creating patch schedules on page 33.•
Inactivate patches: If there are patches you do not want to deploy, mark them asInactive.
•
Test patches: Create a schedule to detect and deploy patches to your test machines. See Creating patch schedules on page 33.•
Identify patches for desktops and servers: Create a patch Smart Label to automatically capture the patches to deploy on servers. See Creating Smart Labels for patches on page 28.•
Detect and deploy desktop and server patches (see Creating patch schedules on page 33):• Create a schedule to periodically detect and deploy patches on your desktops. • Create a schedule to periodically detect and deploy patches on your servers.
•
Detect and deploy laptop patches (see Creating patch schedules on page 33):• Create a schedule to periodically detect patches on your laptops. • Create a schedule to periodically deploy patches on your laptops.
•
Check patching status: Periodically check the patching status. See Monitoring patching status on page 44.About using Smart Labels for patching
Smart Labels area type of label that can be applied and removed automatically based on criteria you specify. For example, to track laptops in a specific office, you could create a label called “San Francisco Office,” and create a Smart Label based on the IP address range or subnet for machines located in the San Francisco office. Whenever a machine that falls within the IP address range checks in, the Smart Label “San Francisco” is automatically applied. When the machine leaves the IP address range, the label is automatically removed. You can use Smart Labels to automatically group patches and machines.You can also label patches and machines manually, but Smart Labels are usually better because they are applied automatically.
For example, you can create a patch Smart Label that matches all Windows XP server patches. Each time a Windows XP server patch becomes available to the K1000 Management Appliance, it is added to the label. If you set up a patching schedule to automatically detect and deploy machines with this label, it is automatically applied to your Windows XP servers.
You can create a labeling scheme that organizes patches by operating system and importance, such as P (patch)_<Operating_System>_<Importance>. For example:
•
P_Vista•
P_Vista_Critical•
P_Vista_Important•
P_MS_Office•
P_Leopard•
P_Mac10.4_Critical_TestSimilarly, you create machine Smart Labels to specify the machines, on which you want to install patches:
•
P_OS_Servers for the server label•
M_Servers to capture all serversThe K1000 Management Appliance evaluates the information provided by the Agents when they check in, and it applies machine Smart Labels if the data matches the label criteria. Patch Smart Labels are immediately applied to existing patches that meet the criteria. The label is added to new patches that meet the criteria when they are downloaded.
See the K1000 Administrator Guide for detailed information on labels, including Smart Labels and label groups, and how to use labels in other components of the appliance.
Creating Smart Labels for patches
Creating a Smart Label for critical OS patches
To create a Smart Label for critical OS patches1. If applicable, select an organization in the drop-down list in the top-right corner of the page.
2. Click Security.
The Patch Management page appears. 3. Click Patch Listing.
The Patch Listing page appears. If you do not have patches available on your K1000 Management Appliance, see Selecting patch download settings on page 20. If you have not subscribed to patches, see Subscribing to and Downloading Patches on page 15. 4. Click the Create Smart Label tab on the right side of the page.
The Create Smart Label form appears.
5. Enter search criteria that capture active critical Windows OS patches: • Status = Active
• ANDImpact = Critical
• ANDOperating System = Windows • ANDPatch Type = OS
6. Click Test Smart Label. Items that match the search criteria are displayed. 7. Adjust the criteria as needed until the results are what you expect.
8. Enter a name for the patch, such as Critical_OS_Windows. 9. Click Create Smart Label.
The Smart Label is applied to existing patches that meet the criteria. The label is added to new patches that meet the criteria when they are downloaded.
10. To view label groups, select Show Label Groups in the Choose Action menu. Label groups are displayed and [groups hidden] is removed from the column heading.
11. To hide label groups, select Hide Label Groups in the Choose Action menu. Label groups are not displayed, and [groups hidden] appears in the column heading.
Creating a Smart Label for new patches
Smart Labels can be used to quickly identify new patches that must be deployed.
To create a Smart Label for new patches
1. If applicable, select an organization in the drop-down list in the top-right corner of the page.
2. Click Security.
The Patch Management page appears. 3. Click Patch Listing.
The Patch Listing page appears.
4. Click the Create Smart Label tab on the right side of the page. The Create Smart Label form appears.
5. Enter search criteria that identify non-critical patches that were added after a specified date:
Release Date> (greater than) <date>. For date, use the format yyyy-mm-dd. AND Impact != (is not equal to) Critical
AND Status= (Active 6. Click Test Smart Label.
7. In the Choose Label field, enter a name for the new patch, such as New Patches since 01-01-2012.
8. Click Create Smart Label.
The label is saved. It is automatically applied to existing patches and to new patches that match the criteria when they are downloaded.
9. To view label groups, select Show Label Groups in the Choose Action menu. Label groups are displayed and [groups hidden] is removed from the column heading.
10. To hide label groups, select Hide Label Groups in the Choose Action menu. Label groups are not displayed, and [groups hidden] appears in the column heading.
Creating Smart Labels for machines
You can create Smart Labels to organize machines by type, such as desktop, server, and laptop.
Creating a Smart Label for desktops
To create a Smart Label for desktops1. If applicable, select an organization in the drop-down list in the top-right corner of the page.
2. Click Inventory.
The Machine Inventory page appears.
3. Click the Create Smart Label tab on the right side of the page. The Create Smart Label form appears.
4. Set up search criteria to include all machines whose operating system name does not include the word server and whose chassis type is not laptop:
OS Name does not contain Server
AND Chassis Typedoes not contain Laptop Other useful criteria for identifying desktops include:
• System Names, if you give all of your desktops a similar name. • System Models, such as all systems with XPS in the model name. • IP addresses, or partial IP addresses using the contains criteria.
• BIOS Serial Numbers, or use the Includes partial serial number criteria. This is useful if you have purchased desktops with sequential numbers. For more
information, contact your vendor.
5. Click Test Smart Label. Items that match the search criteria are displayed.
6. In the Choose label drop-down list, select a label name or enter a name for the Smart Label, such as All_Desktops.
7. Click Create Smart Label. The Smart Label is created.
8. (Optional) To confirm that the new label appears on the Labels list, click Home > Label > Smart Labels or Label Management.
The new label appears empty at first. As machines check in, the label is applied to them when they match the Smart Label criteria.
9. To test the Smart Label:
a. Go to Inventory > Computers.
b. Click the name of a machine that matches the criteria, but to which the label has not yet been applied.
c. On the Computers: Detail page, click Force Update. If the Smart Label is working correctly, the machine checks in and the label is applied to it.
Creating a Smart Label for servers
To create a Smart Label for servers1. If applicable, select an organization in the drop-down list in the top-right corner of the page.
2. Click Inventory.
The Machine Inventory page appears.
3. Click the Create Smart Label tab on the right side of the page. The Create Smart Label tab appears above the Inventory table.
4. Set up search criteria to include all machines whose operating system name includes the word “server” and whose chassis type is not laptop:
OS Name contains Server
AND Chassis Type does not contain Laptop Other useful criteria for identifying servers include:
• System Names, if you give all of your servers a similar name. • IP addresses, or partial IP addresses using the contains criteria.
• BIOS Serial Numbers, or use the Includes partial serial number criteria. This is useful if you have purchased servers with sequential numbers. For more
information, contact your vendor.
• Software Title, if servers have a title in common.
6. In the Choose label drop-down list, select a label name or enter a name for the Smart Label, such as All_Servers.
7. Click Create Smart Label. The Smart Label is created.
8. (Optional) To confirm that the new label appears on the Labels list, click Home > Label > Smart Labels or Label Management.
The new label appears empty at first. As machines check in, the label is applied to them when they match the Smart Label criteria.
9. To test the Smart Label:
a. Go to Inventory > Computers.
b. Click the name of a machine that matches the criteria, but to which the label has not yet been applied.
c. On the Computers: Detail page, click Force Update. If the Smart Label is working correctly, the machine checks in and the label is applied to it.
Creating a Smart Label for laptops
To create a Smart Label for laptops1. If applicable, select an organization in the drop-down list in the top-right corner of the page.
2. Click Inventory.
The Machine Inventory page appears.
3. Click the Create Smart Label tab on the right side of the page. The Create Smart Label form appears.
4. Set up search criteria to include all machines whose operating system name does not include the word “server”.
OS Name does not contain Server ANDChassis Type contains Laptop
Other useful criteria for identifying laptops include:
• System Names, if you give all of your laptops a similar name. • IP addresses, or partial IP addresses using the contains criteria.
• BIOS Serial Numbers, or use the Includes partial serial number criteria. This is useful if you have purchased laptops with sequential numbers. For more
information, contact your vendor.
• Software Title, if laptops have a title in common.
5. Click Test Smart Label. Items that match the search criteria are displayed.
6. In the Choose label drop-down list, select a label name or enter a name for the Smart Label, such as All_Laptops.
7. Click Create Smart Label. The Smart Label is created.
8. (Optional) To confirm that the new label appears on the Labels list, click Home > Label > Smart Labels or Label Management.
The new label appears empty at first. As machines check in, the label is applied to them when they match the Smart Label criteria.
9. To test the Smart Label:
a. Go to Inventory > Computers.
b. Click the name of a machine that matches the criteria, but to which the label has not yet been applied.
c. On the Computers: Detail page, click Force Update. If the Smart Label is working correctly, the machine checks in and the label is applied to it.
Creating patch schedules
This section explains how to create patching schedules and set a time for them to run.
To create patch schedules
1. If applicable, select an organization in the drop-down list in the top-right corner of the page.
2. Click Security.
The Patch Management page appears. 3. Click Detect and Deploy Patches.
The Patch Schedules page appears.
4. In the Choose Action menu, select Add New Item. The Patch Schedule: Edit Detail page appears.
5. In the Schedule Description field, enter a description for the schedule. This appears on the Patch Schedules page.
6. In the Patch Action drop-down list, select a patch action for the schedule. The patch action behavior is dependent on the combination of reboot, detect, deploy, and rollback selections you make. Whenever a patch action does both a Detect pass and something else, as is the case with Detect and Deploy and Detect and Rollback, the action is repeated cyclically until the Detect action finds no further patches to deploy or roll back. This might result in multiple Reboot actions for a single scheduled run. In addition, the type of machine you are patching affects the type of patch action to use.
Detect and Deploy patching jobs require an AMP (Agent Messaging Protocol) connection between the machine and K1000 Management Appliance; they do not run offline. For more information about the Agent and AMP
Option Description
Detect Perform Detect-only actions. This is useful when you want to detect patches that are installed on or missing from managed machines.
Detect-only actions are most useful for laptops. Detect actions can be run anytime, but they should be run at least one day before Deploy actions, which might require a reboot. Detect and
Deploy
Perform Detect and Deploy actions. This is usually appropriate for desktops and servers.
Note: If patch deployment is unsuccessful after the maximum number of attempts, the deployment fails and the machine is skipped. For more information about the maximum number of deploy attempts, see Select Deploy Patch Label Selection options or Rollback Patch Label Selection options: on page 39. For information on viewing patch status, including failures, see Viewing patch status by machine on page 44.
Detect and Deploy with Force Reboot
When you select Detect and Deploy and choose Force Reboot in the Reboot Options section, the following occurs according to the patching schedule:
• A Detect job runs.
• All patches are deployed and the machine is rebooted as needed.
• After the last reboot, a final Detect job runs.
Detect and Deploy with Force Reboot works well with servers because they usually have no dedicated users. However, it is important to warn users that services will not be available when servers are being patched and rebooted. For more information, see Notify users when machines are being patched on page 12.
Detect and Deploy with Prompt User
When you select Detect and Deploy and choose Prompt User in the Reboot Options section, the following occurs according to the patching schedule:
• A Detect job runs.
• Patches are deployed until a reboot is required, then the user is prompted to reboot.
• If no user is logged in, the machine is rebooted immediately.
• If the user clicks OK, the machine reboots. The patching process continues until another reboot is required and the user is prompted again. The pattern continues until the patch list is exhausted.
• If the user snoozes or cancels the reboot, patching stops until a reboot occurs. When a reboot occurs, patching continues until the next reboot is needed, and the user is prompted again. The pattern continues until the patch list is exhausted.
• A final Detect job runs to verify patch status.
Detect and Deploy with Prompt User is risky because deploying patches without rebooting when required can leave systems unstable. Further, patches that require reboots only shown as deployed after the reboot.
Detect and Deploy with No Reboot
When you select Detect and Deploy and choose No Reboot in the Reboot Options section, the following occurs according to the patching schedule:
• A Detect job runs. • Patches are deployed.
• If no reboot is required, and the patch list is exhausted, a final Detect job runs to verify patch status.
• If a reboot is required, patching stops. When the machine is rebooted, patching continues until either the patch list is exhausted, or a reboot is needed and patching stops. • When the patch list is exhausted, a final Detect job runs to
verify patch status.
Detect and Deploy with No Reboot is not recommended because deploying patches without rebooting when required can leave systems unstable. Further, patches that require reboots are only shown as deployed after the reboot.
Deploy Perform Deploy-only actions. This is useful when you know that specific patches need to be deployed to managed machines. A final Detect job runs either after the patch is deployed or, if a reboot is required, after the machine reboots and the Agent reconnects to the appliance.
Note: If patch deployment is unsuccessful after the maximum number of attempts, the deployment fails and the machine is skipped. For more information about the maximum number of deploy attempts, see step 9 on page 39. For information on viewing patch status, including failures, see Viewing patch status by machine on page 44.
Deploy with Force Reboot
When you select Deploy and choose Force Reboot in the
Reboot Options section, the following occurs according to the patching schedule:
• All patches are deployed and the machine is rebooted as needed.
• A Detect job runs. Patching continues at the next scheduled patch deployment time.
• A final Detect job runs either after the last patch is deployed or, if a reboot is required, after the machine reboots and the Agent reconnects to the appliance. Deploy with
No Reboot
When you select Deploy and choose No Reboot in the Reboot Options section, the following occurs according to the patching schedule:
• Patches are deployed until a reboot is required, then patching stops.
• A Detect job runs. Patching continues at the next scheduled patch deployment time.
• A final Detect job runs either after the last patch is deployed or, if a reboot is required, after the machine reboots and the Agent reconnects to the appliance. Detect and
Rollback
Find and remove unwanted patches.
Detect and Rollback with Prompt User
When you select Detect and Rollback and choose Prompt User in the Reboot Options section, the following occurs according to the patching schedule:
• A Detect job runs to identify unwanted patches.
• If unwanted patches are found, the appliance attempts to remove them.
• If removal is unsuccessful after the maximum number of attempts, the rollback fails and the machine is skipped. For more information about the maximum number of
attempts, see step 9 on page 39.
• If the rollback is successful, the user is prompted to reboot. • If no user is logged in, the machine is rebooted
immediately.
• If the user clicks OK, the machine reboots. The rollback process continues until another reboot is required and the user is prompted again. The pattern continues until the patch list is exhausted.
• If the user snoozes or cancels the reboot, patching stops until a reboot occurs. When a reboot occurs, rollback continues until the next reboot is needed, and the user is prompted again. The pattern continues until the patch list is exhausted.
Rollback Roll back patches that have been applied. Rollback
with Prompt User
When you select Rollback and choose Prompt User in the
Reboot Options section, the following occurs according to the patching schedule:
• The appliance attempts to remove the unwanted patches • If removal is unsuccessful after the maximum number of
attempts, the rollback fails and the machine is skipped. For more information about the maximum number of
attempts, see step 9 on page 39.
• If rollback is successful, the user is prompted to reboot. • If no user is logged in, the machine reboots immediately. • If the user clicks OK, the machine reboots. The rollback process continues until another reboot is required and the user is prompted again. The pattern continues until the patch list is exhausted.
• If the user snoozes or cancels the reboot, the rollback process stops until a reboot occurs. When a reboot occurs, rollback continues until the next reboot is needed, and the user is prompted again. The pattern continues until the patch list is exhausted.
7. Select Machine Selection options:
Option Description
Run On All Machines Run the schedule on all machines in the selected organization. Use caution with this setting. It is usually better to test patch actions on a limited number of machines, and to limit patch actions to selected machines or machine labels. This ensures that patch actions are applied appropriately.
Limit Run To Selected Machine Labels
Restrict the patch actions to the machines in the labels that you select.
Limiting the run to labels, especially Smart Labels, helps to ensure that patches are applied appropriately. For example, some application patches have the ability to install applications as well as update applications that are already installed. To prevent the appliance from installing the application on machines that do not already have the application installed, you can create a Smart Label to identify machines that have the application. You can then limit the patch action to machines that have that label. The patch is then applied only to machines that already have the application installed.
To use this option, you must already have labels or Smart Labels. For more information, see About using Smart Labels for patching on page 27.
Limit Run To Machines Run detect and deploy patching actions on a small set of machines that you select. You can use this option for a small set of users that do not require a label. Select Machines in the Select Machines to add drop-down list. After this option is selected, the machines appear in the Limit Run To Machines box. You can also create a filter to select machines and enter it in the Filter
field. This is the most commonly used machine selection option. It limits the machines shown in the list to only those that contain the characters you type in the filter.
Limit Run To Machines With Selected
Operating Systems
Create an “on the fly” filter by selecting the operating systems of the machines on which you want to run the actions. The default is all operating systems.
8. Select Detect Patch Label Selection options:
9. Select Deploy Patch Label Selection options or Rollback Patch Label Selection options:
Option Description
Detect All Patches Detect all available patches.
This process can take a long time, and it might detect patches that are not required by managed machines. For example, if managed machines use antivirus applications from only one vendor, you might not need to detect patches for all antivirus vendors. Detect All, however, detects all missing patches regardless of whether they are required by managed machines. To refine patch detection, set up labels for the patches you want to detect, then use the Limit Detect to Selected Patch Labels option.
Limit Detect To Selected Patch Labels
Restrict the action to the patches in the labels that you select. This is the most commonly used patch detection option.
To select labels, click Edit.
To use this option, you must already have labels or Smart Labels for the patches you want to detect. For more information, see About using Smart Labels for patching on page 27.
Option Description
Deploy All Patches Rollback All Patches
Deploy or rollback all patches; this can take a long time.
To refine patch deployment or rollback, set up labels for the patches you want to deploy or rollback, then use the Limit Deploy to Selected Patch Labels option. Limit Deploy To
Selected Patch Labels Limit Rollback To Selected Patch Labels
Restrict the action to the patches in the labels that you select. This is the most commonly used patch
deployment or rollback option. To select labels, click Edit.
To use this option, you must already have labels or Smart Labels for the patches you want to detect. For more information, see About using Smart Labels for patching on page 27
Limit Patches To Matching Machine Labels
Dell KACE recommends that you do not select this option; it is provided for backward-compatibility in specific and rare cases.