Cisco ACI with Microsoft SCVMM
This chapter contains the following sections:
•About Cisco ACI with Microsoft SCVMM, on page 1
•Getting Started with Cisco ACI with Microsoft SCVMM, on page 4
•Upgrading the Cisco ACI with Microsoft SCVMM Components, on page 24
•Deploying Tenant Policies, on page 27
•Troubleshooting the Cisco ACI with Microsoft SCVMM, on page 32
•Reference Information, on page 33
•Programmability References, on page 35
•Configuration References, on page 36
•Uninstalling the Cisco ACI with Microsoft SCVMM Components, on page 37
•Downgrading the Cisco APIC Controller and the Switch Software with Cisco ACI and Microsoft SCVMM Components, on page 39
•Exporting APIC OpFlex Certificate, on page 40
About Cisco ACI with Microsoft SCVMM
The Application Policy Infrastructure Controller (APIC) integrates with Microsoft VM management systems and enhances the network management capabilities of the platform. The Cisco Application Centric Infrastructure (ACI) integrates at the following levels of the Microsoft VM Management systems:
• Cisco ACI with Microsoft System Center Virtual Machine Manager (SCVMM)—When integrated with Cisco ACI, SCVMM enables communication between ACI and SCVMM for network management.
Migrating from SCVMM to SCVMM HA is not supported by Microsoft.
Note
• Cisco ACI and Microsoft Windows Azure Pack—For information about how to set up Cisco ACI and Microsoft Windows Azure Pack, seeCisco ACI with Microsoft Windows Azure Pack Solution Overview.
Cisco ACI with Microsoft SCVMM Solution Overview
At this integration point the Application Policy Infrastructure Controller (APIC) and Microsoft System Center Virtual Machine Manager (SCVMM) communicate with each other for network management. Endpoint groups
(EPGs) are created in APIC and are created as VM networks in SCVMM. Compute is provisioned in SCVMM and can consume these networks.
Physical and Logical Topology of SCVMM
This figure shows a representative topology of a typical System Center Virtual Machine Manager (SCVMM) deployment with Cisco Application Centric Infrastructure (ACI) fabric. The Microsoft SCVMM service can be deployed as a Standalone Service or as a Highly Available Service on physical hosts or virtual machines, but will logically be viewed as a single SCVMM instance which communicates to the APIC.
Connectivity between an SCVMM Service and the Application Policy Infrastructure Controller (APIC) is over the management network.
Figure 1: Topology with ACI Fabric and SCVMM
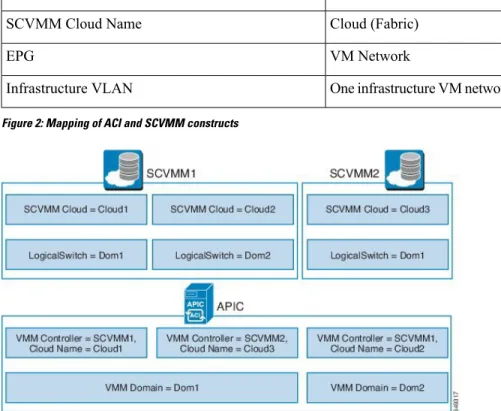
About the Mapping of ACI Constructs in SCVMM
This section shows a table and figure of the mapping of Application Policy Infrastructure Controller (APIC) constructs in Microsoft System Center Virtual Machine Manager (SCVMM).
Table 1: Mapping of APIC and SCVMM constructs
System Center APIC
Logical Switch and Logical Network VMM Domain
Cisco ACI with Microsoft SCVMM Physical and Logical Topology of SCVMM
System Center APIC SCVMM VMM Controller Cloud (Fabric) SCVMM Cloud Name VM Network EPG
One infrastructure VM network for each logical switch Infrastructure VLAN
Figure 2: Mapping of ACI and SCVMM constructs
The mapping is bound by the following rule:
• One VMM domain cannot map to the same SCVMM more than once.
SCVMM Fabric Cloud and Tenant Clouds
Microsoft System Center Virtual Machine Manager (SCVMM) provides an object called "Cloud", which acts as a container of logical and physical fabric resources. ACI Integration with SCVMM automatically creates the various logical networking pieces and enables the logical networks at your designated cloud. When configuring ACI Integration with SCVMM, the fabric cloud is the cloud that is specified as the root container on the Application Policy Infrastructure Controller (APIC), while the tenant cloud is an SCVMM cloud that contains a subset of the host groups specified in the fabric cloud. SCVMM contains all the host groups that will be used to deploy the logical switch. Once the fabric cloud is set up and the logical switch has been deployed to the hosts in the host groups, an SCVMM Admin can then create tenant clouds and enable the apicLogicalNetwork on that tenant cloud, enabling Windows Azure Pack tenants to create and deploy tenant networks on the fabric.
Example:
SCVMM Cloud Name: Fabric_Cloud Host Groups: All Hosts
Host Group HumanResources: HyperV Node: Node-2-24 Host Group Engineering:
HyperV Node: Node-2-25 SCVMM Cloud Name: HR_Cloud
Cisco ACI with Microsoft SCVMM
Host Groups: HumanResources SCVMM Cloud Name: Engineering_Cloud
Host Groups: Engineering
Getting Started with Cisco ACI with Microsoft SCVMM
This section describes how to get started with Cisco Application Centric Infrastructure (ACI) with Microsoft System Center Virtual Machine Manager (SCVMM).
You must download and unzip the Cisco ACI and Microsoft Integration file for the 2.2(1) release before installing Cisco ACI with Microsoft Windows Azure Pack.
1. Go to Cisco's Application Policy Infrastructure Controller (APIC) Website:
http://www.cisco.com/c/en/us/support/cloud-systems-management/
application-policy-infrastructure-controller-apic/tsd-products-support-series-home.html 2. ChooseAll Downloads for this Product.
3. Choose the release version and theaci-msft-pkg-2.2.1x.zipfile.
4. ClickDownload.
5. Unzip theaci-msft-pkg-2.2.1x.zipfile.
Cisco ACI with Microsoft System Center Virtual Machine Manager (SCVMM) only supports ASCII characters. Non-ASCII characters are not supported.
Ensure thatEnglishis set in the System Locale settings for Windows, otherwise ACI with SCVMM will not install. In addition, if the System Locale is later modified to a non-English Locale after the installation, the integration components may fail when communicating with the APIC and the ACI fabric.
Note
Prerequisites for Getting Started with Cisco ACI with Microsoft SCVMM
Before you get started, ensure that you have verified that your computing environment meets the following prerequisites:
• Ensure that one of the following Microsoft System Center Virtual Machine Manager (SCVMM) versions with the Administrator Console Builds are met:
• SCVMM 2019 RTM (Build 10.19.1013.0) or newer • SCVMM 2016 RTM (Build 4.0.1662.0) or newer
• SCVMM 2012 R2 with Update Rollup 9 (Build 3.2.8145.0) or newer
• Ensure that Windows Server 2019, 2016, 2012 R2 is installed on the Hyper-V server with the Hyper-V role enabled.
See Microsoft's documentation.
Cisco ACI with Microsoft SCVMM Getting Started with Cisco ACI with Microsoft SCVMM
• Ensure the cloud is configured in SCVMM and appropriate hosts added to that cloud. See Microsoft's documentation.
• If there are switches between the Cisco Application Centric Infrastructure (ACI) leaf switch and the Hyper-V host (such as a Fabric Interconnect), you must allow the infrastructure VLAN on these intermediary devices.
• Ensure "default" AEP exists with infrastructure VLAN enabled.
• Ensure you have the Cisco MSI files for APIC SCVMM and the Host Agent. SeeGetting Started with Cisco ACI with Microsoft SCVMM, on page 4.
• Ensure that you scheduled a maintenance window for the SCVMM Installation. The Cisco ACI SCVMM Installation process with automatically restart the current running SCVMM service instance.
If the VMs in SCVMM are configured with Dynamic MAC, then it takes time for the APIC to update the VM Inventory as the SCVMM takes time to learn or discover these MAC addresses.
Note
• Ensure the Hyper-V Management Tools is installed on the Hyper-V hosts as well as the SCVMM server. To install the Hyper-V Management Tools feature:
1. In theRemote Server Administration Tools,Add Roles and Features>Feature>Remote Server Administration Tools>Role Administration Tools>Hyper-V Management Toolsand finish the wizard to install the feature.
2. Repeat for each Hyper-V and the SCVMM server.
This installs the Hyper-V PowerShell cmdlets needed for the APIC SCVMM and host agent.
Installing, Setting Up, and Verifying the Cisco ACI with Microsoft SCVMM
Components
This section describes how to install, set up, and verify the Cisco Application Centric Infrastructure (ACI) with Microsoft System Center Virtual Machine Manager (SCVMM) components.
Task Component
SeeInstalling the APIC SCVMM Agent on SCVMM, on page 7.
SeeInstalling the APIC SCVMM Agent on a Highly Available SCVMM, on page 7
For the Windows Command Prompt method, see
Installing the APIC Agent on SCVMM Using the Windows Command Prompt, on page 33. Install the APIC SCVMM Agent on SCVMM or on
a Highly Available SCVMM
SeeGenerating APIC OpFlex Certificate, on page 8. Generate the OpflexAgent certificate
Cisco ACI with Microsoft SCVMM
Task Component
SeeAdding the OpFlex Certificate Policy to APIC, on page 9.
Add the OpFlex certificate policy to APIC
SeeInstalling the OpflexAgent Certificate, on page 10.
Install the OpflexAgent certificate
SeeConfiguring APIC IP Settings with OpflexAgent Certificate on the SCVMM Agent, on page 12. or
SeeConfiguring APIC IP Settings with OpflexAgent Certificate on the SCVMM Agent on a Highly Available SCVMM, on page 14.
Configure APIC IP Settings with APIC credentials on the SCVMM Agent or on the SCVMM Agent on a Highly Available SCVMM
SeeInstalling the APIC Hyper-V Agent on the Hyper-V Server, on page 15.
For the Windows Command Prompt method, see
Installing the APIC Hyper-V Agent on the Hyper-V Server Using the Windows Command Prompt , on page 34.
Install the APIC Hyper-V Agent on the Hyper-V server
SeeVerifying the APIC SCVMM Agent Installation on SCVMM, on page 17.
or
SeeVerifying the APIC SCVMM Agent Installation on a Highly Available SCVMM, on page 18. Verify the APIC SCVMM Agent installation on
SCVMM or on a Highly Available SCVMM
SeeVerifying the APIC Hyper-V Agent Installation on the Hyper-V Server, on page 19.
Verify the APIC Hyper-V Agent installation on the Hyper-V server
SeeCreating SCVMM Domain Profiles, on page 20
andCreating a SCVMM Domain Profile Using the GUI, on page 20.
For the NX-OS Style CLI method, seeCreating a SCVMM Domain Profile Using the NX-OS Style CLI.
For the REST API method, seeCreating a SCVMM Domain Profile Using the REST API.
Create SCVMM Domain Profiles
See Verifying the SCVMM VMM Domain and SCVMM VMM, on page 22.
Verify the SCVMM VMM Domain and SCVMM VMM
SeeDeploying the Logical Switch to the Host on SCVMM, on page 23.
Deploy the logical switch to the host on SCVMM
SeeEnabling the Logical Network on Tenant Clouds, on page 24.
Enable the Logical Network on Tenant Clouds
Cisco ACI with Microsoft SCVMM Installing, Setting Up, and Verifying the Cisco ACI with Microsoft SCVMM Components
Installing the APIC SCVMM Agent on SCVMM
This section describes how to install the Application Policy Infrastructure Controller (APIC) SCVMM agent on System Center Virtual Machine Manager (SCVMM).
Procedure
Step 1 Log in to the SCVMM server with SCVMM administrator credentials.
Step 2 On the SCVMM server in Explorer, locate theAPIC SCVMM Agent.msifile.
Step 3 Right-clickAPIC SCVMM Agent.msifile and selectInstall.
Step 4 In theCisco APIC SCVMM Agent Setupdialog box, perform the following actions: a) ClickNext.
b) Check theI accept the terms in the License Agreementcheck box and clickNext. c) Enter your account name and password credentials.
Provide the same credentials that you used for the SCVMM console. The Cisco APIC SCVMM agent requires these credentials for the SCVMM operations to be able to function.
The installation process verifies the entered account name and password credentials. If the installation fails, the SCVMM shows an error message and you must re-enter valid credentials.
d) After successful validation of the account name and password credentials, clickInstall. e) ClickFinish.
Installing the APIC SCVMM Agent on a Highly Available SCVMM
This section describes how to install the Application Policy Infrastructure Controller (APIC) SCVMM agent on a Highly Available System Center Virtual Machine Manager (SCVMM).
Procedure
Step 1 Log in to the Current Owner Node of the Highly Available SCVMM installation.
Step 2 On the SCVMM server in File Explorer, locate theAPIC SCVMM Agent.msifile.
Step 3 Right-clickAPIC SCVMM Agent.msifile and selectInstall.
Step 4 In theCisco APIC SCVMM Agent Setupdialog box, perform the following actions: a) ClickNext.
b) Check theI accept the terms in the License Agreementcheck box and clickNext. c) Enter your account name and password credentials.
Provide the same credentials that you used for the SCVMM console. The Cisco APIC SCVMM agent requires these credentials for the SCVMM operations to be able to function.
The installation process verifies the entered account name and password credentials. If the installation fails, the SCVMM shows an error message and you must re-enter valid credentials.
d) After successful validation of the account name and password credentials, clickInstall. e) ClickFinish.
Cisco ACI with Microsoft SCVMM
Step 5 Repeat steps 1-4 for each Standby Node in the Windows Failover Cluster.
Generating APIC OpFlex Certificate
This section describes how to generate APIC OpFlex certificate to secure communication between the Application Policy Infrastructure Controller (APIC) and SCVMM agents.
This should only be done once per installation.
Note
Procedure
Step 1 Log in to the SCVMM server, chooseStart>Run >Windows Powershell, and then, in the app bar, click
Run as administrator.
Step 2 LoadACISCVMMPsCmdletsand create a new OpflexAgent.pfx certificate file, by entering the following commands:
Windows PowerShell
Copyright (C) 2013 Microsoft Corporation. All rights reserved. PS C:\Users\Administrator.INSCISCO> cd \
PS C:\> cd '.\Program Files (x86)\ApicVMMService'
PS C:\Program Files (x86)\ApicVMMService> Import-Module .\ACIScvmmPsCmdlets.dll
PS C:\Program Files (x86)\ApicVMMService> Get-Command -Module ACIScvmmPsCmdlets
CommandType Name ModuleName --- ---- ---Cmdlet Get-ACIScvmmOpflexInfo ACIScvmmPsCmdlets Cmdlet Get-ApicConnInfo ACIScvmmPsCmdlets Cmdlet Get-ApicCredentials ACIScvmmPsCmdlets Cmdlet New-ApicOpflexCert ACIScvmmPsCmdlets Cmdlet Read-ApicOpflexCert ACIScvmmPsCmdlets Cmdlet Set-ApicConnInfo ACIScvmmPsCmdlets Cmdlet Set-ApicCredentials ACIScvmmPsCmdlets
Step 3 Generate a new OpFlex Certificate, by entering the following commands. The "New-ApicOpflexCert" PowerShell command will both generate the PFX certificate package file for use on other machines and install the certificate to the local machine's Certificate Store.
PS C:\Program Files (x86)\ApicVMMService> $pfxpassword = ConvertTo-SecureString "MyPassword" -AsPlainText -Force
PS C:\Program Files (x86)\ApicVMMService> New-ApicOpflexCert -ValidNotBefore 1/1/2015 -ValidNotAfter 1/1/2020
-Email [email protected] -Country USA -State CA -Locality "San Jose" -Organization MyOrg –PfxPassword $pfxpassword
Successfully created:
C:\Program Files (x86)\ApicVMMService\OpflexAgent.pfx PS C:\Program Files (x86)\ApicVMMService>
Step 4 Display the certificate information to be used on APIC using the REST API.
Cisco ACI with Microsoft SCVMM Generating APIC OpFlex Certificate
SeeDisplaying the Certificate Information to be Used on APIC Using the REST API, on page 9.
Displaying the Certificate Information to be Used on APIC Using the REST API
This section describes how to display the certificate information to be used on APIC using the REST API.
Procedure
To display the certificate information to be used on the APIC.
PS C:\Program Files (x86)\ApicVMMService> $pfxpassword = ConvertTo-SecureString "MyPassword" -AsPlainText -Force
PS C:\Program Files (x86)\ApicVMMService> Read-ApicOpflexCert -PfxFile
"C:\Program Files (x86)\ApicVMMService\OpflexAgent.pfx" -PfxPassword $pfxpassword
---BEGIN CERTIFICATE---MIIDojCCAoqgAwIBAgIQHz+F2luuOpFKK0p3jxWRfjANBgkqhkiG9w0BAQ0FADBfMRwwGgYJKoZI hvcNAQkBFg10MEBkb21haW4uY29tMQ4wDAYDVQQKDAVNeU9yZzELMAkGA1UECAwCQ0ExDDAKBgNV BAYTA1VTQTEUMBIGA1UEAwwLT3BmbGV4QWdlbnQwHhcNMTUwMTAxMDAwMDAwWhcNMjAwMTAxMDAw MDAwWjBfMRwwGgYJKoZIhvcNAQkBFg10MEBkb21haW4uY29tMQ4wDAYDVQQKDAVNeU9yZzELMAkG A1UECAwCQ0ExDDAKBgNVBAYTA1VTQTEUMBIGA1UEAwwLT3BmbGV4QWdlbnQwggEiMA0GCSqGSIb3 DQEBAQUAA4IBDwAwggEKAoIBAQCzQS3rvrIdxiHfeAUqtX68CdjIL1+nDtqBH8LzDk0RBVb0KU6V 9cYjCAMwW24FJo0PMt4XblvFJDbZUfjWgEY1JmDxqHIAhKIujGsyDoSZdXaKUUv3ig0bzcswEGvx khGpAJB8BCnODhD3B7Tj0OD8Gl8asd1u24xOy/8MtMDuan/2b32QRmn1uiZhSX3cwjnPI2JQVIif n68L12yMcp1kJvi6H7RxVOiES33uz00qjxcPbFhsuoFF1eMT1Ng41sTzMTM+xcE6z72zgAYN6wFq T1pTCLCC+0u/q1yghYu0LBnARCYwDbe2xoa8ClVcL3XYQlEFlp1+HFfd//p1ro+bAgMBAAGjWjBY MBIGA1UdEwEB/wQIMAYBAf8CAQAwEwYDVR0lBAwwCgYIKwYBBQUHAwEwHQYDVR0OBBYEFGuzLCG5 4DEcP+bPiFbiDjMDQ3tMMA4GA1UdDwEB/wQEAwIBBjANBgkqhkiG9w0BAQ0FAAOCAQEANc5kKvN4 Q62tIYa1S2HSyiwjaMq7bXoqIH/ICPRqEXu1XE6+VnLnYqpo3TitLmU4G99uz+aS8dySNWaEYghk 8jgLpu39HH6yWxdPiZlcCQ17J5B5vRu3Xjnc/2/ZPqlQDEElobrAOdTko4uAHG4lFBHLwAZA/f72 5fciyb/pjNPhPgpCP0r7svElQ/bjAP1wK8PhCfd7k2rJx5jHr+YX8SCoM2jKyzaQx1BAdufspX3U 7AWH0aF7ExdWy/hW6CduO9NJf+98XNQe0cNH/2oSKYCl9qEK6FesdOBFvCjlRYR9ENqiY4q7xpyB tqDkBm80V0JslU2xXn+G0yCWGO3VRQ== ---END
CERTIFICATE---PS C:\Program Files (x86)\ApicVMMService>
Adding the OpFlex Certificate Policy to APIC
This section describes how to add the OpFlex certificate policy to theApplication Policy Infrastructure Controller (APIC) .
Procedure
Add the AAA policy to allow authenticate this certificate on the APIC server. The Hyper-V agent certificate policy can be added in APIC through the GUI or REST Post:
• GUI method:
a. Log in to the APIC GUI, on the menu bar, chooseADMIN>AAA.
b. In theNavigationpane, chooseSecurity Management>Local Usersand click onadmin. Cisco ACI with Microsoft SCVMM
c. In thePROPERTIESpane, chooseActions>Create X509 Certificate, in the drop-down list, enter the name and data.
d. In theCreate X509 Certificatedialog box, in theNamefield, you must enter "OpflexAgent".
e. On the SCVMM server, enter the output of the PowerShell Read-ApicOpflexCert cmdlet.
f. When you run the Read-ApicOpflexCert cmdlet, provide the full link when prompted for the name of the pfx file:C:\Program Files (x86)\ApicVMMService\OpflexAgent.pfx, then enter the password.
g. Copy from the beginning of "---BEGIN CERTIFICATE---" to the end of "---END CERTIFICATE---"and paste it in theDATAfield.
h. ClickSUBMIT.
i. In thePROPERTIESpane, under theUser Certificatesfield, you will see the user certificate displayed.
• REST Post method:
POST http://<apic-ip>/api/policymgr/mo/uni/userext/user-admin.json?rsp-subtree=full {"aaaUserCert":{"attributes": {"name":"OpflexAgent", "data":" ---BEGIN CERTIFICATE---MIIDojCCAoqgAwIBAgIQHz+F2luuOpFKK0p3jxWRfjANBgkqhkiG9w0BAQ0FADBfMRwwGgYJKoZI hvcNAQkBFg10MEBkb21haW4uY29tMQ4wDAYDVQQKDAVNeU9yZzELMAkGA1UECAwCQ0ExDDAKBgNV BAYTA1VTQTEUMBIGA1UEAwwLT3BmbGV4QWdlbnQwHhcNMTUwMTAxMDAwMDAwWhcNMjAwMTAxMDAw MDAwWjBfMRwwGgYJKoZIhvcNAQkBFg10MEBkb21haW4uY29tMQ4wDAYDVQQKDAVNeU9yZzELMAkG A1UECAwCQ0ExDDAKBgNVBAYTA1VTQTEUMBIGA1UEAwwLT3BmbGV4QWdlbnQwggEiMA0GCSqGSIb3 DQEBAQUAA4IBDwAwggEKAoIBAQCzQS3rvrIdxiHfeAUqtX68CdjIL1+nDtqBH8LzDk0RBVb0KU6V 9cYjCAMwW24FJo0PMt4XblvFJDbZUfjWgEY1JmDxqHIAhKIujGsyDoSZdXaKUUv3ig0bzcswEGvx khGpAJB8BCnODhD3B7Tj0OD8Gl8asd1u24xOy/8MtMDuan/2b32QRmn1uiZhSX3cwjnPI2JQVIif n68L12yMcp1kJvi6H7RxVOiES33uz00qjxcPbFhsuoFF1eMT1Ng41sTzMTM+xcE6z72zgAYN6wFq T1pTCLCC+0u/q1yghYu0LBnARCYwDbe2xoa8ClVcL3XYQlEFlp1+HFfd//p1ro+bAgMBAAGjWjBY MBIGA1UdEwEB/wQIMAYBAf8CAQAwEwYDVR0lBAwwCgYIKwYBBQUHAwEwHQYDVR0OBBYEFGuzLCG5 4DEcP+bPiFbiDjMDQ3tMMA4GA1UdDwEB/wQEAwIBBjANBgkqhkiG9w0BAQ0FAAOCAQEANc5kKvN4 Q62tIYa1S2HSyiwjaMq7bXoqIH/ICPRqEXu1XE6+VnLnYqpo3TitLmU4G99uz+aS8dySNWaEYghk 8jgLpu39HH6yWxdPiZlcCQ17J5B5vRu3Xjnc/2/ZPqlQDEElobrAOdTko4uAHG4lFBHLwAZA/f72 5fciyb/pjNPhPgpCP0r7svElQ/bjAP1wK8PhCfd7k2rJx5jHr+YX8SCoM2jKyzaQx1BAdufspX3U 7AWH0aF7ExdWy/hW6CduO9NJf+98XNQe0cNH/2oSKYCl9qEK6FesdOBFvCjlRYR9ENqiY4q7xpyB tqDkBm80V0JslU2xXn+G0yCWGO3VRQ== ---END
CERTIFICATE---Installing the OpflexAgent Certificate
This section describes how to install the OpflexAgent Certificate.
Procedure
Step 1 Log in to the SCVMM server with administrator credentials.
Step 2 Use one of the following methods:
• For large-scale deployments, see Microsoft's documentation for Deploy Certificates by Using Group Policy:
Cisco ACI with Microsoft SCVMM Installing the OpflexAgent Certificate
https://technet.microsoft.com/en-us/library/cc770315(v=ws.10).aspx. • For small-scale deployments follow these steps:
You must add OpFlex security certificate to the local machine. The Microsoft SCVMM agent has a security certificate file namedOpflexAgent.pfxlocated in theC:\Program Files (x86)\ApicVMMService
folder on the SCVMM server. If the following steps are not performed on your SCVMM servers, the APIC SCVMM Agent cannot communicate with the Application Policy Infrastructure Controller (APIC) .
Install the OpFlex security certificate on the SCVMM Windows Server 2012 local machine’s certificate repository. On each SCVMM server, install this certificate by performing the following steps:
a. ChooseStart>Run.
b. Entermmcand clickOK.
c. In theConsole Rootwindow, on the menu bar, chooseAdd/Remove Snap-in.
d. In theAvailable Snap-insfield, chooseCertificatesand clickAdd.
e. In theCertificates snap-indialog box, choose theComputer Accountradio button, and clickNext.
f. In theSelect Computerdialog box, choose theLocal Computerradio button, and clickFinish.
g. ClickOKto go back to the mainMMC Consolewindow.
h. In theMMC Consolewindow, double-clickCertificates (local computer)to expand its view.
i. Right-clickCertificatesunderPersonaland chooseAll Tasks>Import.
j. In theCertificates Import Wizarddialog box, perform the following actions:
1. ClickNext.
2. Browse to theOpflex Agentfile and clickNext.
k. Enter the password for the certificate that was provided when you installed MSI. Cisco ACI with Microsoft SCVMM
l. You must choose theMark this key as exportable. This will allow you to back up or transport your keys at a later timeradio button.
m. Choose theInclude all extended propertiesradio button.
n. Choose thePlace all certificates in the following storeradio button, browse to locatePersonal, and clickNext.
o. ClickFinish.
p. ClickOK.
Step 3 Repeat steps 1 through 5 for each SCVMM server.
Configuring APIC IP Settings with OpflexAgent Certificate on the SCVMM Agent
This section describes how to configure the Cisco Application Policy Infrastructure Controller (APIC) IP settings with OpflexAgent Certificate on the System Center Virtual Machine Manager (SCVMM) agent.
Procedure
Step 1 Log in to the SCVMM server and chooseStart>Run >Windows PowerShell.
Step 2 LoadACISCVMMPsCmdletsby entering the following commands:
Example:
Get-ApicCredentials and Set-ApicCredentials are now deprecated, use Get-ApicConnInfo and Set-ApicConnInfo.
Note
Windows PowerShell
Copyright (C) 2013 Microsoft Corporation. All rights reserved.
Cisco ACI with Microsoft SCVMM Configuring APIC IP Settings with OpflexAgent Certificate on the SCVMM Agent
PS C:\Users\Administrator.INSCISCO> cd \
PS C:\> cd '.\Program Files (x86)\ApicVMMService'
PS C:\Program Files (x86)\ApicVMMService> Import-Module .\ACIScvmmPsCmdlets.dll
PS C:\Program Files (x86)\ApicVMMService> Get-Command -Module ACIScvmmPsCmdlets
CommandType Name ModuleName --- ---- ---Cmdlet Get-ACIScvmmOpflexInfo ACIScvmmPsCmdlets Cmdlet Get-ApicConnInfo ACIScvmmPsCmdlets Cmdlet Get-ApicCredentials ACIScvmmPsCmdlets Cmdlet New-ApicOpflexCert ACIScvmmPsCmdlets Cmdlet Read-ApicOpflexCert ACIScvmmPsCmdlets Cmdlet Set-ApicConnInfo ACIScvmmPsCmdlets Cmdlet Set-ApicCredentials ACIScvmmPsCmdlets PS C:\Program Files (x86)\ApicVMMService>
Step 3 Set up Cisco APIC connection parameters for the SCVMM agent by entering the following commands, adding at least one Cisco APIC:
PS C:\Users\administrator.APIC> Set-ApicConnInfo -ApicNameOrIPAddress APIC_1_IP -CertificateSubjectName OpflexAgent
Apic Credential is successfully set to APIC SCVMM service agent.
If you enter more than one -ApicNameOrIPAddress, use the following format:
"APIC_1_IP;APIC_2_IP;APIC_3_IP;APIC_N_IP"
If you enter the wrong information inSet-ApicCredentials, the information fails to apply and validate on the Cisco APIC. This information is not preserved.
PS C:\Program Files (x86)\ApicVMMService> Set-ApicConnInfo -ApicNameOrIPAddress APIC_1_IP
-CertificateSubjectName O pflexAgentWrong
Failed cmdlet with Error: Invalid APIC Connection Settings.
Set-ApicConnInfo : The remote server returned an error: (400) Bad Request. At line:1 char:1
+ Set-ApicConnInfo -ApicNameOrIPAddress APIC_1_IP -CertificateSubjectName Opf ... + ~~~~~~~~~~~~~~~~~~~~~~~~~~~~~~~~~~~~~~~~~~~~~~~~~~~~~~~~~~~~~~~~~~~~~~~~~~~~~~~~
+ CategoryInfo : InvalidArgument: (:) [Set-ApicConnInfo], WebException + FullyQualifiedErrorId : Failed cmdlet with Error: Invalid APIC Connection Settings.,Cisco.ACI.SCVMM.
PowerShell.SetApicConnInfo
Step 4 Verify that the Cisco APIC connection parameters are set properly on Cisco APIC SCVMM Agent by entering the following command:
PS C:\Program Files (x86)\ApicVMMService> Get-ApicConnInfo
EndpointAddress : Username : Password : ApicAddresses : 172.23.139.224 ConnectionStatus : Connected adminSettingsFlags : 0 certificateSubjectName : OpflexAgent ExtensionData :
Cisco ACI with Microsoft SCVMM
PS C:\Program Files (x86)\ApicVMMService>
Configuring APIC IP Settings with OpflexAgent Certificate on the SCVMM Agent on a Highly
Available SCVMM
This section describes how to configure the Application Policy Infrastructure Controller (APIC) IP settings with OpflexAgent Certificate on the System Center Virtual Machine Manager (SCVMM) agent.
Procedure
Step 1 Log in to the Owner Node SCVMM server and chooseStart>Run >Windows PowerShell.
Step 2 LoadACISCVMMPsCmdletsby entering the following commands:
Example:
Get-ApicCredentials and Set-ApicCredentials are now deprecated, use Get-ApicConnInfo and Set-ApicConnInfo.
Note
Windows PowerShell
Copyright (C) 2013 Microsoft Corporation. All rights reserved. PS C:\Users\Administrator.INSCISCO> cd \
PS C:\> cd '.\Program Files (x86)\ApicVMMService'
PS C:\Program Files (x86)\ApicVMMService> Import-Module .\ACIScvmmPsCmdlets.dll
PS C:\Program Files (x86)\ApicVMMService> Get-Command -Module ACIScvmmPsCmdlets
CommandType Name ModuleName --- ---- ---Cmdlet Get-ACIScvmmOpflexInfo ACIScvmmPsCmdlets Cmdlet Get-ApicConnInfo ACIScvmmPsCmdlets Cmdlet Get-ApicCredentials ACIScvmmPsCmdlets Cmdlet New-ApicOpflexCert ACIScvmmPsCmdlets Cmdlet Read-ApicOpflexCert ACIScvmmPsCmdlets Cmdlet Set-ApicConnInfo ACIScvmmPsCmdlets Cmdlet Set-ApicCredentials ACIScvmmPsCmdlets PS C:\Program Files (x86)\ApicVMMService>
Step 3 Set up Cisco APIC connection parameters for the SCVMM agent by entering the following commands, adding one or more Cisco APIC:
PS C:\Users\administrator.APIC> Set-ApicConnInfo -ApicNameOrIPAddress APIC_1_IP -CertificateSubjectName OpflexAgent
Apic Credential is successfully set to APIC SCVMM service agent. 10:25 AM
If you enter more than one -ApicNameOrIPAddress, use the following format:
"APIC_1_IP;APIC_2_IP;APIC_3_IP;APIC_N_IP"
If you enter the wrong information inSet-ApicCredentials, the information fails to apply and validate on the Cisco APIC. This information is not preserved.
PS C:\Program Files (x86)\ApicVMMService> Set-ApicConnInfo -ApicNameOrIPAddress APIC_1_IP
-CertificateSubjectName O
Cisco ACI with Microsoft SCVMM Configuring APIC IP Settings with OpflexAgent Certificate on the SCVMM Agent on a Highly Available SCVMM
pflexAgentWrong
Failed cmdlet with Error: Invalid APIC Connection Settings.
Set-ApicConnInfo : The remote server returned an error: (400) Bad Request. At line:1 char:1
+ Set-ApicConnInfo -ApicNameOrIPAddress APIC_1_IP -CertificateSubjectName Opf ... + ~~~~~~~~~~~~~~~~~~~~~~~~~~~~~~~~~~~~~~~~~~~~~~~~~~~~~~~~~~~~~~~~~~~~~~~~~~~~~~~~
+ CategoryInfo : InvalidArgument: (:) [Set-ApicConnInfo], WebException + FullyQualifiedErrorId : Failed cmdlet with Error: Invalid APIC Connection Settings.,Cisco.ACI.SCVMM.
PowerShell.SetApicConnInfo
Step 4 Verify that the Cisco APIC connection parameters are set properly on the Cisco APIC SCVMM Agent by entering the following command:
PS C:\Program Files (x86)\ApicVMMService> Get-ApicConnInfo
EndpointAddress : Username : Password : ApicAddresses : 172.23.139.224 ConnectionStatus : Connected adminSettingsFlags : 0 certificateSubjectName : OpflexAgent ExtensionData
Installing the APIC Hyper-V Agent on the Hyper-V Server
This section describes how to install the APIC Hyper-V agent on the Hyper-V server.
Before you begin
Scheduled downtime for the Hyper-V node. For more information regarding Hyper-V Maintenance Mode behavior, see:https://technet.microsoft.com/en-us/library/hh882398.aspx
Procedure
Step 1 Log on to the SCVMM server and bring the Hyper-V node into Maintenance Mode.
Step 2 Log in to the Hyper-V server with administrator credentials.
Step 3 On the Hyper-V server in File Explorer, locate theAPIC Hyper-V Agent.msifile.
Step 4 Right-click theAPIC Hyper-V Agent.msifile and chooseInstall.
Step 5 In theApicHypervAgent Setupdialog box, perform the following actions: a) Check theI accept the terms in the License Agreementcheck box. b) ClickInstall.
c) ClickFinish.
Step 6 Follow the steps in Microsoft's documentation to view and bring the apicVSwitch Logical Switch into compliance. Also referred to in this guide as Host Remediate or Logical Switch Instance Remediation:
https://technet.microsoft.com/en-us/library/dn249415.aspx
Step 7 Use one of the following methods:
• For large-scale deployments, see Microsoft's documentation for Deploy Certificates by Using Group Policy:
Cisco ACI with Microsoft SCVMM
https://technet.microsoft.com/en-us/library/cc770315(v=ws.10).aspx
• For small-scale deployments follow these steps:
You must add OpFlex security certificate in the local system. The Microsoft Hyper-V agent has a security certificate file namedOpflexAgent.pfxlocated in theC:\Program Files (x86)\ApicVMMServicefolder on the SCVMM server. If the following steps are not performed on your Hyper-V servers, the APIC Hyper-V Agent cannot communicate with the Cisco Application Centric Infrastructure (ACI) fabric leaf switches.
Install the OpFlex security certificate on the Hyper-V Windows Server 2012 local machine’s certificate repository. On each Hyper-V server, install this certificate by performing the following steps:
a. ChooseStart>Run.
b. Entermmcand clickOK.
c. In theConsole Rootwindow, on the menu bar, chooseAdd/Remove Snap-in.
d. In theAvailable Snap-insfield, chooseCertificatesand clickAdd.
e. In theCertificates snap-indialog box, choose theComputer Accountradio button, and clickNext.
f. In theSelect Computerdialog box, choose theLocal Computerradio button, and clickFinish.
g. ClickOKto go back to the mainMMC Consolewindow.
h. In theMMC Consolewindow, double-clickCertificates (local computer)to expand its view.
i. Right-clickCertificatesunderPersonaland chooseAll Tasks>Import.
j. In theCertificates Import Wizarddialog box, perform the following actions:
1. ClickNext.
2. Browse to theOpflex Agentfile and clickNext.
k. Enter the password for the certificate that was provided when you installed MSI.
Cisco ACI with Microsoft SCVMM Installing the APIC Hyper-V Agent on the Hyper-V Server
l. You must choose theMark this key as exportable. This will allow you to back up or transport your keys at a later timeradio button.
m. Choose theInclude all extended propertiesradio button.
n. Choose thePlace all certificates in the following storeradio button, browse to locatePersonal, and clickNext.
o. ClickFinish.
p. ClickOK.
Step 8 Log on to the SCVMM Sserver and bring the Hyper-V node out of Maintenance Mode.
Step 9 Repeat steps 1 through 8 for each Hyper-V server.
Verifying the Installation of Cisco ACI with Microsoft SCVMM
Verifying the APIC SCVMM Agent Installation on SCVMM
This section describes how to verify the APIC SCVMM agent installation on System Center Virtual Machine Manager (SCVMM).
Procedure
Step 1 ChooseStart>Control Panel.
Step 2 In theControl Panelwindow, enterControl Panel\Programs\Programs and Featuresin the address bar.
Step 3 LocateCisco APIC SCVMM Agent. IfCisco APIC SCVMM Agentis present, then the product is installed. Cisco ACI with Microsoft SCVMM
IfCisco APIC SCVMM Agentis not present, then the product is not installed. See theInstalling the APIC SCVMM Agent on SCVMM, on page 7orInstalling the APIC Agent on SCVMM Using the Windows Command Prompt, on page 33section.
Step 4 Verify theApicVMMServiceis in RUNNING state through the GUI or CLI:
• GUI method: ChooseStart>Runand enterservices.msc. In theServicepane, locate the
ApicVMMServiceand verify the state is RUNNING.
• CLI method: From the command prompt, enter thesc.exe query ApicHypervAgentcommand and verify the state is RUNNING:
sc.exe query ApicVMMService
SERVICE_NAME: ApicVMMService TYPE : 10 WIN32_OWN_PROCESS STATE : 4 RUNNING
(STOPPABLE, NOT_PAUSABLE, ACCEPTS_SHUTDOWN) WIN32_EXIT_CODE : 0 (0x0)
SERVICE_EXIT_CODE : 0 (0x0) CHECKPOINT : 0x0
WAIT_HINT : 0x0
Verifying the APIC SCVMM Agent Installation on a Highly Available SCVMM
This section describes how to verify the APIC SCVMM agent installation on a Highly Available System Center Virtual Machine Manager (SCVMM).
Procedure
Step 1 ChooseStart>Control Panel.
Step 2 In theControl Panelwindow, enterControl Panel\Programs\Programs and Featuresin the address bar.
Step 3 LocateCisco APIC SCVMM Agent. IfCisco APIC SCVMM Agentis present, then the product is installed. IfCisco APIC SCVMM Agentis not present, then the product is not installed. See theInstalling the APIC SCVMM Agent on SCVMM, on page 7orInstalling the APIC Agent on SCVMM Using the Windows Command Prompt, on page 33section.
Step 4 Verify theApicVMMServiceis in RUNNING state through the GUI or CLI:
• GUI method: ChooseStart>Runand enterservices.msc. In theServicepane, locate the
ApicVMMServiceand verify the state is RUNNING.
• CLI method: From the command prompt, enter thesc.exe query ApicHypervAgentcommand and verify the state is RUNNING:
sc.exe query ApicVMMService
SERVICE_NAME: ApicVMMService TYPE : 10 WIN32_OWN_PROCESS STATE : 4 RUNNING
(STOPPABLE, NOT_PAUSABLE, ACCEPTS_SHUTDOWN) WIN32_EXIT_CODE : 0 (0x0)
SERVICE_EXIT_CODE : 0 (0x0)
Cisco ACI with Microsoft SCVMM Verifying the APIC SCVMM Agent Installation on a Highly Available SCVMM
CHECKPOINT : 0x0 WAIT_HINT : 0x0
Step 5 ChooseStart>PowerShelland enter the following commands:
PS C:\Users\administrator.APIC\Downloads> Get-ClusterResource -Name ApicVMMService
Name State OwnerGroup ResourceType ---- --- --- ---ApicVMMService Online clustervmm07-ha Generic Service
PS C:\Users\administrator.APIC\Downloads> Get-ClusterCheckpoint -ResourceName ApicVMMService
Resource Name ---
----ApicVMMService SOFTWARE\Wow6432Node\Cisco\Apic
PS C:\Users\administrator.APIC\Downloads> Get-ClusterResourceDependency -Resource ApicVMMService
Resource DependencyExpression ---
---ApicVMMService ([VMM Service clustervmm07-ha])
Verifying the APIC Hyper-V Agent Installation on the Hyper-V Server
This section describes how to verify the APIC Hyper-V agent installation on the Hyper-V server.
Procedure
Step 1 ChooseStart>Control Panel.
Step 2 In theControl Panelwindow, enterControl Panel\Programs\Programs and Featuresin the address bar.
Step 3 LocateCisco APIC Hyperv Agent. IfCisco APIC Hyperv Agentis present, then the product is installed. IfCisco APIC Hyperv Agentis not present, then the product is not installed. See theInstalling the APIC Hyper-V Agent on the Hyper-V Server, on page 15orInstalling the APIC Hyper-V Agent on the Hyper-V Server Using the Windows Command Prompt , on page 34section.
Step 4 Verify theApicHypervAgentis in RUNNING state through the GUI or CLI:
• GUI method: ChooseStart>Runand enterservices.msc. In theServicepane, locate the
ApicHypervAgentand verify the state is RUNNING.
• CLI method: From the command prompt, enter thesc.exe query ApicHypervAgentcommand and verify the state is RUNNING:
sc.exe query ApicHypervAgent
SERVICE_NAME: ApicHypervAgent TYPE : 10 WIN32_OWN_PROCESS STATE : 4 RUNNING
(STOPPABLE, NOT_PAUSABLE, ACCEPTS_SHUTDOWN) WIN32_EXIT_CODE : 0 (0x0)
SERVICE_EXIT_CODE : 0 (0x0)
Cisco ACI with Microsoft SCVMM
CHECKPOINT : 0x0 WAIT_HINT : 0x0
Setting Up ACI Policies
Creating SCVMM Domain Profiles
In this section, the examples of a VMM domain are System Center Virtual Machine Manager (SCVMM) domains. The example tasks are as follows:
• Configuring the VMM domain name and SCVMM controller.
• Creating an attach entity profile and associating it to the VMM domain. • Configuring a pool.
• Verifying all configured controllers and their operational states.
Creating a SCVMM Domain Profile Using the GUI
Before you begin
Before you create a VMM domain profile, you must establish connectivity to an external network using in-band or out-of-band management network on the Application Policy Infrastructure Controller (APIC).
Procedure
Step 1 Log in to the APIC GUI, and then chooseVirtual Networking>Inventory.
Step 2 In theNavigationpane, expandVMM Domains, right-click the VM ProviderMicrosoftand chooseCreate SCVMM Domain.
Step 3 In theCreate SCVMM domaindialog box, in theNamefield, enter the domain's name (productionDC).
Step 4 Optional: In theDelimiterfield, enter one of the following:|,~,!,@,^,+, or=. If you do not enter a symbol, the system default|delimiter will appear in the policy.
Step 5 In theAssociated Attachable Entity Profilefield, from the drop-down list, chooseCreate Attachable Entity Profile, and perform the following actions to configure the list of switch interfaces across the span of the VMM domain:
a) In theCreate Attachable Access Entity Profiledialog box, in theProfilearea, in theNamefield, enter the name (profile1), and clickNext.
b) In theAssociation to Interfacesarea, expandInterface Policy Group.
c) In theConfigured Interface, PC, and VPCdialog box, in theConfigured Interfaces, PC, and VPC
area, expandSwitch Profile.
d) In theSwitchesfield, from the drop-down list, check the check boxes next to the desired switch IDs (101 and 102).
e) In theSwitch Profile Namefield, enter the name (swprofile1). f) Expand the+icon to configure interfaces.
g) Choose the appropriate interface ports individually in the switch image (interfaces 1/1, 1/2, and 1/3). TheInterfacesfield gets populated with the corresponding interfaces.
Cisco ACI with Microsoft SCVMM Setting Up ACI Policies
h) In theInterface Selector Namefield, enter the name (selector1).
i) In theInterface Policy Groupfield, from the drop-down list, chooseCreate Interface Policy Group. j) In theCreate Access Port Policy Groupdialog box, in theNamefield, enter the name (group1). k) ClickSubmit.
l) ClickSave, and clickSaveagain. m) ClickSubmit.
n) In theSelect the interfacesarea, underSelect Interfaces, click theAllradio button. o) Verify that in thevSwitch Policiesfield, theInheritradio button is selected. p) ClickFinish.
TheAttach Entity Profileis selected and is displayed in theAssociated Attachable Entity Profilefield.
Step 6 In theVLAN Poolfield, from the drop-down list, chooseCreate VLAN Pool. In theCreate VLAN Pool
dialog box, perform the following actions:
a) In theNamefield, enter the VLAN pool name (VlanRange).
b) In theAllocation Modefield, verify that theDynamic Allocationradio button is selected.
c) ExpandEncap Blocksto add a VLAN block. In theCreate Rangesdialog box, enter a VLAN range. We recommend a range of at least 200 VLAN numbers. Do not define a range that includes the reserved VLAN ID for infrastructure network because that VLAN is for internal use.
Note
d) ClickOK, and clickSubmit.
In theVLAN Poolfield, "VlanRange-dynamic" is displayed.
Step 7 ExpandSCVMM. In theCreate SCVMM Controllerdialog box, verify that theTypeisSCVMM, and then perform the following actions:
a) In theNamefield, enter the name (SCVMM1).
b) To connect to a SCVMM HA Cluster, specify the SCVMM HA Cluster IP address or the SCVMM Cluster Resource DNS name, which was specified during the SCVMM HA installation. See How to Connect to a Highly Available VMM Management Server by Using the VMM Console:https://technet.microsoft.com/ en-us/library/gg610673.aspx
c) In theHost Name (or IP Address)field, enter the Fully Qualified Domain Name (FQDN) or IP address of your SCVMM.
d) In theSCVMM Cloud Namefield, enter the SCVMM cloud name (ACI-Cloud). e) ClickOK.
f) In theCreate SCVMM Domaindialog box, clickSubmit.
Step 8 Verify the new domain and profiles, by performing the following actions: a) On the menu bar, chooseVirtual Networking>Inventory.
b) In the navigation pane, chooseVMM Domains>Microsoft>productionDC>SCVMM1. c) In theWorkpane, view the VMM domain name to verify that the controller is online.
d) In theWorkpane, the SCVMM1 properties are displayed including the operational status. The displayed information confirms that connection from the APIC controller to the SCVMM server is established, and the inventory is available.
Configuring the Port Channel Policy
This section describes how to configure the port channel policy. Modifying the Interface Port Channel Policy
Cisco ACI with Microsoft SCVMM
The Cisco ACI SCVMM Agent synchronizes the SCVMM uplink port profile with the aggregated interface port channel policies and performs an automated update when there are changes to the policy.
To update the policy for Hyper-V servers, perform the following steps.
Procedure
Step 1 Log in to the Cisco APIC GUI, and on the menu bar, choose Fabric>Access Policies.
Step 2 In the navigation pane, expandInterfaces>Leaf Interfaces>Policy Groups.
Step 3 Choose the policy group and check the name of the policy group.
Step 4 Navigate to the policy group and update it based on your requirements (for example, LACP or MAC pinning).
Overriding the VMM Domain VSwitch Policies for Blade Servers
When Blade servers are connected to ACI fabric interface port channel policy will be used between interface and fabric interconnect. When fabric interconnect is configured for LACP you will need to configure the Hyper-V server for MAC pinning mode.
To configure the Hyper-V server for MAC pinning mode perform the following steps.
Procedure
Step 1 Log in to the APIC GUI, on the menu bar, chooseVirtual Networking.
Step 2 In the navigation pane, expandVMM Domains>Microsoft>Domain_Name.
Step 3 In theWorkpane, clickACTIONSand chooseCreate VSwitch Policies.
Step 4 On the port channel policy, select the existing policy for mac pinning or create a new policy.
If the hosts are already connected to logical switch, then the SCVMM admin should perform host remediate for all the hosts for uplink policy to take effect.
Note
Verifying the SCVMM VMM Domain and SCVMM VMM
Procedure
In the System Center Virtual Machine Manager Console GUI, the following object has been created by the SCVMM agent for the newly created SCVMM VMM domain and VMM Controller’s rootContName (SCVMM Cloud Name):
a) ClickFabricat the bottom left side pane and under fabric verify the following objects:
Example:
1. ChooseNetworking>Logical Switchesand in the right side pane, the logical switch name is
apicVSwitch_VMMdomainName.
2. ChooseNetworking>Logical Networksand in the right side pane, the logical network name is
apicLogicalNetwork_VMMdomainName.
Cisco ACI with Microsoft SCVMM Overriding the VMM Domain VSwitch Policies for Blade Servers
3. ChooseNetworking>Port Profilesand in the right side pane, the port profile name is
apicUplinkPortProfile_VMMdomainName.
b) ClickVMs and Servicesin the bottom left side pane.
Example:
1. ChooseVM Networks.
2. In the right side pane, the VM network name isapicInfra|10.0.0.30|SCVMM Controller HostNameORIPAddress filed value|VMMdomainName.
You must use infra VM Network to create VTEP on the Hyper-V server.
Deploying the Logical Switch to the Host on SCVMM
This section describes how to deploy the logical switch to the host on System Center Virtual Machine Manager (SCVMM).
If SCVMM upgrade is performed and hosts are already connected to logical switch then SCVMM admin should perform host remediation for all the hosts for hosts to establish connection to leaf.
Note
Procedure
Step 1 Log in to the SCVMM server, in theNavigationpane, chooseFabricon the bottom left.
Step 2 In theNavigationpane, expandNetworking>Logical Switchesto ensure the logical switch is created (apicVswitch_cloud1).
Step 3 In theNavigationpane, chooseVMs and Serviceson the bottom left.
Step 4 In theNavigationpane, expandAll Hosts.
Step 5 Choose the Hyper-V host folder (Dev8).
Step 6 Right-click the Hyper-V host (Dev8-HV1) and chooseProperties.
Step 7 In theDev8-HV1.inscisco.net Propertiesdialog box, chooseVirtual Switchesand perform the following actions:
a) Choose+ New Virtual Switch. b) ChooseNew Logical Switch.
c) In theLogical switchfield, from the drop-down list, choose a logical switch (apicVswitch_cloud1). d) In theAdapterfield, from the drop-down list, choose an adapter (Leaf1-1-1 - Intel(R) Ethernet Server
Adapter X520-2 #2).
e) In theUplink Port Profilefield, from the drop-down list, choose an Uplink Port Profile (apicUplinkPortProfile_Cloud01).
f) ClickNew Virtual Network Adapter, choose the unnamed virtual network adapter, and enter the name (dev8-hv1-infra-vtep).
g) ClickBrowse.
h) In theDev8-HV1.inscisco.net Propertiesdialog box, choose the VM network (apicInfra|10.0.0.30|dev8-scvmm.apic.net|Cloud01) and clickOK.
Cisco ACI with Microsoft SCVMM
i) In theVirtual Machine Managerdialog box, clickOK.
Step 8 ClickJobson the bottom left.
Step 9 In theHistorypane, you can check the status of theChange properties of virtual machine hostjob to ensure that the job has completed.
Step 10 You must refresh the host under SCVMM for the Hyper-V server to reflect proper Hyper-V Host IP address in SCVMM. Once it has been refreshed, the APIC GUI reflects the updated Hyper-V Host IP information.
Enabling the Logical Network on Tenant Clouds
This section describes how to enable the Cisco ACI Integration with SCVMM Tenant Clouds. For more information, see theSCVMM Fabric Cloud and Tenant Clouds, on page 3.
Procedure
Step 1 Log in to the SCVMM server with SCVMM administrator credentials, and open up the SCVMM Admin Console.
Step 2 On the SCVMM Admin Console, navigate to VMs and Services.
Step 3 In theNavigationpane, expandClouds, right-click on your target Tenant Cloud (HR_Cloud) and choose
Properties.
Step 4 In the Pop-Up Window, in theNavigationpane, chooseLogical Networks
a) Locate the logical network which was automatically created as part of associating the VMM Domain to this SCVMM.
b) Click the logical network check box (apicLogicalNetwork_MyVmmDomain). c) ClickOK.
The tenant cloud is now ready to be used within ACI Integration at the Windows Azure Pack Plan configuration page.
Upgrading the Cisco ACI with Microsoft SCVMM Components
If you are trying to upgrade to SCVMM 2016, you must follow the Microsoft procedure and then install the Cisco ACI with Microsoft SCVMM components as a fresh install.Prerequisites:
If upgrading to SCVMM 2012 R2, Microsoft servers that you integrate into ACI must be updated with the KB2919355 and KB3000850 update rollups prior to upgrading ACI to the 2.2(1) release. The KB2919355 update rollup includes the 2929781 patch, which adds new TLS cipher suites and changes the cipher suite priorities in Windows 8.1 and Windows Server 2012 R2.
You must patch the following Microsoft servers:
• Microsoft Windows Azure Pack Resource Provider Servers • Microsoft Windows Azure Pack Tenant Site Servers • Microsoft Windows Azure Pack Admin Site Servers
Cisco ACI with Microsoft SCVMM Enabling the Logical Network on Tenant Clouds
• Microsoft System Center Service Provider Foundation/Orchestration Servers • Microsoft System Center 2012 R2 Servers
• Microsoft HyperV 2012 R2 Servers
Upgrading the ACI Microsoft SCVMM Components Workflow
This sections describes upgrading the ACI Microsoft SCVMM components workflow.
Procedure
Step 1 Upgrade the APIC Controller and the Switch Software.
For more information, see theCisco APIC Firmware Management Guide.
Step 2 Upgrade the APIC SCVMM Agent on SCVMM or Upgrade the APIC SCVMM Agent on a Highly Available SCVMM.
For more information, seeUpgrading the APIC SCVMM Agent on SCVMM, on page 25.
For more information, seeUpgrading the APIC SCVMM Agent on a High Available SCVMM, on page 26.
Step 3 Upgrade the APIC Hyper-V Agent.
For more information, seeUpgrading the APIC Hyper-V Agent, on page 26.
Upgrading the APIC SCVMM Agent on SCVMM
This section describes how to upgrade the APIC SCVMM agent on System Center Virtual Machine Manager (SCVMM).
Before you begin
Scheduled downtime for the Microsoft SCVMM Server. The upgrade process will automatically restart the Microsoft System Center Virtual Machine Manager Service, resulting in the SCVMM Service to be temporarily unable to handle any change or query requests.
Procedure
Upgrade the APIC SCVMM agent on SCVMM. If upgrading from release 1.1(2x) or later:
a) Follow the steps outlined in theInstalling the APIC SCVMM Agent on SCVMM, on page 7.
The MSI packages handles uninstalling the previous version and installing the new version as part of the upgrade.
If upgrading from a prior release of 1.1(2x): Cisco ACI with Microsoft SCVMM
a) Follow the steps outlined in theInstalling the APIC SCVMM Agent on SCVMM, on page 7.
The MSI packages handles uninstalling the previous version and installing the new version as part of the upgrade.
b) Follow the steps outline in the Exporting APIC OpFlex Certificate, on page 40. c) Follow the steps outline in theInstalling the OpflexAgent Certificate, on page 10.
d) Follow the steps outline in theConfiguring APIC IP Settings with OpflexAgent Certificate on the SCVMM Agent, on page 12orConfiguring APIC IP Settings with OpflexAgent Certificate on the SCVMM Agent on a Highly Available SCVMM, on page 14.
Upgrading the APIC SCVMM Agent on a High Available SCVMM
This section describes how to upgrade the APIC SCVMM agent on a high available System Center Virtual Machine Manager (SCVMM).
Procedure
Step 1 Log in to a Standby node of the Highly Available SCVMM installation.
Step 2 On the SCVMM server in File Explorer, locate theAPIC SCVMM Agent.msifile.
Step 3 Right-clickAPIC SCVMM Agent.msifile and selectInstall.
The MSI packages handles uninstalling the previous version and installing the new version as part of the upgrade.
Step 4 In theCisco APIC SCVMM Agent Setupdialog box, perform the following actions: a) ClickNext.
b) Check theI accept the terms in the License Agreementcheck box and clickNext. c) Enter your account name and password credentials.
Provide the same credentials as used for the SCVMM console. The Cisco APIC SCVMM agent requires these credentials for the SCVMM operations to be able to function.
The installation process verifies the entered account name and password credentials. If the installation fails, the SCVMM shows an error message and you must re-enter valid credentials.
d) After successful validation of the account name and password credentials, clickInstall. e) ClickFinish.
Step 5 Repeat steps 1-4 for each Standby Node in the Windows Failover Cluster.
Step 6 Failover from the Current Owner Node of the Highly Available SCVMM installation to one of the newly upgrade Standby Nodes.
Step 7 Follow steps 2-4 on the final Standby Node of the Windows Failover Cluster.
Upgrading the APIC Hyper-V Agent
This section describes how to upgrade the APIC Hyper-V agent.
Cisco ACI with Microsoft SCVMM Upgrading the APIC SCVMM Agent on a High Available SCVMM
Before you begin
Scheduled downtime for the Hyper-V node. For more information regarding Hyper-V Maintenance Mode behavior, see:https://technet.microsoft.com/en-us/library/hh882398.aspx
Procedure
Upgrade the APIC Hyper-V agent. If upgrading from release 1.1(2x) or later:
a) Follow steps 1-8 in theInstalling the APIC Hyper-V Agent on the Hyper-V Server, on page 15. Skip step 7. Step 7 is not required for upgrades as the OpflexAgent certificate is already installed on the Hyper-V node.
The MSI packages handles uninstalling the previous version and installing the new version as part of the upgrade.
If upgrading from a prior release of 1.1(2x):
a) Follow the steps outlined in theUninstalling the APIC Hyper-V Agent.
b) Follow steps 1-8 in theInstalling the APIC Hyper-V Agent on the Hyper-V Server, on page 15. Skip step 7. Step 7 is not required for upgrades as the OpflexAgent certificate is already installed on the Hyper-V node.
The MSI packages handles uninstalling the previous version and installing the new version as part of the upgrade.
Deploying Tenant Policies
Deployment Tenant Policies Prerequisites
Ensure that your computing environment meets the following prerequisites: • Ensure you have installed the APIC SCVMM Agent.
For details, seeInstalling the APIC SCVMM Agent on SCVMM, on page 7. • Ensure you have installed the APIC Hyper-V Agent.
For details, seeInstalling the APIC Hyper-V Agent on the Hyper-V Server, on page 15. • Ensure you have created a logical switch.
See Microsoft's documentation.
• Ensure you have created a virtual switch. See Microsoft's documentation.
Cisco ACI with Microsoft SCVMM
Creating a Tenant
Procedure
Step 1 On the menu bar, chooseTENANTS, and perform the following actions: a) ClickAdd Tenant.
TheCreate Tenantdialog box opens.
b) In theNamefield, add the tenant name (ExampleCorp).
Step 2 ClickFinish.
See theCisco APIC Basic Configuration Guidefor more information.
Creating an EPG
This section describes how to create an endpoint group (EPG).
Procedure
Step 1 Log in to the APIC GUI, on the menu bar, chooseTENANTS>Tenant Name.
Step 2 In theNavigationpane, expandTenant Name>Application Profiles>Application Profile Name, right-click
Application EPGs, and chooseCreate Application EPG.
Step 3 In theCreate Application EPG dialog box, perform the following actions: a) In theNamefield, enter the name (EPG1).
b) In theBridge Domainfield, from the drop-down list, choose one to associate with the bridge domain. c) In theAssociate to VM Domain Profilesfield, click the appropriate radio button and clickNext. d) In theAssociated VM Domain Profilesfield, click the+icon, and choose a cloud to add (Cloud10). You have now created an EPG.
Associating the Microsoft VMM Domain with an EPG
This section describes how to create a VM Network by associating the Microsoft VMM domain with an endpoint group (EPG).
Content in theHypervisors,Virtual Machines,andVirtualization Ratioareas of the Cisco APIC capacity dashboard appears as 0 when SCVMM endpoints are learned in Pre-Provision mode.
Note
Before you begin
Ensure you have created an EPG.
Cisco ACI with Microsoft SCVMM Creating a Tenant
Procedure
Step 1 Log in to the Cisco APIC GUI and on the menu bar, chooseTenants>Tenant Name.
Step 2 In theNavigationpane, expandTenant Name>Application Profiles>Application Profile Name>
Application EPGsand select an existing EPG.
Step 3 In theNavigationpane, chooseDomains (VMs and Bare-Metals).
Step 4 In theDomains (VM and Bare-Metals)pane, click on theACTIONSand chooseAdd VMM Domain Association.
Step 5 In theAdd VMM Domain Associationdialog box, click theDeploy Immediacyfield radio button for either
ImmediateorOn Demand.
SeeEPG Policy Resolution and Deployment Immediacyfor more information.
Step 6 In theAdd VMM Domain Associationdialog box, click theResolution Immediacyfield radio button for eitherImmediate,On Demand, orPre-Provision.
SeeEPG Policy Resolution and Deployment Immediacyfor more information. You have now created a VM Network.
Step 7 Optional: In theDelimiterfield, use a single character as the VM Network Name delimiter, enter one of the following:|,~,!,@,^,+, or=. If you do not enter a symbol, the system default of | will be used.
Verifying the EPG is Associated with the VMM Domain on APIC
This section describes how to verify the endpoint group association with the VMM domain on Application Policy Infrastructure Controller (APIC).
Procedure
Step 1 Log in to the APIC GUI, on the menu bar, chooseVirtual Networking>Inventory.
Step 2 In the navigation pane, expandVMM Domains>Microsoft>Cloud10>Controller>Controller1>
Distributed Virtual Switch>SCVMM|Tenant|SCVMM|EPG1|Cloud1.
The name of the new VM Network is in the following format:Tenant Name|Application Profile Name|Application EPG Name|Microsoft VMM Domain.
Step 3 In thePROPERTIESpane, verify the EPG associated with the VMM domain, the VM Network, and the details such as NIC NAME, VM NAME, IP, MAC, and STATE.
Verifying the EPG is Associated with the VMM Domain on SCVMM
This section describes how to verify the endpoint group (EPG) associated with the VMM domain on System Center Virtual Machine Manager (SCVMM).
Cisco ACI with Microsoft SCVMM
Procedure
Step 1 Open theVirual Machine Manager Consoleicon on your desktop.
Step 2 In the bottom left pane, click onVMs and Servicesor pressCtrl+M.
Step 3 In theVMs and Servicespane, click onVM Networksand verify the EPG associated with the VMM domain. The EPG associated with the VMM domain is in the following format:Tenant Name|Application Profile Name|Application EPG Name|Microsoft VMM Domain.
Creating a Static IP Address Pool
Static IP Address Pools enable an Microsoft SCVMM Server to statically assign IP Address to virtual machines during the VM Template Deployment phase. This feature removes the need to request a DHCP address from a DHCP Server. This feature is most often used to deploy server VMs which require statically assigned IP Addresses in the network such as: Windows Active Directory Domain Controllers, DNS Servers, DHCP Servers, Network Gateways, etc.
For more information regarding Static IP address pools, see the Microsoft Documentation:
https://technet.microsoft.com/en-us/library/jj721568.aspx#BKMK_StaticIPAddressPools
With Cisco ACI SCVMM Integration - the Cisco APIC can automate the deployment of a Static IP Address Pool to a VM Network, bypassing the need to perform these operations on the Microsoft SCVMM Server itself.
Before you begin
Ensure an EPG is associated to a Microsoft SCVMM VMM Domain.
Procedure
Step 1 Log in to the APIC GUI, on the menu bar, chooseTENANTS>Tenant Name.
Step 2 In theNavigationpane, expandTenant Name>Application Profiles>Application Profile Name>
Application EPGs>Your Target EPG, right-clickSubnets, and chooseCreate EPG Subnet.
Step 3 In theCreate EPG Subnetdialog box, perform the following actions: a) Enter a default Gateway IP in address/mask format.
b) ClickSubmit.
Step 4 Right-click on the newly created subnet and chooseCreate Static IP Pool Policy.
Step 5 In theCreate Static IP Pool Policydialog box, perform the following actions: a) Enter a Name (IP).
b) Enter a Start IP and End IP.
c) Enter optional Static IP Pool policies.
The DNS Servers, DNS Search Suffix, Wins Servers fields Allow a list of entries, simply use semicolon to separate the entries. For example within the DNS Servers Field:
192.168.1.1;192.168.1.2
Cisco ACI with Microsoft SCVMM Creating a Static IP Address Pool
When configuring the Start IP and End IP, ensure they are within the same Subnet as the Gateway defined in Step 3. If not deployment of the Static IP Address Pool to SCVMM fails.
Only 1 Static IP Address Pool will be used for a given EPG. Do not create multiple Static IP Pool Policies under a Subnet as the others will not take effect.
The Static IP Address Pool Policy follows the VMM Domain association. If this EPG is deployed to multiple SCVMM Controllers in the same VMM Domain, then the same Static IP Addresses will be deployed, causing duplicate IP Addresses. For this scenario, deploy an addition EPG with a non-overlapping Address pool and create the necessary policies and contracts for the endpoints to communicate.
Note
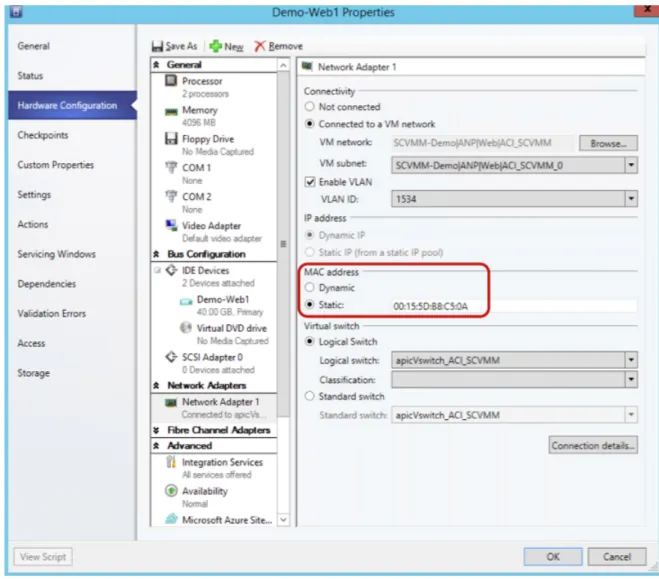
Connecting and Powering on the Virtual Machine
This section describes how to connect and power on the virtual machine.
Procedure
Step 1 Log in to the SCVMM server, chooseVMs and Services>All Hosts, and choose one of the hosts.
Step 2 In theVMspane, right-click on the VM host that you want to associate to the VM Network and choose
Properties.
Step 3 In thePropertiesdialog box, chooseHardware Configuration, and choose a network adapter (Network Adapter 1).
Step 4 In theNetwork Adapter 1pane, perform the following actions to connect to a VM network: a) Click theConnect to a VM networkradio button.
b) Click theBrowsebutton.
c) Verify the list of VM networks, which lists all of the VM networks to which the hypervisor is associated.
Step 5 Power on the virtual machine.
Verifying the Association on APIC
This section describes how to verify the association on Application Policy Infrastructure Controller (APIC).
Procedure
Step 1 Log in to the APIC GUI, on the menu bar, chooseVirtual Networking>Inventory.
Step 2 In the navigation pane, expandVMM Domains>Microsoft>Cloud10>Controller>Controller1>
Hypervisors>Hypervisor1>Virtual Machinesto verify the association. Cisco ACI with Microsoft SCVMM
Viewing EPGs on APIC
This section describes how to view endpoint groups (EPGs) on the Application Policy Infrastructure Controller (APIC).
Procedure
Step 1 Log in to the APIC GUI, on the menu bar, chooseTENANTS>Tenant Name.
Step 2 In theNavigationpane, expandTenant Name>Application Profiles>VMM>Application EPGs>
EPG1.
Step 3 In theApplication EPG - EPG1pane, click theOPERATIONALbutton, and verify if the endpoint group is present.
Troubleshooting the Cisco ACI with Microsoft SCVMM
Troubleshooting APIC to SCVMM Connectivity
Use the ApicVMMService logs to debug the System Center Virtual Machine Manager (SCVMM) server.
Procedure
Step 1 Log in to the SCVMM server, go to theApicVMMServicelogs. Located atC:\Program Files (X86)\ApicVMMService\Logs.
Step 2 Check theApicVMMServicelogs to debug.
If you are unable to debug, on the SCVMM server copy all theApicVMMServicelogs fromC:\Program Files (X86)\ApicVMMService\Logsand send them to Cisco Tech Support.
Troubleshooting Leaf to Hyper-V Host Connectivity
Use the ApicHypervAgent logs to debug the Hyper-V servers.
Procedure
Step 1 Log in to the Hyper-V servers, go to theApicHypervAgentlogs. Located atC:\Program Files (x86)\ApicHypervAgent\Logs.
Step 2 Check theApicHypervAgentlogs to debug.
Cisco ACI with Microsoft SCVMM Viewing EPGs on APIC
If you are unable to debug, on the Hyper-V servers copy all theApicHypervAgentlogs fromC:\Program Files (x86)\ApicHypervAgent\Logsand send them to Cisco Tech Support.
Troubleshooting the EPG Configuration Issue
If during the lifetime of the endpoint group (EPG), the VLAN ID of the EPG changes on the APIC, then SCVMM needs to update the VLAN configuration on all virtual machines for the new setting to take effect.
Procedure
To perform this operation run the following PowerShell commands on the SCVMM server:
Example:
$VMs = Get-SCVirtualMachine $VMs | Read-SCVirtualMachine
$NonCompliantAdapters=Get-SCVirtualNetworkAdapter -All | Where-Object {$_.VirtualNetworkAdapterComplianceStatus -eq "NonCompliant"}
$NonCompliantAdapters | Repair-SCVirtualNetworkAdapter
Reference Information
Installing the APIC Agent on SCVMM Using the Windows Command Prompt
This section describes how to install the APIC Agent on System Center Virtual Machine Manager (SCVMM) using the Windows Command Prompt.
Procedure
Step 1 Log in to the SCVMM server with SCVMM administrator credential.
Step 2 Launch the command prompt, change to the folder where you copied theAPIC SCVMM Agent.msifile, and execute following commands:
Example:
C:\>cd MSIPackage
C:\MSIPackage>dir
Volume in drive C has no label. Volume Serial Number is 726F-5AE6 Directory of C:\MSIPackage
02/24/2015 01:11 PM <DIR> . 02/24/2015 01:11 PM <DIR> ..
02/24/2015 05:47 AM 3,428,352 APIC SCVMM Agent.msi 1 File(s) 3,428,352 bytes
Cisco ACI with Microsoft SCVMM