LibreOffice 3.5
Math Guide
The LibreOffice Equation Editor
Copyright
This document is Copyright © 2011–2012 by its contributors as listed below. You may distribute it and/or modify it under the terms of either the GNU General Public License
(http://www.gnu.org/licenses/gpl.html), version 3 or later, or the Creative Commons Attribution License (http://creativecommons.org/licenses/by/3.0/), version 3.0 or later.
All trademarks within this guide belong to their legitimate owners.
Contributors
Jean Hollis Weber Hazel Russman
Feedback
Please direct any comments or suggestions about this document to: [email protected]
Acknowledgments
This guide is based on the OpenOffice.org 3.3 Math Guide. The contributors to that book are:
Daniel Carrera Agnes Belzunce TJ Frazier
Peter Kupfer Ian Laurenson Janet M. Swisher
Jean Hollis Weber Michele Zarri
Additional material has been added from the German Math Handbuch for LibreOffice 3.4 (translated to English by Hazel Russman). Contributors to that book are:
Regina Henschel Christian Kühl Florian Reisinger Gisbert Friege (Dmaths) Jochen Schiffers
Publication date and software version
Published 22 June 2012. Based on LibreOffice 3.5.Note for Mac users
Some keystrokes and menu items are different on a Mac from those used in Windows and Linux. The table below gives some common substitutions for the instructions in this chapter. For a more detailed list, see the application Help.
Windows or Linux Mac equivalent Effect
Tools > Options menu
selection LibreOffice > Preferences Access setup options
Right-click Control+click Opens a context menu
Ctrl (Control) z(Command) Used with other keys
F5 Shift+z+F5 Opens the Navigator
Contents
Copyright... 2
Note for Mac users...2
What is Math?...5
Getting started...5
Creating an equation as a separate document... 5
Inserting a formula into a Writer document... 6
Entering a formula... 7
The Elements window... 7
Right-click (context) menu... 9
Markup... 9
Greek characters... 10
Changing a formula...11
Choosing the region to alter... 12
Carrying out changes... 12
Customizations... 13
Formula editor as a floating window... 13
Customizing the catalog... 13
Space at the end of a formula... 15
Formula layout... 15
Brackets are your friends... 15
Recognizing functions in Math... 16
Equations over more than one line... 16
How do I add limits to my sum/integral?...17
Brackets with matrices look ugly!... 17
How do I write a derivative?... 18
Isolated and unpaired brackets... 18
Markup characters as regular characters... 19
Text in a formula... 19
How do I align my equations at the equals sign?... 20
Changing the appearance of formulas... 20
Changing the font... 20
Changing the font size... 22
Adjusting spacing in formulas... 23
Changing the alignment... 24
Numbering equations... 26
Formulas in Writer documents... 27
Position... 27
Margins... 27
Background, borders, and size... 27
Creating a formula library... 27
Formulas in Calc, Impress, and Draw...28
Graphical properties... 28
Combining formulas with text... 29
Text elements within the formula... 29
Grouping formulas with graphic objects... 29
Formulas in Writer OLE objects... 29
Formulas in charts... 30
Export and import... 30
Export as MathML... 30
Microsoft file formats... 31
XHTML... 32
Flat XML... 32
Dmaths – an extension for more than just faster formula input...33
Technical details... 34
OASIS Open Document Format for Office applications...34
Handling of formulas in Basic... 34
Math commands - Reference... 36
Unary / binary operators... 36
Relational operators... 37 Set operations... 38 Functions... 39 Operators... 40 Attributes... 41 Miscellaneous... 42 Brackets... 43 Formats... 44 Characters – Greek... 45 Characters – Special...45
What is Math?
Math is LibreOffice’s component for writing mathematical and chemical equations. It is most commonly used as an equation editor for text documents, but it can also be used with other types of documents or stand-alone. When used inside Writer, the equation is treated as an object inside the text document.
Note
The equation editor is for writing equations in symbolic form, as in equation 1. If you want to evaluate a numeric value, see the Calc Guide.df
(
x
)
dx
=
ln
(
x
)+
tan
− 1(
x
2)
(1) orNH
3+
H
2O
⇌
NH
+4+
OH
−Getting started
You can create an equation (formula) as a separate document or insert it into a document in Writer or another component of LibreOffice.
Creating an equation as a separate document
To create an equation as a separate document, open the Math component of LibreOffice using one of these methods:
•
On the menu bar, choose File > New > Formula.•
On the standard toolbar, click the triangle to the left of the New icon and choose Formula.•
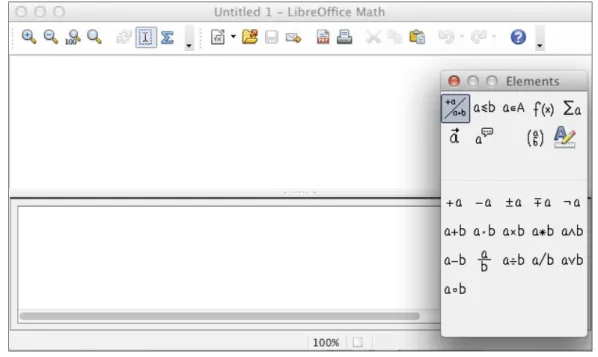
From the Start Center, click Formula.An empty formula document opens (see Figure 1).
Figure 1: An empty formula document
The upper area is the preview window, where the equation will appear during and after input. The lower area is the equation editor, where the markup code for the equation is entered. The floating Elements window will also appear.
Inserting a formula into a Writer document
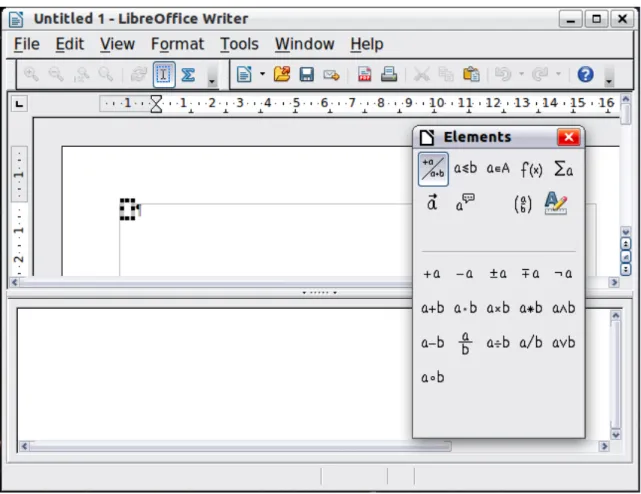
To insert a formula into a Writer document, open the document and then choose Insert > Object > Formula from the menu bar.
The formula editor opens at the bottom of the Writer window, and the floating Elements window appears. You will also see a small box with a gray border in your document, where the formula will be displayed, as shown in Figure 2.
Figure 2: Equation Editor, Elements window, and location of resulting equation in Writer
When you are done entering the formula, you can close the editor by pressing the Esc key or by clicking an area outside the formula in the main document. A double-click will open the editor again, so you can edit the formula.
Formulas are inserted as OLE objects. In a Writer document, the formula is inserted as a default character, so it is embedded in the continuous text. You can, as with any other OLE object, change the anchor and make the formula floating. In Impress and Draw documents, formulas are
embedded as floating OLE objects.
If you frequently need to insert formulas, it is advisable to add the Formula icon to the Standard toolbar or create a keyboard shortcut. See Chapter 14, Customizing LibreOffice, in the Getting Started guide for more information.
Entering a formula
The equation editor uses a markup language to represent formulas. For example, %beta creates the Greek character beta (
). This markup is designed to read similar to English whenever possible. For example, a over b produces a fraction: ab . You can enter a formula in three ways:
•
Select a symbol from the Elements window.•
Right-click on the equation editor and select the symbol from the context menu.•
Type markup in the equation editor.The context menu and the Elements window insert the markup corresponding to a symbol. This provides a convenient way to learn the LibreOffice Math markup.
Note
Click on the document body to exit the formula editor.Double-click on a formula to enter the formula editor again.
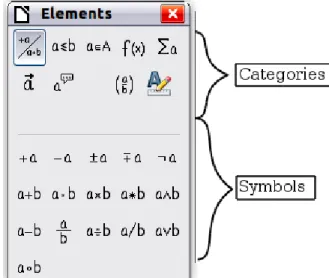
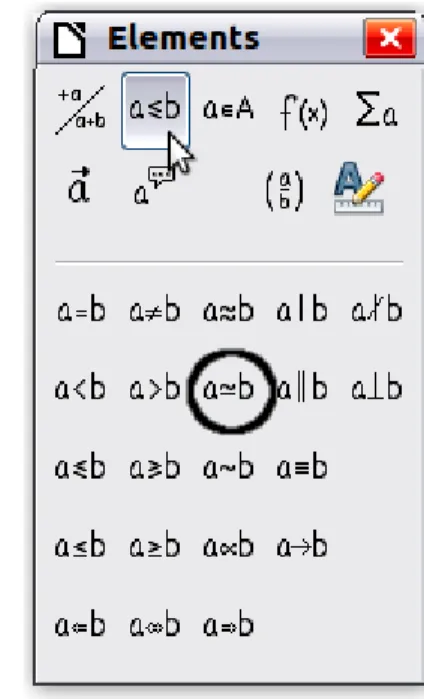
The Elements window
The simplest method for entering a formula is the Elements window.
Figure 3: Symbols are divided into categories
The Elements window is divided into two main parts.
•
The top shows the symbol categories. Click on these to change the list of symbols.•
The bottom shows the symbols available in the current category.Tip
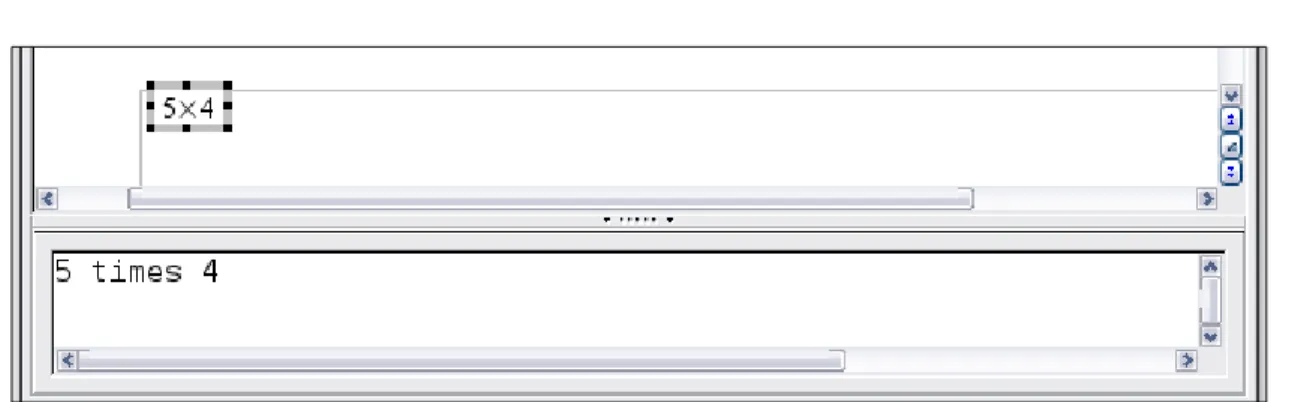
You can hide or show the Elements window with View > Elements.Example 1:
5
×
4
For this example we will enter a simple formula:
5
×
4
. On the Elements window: 1) Select the top-left button of the categories (top) section.2) Click on the multiplication symbol.
Figure 4: Selecting the multiplication symbol
When you select the multiplication symbol on the Elements window, two things happen:
•
The equation editor shows the markup:<?> times <?>
•
The body of the document shows a gray box like this: ×Figure 5: Result of selecting the multiplication symbol
The <?> symbols shown in Figure 5 are placeholders that you can replace by other text, for example 5 and 4. The equation will update automatically, and the result should resemble Figure 6.
Tip
To keep the equation from updating automatically, select To update a formula manually, press F9 or select View > UpdateView >AutoUpdate display. .Right-click (context) menu
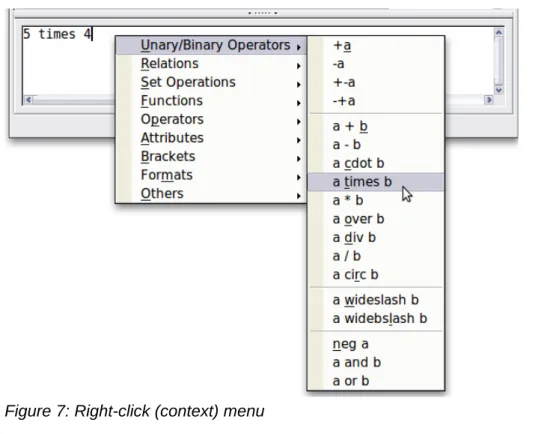
Another way to access mathematical symbols is to right-click on the equation editor. This pops up the menu shown in Figure 7. The items in this menu correspond exactly to those in the Elements window.
Figure 7: Right-click (context) menu
Note
Neither the window elements, nor the context menu contains a complete list of commands. Some seldom-used commands, you must always enter the markup. For a complete list of commands can be found in Appendix A to this manual.Markup
You can type the markup directly in the equation editor. For example, you can type 5 times 4 to obtain
5
×
4
. If you know the markup, this can be the fastest way to enter a formula.Tip
The formula markup resembles the way the formula reads in English.Below is a short list of common equations and their corresponding markup.
Display Command Display Command
a
=
b
a = b
a
sqrt {a}a
2 a^2a
n a_n∫
f
x
dx
int f(x) dx∑
a
n sum a_na
≤
b
a <= b∞
infinitya
×
b
a times bx
⋅
y
x cdot yGreek characters
Greek characters (
,
,
,
, etc) are common in mathematical formulas. These characters are not available in the Elements window or the right-click menu. Fortunately, the markup for Greek characters is simple: Type a % sign followed by the name of the character, in English.•
To write a lowercase character, type the name of the character in lowercase.•
To write an uppercase character, type the name of the character in uppercase. A complete table of Greek characters is provided on page 45. See the table below for some examples. Lowercase Uppercase %alpha
%ALPHA
A
%beta
%BETA
B
%gamma
%GAMMA
%psi
%PSI
%phi
%PHI
%theta
%THETA
Another way to enter Greek characters is by using the Symbols catalog window. Choose Tools > Catalog. This window is shown in Figure 8. Under Symbol set, select Greek and double-click on a Greek letter from the list. The markup name of the character is shown below the list window.
Figure 8: Symbols catalog, used for entering Greek characters and some special symbols
Example 2:
≃
3.14159
For this example we will suppose that:•
We want to enter the above formula (the value of pi rounded to 5 decimal places).•
We know the name of the Greek character (pi).Step 1: Type % followed by the text pi. This displays the Greek character
. Step 2: Open the Elements window (View > Elements).Step 3: The
≃
symbol is a relation, so we click on the Relations button. If you hover the mouse over this button you see the tooltip Relations (Figure 9).Figure 10 shows the Selection window after clicking the Relations button. The symbol we want is circled.
Figure 9: Tooltip indicates the Relations button
Figure 10: After selecting Relations
Step 4: Click on the a
≃
b symbol. The equation editor now shows the markup %pi<?> simeq <?>.Step 5: Delete the <?> text and add 3.14159 at the end of the equation. We end up with the markup %pi simeq 3.14159. The result is shown in Figure 11.
Figure 11. Final result
Changing a formula
You can change a formula at any time. To switch into edit mode, double-click on the formula.
Choosing the region to alter
To get to the appropriate section in the markup code, do any one of the following:
•
In the equation editor, click on the location.•
Select an area of the markup code that you wish to change.•
Click on an element in the preview area; the cursor will automatically move to the corresponding point in the equation editor.•
Double-click on an element in the preview area; the corresponding section in the equation editor will be selected.To be able to work in the upper (preview) area in the stand-alone Math window (Figure 1), the formula cursor must be activated. Use the Formula Cursor button on the Tools toolbar.
Carrying out changes
You can change an equation by overwriting selected text or by inserting new markup code at the cursor position.
Tip
LibreOffice also provides a means of carrying out alterations directly in the preview area. This is still under development and therefore counts as “experimental”. In order to make use of it, you must first carry out the following configuration change: go to Tools > Options > LibreOffice > General and check the box for Enable experimental (unstable) features.
The activation of this option makes it impossible, by clicking on a formula element, to gain access to the corresponding position in the markup code.
Caution
The use of experimental features can lead to program crashes and/or loss of data. Only make the above change if you can accept this risk.
Text mode
Larger formulas should always be in a paragraph of their own, separated from the text. When you use formula elements in running text, they can often be higher than the letter height.
However, if it is necessary to place a formula within running text, switch into the equation editor and go to Format > Text mode. Math will try to shrink the formula to fit the letter height. The numerators and denominators of fractions are shrunk, and the limits of integrals and sums are placed beside the integral/sum sign.
Example:
A formula in a separate paragraph:
∑
i=2 5
i
2Customizations
Here are a few ways to customize your use of Math.
Formula editor as a floating window
The formula editor can cover a large part of the Writer window. To turn the formula editor into a floating window, do this:
1) Hover the mouse over the editor frame, as shown in Figure 12. 2) Hold down the Control key and double-click.
Figure 12: Turning the formula editor into a floating window
Figure 13 shows the result. You can dock the floating window again by using the same steps. Hold down the Control key and double-click the window frame.
Figure 13: Formula editor as a floating window
Customizing the catalog
If you need to use a symbol that is not available in Math, you can add it to the catalog yourself. The following example shows the procedure for symbols that are used in marking school work.
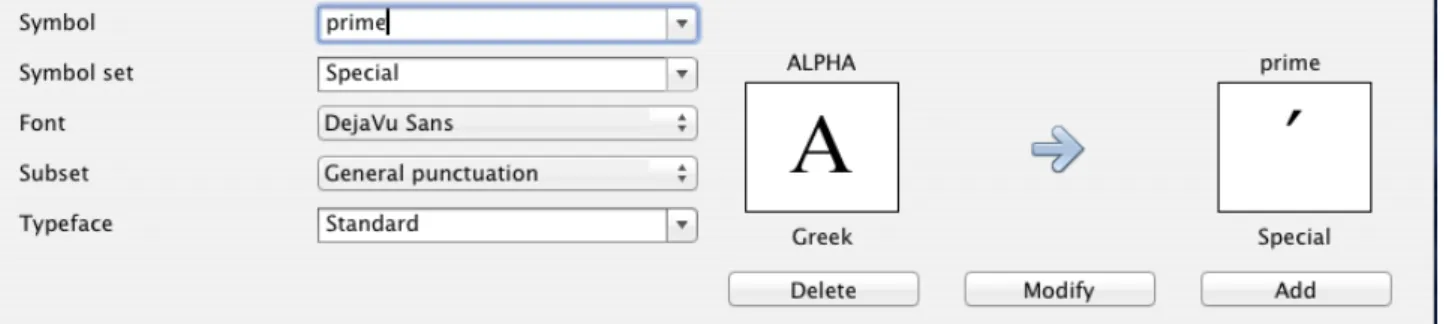
1) Go to Tools > Catalog or click on the catalog button to open the Symbols catalog (Figure 8).
2) Click the Edit button. The Edit symbols window (Figure 14) opens.
3) The symbols are arranged in so-called symbol sets. In the lower part of the window, choose an available set for your new symbol from the Symbol set list, for example the Special set. Or you can type the name of a new symbol set directly into the box.
4) From the Font list, choose a font that contains the desired symbol.
When you have selected a font, its characters appear in the font summary window. You can scroll through it using the scrollbar at the side, or use the Subset list to go straight to the place you need.
To follow this example, choose the font DejaVu Sans and the subset General punctuation.
5) Click on the desired symbol (here Ux2032). It appears enlarged in the right-hand preview box (see Figure 15). Make sure that the symbol set is set to Special.
6) In the Symbol field, enter a name for the symbol, for example prime.
7) If the name is not already in use, the Add button becomes active. Click on it.
8) You can immediately add more symbols. In the example, the “U+2033” symbol, named dblprime, and the “U+2034” symbol, named triprime, are added. (See Figure 16.) 9) Click OK to close the dialog.
Figure 14: Edit Symbols dialog
Figure 15: Edit Symbols dialog: characters selected
Now the Symbol set view area shows the new symbol. It can be selected just like the other symbols, either from here, or by writing them directly into the equation editor in the form %prime. There are numerous free fonts containing a great number of mathematical symbols. The “STIX1” font is worthy of special mention here. It was developed specially for writing mathematical/technical texts. The DejaVu2 and Lucida3 fonts also have a wide range of symbols.
1 Font files for STIX are available from http://www.stixfonts.org
2 Font files for DejaVu Sans are available from http://www.dejavu-fonts.org
Figure 16: Catalog with new symbol
Note
Many symbols occur in more than one font. If you want to exchange documents with others, take care to use a font that is installed on their machine. In the basic LibreOffice installation, only those user-defined symbols that actually occur in the document are stored with it. Sometimes it is useful to embed all the user-defined symbols, for example when the document is going to be further edited by another person. Go to Tools > Options > LibreOffice Math and on the Settings page, uncheck the option Embed only used symbols (smaller file size).This setting is only available when you are working on a Math document.Space at the end of a formula
The grave accent ` inserts a small additional space into the formula; the tilde ~ inserts a larger one. In the basic installation, these symbols are ignored when they occur at the end of a formula.
However, when working with running text, it may be necessary to include spacing at the end of formulas as well. This customization is only available when you are working with a Math document, and not when you are embedding a Math object.
Open a Math document with File > New > Formula. Open the customisation dialog with Tools > Options and choose LibreOffice Math. On the Settings page, uncheck the option Ignore ~ and ` at the end of the line.
Formula layout
The most difficult part of using LibreOffice Math comes when writing complicated formulas. This section provides some advice.
Brackets are your friends
LibreOffice Math knows nothing about order of operation. You must use brackets to state the order of operations explicitly. Consider the following examples.
Markup Result Markup Result 2 over x + 1
2
x
1
2 over {x + 1}2
x
1
– 1 over 2−
1
2
– {1 over 2}−
1
2
In the first example, Math has recognized that the 2 before and the x after the over belong to the fraction, and has represented them accordingly. If you want x+1 rather than x to be the
denominator, you must bracket them together so that both will be placed there.
In the second example, Math has recognized the minus sign as a prefix for the 1 and has therefore placed it in the numerator of the fraction. If you wish to show that the whole thing is negative, with the minus sign in front of the fraction, you must put the fraction in brackets in order to signify to Math that the characters belong together.
The braces belong solely to the layout of the markup code and are not printed. If you wish to use braces in the formula, use the commands lbrace and rbrace.
Compare the following examples:
Markup Result Markup Result
x over {–x + 1}
x
−
x
+
1
x over lbrace –x + 1 rbracex
{−
x
+
1
}
Recognizing functions in Math
In the basic installation, Math outputs variables in italics. If you enter a function, Math usually recognizes it and outputs it normally. If Math fails to recognize a function (a list of recognized functions begins on page 36), you can inform Math about it. Enter the markup code func before the function, and the following text will be recognized as a function.
When Math has recognized a function, it expects this to be followed by numbers or variables. If these are missing, Math puts an inverted question mark in their place, which you can only remove by entering a variable or number, or a pair of empty braces { } as a placeholder.
Equations over more than one line
Suppose you want to make an equation covering more than one line, for example:
x
=
3
y
=
1
Your first reaction would be to simply press the Enter key. However, if you press the Enter key, although the markup goes to a new line, the resulting equation does not. You must type the newline command explicitly. This is illustrated in the table below.Markup Result x = 3 y = 1
x
=
3
y
=
1
x = 3 newline y = 1x
=
3
y
=
1
If you want to continue the calculation on a new line without writing a complete new equation, this is not directly possible, because Math expects a term on the left hand side of an equals sign. You can substitute:
•
Empty quotes “”. This will automatically cause the line to be left-justified.•
Empty braces { }. The following line will then be centered.The alignment of equals signs under each other is described on page 20.
How do I add limits to my sum/integral?
The sum and int commands can (optionally) take the parameters from and to. These are used for lower and upper limits respectively. These parameters can be used singly or together. Limits for integrals are usually treated as subscripts and superscripts.
Markup Result
sum from k = 1 to n a_k
∑
k=1 n
a
k int from 0 to x f(t) dt or int_0^x f(t) dt∫
0 xf
t
dt
or
∫
0 xf
t
dt
int from Re f∫
ℜf
sum to infinity 2^{-n}∑
∞2
−nNote
For more details on integrals and sums, see page 40.Brackets with matrices look ugly!
For background, we start with an overview of the matrix command.
Markup Result
matrix { a # b ## c # d }
a b
c d
Note
Rows are separated by two #’s and entries within each row are separated by one #.The first problem people have with matrices is that brackets do not scale with the matrix:
Markup Result
( matrix { a # b ## c # d } )
a b
c d
LibreOffice Math provides scalable brackets. That is, the brackets grow in size to match the size of their contents. Use the commands left( and right) to make scalable brackets.
Markup Result
left( matrix { a # b ## c # d } right)
a b
c d
Tip
Use left[ and right] to obtain square brackets.Tip
If you want all brackets to be scalable, go to Format > Spacing. Then in the Spacing dialog, choose the category Brackets and check the option Scale all brackets.How do I write a derivative?
Writing derivatives essentially comes down to one trick: Tell LibreOffice it’s a fraction.
In other words, you have to use the over command. Combine this with either the letter d (for a total derivative) or the partial command (for a partial derivative) to achieve the effect of a derivative.
Note
Notice that we have to use braces (squiggly brackets) to make the derivative.Markup Result
{df} over {dx}
df
dx
{partial f} over {partial y}∂
f
∂
y
{partial^2 f} over {partial t^2}∂
2
f
∂
t
2To write function names with primes, as is usual in school notation, you must first add the signs to the catalog. Using single and double quotes is typographically ugly. See “Customizing the catalog” on page 13.
Isolated and unpaired brackets
Math expects that for every opening bracket there will be a closing one. If you forget a bracket, Math places an inverted question mark by the corresponding bracket. This disappears when all brackets are matched. Sometimes forgetting a bracket causes the whole structure of the formula to fall apart. However an unpaired bracket is sometimes necessary. In such cases, you have two options:
With non-scalable brackets, use a preceding backslash \ to indicate that the following character should not be regarded as a bracket but as a literal character. So the half-open interval [a;b[ is represented by \[a;b\[ — try comparing this with [a;b[
Scalable brackets can also be unpaired. The same half-open interval is represented by
For scalable brackets, you can also use the command none to replace a non-existent paired bracket.
∣x
∣=
{
x
for
x
≥
0
−
x
for
x
<
0
can be represented byabs x = left lbrace stack {x "for" x >= 0 # -x "for" x < 0} right none
Markup characters as regular characters
Characters that are used for controlling markup cannot be entered directly as normal characters. The characters concerned are: %, {, }, &, |, _, ^ and ". So, for example, you cannot write 2% = 0.02 or 1" = 2.56cm. Two methods are available to overcome this limitation:
•
Use double quotes to mark the character as text, for example 2”%”= 0.02. Obviously this is not possible for the double-quote character itself.•
Add the character to the catalog. See the section on Customizing the catalog on p.... In some cases you can use commands:•
lbrace and rbrace give you literal braces{}
.•
Mline gives you the vertical line, for example 2 mline 3 for(
2
∣3
)
Conversion into an entity as in html or the use of an escape character is not possible in Math.
Text in a formula
To include text in a formula, enclose it in straight double-quotes:
abs x = left lbrace matrix {x # "for " x >= 0 ## -x # "for " x < 0} right none
∣x
∣=
{
x
for
x
≥
0
−
x
for
x
<
0
All characters except double quotes are permissible in text. Unfortunately the Special characters dialog is not available. If necessary, you can write the text in a text document and copy it into the equation editor via the clipboard. In this way smart quotes can be inserted, as shown below.
Figure 17: Smart quotes included by copy and paste from Writer.
Text is shown in the font that was selected from the Textlist in the Fontsdialog (compare with the section below on changing the font in a formula). To use a font from the lower window of the equation editor, set the attribute Serif, Sans or Fixed before the text.
By default, text is left-justified. You can change the justification with alignc or alignr.
Commands are not interpreted within text. Use quotes to break up the text if you wish to use special formatting commands.
“In” color blue bold “isosceles” “triangles, the base angles are equal”
Inisoscelestriangles, the base angles are equal
How do I align my equations at the equals sign?
LibreOffice Math does not have a command for aligning equations on a particular character, but you can use a matrix to do this, as shown below.
Markup Result
matrix{
alignr x+y # {}={} # alignl 2 ## alignr x # {}={} # alignl 2-y }
x
y
=
2
x
=
2
−
y
The empty braces around = are necessary because = is a binary operator and thus needs an expression on each side.You can reduce the spacing around = if you change the inter-column spacing of the matrix: 1) With the equation editor open, choose Format > Spacing from the menu bar.
2) In the Spacing dialog (Figure 18), click the Category button and select Matrices in the drop-down menu.
3) Enter 0% for Column spacing and click OK.
Figure 18: Changing spacing in a matrix formula
Changing the appearance of formulas
Changing the font
The fonts used in formulas can be changed using Format > Fonts.
The Formula fonts section of the Fonts dialog (Figure 19) refers to the three specified formula elements. The font for operators, relationships and brackets is not affected, as these elements normally come from the OpenSymbol font. Similarly elements from the catalog continue to be displayed in the font specified there.
Figure 19: Fonts dialog
The Custom fonts section determines which font will be used when the attribute font serif, font sans or font fixed is specified.
To change a font, first click on the Modify listbox.
Choose the type of entry you wish to modify. The Fonts dialog opens, showing all the fonts available on your system.
If you enter an initial character in the upper text box, the list will jump to that place. By entering a few additional characters, you can specify the exact font that you want. If you do not know its name, use the scrollbar to scroll through them. Click on any name and the box below will show a preview.
Variables should be written in italics, so make sure that the Italicbox is checked. For all other elements, use the basic (Roman) form. The style can be easily altered in the formula itself by using the commands italic or bold to set these characteristics and nitalic or nbold to unset them.
When you have chosen a new font for a formula, the old font remains in the list alongside the new one and can be selected again. This applies only to the current session; the old font is not stored permanently.
You can choose whatever fonts you like, but if you are exchanging documents with someone else, you should choose fonts that are present on your colleague’s computer.
Changing the font size
This is one of the most common questions people ask about LibreOffice Math. The answer is simple, but not intuitive:
1) Start the formula editor and choose Format > Font size.
Figure 20: Changing the font size for a formula
2) Select a larger font size under Base size (top-most entry).
Figure 21. Edit Base size (top) to make a formula bigger
Figure 22. Result of changing the base font size
Note
The change in font size applies only to the current formula. To change the font size generally, click on the Defaultbutton and then OK. A general change in the font size might, for example, make your work easier when you are preparing a big
presentation and want all the formulas in it to have a base size of 28pt—but do not forget to set the font size back to its original value whenthe work is finished.
Adjusting spacing in formulas
To increase or decrease spacing in formulas, do the following: 1) Go to Format > Spacing.
2) In the Spacing dialog, click the triangle next to Category, and choose an entry from the list. 3) Choose appropriate spacing values (the types of spacing that can be set depend on the
category) and click OK.
Figure 23: Spacing dialog
Note
Changes in spacing apply only to the current formula. To change spacing generally, click on the Defaultbutton and then OK. Spacing changes are possible for the categories shown in the following table.Category Possible adjustment
Spacing
Character spacing Line spacing Root spacing Indices
Superscript Subscript
Fractions
Numerator height Denominator depth Fraction line
Line Length Line thickness Limits
Limit height Limit depth Brackets
left/right outsize Spacing Matrices
Line spacing Column spacing Symbols
Primary height Minimum distance Operators
Excess height spacing Borders
Left Right Above Below
Changing the alignment
The alignment settings determine how formula elements located above one another are aligned horizontally relative to each other. Use Format > Alignment to choose between Left, Center or Right on a global basis.
Figure 24: Alignment dialog
Here again you can use the Default button to make the change apply to all formulas and not just the current one. The following example shows the effect in different situations:
Alignment Examples left
x
2−
9
x
(
100
7
)
c
2=
a
2+
b
2−
2
a b
cos
γ
cos
γ=
c
2−
a
2−
b
2−
2
a b
centered (Default)x
2−
9
x
(
100
7
)
c
2=
a
2+
b
2−
2
a b
cos
γ
cos
γ=
c
2−
a
2−
b
2−
2
a b
rightx
2−
9
x
(
100
7
)
c
2=
a
2+
b
2−
2
a b
cos
γ
cos
γ=
c
2−
a
2−
b
2−
2
ab
It is not possible to align formulas on a particular character.
Default settings of alignment do not apply to text elements; they are always aligned left. In the following examples, the default alignment is right but the first example begins the second line with text (albeit empty text) and is therefore aligned left.
Markup Code Result
{1+2+3+4} over 5 + 2 over {60+70+80+90} newline ""=2+1 over 150 1+2+3+4 5+ 2 60+70+80+90 =2+ 1501 {1+2+3+4} over 5 + 2 over {60+70+80+90} newline {}=2+1 over 150 1+2+3+4 5+ 2 60+70+80+90 =2+ 1501 Independent of the default alignment, it is possible to align formulas explicitly using the commands alignl, allignc and alignr. This attribute also works for text elements.
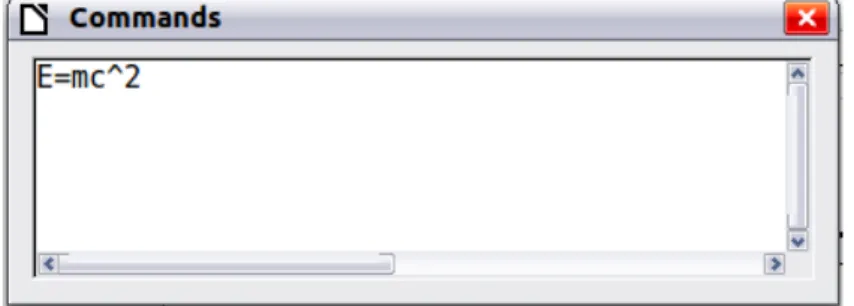
Numbering equations
Equation numbering is one of LibreOffice Math’s best hidden features. The steps are simple, but obscure:
1) Start a new line.
2) Type fn and then press F3.
The fn is replaced by a numbered formula:
E
=
mc
2 (2)Now you can double-click on the formula to edit it. For example, here is the Riemann Zeta function:
ζ(
z
)=
∑
n=1
∞
1
n
z (3)You can reference an equation (“as shown in Equation (2)”) with these steps: 1) Choose Insert > Cross-reference from the menu bar.
2) On the Cross-references tab (Figure 25), under Type, select Text.
3) Under Selection, select the equation number. Under Format, select Reference. 4) Click Insert.
Done! If you later add more equations to the paper before the referenced equation, all the equations will automatically renumber and the cross-references will update.
Tip
To insert the equation number without parentheses around it, choose instead of Reference under Format. NumberingThe AutoText inserted as a result of the above procedure consists of a 1x2 table. The left cell contains the formula and the right one the number. The number is treated as text. You can edit the AutoText if, for example, you prefer square rather than round brackets, or if you want formula and number to be separated by tabs rather than formatted as a table. Read the section on “Using AutoText” in Chapter 3 in the Writer Guide (Working with text).
Formulas in Writer documents
Position
Normally a formula is anchored As character in a Writer document. But as with any other OLE object, you can change the anchoring mode to position the formula where you want it. For more information, see Chapter 11 of the Getting Started guide (Graphics, the Gallery, and Fontwork). By default, formula objects anchored As character are automatically aligned vertically to the baseline of the surrounding text. To align the formula manually, go to Tools > Options >
LibreOffice Writer > Formatting Aids and uncheck the option Math baseline alignment. This setting is stored with the document and applies to all formulas within it. New documents use the current setting from this dialog.
Margins
An inserted Math object has margins to left and right of it, separating it from surrounding text. If you do not want this, it is best to alter the frame style for formulas, as this will apply simultaneously to all existing formulas and those still to be inserted in the document. Proceed as follows:
1) Press F11. The Styles and Formatting dialog opens. 2) Click on the Frame Styles tab.
3) Find the Formula frame style and right-click on it.
4) Choose Modify from the context menu. The Frame Style dialog opens.
5) Switch to the Wrap tab of the dialog. Change the values for Left and Right in the Spacing section to 0.00.
6) Click OK to close the dialog.
This changes the spacing for all formulas that have not had their spacing adjusted manually. You can find more information on using styles in Chapter 3 of the Getting Started guide (Styles and Formatting).
Background, borders, and size
With regard to formatting, formulas are treated as objects of the Frame Style type with the Formula frame style. Background color and borders can be set using this style or directly with Format > Frame/Object, or by right-clicking the formula and choosing Object from the context menu. In the basic installation, formulas have a transparent background and no borders. The size of a formula cannot be adjusted; in a Writer document it depends directly on the way the formula is constructed.
Creating a formula library
When you use the Math component of LibreOffice directly with File > New > Formula, you create documents with the file suffix .odf, each containing a single formula. You can use these to build up a library of frequently-used formulas. Embedded formulas can also be stored as separate Math documents by right-clicking on the formula and choosing Save copy as from the context menu. To insert such a Math document into a Writer document, use Insert > Object > OLE Object. Select
the option Create from file and enter the pathname of the file or browse for it using your system’s file manager by pressing the Search button.
Note
You cannot insert the document by dragging and dropping with the mouse, nor by using Insert > File. Formulas cannot be stored in the gallery because they are not in graphical format. You canhowever store a formula as autotext. Write the formula in a separate paragraph, select it and go to Edit > AutoText. For further information see “Using AutoText” in Chapter 3 in the Writer Guide
(Working with Text).
Formulas in Calc, Impress, and Draw
Graphical properties
Formula objects have similar properties in Calc, Impress, and Draw. They are always inserted with a transparent background and without borders. In Draw and Impress, they are assigned the
Default graphical style; there is no assigned style for them in Calc and properties must be specified directly. The properties shown in the Styles and Formatting window, the context menu, and the Format > Graphic menu are limited, when available at all.
Line, Area, Shadow
You can set values but the settings are completely ignored.
Text attributes
All text attributes, such as font and alignment, refer not to the formula text but to the text element present in all graphical objects. For a selected object, this can be accessed via the F2 key. For further information, read the “Working with text in Draw” in Chapter 10 (Advanced Draw
Techniques) of the Draw Guide.
Position
A formula can be positioned anywhere you like. Use the mouse, the arrow keys, or the Position and Size dialog available from Format > Position and Size.
Size
In documents a formula is not represented directly but replaced by a graphic. The size of this graphic is initially protected. To change the size, open the Position and Sizedialog and, on the first page, in the Protect section, uncheck the Size checkbox. This activates the Size section directly above. Enter your modifications. When the dialog is closed, the size will immediately be protected again.
Changing the size does not affect the formula itself but only its graphical representation. In particular the basic font size of the formula does not change. To revert to the size determined by the formula content, use the Original Size option in the context menu. This allows sizing errors that are sometimes caused by inserting a formula from a different module to be corrected.
Rotation, shear, and flipping
Rotation, shearing, and flipping (creating mirror images) are not possible; the corresponding dialog options are inactivated. If you need to do this, convert the formula to a GDI metafile graphic. Once you have done this, it is not a formula any more but an image. Copy the formula onto the clipboard.
Choose Edit > Paste Special or, on the Standard Toolbar, use the Paste menu (available from the small triangle to the right of the Paste icon) and choose the option GDI Metafile.
Combining formulas with text
Since a formula is an OLE object, you cannot insert it into the content of a spreadsheet cell, graphic or presentation object. Thus, unlike in Writer, you cannot integrate formulas with running text. Here are some alternatives:
Text elements within the formula
You can write the text directly into the formula. For example:
The illustration of a parallelogram suggests the
relationship
⃗
AB
=⃗
CD
⇔⃗
AC
=⃗
BC
.
But this does not constitute a proof.
The corresponding markup text is:"The illustration of a parallelogram suggests the" newline
"relationship " widevec AB = widevec CD dlrarrow widevec AC = widevec BC "." newline
"But this does not constitute a proof."
Lines are not wrapped automatically; you must use the newline command.
You can use Format > Fonts to match the text to its surroundings. See “Changing the font“ on page 20.
Grouping
formulas with graphic objects
Formulas can easily be combined with other objects into a group, which is not possible in text documents. In the following example, text boxes are combined with formulas and rectangles are used to highlight parts of the formula.
Nun wird die quadratische Ergänzung eingefügt
=
x
2−
6
x
+
3
2−
3
2−
7
und anschließend werden die Teile zusammengefasst.
=
x
2−
6
x
+
3
2−
3
2−
7
=(
x
−
3
)
2−
16
Formulas in Writer OLE objects
To be able to use all the facilities possible in text documents, create the formula and its text in Writer. Choose a page size that roughly matches your eventual objective. Do not write more than one page because page selection causes problems later. Save the document.
In Impress (or Draw or Calc), use Insert > Object > OLE Object and then choose the option
Create from file. The formula is embedded as an OLE object in a document that is itself an OLE object. As a result, the formula cannot be modified in Impress. For that reason, you should always activate the option Link to file. Then if you need to make a change, open the text document and edit text and formula there. In Impress, use Edit > Links and then the Update button to display the stored version of the text document. Do not try to modify the formula in Impress; it causes the representation to become faulty.
Formulas in charts
A chart is itself an OLE object. Therefore you cannot call up the equation editor within it. There is no freestanding module of LibreOffice that creates charts, so you cannot use anything similar to the above method using Writer either. However you can create a formula outside the charts editor, copy it to the clipboard, activate the chart for editing, and paste in the formula from the clipboard. This automatically converts the formula into a metafile graphic. If you wish to make further modifications, you must discard it and repeat the procedure.
Export and import
Export as MathML
In addition to exporting documents as PDFs, as described in Chapter 10, Printing, Exporting, and Emailing, of the Getting Started guide, Math offers the possibility of exporting formulas as MathML. Unfortunately browsers do not follow this standard perfectly. If there are subsequent faults in display, the fault lies with your browser!
As an example, take this formula:
Markup Result
%zeta (z) = sum from {n = 1} to infinity {1 over {n^z}} newline (matrix {a # b ## c # d}) newline "Text" newline int_0^x f(t) dt newline x = 3 y = 1
ζ(
z
)=
∑
n=1 ∞1
n
z(
a b
c d
)
Text
∫
0 xf
(
t
)
dt
x
=
3
y
=
1
This formula combines various possibilities that Math offers, which makes it useful for testing. If you are working in a separate Math document, go to File > Save as to open the Save as dialog. Choose MathML from the list of available file formats, to save your formula as MathML.
For an embedded formula, choose Save copy as from the context menu.
Result
Firefox 6 Opera 11.50
Internet Explorer 9
Chromium 13
Safari 5.1 only opens the file manager to save the data.
Microsoft file formats
The options in Tools > Options > Load/Save > Microsoft Office control how the import and export of Microsoft Office file formats is carried out in regard to formulas.
Loading
If [L] is checked, LibreOffice converts Microsoft formulas into native format when a document is loaded. This is possible if the formulas were created with MathType4 (up to version 3.1) or with the Microsoft Equation Editor. The latter is a reduced, older version of MathType licensed by Microsoft and included in the Microsoft Office package.
Formulas created by newer versions of MathType or by the new Microsoft formula editor “OMML5 Equation Editor” (Microsoft Office Suite 2010 and to some extent 2007) cannot be converted. If a document created in Microsoft Office 2010 and containing an OMML formula is saved into a .doc file format, Microsoft Office converts the formula into a graphic. Only this graphic is then accessible to LibreOffice.
4 http://www.dessci.com.en/
5 Office Math Markup Language
If you load a .docx document that contains OMML formulas, these fail in conversion whether [L] is checked or not.
Inside Microsoft Office, formulas created with MathType or Microsoft Equation Editor are treated as OLE objects. If [L] is not checked, LibreOffice maintains this. Double-clicking on the object
launches MathType and new formuls can be inserted using Insert > Object > OLE Object. This setup is to be recommended if you have MathType installed and wish to use it to create and edit formulas.
Saving
If [S] is checked, LibreOffice converts the formula into a form that can be read and modified by Microsoft Equation Editor and MathType. When [S] is not checked, the formula is treated as an OLE object on conversion into a .doc format, and remains linked to LibreOffice. A double-click on the object in Word will therefore attempt to launch LibreOffice.
If you save in the .docx format, formulas are not converted, whether [S] is checked or not.
Opening OpenDocument texts in Microsoft Word 2010
When you use Microsoft Office 2010, it is possible to open LibreOffice files in .odt format. Microsoft Office 2010 reports an error but nevertheless displays a “repaired” document. In this document, any original formulas are converted to OMML. If you save it again in .odt format,
Microsoft Office 2010 converts the formulas into MathML, and these formulas can then be edited in LibreOffice. Take care that symbols that belong together are enclosed in grouping brackets, even if these are not necessary for display in LibreOffice itself. This enables LibreOffice to correctly
translate the formula into MathML. For example, use sum from {i=1} to n {i^2}rather than sum from i=1 to n i^2.
In this procedure, the annotation element is lost. As a result, LibreOffice no longer shows the original Math markup code in the equation editor, but instead generates a new markup code from the internal MathML notation.
XHTML
The XHTML file format is available only as an export format. For this reason you will find the option under File > Export rather than File > Save. If this option is missing in your setup, you can install the necessary filter (run LibreOffice Setup, select Modify, and then select Optional Components > XSLT Sample Filters). The replacement graphic for the formula is embedded in the file, but the original Math markup code, included as an annotation element in MathML, is absent in this case (compare with the section on “Export as MathML” on page 30).
Whether the document is correctly displayed depends on the browser. Firefox shows the document correctly including the formulas. Opera and Internet Explorer have some problems with the
embedded graphic.
The older filter “HTML Document (OpenOffice.org Writer)(.html)“ does not save formulas at all but uses only a poorly resolved graphic in .gif file format.
Flat XML
This format can be both read and saved by LibreOffice. If the option is not present under File > Save or File > Save as, you can install the necessary filter. In this format, the whole content of the document, includingthe template, is saved within an XML document. In other words, it is not a compressed folder, as is usually the case for saved OpenDocument files. Any formulas are included as MathML elements, similar to the results of exporting as MathML. However individual formulas are not saved, only the whole document including the formulas. This format is suitable for direct entry into an external version control system.
Dmaths – an extension for more than just faster formula input
Dmaths is a mathematical macro package for LibreOffice Writer, which can be installed as an extension. It can be downloaded from http://extensions.libreoffice.org/.After installing Dmaths, close and reopen LibreOffice. Writer now shows a new menu (Figure 26), a new (customizable) toolbar with 36 buttons (Figure 27), a new toolbar with 26 buttons for use with Gdmath (Figure 28), a new toolbar with 10 buttons for use with AHmath3D (Figure 29), and two short toolbars to switch the longer ones on and off and to access a few further functions (Figure 30).
Figure 26: New Dmaths menu
Figure 27: Customizable Dmaths toolbar
Figure 28: Gdmath toolbar
Figure 29: AHmath3D toolbar
Figure 30: Toolbars for switching on and off further functions
Dmaths offers numerous tools for creating mathematical documents:
•
Single-click creation of Math formulas from text input (orange symbols)•
Creation of Math formulas using an input dialog (violet symbols)•
Tagging text (blue symbols)•
Changing the properties of existing formulas (green symbols)•
Drawing graphics, grids, statistical diagrams and geometrical figures (cyan symbols)•
Drawing and modification of geometric objects (gray Gdmath toolbar, also available inLibreOffice Draw)
•
Drawing 3D objects (AHmath 3D toolbar with wire models)The menu provides access to further add-ons, configuration, and a detailed Dmaths Help Guide. Dmaths was initially created by the French mathematician, Didier Dorange, but is now available in German, English, and Spanish as well as French. The original website is www.dmaths.org.
Technical details
OASIS Open Document Format for Office applications
The ODF specification does not lay down a completely new standard for Math formulas but takes over the Standard Mathematical Markup Language (MathML) developed by the World Wide Web Consortium (W3C) for representing formulas on websites (compare
http://www.w3.org/TR/2003/REC-MathML2-20031021). Of the two types provided, Presentation markup and Content markup, ODF uses the former. It therefore describes the representation of a formula rather than its mathematical meaning.
The MathML markup language differs from the one used in the equation editor. So, for example, in the formula int from {i=1} to 3 {f(t) {nitalic d}t}, the parts from... to… are not translated but converted into MathML similarly to int_{i=1}^3. The original formula in the equation editor is a StarMath6 5.0 encoding. To prevent it from being lost, it is stored as an annotation element. Other applications do not need either to evaluate nor to save this element, nor do they themselves create it.
In LibreOffice a formula is always associated with a replacement graphic. In the container formats - .odf, .odt and so on – these graphics are stored in a separate folder and are internally linked to their document. However if you use the file format “Open Document (Flat XML)” or export to XHTML, these graphics must be embedded. For this purpose they are encoded in BASE64.
Handling of formulas in Basic
This section is not an introduction to Basic but simply describes some specific aspects of formulas. You can get more specific information about types and services at
http://api.libreoffice.org/common/ref/com/sun/star/module-ix.html. If you look up the notations shown here in the index, you will quickly get to the relevant descriptions.
Formulas in a Writer document
In a Writer document, all OLE objects, including formulas, belong to a collection of type SwXTextEmbeddedObjects:
oCurrentController = ThisComponent.getCurrentController() oTextDocument = oCurrentController.Model
oEmbeddedObjects = oTextDocument.EmbeddedObjects
This collection is numbered continuously from 0. You can find a given object by:
nEndIndex = oEmbeddedObjects.Count-1 for nIndex=0 to nEndIndex
oMathObject = oEmbeddedObjects.getByIndex(nIndex)
To determine if this object is actually a formula, test whether it supports a service that is supported by formulas:
oModel = oMathObject.Model
if oModel.supportsService("com.sun.star.formula.FormulaProperties") then
Alternatively test if the CLSID, which every OLE object possesses, is that belonging to a Math object:
if oMathObject.CLSID = "078B7ABA-54FC-457F-8551-6147e776a997" then
Using the model, you can then alter the properties of the formula, for example the basic font size:
oModel.BaseFontHeight = 12
To make this change visible, the formula must be redrawn. The
ExtendedControlOverEmbeddedObject property provides some methods that specifically apply to OLE objects:
oXCOEO = oMathObject.ExtendedControlOverEmbeddedObject oXCOEO.update()
Formulas in a Draw/Impress/Calc document
In a Draw, Impress or Calc document, OLE objects are similarly treated as graphics. After you have accessed a particular object, test if it is an OLE object, and then if it is a formula. The core of your macro is then something like:
if oShape.supportsService("com.sun.star.drawing.OLE2Shape") then if oShape.CLSID = "078B7ABA-54FC-457F-8551-6147e776a997" then oModelFormula = oShape.Model
oModelFormula.BaseFontHeight = 12
In this case an explicit update is not necessary.
Math commands - Reference
Unary / binary operators
Operation Command Display
+sign +1 1
–sign –1 −1
+/– sign +–1 ±1
–/+ sign –+1 ∓1
Boolean not neg a ¬a
Addition + a + b ab
Dot product a cdot b a⋅b
Multiplication (X) a times b a×b
Multiplication (asterisk) a * b a∗b
Boolean ‘and’ a and b a∧b
Subtraction (–) a – b a−b
Division (as a fraction) a over b a
b
Division (as an operator) a div b a÷b
Division (with a slash) a / b a/b
Boolean ‘or’ a or b a∨b
Relational operators
Operation Command Display
Is equal a = b a=b
Is not equal a <> b a≠2
Approximately a approx 2 a≈2
Divides a divides b a∣b
Does not divide a ndivides b a∤b
Less than a < 2 a2
Greater than a > 2 a2
Similar to or equal a simeq b a≃b
Parallel a parallel b a∥b
Orthogonal to a ortho b a⊥b
Less than or equal to a leslant b ab
Greater than or equal to a geslant b ab
Similar to a sim b a~b
Congruent a equiv b a≡b
Less than or equal to a <= b a≤b
Greater than or equal to a >= b a≥b
Proportional a prop b a∝b
Toward a toward b ab
Arrow left a dlarrow b a⇐b
Double arrow left and right a dlrarrow b a⇔b
Arrow right a drarrow b a⇒b
Set operations
Operation Command Display
Is in a in B a∈B
Is not in a notin B
a
∉
B
Owns A owns b A∋b
Empty set emptyset ∅
Intersection A intersection B A∩B Union A union B A∪B Difference A setminus B A∖B Quotient A slash B A/B Aleph aleph ℵ Subset A subset B A⊂B
Subset or equal to A subseteq B A⊆B
Superset A supset B A⊃B
Superset or equal to A supseteq B A⊇B
Not subset A nsubset B A⊄B
Not subset or equal A nsubseteq B A⊈B
Not superset A nsupset B A⊅B
Not superset or equal A nsupseteq B A⊉B
Set of natural numbers setN
ℕ
Set of integers setZ ℤ
Set of rational numbers setQ
ℚ
Set of real numbers setR ℝ
Functions
Operation Command Display
Exponential func e^{a} ea
Natural logarithm ln(a)
ln
a
Exponential function exp(a)
exp
a
Logarithm log(a)
log
a
Power a^{b} ab
Sine sin(a)
sin
a
Cosine cos(a)
cos
a
Tangent tan(a)
tan
a
Cotangent cot(a)
cot
a
Square root sqrt{a}
aArcsine arcsin(a)
arcsin
a
Arc cosine arccos(a)
arccos
a
Arctangent arctan(a)
arctan
a
Arc cotangent arccot(a)
arccot
a
nth root nroot{a}{b} a
bHyperbolic sine sinh(a)
sinh
a
Hyperbolic cosine cosh(a)
cosh
a
Hyperbolic tangent tanh(a)
tanh
a
Hyperbolic cotangent coth(a)
coth
a
Absolute value abs{a}
∣
a
∣
Arc hyperbolic sine arsinh(a)
arsinh
a
Arc hyperbolic cosine arcosh(a)
arcosh
(
a
)
Arc hyperbolic tangent artanh(a)
artanh
(
a
)
Arc hyperbolic cotangent arcoth(a)
arcoth
(
a)
Factorial fact{a}
a
!
Operators
All operators can be used with the limit functions (“from” and “to”).
Operation Command Display
Limit lim{a} lim a
Sum sum{a}
∑
a
Product prod{a}
∏
a
Coproduct coprod{a}
∐
aUpper and lower bounds shown with
integral int from {r_0} to {r_t} a
∫
r0
rt
a
Integral int{a}
∫
a
Double integral iint{a}
∬
a
Triple integral iiint{a}
∭
a
Lower bound shown with summation
symbol sum from{3}b
∑
3b
Contour integral lint a
∮
a
Double curved integral llint a
∯
a
Triple curved integral lllint a
∰
a
Upper bound shown with product
symbol prod to{3} r
∏
3 r
Attributes
Operation Command Display
Acute accent acute a a
Grave accent grave a a
Reverse circumflex check a a
Breve breve a a
Circle circle a a˚
Vector arrow vec a a
Tilde tilde a a
Circumflex hat a a
Line above bar a a
Dot dot a a˙
Wide vector arrow widevec abc abc
Wide tilde widetilde abc abc
Wide circumflex widehat abc abc
Double dot ddot a a¨
Line over overline abc abc
Line under underline abc abc
Line through overstrike abc acb
Triple dot dddot a a
Transparent (useful to get a placeholder of a
given size) phantom a
Bold font bold a
a
Italic font7 ital “a”
a
Resize font size 16 qv
qv
Following item in sans serif font8 font sans qv qv
Following item in serif font font serif qv
qv
Following item in fixed font font fixed qv qv Make color of following text cyan9 color cyan qv qv7 Unquoted text that is not a command is considered to be a variable. Variables are, by default, italicized. 8 There are three custom fonts: sans serif (without kicks), serifs (with kicks), and fixed (non-proportional).
To change the actual fonts used for custom fonts and the fonts used for variables (unquoted text), numbers and functions, use Format > Fonts.
9 For all coloring, the color will apply only to the text immediately following the command until the next space is encountered. In order to have the color apply to more characters, place the text you want in color in curly brackets.