Integrated Virtual Debugger for
Visual Studio Developer’s Guide
VMware Workstation 7.0
This document supports the version of each product listed and
supports all subsequent versions until the document is replaced
by a new edition. To check for more recent editions of this
document, see http://www.vmware.com/support/pubs.
VMware, Inc.
3401 Hillview Ave. Palo Alto, CA 94304 www.vmware.com
You can find the most up-to-date technical documentation on the VMware Web site at: http://www.vmware.com/support/
The VMware Web site also provides the latest product updates.
If you have comments about this documentation, submit your feedback to:
Copyright © 1998–2009 VMware, Inc. All rights reserved. This product is protected by U.S. and international copyright and intellectual property laws. VMware products are covered by one or more patents listed at
http://www.vmware.com/go/patents.
VMware is a registered trademark or trademark of VMware, Inc. in the United States and/or other jurisdictions. All other marks and names mentioned herein may be trademarks of their respective companies.
Contents
About
This
Book 5
1
Introduction
to
Live
and
Replay
Debugging 7
Debugging Modes of the Integrated Virtual Debugger 7 Replay Debugging as a Break‐Through Technology 8 Requirements for the Integrated Virtual Debugger 9
Prerequisites for Live Debugging Mode 9 Prerequisites for Replay Debugging Mode 9 Installing the Integrated Virtual Debugger 10
Programming Languages Supported 10 Choosing Live Mode or Replay Mode 10
2
Using
Replay
Debugging
Mode 11
Overview of Replay Debugging Mode 11 Prepare the Host and Guest 12
Prepare the Host System for Replay Debugging 12 Ensure that Guest DLLs are Available on the Host 12 Prepare the Guest System for Replay Debugging 12
Check VMware Tools and Virtual Hardware 12 Copy Necessary DLLs from Host to Guest 12 Disable Paging of Kernel‐Mode Stacks 12 Take a Snapshot 13
Why All the Preparation? 13
Configure Visual Studio and the Integrated Virtual Debugger 13 Configure Visual Studio for Replay Debugging 13
Use the Microsoft Symbol Server 13 Avoid Debugging DLLs 14
Configure the Integrated Virtual Debugger 14 Create a Recording 14
Create a Recording Within Visual Studio 14 Add Replay Snapshots During a Recording 15 Start Replay Debugging 15
Identify the Application for Replay Debugging 16 Reverse Execution for Debugging 16
What is Reverse Execution? 16 Start and Stop Reverse Execution 16
How to Improve Reverse Execution Performance 16 Remote Replay Debugging 17
Start the Debugging Proxy on a Remote Machine 17 Configure Visual Studio to Start Remote Debugging 17 Configuration Properties Reference 18
General Options 18
Pre‐Record Event Options 19 Post‐Record Event Options 19 Advanced Option 19
3
Using
Live
Debugging
Mode 21
Overview of Live Debugging Mode 21 Prepare the Guest for Live Debugging 21
Configure the Group Policy Settings for Windows 22 Disable or Configure the Windows Firewall 22 Configure User Accounts 22
Blank Passwords and the Default Password Policy 22 Suppress Security Prompts on the Guest System 23
Install the Microsoft .NET Framework to Support Managed Applications 23 Rename Virtual Machine Computer Names 23
Install the Remote Debug Monitor Manually on Windows 98 Guests 23
Start the Remote Debug Monitor Without Authentication on the Default Port 24 Configure Visual Studio for Live Debugging 24
Configure the Runtime Library Setting for C++ Applications 24 Configure the Integrated Virtual Debugger for Live Debugging 24
Create Configurations 24 Set Configuration Properties 25 Set General Properties 25
Set Pre‐Debug Event Properties 25 Set Post‐Debug Event Properties 26 Rename a Configuration 26 Remove a Configuration 26
Debug Live Applications in Virtual Machines 27
Start a Live Debugging Session in a Virtual Machine 27 Start a Session Without Debugging in a Virtual Machine 27 Attach the Debugger to a Process Running in a Virtual Machine 27 Configuration Properties Reference 28
General Options 28
Pre‐Debug Event Options 28 Post‐Debug Event Options 29
4
Troubleshooting
Live
and
Replay
Debugging 31
Reporting Bugs and Viewing Log Files 31
Files Maintained by the Integrated Virtual Debugger 31 Live Debugging Tips 31
Cannot Change Shortcut Keys 31
Live Debugging Session Does Not Start 32
Cannot Exit Visual Studio with Powered On Virtual Machine 32 Cannot Prevent VMDebugger Add‐in from Loading 32
Need to Clean Up After a Failure to Debug Locally 32 Visual Studio 2005 Fails in Vista 33
Replay Debugging Tips 33
File Not Found Before Shared Folders Enabled 33 Recordings Numbered but Not Named 33
Cannot Replay a Recording Created in Workstation 6.5 33 An Application Does Not Run in the Guest System 33
This manual, Integrated Virtual Debugger for Visual Studio Developer’s Guide, provides information about how to
install, configure, and use the Integrated Virtual Debugger for Visual Studio. This VMware product provides
a configurable extension to Microsoft Visual Studio for debugging programs in virtual machines. This manual
includes information about both live debugging and replay debugging. The troubleshooting section lists some
common errors and workarounds for issues that developers might experience while doing either live
debugging or replay debugging.
Revision History
This document is revised with each release of the product or when necessary. A revised version can contain
minor or major changes. Table 1 summarizes the significant changes in each version of this document.
Intended Audience
This manual is intended for software developers and QA engineers who want to debug in a virtual machine,
or with the assistance of replay. Readers should be familiar with virtual machine technology, Visual Studio,
and the debugging workflow.
Document Feedback
VMware welcomes your suggestions for improving our documentation. Send your feedback to [email protected].
Technical Support and Education Resources
The following sections describe the technical support resources available to you. To access the current versions
of other VMware books, go to http://www.vmware.com/support/pubs.
Additional information about replay debugging is available at http://www.replaydebugging.com.
Online and Telephone Support
To use online support to submit technical support requests, view your product and contract information, and
register your products, go to http://www.vmware.com/support.
About This Book
Table 1. Revision History
Revision Date Description
2009‐10‐20 Third draft for the Workstation 7.0 GA release. 2009‐10‐01 Second beta draft for the Workstation 7.0 RC release.
2009‐08‐20 Standalone manual (beta draft) for the 2009 Workstation Technical Preview. 2008‐09‐23 Included as an appendix of the version 6.5 Workstation User’s Manual.
Support Offerings
To find out how VMware support offerings can help meet your business needs, go to http://www.vmware.com/support/services.
VMware Professional Services
VMware Education Services courses offer extensive hands‐on labs, case study examples, and course materials
designed to be used as on‐the‐job reference tools. Courses are available onsite, in the classroom, and live
online. For onsite pilot programs and implementation best practices, VMware Consulting Services provides
offerings to help you assess, plan, build, and manage your virtual environment. To access information about
1
The Integrated Virtual Debugger extends Visual Studio to help you debug virtual‐machine applications, either
live or recorded. This chapter includes the following sections:
“Debugging Modes of the Integrated Virtual Debugger” on page 7
“Replay Debugging as a Break‐Through Technology” on page 8
“Requirements for the Integrated Virtual Debugger” on page 9
“Installing the Integrated Virtual Debugger” on page 10
You can install the Integrated Virtual Debugger on most Windows hosts that have VMware Workstation and
Visual Studio installed. For more information about Workstation, see the VMware Workstation User’s Manual
on the VMware Web site. For information about Visual Studio, see the Microsoft Web site.
Debugging Modes of the Integrated Virtual Debugger
The Integrated Virtual Debugger offers two modes: live debugging and replay debugging.
Live debugging lets you debug an application in a virtual machine. It is similar to remote debugging with
Visual Studio, except it works with virtual machines instead of physical machines. In fact, live debugging was
called remote debugging in the Workstation 6.5 release.
Replay debugging lets you record the execution of an application in a virtual machine and subsequently debug
the recorded form of the application. This feature is experimental in this release.
Debugging on virtual machines has many advantages over debugging on physical machines. You can easily
compare behavior of different Windows versions, service packs, DLL combinations, and so on. If you are a
software developer or QA engineer, you can use the Integrated Virtual Debugger to help manage a collection
of virtual machines. Live debugging mode makes a Visual Studio debugging session as convenient as a local
debugging session. Replay debugging mode offers an entirely new approach. The Integrated Virtual Debugger allows the following operations:
Power a virtual machine on or off
Start a live or replay debugging session in a virtual machine
Attach to a process in a live virtual machine or in a recording
Start an application without debugging
Create a recording for later replay, or take a snapshot
Execute a program in reverse
Configure settings for application execution and debugging in a virtual machine
Introduction to Live and Replay
Replay Debugging as a Break-Through Technology
Replay debugging allows developers to debug recordings of programs running in virtual machines. Replay
debugging is valuable for finding, diagnosing, and fixing bugs that are not easily reproduced, a particularly
challenging class of bugs. Once the manifestation of a bug has been recorded, it can be replayed (and
debugged) over and over again, and it is guaranteed to have instruction‐by‐instruction identical behavior each
time. In addition, VMware Workstation includes a feature that simulates reverse execution of the program,
making it easier to pin point the origin of a bug.
Here are specific circumstances that benefit from replay debugging:
Nondeterministic bugs. Some bugs only rear their ugly heads when a particular interleaving of concurrent
entities (e.g., threads, the operating system, network activity, and user input) is present. Given that the
programmer cannot normally control (or even reason about) this interleaving, these bugs can be very difficult
to reproduce. But if such a bug is recorded, we can examine it in the debugger as often as we like. Once a bug
is recorded, it is no longer nondeterministic.
Pseudo nondeterministic bugs. Some bugs are deterministic, but itʹs not always clear exactly what is
necessary to reproduce the bug. Bug reports indicating that a program crashed “...after clicking on a bunch of
different UI elements,” are common but usually useless. If the bug is recorded, it is unnecessary to describe
the steps for reproduction, because they are an implicit part of the recording itself.
Bugs that can only be reproduced with a complex environment. If a bug appears in an application that
communicates with dozens of other local and remote processes that need to be setup and configured,
reproducing the bug may be possible but prohibitively expensive. If the bug is recorded, the developer need
not setup the other components of the system (e.g., other processes or remote clients). The effect of the other
components is recorded, allowing the program of interest to be debugged in isolation.
Heisenbugs. A Heisenbug (a play on the Heisenberg uncertainly principle) is a bug that does not manifest
itself when it is examined in the debugger. Such bugs are common because debugging is an invasive process
that dramatically changes the timing characteristics of the program. If a bug is recorded, it can be debugged
without impacting the behavior of the program at all.
Memory corruption bugs. Memory corruption bugs are difficult to diagnose because almost any pointer
dereference in the program can be responsible for the corruption. The replay debugging facility in VMware
Workstation 6.5 includes a reverse execution feature that (among other things) greatly helps track down
memory corruption bugs. When a corrupted data structure is identified, the developer simply sets a data
breakpoint (i.e., a watchpoint) on the corrupted data and executes backward. This will take the developer to
the last point in time that the corrupted data structure was modified.
To summarize, replay debugging has several benefits over traditional debugging:
No debugging is performed during recording, so debugging activities do not affect the normal execution
of an application. This is useful for applications that interact with other processes or remote servers. For
example, TCP connections do not time‐out during a recording as they would during a debugging session.
Bugs captured in a recording are reproduced exactly during playback debugging. You can examine
recorded bugs repeatedly in Visual Studio, and always see the same behavior. This characteristic makes
replay debugging a powerful tool for identifying bugs that are hard to reproduce due to subtle variations
in timing or system conditions.
A feature simulating reverse execution is available in the replay debugging mode. In a traditional
debugging context, you must restart an application, then try to stop it soon enough to find the bug.
Reverse execution makes it easier to find the bug. For example, if your data structure is corrupted, you set
a data breakpoint (that is, a watchpoint) on the corrupted data and execute backward until you encounter
the code that caused the corruption.
Replay debugging has also been implemented for gdb in Linux. For current details, see the VMTN blogs and
Chapter 1 Introduction to Live and Replay Debugging
Requirements for the Integrated Virtual Debugger
Replay debugging mode has more stringent requirements than live debugging mode.
Prerequisites for Live Debugging Mode
Table 1‐1 summarizes the requirements for live debugging mode.
Prerequisites for Replay Debugging Mode
Table 1‐2 summarizes the requirements for replay debugging mode.
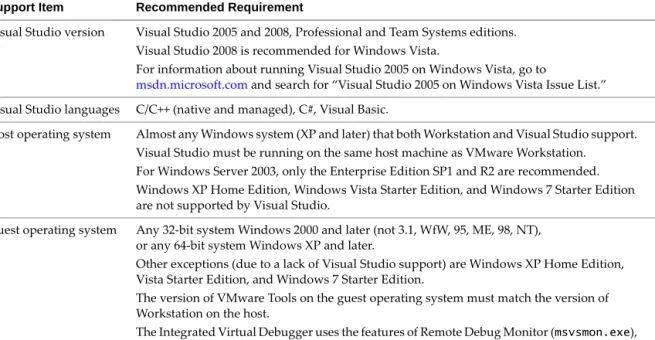
Table 1-1. Requirements for Live Debugging
Support Item Recommended Requirement
Visual Studio version Visual Studio 2005 and 2008, Professional and Team Systems editions.
Visual Studio 2008 is recommended for Windows Vista.
For information about running Visual Studio 2005 on Windows Vista, go to
msdn.microsoft.com and search for “Visual Studio 2005 on Windows Vista Issue List.” Visual Studio languages C/C++ (native and managed), C#, Visual Basic.
Host operating system Almost any Windows system (XP and later) that both Workstation and Visual Studio support.
Visual Studio must be running on the same host machine as VMware Workstation. For Windows Server 2003, only the Enterprise Edition SP1 and R2 are recommended. Windows XP Home Edition, Windows Vista Starter Edition, and Windows 7 Starter Edition
are not supported by Visual Studio.
Guest operating system Any 32‐bit system Windows 2000 and later (not 3.1, WfW, 95, ME, 98, NT), or any 64‐bit system Windows XP and later.
Other exceptions (due to a lack of Visual Studio support) are Windows XP Home Edition,
Vista Starter Edition, and Windows 7 Starter Edition.
The version of VMware Tools on the guest operating system must match the version of
Workstation on the host.
The Integrated Virtual Debugger uses the features of Remote Debug Monitor (msvsmon.exe),
which must exist, to communicate with the guest operating system.
Table 1-2. Requirements for Replay Debugging
Support Item Recommended Requirement
Visual Studio version Visual Studio 2005 and 2008, Professional and Team Systems editions.
Visual Studio 2008 is recommended for Windows Vista.
For information about running Visual Studio 2005 on Windows Vista, go to
msdn.microsoft.com and search for “Visual Studio 2005 on Windows Vista Issue List.” Visual Studio languages C/C++ (native).
Physical hardware The host hardware must have a replay‐capable CPU. If you can record virtual machines using
VMware Workstation, the processor is replay‐capable.
Host operating system Windows XP, Windows Server 2003 SP1 or R2, Windows Vista, or Windows 7.
Windows XP Home Edition, Windows Vista Starter Edition, and Windows 7 Starter Edition
are not supported by Visual Studio.
Virtual hardware The virtual hardware must be set to single CPU. This is a record‐replay limitation. Guest operating system Any 32‐bit system Windows XP and later (not 3.1, WfW, 95, ME, 98, NT, 2000).
Record‐replay does support multiprocessor virtual machines, so Windows guests running in
SMP mode (symmetric multi‐processing) are not supported.
The version of VMware Tools on the guest operating system must match the version of
Installing the Integrated Virtual Debugger
If Visual Studio is already installed on your host, the VMware Workstation installer should also install the
Integrated Virtual Debugger.
If you install Workstation after you install Visual Studio, you can choose custom install to verify that
Integrated Virtual Debuggers > Visual Studio PlugIn is selected.
If you install Visual Studio after you install Workstation, run the Workstation installer again. a In the program maintenance dialog box, select Modify/Change.
b To install, click Integrated Virtual Debuggers > Visual Studio PlugIn and proceed.
Plug‐ins are also available for Eclipse Java and Eclipse C/C++. You do not need to install them to use the
Integrated Virtual Debugger for Visual Studio.
After you install the Integrated Virtual Debugger, a new menu similar to Table 1‐3 appears in Visual Studio.
Programming Languages Supported
Replay debugging supports C and C++, while live debugging supports several Visual Studio languages.
Choosing Live Mode or Replay Mode
You can use only one mode during a single debugging session, either live debugging or replay debugging. If you plan to use live debugging mode, go to Chapter 3, “Using Live Debugging Mode,” on page 21. Additional steps are necessary to get ready for replay debugging:
1 Prepare the host and guest for replay debugging. 2 Configure Visual Studio to use replay debugging. 3 Create a recording.
4 Start replay debugging.
5 Understand the concepts behind replay debugging.
If you plan to use replay debugging mode, go to Chapter 2, “Using Replay Debugging Mode,” on page 11.
Table 1-3. VMware Menu in Visual Studio
Start Live Debugging in a VM Start Replay Debugging in a VM Attach to Process in Live VM... Attach to Process in Recording Restart
Start Without Debugging in VM Create Recording for Replay Reverse Continue
Reverse Run to Cursor Take Snapshot in VM Cancel
Options... Help Topics
2
Replay debugging mode allows you to debug an application in a recording of virtual machine execution. This
chapter includes the following sections:
“Overview of Replay Debugging Mode” on page 11
“Prepare the Host and Guest” on page 12
“Configure Visual Studio and the Integrated Virtual Debugger” on page 13
“Create a Recording” on page 14
“Start Replay Debugging” on page 15
“Reverse Execution for Debugging” on page 16
“Remote Replay Debugging” on page 17
“Configuration Properties Reference” on page 18
“Limitations of Replay Debugging” on page 20
Overview of Replay Debugging Mode
You can make recordings for replay debugging either from within Visual Studio, or using the Workstation
recording interface. To make a recording from within Visual Studio, you choose Create Recording for Replay
from the VMware menu. The Integrated Virtual Debugger starts the virtual machine, creates a recording,
ensures that the application is available in the virtual machine, runs the application to completion, and stops
the recording. To create a recording using the Workstation recording interface, you must do all these steps
yourself, as documented in the VMware Workstation User’s Manual.
Given a recording, you can debug the application while it replays. To start debugging the application in Visual
Studio, you choose Start Replay Recording from the VMware menu. In replay debugging mode, you can set
breakpoints, add data breakpoints, step through source statements, start replay debugging, and examine
threads, locals, and stack frames.
Unlike traditional debugging, the application you debug in replay mode does not interact with the user or
network, but it appears to accept user input and connect to the network, whenever it accepted user input or
connected to the network during recording. Because it is a recording, the application behaves the same way
every time you debug it.
Replay debugging also provides a reverse execution feature. Reverse execution is analogous to forward
execution, except that the application runs until it reaches the previous breakpoint, data breakpoint, or
exception. To initiate reverse execution in Visual Studio, you choose Reverse Continue or Reverse Run to Cursor from the VMware menu. The Integrated Virtual Debugger implements reverse execution by replaying
a recording to find a specific time in the past. In some circumstances, multiple replay steps are necessary to
achieve a single reverse execution operation.
Replay debugging is complicated, so it is best to start by practicing on trivial code, such as the “Hello world!”
program, before proceeding with massive production code.
Prepare the Host and Guest
Before using replay debugging, you must prepare your host and guest systems.
Prepare the Host System for Replay Debugging
If you have not installed the VMware software, see “Installing the Integrated Virtual Debugger” on page 10.
Ensure that Guest DLLs are Available on the Host
All DLLs used by the programs that you debug in the guest must be accessible on the host. The DLLs that are
built as part of your Visual Studio project are always available on both the host and guest, but you must copy
all other DLLs (including system DLLs) from the guest to the host. At minimum, you must copy the system
folder C:\Windows\system32 on the guest to a folder on the host, such as C:\guestdlls\system32. The
system folder includes kernel32.dll, ntdll.dl, among others.
Absence of any required DLLs on the host system prevents the application you are debugging from loading
symbols from the missing DLLs, adversely affecting performance. See “Why All the Preparation?” on page 13
for a detailed explanation.
Prepare the Guest System for Replay Debugging
To prepare the guest for replay debugging you must have VMware Tools installed, configure the guest to make
all the DLLs and files accessible for debugging on the guest system, and disable paging kernel‐mode stacks.
After doing all this, take a snapshot of the guest.
Check VMware Tools and Virtual Hardware
Make sure that you have the latest version of VMware Tools that matches the guest operating system. Replay
debugging should be enabled by default in the Workstation Virtual Machine Settings editor.
The virtual machine must have exactly one virtual CPU, a requirement of record and replay technology.
Copy Necessary DLLs from Host to Guest
All DLLs called by the program that you intend to debug must be available in the guest, because that is where
the program will run. System DLLs are already in the guest, and DLLs built by your Visual Studio project will
become available in the guest. You must manually copy any other DLLs into the guest. Yo u can drag and drop
DLLs from the host to the guest. Very simple programs might have no DLL dependencies. However a normal
application does not run, and cannot be debugged, if the required DLLs are unavailable in the guest.
Disable Paging of Kernel-Mode Stacks
You can disable paging of kernel‐mode stacks either by using the Global Flags utility (the easy way) or by
editing the Windows registry. Visual Studio frequently reports incorrect registers and call‐stacks if the paging
of kernel‐mode stacks is not disabled in the guest system.
To disable paging kernel-mode stacks
1 Start the Global Flags utility distributed with the Microsoft Debugging Tools for Windows.
C:\Program Files\Debugging Tools for Windows\gflags.exe
If the Debugging Tools for Windows are not installed in the guest, copy the gflags.exe file from the host
to the guest and start it.
2 On the System Registry tab, select the option Disable paging of kernel stacks and click OK. 3 Reboot the guest system for this change to take effect.
IMPORTANT Carefully follow all the steps for preparing the host and guest, or else your replay debugging
Chapter 2 Using Replay Debugging Mode
To edit the Registry and disable paging kernel-mode stacks
1 Click Start > Run and type regedit.
2 In the left pane of the Registry Editor, navigate to
HKEY_LOCAL_MACHINE\SYSTEM\CurrentControlSet\Control\Session Manager.
3 In the right pane, right‐click GlobalFlag and select Modify.
4 With Base Hexadecimal, type value 80000, which corresponds to FLG_DISABLE_PAGE_KERNEL_STACKS. 5 Click OK and exit the Registry Editor.
6 Reboot the guest system for this change to take effect.
Take a Snapshot
Before debugging, take a snapshot to serve as the starting point for recordings that you create. A snapshot
eliminates the need to power on the virtual machine every time you create a recording. Call it BaseSnapShot.
Why All the Preparation?
Previous sections asked you to ensure that Visual Studio is configured to use the Microsoft symbol server, that
DLLs used by your program are available in both the guest and the host, and that paging of kernel‐mode stacks
is disabled. Proper preparation is needed to guarantee accessibility of memory in the guest. The virtualization
layer can access only guest physical memory. When Visual Studio tries to access memory that is not present in
guest physical memory (for example, because it has been paged), the memory is not accessible.
Proper preparation helps the Integrated Virtual Debugger avoid the problem. When paging of kernel‐mode
stacks is disabled, kernel‐mode stacks are guaranteed to be in guest physical memory. Similarly, when Visual
Studio uses the Microsoft symbol server, Visual Studio has access to accurate symbols in the memory that it
tries to read (in other words, it reads memory that is more likely to be in guest physical memory).
Otherwise, the Integrated Virtual Debugger tries to get the desired data in some other way. One technique it
uses is to read code memory out of the file from which it was mapped. This is why the debugger needs access
to the same DLLs on both the host and the guest. As a last resort, the debugger takes a snapshot, goes live
(diverging from the replay process), asks the guest tools to read memory, and finally restores the snapshot. The
snapshot technique is effective but slow, which is why you should take preparatory steps to avoid it.
Configure Visual Studio and the Integrated Virtual Debugger
You must prepare also Visual Studio and the Integrated Virtual Debugger for replay debugging. The following
procedures assume that you have already created a project, built it, and run it locally.
Configure Visual Studio for Replay Debugging
These steps make symbols more quickly available during debugging.
Use the Microsoft Symbol Server
Visual Studio interacts with the replay debugging infrastructure more efficiently when it has access to
Microsoft symbols. This requires Internet access initially.
To access the Microsoft symbol server
1 In Visual Studio, select Tools > Options.
2 In the left pane of the Options window, select Debugging > Symbols. 3 Click on the yellow add icon and type the following symbol file location.
http://msdl.microsoft.com/download/symbols
4 In the text box Cache symbols from the symbol server to this directory, enter an existing directory on the
Avoid Debugging DLLs
By default, Visual Studio generates programs that are dependent on debugging DLLs that are not available on
most machines. You could copy the debugging DLLs into the guest, but it is easier not to use them.
To stop use of debugging DLLs
1 In Visual Studio, select Project > Properties.
2 In the left pane of the Property Pages windows, expand Configuration Properties > C/C++ and select
Code Generation.
3 In the right pane, change Runtime Library to Multi‐threaded Debug (/MTd). 4 Rebuild your project and run it locally to confirm that it is functioning properly.
Configure the Integrated Virtual Debugger
You must also change several essential settings in the Integrated Virtual Debugger.
To configure the Integrated Virtual Debugger
1 In Visual Studio, select VMware > Options.
2 In the left pane, select Replay Debugging in VM > General.
3 In the right pane, ensure that Local or Remote is set to Local. Remote replay debugging is also possible.
See “Remote Replay Debugging” on page 17.
4 In the right pane, in the Virtual Machine text box, enter the path of your virtual machine’s .vmx file. Tip: click on the field, then click the down‐arrow to browse.
5 In the left pane, select Replay Debugging in VM > Pre‐Record Event.
6 In the right pane, in the Base Snapshot for Recording text box, enter the name of the base snapshot that
you recorded in “Take a Snapshot” on page 13 (BaseSnapShot was suggested). 7 Click OK.
You are finished with preparation and configuration tasks. You might have noticed configuration options for
recording name, guest login credentials, and so forth. These are important, but you are prompted for them as
you go, or they get filled in automatically.
Create a Recording
To debug an application during replay, you must have a recording of the application running. You could use
the Workstation user interface to power on a virtual machine, copy your program from the host to the guest,
share its application folder, start recording, run the program, wait for it to finish, stop recording, and update
VMware > Options to designate this new recording. The Integrated Virtual Debugger automates these steps.
Create a Recording Within Visual Studio
Before you create a recording, start with a built and working project.
To create a recording from Visual Studio
1 In Visual Studio, select VMware > Create Recording for Replay. 2 You are prompted for the guest login and password.
The Integrated Virtual Debugger runs the Command Line specified for pre‐record event and post‐record
event, and updates the configuration options to use the new recording in subsequent debugging sessions.
See “Pre‐Record Event Options” on page 19 and “Post‐Record Event Options” on page 19.
3 (Optional) Add replay snapshots to the recording. If the recording is long, VMware recommends that you
Chapter 2 Using Replay Debugging Mode
Add Replay Snapshots During a Recording
Replay snapshots take a replay‐specific snapshot at the current location within a recording. Later during a
debugging session, you can attach to your application process starting with a specific replay snapshot, instead
of replaying the entire recording from the beginning. This is useful when you have long recordings.
To add replay snapshots during a recording, click Add Snapshot in the recording dialog box. The application
that you are debugging must be running when you add the replay snapshot to the recording.
To enable automatic snapshots
1 Power off the virtual machine.
2 From the Workstation menu bar, select VM > Settings. 3 Click the Options tab.
4 Select Replay and in the right pane, set the Snapshot Frequency option.
Troubleshooting DLL Problems
If your program does not appear to start in the guest, it might be because the program cannot run in the guest,
perhaps due to a missing DLL. To help diagnose this issue, copy your program from the host to the guest and
try to run it on the guest.
Start Replay Debugging
After preparing and recording, you are ready to start debugging. You can start a replay debugging session
from the beginning of the recording, or you can attach to a process that is already running in the recording.
Starting a replay debugging session powers on a virtual machine and starts replaying a recording. As with
traditional debugging, if a breakpoint or exception is encountered, the application is suspended. You can then
examine the application or continue execution.
To start a replay debugging session
1 Set a breakpoint, for example in the first line of main().
2 Select VMware > Start Replay Debugging in VM. Replay begins.
3 When you are prompted to enter the folder containing various DLLs (ntdll.dll for example), type the
name of the folder that you created in “Ensure that Guest DLLs are Available on the Host” on page 12
(C:\guestdlls\system32 was suggested).
The configuration options are updated with this folder name, so you are not asked again for a folder
name, unless another DLL is missing.
4 When the debugger hits your breakpoint, you can do almost anything possible in traditional debugging. If the end of the recording is reached while replay debugging, the debugging process is interrupted before
exiting so that you can initiate reverse execution.
If you have replay snapshots in your recording, you can select a replay snapshot to access a specific point in
the recording without having to replay the recording from the beginning. This is useful for long recordings.
To start a replay debugging session from a designated point in a recording
1 Select VMware > Attach to Process in Recording. A Visual Studio project must be open.
2 Enter information in the Attach to Process dialog box. Most fields are populated from the configuration
properties of the current project. You must specify the replay snapshot you want to use. 3 Select Get Processes to get a list of all processes.
4 Select the process to debug and click Attach.
Identify the Application for Replay Debugging
When you start a replay debugging session, the Integrated Virtual Debugger uses the current Visual Studio
Startup Project in the solution to determine which executable file in the recording to debug. If your Visual
Studio solution has more than one project that builds an executable file, you must set the project you want to
debug as the StartUp Project before you replay.
To identify the application for replay debugging
1 In the Visual Studio Solution Explorer window, right‐click the project that you want to replay debug. 2 Select Set As StartUp Project.
Reverse Execution for Debugging
As explained in “Replay Debugging as a Break‐Through Technology” on page 8, reverse execution is an
interesting and potentially useful feature of the Integrated Virtual Debugger.
What is Reverse Execution?
Replay debugging’s reverse execution feature simulates executing an application backward until it encounters
a debugging event such as a breakpoint or exception, or reaches the beginning of the recording.
Reverse execution is simulated by replaying a recording to arrive at a previous point in time. This process is
slow for long recordings, but you can use replay snapshots to reduce the replay time. You can manually add
replay snapshots or configure Workstation to automatically add them. For information on enabling snapshots,
see “Add Replay Snapshots During a Recording” on page 15.
Start and Stop Reverse Execution
Select VMware > Reverse Continue to enable reverse execution. A status window appears to inform you of
the progress of reverse execution. When you start reverse execution, the virtual machine powers on and off
and replays the execution multiple times.
You cannot stop reverse execution by using Debug > Break All, because the state of the virtual machine at any
given instant might not represent a valid point in time between when reverse execution was initiated and the
previous debugging event. The only way you can interrupt reverse execution is to stop the debugging session.
To stop reverse execution, select Debug > Stop Debugging.
Reverse execution might not function properly with more than four data breakpoints.
How to Improve Reverse Execution Performance
With an understanding of the implementation of reverse execution and the overheads it entails, you can take
steps to improve performance and optimize your debugging experience. During replay debugging, you are
debugging a program at time t in a recording. Reverse execution from time t is implemented by replaying the
recording to some time p prior to t. The reverse execution engine finds the appropriate time p corresponding
to the last debugging event (exception, breakpoint, thread creation, DLL loading) by replaying from the
previous snapshot in the recording back to time p, displaying the events encountered in the recording. If the engine does not find any events, it iteratively initiates the same process from earlier snapshots until an
event is found. Next, the reverse execution engine replays to the time of the last event, at time p, and delivers
the event to the debugger. For the Integrated Virtual Debugger, the state of the target application has evolved
Chapter 2 Using Replay Debugging Mode
Reverse execution includes three kinds of overhead, all of which can be significant yet controllable. The three
are replay overhead, replay snapshot restore overhead, and overhead due to repeated replay steps.
Reverse execution is implemented by replaying portions of the recording. To reduce the replay overhead,
you can add replay snapshots while recording or debugging so that smaller segments of the recording
need to be replayed. If you can identify a point in the recording that you are likely not to go past backward,
place a snapshot there. The snapshot prevents replaying all the recording before this point. Adding more
replay snapshots often reduces the replay overhead, but you must balance this benefit with the added
disk space overhead of replay snapshots and replay snapshot restore overhead.
Replay snapshot restore overhead comes from the fact that every replay step starts by restoring a
snapshot, which takes a nontrivial interval of time. The cost of snapshot restore is primarily determined
by the cost of reading the virtual machine’s RAM and video memory from disk. You can reduce replay
snapshot restore overhead by reducing the virtual machine RAM and video memory if the applications
that you are debugging in the virtual machine allow it. For more information on setting virtual machine
hardware options, see the VMware Workstation Userʹs Manual.
Reverse execution often requires multiple replay steps when the previous event does not cause Visual
Studio to change from running mode to debugging mode. In this circumstance, Visual Studio continues
execution, requiring additional replay steps to find the next previous event. For example, when you set a
conditional breakpoint on a statement so that only the 100th occurrence of the breakpoint is hit, an extra
replay step is required for each occurrence of the breakpoint even though execution only stops on the
100th occurrence. To avoid this overhead, VMware recommends disabling conditional breakpoints while
using reverse execution.
Remote Replay Debugging
If a recording is created on a host without Visual Studio, the Integrated Virtual Debugger can still replay
recordings and perform a replay debugging session using the remote debugging feature. To use remote
debugging, you must run a proxy process on the remote host and configure the Integrated Virtual Debugger.
You must also have a remote desktop application such as Microsoft Remote Desktop installed on the host.
Start the Debugging Proxy on a Remote Machine
The proxy process allows the Integrated Virtual Debugger to connect to the remote host.
To start the debugging proxy on a remote machine
1 Connect to the remote host using a remote desktop application.
2 From the command line on the remote host, run the following command:
C:\Program Files\VMware\VMware Workstation\Visual Studio Integrated Debugger\dclProxy.exe
3 When prompted, enter the passcode to authenticate debugging connections.
Do not use sensitive passwords or the password of your user account. For security reasons, VMware
recommends to log off from the remote machine when you finish your debugging session. You must not
allow dclProxy.exe to run unattended.
Configure Visual Studio to Start Remote Debugging
Remote replay debugging requires additional configuration compared to local replay debugging, but starting
a remote debugging session is the same as for local debugging.
To configure and start the Integrated Virtual Debugger for remote debugging
1 Select VMware > Options.
2 Under Configuration Properties, click Replay Debugging in VM and select General.
3 In the Local or Remote field, Select Remote.
4 In the Remote Machine field, enter the name of the remote machine.
5 In the Remote Machine Passcode field, enter the passcode you provided to dclProxy.
6 In the Virtual Machine and Recording Name fields, enter the virtual machine and recording names. Because the virtual machine is on a remote machine, browsing capabilities are not available. You must
enter the full path to the .vmx file of the virtual machine on the remote machine and the full name of the
recording that you want to debug.
7 To start a remote debugging session, select either VMware > Start Replay Debugging in VM or
VMware > Attach to Process in Recording.
For a local attach, you can select the desired recording from a drop‐down list of recording names and
times. However, for a remote attach, the debugger cannot provide a drop‐down list, so you must type the
name of a recording. Specify only the recording name, without any time information.
Configuration Properties Reference
You access configuration properties from the VMware > Options menu. The Replay Debugging in VM menu
has four sets of options as documented in Table 2‐1, Table 2‐2, Table 2‐3, and Table 2‐4.
General Options
You must set some general properties before you can use replay debugging, such as the virtual machine to use
and the name of the recording that you want to replay. The names of recordings are automatically populated
when you make a recording with Visual Studio.
Table 2-1. General Configuration Properties
Option Name Function
Local or Remote Specifies whether the virtual machine in which you are debugging resides on the same machine
as Visual Studio (local) or another machine (remote).
Remote Machine Specifies the host name or IP address of the remote machine for remote debugging. You can
specify an optional port number, for example myhost:9932. Use this option only with remote
replay debugging.
Remote Machine
Passcode
Specifies the passcode created when the proxy server (dclProxy.exe) was started on the remote
machine for remote debugging. This passcode is for authentication with the remote proxy server.
Use this option only with remote replay debugging.
Virtual Machine Specifies the full path to the .vmx file of the virtual machine in which you are debugging.
Recording to Replay Specifies the name of recording to replay during replay debugging. This field is automatically
populated when Visual Studio creates recordings with VMware > Create Recording for Replay.
Guest Command Specifies the program you want to debug. Normally, you should leave this set to the default <Use
hostʹs Visual Studio project command> indicating that you want to debug the target of the
Visual Studio project. Alternatively, you can select <Run guest command> to specify an arbitrary
program in the guest.
Shared Folders Specifies one or more directories to be shared by the host with the virtual machine when creating
recordings. Insert a semicolon (;) to separate items in a list of name and directory pairs, of the
form <shared_name>=<host_folder_name>. Use this option only when creating recordings.
Host Executable
Search Path
Specifies a list of host folders separated by semicolon (;) that are searched to find the .exe and .dll files. Visual Studio needs access to these files, so you must copy them from the guest to the
host. This option says where to find them on the host. If an .exe or .dll file cannot be found on
the host, a prompt asks for a new location and this option is updated with the folder location.
Guest Login
Credentials
Specifies the login credentials for the guest operating system. If this option is not configured, a
Chapter 2 Using Replay Debugging Mode
Pre-Record Event Options
The pre‐record options pertain to actions taken before a recording and before the target program starts.
You can set properties for creating recordings with Visual Studio by specifying Base Snapshot for Recording.
The snapshot encapsulates the state of the virtual machine before recording begins. If the base snapshot is not
specified, the recording starts from the current state of the virtual machine, powering it on if necessary.
Post-Record Event Options
The post‐record options pertain to actions taken after a recording is created.
Advanced Option
This option is useful when your application runs multiple times in a recording.
Table 2-2. Pre-Record Event Configuration Properties
Option Name Function
Base Snapshot for
Recording
Specifies the snapshot that provides the initial state of the virtual machine before a recording is
created. If a snapshot is specified, the virtual machine is powered off if it is currently powered
on, and the snapshot is restored before a recording is created. If you specify <None>, the virtual
machine is powered on if it is currently powered off, before a recording is created.
Copy Files Lists the files or folders to copy from the host machine to the virtual machine before recording
begins. Insert a semicolon (;) to separate items in the list of host and guest file or folder pairs, in
the form <host_file or folder>=<guest_file or folder>. For example, the host and guest pair C:\testing\mydir\config1.txt=C:\configs\config.txt copies the testing config1.txt
file on the host to the configs\config.txt file in the guest before starting a recording. You can
copy entire folders in the same manner. This configuration property is optional.
Command Line Specifies a command line to run before a recording starts. You can specify multiple commands
by separating them with a semicolon (;). This configuration property is optional. The pre‐record line must specify a command, cscript.exe for example. To run a script,
explicitly specify the script processor command, with the script as a parameter. For example:
perl.exe myscript.pl
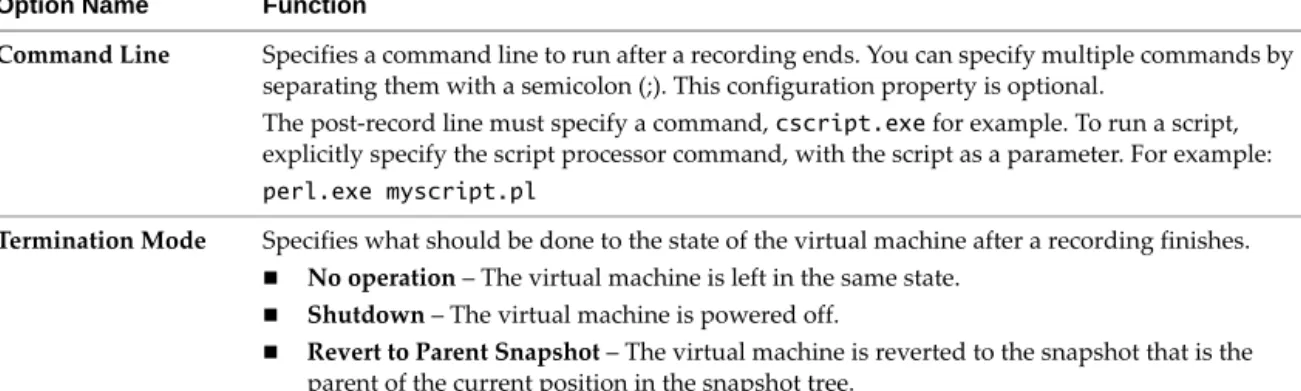
Table 2-3. Post-Record Event Configuration Properties
Option Name Function
Command Line Specifies a command line to run after a recording ends. You can specify multiple commands by
separating them with a semicolon (;). This configuration property is optional.
The post‐record line must specify a command, cscript.exe for example. To run a script,
explicitly specify the script processor command, with the script as a parameter. For example:
perl.exe myscript.pl
Termination Mode Specifies what should be done to the state of the virtual machine after a recording finishes.
No operation – The virtual machine is left in the same state.
Shutdown – The virtual machine is powered off.
Revert to Parent Snapshot – The virtual machine is reverted to the snapshot that is the
parent of the current position in the snapshot tree.
Suspend – The virtual machine is suspended. Table 2-4. Advanced Configuration Property
Option Name Function
Process Instance to
Debug
Specifies which instance of a process in a recording to debug (a single recording could contain
multiple instances of the same process).
Select Ask me when debugging to be prompted which instance you want to debug as they
are encountered during replay.
Type <Enter instance creation order number> to specify the process instance based on the
order in which it was started in the recording. For example, 1st, 2nd, 3rd, and so on. Type <Enter PID> if you know the process ID of the process to debug.
Limitations of Replay Debugging
The following are some limitations of replay debugging mode:
Memory, registers, and control flow cannot be changed while replay debugging.
The infrastructure is limited to 28 breakpoints. Visual Studio internally allocates its own breakpoints,
which reduces the number of available breakpoints. If all breakpoints are allocated, a message appears.
Reverse execution might not function properly with more than four data breakpoints.
Attach to Process in Recording is enabled only if a Visual Studio project is open. If you attempt to attach
to an executable that is different from the startup project command, a dialog box appears so that you can
select an executable on the host.
Suspending an application you are debugging also suspends everything in the virtual machine. The guest
screen output might lag from the state observed in the Integrated Virtual Debugger.
3
This chapter introduces live debugging mode and includes the following sections:
“Overview of Live Debugging Mode” on page 21
“Prepare the Guest for Live Debugging” on page 21
“Configure Visual Studio for Live Debugging” on page 24
“Configure the Integrated Virtual Debugger for Live Debugging” on page 24
“Debug Live Applications in Virtual Machines” on page 27
“Configuration Properties Reference” on page 28
Overview of Live Debugging Mode
The Integrated Virtual Debugger’s live debugging mode simplifies the task of debugging applications in
virtual machines using the live debugging feature of Visual Studio. Live debugging mode works exactly like
Visual Studio remote debugging, except that virtual machines are usually on the same Workstation host
instead of across the network.
Live debugging lets you debug an application in a virtual machine. You can debug using different versions of
Windows, different service packs, various DLLs installed, and so on. Using virtual machines for debugging
provides a convenient alternative to debugging on physical machines. The Integrated Virtual Debugger helps
you manage your virtual assets. The Integrated Virtual Debugger can power virtual machines on and off, start
the application in its virtual machine, attach the debugger to the application, and control the application. When you do live debugging with Visual Studio, you have to manually manage the virtual machine, manage
the files in the virtual machine, start the application to debug in a virtual machine, and attach the Integrated
Virtual Debugger to an application. Live debugging provides the same debugging options as the Visual Studio
remote debugger, however it eliminates some of the tedium of Visual Studio remote debugging.
The live debugging mode differs from replay debugging mode in that the live debugging debugs a live session
of an application, whereas replay debugging debugs a replayed recording of an application. For more details,
see Chapter 2, “Using Replay Debugging Mode,” on page 11. During a single debugging session, you can use
only one mode, live debugging or replay debugging.
To get started with live debugging, prepare the guest virtual machine, configure Visual Studio, and configure
the Integrated Virtual Debugger, as described in the following sections.
Prepare the Guest for Live Debugging
You can manage live debugging configuration settings for each virtual machine in which you run and debug
applications. Virtual machine configuration properties, set in the Integrated Virtual Debugger configuration
pages, determine which virtual machine runs the application and how the application starts.
Configure the Group Policy Settings for Windows
Verify that the group policy is configured correctly for local authentication.
To configure the group policy settings for Windows
Do one of the following:
To configure the guest system’s group policy settings for Windows XP Professional:
a Select Control Panel > Administrative Tools > Local Security Policy > Local Policies and select the
Security Options page.
b Set the Network access: Sharing and security model for local accounts policy to Classic – local users authenticate as themselves.
To configure the guest system’s group policy settings for Windows Vista and Windows 7: a Set Network security: LAN Manger authentication level to Send LM & NTLM responses.
b Set the Network access: Sharing and security model for local accounts policy to Classic – local users authenticate as themselves.
You cannot view the group policy on Vista Home Premium or Vista Home Basic.
Disable or Configure the Windows Firewall
Windows XP SP2 (and later) systems usually have the firewall enabled by default. To debug in a Windows
guest, you must disable the firewall or configure it appropriately. VMware recommends disabling the firewall
if you are on a safe network.
For information about using Windows XP SP2 with the firewall enabled when doing remote debugging with
Visual Studio, go to the Microsoft Support Web site and enter the Microsoft knowledge base article ID 833977
in the Search menu.
Configure User Accounts
To configure user accounts, log in to the guest operating system with an Administrator account, and establish
an appropriate account if necessary.
For more information about how to set up Windows user accounts for live debugging, go to the Microsoft
Developer Network Web site, enter the search keywords Error: Remote Debugger Service On the Target
Computer Cannot Connect Back, and click the first search result.
Communication between Visual Studio and the guest operating system is not initiated until the virtual
machine is powered on and the configured user is logged in. The user runs the Remote Debug Monitor on the
guest, which in turn communicates with Visual Studio on the host.
To prevent a delay, power on the virtual machine and log in to the guest operating system before you debug
in a virtual machine. You can set up automatic login to bypass the login screen when the guest is booting.
Blank Passwords and the Default Password Policy
Windows has a default security feature that helps protect users with blank passwords from network‐based
attacks. Users who do not password protect their accounts can log in only at their physical computer console:
the monitor, keyboard, and mouse that are physically connected to their computer. This restriction applies to
local user accounts only, not to domain user accounts.
For information about how to disable blank password restrictions, go to the Microsoft Support Web site, enter
the Microsoft knowledge base article ID 303846 in the Search menu, and click the first search result.
IMPORTANT The user name, password, and domain name (if not local on both systems) must match on the
host and the guest. If they do not match, the Remote Debug Monitor on the guest cannot communicate with
Chapter 3 Using Live Debugging Mode
Suppress Security Prompts on the Guest System
Running an application from a network share triggers a security prompt every time a shared file is accessed.
VMware recommends that you turn off security prompts on the guest operating system. You can use either Internet Explorer, or edit your registry key, to suppress security prompts.
To suppress security prompts on the guest system with Internet Explorer
1 In the Internet Explorer browser on the guest, select Tools > Internet Options > Security > Local Intranet
and click Sites.
2 Click Advanced and add a new Web site:
file://*..host
To edit a registry key to suppress security prompts
1 In the guest system, open the registry with regedit. 2 Add a new key called .host under
HKCU\Software\Microsoft\Windows\CurrentVersion\InternetSettings\ZoneMap\Domains.
3 In the .host key, create a DWORD Value called file and set its value to 1.
Install the Microsoft .NET Framework to Support Managed Applications
To debug managed C++, C#, and Visual Basic applications, which use the Common Language Runtime, the
guest must have the Microsoft .NET Framework version 2.0 or later is installed. If not, install it.
Rename Virtual Machine Computer Names
Computer names must be unique on all virtual machines. If the names are not unique, the Integrated Virtual
Debugger cannot find the appropriate virtual machine on the network.
To rename virtual machine computer names
1 On the guest system, select Start > Control Panel > System.
2 Click the Computer Name tab. 3 Click Change.
4 Type a unique name and click OK.
Install the Remote Debug Monitor Manually on Windows 98 Guests
To enable debugging in a virtual machine, the Integrated Virtual Debugger shares the host folder that contains
the Remote Debug Monitor, and runs that Remote Debug Monitor on the guest. On Windows 98, you cannot
run the Remote Debug Monitor (or any executable file) from a shared folder. An attempt to do so generates
the following error:
The remote debugger is not properly installed. On a Windows ME or Windows 98 computer, the debugger cannot be run off a file share. Run the remote debugger setup.
Manually install and start the msvsmon.exe Remote Debug Monitor executable file on the guest operating
system before you start a debugging session.
To install the Remote Debug Monitor manually on Windows 98 guest systems
Use one of the following methods to install the Remote Debug Monitor:
Create a mapping to a network share with the host where msvsmon.exe is located.