MINDS51:
Information in this document is subject to' change without notice and does not represent a commitment on the part of Mindset Corporation.
MINDSET is a registered trademark of Mindset· Corporation.
MS-DOS is a trademark of Microsoft Corporation. Lumena is a trademark of Time Arts Inc.
LIMITED
WARRANTY
Mindset Corporation ("Mindset") warrants the product it manufactures for a period of 90 days from the date of purchase. During the warranty period, Mindset at its option will repair or replace components that prove to be defective at no charge provided the product is returned to an authorized Mindset dealer.
This warranty does not apply if, in the opinion of Mindset, the product has been damaged by accident, misuse, misapplication, or as a result of service or modification by other than an authorized Mindset dealer.
NO OTHER WARRANTIES ARE EXPRESS OR IMPLIED,
INCLUDING BUT NOT LIMITED TO THE IMPLIED
WARRANTIES OF MERCHANTABILITY AND FITNESS FOR A
PARTICULAR PURPOSE. ANY IMPLIED WARRANTIES ARE
LIMITED IN DURATION TO THE WARRANTY PERIOD SET
FORTH ABOVE.
IN NO EVENT SHALL MINDSET BE
LIABLE FOR LOST PROFITS, LOSS OF GOODWILL, OR
ANY OTHER SPECIAL OR CONSEQUENTIAL DAMAGES.
This warranty gives you specific legal rights. You may also have other rights, or certain
FEDERAL COKMUNICATIONS OOMMISSION RADIO FREQUENCY INTERFERENCE STATEMENT
Contents
Section 1 Introduction
The Mindset Image Capture System What You Need
How to Use This Guide
Section 2
Setting Up and Using the Image Capture Module
1
2
3
Before Setting Up Your System 5
The Image Capture Module 5
How to Set Up the Image Capture Module 7
The Display Control Switch 10
Section 3
Capturing Images
Backing Up Your
Image Capture Utility Diskette Making a System.Diskette From Your
Image Capture Utility Diskette Installing the Image Capture Utility
on a Hard Disk
Loading the Image Capture Utility The Utility Menu
Some Technical Information Error Messages
11
12
13
14
Appendix A Specifications
Figures
Figure 2-1: Figure 2-2:
The Image Capture Module Connecting the Image Capture
Module
21
6
Section 1
Introduction
The Mindset Image Capture System
The Mindset Image Capture Module and its
companion software, the Image Capture Utility, enables you to capture images from any standard NTSC video source: I/2-inch (consumer-grade) and 3/4- or I-inch (professional) videotape; a consumer or professional studio video camera; a video disk; a TV broadcast; even another Mindset Computer System. Because each image is captured through "flash digitizing"--that is, at NTSC field rate or in real time--your Mindset can "grab" images from a moving videotape or disk or
off the air. .
With a single composite monitor, the module's display control (C-X) switch allows you to alternate between viewing the external source video and the captured image. If you have two monitors, you can use the module's "loop-through" capability to view both the external source video and a captured image
simultaneously.
Image Capture System User's Guide
The Image Capture Utility software is a simple, . menu-driven program. It allows you to capture
an image with a single keystroke, map its colors .in the way you want, and store it on diskette·
or hard disk for later use or enhancement using Mindset Lumena or Designer graphics software.
What You Need
Your Mindset Image Capture System consists of the following:
o Mindset Image Capture Module
o Mindset Host Adapter Interface Module o Mindset Image Capture Utility diskette o AC power adapter
o One data cable with 37-pin connectors o Three standard phono jack cables
In addition, you need a Mindset System Unit and Expansion Unit with at least 256K total RAM and Mindset MS-DOS. And you need a source for the video images you want to capture: a videotape player/recorder or videodisk player, a
television set with a composite video output jack, a video camera, or another Mindset Computer System.
To display your images, of course, you need a monitor. To use the "loop-through" capability of the module, you also need a second monitor, which ~ be composite.
Image Capture System User's Guide
How to Use This Guide
In addition to this "Introduction," this guide consists of two sections and an appendix:
o Section 2, "Setting Up the Image Capture Module," provides step-by-step instructions for connecting the module to your Mindset Computer.
o Section 3, "Capturing Images," explains how to load the Image Capture Utility into your computer and how to use it to capture and manage images. Also included here is some technical information on how images are captured and stored, and a list of error messages you may get and what to do about them.
o Appendix A, '~pecifications," lists technical specifications for the Mindset Image Capture System.
Before you set up and begin using your Image Capture Module, it's very important that you first familiarize yourself with the normal set-up and operation of your Mindset Computer System--see your Mindset Computer System Operation Guide.
Section 2
Setting Up and Using the Image Capture Module
Before Setting Up Your System
Before setting up and using your Image Capture Module, you should become familiar with your Mindset Computer System and with MS-DOS, the disk operating system used with the Mindset. If you have not already done so, set aside this manual until you've set up and learned to operate your Mindset.
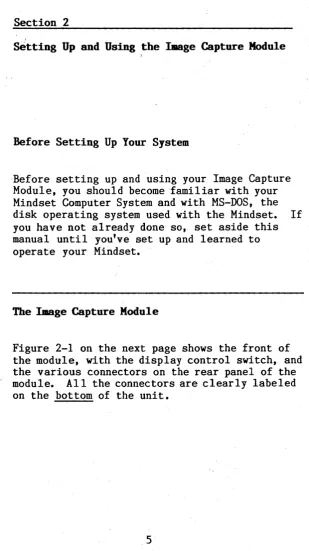
The Image Capture Module
[image:11.403.73.383.16.568.2]Image Capture System User's Guide
...
~ ::I
a: 0 0 0
5
S w w zr=- ~
u Q Q 0 _w ~
w :; :; 0 0(1)
~
Z ..I ..I W wQ
Z C( C( Q Q~ ~ 0
0 z z :; sa a: a::I:
u a: a: 0: O::E w ~g
~ w I!! :E :EO
~
~ ~ w )( w 0 oa: 03=
u u!!:. 11.(1)
lot
I
\01
,JI
1$1 1$1
Iii
~
I
DISPLAY
[image:12.413.11.358.31.472.2]Image Capture System User's Guide
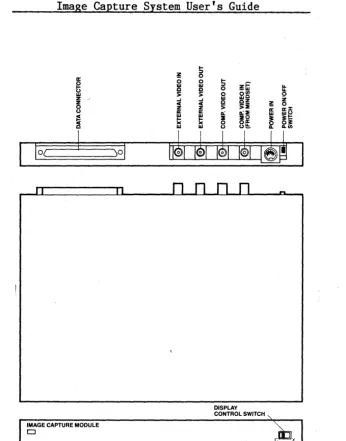
How to Set Up the IJIage Capture Module
Follow these steps to set up your Image Capture Module in either of two ways: for switching between display of your external source video and a captured image on a single composite monitor, or for simultaneous display of the external source video and a captured image on separate monitors.
1. Turn off your Mindset.
2. Plug the Host Adapter Interface Module into the right-most I/O module port (as you look at the back of the unit) on the back of the Mindset System Unit or into any I/O module port on the back of the Expansion Unit. Make sure that the module is securely seated in the port.
3. Connect the 37-pin connector on one end of the Image Capture data cable to the matching connector on the Host Adapter Interface Module. Connect the 37-pin connector on the other
end of the cable to the matching connector labeled DATA CONNECTOR on the rear panel of the Image Capture Module. Tighten the screws on both connectors and make sure that the cable is securely fastened.
4. Use a standard phono jack cable to connect your external video source to the EXTERNAL VIDEO IN connector on the rear panel of the Image Capture Module.
MINDSET COMPUTER SYSTEM
-.' MONITOR
.... _________ , ____________ .... Q
DISPLAYTO~ ~ Iii
I
A CAPTURED_ I ~ COMPOSITE"
o g! I -c::::/ IMAGES.
~~~~
Ie
al
d
~!i
00MONITOR co ~o i
SOURCE VIDEO A EXTERNAL VIDEO OUT 8 [ i ~ COMPOSITE DISPLAY
~- .... - - - - - - -, I TO MONITOR
I I COMPo VIDEO OUT' [
a
SOURCE VIDEO00 EXTERNAL I rl---·---·-·--- ~ ~fai~~TURED
VIDEO SOURCE
veR
.1
~ffiffiEI
~f;:R
I.-
I
VIDEO
r41l
CAMERA
LJ
COMPOSITE VIDEO IN I I I POWER IN
I I i 00
ACADAPTER
IMAGE CAPTURE MODULE
Image Capture System User's Guide
omit step 6. If you want to use one monitor to display your captured images and a separate monitor for simultaneous display of your external source video, skip step 5 and go to step 6.
5. To allow switching between your external source video and captured images on a single composite
monitor--a. Use a standard phono jack cable to connect the CaMP VIDEO connector on the back of the Mindset System Unit to the CaMP. VIDEO IN (FROM MINDSET) connector on the rear panel of the Image Capture Module.
b. Use a second phono jack cable to connect th~ CaMP. VIDEO OUT connector on the rear panel of the Image Capture Module to your composite monitor.
6. For simultaneous display of your captured images on one monitor and your external source video on a separate
monitor--a. Connect the first monitor to the appropriate VIDEO connector (CaMP VIDEO, TV/RF, or RGB VIDEO) on the back of your Mindset System Unit.
b. Use a phono jack cable to connect the EXTERNAL VIDEO OUT connector on the rear panel of the Image Capture Module to your second moni tor, which must be composite.
Image Capture System User's Guide
control switch [see below] to
I.)
7. Plug the 5-pin DIN connector from the AC power adapter into the matching POWER IN
connector on the rear panel of the Image Capture Module, and the standard AC power cord into a wall outlet.
8. Turn on your Mindset and your Image Capture Module.
The Display Control Switch
If you're using a single composite monitor for alternate display of your external source video and captured images, set the display control (C-X) switch on the Image Capture Module to X to view the external source video, to C to view a captured image.
Section 3 '
Capturing '.lIIages
Backing Up Your Image Capture Utility Diskette
Before you start using the Image Capture
Utility, it's a good idea to make a backup copy. Then you can use the copy as your working
utility diskette, and keep the original in a safe place, to use in case your working copy is damaged or lost. Here's how to make a copy:
1. Load Mindset MS-DOS into your computer. Set the date and time, if necessary (or press RETURN twice).
(If you're using an earlier version of MS-DOS than 2.11, you must format your blank diskette before using the DISKCOPY command to copy the utility. For complete details on formatting and copying diskettes, see your Introductory Guide to MS-DOS and MS-DOS Reference Manual.)
2. With your MS-DOS System Diskette in drive A, and the A) prompt on the screen, type DISICOPY
A: B:
and press RETURN. Follow the prompts that appear on the screen for placing your original utility diskette (the "source" diskette) inImage Capture System User's Guide
When your backup copy is complete, label it. Store the original in a safe place, and use the backup as your working copy of the utility.
Making a System Diskette From Your Image Capture Utility Diskette
Unless you're installing the utility on a hard disk (see next page),' you'll probably want to make your working copy of the utility into a system diskette. For everyday use, you'll then be able to load the utility without first having to load MS-DOS. All you need to do is copy a few DOS system files from your MS-DOS System Diskette. Here's how:
1. With MS-DOS loaded, your MS-DOS System Diskette in drive A, and the A> prompt on the screen, insert your working copy of the utility in drive B. (If you have a hard disk, boot MS-DOS from the.hard disk--the C> prompt will appear.) Then type SYS B: and press RETURN.
2. When the A> (or C» prompt reappears, type COpy COMMAND.COM B: and press RETURN.
(For complete details on transferring MS-DOS system files, see your MS-DOS Reference Manual.)
Image Capture System User's Guide
Installing tbeI.age Capture Utility on a Hard Disk '
Here's how to install the Image Capture Utility on a hard disk:
1. Boot MS-DOS from your hard disk. Set the date and time, if necessary (or simply press RETURN t:wice).
2. To place the utility in an existing
directory-with the C> prompt on your screen, type:
CD <directory name>
then press RETURN.
To make a directory for the uti'lity, enter the following commands. Al ways wait for the C> prompt to reappear before typing in the next command in the sequence, an4 press RETURN after each entry.
CD\
MD <directory name> CD <directory name>
3. To copy the utility onto the hard disk, place your utility diskette in drive A and, with the C> prompt on your screen, type:
ropy
A:*.* C:Image Capture System User's Guide
Loading the !.age Capture Utility
Here's how to load the Image Capture Utility into your computer system from a diskette:
1. If you have not made your utility diskette into a system diskette, you must first load MS~
DOS into your system. If you have made your utility diskette into a system diskette, simply place it in drive A and turn on your system (or press ALT-RESET, if your system is already on). Set the date and time, if necessary (or simply press RETURN twice).
2. With the A> prompt on the screen and your utility diskette in drive A, type CAPTURE and press RETURN. As the utility loads into your computer, a copyright screen appears, along with the prompt to press any key to continue. Press any key--the utility menu appears.
To load the Image Capture Utility into your computer system from a hard disk, first boot MS-DOS from the hard disk. Set the date and time, if necessary (or simply press RETURN twice). Change to the directory in which you placed the utility on your hard disk--with the C> prompt on your screen, type:
CD <directory name>
then press RETURN. Then, to load the program--with the C> prompt on your screen, type:
Image Capture System User's Guide
your computer, a copyright screen appears, along with the prompt to press any key to continue. ·Press any·key--the utility menu appears.
The Utility Menu
A single main menu gives you access to all the functions of the Image Capture Utility. To select any command on the main menu, first position the cursor within the box containing the command you want to execute--you may use either a Mindset Mouse or the cursor direction keys at the lower right of your keyboard to guide the cursor. Then press either button on the mouse or the RETURN key on the keyboard.
To return from any command sub-menu to the utility main menu, press the ESC key on your keyboard. To exit from the utility main menu to MS-DOS, press the ESC key on your keyboard.
Following are instructions for using each
command. It's recommended that you read through them before beginning to use the utility; as you become more experienced in using your Image Capture system, you'll develop familiar sequences of commands.
Image Capture System User's Guide
captured in the Image Capture Module's memory buffer, transferred to the capture buffer in the Mindset system memory, mapped to the Mindset display mode, and displayed on your screen. How the image is mapped to the display mode can be . controlled by the CONVERT and D MODE commands--the default display mode is POPULAR (see below).
CONVERT
This command converts the image stored in your system's capture buffer to a display format, using the color palette selected through the D MODE command, and displays it on your monitor. When you execute CONVERT, each of the possible 4096 colors is mapped to one of the 16 colors of the palette chosen through D MODE, and the
captured image is displayed accordingly.
VIEW
While the utility menu is onscreen, the colors of a captured image may be distorted. When you execute this command, the utility menu is
removed from the screen to give you an
unobstructed and undistorted view of a captured image. You may bring back the menu display by pressing either of the mouse buttons or any key on the keyboard; you can also toggle the menu on and off by pressing the space bar on the
keyboard.
D MODE (Display MODE)
Image Capture System User's Guide
(the mapping is executed prior to display when you execute the CONVERT command, described above). If you select the POPULAR mode, the system selects a 16-color palette based ·on the 16 colors most used in the captured image. If you select the FIXED mode, the system maps your image according to the current color palette. In turn, the current palette may have been selected from the previous image using the POPULAR mode, or may be a palette that you've loaded from diskette using the LOAD P command, described below. (POPULAR is the default mode.)
Use this command to toggle between the TV display mode (for television sets, composite monitors, and analog RGB monitors) and the monitor display mode (for TTL RGB monitors).
SAVE D (SAVE Display)
Image Capture System User's Guide
SAVE F (SAVE File)
Use this command to save captured images in the capture buffer ~ In their "raw" form, images in the capture buffer may be composed of up to 4096 colors. Though the Mindset display m~des
cannot handle that many colors, you may wish to store images in their original form for output on high-resolution printing and other devices. See "Some Technical Information" (next page) for details on how captured images are formatted; and see SAVE D, above, for details on storing images for later editing or enhancement with Lumena, Designer, or MGI.
LOAD F (LOAD File)
This command loads a file stored using SAVE F . (described above) into the capture buffer. You
may then map the colors of the image and display it using CONVERT and VIEW (also described above).
SAVE P (SAVE Palette)
Use this command to save the current color palette (selected through the D MODE command, described above) as a Lumena color map. If you specify no extension when naming the file for storing the palette, the system supplies the standard Lumena .MAP extension. See your Lumena User's Manual for details on palettes and color mapping.
Image Capture System User's Guide
Image Capture system; you must specify the filename of the palette file.
Some Technical Information
The Image Capture Utility uses two basic data formats. The first is that of an image captured from an external video source, referred to in this guide as the contents of the capture buffer. This format consists of one data word for each of the 64,000 pixels captured (in 320 by 200 resolution) by the Image Capture Module. Each word consists of the following three
fields:
bits 0 - 3 bits 4 - 7 bits 8 - 11
red green blue
(The remaining bits 12 - 15 are all 0.)
Image Capture System User's Guide
Error Messages
Listed here are the two error messages you may get when using the Image Capture Utility, with suggestions for correcting each problem. Any other error messages that appear are system-related--see your MS-DOS Reference Manual.
No Video Input
A timeout has occured while the system was attempting to capture an image. Check all the connections in your system, and make sure that your external video source is operating
properly.
File I/O
Appendix
Specifications
Listed here are technical specifications for the Mindset Image Capture Module.
o Video input: 75 ohm--any standard signal
from: /
--1/2-. 3/4-, or I-inch videotape
(consumer or broadcast grade) --video (laser) disk
--video camera (consumer or broadcast grade)
-TV
broadcasto Video output: 75 ohm-video loop-through to allow viewing of image to be captured
o Capture resolution: 320 by 200 by 12 (4096
colors per pixel)
o Display resolution: 320 by 200 by 4 (16
colors displayed simultaneously from a palette of 512)
o Capture time: 1/60 second
o Color mapping time (Image Capture Utility): approximately 3 seconds
o Dimensions: 12" wide by 10" deep by 1.1