Apache Server Survival Guide
Table of Contents
About the Author ●
Part I:
Getting Started: Installation and Configuration●
1Why the Apache Server? ●
2Installing and Configuring the Apache Serve r ●
3Organizing Your Web Site ●
Part II:
Beyond the Basics: Advanced HTTP Server Funct ionality●
4Virtual Hosts ●
5CGI (Common Gateway Interface) Programming ●
6Server Side Includes (SSI) ●
7Third-Party Modules ●
Part III:
Complete Reference: Apache Configuration in Detail●
8Apache Configuration Overview ●
9Apache Server Core Directives ●
10Apache Modules ●
Part IV:
Keeping Up: Web Server System Administration●
11Basic System Administration ●
12 Web Server Performance Tuning ●
Part V:
Security: Options & Procedures●
14Secure Web Servers ●
15Access Control and User Authentication ●
16Web Server Security Issues ●
Part VI:
Other ReferencesAUn-CGI Version 1.7 Documentation ❍
BManaging Virtual Domains with sendmail V8 ❍
CFastCGI ❍
DHTML Reference Guide ❍
EDNS and BIND Pr imer ❍
Apache Server Survival Guide asgfm.htm
About the Author
Manuel Alberto Ricart is one of the founders of accessLINK, inc., a high-technology firm that provides Internet and Web consulting services worldwide.
Alberto, has been involved with computers since the late 70s when he was introduced to programming on a then state-of-the-art IBM system 32, which had a whopping 32KB of RAM and a tiny hard disk. Since then, Alberto has developed software products for Macintosh and NEXTSTEP, as well as provided UNIX and PC system administration support to a wide range of clients since the mid-80s.
In 1992, he founded a software company, SmartSoft, Inc., that develops a wide range of commercial shrink-wrap software for NEXTSTEP/OPENSTEP (UNIX) operating systems. Their products are sold worldwide.
In 1995, he co-founded a second firm dedicated to building Internet solutions that allow companies to harness the Internet for business. Their technologies range from simple static Web publishing to dynamic content-driven Web systems that use database sources for their information infrastructure. AccessLINK also provides a number of hosting products and services.
Alberto specializes in Internet and Web core technologies such as the Apache Web server and all other technologies required to support it, such as UNIX network connectivity, administration, training, and support. Other responsibilities include the invention and design of software products and tools.
Apache Server Survival Guide asgpt1.htm
Part I: Getting Started: Installation and
Configuration
Why the Apache Server?
●
Installing and Configuring an Apache Server
●
Organizing Your Web Site
Apache Server Survival Guide asg01.htm
What Is a Web Server? ■
Commercial Versus Freeware ■
Ease of Installation ■
Ease of Configuration ■
Ease of Extending or Customizing Some Aspect of the Server ■
Features ■
Size of the Installed Base ■
Ongoing Development ■
Performance and Resource Consumption ■
Secure Transaction Support ■
Source Code Availability ■
Technical Support ■
Third-Party Support ■
Summary ■
1
What Is a Web Server?
A Web server is the server software behind the World Wide Web. It listens for requests from a client, such as a browser like Netscape or Microsoft's Internet Explorer. When it gets one, it processes that request and returns some data. This data usually takes the form of a formatted page with text and graphics. The browser then renders this data to the best of its ability and presents it to the user. Web servers are in concept very simple programs. They await for requests and fulfill them when received. Web servers communicate with browsers or other clients using the Hypertext Transfer Protocol (HTTP), which is a simple protocol that standardizes the way requests are sent and processed. This allows a variety of clients to communicate with any vendor's server without compatibility problems.
Most of the documents requested are formatted using Hypertext Markup Language (HTML). HTML is a small subset of another markup language called Standard General Markup Language (SGML), which is in wide use by many organizations and the U.S. Government.
HTML is the lifeblood of the Web. It is a simple markup language used for formatting text. Browsers interpret the markup information and render its intent to the best of their abilities. More importantly, HTML allows linking to different documents and resources; this is the hypertext portion of the Web. Hypertext allows a user to refer to other documents stored in the same computer or in a computer located in a different part of the world. It allows information to be almost tridimensional. Not only can you read sequentially, but you can jump for more elsewhere.
The information retrieval process is completely transparent to the user; it's easy and free-form.
Navigation through this sea of information is in an ad hoc way. While the results and implications of this new learning process are yet to be seen, it sure is powerful. It provides a seamless exploration experience of documents and services. This is what the Web is all about. It allows you to gather information easily and presents it in a way that it is easy to digest. It's graphic, and it can combine sound and moving pictures.
You can learn more and find related issues that spark your interest; it's interactive. Instead of paging through a book (still a good thing), you can use the computer to remove much of the legwork associated with retrieving related information, and it allows you to explore the material that fits your needs or mood. It's like TV, but you get to choose the programming.
The Web server is responsible for fetching you this information. While Web servers may have been simple at some point, they are not anymore. All Web servers are not created equal.
If all the sudden you were asked to set up a Web site, you would be confronted with a variety of issues that you would need to resolve before you code your first HTML page. The most important issue, and probably the reason why you bought this book, is deciding which server software to use. Given the myriad of Web servers available, the choice is undoubtedly difficult.
Commercial versus freeware Ease of installation
Ease of configuration
Ease of extending or customizing some aspect of the server Features
Size of the installed base Ongoing development
Performance and resource consumption Secure transaction support
Source code availability Technical support
Platform support Third-party support
Commercial Versus Freeware
Apache is freeware; therefore, you invariably have to confront the issue of free software. Is free software really cheap? After all, who do you go to if you have problems? What are the odds of the product not being supported? Free software usually has sparse documentation and no direct technical support. However, there are a few software packages out there that are superbly documented, supported, and maintained. In my view, Apache belongs to that list.
Ease of Installation
If you have a little understanding about UNIX, know how to use an UNIX editor such as vi, pico, or emacs, and are not afraid of the shell, Apache is a great choice. It is easy to install and configure, even for people that are not too savvy on the UNIX ways. The software is available in two types: precompiled and in source form.
Precompiled binaries are available for AUX 3.1
BSDI 2.0
●
FreeBSD 2.1
●
HP-UX 9.07
●
IRIX 5.3
●
Linux
●
NetBSD 1.1
●
NEXTSTEP
●
SolarisX86 2.5
●
Solaris 2.4
●
Solaris 2.5
●
SunOS 4.1.3
●
UnixWare 1.1.2
●
There's also an OS/2 version. Rumor has it that a Windows NT version of Apache is also in the works. Given the growing popularity of both Apache and Windows NT in corporate networks, such a port would help to capture an even bigger segment of the Web server market.
If your OS/hardware is not available precompiled and you have an UNIX compiler such as GNU's GCC, there are configuration directives for almost every UNIX variant imaginable. All you need to do is set up a few options, type make, and your software will be built. The next chapter walks you through the
process of compiling and installing your Apache server.
Installing a Web server—be it through a graphical user interface (GUI)-based Netscape product or
Apache—is simple. The GUI tools may give more reassurance to people who are afraid of command line interfaces, but in general, configuration and installation are fairly straight forward in either version. If you are not sure what a configuration value is, more than likely you will be stumped in either
Ease of Configuration
Configuring Apache is very easy to do. Apache utilizes three configuration files; all of which are already preset to safe default behaviors. You just need to specify a few file locations, and name your server so that Apache can find its configuration files and the location of the document tree it is serving. To do this, all you need is a good UNIX text editor that you feel comfortable with. Chances are your version of UNIX has some sort of graphical editor you already feel comfortable with. Chapter 2, "Installing and Configuring an Apache Server," explains all the basic configuration steps you need to take to get your Apache server running fast. It's easy to do.
Ease of Extending or Customizing Some Aspect of
the Server
If you are customizing some aspect of the server, you'll love Apache. Its source code is clearly written but is a little thin on the documentation side. The Apache server is implemented as a set of software modules. Creating a new module that modifies the behavior of the server in some way will require less to learn on your part. There's a growing list of freely available third-party modules. More than likely you can find a module that implements the functionality you need.
Features
The Apache server implements the same, if not more, features than the equivalent commercial Web server, and basically every aspect of the Apache server's functionality is configurable. This makes it easy to get the server to behave the way you want or need for your site.
Some of the most important features include the following: It's a plug-and-play replacement for NCSA Web servers.
●
Fixes bugs and security holes found on NCSA 1.3 and 1.4 servers.
●
It's very fast, much faster than NCSA servers.
●
Compiles better with the current HTTP specifications. By the time you read this, Apache should be unconditionally compliant with HTTP/1.1 specifications.
●
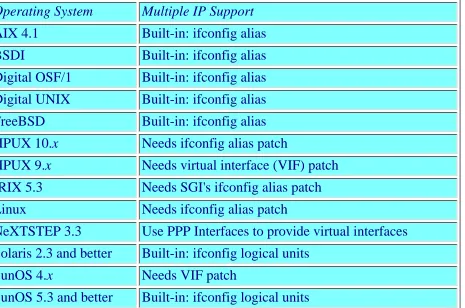
Apache provides several forms of implementing multihomed and virtual servers. A multihomed
server serves requests under various names, such as http://www.x.com and http://www.y.com. Both of which are resident on the same computer and are served by the same process. One of these is a non-IP intensive method that works in conjunction with popular browsers.
You can customize the error responses with the use of files or scripts. The server will intercept an error and display the specified file or execute a CGI that could perform an on-the-fly diagnosis of the problem. This allows your server to return more meaningful error messages to visitors or to perform some special action in response to an error condition.
●
Apache servers can automatically negotiate content retrieval with a browser and can serve the most appropriate out of various sets of equivalent documents. This allows the server to retrieve the
document having the best representation that the client is willing to accept. For example, when serving documents in English and Spanish, depending on your browser settings, Apache will automatically retrieve the version most appropriate for you.
●
Apache includes an automatic index file selection. You can instruct the server to return any of several resources for directory requests (http://www.company.com/). The server will search for a matching index file(s) and return the first one found to the client. Should none of the specified files be found, the server can be configured to produce an automatically generated listing of all the resources available in that directory.
●
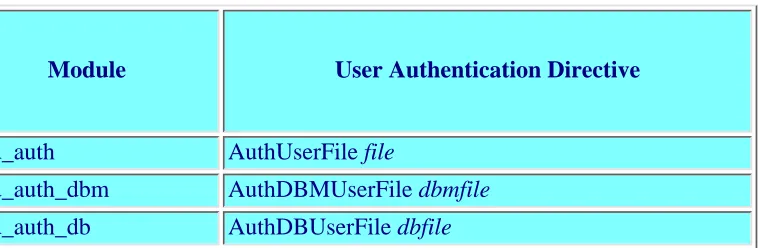
Apache provides several user authentication—methods ranging from flat-file user databases, to indexed files and relational database support. Third-party modules allow Apache to interface with many popular network authentication systems.
●
Size of the Installed Base
At the time of this writing, Apache was the leader in Web server installed base. According to the August 1996 Netcraft survey (http://www.netcraft.co.uk/Survey/Reports/), Apache brand Web servers comprised 35.68 percent (37.16 percent if you add all the secure versions of the server) of the Web servers in their survey. That doesn't seem like much until you realize that the competition is far behind, and the entire Web server market is dominated by three products:
Server Brand Market Share Apache 35.68%
NCSA 18.25%
CERN 6.22%
Microsoft Internet Information Server 5.49% WebSite 3.40%
WebSTAR 1.95% BESTWWWD 1.68% Apache SSL US 1.43% Purveyor 1.38%
WebSitePro 1.07%
The other remaining 424 server brands didn't even get one percent of the market share! The Netcraft survey currently includes 342,081 servers. Check the details of the survey for yourself on Netcraft's Web site because this information changes monthly.
Ongoing Development
The Apache server was originally based on the NCSA code. Its development was started because of some security problems associated with the NSCA server and concerns for having an UNIX Web server that implemented some special features. Also driving the effort was a concern to somehow guarantee that a free UNIX server would always be available to the UNIX community. The Apache group was then formed, which developed a series of patches for the NCSA server—hence the name, Apache, from A PAtCHy server.
The Apache server has undergone several releases since its initial inception. There have been 32 different releases including five beta releases for version 1.1.0—the current version at the time of this writing is 1.1.1. However, by the time this book is printed, version 1.2 should be available. The Apache team develops new revisions faster than I can document. Bug fixes are addressed almost immediately. More importantly, advisories from Computer Emergency Response Team (CERT) Coordination Center and other parties are corrected immediately to ensure that no security problems are present in the server. In terms of total code lines, the server has more than doubled from approximately 10,000 lines in its initial NCSA-fixed version, to over 25,000 in its current released incarnation (these counts include comment lines). In its current form, it bears little resemblance to the NCSA server; it's a whole new animal.
Performance and Resource Consumption
The Apache server offers superior performance than the NCSA server. It has a pre-forking model that manages a configurable amount of child processes. A preforking model is one where server processes are waiting to answer requests. Many servers start a process only when they receive a request. Once the request is fulfilled, the server process dies, requiring this cycle to start all over with the next request. Under UNIX, forking (launching) a process can be very expensive. It takes time that a busy server
doesn't have and creates an impact on the system that further aggravates performance. By preallocating a number of servers to wait for requests, Apache can respond quickly and more efficiently. By reusing already available servers to respond to new requests, Apache is able to gain additional performance because it spends more time serving requests than setting up and cleaning after itself.
Using a conservative approach, the number of children processes changes dynamically. As server demands change, the number of processes is adjusted accordingly. Children processes are reused for a certain number of connections after which the parent server process kills them and recycles those resources with a new process.
Apache also implements a new HTTP 1.1 draft feature: Keep-Alive persistent connections. (Apache 1.2 is fully HTTP/1.1 compliant.) Keep-alive allows a single TCP connection to serve several requests from a client. The original model instigated a new connection for each request, requiring the overhead of starting and closing a Transmission Control Protocol (TCP) connection with the server for each element in a page. If an HTML page referenced five images, a total of six different requests would be generated. Under the new persistent connection scheme, the six elements are transmitted through the same TCP connection. This approach increases performance on pages that contain multiple images by as much as 50 percent. However, this feature only works with supporting browsers (currently Netscape Navigator, Spyglass, and Microsoft's Internet Explorer) that provide browser support for this feature. Also,
Keep-Alive connections only work if the size of a file is known beforehand, meaning that output from a CGI program doesn't benefit from the new connection model.
Secure Transaction Support
Source Code Availability
Following UNIX's tradition of source code availability, Apache's source code is distributed with every copy at no extra charge, making it possible to compile your own customized version easily. This allows you to compile a version of Apache for a nonpopular UNIX box. Source code availability invariably plays an important role in UNIX software acceptance. On sites where stringent security is important, system administrators have the ability to examine the source code line by line, thus ensuring no undesirable effects or hidden security risks are present.
Technical Support
Great technical support for Apache is available from Usenet at comp.infosystems.www.servers.unix. Many members of the Apache team answer questions there regularly.
To search for questions that may have been already asked, surf to http://www.dejanews.com. Dejanews is a useful Usenet database. It archives all USENET newsgroups and has a fast search engine that allows you find the information you need in seconds. If your question has been asked before, it will be there. Commercial support for Apache is available through a number of third-party organizations. One of the most popular is available from http://www.ukweb.com. However, it is expensive (around $1,500 per year).
Third-Party Support
Because of Apache's modular design, many third-party developers have programmed modules to meet their specific needs, such as custom authentication modules, embedded Perl interpreters, SSI scripting extensions, and so on. Chapter 7, "Third-Party Modules," covers many of the more important ones. Chances are good that something you need has already been developed by someone else. If the module you need was not included with the Apache release, you can probably find what you need at
http://www.zyzzyva.com/erver/module_registry/
Support for setting the UID and GID of executing CGI scripts User authentication using UNIX system account databases Enhanced Server Side Include (SSI) modules
Embedded Perl interpreter Kerberos-based authentication Character set translators
Postgres95 and mSQL database user authentication modules Web page counters
Extended log formats NIS authentication
URI/URL rewriting modules Tcl scripting processor
CGI module alternatives
Summary
The most important reason to use Apache should be subjective. It should be based on how Apache fits
you. Software evaluation is like test-driving a car. You wouldn't buy a car just by looking at the brochure.
To feel how you like the server, you need to test-drive it.
Luckily, most of the Web servers out there have some sort of demo version available. Unless you are going to customize some portion of the Apache server, such as writing a custom module, your
commitment is small. Should a better product for UNIX appear, your HTML documents would migrate effortlessly. So your risk is minimal. To avoid a crap-shoot, test-drive the software and deploy on the basis of your experiences with it. Experience is your best guide.
While it is impossible to determine in a few hours if a solution will be the right one for you, the Internet is a close knit community of software junkies. Make use of the collective knowledge. Ask questions on Usenet and read the frequently asked questions (FAQ).
Installing a Precompiled Server
■
Installing from the Source
Editing the Configuration File
■
Running the Configure Script
■
Running make
■ ■
Runtime Server Configuration Settings Editing httpd.conf ■ Editing srm.conf ■ Editing access.conf ■ ■
Configuring an inetd Server Configuring inetd
■ ■
Running the Web Server for the First Time Starting Up a Standalone Server
■
Starting Up an inetd Server
■ ■
Starting and Stopping the Server The start Script
■
The stop Script
■
The restart Script
■
Auto-Starting the Web Server at Boot Time
■ ■
Testing the Newly Installed Server
■
Configuration File Listings src/Configuration File
■
The Server Configuration File: conf/httpd.conf
■
The Resource Configuration File: conf/srm.conf
■
The Global Access Configuration File: conf/access.conf
■ ■
Summary
■
2
Installing and Configuring the Apache Server
http://www.apache.org). A copy of the latest release available at the time this book was written (Apache 1.1.1) is included on the CD-ROM that accompanies this book.
If you don't have access to a compiler, you can still install Apache provided that you can find a precompiled version of the server that works with your hardware and operating system. I have included the precompiled servers I found at the Apache group's Web server, including AUX 3.1, BSDI 1.1 and 2.0, FREEBSD 2.1, HPUX 9.07, IRIX 5.3, Linux, NETBSD 1.1, SOLARIS 2.4, SunOS 4.1.3, and UNIXWARE 1.1.2., and others.
Fig. 2.1 The Apache home page. Notice this site is mirrored around the world.
The Apache site provides links to various mirror sites from which you can download the software. Choose the one that is geographically closest to you from the various sites listed on the Apache home page.
To install Apache in its default location at /usr/local/etc/httpd, you may need to be the superuser. You'll need to know the root password of the machine in which you are installing Apache. If you don't know how to become root, please contact your local system
administrator. Put the distribution archive in the /tmp directory. A sequence of commands to do the installation from /tmp might look like this:
mkdirs /usr/local/etc (your system may use 'mkdir -p /usr/local/etc' instead)
cd /usr/local/etc
mv /tmp/apache_1.1.1.tar.gz /usr/local/etc
gzcat apache_1.1.1.tar.gz | tar xf
-mv apache_1.1.1 httpd
If your system does not support gzcat, you may need to do a gunzip -c instead.
Note that depending on the version you are installing, you will be left with a directory called apache_x.x.x. Now you should have a tree under httpd that contains the complete distribution of Apache. This directory tree contains configuration templates and other resources that the server needs for its operation. Be sure not to move or rename any of the files and directories, unless you know what you are doing.
Installing a Precompiled Server
Apache has been compiled for many platforms, and chances are that a prebuilt copy of the server exists for your setup. If you are interested in compiling the source, you might want to skip to the section in this chapter titled, "Installing from the Source" because it offers information on how to build the Apache HTTP server.
Installing a precompiled server is very similar to installing a source-only distribution. The only difference is that a compiled httpd binary already exists in the server's src directory. The compiled binary of the Apache server is called httpd. On binary distributions, the binary is usually labeled httpd-architecture, where architecture is the name of the OS you are installing. For Linux, the httpd binary is called httpd-linux.
Although it is perfectly fine to keep the binary in the src directory, I like to install the binary at the top of the distribution tree. In this example, that is /usr/local/etc/httpd/httpd. Sometimes, the binary distribution has not been stripped. Stripping removes extra symbol information that the linker left from the compilation linking process. Removing this extra information using strip usually makes the binary about 30 to 40 percent smaller. I also like to protect the executable from any user trying to alter it. An easy way to do this is by changing the owner and group of the executable to root and the group to wheel. Then remove all write privileges to the binary from everyone but the owner. To chown and chmod a file (change owner and change mode) to root, you need to do this as the superuser. The following installation steps might look something like this:
1. cd /usr/local/etc/httpd 1.
3. strip httpd 3.
4. chown root.wheel httpd 4.
5. chmod 755 httpd 5.
If you are installing a precompiled server, you can skip to the section titled, "Runtime Server Configuration Settings."
Installing from the Source
Installing from the source is a little more time-consuming, but it will force you to get familiar with the source distribution of the Apache server. It will also give you the opportunity to customize the modules that are built into Apache. Many of these modules provide
functionality that will make your server more powerful. All the files you will need to edit to build the binary are in the src directory. Building from the source is a three-step process:
1. Edit the one-time configuration file, src/Configuration. 1.
2. Run the Configure script. 2.
3. Run make. 3.
Editing the Configuration File
Before you can compile the software, you need to edit the configuration file and set some compile-time options that address the peculiarities of your operating system (and, in some cases, the hardware on which you are going to be running the server). Apache supports the concept of modules that extend and enhance the functionality of the server. However, in order for some of these modules to work, they have to be enabled in the configuration file. The configuration file can be found in /usr/local/etc/httpd/src. To make a copy of the configuration file, type in the following:
cd /usr/local/etc/httpd/src
cp Configuration.tmpl Configuration
Using your favorite editor, read and edit the configuration file you just created. A listing of the default configuration files is included at the end of this chapter for your reading enjoyment.
I kept all the default settings with the exception of changing the compiler and compilation options to match my hardware and operating system. This is executed by removing the comments (the # signs) from the AUX_CFLAGS and AUX_LIBS defines found on the configuration file. Remember to comment out (put in a #) in front of other settings that may not apply to your system configuration.
Running the Configure Script
cd /usr/local/etc/httpd/src
./Configure
Configure allows you to specify a configuration file on the command line by using the -file flag: Configure -file NEXTSTEP.configuration
Using alternate config file NEXTSTEP.configuration
This feature is useful if you need to maintain various different configurations for several different machines.
Running make
If Configure proceeded normally, you should be able to build the server binary at this point. To build the binary, type this on your terminal:
make
After a few minutes, depending on the speed of your hardware, you will have a compiled version of the Web server. It is called httpd and is on the /usr/local/etc/apache/src directory. The current version of the Apache source code does not have an install target for make, so you'll have to copy and strip the executable by hand:
cp httpd ../httpd
cd ..
strip httpd
chown root.wheel httpd
chmod 755 httpd
Runtime Server Configuration Settings
Apache reads its configuration settings from three files: access.conf, httpd.conf, and srm.conf. Primarily, this has been done to maintain backward compatibility with the NCSA server, but the reasoning behind this organization makes good sense. The configuration files reside in the conf subdirectory of the server distribution. Sample configuration files are included in the software distribution; they are named access.conf-dist, httpd.conf-dist, and srm.conf-dist, respectively. You will need to create copies of these files without the -dist portion:
cd /usr/local/etc/httpd/conf
cp httpd.conf-dist httpd.conf
cp access.conf-dist access.conf
cp srm.conf-dist srm.conf
After you've made your local copies, you are ready to configure a basic server.
them to tell the server about various options that you want to enable, such as the location of files important to the server configuration and operation. Configuration directives follow this syntax:
Directive option option…
Directives are specified one per line. Some directives only set a value such as a filename; others let you specify various options. There are special directives, called sections, that look like HTML tags. Section directives are surrounded by angle brackets, such as
<directive>. Sections usually enclose a group of directives that apply only to the directory specified in the section:
<Directory somedir/in/your/tree>
Directive option option
Directive option option
</Directive>
All sections are closed with a matching section tag that looks like </directive>. You will see some of these constructs in the conf/access.conf and in your conf/httpd.conf files. Note that section tags, like any other directive, are specified one per line.
Editing httpd.conf
httpd.conf contains configuration directives that control how the server runs, where its logfiles are found, the user ID (UID) it runs under, the port that it listens to, and so on. You will need to edit some of the default configuration values to settings that make sense in your site. I kept most of the defaults found on my httpd.conf, with the exception of the following:
Figure 2.2. One of the error messages the server returns if there's an error. Note that the ServerAdmin was set to [email protected].
ServerAdmim The ServerAdmin directive should be set to the address of the webmaster managing the server. It should be a valid e-mail address or alias, such as [email protected]. Setting this to a valid address is important because this address will be returned to a visitor when there's a problem.
User and Group The User and Group directives set the UID and group ID (GID) that the server will use to process requests. I kept these to the defaults: nobody and nogroup. Please verify that the names nobody and nogroup exist in your /etc/passwd and /etc/group files, respectively. If you want to use a different UID or GID, go ahead; however, be aware that the server will run with the permissions you define here. The permissions for the specified UID and GID should be very low because, in case of a security hole, whether on the server or (more likely) on your own CGI programs, those programs will run with the assigned UID. If the server runs as root or some other privileged user, someone may exploit the security holes and do nasty things to your site. Instead of specifying the User and Group directives using a name, you can specify them by using the UID and GID numbers. If you use numbers, be sure that the numbers you specify correspond to the user and group you want, and that they are preceded by the pound (#) symbol.
User nobody
Group nogroup
Here's the same specification, but by UID and GID:
User #-1
Group #-1
ServerName The ServerName directive sets the hostname the server will return. Set it to a fully qualified domain name (fqdn). If not set, the server will try figure it out by itself and set to its canonical name.
However, you may want the server to return a friendlier address such as www.your.domain. Whatever you do, ServerName should be a real Domain Name System (DNS) name for your network. If you are administering your own DNS, remember to add a CNAME alias for your host. If someone else manages the DNS for you, ask her to do this for you. Your ServerName entry should look like this: ServerName www.your.domain
If you would like to install a Web server for test purposes on a standalone machine, you can do so by specifying a ServerName of localhost. You can then access the server as http://www.localhost from within the standalone machine. This may be a useful thing to do for trying out new
configurations or Internet Web servers.
ServerRoot This directive sets the absolute path to your server directory (where your httpd binary is located). This directive tells the server where to find all the resources and configuration files. Many of these
resources are specified in the configuration files relative of the ServerRoot directory. If you installed your server using my examples, your ServerRoot directive will read: ServerRoot /usr/local/etc/httpd
Editing srm.conf
The srm.conf file is the resource configuration file. It controls settings related to the location of your Web document tree, the CGI program directories, and other resource configuration issues that affect your Web site. I kept most of the defaults found on my srm.conf. The most important directives on this configuration file are
DocumentRoot Set this directive to the absolute path of your document tree. Your document tree is the top directory from which Apache will serve files. By default it is set to /usr/local/etc/httpd/htdocs.
You may also want to set the UserDir directive to disabled. The UserDir directive defines the directory relative of a local user's home directory where they will put public HTML documents. It's relative because each user will have a
Chapter 16, "Web Server Security Issues," discusses alternatives for providing this functionality that I feel are better from a security and maintenance standpoint.
A copy of the boilerplate conf/srm.conf file has been included at the end of this chapter.
Editing access.conf
I kept all the defaults found in my access.conf file. access.conf is the global access control file; it configures the type of access users have to your site and the documents you make available, as well as security issues defining the extent to which users may alter the security settings you may have defined. The default configuration provides unrestricted access to documents in your DocumentRoot.
If you want to provide a more restrictive site, you may want to verify that all <Directory path> sections match the
directories they list in your installation. The Directory sections specify a set of options, usually involving security issues, on a per-directory basis. In particular, you may want to remove the Indexes option that follows the Options directive on the section that looks like this:
<Directory /usr/local/etc/httpd/cgi-bin>
Options Indexes FollowSymLinks
</Directory>
The Indexes option allows for server-generated directory listings. You probably don't want anyone peeking at the contents of your cgi-bin directories.
Options that you implement on your global ACT can be overridden by the use of an .htaccess file. You can disable all .htaccess overrides by setting the directive AllowOverride to None, which is by default set to allow all overrides:
AllowOverride None
I discuss access control and security in Chapter 15, "Access Control and User Authentication."
Configuring an inetd Server
Normally, Apache runs in standalone mode or daemon mode. How it is run by the system depends on how it is configured by the ServerType directive in conf/httpd.conf.
A standalone server offers superior performance over inetd-run servers because usually there will be a server process ready to serve a request. When run under inetd (the Internet daemon), a new server is started every time a request is received on the HTTP port. There is a considerable amount of overhead in starting a new server process with each new request.
The default setting for ServerType is standalone; unless you have an extremely light traffic site, you should stick with this setting. inetd servers are good for information you want available, but to which you don't want to dedicate a computer.
inetd servers are great for testing configuration settings because the server rereads all its settings every time there's a request. On standalone servers, you need to manually restart the server before it sees any changes you made to the configuration files.
ServerType inetd
The Port directive has no effect on an inetd server. A standalone server uses this configuration information to learn which port it should be listening to. Because inetd does the binding between the port and the software, this setting has no effect on an inetd configuration.
Configuring inetd
inetd is the "Internet superserver." It gets started when the machines boots by /etc/rc. Once launched, inetd listens for connections on Internet socket ports. When it finds a connection, it starts up the program responsible for managing that port. When the request is served and the program exits, inetd continues to listen for additional requests on that port.
To make Apache work from inetd, you need to edit /etc/inetd.conf and /etc/services. Configuring an inetd server requires a bit more system configuration than a standalone server.
First, you need to edit your /etc/services file. The /etc/services database contains information about all known services available on the Internet. Each service is represented by single line listing the following information:
Official service name
Port number
Protocol name
Aliases by which the service is known
Each entry is separated by a tab or spaces. An entry describing httpd will look like this:
http portnumber/tcp httpd httpd
UNIX ports range from 0 to 65,535; however, the first 1,024 ports are reserved. A reserved port means that only processes owned by the superuser will be able to bind to them; if you want to run the server at port 80 (the default for httpd), httpd will need to be started by the superuser.
Set portnumber to the port number on which you want to run the server. Typically this will be port 80 for a standalone server. inetd servers run better at port 8080, so your entry will look like this:
http 8080/tcp httpd httpd
If you are running NetInfo, you can type this line into a temporary file, such as /tmp/services, and then run
niload services . < /tmp/services
Next, you need to edit /etc/inetd.conf to configure inetd to listen for httpd requests. Each line in inetd.conf contains the following information:
Service name
Socket type
Protocol
User the server program will run as
Server program
Server program arguments
My completed entry looks like this:
httpd stream tcp nowait nobody /usr/local/etc/httpd/httpd httpd -f /usr/ local/etc/httpd/conf/httpd.conf
The previous example will start the server as nobody. Typically, you will want a standalone server to be started by the root user so that the server is able to bind to port 80, the standard HTTP port, and be able to change the UID and GID of its children processes. When the standalone server starts up, it forks children processes. These children processes run with a UID of nobody and a GID of nogroup unless you specified a different setting with the User and Group directives. The children processes are the ones that handle HTTP requests. The main process, owned by root, has as its duty the creation and destruction of its children processes. This makes the standard,
standalone server secure.
If you specify the root UID in this example with the intention of running the inetd server on port 80, the process handling the request is owned by root. This may create security problems; unlike a standalone server, the inetd server doesn't fork any children processes, so it handles requests with the UID and GID of the process owner.
After adding the httpd entry to /etc/inetd.conf, you'll need to restart inetd. You can easily do this by finding out the inetd process number with ps and sending it a HANGUP signal:
# kill -HUP InetdProcessID
Replace the InetdProcessID with the process number listed by the ps command. If the PID listed was 86, you would type kill -HUP 86.
inetd will restart, rereading its configuration file that will instruct it to listen for request for port 8080.
Running the Web Server for the First Time
Before you can run the server for the first time, you need to create an HTML document. The standard Apache distribution includes such a file, but I have created another which is more useful and I am sure that you'll use time and again. Using your favorite text editor, create a file called index.html inside the htdocs directory with this content:
<HTML>
<HEAD>
<TITLE>Apache Server Survival Guide</TITLE>
</HEAD>
<BODY BGCOLOR="#ffffff" LINK="#000080" VLINK="#000080">
<H2><CENTER>Congratulations! Your Apache server was successfully
installed.</CENTER></H2>
<H3>Here are some interesting sites that host information about
the Apache server: </H3>
<UL>
<LI>The official homepage for the
<A HREF="http://www.apache.org">Apache Group</A>
<LI>The official homepage for
<A HREF="http://www.us.apache-ssl.com">Community Connexion</A>
developers of Stronghold: Apache-SSL-US (A Netscape compatible
SSL server based on Apache)
<LI>The official homepage for
<A HREF="http://www.algroup.co.uk/Apache-SSL">Apache-SSL</A>
(A Netscape compatible SSL server based on Apache - only available
to users outside of the United States).
<LI><A HREF="http://www.zyzzyva.com/server/module_registry/">
Apache Module Registry</A>, the place where you can find information
about 3<SUP>rd</SUP> party Apache modules and other development stuff.
<LI><A HREF="http://www.apacheweek.com">The Apache Week Home</A>,
here you will find an essential weekly guide dedicated to Apache server nformation.
<LI><A HREF="http://www.ukweb.com">UK Web's Apache Support Center</A>
<LI><A HREF="http://www.fastcgi.com">The FastCGI Website</A>
</UL>
<P>
<STRONG>Deja News a very handy USENET news search engine:</STRONG>
<FORM ACTION="http://search.dejanews.com/dnquery.xp" METHOD=POST>
<P>
<CENTER>
<STRONG>Quick Search For:</STRONG> <INPUT NAME="query" VALUE="Apache" SIZE="37">
<INPUT NAME="svcclass" VALUE="dncurrent" TYPE="hidden">
<INPUT NAME="maxhits" VALUE="20" TYPE="hidden">
</CENTER>
</FORM>
</BODY>
</HTML>
Put this file in your htdocs directory. At this point you are ready to test the server.
[ic:CD-ROM]The machine-readable text for the file you just created is included in server/setup/index.html, and it should
be placed in DocumentRoot/index.html.
Starting Up a Standalone Server
If you are running a standalone server, you'll need to start httpd manually. This is how you do it:
# /usr/local/etc/httpd/httpd -f /usr/local/etc/httpd/conf/httpd.conf
Please note that I started the standalone server from the root account, indicated by the pound sign (#) at the beginning of the line. Standalone servers need to be started by root so two important things happen:
If your standalone server uses the default HTTP port (port 80), only the superuser can bind to Internet ports that are lower than 1025.
■
Only processes owned by root can change their UID and GID as specified by the User and Group directives. If you start the server under another UID, it will run with the permissions of the user starting the process.
■
Starting Up an inetd Server
As you probably guessed, you don't need to start an inetd server. inetd will start httpd every time a request is received in the port assigned to the server. inetd servers make good development platform because configuration settings are reread every time you send a request.
Starting and Stopping the Server
The Apache server, httpd, has a few command-line options you can use to set some defaults specifying where httpd will read its configuration directives. The Apache httpd executable understands the following options:
httpd [-d ServerRoot] [-f ConfigurationFile] [-x] [-v] [-?]
ServerRoot directive in httpd.conf:
The -f flag specifies the location of the main configuration file, conf/httpd.conf. Reads and executes the configuration commands found on ConfigurationFile on startup. If the ConfigurationFile is not an absolute path (doesn't begin with a /), its location is assumed to be relative of the path specified in the ServerRoot directive in httpd.conf. By default, this value is set to ServerRoot/conf/httpd.conf.
The -x option is used by the developers of Apache as a debugging aid and should not be used under normal server operation. It runs a single server process that does not create any children.
The -v option prints the development version of the Apache server and terminates the process.
The -? option prints the following usage information for the server:
Usage: httpd [-d directory] [-f file] [-v]
-d directory : specify an alternate initial ServerRoot
-f file : specify an alternate ServerConfigFile
The start Script
I have developed a small start script that launches the server with all the command-line settings I use. This script saves me a little typing when I'm trying things that require me to start and stop the server.
You can create this script by just typing it into a file (one per script). When you are done entering it, to turn it into executable, type:
cd WhereEverYouEnterThem
chmod 755 start stop restart
You may want to store the script in a place where it is convenient, such as /usr/local/bin. Here's the listing for the start script:
#!/bin/sh
/usr/local/etc/httpd/httpd -f /usr/local/etc/httpd/conf/httpd.conf
The stop Script
The server is designed to stop gracefully when its sent a TERM (terminate) signal. Because when the server starts it spawns several children processes, it becomes a little more difficult to terminate. Apache automatically kills any children processes when the main process is killed. Luckily, the developers of Apache put the process ID of the main process in a file where you can easily obtain the ID of the process. My stop script makes use of the PidFile (/usr/local/etc/httpd/logs/PidFile) file.
This is the listing to the stop script:
#!/bin/sh
kill 'cat /usr/local/etc/httpd/logs/httpd..pid'
The restart Script
The server is designed to restart if it receives a -HUP (hangup) signal. On receiving this type of signal, the server stops and immediately restarts, rereading its configuration files.
Here's the listing for the restart script:
#!/bin/sh
#Restart Apache Script
kill -HUP 'cat /usr/local/etc/httpd/logs/httpd.pid'
This is a very convenient script that automates the process. Any time you modify any of the configuration files, you need to restart the server to enable the changes. htrestart makes this easy to do.
Auto-Starting the Web Server at Boot Time
You may be interested in automating the startup process of the server whenever you boot your machine. Doing so is very easy. On your /etc/rc.local file, add an entry like this:
#
# Run httpd server automatically
#
echo 'starting httpd server'
if [ -f /etc/rc.httpd ]; then
sh /etc/rc.httpd
fi
Create a new file, /etc/rc.httpd, with the following contents:
#!/bin/sh -u
#
cd /usr/local/etc/httpd/
./httpd -d /usr/local/etc/httpd/ -f conf/httpd.conf
Testing the Newly Installed Server
If your configuration files were edited properly, you should be able to point your Web browser to the machine running the server and see the page you created earlier, confirming that your server is running. Figure 2.2 shows what your screen should look like.
Figure 2.3. The startup page you created as rendered by Microsoft Internet Explorer version 3.0.
If you are running the server in a nonstandard port, such as 8080, you'll need to specify the port number as part of the URL:
httpd://yourhost.yourdomain.com:port
If there was a problem with the server or a configuration, Apache is pretty good about giving you an indication about the problem. If Apache could not find some of the configuration files, it should give you a message like this:
httpd: could not open document config file /usr/local/etc/httpd/conf/httpd.conf
fopen: No such file or directory
Check for typos or incorrect path information on your command line or in the configuration files. Typically this problem appears if you have customized your installation to a different directory. Apache has compiled-in defaults that preset the location of ServerRoot. If you specify a relative path, the server prefixes the compiled-in ServerRoot instead.
Other problems may have dump values such as
httpd: could not bind to port
bind: Address already in use
If you get this message, more than likely there's another process using the port number you have defined. Other port binding problems can show up if you specify a reserved port number (one whose address is smaller than 1025). Only root processes can bind to reserved ports. The solution is to start the server as root so that the server can bind properly to the specified port (if you have followed our instructions, your server although started by root, runs as nobody).
If the server doesn't respond, check to see if it is running. Use the ps program to see what's going on:
ps -guax | grep httpd (on BSD-type systems)
ps -ef | grep httpd (on SVR4-type systems)
Don't get worried if you see several httpd processes running. Apache's server model runs several simultaneous processes coordinated by the parent process (the one owned by root).
Sometimes Apache returns enough information that will help you track a problem to a bad configuration setting. Other times, you'll have to hunt for the error. The first thing to check are the logs/error_log and logs/access_log files for more information. While you're at it, you may want to check for any core files in the ServerRoot. If some problem is crashing Apache (I've never had one that dumped core), it's likely that it left a trace there.
Configuration File Listings
For your convenience, here's a listing of the various configuration files I talked about in this chapter.
After you configure and build your server, you won't have to edit this file. At least not until you enable additional modules. You will then have to add them here, and repeat the configuration and binary building process again.
Listing 2.2. The Configuration.tmpl File
# Config file for the Apache httpd.
# Configuration.tmpl is the template for Configuration. Configuration should
# be edited to select system type. Configuration.tmpl should only be changed
# when a new system or module is added, or an existing one modified.
# There are three types of lines here:
# '#' comments, distinguished by having a '#' as the first non-blank character
#
# Lines which set a Make option --- these are simply copied into the Makefile
#
# Module selection lines, distinguished by having 'Module' at the front.
# These list the configured modules, in priority order (highest priority
# first). They're down at the bottom.
# First, ordinary compile-time configuration.
# What to call the compiler: For normal machines with ANSI compilers
# CC= cc
# For Suns or other non-ANSI platforms. Please make sure your gcc is
# 2.0 or later, as 1.40 seems to create bad code for the Sun 4.
CC= gcc
# CFLAGS, compile flags.
# -DMINIMAL_DNS is now obsolete. Use httpd.conf settings of
# HostnameLookups on
# or
# HostnameLookups off
#
# If you want to have more secure hostname resolution at the cost of some
# If you want setting the xbit of a file to cause it to be treated as
# server-included HTML (unless it is a CGI script), say -DXBITHACK. Note
# that this is a run-time option, per-directory, either way (via the XBITHACK
# command); this option only sets the default.
# If you find that your OS can't cope with mmap (compiles OKAY but refuses
# to run and moans "httpd: Could not mmap memory" .. or similar) try
# disabling use of shared memory for process management (scoreboard with
# -DNO_MMAP
# Status Instrumentation
# In order for the status module to obtain full statistics Apache must
# be modified to keep track of various information. This is not
# turned on by default. In order to enable full status details add -DSTATUS
# to the end of the CFLAGS line below.
# Using SOCKS
# Apache can be compiled to work over a SOCKS firewall by
# adding the following string to your CFLAGS define:
#
# -Dconnect=Rconnect -Dselect=Rselect -Dgethostbyname=Rgethostbyname
#
# and by adding the following to the EXTRA_LIBS define:
#
# -L/usr/local/lib -lsocks
#
# making sure that -L points to wherever you've put libsocks.a.
# [Some other former Apache compile-time options are now treated differently;
# the virtual host code is always present; DBM auth is an optional module, and
# may be configured out by changing the module config below, though it still
# defaults in. Note that this config file does not include DBM auth by
# default --- configure it in below if you need it].
# Place here any flags you may need upon linking, such as a flag to
# prevent dynamic linking (if desired)
LFLAGS=
# Place here any extra libraries you may need to link to.
# -lndbm is commonly required for DBM auth, if that is configured in.
EXTRA_LIBS=
# AUX_CFLAGS are system-specific control flags.
# NOTE: IF YOU DO NOT CHOOSE ONE OF THESE, EDIT httpd.h AND CHOOSE
# SETTINGS FOR THE SYSTEM FLAGS. IF YOU DON'T, BAD THINGS WILL HAPPEN.
# For SunOS 4
#AUX_CFLAGS= -DSUNOS4
# For Solaris 2.
#AUX_CFLAGS= -DSOLARIS2
#AUX_LIBS= -lsocket -lnsl
# For SGI IRIX. Use the AUX_LIBS line if you're using NIS and want
# user-supported directories
#AUX_CFLAGS= -DIRIX
#AUX_LIBS= -lsun
# For HP-UX n.b. if you use the paid-for HP CC compiler, use flag -Ae
#AUX_CFLAGS= -DHPUX
# For AIX
#AUX_CFLAGS= -DAIX -U__STR__
# For Ultrix
#AUX_CFLAGS= -DULTRIX
# For DEC OSF/1
#AUX_CFLAGS= -DOSF1
# For NeXT
#AUX_CFLAGS= -DNEXT
# For Sequent
# For Linux -m486 ONLY IF YOU HAVE 486 BINARY SUPPORT IN KERNEL
#AUX_CFLAGS= -DLINUX
# For A/UX
#AUX_CFLAGS= -DAUX -D_POSIX_SOURCE
#AUX_LIBS= -lposix -lbsd -s
# For SCO ODT 3
# libcrypt_i available from sosco.sco.com, files /SLS/lng225b.Z and
# /SLS/lng225b.ltr.Z
# the -Oe option causes cc to die compiling mod_imap (using 3.0.0a of the dev sys)
#CFLAGS= -Oacgiltz
#AUX_CFLAGS= -DSCO
#AUX_LIBS= -lPW -lsocket -lmalloc -lcrypt_i
# For SCO OpenServer Release 5
# -K noinline is needed to work around an optimiser bug which appears in
# http_bprintf.c
#AUX_CFLAGS= -DSCO5
#AUX_LIBS=-lsocket -lmalloc -lprot
#BROKEN_BPRINTF_FLAGS=-K noinline
# For SVR4
# Some SVR4 implementations will require SO_LINGER option to be set in order
# to guarantee buffer flushes. Dell, Esix, and UnixWare are a few of these.
# Use -DNEED_LINGER in addition to other AUX_CFLAGS for these.
#AUX_CFLAGS= -DSVR4
#AUX_LIBS= -lsocket -lnsl -lc
# For UnixWare 2.x, no longer just SVR4 (sigh) - use cc, not gcc
# AUX_LIBS= -lsocket -lnsl -lcrypt
# For Amdahl UTS 2.1
# -Xa enables ANSI mode, -eft is expanded types
#AUX_CFLAGS= -Xa -eft -DUTS21
# For HP/Apollo Domain/OS
#AUX_CFLAGS= -DAPOLLO
# For NetBSD/FreeBSD/BSDI 2.x
# -m486 only if you are running on Intel 486/586
#AUX_CFLAGS= -m486
# BSDI doesn't need -lcrypt
#AUX_LIBS= -lcrypt
# For QNX
#AUX_CFLAGS= -DQNX
#AUX_LFLAGS= -N 0x20000
# For LynxOS
#AUX_CFLAGS= -DLYNXOS
#EXTRA_LIBS=-lbsd -ldes -lc_p
# For DG/UX 5.4
#AUX_CFLAGS= -DDGUX
#AUX_LIBS=
# For EMX OS/2 port
#AUX_CFLAGS= -Zbsd-signals -Zbin-files
#-DNO_KILLPG -DNEED_STRCASECMP -DNO_SETSID
#-g
#AUX_LIBS= -lsocket -llibufc -lgdbm -lbsd
################################################################
# Module configuration
#
# Modules are listed in reverse priority order --- the ones that come
# later can override the behavior of those that come earlier. This
# can have visible effects; for instance, if UserDir followed Alias,
# you couldn't alias out a particular user's home directory.
# The configuration below is what we consider a decent default
# module, remove the "#" sign at the beginning of the line. But remember,
# the more modules you compile into the server, the larger the executable
# is and the more memory it will take, so if you are unlikely to use the
# functionality of a particular module you might wish to leave it out.
## Basic modules (i.e., generally useful stuff that works everyplace):
## You should probably not comment out any of these unless you know what it
## does and you know you won't need it.
Module mime_module mod_mime.o
Module access_module mod_access.o
Module auth_module mod_auth.o
Module negotiation_module mod_negotiation.o
Module includes_module mod_include.o
Module dir_module mod_dir.o
Module cgi_module mod_cgi.o
Module userdir_module mod_userdir.o
Module alias_module mod_alias.o
Module env_module mod_env.o
Module common_log_module mod_log_common.o
## The asis module implemented ".asis" file types, which allow the embedding
## of HTTP headers at the beginning of the document. mod_imap handles internal
## imagemaps (no more cgi-bin/imagemap/!). mod_actions is used to specify
## CGI scripts which act as "handlers" for particular files, for example to
## automatically convert every GIF to another file type.
Module asis_module mod_asis.o
Module imap_module mod_imap.o
Module action_module mod_actions.o
## Optional modules for NCSA user-agent/referer logging compatibility
## We recommend, however, that you migrate to the configurable logging
## module, below.
# Module referer_log_module mod_log_referer.o
## This is a *replacement* for mod_log_common which supports a
## LogFormat directive which allows you to specify what goes into
## the TransferLog (if you want Referer, etc.) source code for docs.
##
## If you play with this, remember to drop the standard
## mod_log_common --- a server with both will work, but you'll get
## very confused trying to figure out what's going on...
# Module config_log_module mod_log_config.o
## cern_meta mimicks the behavior of the CERN web server with regards to
## metainformation files.
# Module cern_meta_module mod_cern_meta.o
## The status module allows the server to display current details about
## how well it is performing and what it is doing. Consider also enabling
## -DSTATUS (see the CFLAGS section near the start of the file) to allow
## full status information. Check conf/access.conf on how to enable this.
# Module status_module mod_status.o
## The Info module displays configuration information for the server and
## all included modules. It's very useful for debugging.
# Module info_module mod_info.o
## Optional authentication modules.
##
## The anon_auth module allows for anonymous-FTP-style username/
## password authentication.
# Module anon_auth_module mod_auth_anon.o
## db_auth and dbm_auth work with Berkeley DB files - make sure there
## is support for DBM files on your system. You may need to grab the GNU
## "gdbm" package if not.
# Module db_auth_module mod_auth_db.o
## msql_auth checks against an MSQL database. You must have MSQL installed
## and an "msql.h" available for this to even compile. Additionally,
## you may need to add a couple entries to the CFLAGS line, like
##
## -lmsql -L/usr/local/lib -L/usr/local/Minerva/lib
##
## This depends on your installation of MSQL.
# Module msql_auth_module mod_auth_msql.o
## "digest" implements HTTP Digest Authentication rather than the less
## secure Basic Auth used by the other modules.
# Module digest_module mod_digest.o
## Outright experiments --- mod_dld defines commands which
## allows other modules to be loaded in at runtime, and mod_cookies
## uses Netscape cookies to automatically construct and log accurate
## click-trails from Netscape cookies, for Netscape-using clients who
## aren't coming in via proxy.
# Module dld_module mod_dld.o
# Module cookies_module mod_cookies.o
## Finally, the proxy module. It's not as complete as it could
## be yet, so use at your own risk.
# Module proxy_module mod_proxy.o
The Server Configuration File: conf/httpd.conf
# This is the main server configuration file. See URL http://www.apache.org/
# for instructions.
# Do NOT simply read the instructions in here without understanding
# what they do, if you are unsure consult the online docs. You have been
# warned.
# ServerType is either inetd, or standalone.
ServerType standalone
# If you are running from inetd, go to "ServerAdmin".
# Port: The port the standalone listens to. For ports < 1023, you will
# need httpd to be run as root initially.
Port 80
# HostnameLookups: Log the names of clients or just their IP numbers
# e.g. www.apache.org (on) or 204.62.129.132 (off)
HostnameLookups on
# If you wish httpd to run as a different user or group, you must run
# httpd as root initially and it will switch.
# User/Group: The name (or #number) of the user/group to run httpd as.
# On SCO (ODT 3) use User nouser and Group nogroup
User nobody
Group #-1
# ServerAdmin: Your address, where problems with the server should be
# e-mailed.
ServerAdmin [email protected]
# ServerRoot: The directory the server's config, error, and log files
# are kept in
ServerRoot /usr/local/etc/httpd
# BindAddress: You can support virtual hosts with this option. This option
# is used to tell the server which IP address to listen to. It can either
# contain "*", an IP address, or a fully qualified Internet domain name.
# See also the VirtualHost directive.
#BindAddress *
# ErrorLog: The location of the error log file. If this does not start
# with /, ServerRoot is prepended to it.
ErrorLog logs/error_log
# start with /, ServerRoot is prepended to it.
TransferLog logs/access_log
# PidFile: The file the server should log its pid to
PidFile logs/httpd.pid
# ScoreBoardFile: File used to store internal server process information
ScoreBoardFile logs/apache_status
# ServerName allows you to set a host name which is sent back to clients for
# your server if it's different than the one the program would get (i.e. use
# "www" instead of the host's real name).
#
# Note: You cannot just invent host names and hope they work. The name you
# define here must be a valid DNS name for your host. If you don't understand
# this, ask your network administrator.
#ServerName new.host.name
# CacheNegotiatedDocs: By default, Apache sends Pragma: no-cache with each
# document that was negotiated on the basis of content. This asks proxy
# servers not to cache the document. Uncommenting the following line disables
# this behavior, and proxies will be allowed to cache the documents.
#CacheNegotiatedDocs
# Timeout: The number of seconds before receives and sends time out
# n.b. the compiled default is 1200 (20 minutes !)
Timeout 400
# KeepAlive: The number of Keep-Alive persistent requests to accept
# per connection. Set to 0 to deactivate Keep-Alive support
KeepAlive 5
# KeepAliveTimeout: Number of seconds to wait for the next request
KeepAliveTimeout 15
# Server-pool size regulation. Rather than making you guess how many
# server processes you need, Apache dynamically adapts to the load it
# handle the current load, plus a few spare servers to handle transient
# load spikes (e.g., multiple simultaneous requests from a single
# Netscape browser).
# It does this by periodically checking how many servers are waiting
# for a request. If there are fewer than MinSpareServers, it creates
# a new spare. If there are more than MaxSpareServers, some of the
# spares die off. These values are probably OK for most sites
---MinSpareServers 5
MaxSpareServers 10
# Number of servers to start --- should be a reasonable ballpark figure.
StartServers 5
# Limit on total number of servers running, i.e., limit on the number
# of clients who can simultaneously connect --- if this limit is ever
# reached, clients will be LOCKED OUT, so it should NOT BE SET TOO LOW.
# It is intended mainly as a brake to keep a runaway server from taking
# Unix with it as it spirals down...
MaxClients 150
# MaxRequestsPerChild: the number of requests each child process is
# allowed to process before the child dies.
# The child will exit so as to avoid problems after prolonged use when
# Apache (and maybe the libraries it uses) leak. On most systems, this
# isn't really needed, but a few (such as Solaris) do have notable leaks
# in the libraries.
MaxRequestsPerChild 30
# Proxy Server directives. Uncomment the following line to
# enable the proxy server:
#ProxyRequests On
# To enable the cache as well, edit and uncomment the following lines:
#CacheRoot /usr/local/etc/httpd/proxy
#CacheGcInterval 4
#CacheMaxExpire 24
#CacheLastModifiedFactor 0.1
#CacheDefaultExpire 1
#NoCache adomain.com anotherdomain.edu joes.garage.com
# Listen: Allows you to bind Apache to specific IP addresses and/or
# ports, in addition to the default. See also the VirtualHost command
#Listen 3000
#Listen 12.34.56.78:80
# VirtualHost: Allows the daemon to respond to requests for more than one
# server address, if your server machine is configured to accept IP packets
# for multiple addresses. This can be accomplished with the ifconfig
# alias flag, or through kernel patches like VIF.
# Any httpd.conf or srm.conf directive may go into a VirtualHost command.
# See alto the BindAddress entry.
#<VirtualHost host.foo.com>
#ServerAdmin [email protected]
#DocumentRoot /www/docs/host.foo.com
#ServerName host.foo.com
#ErrorLog logs/host.foo.com-error_log
#TransferLog logs/host.foo.com-access_log
#</VirtualHost>
The Resource Configuration File: conf/srm.conf
# With this document, you define the name space that users see of your http
# server. This file also defines server settings which affect how requests are
# See the tutorials at http://www.apache.org/ for
# more information.
# Originally by Rob McCool; Adapted for Apache
# DocumentRoot: The directory out of which you will serve your
# documents. By default, all requests are taken from this directory, but
# symbolic links and aliases may be used to point to other locations.
DocumentRoot /usr/local/etc/httpd/htdocs
# UserDir: The name of the directory which is appended onto a user's home
# directory if a ~user request is recieved.
UserDir public_html
# DirectoryIndex: Name of the file or files to use as a pre-written HTML
# directory index. Separate multiple entries with spaces.
DirectoryIndex index.html
# FancyIndexing is whether you want fancy directory indexing or standard
FancyIndexing on
# AddIcon tells the server which icon to show for different files or filename
# extensions
AddIconByEncoding (CMP,/icons/compressed.gif) x-compress x-gzip
AddIconByType (TXT,/icons/text.gif) text/*
AddIconByType (IMG,/icons/image2.gif) image/*
AddIconByType (SND,/icons/sound2.gif) audio/*
AddIconByType (VID,/icons/movie.gif) video/*
AddIcon /icons/binary.gif .bin .exe
AddIcon /icons/binhex.gif .hqx
AddIcon /icons/tar.gif .tar
AddIcon /icons/world2.gif .wrl .wrl.gz .vrml .vrm .iv
AddIcon /icons/compressed.gif .Z .z .tgz .gz .zip
AddIcon /icons/a.gif .ps .ai .eps
AddIcon /icons/text.gif .txt
AddIcon /icons/c.gif .c
AddIcon /icons/p.gif .pl .py
AddIcon /icons/f.gif .for
AddIcon /icons/dvi.gif .dvi
AddIcon /icons/uuencoded.gif .uu
AddIcon /icons/script.gif .conf .sh .shar .csh .ksh .tcl
AddIcon /icons/tex.gif .tex
AddIcon /icons/bomb.gif core
AddIcon /icons/back.gif ..
AddIcon /icons/hand.right.gif README
AddIcon /icons/folder.gif ^^DIRECTORY^^
AddIcon /icons/blank.gif ^^BLANKICON^^
# DefaultIcon is which icon to show for files which do not have an icon
# explicitly set.
DefaultIcon /icons/unknown.gif
# AddDescription allows you to place a short description after a file in
# server-generated indexes.
# Format: AddDescription "description" filename
# ReadmeName is the name of the README file the server will look for by
# default. Format: ReadmeName name
#
# The server will first look for name.html, include it if found, and it will