Securing the Linux
Environment
Craig Ozancin
Senior Security Analyst
Symantec Corporation
June 12, 2001
Nearly two years ago, I walked into a computer store and asked a sales person if they had any Linux distributions in stock. I was looking for the latest RedHat or Caldera distribution. The sales person paused and looked at me with a blank stare.
"Do you mean a Lenox heating/refrigeration unit?" he asked. "This is a computer store," he explained. "Linux is a Unix-like operating system," I explained in turn.
He pointed me to the area of the store where they stocked Microsoft Windows. "If we have it, it will be there," he said.
In an obscure corner, I found both RedHat and Caldera distributions, and they were both at least one revision out of date.
Today, Linux is better known. Nearly every computer store carries up-to-date distributions, and sales people have heard of it. Some have even used it. Bookstores offer many books about it. In 1999, Linux was the only server-class operating system to increase its market share. Not even Windows NT did that. Linux is breaking into prime time. Linux offers an incredible wealth of tools and services, the bulk of which are completely open-source. With its newfound popularity, security is now becoming an ever-increasing concern. Once the playground of computer hackers who generally knew the principles of securing their systems, Linux is now beginning to be used by the computer novice who reads about it in magazines or sees it on TV and decides to try it. Security is often an
afterthought. When they want to secure their system, novice users don't know where to begin. With the recent rise of new attack tools that can use multiple systems to flood commercial sites, unsecured systems become a serious threat to the well being of the Internet.
Part 1: Installation
Linux security should really begin at the point where you install in onto a system. Many issues such as root password, the packages to install and configuration will all be addressed at this stage. While it is possible to deal with these issues at a later date, it is less likely that something will be forgotten or overlooked if done at installation time.
Install only what you need and use
Security begins at installation time. While it can be tempting to install every package in the distribution, unused packages can pose a security threat. Attackers can often compromise a system using services or tools that is not being used. Typically even a default installation will contain packages that are unneeded and possibly pose a security threat. Installing only those packages that you need limits the potential of attack or abuse.
Where possible, chose the install option that will allow you to specify which packages are to be installed. This does however pose a much higher level of risk, as this will generally require you to choose the advanced installation option. For new users this option may be too difficult. If this is the case for you, choose the easier installation option. Once the installation is complete, review a list of installed packages. How you will do this will very from
distribution to distribution. For distributions using the “Red Hat Package Manager”, a list of installed packages with descriptions can be obtained with the entering the following command at a command prompt:
rpm –qia | less
On distributions using the Debian package management system, this can be obtained by entering the following: dpkg –l * | less
This will cover the majority of distributions currently available. There are a few distributions that do not use a package management system. For these you will need to refer to the distribution documentation to determine how you can list, remove and add packages.
Review the list of packages and identify those that should be removed. Both the Red Hat and Debian package management system maintain dependency. If you attempt to remove a package that is required by another, the package management system will inform you of this. For example if you wish to remove a library package, you will also need to remove all other packages that use it.
Once you have determined what packages you do not need, start removing them. On distributions using the Red Hat Package Management system the following command can be used:
rpm –e package-name
For distributions using the Debian Package Management system use this command: dpkg –r package-name
Separate user areas from system areas with a partition
Consider dividing the installation into multiple partitions. As a rule of thumb, anytime you can separate system space from user space you will have a more robust system. This will prevent users from filling up a system partition and causing downtime.
First separate any area where a normal user has permission to write data. This includes the /home and /tmp directories. If possible make each of these a separate partition. Next consider any other area that that user may be able to cause data to be written to. For example, the /var directory contains areas where logs, email, and other volatile data. It also should be a separate partition.
Separating the installation into multiple partitions may also allow you to protect other areas. For example, if move the /usr file system to a separate file system you may be able to mount it read-only. This prevents this area to be altered unless somebody with administrator access remounts it as Read/Write.
Is your password "hard to guess?"
Passwords are used to identify valid users. Valid users are allowed to log in and have access to system resources while invalid users are not. One common attack is to try to guess a password. It is surprising how often this works, because either the system administrator or user used a weak password, or even worse, none at all.
Another common problem arises when a user on your system also has login accounts on other systems. Most of the time, users will use the same password on other systems as they used on yours. If an attacker can gain access to one of these other systems, they will probably be able to access the system files containing password information. From this information, they can probably figure out the user's password. This is known as password cracking.
On Unix or Linux systems, the password information is encrypted with a "one way hash." A one-way hash means that you can encrypt a password but you cannot decrypt it. When you log in, the password you entered is encrypted with the one-way hash and compared byte for byte against the stored encrypted password. If they match, you are allowed to log in.
Two of the most popular Unix and Linux password crackers are "Crack" and "John the Ripper." The first step that these password crackers will try is to guess if your password is blank, a carriage return or the same as the login name. It is very common for large password lists to contain at least one weak password of this type. A common mantra of the security community is "Security is no better than the weakest link." In other words, if user John has a good strong password but user Dave does not, an attacker will use Dave's password to gain access.
"John the Ripper" can be downloaded from http://www.openwall.com/john/. "Crack" can be downloaded from http://www.securityfocus.com/data/tools/crackers/crack5.0.tar.gz. Keep in mind that attackers will usually copy the password information to their own system and crack the passwords there.
The second step, called a "password dictionary attack", uses a list of candidate passwords. An attacker can use any number of dictionaries to find valid passwords. Dictionary lists are very common and nearly all-human languages can be found on the Internet. I have even seen a Klingon dictionary. Each word in the list is tried as a possible match. Then, each word is tried in combination with numbers. For example, the word 'earth' is tried first, followed by earth1, earth2, and so on.
completion, but simply until a password is found.
As you can see, even good passwords can be cracked. All passwords can be found using brute force methods. The secret is to use passwords that will take so long to find that the attacker will give up long before. The first step is to use long passwords of seven or more characters. Avoid using words that might be found in a dictionary. For
example, the password "earth1" is a poor choice since "earth" can be found in a standard dictionary list. "Edifeng" is better, but is still susceptible to brute force attack.
The brute force attack generally uses an array of characters to form all possible combinations of passwords. Characters rarely used in passwords will not be placed in the array, and therefore will not be used during the brute force attack. Using rarely used characters along with the guidelines discussed above will give you a very strong password that will not likely be cracked. "Linux.4.u" is a very strong password, which is easy to remember. It is not susceptible to dictionary attacks and will take too long to crack using brute force.
Note: The "." is an example of a character not generally used in brute force attacks.
As systems administer, you need to encourage users to use strong passwords. Use the information we have discussed here. Also, encourage them to use different passwords for different systems accounts.
Since some users will not choose "hard to crack" passwords, take a pro-active stance. Use these same password-cracking tools to find how many you can crack on your system. Require users with weak passwords to change them.
Note: The use of password crackers is controversial. Some companies will condone this activity, others will not. You could lose your job unless you have management approval. Explain to them the advantages of using a password cracker to check the strength of user passwords. Set some ground rules on what you will do with the results. Let the users on your system know that you will be using a password cracker. Finally, remember that as a system administrator, you have the responsibility to maintain confidentiality. The password information obtained from password cracking must be kept safe.
Shadow Passwords
In the early days of Unix, login information was kept in the /etc/passwd file. This file had to be readable by all users to allow user name information to be obtained. If a user executed the command ls -l, the /etc/passwd file would be read to identify the owner of all files to be listed. Along with such information as login name, user ID, Group id, location to user's home directory and the preferred shell, the user's password was also kept. The problem with this was that any user could access the password information, run a password cracker and possibly obtain passwords for other users.
To solve this problem, password information was moved into the /etc/shadow file. This file is readable only by root. The password entry in the /etc/password file has been replaced with a marker indicating the password is located in the shadow file. By separating this information into two files, password information cannot be viewed by anyone but root, while still maintaining access to the login information. Besides password information, the /etc/file also contains information on password aging.
PAM - a new face to authentication
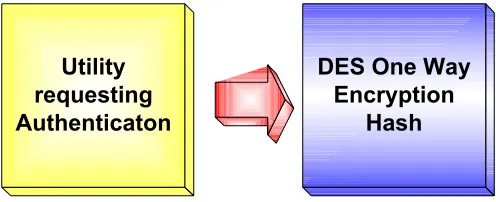
In the past, Linux (like its forbearer Unix) used a DES one-way encrypted password hash scheme to represent each password. It is called “one way” because it is impossible to use the encrypted hash to retrieve the password. Each utility that requires user authentication uses library calls to perform the various tasks of authentication.
If a different password scheme were needed then each utility would at a minimum need to be recompiled to use a new library. Some may even need to be modified. Figure 1 shows this configuration.
Utility
requesting
Authenticaton
DES One Way
Encryption
[image:5.612.182.430.181.282.2]Hash
Figure 1: The original authentication model
Note: The use of the one-way password hash is only a deterrent. There are many tools available to crack these passwords. The make repeated guesses for each password. The guess is encrypted to its corresponding one-way hash and compared to that of the target password. If the two one-way hashes match, then the password is known. These tools are called password crackers and many are available for download from the Internet.
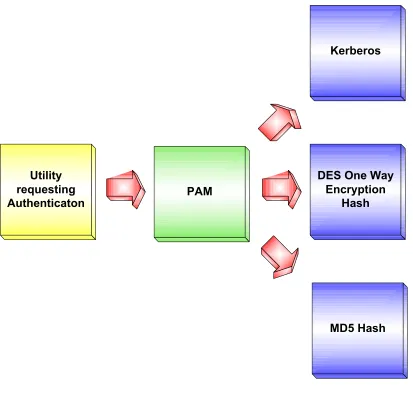
A recent addition to the Linux environment is the "Pluggable Authentication Modules" or (PAM). PAM allows the system administrator to change the authentication method on the system without the need to modify and recompile each utility that requires user authentication. Each authentication method consists of modules that can be selected through the use of system files. This completely eliminates the need to modify or recompile any utilities.
Utility
requesting
Authenticaton
Kerberos
PAM
MD5 Hash
DES One Way
[image:6.612.102.515.67.461.2]Encryption
Hash
Figure 2: The PAM authentication model
Currently on some distributions, you have the option of using MD5 checksums as a password hash. Many other PAM modules can also be added. Many different modules have been created by others and are available for download from the Internet. Some of these are:
• Kerberos • iBottons • SecurID • IMAP • LDAP • SQL
• TCPD (TCP Wrappers) • Chroot
• S/KEY
At a minimum you should at least use the MD5 PAM module. The following advantages will be gained:
• Unlimited password length – The default DES password scheme is limited to a maximum password length of 8 characters. By using MD5 passwords you will be able to choose a passwords of unlimited length (i.e. a phrase or long text). Each additional character length that you add to your password will increase its strength. The time it would take to crack the password will substantially increase for each additional character (the actual time will very with the character set being used to perform a brute force crack). • Time to construct md5 password hash – the time to create a password hash using md5 is substantially
longer than for DES encryption. The extra time is negligible when used to verify a single password during a login. However, it will increase the time needed when used by a password cracker. This time could go from hours (possibly days or weeks) for DES to years.
• There are no password crackers for MD5 – Currently the available password crackers are all designed to crack DES passwords. While it would be trivial to modify a password cracker like “John the Ripper” to crack MD5 passwords, that would be a substantial deterrent for most Script Kiddies.
Additional information on the use of PAM on Linux can be found at the “Linux-PAM” Web site located at: http://www.kernel.org/pub/linux/libs/pam/
The BIOS
The BIOS contains many tunable parameters, which, if incorrect, prevent the system from running properly. An attacker with physical access to the system could change the BIOS. This can result in downtime while you investigate what happened.
The boot device order, controlled by the BIOS, also causes concern. By default, nearly all systems attempt to boot from the floppy disk. The hard drive or CD-ROM will be tried next. This boot sequence is generally configurable in the BIOS. With the default configuration, the risks exist that someone will reboot your system from a floppy containing a backdoor or other malicious executable. Most Linux distributions contain images for a rescue disk that is ideal for this purpose. Intended to help correct boot problems, the rescue floppy can also give an attacker complete access to your system files.
To eliminate this problem, configure the BIOS to boot from the hard disk first. If possible, remove the floppy and CD-ROM completely from the sequence. Remember, the CD-ROM can also boot a different environment. You should now add a password to the BIOS. This will require that you enter this password before changes to the BIOS are allowed. This prevents attackers from simply changing the boot sequence to use the floppy first. This also prevents someone from making changes that will prevent the system from booting.
While these steps may help protect your system from would-be attackers, it is very easy to overcome the password protection in the BIOS. Changing a jumper position will reset the BIOS settings, including clearing the password. The boot sequence is also reset to its default.
Note: The BIOS may limit passwords to seven characters or less.
This boot brought to you by "LILO"
acts as bootstrap code. When located, the BIOS hands over execution to it. When the LILO executes, it will load and boot the Linux kernel (or another operating system). The Linux kernel in turn will complete the boot process. A security concern with LILO comes from its ability to allow users to specify the init state that the system boots to. Init states are states of operation that represent different levels of operations. Init state 1, or "Single user mode", has few if any services running and only allows logging in form of the system console. Init state 3 is normally used for Multi-user text mode operations. Init state 5 is normally used for X-Windows or graphical mode.
The LILO also allows for booting different Linux kernels or other operating systems. It also allows you to pass arguments to the kernel. One of these arguments tells the Linux kernel what state to boot to. A security concern arises when a user wishes to boot to single user mode, or init state 1. In single user mode, the normal authentication challenge is skipped, instead presenting a shell prompt on the console with root privileges. In other words, you do not need to log in to the system to have complete control.
To prevent this condition from being exploited, add a password to the LILO configuration file located at
/etc/lilo.conf. You can add a global password that will need to be entered to boot any operating system, or you can use a different one for each operating system available. This password will prevent the system from rebooting to any init state without knowing the password. However, this will unfortunately require the administrator to enter a password at the console each time.
Read the manual page on LILO to learn how to add a password to the configuration file. Type "man lilo" at a shell prompt to display the manual page.
Remember that the information in lilo.conf is not encrypted, including the password entries that you have added. To prevent users from viewing the information in the file, set the permissions so that only root has access. Type the following command as root at a shell prompt: "chown 600 /etc/lilo.conf".
Finally, install a new copy of the boot loader that includes the new configuration information from /etc/lilo.conf. The command "lilo." For complete details, read the manual page.
Dual Booting
It is common practice for new users to configure their computers to support multiple operating systems. A
combination of Linux and Microsoft Windows 95/98 is quite common. Many combinations are possible and you are not limited to just two. The only limitation is hard disk space.
From a security point of view, be very cautious. Security will be no better than the weakest operating system. For example, if you have a duel boot system with Linux and Windows 98, your Linux partitions may not be accessible, but they can be reformatted. An attacker only needs to reboot your system to Windows 98, type "cancel" or hit ESCAPE (if the login prompt is presented) to gain access and remove your Linux partitions.
Note: Explorer2fs is a program written to allow users to read Linux ext2 file systems from Microsoft Windows 9x, NT 4.0 and 2000. It is available from:
http://uranus.it.swin.edu.au/~jn/linux/explore2fs.htm
The best solution is to add a password to the /etc/lilo.conf file for each operating system available for booting. Remember to install the boot loader with the new configuration. For example, if we have a lilo.conf file that looks like:
default=linux
keytable=/boot/us.klt lba32
prompt timeout=50
message=/boot/message image=/boot/vmlinuz label=linux root=/dev/hda5 read-only other=/dev/fd0 label=floppy unsafe
Add a password for each boot image. The lilo.conf file will now appear as:
boot=/dev/hda map=/boot/map install=/boot/boot.b vga=normal
default=linux
keytable=/boot/us.klt lba32
prompt timeout=50
message=/boot/message image=/boot/vmlinuz label=linux root=/dev/hda5 read-only
password=password-string
other=/dev/fd0 label=floppy unsafe
Notice the highlighted password entry. Choose a unique password in place of “password-string”. Finish by writing the lilo.conf information to the boot loader by executing the following command.
/sbin/lilo
Note: The actual location of the lilo command may very for each Linux distribution.
Part 2: Configuration Issues
Most Linux distributions will make some assumptions about the installation and configuration that you will need to address. These configuration issues represent potentially serious security vulnerabilities that may exist on your newly installed Linux system. In many cases default configuration files are installed. These default configurations are designed for the novice user and less for security.
Network Services
Linux Network Services provide the basic framework for all network communications. They allow remote users to access Web pages, FTP archives, telnet sessions, read e-mail, read news, IRC, and more. Without Network Services, each computer system would be isolated and the Internet would be unreachable.
Network services also provide attackers with an ever increasing potential of abuse. Vulnerabilities can often be exploited to gain access to remote systems. Network services that are improperly configured also have the potential of revealing confidential information or allowing unauthorized remote access to the system.
The inetd Service
The inetd service does not provide any specific network service, but rather acts as a network traffic cop. Inetd monitors a list of specified network ports, and calls the appropriate service executable when a request is detected. For example, telnet communications are usually made to network port 23. When inetd identifies an open request to this port, it calls the telnetd executable to handle that request. Most network services are configured to be executed through the inetd service. This allows the system to conserve resources by not requiring that all network services are running. Each will be started when it is needed.
Two configuration files are used by inetd. The first identifies network ports to be monitored by inetd. This file is located at “/etc/services”. Figure 3 shows a portion of the services file.
# /etc/services:
# $Id: services,v 1.11 2000/08/03 21:46:53 nalin Exp $ #
# Network services, Internet style #
# Note that it is presently the policy of IANA to assign a single well-known # port number for both TCP and UDP; hence, most entries here have two entries # even if the protocol doesn't support UDP operations.
# Updated from RFC 1700, ``Assigned Numbers'' (October 1994). Not all ports # are included, only the more common ones.
#
# Each line describes one service, and is of the form: #
#
# service-name port/protocol [aliases ...] [# comment]
tcpmux 1/tcp # TCP port service multiplexer echo 7/tcp
echo 7/udp
discard 9/tcp sink null discard 9/udp sink null systat 11/tcp users daytime 13/tcp
daytime 13/udp netstat 15/tcp
qotd 17/tcp quote
msp 18/tcp # message send protocol msp 18/udp # message send protocol chargen 19/tcp ttytst source
chargen 19/udp ttytst source ftp-data 20/tcp
ftp 21/tcp
fsp 21/udp fspd
[image:10.612.109.483.298.642.2]ssh 22/tcp # SSH Remote Login Protocol ssh 22/udp # SSH Remote Login Protocol telnet 23/tcp
Figure 3: Portion of the /etc/services file
#
# inetd.conf This file describes the services that will be available # through the INETD TCP/IP super server. To re-configure # the running INETD process, edit this file, then send the # INETD process a SIGHUP signal.
#
# Version: @(#)/etc/inetd.conf 3.10 05/27/93 #
# Authors: Original taken from BSD UNIX 4.3/TAHOE.
# Fred N. van Kempen, <[email protected]> #
# Modified for Debian Linux by Ian A. Murdock <[email protected]> #
# Modified for RHS Linux by Marc Ewing <[email protected]> #
# <service_name> <sock_type> <proto> <flags> <user> <server_path> <args> #
# Echo, discard, daytime, and chargen are used primarily for testing. #
# To re-read this file after changes, just do a 'killall -HUP inetd' #
#echo stream tcp nowait root internal #echo dgram udp wait root internal
#discard stream tcp nowait root internal #discard dgram udp wait root internal #daytime stream tcp nowait root internal #daytime dgram udp wait root internal #chargen stream tcp nowait root internal #chargen dgram udp wait root internal #time stream tcp nowait root internal
#time dgram udp wait root internal #
# These are standard services. #
[image:11.612.109.451.75.408.2]ftp stream tcp nowait root in.ftpd -l -a telnet stream tcp nowait root in.telnetd
Figure 4: Portion of the /etc/inetd.conf file
For information on the organization of the inetd.conf file, refer to the online manual entry for "/etc/inetd.cof". Type: “man inetd.conf”.
Note: The /etc/inetd.conf file may not exist. For example Redhat 6.2 separated the client and server components for common network tools into separate installs. If you do not need the server piece then it will not be installed. You will still be able to use the client portion to communicate with other systems. A typical Workstation install will not include any network services and therefore the inetd program will not be required.
Securing network services with TCP Wrapper
Developed by Wietse Venema, TCP Wrapper improves logging and restricts access to network services. Designed to be as non-intrusive as possible, TCP Wrapper is easy to install and configure.
“tcpd”.
ftp stream tcp nowait root /usr/sbin/tcpd in.ftpd -l -a tenet stream tcp nowait root /usr/sbin/tcpd in.telnetd
Note the addition of "/usr/sbin/tcpd" to each entry. This is the TCP Wrapper executable. Each network service you wish to monitor will need the TCP Wrapper executable path added to its entry in the /etc/inetd.conf file.
After editing /etc/inetd.conf, inetd needs to re-read this information in order for the changes to take place. Refer to your inetd documentation on how best to accomplish this task.
Xinetd
From a security perspective, inetd has a few problems. Some of these problems are:
• Access control – is either all or nothing for inetd when it comes to allowing connections to services. If you configure inetd to allow connections to a server, then every one will be able to connect to it. The TCP Wrappers package was written to compensate for this deficiency.
• No connection limits – this make inetd a target for Denial-of-Service attacks. When a connection request is made to an available service, inetd will execute the appropriate service daemon (a new process) to handle the request. If I were to write a script that repeatedly opened services on another system, the system would eventually run out of process table entries or other resources.
Note: The process table is where the Linux kernel keeps track of all details about each process that is running on the system. Each time that a new process is started, a new entry is created. When a process terminates, its process table entry is cleared and made available for future use.
• Poor logging – inetd provides little or no logging capabilities. When available, logging is enabled through the use of a command line option to inetd. Logging configuration is limited to this on or off command line option.
Xinetd was written as a secure replacement to inetd. It incorporates many of the access control concepts that TCP Wrappers introduced. In addition, Xinetd also provides options to limit the number of simultaneous process that can be active.
Enhanced logging has been added to xinetd. Depending on the options given, an extensive amount of information can be logged. By default, all log information will be sent to syslog. Xinetd can be configured to send log
information to a specified file if syslog is not desired. Additional login options allow for login the start and stop time for network connections.
Another feature allows global defaults to be set. These defaults can be overridden by each network service definition (the override is limited to the scope of the service definition). This allows the administrator to set very restrictive defaults that can be overridden for specific network services as needed. For example, we can set the default access control be completely prevent connections to the system from any other system. The administrator will now open up access to the system for each available network service. We can limit access for one network service to a limited group of systems or network address ranges, while allowing access for another network service from a completely different group.
•
Support for IPv6.
•
Forwarding of services requests to another system.
•
The ability to specify unique banners for each network service.
The syntax used by xinetd in its configuration file is quite different from that of inetd. Figure 5
shows an example /etc/xinetd.conf file.
#
# Simple configuration file for xinetd #
# defaults
defaults {
instances = 25
log_type = SYSLOG authpriv log_on_success = HOST PID log_on_failure = HOST RECORD only_from
}
# echo server
service echo {
type = INTERNAL
id = echo-stream
socket_type = stream
protocol = tcp
user = root
wait = no
disable = yes
}
# finger service
service finger {
socket_type = stream
wait = no
user = nobody
server = /usr/sbin/in.fingerd only_from = 192.168.1.0/24 }
Figure 5: An example of an /etc/xinetd.conf file.
In the default section, we specify the maximum number of simultaneous services that xinetd will
allow. The entry looks like:
instances = 25
Next we specify logging options. These include: • Logging will be to syslog.
• Information to log for a successful connection.
log_on_success = HOST PID
• Information to log for a failed connection.
log_on_failure = HOST RECORD
Finally we deny access to all hosts with:
only_from
Normally this option would be followed by a list of hosts, IP addresses or range of hosts that
would be allowed to connect to the system. By leaving the option blank, we are saying that no
hosts are allowed to connect.
In the “echo” service section we specify some operational parameters. We also specify that the
service is disabled with this entry:
disable = yes
The finger service section also specifies operational parameters including the path to the service
executable. The finger service is not disabled. We open access to the finger service to a range of
IP addresses in the local network with this entry:
Only_from = 192.168.1.0/24
For more information on xinetd, refer to the online man page.
Startup scripts
Not all network services will be started from inetd. For example, the Apache web server is started at boot time and remains resident in memory waiting for httpd requests. Because of its complexity and resource requirements, it is impractical to control it with inetd. Instead a startup script is used. Startup scripts are executed when the system changes runtime states. For example, when a system boots to multi-user mode, the system will execute all associated startup scripts. When the system shuts down, the appropriate scripts are executed to shutdown running services. A typical startup script will include both a startup and shutdown function.
On most Linux distributions, startup scripts reside under a directory hierarchy located at “/etc/rc.d”. Figure 6 shows a typical tree hierarchy.
/etc/rc.d/
|--- init.d/ |--- rc0.d/ |--- rc1.d |--- rc2.d |--- rc3.d |--- rc4.d |--- rc5.d |--- rc6.d
Figure 6: Typical Tree Hierarchy
#!/bin/sh #
# linuxconf Hook to allow linuxconf to put into place any # linuxconf-specific policies.
#
# chkconfig: 2345 99 00
# description: Linuxconf will sometimes arrange to perform various tasks at \ # boot-time to maintain the system configuration.
# Source the function library. . /etc/init.d/functions
RETVAL=0
# See how we were called. case "$1" in
start)
if [ -x /sbin/linuxconf -a -x /sbin/netconf ] ; then
action "Running Linuxconf hooks:" /sbin/netconf --S99linuxconf RETVAL=$?
fi ;; stop)
# ignore ;; *)
echo "Usage: $0 start" RETVAL=1
esac
exit $RETVAL
Figure 7: The linuxconf startup script
For more information on system runtime states, refer to the online manual page for init. Init is the system tool used to change system states. Type “man init” to view the manual page.
Remove what you don’t need
Network services are no more prone to bugs than any other software. The real threat comes from their visibility. If a vulnerability is discovered, it might be exploitable by anyone with network access to the system. If the system is connected to the Internet then it means anyone in the whole world. Add to this the fact that many are run as root and the potential for abuse increases with each service. Vulnerabilities in normal executables, on the other hand, cannot usually be executed unless the attacker has access to them. This means that they will have to gain some level of system access first.
The first step in securing network services is to reduce the level of exposure. The best way to do this is to remove all services that are not needed. Edit the inetd.conf or xinetd.conf files and comment out or disable every service that you are not required to have. Review the startup scripts on the system and remove or disable those that are not needed. If you are unable to remove the service, put “exit o” at the beginning of each startup script that is not needed. This disables the script without damaging it.
Now review what services are left running on the system using the netstat command. Netstat lists information about the systems network subsystem. We will identify the services running on your system by determining what network ports are listening. Figure 8 shows typical output from netstat. We have used the -l option to show listening ports.
# netstat –l
Active Internet connections (servers and established)
Proto Recv-Q Send-Q Local Address Foreign Address State tcp 0 0 *:X *:* LISTEN tcp 0 0 *:587 *:* LISTEN tcp 0 0 *:smtp *:* LISTEN tcp 0 0 *:ftp *:* LISTEN tcp 0 0 *:auth *:* LISTEN tcp 0 0 *:1025 *:* LISTEN tcp 0 0 *:sunrpc *:* LISTEN
Figure 8: Output from netstat
Whenever netstat can find matching port information in the “/etc/services” file, it will list the service by name. If a match cannot be made, netstat will list the port number. In our example listing we see that the X, smtp , ftp, auth, and sunrpc services are running. Netstat also reported two services running that could not be identified. These are at ports 587 and 1025. These services were likely started by one of the start up scripts. On my system, RedHat 7.0, 587 corresponds to sendmail, while 1025 corresponds to apmd.
Logging and Access control
TCP Wrapper uses two additional configuration files to control access to each service. These are "/etc/hosts.allow" and "/hosts.deny". The hosts.allow file identifies source IP addresses allowed to connect to specific network
services. Conversely the hosts.deny file specifies Source IP addresses that are not allowed to access specific network services on the system.
When operational, the TCP Wrapper will a) log the source IP address, b) the specific service being requested and c) whether the connection request was allowed or denied. This information is sent to the system logger know as "syslog." (Refer to the online manual entries for "syslog" and "syslog.conf." These entries will help you understand this utility and how to configure it.)
If a telnet request is made, for example, "/user/sbin/tcpd" will be called in place of "in.telnetd." TCP Wrapper will note the IP address of the calling system and the service being requested. Using this information, TCP Wrapper will determine whether the source IP address should be granted access to the desired network service.
When a network connection is attempted, the hosts.allow file is searched first, looking for source IP address matches. These matches specify hosts or ranges of hosts that are allowed to access specific services. The hosts.deny file is searched next, looking for matches of source IP address that are denied access to the specific service.
The following shows the format of entries in the /etc/host.allow and /etc/host.deny files.
(Service list) : (host list) [ : (Executable command) ]
• (Service list) is one or more comma separated Network services or keywords.
• (Executable command) is an optional command to be executed if the (Service list) and (Host list) entries match.
The following shows an example entry in the hosts.allow file that grants all local systems access and ftp access to the system, "x.some.domain".
ALL: LOCAL, .local.domain in.ftpd: x.some.domain
• (ALL) is a special keyword that matches everything.
• (LOCAL) matches any host name that does not contain a dot.
• (.local.domain) would be your domain. For example at AXENT this would appear as ".axent.com". Access can be limited to as few as one system as demonstrated for ftp.
The following shows a simple hosts.deny file that denies access to everyone and executes a command to identify user information from the system making the request. This booby trap will mail any information gathered to the root user.
ALL: ALL: (safe_finger -l @%h | mail -s $d-%h root) &
Note: Extended access control options are available with TCP Wrapper and must be compiled into the executable and are not described here. For details of these extensions, see the "hosts_option(5)" online man page.
Detecting Address Spoofing
Since TCP Wrapper is so dependent on valid source IP information, it is important to verify that every host name or IP address is valid. To accomplish this, TCP Wrapper uses the following methods to verify each host:
• Refuse connections that have IP source routing turned on. IP source routing has been used in conjunction with IP address spoofing. This does not help UDP services, where only the destination IP address can be relied on. For this reason, be very cautious when enabling UDP services.
• Verify the source host name from the IP address.
• Verify the source host name returned by the Distributed Name Services (DNS) by using another DNS server to verify the results of the first. In the case of DNS cache poisoning, it is possible to have a DNS name server report an incorrect host name. This could allow an attacker to impersonate another trusted system.
Part 3: Controlling Root
/etc/shadow file. If the permissions of these files permit the user to accomplish this, they could also modify their own user id as well as the user id of others. They could also delete or add additional users. This completely breaks down the system security. This level of access must never be allowed.
How, then, do we allow a user to change their password without compromising system security? For better or worse, the option chosen in the early days of Unix was to allow certain programs administrative access. In our example above, the password command, when executed, is allowed to modify the password or shadow files. When a user executes "passwd," the users privileges are elevated temporarily to that of root, allowing them to modify the necessary files. When the command exits, the users privileges are returned to their normal access restrictions. By restricting this elevated privilege to a single executable, users are allowed to perform the required task without compromising security. Hopefully the executable has been developed by a reliable source and should restrict the actions that it will perform. For example, the passwd command should only allow a user to change their password. No other actions should be allowed. Each Linux distribution contains a set of programs like the passwd command that are allowed to have this elevated privilege.
Two types of elevated privilege are available. The first, known as SET USER ID ("setuid"), allows users to execute a program with the privileges of the file's owner. For example, the passwd file is owned by root. When executed by non-root users, its privileges will be raised to that of root . If a non-administrative user owns a program, then the privilege will be elevated (or possible lowered) to that user. The second type, known as SET GROUP ID (setgid) provides the same capabilities as setuid, except that the program's group ownership is used.
A program is designated either setuid or setgid through the use of its permission data. The permission data for a file identifies who can read, write and execute it. Permissions are separated into three categories. The first is the owner of the file, the second is the group that the file is associated with and the third is everyone else. Additional fields are included in the permissions data to identify whether the file is setuid or setgid. Figure 9 shows the layout of the file permission field.
File Type
[image:18.612.72.544.432.472.2]Information UIDSet GIDSet StickyBit OwnerRead OwnerWrite OwnerExec GroupRead GroupWrite GroupExec OtherRead OtherWrite OtherExec
Figure 9: The makeup of the Unix/Linux Permission attribute
The “chmod” command is used to change the access permissions for files and directories. It also can be used to set the setuid and setgid flags for a file. For example, let us assume that we have an executable file named “test” that we wish to make setuid. Currently the permissions for this file are 0755 or “u+rwx,g+rx,o+rx” in symbolic
representation. (For information on file permissions refer to the online manual page for “chmod”.) To set the setuid flag for the program "test," type the following:
chmod 4755 test
Or in chmod symbolic representation: chmod u+s test
The SET-UID threat
The reason I spent time discussing setuid and setgid capabilities is to introduce you to the potential for their abuse. This abuse represents one of the most basic problems in computer security today – the exploitation of design or programming errors.
Buffer overflows are an annoyance to users, system administrators and the programmers who wrote the source code. They have been around since the beginning of computing.
A buffer overflow occurs when a memory buffer allocated on the program stack is smaller than the data being saved to it. For example, if we have a text buffer that is 8 characters long and we attempt to write a text string to this buffer that contains “Hello World!” we will overflow the buffer. Figure 10 illustrates this buffer overflow in terms of memory allocation.
H
e
l
l
o
W
o
r
l
d
!
\0
[image:19.612.72.544.269.357.2]Allocated Buffer
Overrun Memory
Figure 10: A buffer overflow
As you can see, our text string does not fit and overflows into memory outside of the buffer boundaries. If the text overflows into unallocated memory, a “Segmentation Fault” occurs and the program terminates. This is the unfortunate consequence of a program error. If this occurs in the Linux kernel, it is called a kernel crash and the system stops working until it is rebooted. When a segmentation fault occurs, the Linux system creates a “Core” file. A core file provides all of the information needed to debug the program and determine what exactly went wrong. Each core file contains a complete memory image of the programs runtime environment at the moment the
Segmentation Fault occurred. This includes the program executable and all variable information. The buffer that has been overflowed is included in the variable information. Many debug tools exist such as “gdb” that provide the capability to identify and debug runtime errors from core files.
A buffer overflow represents a serious security threat, especially when it occurs in a setuid or setgid program. An attacker can initiate certain undesirable side effects. Let's look at an example of a buffer overflow attack. An attacker knows that a setuid program has a buffer overflow bug. They know that by entering a very large command line option, the program will overwrite one of its internal buffers and produce a segmentation fault. Our attackers performs the follow actions:
1) Change current working directory to /tmp (cd /tmp).
2) Create a symbolic link called “core” in the /tmp directory that points to “/root/.rhosts”. The /root/.rhosts does not need to exist at this time. (ln –s /root/.rhosts core).
3) Run the setuid program with the known buffer overflow. Give the program a very large argument. The text, “\n+ +\n” is embedded somewhere in the large argument.
4) Remotely logs onto the system as root (rsh –l root localhost)
logon from specific systems. In the case of /root/.rhosts, they would be logged in as root. This is a good reason to completely remove the Berkeley R-commands from your system.
How did this happen? Let's take a look at the exploit from the beginning. When the buffer overflow and resulting segmentation fault occurred, the system attempted to save the runtime image to the current working directory as a core file. Since the attacker changed directory to /tmp, the core file was placed there. Since our attacker created a symbolic link in the /tmp file called "core" pointing to the /root/.rhosts file, when the system wrote the core file, it followed the symbolic link and created /root/.rhosts instead. Normally the access permissions for the /root directory would prevent this from occurring. However, since the attacker is exploiting a buffer overflow in a program that has been set setuid, permission was granted.
As noted in step three, the text string “\n+ +\n” was contained in the command line argument that caused the buffer overflow. The complete runtime environment, including all arguments, were included in the core file redirected to /root/.rhosts. The “+ +” entry in the .rhosts file allows anyone to log in from any system. This completely subverts normal access control.
In step 4, the attacker used the “rsh” command to log in to localhost as root. The rshd service looks in the .rhosts file for access permissions. It eventually find the “+ +” entry and grants root access. The attacker now has root access to the system.
Insert Your Code here
The previous example demonstrates what I like to refer to as the “Side Effect Buffer Overflow Exploit”. Another type of buffer overflow attack is the “Code Insertion Buffer Overflow Exploit”. In this type of buffer overflow, new executable code is inserted into the overflowed buffer and executed. If the program is set setuid, then this new code will run as root. The code is written by the attacker and therefore can perform any action desired. Lets look at an example of this type of buffer overflow exploit.
Figure 11: The stack area affected by the buffer overflow
Each of these fields was created when a subroutine call was made. The return address is the location to return to once the subroutine has completed. The rest of the fields represent dynamic data that the subroutine allocates on the stack. Each field represents at least 1 byte of information and usually more.
Buffer 2 is the buffer that is being overflowed. The attacker is able to determine that if the data that causes the overflow is large enough, the return address field can also be overwritten. This is very important, as you will see in a moment.
The skill required to create a code insertion buffer overflow exploit is considerably more difficult that that of the side effect exploit. Knowledge of assembly language is very useful. The new code being inserted will be in the form of binary execution code. A good knowledge of how the operating system works including making system calls from the binary level is needed. The ability to write and compile a standalone executable in C, C++ or some other language will be very useful if they wish to automate the exploit.
The attacker decides that the insertion code should start a command line shell. Since they are exploiting a setuid program owned by root, the shell will have administrative privileges.
Our attacker writes the code to call the shell command and converts it to binary executable. They append just enough random data at the end of the executable code to fill the overflow up to the return address. They then append the address of the buffer being overflowed. Figure 12 shows how this should appear.
Figure 12: the makeup of the buffer overflow exploit.
[image:21.612.203.406.551.707.2]Figure 13: The buffer overflow exploit on the stack
[image:22.612.181.427.186.349.2]The new executable code, random filler and new return address of Buffer 2 overwrite the desired memory. The address of Buffer 2 replaces the return address. This is key to this type of attack. When the subroutine completes and returns control to the calling program, it actually calls the new exploit code, which begins at Buffer 2. Figure 14 demonstrates this.
Figure 14: The exploit code is executed on the stack
The exploit code is executed and starts a command line shell (/bin/sh). Because the program being exploited is setuid, the command line shell also has root access. The attacker now has complete access to the system.
While this type of attack is far more difficult to produce, it still poses a serious threat. A number of code insertion buffer overflow exploits appear every year. By embedding the exploit code into a separate program, it can also be distributed on the Internet where is can be downloaded and used by anyone, including “Script Kiddies” who may have little true knowledge of the how computers and security work.
Network Services Revisited
The code insertion buffer overflow poses one of the biggest threats to network services. Similar to our previous example, an attacker can create a buffer overflow exploit that will connect to a service, cause the buffer overflow with exploit code, and call a command line shell connected to the network port. They will then have administrative access to the system remotely.
Minimize the risk
Setuid and setgid programs are a necessary evil. The normal user will find the system difficult to use without them, yet each setuid and setgid program is a potential security threat.
To locate SET-UID programs: find / –perm -4000 –print
To locate SET-GID programs and: find / –perm -2000 –print
Try to identify what each program does and decide if you accept the risk of having each program on your system. Remove unnecessary programs from the system or change the state of their setuid or setgid flags for those you decide are unneeded. Consider the possibility that a specific executable does not need these flags set to function. They may have the flags set by accident or allow additional access that may not always be needed.
Remember that not all setuid or setgid programs are a threat. For example, the setgid program “man” (which is a member of the man group), is actually be reducing the level of accessibility.
Some references
In this paper we have discussed many security concerns associated with installing a Linux system. We have explored several issues and discussed possible solutions. Here are a few very useful Web sites that can help you continue to learn about security. They are the ones that I rely on the most.
The first site is LinuxSecurity located at http://www.linuxsecurity.com. This site is an excellent portal to daily security news, vulnerabilities, tools and documentation. It is the first site that I visit each day.
Security Focus is the home of BUGTRAQ. For those of you that are unaware of what BUGTRAQ is, it is an open email list where participants discuss new vulnerabilities. Many new vulnerabilities are first reported on the BUGTRAQ list. The list is moderated by Elias Levy who was just recently selected by Network Computing as one of 'The 10 Most Important People of the Decade'. The home page for this list is located at
http://www.securityfocus.com. Also, check out some of their other useful email lists.
Packet Storm is probably the largest archive of both security and attack tools. If you are looking for tools, this is a great place to start. It is located at http://packetstorm.securify.com.
CVE (Common Vulnerability and Exposures) quoting from the Web site is ‘A list of standardized names for vulnerabilities and other information security exposures - CVE aims to standardize the names for all publicly known vulnerabilities and security exposures.’ I am currently a voting board member and encourage people to use it whenever possible. It is located at http://cve.mitre.org.
For those who are looking for on location where they can find books, articles and documents on security, I suggest the Network Security Library at http://secinf.net. This site contains probably the largest collection of security texts found anywhere.
Conclusions
Remember that securing Linux begins at the installation.
• Only install what you need and use. Unused software may give an attacker a way to gain access to your system.
• Use strong passwords that are difficult to guess.
• Use Shadow password files to prevent unauthorized access to passwords. • Use MD5 passwords.
• Secure the system BIOS so that it cannot be used by attackers to gain access to your system. • Add passwords to LILO so that a backdoor boot program cannot be used.
• Be cautious when using Dual boot configurations.
The use of network services is unavoidable. With the emergence of the Internet, there is an ever-increasing dependence on the need to communicate with other networked systems. Knowing this, you can configure your system to provide the needed network services in a controlled and secure manner.
Always remember the mantra of the security community:
Less is more!
Follow this mantra when deciding what network services you wish to provide. Only allow what you must, and use a layer of protection.
It is important to provide users with the tools and access they need to accomplish their tasks. It is also important that in doing so, that you do not open your system up to attack by compromising its security. The setuid and setgid approach found in Unix and Linux systems was designed with this goal in mind.
Be very cautious when allowing programs to have these special privileges. Remember, less is more. Try to restrict setuid and setgid to only those programs that really need it.
Authors BIO