QUATIRO'
Getting Started With Ouattro
~;:~ ... ~ ..
..
1II'
171J
1''';
TIE PIIIEII/IIIAl
III "."
j
U . . .
'ET
Borland's No-Nonsense License Statement!
This software is protected by both United States copyright law and international treaty provisions. Therefore, you must treat this software just like a book, with the following single exception. Borland International authorizes you to make archival copies of the software for the sole purpose ofbacking-up our software and protecting your investment from loss.
By saying, "just like a book," Borland means, for example, that this software may be used by any number of people and may be freely moved from one computer location to another, so long as there is no possibility of it being used at one location while it's being used at another. Just like a book that can't be read by two different people in two different places at the same time, neither can the software be used by two different people in two different places at the same time. (Unless, of course, Borland's copyright has been violated).
WARRANTY
With respect to the physical diskette and physical documentation enclosed herein, Borland International, Inc. ("~orland") warrants the same to be free of defects in materials and workmanship for a period of ~O days from the date of purchase. In the event of notification within the warranty period of defects in material or workmanship, Borland will replace the defective diskette or documentation. If you need to return a product, call the Borland Customer Service Department to obtain a return author~zation
number. The remedy for breach of this warranty shall be limited. to replacement and shall not encompass any other damages, including but not limited to loss of profit, and special, incidental, consequential, or other similar claims.
Borland International, Inc. specifically disclaims all other warranties, expressed or implied, including but not limited to implied warranties of merchantability and fitness for a particular purpose with respeCt to defects in the diskette and documentation, and the program license granted herein in particular, and without limiting operation of the program license with respect to any particular application: use, or purpose. In no event shall Borland be liable for any loss of profit or any other commercial damage, including but not limited to special, incidental, consequential or other damages.
GOVERNING LAW
This statement shall be construed, interpreted, and governed by the laws of the state of California.
This manual was produced with
Sprint®: The Professional Word Processor,
available from Borland,
Borland International 4585 Scotts Valley Drive Scotts Valley, CA 95066
All Borland products are trademarks or registered trademarks of Borland International, Inc. or Borland/ Analytica, Inc. Other brand and product
names are trademarks or registered trademarks of their respective holders. Copyright ©1987 Borland International.
Copyright ©1987 All rights reserved Printed in the U.S.A.
Table of Contents
Introduction 1
Who Should Use This Book? .... . . .. 1
Inside This Book ... 2
Where Do I Go From Here? . . . .. 2
Borland's No-Nonsense License Statement ... 2
How to Contact Borland ... 3
Trademarks ... 3
Chapter 1 Welcome to Quattro 5 Chapter 2 Before You Begin 7 The Quattro Package ... 8
Necessary Equipment ... 8
The Quattro Disks . . . .. 8
Reading the README File ... 10
Using a Hard Disk. . . .. 10
Using a Floppy-Drive System ... 11
Formatting Your Work Disks . . . .. 11
Backing Up Your Quattro Disks ... 11
Copying COMMAND.COM .. . . .. 12
Installing Quattro for a Floppy-Drive System ... 13
Chapter 3 Quattro for the Beginning Spreadsheet User 15 What Is a Spreadsheet? ... 15
What Is a Database? ... 16
What Is a Graph? . . . .. . . .. 17
Loading Quattro ... 18
Entering Information in the Spreadsheet. . . .. 19
Getting Help ... 19
Using the Menus .. . . .. 20
Chapter 4 Quattro for Lotus 1-2-3 Users 23
How Is Quattro Different from 1-2-3? ... 23
Using the 123.RSC Menu Tree and Defaults . . . .. 25
Installing 123.RSC and 123.AL T from within Quattro . . . .. 26
Setting Quattro Defaults for Compatibility. . . .. 27
Descriptor Line Placement . . . .. 28
File-Name Extension ... 28
Autoload File . . . .. 29
Menu Memory. . . .. 29
Confirm Options ... 30
Macro Recording . . . .. 30
Quattro Macros versus 1-2-3 Macros ... 31
Chapter 5 A Tutorial 35 Who Should Use This Tutorial ... 36 How to Use the Tutorial ... . Lesson 1: Setting Up a Spreadsheet ... . Loading Quattro ... . Creating Headings ... . Adjusting Headings ... . Changing Column Width ... . Aligning Headings ... . Saving Your Work and Returning to DOS ... . Summary ... .
If You're Ready for More ... . Lesson 2: Entering Information ... . Entering and Copying Data ... . Entering Dates and Locations ... . Entering Numbers ... . Entering Formulas ... . Making Changes ... . Displaying Numbers as Currency ... . Insert a Dashed Line ... . Freezing Titles on the Screen ... . Lesson 2 Summary ... .
If You're Ready for More ... . Lesson 3: Working With Your Database ... . Searching the Database ... . Sorting the Database ... . Lesson 3 Summary ... .
If You're Ready for More ... . Lesson 4: Building a Graph ... . Creating a Graph ... . Customizing Your Graph ... .
Naming Your Graph ... 85
Lesson 4 Summary ... 87
If You're Ready for More ... 88
Lesson 5: Creating a Macro ... 89
Recording a Macro ... 89
Executing a Macro. . . .. 91
Lesson 5 Summary ... 93
If You're Ready for More... . . . .. 94
Lesson 6: Printing ... 95
Printing Your Spreadsheet ... 95
Printing a Graph ... 97
Lesson 6 Summary ... 99
If You're Ready for More. .. . . . .. 99
Appendix A Glossary
Index
iii
101
N T R
o
Du
c
To
NThe information in this book is designed to get you started with Quattro. It tells you what you need to do to get Quattro up and running, and introduces you to Quattro's features. It includes an easy-to-follow tutorial that will give you immediate hands-on experience with the program.
This Getting Started book accompanies the main Quattro documentation:
The User's Guide, which contains detailed "how-to" information about every
aspect of Quattro, and The Reference Guide, which contains simplified explanations and procedures for each major Quattro operation, as well as information on each of Quattro's @functions and macro commands.
Who Should Use This Book?
This book is essential to both experienced and inexperienced spreadsheet users.
If you're new to spreadsheet programs, you should read through this book in its entirety. The tutorial in the last chapter will give you a step-by-step introduction to Quattro, as well as spreadsheets in general.
If you're an experienced spreadsheet user, install the program using the instructions in Chapter 2 of this book, "Before You Begin." You can skim through the rest of the book as you see fit, paying special attention to the section "Quattro for 1-2-3 Users."
Once you've read this book, you'll know how to
• get Quattro up and running
• use Quattro menus and get on-screen help •. create and print a basic accounting spreadsheet • build, save, and print a customized Quattro graph • use simple macros
• save your data and exit Quattro
Inside This Book
Here's what you'll find in this book:
Chapter I, "Welcome to Quattro," describes the contents of your Quattro package and the hardware required to run Quattro. It also introduces you to some of Quattro's basic features.
Chapter 2, "Before You Begin," tells you how to copy Quattro onto your hard disk, or onto back-up floppy disks.
Chapter 3, "Quattro for the Beginning Spreadsheet User," offers basic information about spreadsheets, graphs, and databases. It tells you how to use Quattro menus and get context-sensitive help, and how to start and exit Quattro.
Chapter 4, "Quattro for Lotus 1-2-3 Users," describes the differences between Quattro and its major competitor, Lotus 1-2-3. It tells you how to instruct Lotus to accept Lotus-compatible commands if you prefer, and how to use macros in relation to 1-2-3 and Quattro.
Chapter 5, II A Tutorial," takes you step by step through the essential
Quattro features, from moving around the spreadsheet to building macros. When you've completed the tutorial, you'll have a solid foundation for using Quattro.
Where Do I Go From Here?
Once you feel comfortable with the material presented in this book, you have a couple of options. If you're an experienced spreadsheet user, or if you plan to begin with a simple Quattro spreadsheet, you can go ahead and experiment with the program. You can refer to information in the Quattro
User's Guide and Quattro Reference Guide for assistance.
If you want to learn more about the features presented here, or if you're interested in stretching the program to its full potential, we suggest you move on to the Quattro User's Guide for more in-depth practice with the program. And, of course, the Quattro Reference Guide provides quick, easily digestible information about every aspect of Quattro.
Borland's No-Nonsense License Statement
This software is protected by both United States Copyright Law and International Treaty provisions. Therefore, you must treat this software just
like a book with the following single exception: Borland International authorizes you to make archival copies of Quattro for the sole purpose of backing up your software and protecting your investment from loss.
By saying, "just like a book," Borland means, for example, that this software may be used by any number of people and may be freely moved from one computer location to another, so long as there is no possibility of its being used at one location while it's being used at another. Just like a book that can't be read by two different people at the same time, neither can the software be used by two different people in two different places at the same time (unless, of course, Borland's copyright has been violated).
How to Contact Borland
The best way to contact Borland is to log on to Borland's Forum on CompuServe: Type GO BOR from the main CompuServe menu and select "Enter Business Products Forum" from the Borland main menu. Leave your questions or comments there for the support staff to process.
If you prefer, write a letter detailing your comments and send it to: Technical Support Department
Borland International 4585 Scotts Valley Drive
Scotts Valley, CA 95066, USA
As a last resort, if you cannot write to us for some reason, you can telephone our Technical Support department at (408) 438-5300. Please have the following information handy before you call:
• product name, version number, and serial number • computer make and model number
• operating system and version number
Trademarks
Within this book, references are made to the following products:
• Lotus 1-2-3 is a registered trademark of Lotus Development Corp. • MS-DOS is a registered trademark of Microsoft Corporation. • Quattro is a trademark of Borland International, Inc.
c
H A p T E R1
Welcome to Quattro
Welcome to the world of Quattro. The Quattro spreadsheet is designed to make your working life easier. It can minimize the amount of time you spend keeping records, balancing books, and drawing graphs, and give you more time to focus on the future. Its automatic features can help you make connections between different areas, uncover weak points, and predict future trends.
The Quattro program includes numerous special features that make data entry and analysis easier than ever:
• Pop-up menus. All Quattro commands can be accessed through pop-up menus that temporarily overlay what you're doing. Simply press the slash key U) to display the first in a tree of menus. To select a command from a menu, highlight it by using the arrow keys and press Enter, or simply enter the first letter of your selection.
• On-line help. From anywhere within Quattro, you can press F1 to display a help screen describing the current area and your options within it. Press Ctrl-Break and you're instantly returned to the spreadsheet. • Shortcuts. You can assign any Quattro menu command to a etrl key
sequence to cut down on keystrokes.
• Choice lists. The NAMES key, F3, lets you display a list of existing block names. You can also display a list of @functions and their syntax (Alt-F3), or macros (Shift-F3). Selecting an item from a list automatically enters it in the input line.
• Pointing. Specify areas in the spreadsheet by using the arrow keys to
point them out. The cell block you point out is automatically entered on
the command line.
• Sorting. You can arrange and rearrange data in your spreadsheet in alphabetical or numerical order.
• Searching. You can automatically search through your spreadsheet for specific cells or records. You can also copy or delete records that meet specified conditions, for example, all records with a value greater than 1000 in the Profit field. You can also automatically replace all instances of one value with another value ("search and replace").
• Importing files. Files created with several other spreadsheet and database programs (Lotus 1-2-3, dBASE, Paradox, and Symphony) are compatible with Quattro. Quattro translates the files automatically when you retrieve them. You can also import ASCII or text files into a Quattro spreadsheet.
• Macros. You can create an unlimited number of macros for use with your spreadsheet. With macros, you can enter often-used data or commands with just a few keystrokes. Macro Record mode records your steps automatically as a macro. You can also use Quattro's extended set of macro commands to build customized program applications.
• Functions. Quattro includes ninety-nine built-in formulas, called
functions, that let you perform mathematical tasks with ease. For
example, the @SUM function lets you add the values contained in a range of cells.
• Flexible Menus. The Menu Builder program extension lets you rewrite or reorganize any of Quattro's menus. You can also load other preset menus such as one that accepts Lotus-compatible command names.
This booklet introduces most of the features listed here. Details on these and other Quattro functions are covered in the Quattro User's Guide and
Quattro Reference Guide.
c
H A p T E R2
Before You Begin
Quattro requires very little or no installation. However, before you begin working with Quattro, there are a few things you need to do first:
• Check the contents of your Quattro package, including your program disks.
• Make sure you have the correct equipment for running the program. • Ready the README. DOC file on your Help Disk.
• Format work disks for storing your work (if you're using a floppy-drive system).
• Make back-up copies of your Quattro disks or copy the disks onto your hard disk.
• If you're using a floppy-drive system, install Quattro for use with floppy drives, and copy the DOS Command file to your System Disk so you can access DOS from within Quattro.
This chapter discusses each of these requirements. It describes the procedures required to get ready to run Quattro from both a hard disk and a floppy-drive system. Follow the procedures appropriate for the system you're using. When you're finished, you'll be ready to go to work with Quattro.
The Quattro Package
Your complete Quattro package includes the following:
• three Quattro manuals, including this one
• three Quattro disks, labeled System Disk, Resource Disk, and Help Disk • function-key templates designed to fit over and label the function keys
on your keyboard
Before you go further, check to make sure you have everything listed here.
If anything is missing, take the entire package back to where you bought it, or contact Borland (see page 3).
Necessary Equipment
Quattro runs on any IBM or compatible computer. It requires only
• a minimum of SI2K bytes of system memory (RAM) • the DOS operating system, version 2.0 or later
If you want to display graphs, you also need a computer graphics card (either color or monochrome). You can still build and print graphs without one, however.
Quattro automatically detects the type of screen you're using and acts accordingly. If you're using a non-standard screen display (such as a black and white monitor with a color graphics card), you will need to specify this with the Defaults Hardware Screen command (see Chapter S of the Quattro User's Guide).
You can use any type of printer for printing spreadsheets. Quattro assumes you're using a parallel printer attached to your computer's first parallel port. If not, you need to specify your printer's setup with the Default Hardware Text Printer command (see Chapter S of the Quattro User's Guide).
To print graphs, you must have a graphics printer and must first specify the type of graphics printer you're using with the Graph Print Printers command (see Chapter 8 of the Quattro User's Guide).
The Quattro Disks
There are three disks included in your Quattro package: the Quattro System Disk, the Resource Disk, and the Help Disk.
The System Disk contains the Quattro program, including the following files:
Q.EXE Q2.0VL Q4.0VL Q123.BAT QF.BAT
main Quattro program program overlay file program overlay file
batch file to load 123.RSC menu tree and defaults batch file to set directories for use with
floppy-drive system
The Resource Disk contains driver files that tell Quattro specific information about your computer:
Ql.0VL program overlay file Q2.0VL program overlay file Q3.0VL program overlay file Q4.0VL program overlay file QUATTRO.DEF Quattro defaults file
123.DEF defaults file for Lotus-compatibility *.TRN several files used to translate files *.BGI several files used to print graphs
*.CHR several files used to display graph titles in different fonts
The Help disk contains the help information displayed in Quattro and a sample Quattro file used in the tutorial in Chapter 4 of this book:
QUATTRO.HLP Help screens displayed with F1
SAMPLE.WKQ Sample spreadsheet for tutorial in Chapter 5 README.COM program file used to read README. DOC README. DOC latest information on Quattro
DEMO.WKQ sample spreadsheet used for demonstration NOVICE.RSC alternative menu tree
TRANS.QAI Transcript add-in MENUBLDR.QAIMenu Builder add-in
HARD.BAT batch file used to reset Quattro for hard disk FLOPPY. BAT batch file used to set Quattro for floppy system Q123.DEF defaults file loaded with Q123.BAT
QF123.DEF defaults file loaded with QF123.BAT if you have a floppy system
QH123.BAT batch file loaded with Q123.BAT if you have a hard disk
QF123.BAT batch file loaded with Q123.BAT if you have a floppy system
Remember that floppy disks are sensitive and must be handled with care. Otherwise, you risk losing the information stored on them. Keep them
away from direct sunlight and magnetic fields. Do not touch the exposed disk surface, bend them, or attach paper clips to them. When not in use, the disks should be stored in their envelopes.
Reading the README File
Any last-minute changes or additions to the Quattro program are documented in a file on the Help Disk called README. DOC. You should review this file carefully before working with Quattro and make note of any changes.
To display the README. DOC file one screenful at a time, simply type
README
on the DOS command line and press Enter.
You can also print this file with the DOS PRINT command.
Using a Hard Disk
To run Quattro from a hard disk, simply copy the files to your hard disk. Because there are many files on these disks, you may want to put them in a separate directory. In the following procedure, you will create a directory called QUATTRO off the root directory, then copy your Quattro files into it. (For more information on directories, see Appendix B, 1/ A DOS Primer," in the Quattro User's Guide.)
1. Type CD c: \ and press Enterto go to the root directory.
2. Type MD QUATTRO and press Enter to create a new directory called
QUATTRO.
3. Move into the new directory by typing CD QUATTRO and pressing Enter.
4. Insert the Quattro System Disk in Drive A and type COpy A: * . * Enter.
5. Replace the System Disk with the Resource Disk and repeat the COpy command.
6. Replace the Resource Disk with the Help Disk and repeat the COpy command.
Note: If you're using a hard disk, you can access your help files more quickly by specifying Instant as the Help Access .Method default setting (see Chapter 5 of the Quattro User's Guide).
Using a Floppy-Drive System
If you're using a floppy-drive system (with no hard disk), you need to do the following before working with Quattro:
• Format a few blank disks • Back up your Quattro disks
• Copy the COMMAND. COM file from DOS to your System Disk • Install Quattro for floppy-drive use
Note: This and other Quattro manuals assume that your floppy-drive system has two disk drives.
Formatting Your Work Disks
To make backup copies of your Quattro disks, you need three blank work disks. You'll also need a few extra disks to save the work you do with Quattro. Before a new disk can be used for storage, it must be formatted.
To format a floppy disk:
1. Put your OOS disk in Drive A and turn the computer on. Your screen displays A>.
2. Type FORMAT B: and press Enter. The system prompts you to insert a
disk in Drive B.
3. Insert a new disk in Drive B and press any key.
4. When formatting is finished, the system asks if you want to format another disk. If you do, press Yand insert another new disk. If you don't, press N, and the A> prompt reappears.
Note: If you're using Quattro and find that the disk you're working with is full, you don't need to exit Quattro (and lose your work) to format a new disk. The OS (Operating System) command on the File menu UFO) lets you access DOS without erasing your spreadsheet; it is only temporarily removed from the screen. Just type Exit and press Enter when you're finished using DOS commands and your spreadsheet will return intact. (See Chapter 1 of the Quattro User's Guide for details.)
Backing Up Your Quattro Disks
Before you work with Quattro, you need to make copies of each of the Quattro disks. You can then work with the copies and save the originals for
backup. The original disks then remain intact and can be recopied should anything happen to the copies.
To copy your Quattro disks, you need three blank, formatted floppy disks.
To make backup copies of the Quattro disks:
1. With DOS loaded, type A: and press Enter to activate Drive A.
2. Insert the Quattro System Disk in Drive A and a blank, formatted disk in Drive B.
3. Type COpy *. * B: and press Enter. This copies all the files on the disk in
Drive A to the disk in Drive B. The files are displayed as copied. When finished, the system redisplays the A> prompt. .
4. Insert the Quattro Resource Disk in Drive A and a blank, formatted disk in Drive B.
5. Type COpy *. * B: and press Enter. The Resource Disk is copied onto the
blank disk.
6. Now insert the Help Disk in Drive A and another blank, formatted disk in Drive B.
7. Type COpy *. * B: and press Enter. The Help Disk is then copied onto
the blank disk.
8. When the A> prompt returns, remove both disks. Store the original disks in a safe place as backups and work with the copies.
Copying COMMAND.COM
After you've copied your Quattro disks, you can add the COMMAND. COM file on your DOS disk to the copy of your Quattro Help Disk. This lets you access DOS from within Quattro.
To copy COMMAND.COM onto your Help Disk:
1. Insert your DOS disk in Drive A.
2. Insert the copy you made of the Quattro Help Disk in Drive B. 3. If the A> prompt is not displayed, type A: and press Enter.
4. Type COPY COMMAND. COM B: and press Enter. The Command file is
copied to the Help Disk in Drive B.
When you access DOS with the
as
command, be sure you have the Help Disk in Drive B.If you don't have COMMAND. COM on your Help Disk, you'll need to insert your DOS disk in Drive B before you can use the
as
command UFO).And each time you exit the program, you will receive a message asking you to insert your DOS disk in the current drive.
Installing Quattro for a Floppy-Drive System
The first time you use Quattro on a floppy-drive system, you need to install Quattro for floppy-drive use:
1. Put the Quattro Help Disk in Drive A. 2. Put the Quattro System Disk in Drive B.
3. Make sure the DOS prompt is A>. (If not, type A: and press Enter.)
4. Type FLOPPY and press Enter. Quattro prompts you to replace the System
Disk with the Resource Disk.
5. Remove the System Disk from Drive B and insert the Resource Disk in its place. Quattro prompts you to remove the floppy disks.
6. Remove both disks from the disk drives.
The FLOPPY commands initiates a batch file that sets your default directories appropriately for a floppy-drive system. You can then load Quattro correctly (see Chapter 3) with the QF command.
Once you've installed Quattro for a floppy-drive system, you shouldn't have to do it again. If you should switch to a hard disk system, however, you'll need to set up Quattro for running from a hard disk before copying the files to your hard disk.
To install Quattro for a hard disk system (after installing it for floppy-drive use):
1. Put the Quattro Help Disk in Drive A. 2. Put the Quattro System Disk in Drive B.
3. Make sure you're logged on to Drive A. (If not, type A: and press Enter.)
4. Type HARD and press Enter.
5. When prompted, replace the System Disk in Drive B with the Resource Disk.
6. When prompted, remove both disks.
You can then copy the Quattro disks safely onto your hard disk.
c
H A p TQuattro for the Beginning
Spreadsheet User
E R
3
Quattro uses a spreadsheet, or rectangular grid, to collect and calculate data. You type the information you want to keep track of into the spreadsheet. You can then use Quattro's myriad features to work on that data-figure totals, calculate formulas, sort information, and so on.
You can use a spreadsheet to record numeric information, such as monthly sales figures or income and expenses. You can also use it as a database manager, to keep track of customer information, for example, or employee records.
Quattro also includes an advanced graphics program, which lets you translate the figures in your spreadsheet into effective visual graphics.
Quattro's extensive features make it a well-rounded program. It acts as an electronic spreadsheet, a database manager, and a business graphics program all in one.
What Is a Spreadsheet?
A spreadsheet is an electronic version of an accountant's ledger book. You use it to record figures and other information. Of course, because Quattro is a computer program, it has a great many advantages over an old-fashioned ledger, just a few of which are
• Spreadsheet Size. What you see on the screen is actually only a fraction
of the entire spreadsheet. You can scroll the spreadsheet, use the Quattro
GOTO key (F5), or even open a second "window" to display different areas.
• Automatic Calculation. You can enter formulas in the spreadsheet to automatically calculate values, for example, to total figures in a column or to calculate the average in a range of entries.
• Easy Editing. It's simple to change a Quattro spreadsheet. Other entries that are affected by the change are automatically updated.
• Instant Graphs. You can instantly create and print graphs (up to 10 different kinds) to help analyze your spreadsheet data.
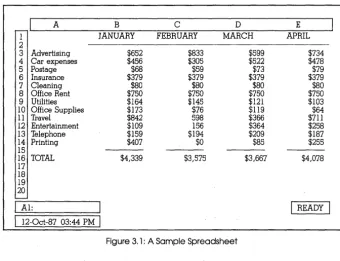
The spreadsheet shown in Figure 3.1 tracks monthly business expenses for a small company. Formulas entered in the last row total monthly figures.
~I
A B C D E1 JANUARY FEBRUARY MARCH APRIL
2
3 Advertising $652 $833 $599 $734
4 Car expenses $456 $305 $522 $478
5 Postage $68 $59 $73 $79
6 Insurance $379 $379 $379 $379
7 Cleaning $80 $80 $80 $80
8 Office Rent $750 $750 $750 $750
9 Utilities $164 $145 $121 $103
10 Office Supplies $173 $76 $119 $64
11 Travel $842 598 $366 $711
12 Entertainment $109 156 $364 $258
13 Telephone $159 $194 $209 $187
14 Printing $407 $0 $85 $255
15
16 TOTAL $4,339 $3,575 $3,667 $4,078
17 18 19 20
-I
AI:I
READYI
[image:23.510.83.423.212.473.2]I
12-0ct-87 03:44 PMI
Figure 3. 1: A Sample Spreadsheet
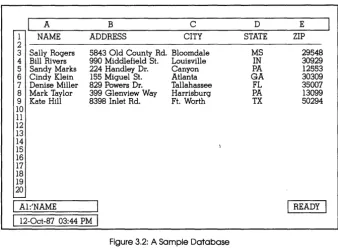
What Is a Database?
In Quattro, a database is any part of your spreadsheet in which information is stored in database format. In this format, information is divided into rows, called records. Each column, or field, contains a category of data, defined by column headings, called field names.
Figure 3.2 shows an address database entered in a Quattro spreadsheet. Each row of information is an individual record, containing one name and
address. The field names at the top of the spreadsheet identify the different types of information: Name, Address, City, State, and Zip.
~I
A1 NAME
2
3 Sally Rogers 4 Bill Rivers 5 Sandy Marks 6 Cindy Klein 7 Denise Miller 8 Mark Taylor 9 Kate Hill 10 11 12 13 14 15 16 17 18 19 20
L...-I
A1:'NAMEB
ADDRESS
C CITY
5843 Old County Rd. Bloomdale 990 Middlefield St. Louisville 224 Handley Dr. Canyon 155 Miguel St. Atlanta 829 Powers· Dr. Tallahassee 399 Glenview Way Harrisburg 8398 Inlet Rd. Ft. Worth
[image:24.509.82.421.86.336.2]I
12-0ct-87 03:44 PMI
Figure 3.2: A Sample Database
D E
STATE ZIP
MS 29548
IN 30929
PA 12553
GA 30309
FL 35007
PA 13099
TX 50294
I
READYI
Quattro includes special commands for use with database information. With them, you can sort the records of your database and search for records that meet specified conditions.
What Is a Graph?
Sometimes a visual representation of data is more effective than words and numbers in presenting information. With Quattro, you can use the information stored in a spreadsheet to create up to 10 types of data graphs:
• Bar graphs (standard, stacked, three-dimensional, and rotated)
• Line graphs • Pie charts .XY graphs
• Area charts
• Marker graphs and combined lines and markers
You can print the graphs immediately, or store them for future reference.
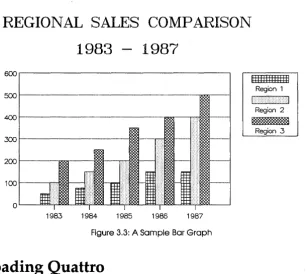
Figure 3.3 shows a bar graph charting yearly sales for each region over five years.
REGIONAL SALES COMPARISON
1983 -
1987
600~---~
500~---'---~=---1
~r---R~--'~~-~
~r---~~---'~~-~
2001----1001----~
o
[image:25.508.103.411.95.369.2]1983 1984 1985 1986 1987
Figure 3.3: A Sample Bar Graph
Loading Quattro
111111111111111 Region 1
I> ><><:1
Region 2
18888888888888
Region 3
In order to work with Quattro, you have to load it into your computer's memory. This displays the spreadsheet on the screen and lets you use all of Quattro's features.
To load Quattro from a hard disk, simply go to the directory that contains your Quattro files (for example, type CD \QUATTRO, then press Enter), then
type Q and press Enter.
To load Quattro from a floppy-drive system:
1. Place the Quattro System Disk in Drive A and the Resource Disk in Drive B. If your screen does not show the A> prompt, type A: and press Enter.
2. Type QF and press Enter.
3. Remove the Quattro System Disk from Drive A and move the Resource Disk from Drive B to Drive A. In Drive B, put the Help Disk (if you
want to access on-screen help) or a data disk for storing and retrieving your spreadsheets.
With Quattro loaded and a blank spreadsheet displayed, you're ready to begin working with the program.
Note: If you have a floppy-drive system, be sure to always use the QF
command (instead of Q) to load Quattro.
Entering Information in the Spreadsheet
With the blank spreadsheet on the screen, the first thing you'll want to do is begin filling in your data. The spreadsheet is divided into hundreds of rectangles, called cells. Each cell can contain a separate value.
To enter information in a cell, use the direction keys on the right side of your keyboard to move the highlighted cell selector around the spreadsheet. Move the selector to the cell in which you want to enter data, then type the information. The characters you type are displayed above the spreadsheet on the input line. Use the Backspace key to erase any mistakes. When you're ready to enter the data you typed into the spreadsheet, press Enter or any of the direction keys.
Getting Help
Any time you're confused or need assistance while using Quattro, press the HELP key, F1. The help window appears, with information pertinent to what you're doing. For example, if you're using a menu, it describes the highlighted item on that menu. If an error message is displayed in the middle of your screen, it interprets the message and tells you what you should do.
Each help screen contains several selectable items, called zoom boxes, that contain different topics. To display additional information about a topic, select its zoom box. To back up to the previous help screen, press Esc. If you ever get confused about where you are in the help system, press F1
again, and information about the help system is displayed.
To return to the main help screen, press Aft-F1. To return directly to the spreadsheet from within any level of help, select the Back to Quattro zoom box or press etrl-Break.
Once you're back in the spreadsheet, you can return directly to the last help screen displayed by pressing Alt-F1.
Using the Menus
Quattro offers hundreds of commands for manipulating and displaying data. Of course, you're not expected to memorize all these commands. Instead, Quattro uses a tree of menus to contain its commands. To initiate a command, you simply select it from one of the displayed menus.
All Quattro menus are accessed through a single menu-the main menu. To display this main menu, just press the slash key U). The main menu contains a list of commands and command categories. When you select a command category, another menu is displayed, listing commands available in that category.
There are two ways to select a command from a menu:
• Use the Up and Down arrow keys (on the right side of the keyboard) to highlight the command you want. Then press Enter .
• Press the key corresponding to the beginning letter of the menu item you want. For example, to select File, press F.
To back out of a menu, press Esc. To exit the menus altogether and return to the spreadsheet, select Quit from any menu except the main menu, or press Gtrl and Break at the same time.
You should find Quattro's menus convenient, intuitive, and easy-to-use. If you're not sure what a menu command does, highlight it. A short description of the command is displayed on the command line above the spreadsheet. For further details on the command, press F1, and a help window is displayed with more in-depth information.
Ending a Work Session
Remember that when you loaded Quattro, the program was copied from disk into the your computer's temporary memory. When you exit Quattro, the program will be erased from that memory, and with it, any work you accomplished in the meantime. For this reason, you need to save any work you've done by copying it from the temporary memory to a file on disk before you exit the program.
Each spreadsheet you create will be stored in a separate file. A file is simply a means of organizing your work, like a file in a file drawer. When you store data in a file, you give the file a name. Then, to display the information in that file, you simply ask for it by name.
To save your work, press
U)
to display the main menu. Select File (press F),then select Save (press S). Quattro displays a message at the top of the screen, asking you for the name you want to give the spreadsheet file. Enter a name of up to eight letters or numbers. (Quattro automatically adds a file-name extension.) Avoid punctuation characters. You can use either upper or lowercase; however, Quattro and DOS will translate lowercase letters into uppercase.
When you press Enter, Quattro saves the data in the displayed spreadsheet in a file and assigns it the file name you specified. To redisplay that spreadsheet data at a later time, you'll simply select the File Retrieve command and specify the name you gave the file.
To exit Quattro, press the slash key
U)
to display the main menu. Then select Quit (press Q). If the spreadsheet contains any data that you haven't saved, Quattro displays a warning menu asking, "Lose Your Changes?" If you want to discard the work you've done, select Yes. If you forgot to save your work, select No, save your work, and select Quit from the main menu again.This chapter has introduced you to general concepts and skills used in Quattro. To begin experimenting with what you've learned and dig in deeper, skip Chapter 4 and begin the tutorial in Chapter 5.
c
H A p T E R4
Quattro for Lotus 1-2-3 Users
Quattro is similar in format to Lotus 1-2-3 and other spreadsheet programs, although the user interface is considerably different. If you've used Lotus 1-2-3, you should make note of several differences and improvements. If
you're more comfortable using the same keys to activate Quattro commands that you used in 1-2-3, you can install a menu tree that uses similar commands.
This chapter includes the following information:
• differences between Quattro and Lotus 1-2-3
• loading Quattro with the 1-2-3-like menu tree and defaults • installing the 1-2-3-like menu tree
• setting Quattro defaults to emulate 1-2-3 • using 1-2-3 macros with Quattro
If you're a 1-2-3 user, this chapter will help orient you to Quattro with a minimum of relearning.
How Is Quattro Different from 1-2-3?
Like Quattro, Lotus 1-2-3 uses a spreadsheet to store, calculate, and display data, and uses graphs to present a visual interpretation of the data. However, there are significant differences:
• Minimal installation. Quattro automatically detects the type of
computer you are using, eliminating the need for any program installation. If you have a hard disk, just copy the Quattro disks to your hard disk and load the program. If you have a floppy disk, you need only
insert the disks and type FLOPPY to install Quattro for use with floppy
drives.
• No separate access system. All of Quattro's functions can be accessed directly from the Quattro spreadsheet. Unlike 1-2-3, you can print a graph or translate a file without exiting the spreadsheet.
• Smarter recalculation. Each time a formula in 1-2-3 needs to be recalculated, the program recalculates every formula in the spreadsheet. Quattro recalculates only the formulas whose elements have changed, greatly reducing recalculation time.
• No copy protection. Borland does not copy-protect its programs. They can be run from a hard disk without inserting the System Disk in the floppy drive, and there's no need to use special commands to copy protected files onto the hard disk.
• Easy Date Entry. Quattro makes it easy to enter dates in the spreadsheet. Instead of using @functions and changing the display format to Date as required in 1-2-3, you simply press etr/-o, then enter a date in any of the acceptable formats. Quattro automatically changes the format for that cell to Date.
• Greater macro capability. Create hundreds of macros per spreadsheet (as opposed to Lotus' 27) with a full set of macro commands. Create macros by actually urecording" your actions rather than typing them. (See uQuattro Macros versus 1-2-3 Macros" at the end of this chapter for details.)
• Full debugging environment. Quattro's macro debugging facility lets you watch your macros as they execute step by step. You can set both standard and conditional breakpoints to invoke Single-Step mode at certain points in macros. You can set trace cells, whose contents are displayed in the Debug Window, while the macro is being debugged. And you can edit macros without leaving the Debug Window.
• Better graphics. Quattro offers a greater variety of graph types, including three-dimensional and rotated bar graphs, area graphs, and combined graph types (using different types for different series of values). It also offers more customization options, such as the size and font of titles. Both displayed and printed graphs are better quality than those in Lotus 1-2-3, and Quattro supports both EGA and VGA graphics cards.
• Simpler graph printing and customization. All Quattro's graphics features can be accessed from within the main program. You never have to leave the spreadsheet to print or customize a graph. And once you've set up your basic printing parameters, you can print graphs by just selecting Go from the Graph Print menu. ' • Direct compatibility with Lotus 1-2-3 files. In most cases, no extra steps
are required to use files created with 1-2-3 and other spreadsheet or
database products. Quattro translates files automatically when you retrieve them. And you can automatically translate a Quattro spreadsheet for use with another program simply by saving it with the appropriate extension. Not only can you pass spreadsheet files back and forth between Quattro and 1-2-3; you can also pass macros .
• Greater flexibility. You can customize the Quattro program to your own liking. Prefer the Lotus-type commands? Install a menu tree that lets you use familar command sequences, or custom build your own. Prefer a different color scheme for displaying the program? Select from a vast range of colors, hues, and intensities to display any part of the Quattro program .
• Transcript Add-In. Quattro includes a program add-in, called Transcript. When loaded, Transcript records every action you take and stores it in a command history file. You can access the file to view your actions, replay all or part of them, and even copy sections to the spreadsheet to create macros.
Using the 123.RSC Menu Tree and Defaults
Quattro's menu tree includes the same functions as the menus in Lotus 1-2-3 (and then some). If you take the time to learn Quattro's menus, you will probably find them much easier to use. But if you still prefer using the commands you're already familiar with, you can adapt Quattro's menu tree to accept them.
Quattro includes a program add-in, called the Menu Builder, which allows you to make changes to the Quattro menu tree. Also included is a file containing an alternative menu tree (123.RSC) created with the Menu Builder. This menu tree allows you to use the Lotus-compatible commands you've already learned. (Additional Quattro commands on the menus are indicated with a filled-in square next to the command.)
Caution: If you use Quattro additions to the 1-2-3 menus in a macro, you won't be able to run the macro in Lotus 1-2-3.
To load Quattro with the 1-2-3 menu tree, simply type
Q123
on the DOS command line and press Enter. This loads Quattro and the 123.RSC menu tree. It also sets several Quattro defaults to be Lotus-compatible.
Note: If you're going to be using macros created with Lotus 1-2-3, it's best to load 123.RSC with Quattro in this way, because all the defaults are set as well, ensuring accurate macro execution.
Also included with Quattro is a Lotus-compatible menu tree that's abbreviated for use as an alternate (123.ALT). You can load it along with your regular menu tree, then switch to it when you need it from within Quattro, for example to use 1-2-3 macros. Alternate menu trees contain all the necessary commands, but rely on the main menu tree for prompts and messages that depend on the menus.
The following sections describe how to load 123.RSC and 123.AL T from within Quattro and how to set Quattro defaults to be Lotus-compatible.
Note: See the inside cover of the Quattro Reference Guide for a diagram of the 123.RSC menu tree.
Installing 123.RSC and 123.ALT from within Quattro
Once you're in Quattro, you can specify a different menu tree to be used consistently or as an alternate menu tree.
To specify 123.RSC as the default main menu tree:
1. With Quattro loaded, press IDS to select Startup from the Default menu. 2. Select Menu Tree. The Menu Tree menu is displayed.
3. Select Main Menus. A list of available main menu trees (*.RSC) is displayed.
4. Select 123.RSC.
5. Press Esc twice to return to the Default menu.
6. Select Update. This stores 123.RSC as the new default.
To establish the new menu tree, you must exit Quattro and reload the program.
Note: Remember that if you load Quattro using Q123, the 123.RSC menu tree is loaded automatically, regardless of the default menu tree.
To specify 123.AL T as the alternate menu tree:
1. With Quattro loaded, press IDS to select Startup from the Default menu. Select Menu Tree. The Menu Tree menu is displayed.'
2. Select Alternate Menus. A list of available menu trees (*.ALT) is displayed.
3. Select 123.ALT.
4. Press Esc twice to return to the Default menu.
5. Select Update. This stores 123.ALT as the new default alternate menu tree.
To switch to the alternate menu tree, select Switch Menus from the Menu Tree menu (lDSCMS), then select Alternate Menus. The alternate menu tree is immediately used. To switch back to the main menu tree, select Switch Menus, then Main Menus.
With 123.ALT specified as the alternate, you can switch to the Lotus-compatible menus any time you want, without having to leave Quattro.
Note: Having two menu trees loaded at once (both main and alternate.) uses approximately 16K bytes of memory space. Only load the alternate menu
tree if you really need it. '
Caution: If you use either 123.RSC or 123.ALT without setting defaults to be Lotus-compatible (by loading Quattro with the Q123 command), and
you intend to use 1-2-3 macros, be sure to set the Borland Style and Remember defaults to No and During Macros to Yes (see page 30). Otherwise, your 1-2-3 macros may not work as expected.
You can make changes to any of the available menu trees with the Menu Builder add-in. You can create your own alternate menu tree by reorganizing the menu commands, changing command names, and even changing the actions taken by certain commands. The Menu Builder is described in Chapter 13 of the Quattro User's Guide.
Setting Quattro Defaults for Compatibility
In addition to the difference in user interfaces, there are several other differences between Quattro and Lotus 1-2-3. The next few pages tell you how to customize Quattro to behave in ways more familiar to you, or to be compatible with macros you created with other products.
The features you can change are as follows:
• Descriptor line placement. You can move the descriptor line at the bottom of the Quattro screen to the top of the screen .
• File-name extension. You can change the default file-name extension from .WKQ to .WK1 or .WKS to automatically assume the Lotus"" compatible file-name extension.
• Autoload file. You can change the name of the file automatically retrieved when you load Quattro from QUATTRO.WKQ to AUT0123.WK1 or AUT0123.WKS to match Lotus 1-2-3.
• Menus. Unlike Lotus 1-2-3, Quattro automatically remembers the last command you used in each menu. If you want, you can change this so that it always highlights the first, or default, item on each menu.
• Confirmation Prompts. Quattro prompts you for confirmation when you erase a spreadsheet, retrieve a file, or exit Quattro only if there is data that
may be lost. Lotus 1-2-3 prompts you for confirmation consistently,
regardless of possible data loss.
Caution: After you've reset any of the defaults, be sure to use the Update command to store the new default values with Quattro. Otherwise, the previous default values will be restored the next time you use Quattro.
Descriptor Line Placement
If you prefer, you can move the first descriptor line underneath the spreadsheet to the top of the screen.
To move the descriptor line:
1. Press ILO to select Descriptor Line from the Layout menu.
2. To store the new position as a permanent default, press Esc to return to the main menu, then press OU to select Update from the Default menu.
Note: If you're using the 123.RSC menu tree, press lIST to move the descriptor line.
File-Name Extension
Quattro automatically assumes the file-name extension .WKQ when none other is specified. You can change the default extension to anything you like, or you can type in an extension with the file name.
To change the default file-name extension:
1. Press lOSE to select Extension from the Default Startup menu. Quattro prompts you for an extension.
2. Enter the extension you want to use as the default. 3. Press Esc to return to the Default menu.
4. Select Update to store the extension as the new default.
Note: If you're using the 123.RSC menu tree, press lISE to change the file-name extension.
Autoload File
When you load Quattro, the program searches through the default data directory for a file named QUATTRO.WKQ. If it finds one, it automatically retrieves the file and displays it on the screen.
You can change the name of the file Quattro loads automatically to AUT0123.WK1 or AUT0123.WKS (Lotus autoload file names), or to any other file name you like.
To change the name of the autoload file:
1. Press IOSA to select Autoload File from the Default Startup menu. Quattro prompts you for a file name.
2. Enter the name of the file you want retrieved automatically each time you load Quattro.
3. Press Esc to return to the Default menu.
4. Select Update to store the extension as the new default.
Note: If you're using the 123.RSC menu tree, press lISA to set the Autoload File default.
Menu Memory
Quattro keeps track of the last command you used on each menu. When you redisplay the menu, the last-used command is highlighted. This makes it easy to return to the last command you used; just press Enter repeatedly until you reach the submenu containing the command.
If you prefer to have the first, or default, item on each menu highlighted, you can turn this feature off.
To turn off menu memory:
1. Press lOSeR to select Remember from the Default Startup Compatibility menu.
2. Select No from the displayed menu.
3. If you want to use this default from now on, press Esc twice to return to the Default menu, then select Update.
Note: If you're using the 123.RSC menu tree, press I/SGRN to set the Remember default to No.
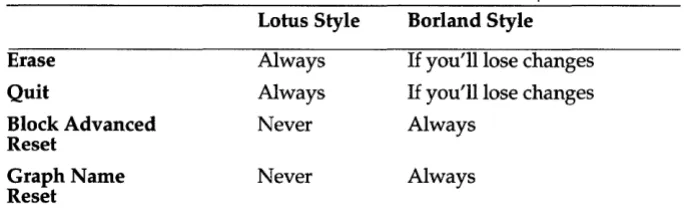
Confirm Options
Normally, Quattro displays a confirmation menu whenever you erase a spreadsheet, retrieve a file, or quit Quattro, and you haven't saved the data in your current spreadsheet. You then have the option of continuing with the operation or canceling it. Lotus 1-2-3 prompts for confirmation at different times.
[image:37.505.83.425.250.357.2]Table 4.1 shows the different times at which Lotus 1-2-3 and Quattro prompt for confirmation.
Table 4.1: Quattro and Lotus 1-2-3 Confirmation Prompts
Lotus Style Borland Style
Erase Always If you'll lose changes
Quit Always If you'll lose changes
Block Advanced Never Always
Reset
Graph Name Never Always
Reset
If you prefer to use Lotus' style of confirmation, you can specify this as the default:
1. Press IDSGB to select Borland-Style from the Default Startup Compatibility Options menu.
2. Select No from the displayed menu.
3. If you want to use this default from now on, press Esc twice to return to the Default menu, then select Update.
Note: If you're using the 123.RSC menu tree, press I/SGBN to set Borland Style to No.
Macro Recording
Quattro lets you record actions as macros instead of entering the keystrokes required to perform the actions. It translates the recorded actions into
menu-equivalent commands, which can then be interpreted by any menu tree in effect. (See Chapter 4 of the Quattro Reference Guide for a tables listing these commands.)
If you want to use macros you create within Quattro with Lotus 1-2-3, you can specify keystroke macro recording. Quattro then records actual keystrokes instead of menu-equivalent commands. Your macros will then be executable in Lotus 1-2-3 (as long as you had the 123.RSC menu tree loaded when you recorded the macros and didn't use any additional Quattro commands).
Note: You can always execute macros you created with Lotus 1-2-3 in Quattro, regardless of the Macro Recording default.
To set the Macro Recording default to Keystroke:
1. Select the Macro Recording command from the Default Startup Compatibility Options menu (lDSCM).
2. Select Keystroke from the displayed menu.
3. If you want to use this default from now on, press Esc twice to return to the Default menu, then select Update.
Caution: You won't be able to execute macros recorded while Macro Recording is set to Keystroke with any other menu tree.
Note: If you're using the 123.RSC menu tree, press IISCMK to set the Macro Recording default to Keystroke.
Quattro Macros versus 1-2-3 Macros
Quattro offers several improvements over the macro facilities available with Lotus 1-2-3 and similar products.
• The Record mode lets you record the steps you want to store in the macro as you perform them, instead of requiring you to remember the necessary keystroke sequence and enter it as a label in a cell.
• In addition to using the Alt key to execute macros, Quattro also incorporates a Macro Execute command (lME or the FB key) that lets you execute an unlimited number of macros. No longer are you restricted to 27 macros per spreadsheet.
• The MACROS choice key (Shift-F3) speeds up macro creation by displaying a list of all macro commands. You can quickly insert a macro command in your macro by selecting it from the list and supplying any required arguments.
• In logical macro recording mode, any menu commands you record in a macro are displayed in the spreadsheet as menu-equivalent commands instead of keystrokes, making the macro much easier to read. For example, IBAP would appear as {/ Block, Protect} Bl .. B2 0- instead of
/RPB1 .. B20-.
• Quattro supports macro user menus with more than eight items (the limit for Lotus 1-2-3).
• Several Quattro macro commands have a more flexible syntax than Lotus 1-2-3.
To use macros created with Lotus 1-2-3 in Quattro, you must have a Lotus-compatible menu tree loaded (see page 26). If you don't normally use 123.RSC as the main menu tree, you can specify 123.ALT as the alternate menu tree and revert to it as necessary to execute Lotus macros.
You can use macros you record in Quattro with any Quattro menu tree, regardless of the menu tree in effect when you recorded the macros. You can also use them with Lotus 1-2-3, if you create them with the following restrictions:
• Be sure a Lotus-compatible menu tree is in effect when you create the macro, either as the main menu tree or as the alternate.
• Set the Macro Recording default to Keystroke. Don't use any of the "Quattro-only" commands on the 123.RSC or 123.ALT menu tree. (These are identified with boxes on the menus.)
• Don't use any of the Quattro @function commands that aren't available in Lotus 1-2-3:
@CELLINDEX @CURVALUE @DEGREES @FILEEXISTS @HEXTONUM @NUMTOHEX @MEMAVAIL @MEMEMSAVAIL @RADIANS
• Don't use any of the Quattro key-equivalent or macro commands that aren't available in Lotus 1-2-3:
{ADDIN} {CLEAR} {CR} {DATE} {FUNCTIONS} {MACROS} {STEPOFF} {STEPON} I;}
• Limit macro user menus to eight items (Lotus' limit).
• Where Quattro allows a more flexible command syntax (for example, referencing an address containing a value instead of giving a value or calling a subroutine by its coordinates), use the more restricted syntax required by Lotus.
c
H A p T E R5
A Tutorial
Welcome to the Quattro Tutorial. The six lessons in this chapter present the basic tools required to use Quattro:
• Lesson 1: Setting Up a Spreadsheet
Loading Quattro Creating Headings Adjusting Headings Saving Your Work
• Lesson 2: Entering Information
Entering and Copying Data Entering Formulas
Making Changes to the Spreadsheet
• Lesson 3: Working with Your Database
Searching Sorting
• Lesson 4: Building a Graph
Creating a Graph Customizing Your Graph Naming Your Graph
• Lesson 5: Creating a Macro
Recording a Macro Executing Your Macro
• Lesson 6: Printing
Printing Your Spreadsheet Printing Your Graph
Who Should Use This Tutorial
Both new and experienced users of spreadsheet software can benefit from the information in this tutorial. The tutorial lessons cover Quattro's major features. In each lesson you'll learn basic spreadsheet functions and then use Quattro to practice them.
If you're a new user, complete each lesson in order to learn Quattro a step at a time.
If you're an experienced user of spreadsheet software, you can scan each lesson and review the parts of Quattro that may be new or unfamiliar to you. If you want to skip the first couple of lessons, you can retrieve a sample spreadsheet file from the Help Disk (called SAMPLE.WKQ) that includes the spreadsheet created in those lessons.
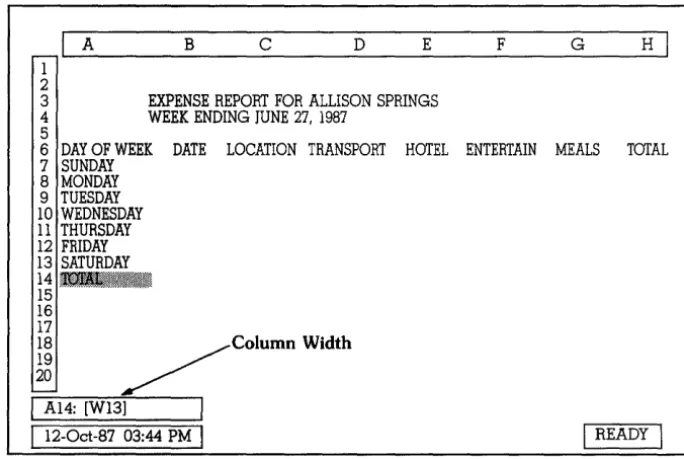
Another alternative is to complete just the steps in the practice sessions to get a quick, guided tour of Quattro. In the practice sessions you'll get to try out all Quattro's features as you create an expense report spreadsheet for a fictitious company called Allison Springs. The practice sessions should be completed in order, as some sessions use material you created in previous sessions.
Before you get started, you may want to review previous chapters:
• Chapter 2, "Before You Begin" tells you how to set up your computer system to use Quattro.
• Chapter 3, "Quattro for the Beginning Spreadsheet User" explains terms and techniques that all new Quattro users will need to know. Review this chapter to learn, for example, how to use Quattro's help facilities.
• Chapter 4, "Quattro for 1-2-3 Users" will help Lotus 1-2-3 users quickly make the transition to Quattro.
Note: This tutorial assumes that you're using the standard Quattro menu tree.
How to Use the Tutorial
Each lesson in the tutorial is divided into sections that explain a common task. The section starts with an overview of concepts related to the task. For example, the overview to the section "Entering and Copying Data" in Lesson 2 introduces the three data types Quattro uses and shows an example of each.
A practice session follows that shows you how to use Quattro to accomplish the task. Each practice session lists new terms and commands
for your reference and then gives you step-by-step instructions that tell you what to do and how to do it.
Instructions (which may be one or several keystrokes) are always indented and shown in bold type. Tips are sometimes included to give you additional information or to tell you another way to complete the task.
Now you're ready to get started with Lesson 1.
Lesson 1: Setting Up a Spreadsheet
In this lesson you'll set up the expense report spreadsheet for a company called Allison Springs. You will
• load Quattro
• create headings to label the rows and columns
• adjust the heading display so the spreadsheet is easy to read • save your spreadsheet in a file
Loading Quattro
Before you can create a spreadsheet, you must first load Quattro into your computer's memory. The procedure for this differs, depending on whether you're using a hard disk system or one with only floppy drives.
To load Quattro with a hard disk system:
1. Go to the directory that contains your Quattro files. For example, in your Quattro files are in directory called QUATTRO off your root directory:
Type: CD \QUATTRO Press: Enter
2. Now load Quattro: Type:Q Press: Enter
To load Quattro from a floppy-drive system:
1. Place the Quattro System Disk in Drive A and the Resource Disk in Drive B. Make sure you're logged onto Drive A:
Type: A: Press: Enter 2. Now load Quattro:
38
Type: QF Press: Enter
3. Remove the Quattro System Disk from Drive A and move the Resource Disk from Drive B to Drive A. Put the Help Disk in Drive B.
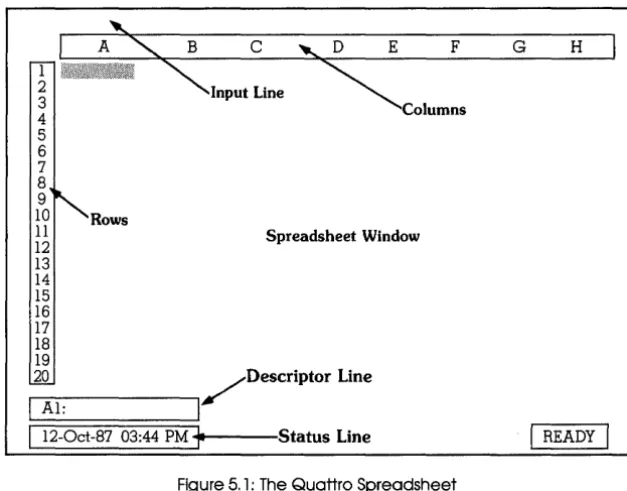
Checkpoint. Your screen should now look like the screen shown in Figure 5.1. The READY indicator in the bottom right corner means that Quattro is ready for you to do something.
1 2
3
4
5
6 7 8 9 10 11 12 13 14 15 16 17 18 19
Rows
Spreadsheet Window
20 /DescriPtor Line
I
AI:I
I
12-0ct-87 03:44 PM ~~~--Status Line [image:46.508.94.408.128.373.2]F
Figure 5.1: The Quattro Spreadsheet
The spreadsheet has four main areas:
G H
I
READYI
• The Input Line is initially blank. You'll use it to enter or edit information in the spreadsheet. It's also used by Quattro to prompt you for information and display information about menu commands .
• The Spreadsheet Window is made up of cells where you enter, display, and organize information in the spreadsheet area.
Every cell has an address. The address of the cell highlighted in Figure 5.1 is AI. The address includes the cell's column and row coordinates, in this example Column A and Row I.
The screen shows columns A-H and rows 1-20. The entire spreadsheet, however, has 256 columns (lettered A-Z, then AA-AZ, BA-BZ and so on, up to IV) and 8192 rows. You'll find as you use Quattro that you typically use much more of the spreadsheet than fits on the screen at one time. You
can scroll the spreadsheet to view different areas.
• The Descriptor Line displays information about the current cell and any
error messages .
• The Status Line displays the date, time and the current spreadsheet
mode or status condition, such as READY or CAPS.
Creating Headings
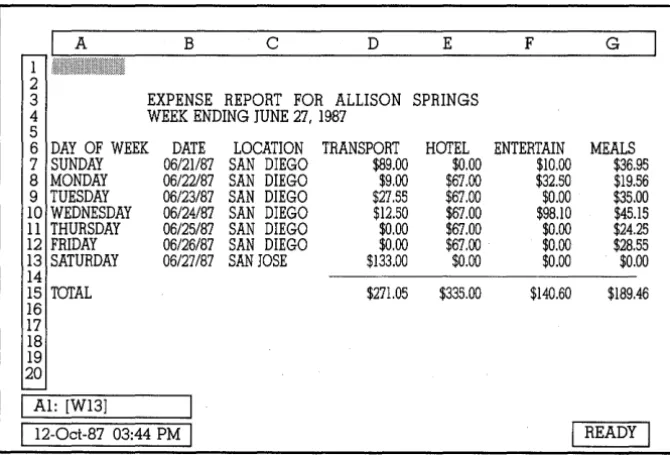
Usually, the first thing you do when creating a new spreadsheet is to figure out the structure for your spreadsheet. You do this by creating column and/ or row headings to define your data. Figure 5.2 shows the column and row headings for the spreadsheet for Allison Springs.
A B C D E F G
1 @~:~:::::::::~:;::::::::::::::::::::::::::.:.:.:.: .... "
:.:::::::::::::::::::~::::::::~::~:::::~:::::::::::::::::
2
3 EXPENSE REPORT FOR ALLISON SPRINGS
4 WEEK ENDING JUNE 27,1987 5
6 DAY OF WEEK DATE LOCATION TRANSPORT HOTEL ENTERTAIN MEALS
7 SUNDAY 06/21187 SAN DIEGO $89.00 $0.00 $10.00 $36.95 8 MONDAY 06/22/87 SAN DIEGO $9.00 $67.00 $32.50 $19.56 9 TUESDAY 06/23/87 SAN DIEGO $27.55 $67.00 $0.00 $35.00
10 WEDNESDAY 06/24/87 SAN DIEGO $12.50 $67.00 $98.10 $45.15 11 THURSDAY 06/25/87 SAN DIEGO $0.00 $67.00 $0.00 $24.25 12 FRIDAY 06/26/87 SAN DIEGO $0.00 $67.00 $0.00 $28.55 13 SATURDAY 06/27/87 SAN JOSE $133.00 $0.00 $0.00 $0.00 14
15 TOTAL $271.05 $335.00 $140.60 $189.46
16 17 18 19 20
I
AI: [W13j [image:47.508.86.421.209.436.2]I
12-0ct-87 03:44 PMI
I
READYI
Figure 5.2: The Allison Springs Expense Report Spreadsheet
As with any form you create, good planning pays off. The more care you put into structuring your Quattro spreadsheet, the happier you'll be with the results. Take time to think about what you want Quattro to accomplish, and organize your data accordingly. You may even want to make some pencil sketches of the spreadsheet before you start.
This practice session introduces the following terms and procedures:
o
Cell Selector. The highlighted rectangle that indicates the current cell iscalled the cell selector.
o
Moving the Cell Selector. To enter spreadsheet information you position the cell selector and start typing. In this lesson you'll use the arrow keys on your keyboard to move the cell selector. Arrow keys are shown as Right arrow, Left arrow, Up arrow and Down arrow.o
Label. A label is any text you enter into a cell. Labels can begin with any letter or punctuation mark other than. (period), / (slash), + (plus),-(minus), $ (dollar sign), ( (left parenthesis), @ (at sign), or # (pound sign).o
Entering Labels. The label appears on the input line as you type it. Ifyou mistype, press Backspace and retype. To write the label into the current cell, press Enter.
To enter labels for the expense report spreadsheet:
1. Move the cell selector to cell B3 and enter the label for the spreadsheet's main heading (refer to Figure 5.2 if necessary):
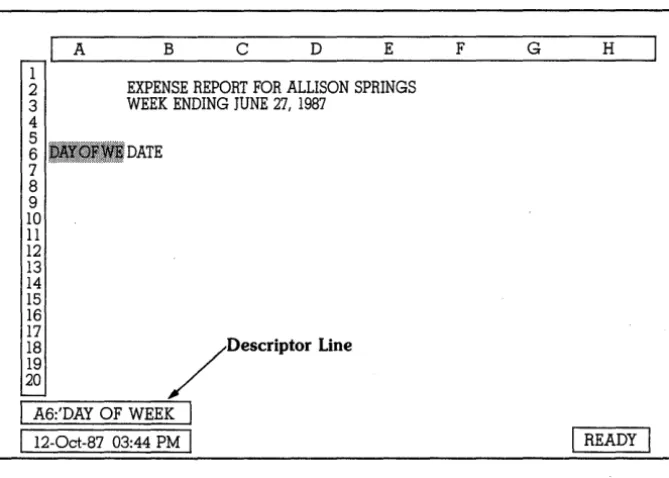
Press: Right arrow then Down arrow twice to move to cell B3 Type: EXPENSE REPORT FOR ALLISON SPRINGS Press: Enter
Tips: Use your Caps Lock key to enter data in all capital letters. If numbers appear on the input line when you try to move the cell