THE TEXT BOOK OF CLOSE COMBAT
Chapter’s 1 and 2
First Steps in Offensive and Defensive Close Combat
INTRODUCTION
The purpose of this text book is to present the reader with both offensive and defensive examples of close combat. A very wide spectrum of techniques and tactics will be described in this text book. The original purpose of this approach was to allow the reader to select techniques that suit them personally and also meet their operational requirements.
The techniques described and illustrated in this text book have been used in general warfare by Western states from the early 1900's onwards. These armies have always used close combat training programs for two main reasons;
• First, close combat training promotes fighting spirit and ruthless efficiency.
• Second, close combat training programs are the solid foundations for self confidence on the battle field.
Definitions
Self Defense.
The amount of physical force used in self defense must be the minimum necessary to protecteither you or others. This degree of force should allow you to either escape ward off or neutralize an attack.
Close Combat.
To fight and oppose with little regard paid to minimum force requirements. The amount of forceused will depend on the operational aims. This may include neutralizing, disabling, capturing and killing the enemy.
First Steps
Whenever possible, text book and video studies must be complemented with "hands on training" from a competent instructor. First hand accounts from combat veterans will also give more credence to the training program.
Standing Combat
Join a boxing, karate or kung fu club and gain valuable contact experience. This must include the practice of timing hits, judging distance, feinting, counter attacking and closing in for grappling techniques. Do not spend to long learning the one style. Focusing on the one style will create a mind set for that particular style. For example, focusing on boxing may cause you to miss the chance to either kick or throw your opponent when that opportunity arises.
Grappling
Join a club that specializes in judo, jujitsu, sombo or wrestling. Here you will learn the fundamentals of balance, break falling, strangling, choking, limb locking, the mount, the guard and escapes. A good substitute for sound practical hands on instruction in these areas does not exist.
When you are fighting more than one opponent, grappling must be avoided. You will limit your chances of survival if you allow yourself to be tied up by either applying or being caught in body holds or arm lock.
A competent ground fighter can be defeated by any of the following quick and lethal tactics; gripping the ear and chopping it off with the free hand, poking out eyes, chopping the front of the throat or eyes, biting off ears, noses and cheeks.
Technical proficiency in either boxing or wrestling or any sport combat is not a requirement for battle field combat. Half a brick or the edge of an entrenching tool to the nape of the neck will work much faster than many years of karate training. The application of these tactics requires nothing more than the will to survive.
Safety Rules
Close combat training will, at some stage, incur physical injury. This is a fact of life in all areas of combat training. Prior to any combat training, commanders are obliged to predict the expected loss rate from training accidents. This will ensure that the program starts with sufficient personnel to offset the training losses.
1. Basic training dress must include rubber soled boots, combat jacket and trousers and finally, protective body guards. Always use commercial protective equipment that meets your training requirements.
2. Prior to any training session, a thorough safety check must be made of all dress and equipment. Always check the soles of all footwear and all clothing to ensure that there are no illegal or foreign bodies attached. Also check that all pockets are empty and no one is wearing jewelry or badges.
3. When sparring, restrict all hand and foot attacks to well padded secondary pressure points. This procedure will help to reduce training injuries and teach individuals to focus and control their attacks.
4. Establish prearranged signals for stopping all activity on the training floor. The signals can be either verbal or non verbal. The most common signals in general use are either two taps on the training partner or the floor or the shout "Stop!"
5. Before practicing any technique, always ensure that those involved have a clear understanding of their roles. 6. Practice all new techniques slowly until those involved can control that technique. Speed follows on from a mastery of accuracy and control.
7. Never allow new training partners to either train or spar in your group. Give all new partners a probation period that allows them to master the safety rules and basic techniques.
8. Competence in basic first aid is a necessary skill for all those taking part in close combat training. Transport must also be available to take injured personnel to the nearest hospital.
9. No one is allowed to leave the training area without the permission of the instructor. 10. Any additions to these safety rules may be dependent on the operational requirements.
Balance
All forms of combat have one common denominator, that is, balance. You must strive to maintain your own equilibrium and try to unbalance your opponent, both mentally as well as physically. This will make all your techniques much stronger and the opponents much weaker. The simple act of stepping out of line from their line of attack will unbalance the opponent. If the opponent has grabbed at your upper body, step back and out to the side to pull them off balance into a defensive mode. If the opponent grabs at your wrist, the act of palm heeling their opposite shoulder will force them to over reach. This can lead you to using a throwing technique.
Ground Fighting
Training programs should be structured so that equal amounts of time are devoted to both standing and ground combat. There are three main reasons for this.
First, either you or your opponent may be punched, clubbed, swept or thrown to the ground.
Second, in some situations it may be more prudent to go down and attack the opponent's legs, knees, groin, testicles or bladder.
Third, there is always the chance that both you and your opponent will go to the ground together.
If your experience in ground fighting is limited, then your survival will also be limited. The grounded opponent is not necessarily overpowered or passive. This position can be used to launch many different forms of crippling and lethal attacks that are banned in sport combat.
When you are fighting more than one person, your survival will be limited. Should you end up in the grounded position, your survival is extremely limited. Offensive and defensive use of the group will be discussed in other chapters.
Lethal Techniques
Sport combat systems have excellent safety rules and safe contact techniques. Some of the techniques used in sport combat can form the basis of your close combat repertoire.
Despite these facts, rigid adherence to the safety rules will produce combatants with limited practical abilities. This is because the simplest and most lethal techniques in close combat remain unexplored and unrehearsed.
The only way lethal techniques can be incorporated into your training program is to either use slow motion drills or direct the lethal strikes to well protected areas. Also, non-lethal pressure point attacks can be directed to various parts of the body. These pressure point attacks can be used for both self defense and for setting up lethal attacks. Strangle and choke holds, as well as limb locks can be applied to the submission stage. This procedure will give you a safe and much more realistic approach to practical close combat.
Fighting Distances
• Close range offensive and defensive styles are usually favored by the shorter opponent or wrestler. (See chapter 2 for a more detailed discussion.)
• Ground fighting is favored by the wrestler. It is also the last option open to the downed opponent. (See chapter 13 for a more detailed discussion.)
Dress
In a combat situation, you will be dressed and carrying equipment essential to the operational task. Unless you have trained in this equipment, you may not be prepared to deal with this situation.
After you have mastered a set of techniques in basic training dress, you must rehearse in full operational dress. This procedure will allow you to appreciate the limitations and restrictions that operational dress and equipment can impose upon specific techniques.
Consideration should also be given to the operational dress worn by the enemy.
Fear Control
Before any boxing match, boxers will experience the physical effects of their mental turmoil. The fear of physical pain, humiliation, or losing the fight can induce many physical side effects.
For example, bowel movements will increase in frequency. There can also be incidences of vomiting or trembling. A detailed discussion on the physiological and psychological effects of battle field fear and its effects would require a chapter on its own. This knowledge would not enhance your ability to cope with the disruptive effects that fear can create.
Fear is much easier to deal with when it is accepted as mental and physical distress. This distress is created by thinking about the impending combat and all the perceived dangers. Mental and physical distress then creates a nervous energy that is very difficult to control. Paradoxically, this nervous energy is also an essential aid to individual survival. The total control of fear is neither necessary, nor desirable. The nervous energies created by fear will tense up the whole body and prepare it for either the fight or the escape. When the human body is slightly tense, it can respond much faster than a relaxed body.
Physical tension also prepares the body for the impact of the opponent's attack. Simultaneously, fear will increase the individual pain threshold. This allows the body to cope with more trauma than normal. Blood flow to the surface of the skin is reduced. Because of this, bleeding from body wounds is also reduced.
The stress of combat will also induce a mental tension. The opponent will be mentally focused on the source of the problem and will be operating with a limited level of consciousness. Their attention will be directed straight towards you. In this state, the opponent will be unable to hear or respond to advice from any source. They will also be unable to see any activity that takes place outside their direct view.
Psychological research has shown that individual fears will peak before and after a battle. During the battle, the majority of the combatants can focus on the operational task. Soldiers who are bonded together with a team spirit, well led, believe their cause is just and properly trained, will find it much easier to focus on the operational task.
Because of these factors, learning to cope with fear must form an integral part of basic combat training. The training program outlined later in this chapter can be used to produce close combat fighters who can control their fears. Your training program must also include ways of coping with the limiting mind set of focused attention. Learn to expand your consciousness during training so that you can see and hear much more than the direct threat.
The Adrenalin Rush and The Shakes
The natural reaction of the body to stress is the fight-or-flight emergency response. As mentioned in the section on fear control, the immediate physiological response is to prepare the body for either fight or flight. This includes an increase of blood flow to the brain and muscles as well as an increase in strength and energy.
If this energy is not dissipated within approximately 10 seconds, through the fight, the energy is lost through a shaking or trembling process. Your aim in any fight is to attack before the energy level peaks. Use that energy boost to defeat the opponent.
If the opponent allows their energy level to peak, without fighting, the shakes will set in and they will be incapable of reacting positively.
Distracting the Opponent
The ideal time to launch an attack is when the enemy is not prepared for it. Always try and hit first. When the enemy is either faster, stronger or prepared for your attack, distractions become necessary.
Throw.
Throw the nearest object to hand. Make the opponent flinch, blink or stop. This form of distraction will give you a fraction of a second to make your own move.
Spit.
Spitting can make the opponent either blink, vomit, draw back or lift their hands to expose the lower targets. Spit out anything that happens to be in your mouth at the time of the confrontation.
Feint.
Before carrying out a definite attack, such as a punch, either pretend to or actually use a kick. This tactic will make the opponent act in a predictable manner.
Develop your own personal set of combinations.
Shout.
Shouting and screaming can be used in order to dispel your nervous energy and disorientate the enemy.
By shouting or screaming, you can make the opponent temporarily freeze. The shouting approach can also make your own attack much stronger.
As with all forms of distraction, the enemy may over react or panic. Because of this factor, the voice must be used in a controlled manner and immediately followed through.
Breathe.
Your breathing can also be used to strengthen your attack and confuse the opponent. This can be done by hissing or grunting as you move or attack.
Consider the boxer's mode of breath coordinated striking. Just before you strike, you tense up your stomach muscles. Before the strike lands, either grunt, hiss or blow out half your lung capacity.
Move.
In many fights, the opponent will be operating with a limited level of consciousness. The opponent will both "telegraph" and persist in using the same technique. The simple act of either kicking or using a straight arm strangle will induce the opponent to copy you. Both these situations can be used to your advantage.
Combatants are usually motivated by fear or blind hatred. It is not normal for them to think tactically and respond positively to their opponents attack. Attacks are usually focused on the position of the opponent. The simple act of stepping out of this direct line of attack can confuse the attacker.
Try to remain mobile during a confrontation. This will disrupt the opponents timing and concentration. If your opponent is circling around you, disrupt their timing by either stepping in or out with a side step of your own. If your opponent is right handed, move round them in an anticlockwise direction. This will keep you away from the much stronger right side of their body.
At other times encourage the opponent to move forward. Their momentum will add more impetus to the force of your attack.
Chapter 2 will contain much more detail on this factor.
Talk.
Talk to the opponent and find out what they want from you. Talking may help to reduce the tension of the situation. It will also leave the opponent more open to attack.
Vary the volume and speed of your speech, this will force the opponent to focus on your voice.
Ambush.
Leave the enemy an obvious opening in your defenses. Once their anticipated attack is initiated, you can counterattack.
Pretend.
Pretend to be afraid, injured, dead, competent, brave, stunned or mad. Do anything to disrupt the thinking processes of the opponent. Create a mental block in the opposition and then use the opportunity this creates to either attack or escape.
Speed
Every individual varies in the degree of speed they can generate in either offensive or defensive techniques. This fact is based on the normal physiological differences.
Other factors can affect individual speed and reaction times. These include, mental alertness, physical well being and the quality of individual combat training.
dependent on the quality of the training program.
Not all fights will be lost because the opponent is much faster than you. Slow reactions can be compensated for in many ways. For example, attack first whenever possible, after that, use distractions or combination attacks.
Initiative
Initiative can be defined, in the military sense, as making the first move. This behaviour will force the enemy to conform to your movements.
Taking the initiative away from the enemy places them in a more vulnerable position. Not only have you taken control of the situation physically, you have also taken a more dominant position at the mental level. All distractions are examples of initiative.
Initiative is not just the prerogative of the team leader. It must be fostered in all members of the team. Individual initiative can be fostered through the employment of a structured training program. Such a program must be based on the team mission. It can have built-in problem scenarios that simulate the expected operation.
Individual passive or active behaviour in these scenarios should become more innovative rather than indecisive or inappropriate. This training should produce individually motivated, self-reliant soldiers who are always thinking one move ahead.
Improvisation
Improvisation involves the adaptation of basic techniques, principles and readily available objects to achieve the team mission. The principles of improvisation and initiative are closely related. Both demand a high degree of flexibility and originality from the thinking processes.
The mind set required for initiating action and improvising on the on the battle field can be enhanced by using a combat orientated training program.
Impulsiveness
Once you are engaged in combat, there is no time to think about specific forms of attack or defense. Your behaviour must be impulsive and more instinctive. This can only be achieved through contact training with an active training partner.
In many sport combat systems, you will receive a grading by displaying standard responses to standard attacks. In close combat, there are too many variables involved to use such a dogmatic mind set. Your response to an attack must break all the rules, the opponents in particular.
After you establish a basic competence in any technique, you must go on to develop variations. This will make your style much more unpredictable, impulsive and instinctive.
Do not waste valuable training time by practising in the sterile mode of bag work. Punch bags are useful for developing combination attacks, timing, distance, impact effect and power.
It is imperative that you go on to sparring sessions. Here you can apply combat techniques on a living, moving opponent who is retaliating and exploiting all of your weaknesses. Your techniques will never be perfect, in this situation, but your impulse to act positively will be much keener. This form of training will also make your reactions much more instinctive.
Impact Effect
Some forms of sport combat award points for perfect strikes. Because no full contact takes place, the effects of these strikes are very speculative. In combat situations you will be faced with someone who moves and even retaliates. Perfect technique is either impractical or may not have the desired effect.
At times, the enemy may absorb a punishing attack without registering any pain. This may be due to either fear, knowledge of impending death, shock, drugs or fighting spirit. It may take four or five strikes to create the desired effect. One strike text book kills must be abandoned for a more flexible and sustained assault.
Impact effect on your own body must also be explored from two perspectives.
First, you must experience the opponents attack in order to assess your ability to absorb the impact and react positively.
Direct Attacks
For economy of space, the techniques illustrated in this text book are all direct attacks. Single technique direct attacks are not always successful.
Your initial attack can be used as a feint. The feint will allow you to observe how the opponent reacts. Feints can also be used to create an opening. This will be discussed later.
Combat Appreciation
(S.W.A.T.)
The experience of fear, on the battle field, can disrupt you tactical thinking. In combat appreciation, you must learn to focus your attention on four basic factors.
The practical consideration of these factors will help you to assess both your situation and the appropriate course of action. These four factors are:
•
S
trength •W
eapons •A
im •T
errain.1. Strength (Numerical and Physical)
a) YOU: Your strength depends on how fit you are to handle the situation and how reliable your comrades are. b) THE ENEMY: Is the enemy younger, fitter, faster, fatter, more confident, more experienced, or drug crazed? Are they accompanied by comrades or are they close at hand?
2. Weapons (Legal, Illegal, Improvised and Procured)
a) YOU: Have you time to go for a weapon? Is it safe to go for a weapon? Are there objects lying around that can be used as weapons?
b) THE ENEMY: What weapons do the enemy have? If you can improvise, will they also improvise? Have you adequate defenses against their weapons?
3. Aim (Purpose and Attitude)
a) YOU: Your aim, at all times, will be survival at any cost. How you achieve this depends on your appreciation of all the other factors.
b) THE ENEMY: Your opponents aim can include detaining, crippling, raping or killing you. It is up to you to find out fast, by arguing, observing, moving, listening, talking, cooperating, thinking and distracting.
4. Terrain (Surface Conditions and Troop Disposition)
a) YOU: Are you in an area that is familiar to you? Can you use the ground to your advantage? What type of tactics can you use on that terrain to escape or stay alive? Where is the nearest refuge? Can you step, roll or fall without danger? Where is your nearest back up?
b) THE ENEMY: Is this their territory? From which direction will their support come? Consideration of these four factors will help you to survive.
Quarter
In a boxing match, when your opponent falls, you immediately go to a neutral corner.
This scenario does not occur in close combat. When your opponent falls, this simply indicates the next phase of the fight. Always continue the fight until your survival is guaranteed.
Never give the opponent the opportunity to recover. Never expect quarter and never give it until your operational aim has been achieved.
Nerve Points
The illustrations in chapter 2 show 32 frontal and 17 rear targets on the human body. Not very many people will have the clarity of mind, in the heat of the fight, to remember these precise points.
Just remember that the maximum damage pressure points lie down the centre line of the body from between the eyes to the pubic area. This centre line is usually well defended with body armour or the opponents forearms. The best way to get to the vulnerable areas of the body is to attack either side of the centre line to open up the opponents defense, then attack the centre.
You can also work your way around the opponent and attack the rear areas.
Consider using combination attacks to weaken the opponent and break down their defenses.
Hand Techniques
The bones of the hand are very delicate and easily damaged. Most people have a natural tendency to clench their fists in violent situations. Because of this fact, some closed fist techniques have been described in this textbook. The fist must only be used when it is protected by heavy duty gloves or knuckle dusters. This will be discussed in much more detail in Chapter 3.
Defensive Stances
Think about this point. If you have the time to adopt a defensive stance, it means that an attack on your person has been either unsuccessful or you have time to perceive an attack on your person and time to adopt a stance.
On many occasions your perception of an attack will be preceded by a feeling of semi-consciousness after a surprise attack or else your body hurtling to the ground after a rear attack.
Stances are secondary to learning how to run from, duck, dodge and parry attacks as they occur. Stances are also secondary to learning how to break your fall and carry out a defense from the ground.
If you have time to perceive an attack, that time would be better spent either escaping or else attacking, rather than presenting a static target and the static mind set that stances can encourage.
Use stances as part of your distracting techniques. For example, adopt a boxers stance and use your feet. Despite these points, stances for stick, knife and unarmed situations will be discussed further in Chapter 2.
Foot Techniques
In sport combat, many foot attacks are directed at difficult to reach areas. For safety reasons, kicks are never allowed to the most vulnerable areas. These areas include the ankles and sides of the knee cap.
Try and keep your kick and sweeps low where they are at their most powerful. This approach will keep you away from the opponent's hand and grappling techniques.
The terrain you are fighting on will restrict the type of foot techniques you can use. Try to revise foot techniques on a wide variety of terrain.
Body Movement
Text book illustrations always fail to convey the degree of body movement involved in any technique. The figures used in illustrations can only represent a single phase of a physical action. Do not slavishly follow the illustrations. It is important that you modify the techniques illustrated in order to suit your height, dress and situation.
In close combat, you must move continually. Keep stepping both in and out of the opponent's line of attack. This will disrupt their timing. Also sway, bob and weave in order to avoid strikes. Body movement is the priority in avoiding attacks. This is because ducking and dodging is much more instinctive than blocking techniques.
Holding the Opponent
Grabbing or holding the opponent will place you at a disadvantage. With your hands employed, your defenses are restricted. This is particularly true when you may have to fight with more than one person. Always weaken or distract the opponent before trying to apply a hold. When you go for a hold, try to apply it to the hair, ears, testicles, throat or fingers. Also use pincer grips, arm and leg locks, chokes and strangles.
The application of holds depends on the successful use of distractions and combinations.
Holding a Weapon
Holding a weapon can place you at a disadvantage, if you are focused on looking for an opening to use that particular weapon.
The weapon can also be used as a distraction by you. While the opponent is focused on the weapon, attack by any other means.
Unconventional Techniques
Survival in combat can be attributed to many factors other than numerical and technological superiority. History has shown us that many a battle has been won by a weaker opponent who can disrupt the enemy with an sudden or unconventional attack.
If you pull an opponent's hair it will cause a great deal of distracting pain. It will also make their eye's water. With a good grip on someone's hair it is possible to slam their head into the wall, the ground, your knee or head butt. When you claw at someone's face or throat, their natural reaction is to either copy the action or at least lift their hands in defense.
This can be used to apply another technique in response to the opponent's behavior.
lower part of the leg.
If you know the opponent's style, unbalance them mentally by breaking all their rules of engagement.
Emergency Techniques
In some standing or grounded situations you may become blinded, stunned, shocked or surprised.
Do have a set of well rehearsed techniques that do not rely on visual contact. They will occupy the opponent and give you time to recover.
• Trap their arms in a bear hug. This will allow you to stamp on their insteps; use head butts, or bite their throat and face.
• Grab a handful of hair and move back, pulling their head into a knee lift or slamming their head into the ground.
• Push the palms of your hands up the opponent's cheeks. Your thumbs will fall naturally into the eye sockets. At this stage use one hand to palm heel the lower body targets.
• If the opponent has their back to an obstruction, you can palm heel the chest area. This will whip lash their head into the wall and back into your head butt.
• Grab at their throat and attack the groin area with the free hand.
• Grab the groin area and attack the face area with your elbows or head butts.
Training Sessions
For combat efficiency, the training requirement is twice weekly for one year. There are two main reasons for embarking on a training program.
First, the ability to fight in either armed or unarmed combat is not a skill that can be learned from either books or videos.
Second, some individuals do not posses the ability to fight and find it impossible to be totally aggressive.
For these reasons, a training program must be employed in order to assess the fighting ability of individual soldiers. There is no point in learning technique from books or videos unless you can apply it to a living, retaliating opponent. Knowledge is the reserve of the instructor who may or may not be able to fight. Fighting experience is the reserve of those who can survive.
The length of the training program also depends on the operational role of the troops involved. This may vary from a short but intensive program to instill self confidence, to a longer program for training future instructors.
Each training session should last for two hours. An all round training approach can be tailored to cater for the units operational requirements. A basic training session would contain the following elements. These elements will be discussed in more detail at the end of this chapter:
10 min - Safety checks 20 min - Basic sparring drill 20 min - Bag work revision 20 min - Ground work revision 20 min - New material
10 min - Free sparring 10 min - Match fighting 10 min - Bag work revision 10 min - Ground work revision 20 min - Yoga and Visualization
Revision Sessions
To promote speed, self confidence, and fighting skill, the revision sessions must contain as many variables as possible, for example;
1. The attack can be structured as a rush attack, rear attack, side attack, group attack, ground attack or combination attack.
4. The conditions must also be varied. Train within a crowd of people, in a cramped room, in darkness, your hands may be tied or you may be blindfolded or stunned.
The stunned condition may be simulated as follows: 1. Place the end of a brush shaft on the ground.
2. Place both your hands over the other end and then rest one of your ears on top of your hands.
3. Run round the broom shaft without lifting the shaft off the ground or lifting your ear from your hands. 4. After 30 seconds of this exercise, try to either adopt a fighting stance or use a punch bag.
Close Combat Training
There should be at least four phases to close combat training. Furthermore, these phases must be broken down into stages. This will help to ensure that your training program has a progressive structure.
Phase 1 - Basic Techniques. Stage 1 - The Basics.
Practice single offensive techniques from all sections of the text book. Make maximum use of the training aids, including punch bags, static and active partners. Practice until you have a thorough knowledge of the basic techniques at the different fighting ranges.
Stage 2 - Defense.
Practice different defenses against the same offensive technique. Learn how to counter attack as well as defend. Keep the physical contact under control so that undefended strikes do not have a serious impact. Move around the training floor using stepping drills and distractions.
Stage 3 - Combination Attacks.
Combine two techniques from one discipline only. One partner remains passive and simply observes the line of the attack. Use this procedure until you are proficient in using combinations.
Both combatants must be continually moving round the training floor. This will teach you how to judge distances and time your hits. By acting as an observer you will also learn how the combination is set up. Pay attention to the way most moves can be "telegraphed" by the attacker, long before they materialize.
Stage 4 - Defense.
Practice several defenses against the same combination attack. Use light contact only at this stage. Again, you must make maximum use of the floor space.
Phase 2 - Free Sparring
Before this phase, sensitivity training and sparring drills may be introduced. The aim of free sparring is to develop your spontaneity in attack and defense. In this phase, there is no collusion between the combatants. The techniques used in free sparring are personally selected and tested out by each individual. You are now learning to use offensive and defensive techniques on an opponent who has the same intentions.
Free sparring is a vital phase in your training program. It will bridge the gap between basic technique and match fighting. Free sparring is used to develop your fighting ability. It is the practical application of the former four stages you have just progressed through.
Lethal tactics are not permitted at this stage and all strikes are directed to full body armor.
Always work in teams of four. The teams are made up from two combatants with one observer each.
Spar for one minute and then allow the observers to discuss both combatant's strengths and weaknesses. The observers are also expected to control dangerous play.
Two sparring sessions, with a total of two minutes, will be quite sufficient in the early stages of your training. Constantly change your training partners. Fresh partners will demand a fresh approach on your part.
Phase 3 - Match Fighting.
A match fight is a knock down contest to establish the superiority of a particular fighter. There is no time limit to a fight. A fighter will lose the fight when:
• They fall down and remain open to lethal attack.
• They are knocked out.
• They are caught in a strangle or choke hold.
• They have to submit on account of a lock.
The judgment of the observers is necessary because protective clothing will nullify some of the lethal attacks. The observers are also necessary because either of the fighters may become stunned and incapable of responding to submission holds.
Phase 4 - Close Combat Drills
Close combat drills will allow you to advance your practical knowledge of close combat without the requirement of lethal contact.
Your knowledge has already been advanced as far as practically possible. You must now use that practical experience to formulate individual drills. The complexity, duration and practicality of these drills will depend entirely upon the effort you put into the preceding three phases.
Combat drill is the prearranged form developed by the combatants. It is used to practice the application of lethal tactics. At the critical stage, all the strikes are controlled with minimal contact.
The subject areas to cover include: • Attacks, either front or rear.
• Attacks and counters.
• Combination attacks.
• Weapon drills.
Training Practice
Keep changing the training partners over. This will stop students from becoming too familiar with each other and thus developing a complacent attitude.
During a training session, have a Team Leader detailed to control the class. The Team Leaders role is to formulate a specific training and stick to that program. The team Leader must be capable of stopping dangerous practices and also motivating the students to maintain a high work rate.
Obstructive Practice
During practice sessions, it is possible to develop an obstructive mind set. This is where you start to anticipate the training partners movements and you apply counter moves. This will slow down your partners development. Allow your partner to practice a move until they are proficient at that technique. Remember that all techniques are usually set up with distracting punches or kicks. Your ability to anticipate your training partners moves will be properly tested during match fighting.
Perfect or Practical
Spend at least two minutes on each technique. Work fast to develop power, speed, recovery, accuracy and tactical movement. Get away from the mind set of doing 200 kicks or 200 punches.. Practice each technique for at least two minutes, even if you only manage 50 repititions. You must try to incorporate the technique into a fighting framework. The aim is to make the technique part of a defense and attack strategy rather than a sterile exercise in technique.
Bag Training
The punch bag is a passive training aid. Spend too much time on it and you will neglect your defense and ability to react positively to an attacker.
Kick Training
Keep your kick training as realistic as possible. Move back and forward, left and right, counter and use combinations. Close combat is both dynamic and demanding, you must keep moving an remain difficult to predict. Kicks are powerful techniques; they will have an effect, not only on the opponent, but also on the applier. Anticipate these effects through a rigorous training procedure that involves an active training partner.
Yoga Exercises
The following Yoga exercises will help you to relax mentally and physically: • Salamba Sirasana - Head Stand
• Salamba Sarvangasana - Neck Stand
• Uddiyana Bandha - Stomach Isolation
Total relaxation is neither desirable nor a prerequisite to fighting success.
There is an ideal level of relaxation to be aimed at. The ideal level that allows you to cope with battle field stress and continue to think tactically.
To Blitzkrieg or to Hammer
In a fighting situation, you have two avenues of attack. First, you can Blitzkrieg the opponent by hitting from every angle.
Second, you can Hammer away at the same spot until the enemy is defeated.
For the untrained, the Blitzkrieg is more difficult to activate and is also less instinctive. This is because it demands an active, analytical form of thinking.
Combat is always performed at a very base level of intellectual consciousness. Thinking, seeing and hearing are usually focused directly on the immediate threat. For this reason, the Hammer approach is a better tactic for the inexperienced fighter. The Hammer is more instinctive, single minded and can be used to break down the opponents covering up tactics.
The physical strength required to defeat an opponent is a limited commodity that evaporates after 5 - 10 seconds of hard combat. The flow of adrenalin, that occurs at the start of a stressful encounter, will sap your strength if it is not controlled.
Using the Hammer tactic will sap your strength if the opponents’ defense is good. Why persist in using valuable energy on an opponent who can cover up and bide their time until your energy level drops? Against an aggressive opponent, hammering away with a single technique will give the opponent time to switch tactics and counterattack. For example, why try to head butt an opponent who is pushing away at your chest. You may try the head butt several times before realizing there is no connection taking place. Meanwhile your strength is sapped, the initiative has gone and the mind set of a single tactic will leave you in an impasse, open to counterattack.
Blitzkrieg or Hammer? It all depends on the opponents approach and responses to your attack.
Visualization
The mental practice of visualization can be used to enhance your fighting skills.
This is a process where mental and physical feed back can accelerate your practical fighting ability. If you can hold a mental image of a technique, your practical performance will improve.
When you can perform a technique properly, enhance your image of it through visualization.
Visualization can also be used as a form of battle field inoculation. Consider a specific set of techniques required for an approaching operation. By visualizing these techniques, your fears and stress levels will be reduced.
General Principles
In combat, it is difficult to think in terms of specific responses to specific attacks. Your mind must remain uncluttered from this baggage.
• Fight without thinking, hit first, react second.
• Reduce the targets to the center line.
• Defend the center line, angle it away from the opponents.
• Never fight the opponents fight, do the opposite.
• Keep changing your tactics.
• Dogged determination and flexibility beat perfect technique every time.
CHAPTER 2
Chapter 2 - Intro
This second section will describe in more detail the fundamental techniques outlined earlier. The subject matter will include:
• Pressure points and appropriate mode of attack
• Body movement
• Footwork
• Kick defenses
• Punch defenses
• Basic sparring drills
• Coping with the different fighting ranges and styles
The Pressure Points
Pressure points are areas of the human body that are vulnerable to damage when attacked with the appropriate weapon. The effects of strikes to pressure points will also depend upon a combination of the following five factors:
• The weight behind the delivery.
• The speed of the delivery.
• The accuracy of the strike.
• The type of weapon used.
• The opponent's physical and mental state.
Operational dress and equipment will directly influence technique as well as the effect of any strikes. Specific pressure points are difficult to reach, especially when the opponent is moving and attacking you at the same time. The exact pressure points can only be attacked when the opponent's defense has been broken down with strong attacks to general areas. Real combat will never be a display of perfect form. It will always be a display of quick opportunities. There will always be a high rate of low power strikes, forced throws and imperfect techniques. Because of this factor, consider the principle of overkill by using combinations in your attack and defense.
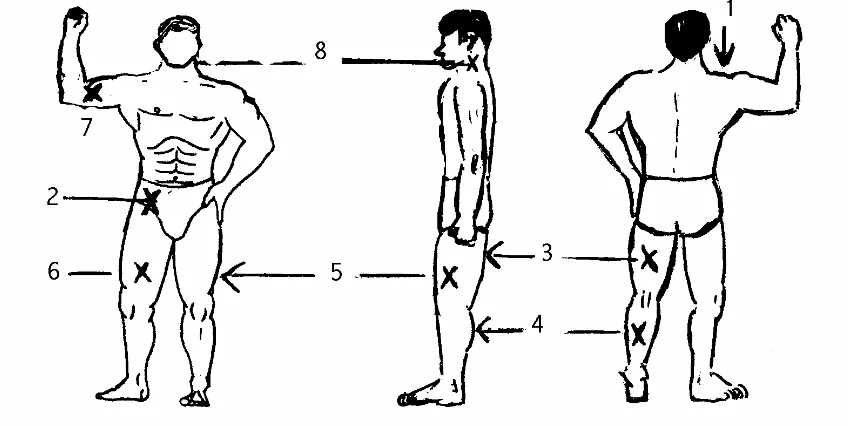
Primary Pressure Points
Front
Fig.1
1. The top front of the head can be attacked with: • Hammer fist
• Heel stamp
2. The temples lie between the tops of the ears and the eyes. Attack the temples with: • Palm heel
• Hooking palm heel
• Head butt
• Toe kick
• Knife hand
• Elbow
• Knee
• Heel stamp
3. Attack the area between the eyes with: • Knife hand
• Palm heel
4. Attack the ears by grabbing or clapping: • Grab and rip up or down
• Grab and chop with knife hand
• Clap with cupped hands to damage the ear drums
5. The eyes can be attacked with any weapon. Minimum force is required to create maximum damage. The only danger to the attacker is the rigid bone that surrounds the eye socket. Remove the eye by pushing the fingers or thumb in at the top middle of the socket.
6. The jaw line can be attacked with:
• Palm heels to the point to cause knock outs
• Palm heels to the side in order to break the jaw or cause knock outs
• Knife hand
• Elbow
• Kick
7. The throat area targets cover the wind pipe, Adam's apple and the hollow of the throat: • Fingers and thumbs
• Palm heel hook
• Elbow
• Knife hand
• Pincer grip
• Heel stamp
• Palm heel
• Side kick
• Roundhouse kick
• Roundhouse shin kick
• Knee
9. The solar plexus area is usually well protected. Any attacks to this area are usually part of a combination that opens up the opponent's defenses. Attack this area with:
• Palm heel
• Knee
• Toe
• Elbow
• Back elbow
• Head butt
10. The ribs are usually protected by the elbows. They can be attacked with: • Forward and rear elbow strikes
• Palm heel hook
• Roundhouse knee
• Roundhouse shin
11. The spleen can be attacked with: • Palm heel
• Toes
• Elbow
12. The bladder and groin area can be attacked with: • Palm heel hook
• Palm heel
• Elbow
• Back knuckle
13. The genital area is usually well protected. Direct attacks to this area can be used to draw the opponent's defense down and leave other targets exposed. Attack this area with:
• Pincer grip
• Grab and twist
• Knife hand
• Shin
• Forearm
14. The knee caps are best attacked when the opponent has most of their weight on them. Attack with: • Side kicks when the opponent is side on to you
• Roundhouse shin kick
• Roundhouse heel kick
15. The insteps have a very delicate bone structure. Attack this area with heel stamps.
Primary (Maximum Damage) Pressure Points
Rear
1. The top front and top back of the head can be attacked with: • Hammer fist
• Palm heel
• Heel stamp
2. The hollow at the base of the skull can be attacked with: • Toe kick
• Palm heel
3. The spine at the base of the neck can be attacked with: • Knife hand
• Palm heel
• Elbow
• Toe kick
• Heel stamp
4. The area between the shoulder blades and the area below the left shoulder blade can be attacked with: • Palm heel
• Heel kick
• Side kick
• Elbow
5. The ribs are also available in rear attacks: • Palm heel
• Side kick
• Elbow
• Roundhouse kick
6. The kidney area and up below the bottom ribs may be attacked with: • Side kick
• Palm heel
• Elbow
7. The tail bone may be attacked with: • Knee kick
• Toe kick
• Elbow
Secondary Pressure Points
When these points are attacked, the following effects can be expected: • Sharp pain
• Stunning pain
• Unconsciousness
The secondary chart excludes those areas susceptible to maximum damage. This will not guarantee that attacks to these areas will not be either crippling or fatal.
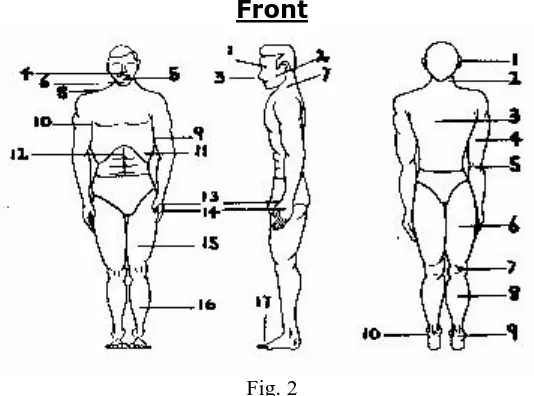
[image:16.612.170.437.295.493.2]Front
Fig. 2
1. The ridges of bone around the eyes can be attacked with:
• Head butt
• Palm heel
• Feet
• Teeth
2. The cheeks can be attacked with: • Teeth
• Nails
• Slaps with the cupped hand
• Head butt
• Knife hand
• Knee
• Elbow
• Teeth
4. The upper lip area and below the nose can be attacked with: • Palm heel
• Knife hand
5. The mouth can be attacked with the feet. Do not attack the mouth with your bare hands. This principle will protect you from damaging your hands and serious infections
6. The point of the jaw can be attacked with palm heel jabs. The sides of the jaw can be attacked by inserting your fingers or thumbs up below the jaw.
7. The muscle ridges to each side of the neck can be attacked with either palm heels or the knife hand. 8. Attack the shoulder muscle with the knife hand.
9. The soft inner side of the upper arm can be attacked with: • Teeth
• Pincer grips
• Single knuckle punch
10. The arm pit can be attacked with thumb pressure directed up to the arm socket. 11. The ribs can be attacked with light palm heel attacks.
12. The solar plexus can be attacked with light palm heel strikes. 13. Attack the wrist area with: Knife edge Pincer grip Teeth
14. The back of the hand can be attacked with single knuckle punches or bites.
15. The full length of the thigh as well as the inner parts of the thigh can be attacked with: • Roundhouse shin kick
• Roundhouse knee kick
• Teeth
16. The shins can be attacked with:
• Scraping the side of the shoe downwards
• Direct toe kick
• Heel kick
17. Distractions can be achieved by stamping in the direction of the toes.
Secondary Pressure Points
Rear
1. The ears can be attacked from the rear by: • Palm heel
• Thumb pressure upwards at the hollow of the jaw line that lies behind the ear lobes.
• The upper jaw area, directly behind the ear lobe, is very susceptible to thumb pressure
3. The areas below the shoulder blades can be attacked with: • Palm heel
• Elbow
4. The centre rear of the upper arm can be attacked with: • Palm heel
• Pincer grip
• Knife edge
5. The elbow joint can be attacked with steady pressure to force the whole arm out straight. This is possible after stopping a punch. A grip is retained on the attacker's wrist and the pressure is applied with your chest.
6. The back of the thigh from the buttocks to the knee joint can be attacked with toe kicks or pincer grips.
7. The back of the knee joint can be stamped to affect a take down. This can also be achieved with thumb pressure.
8. The calf muscle can be attacked with: • Thumb pressure
• Toe kick
• Side kick
9. The Achilles' tendon can be attacked with toe kicks or forearm pressure to affect a leg lock. 10. The ankle bones can be attacked with toe kicks.
The Stances
General
There are no superior stances. The value of any stance depends on your fighting knowledge of its weaknesses and strengths. This also has to be coupled with your reactions to the opponent.
One of the best all round stances for quick response remains the wrestling stance. In this stance both your feet are about shoulder width apart. The knees are slightly bent and your body weight should be equally balanced on both feet.
The Basic Stance
The aim of explaining and illustrating this basic stance is not to promote it as a superior stance. This stance has been used to explain the theoretical use of stances. With the working knowledge gained from using the basic stance, you can go on to adapt it to suit your personal situation.
The basic stance illustrated in Figure 3 can be used either defensively or offensively. In the defensive mode, 75% of your body weight is on the rear foot. In the offensive mode, your body weight is equally distributed on both feet. In both cases, the most vulnerable areas of your body are turned away from the attackers direct line of attack.
Leg Position.
To use the basic stance, point the toes of the leading leg at the opponent. Ideally, the toes and the heel of the leading leg should be in line with the heel of the rear foot. The knee caps are easily damaged in combat. To protect the leading knee cap, transfer your body weight to the rear leg. The leading leg can also be used to protect the rear leg.Upper Body Position.
In the left leading stance, the left leg is in front. The left hand is raisedto a point six inches in front of the chin. This hand is used to protect the face. The left elbow is positioned in front of the body in order to protect the rib cage. As a counter against low punches and kicks, your right forearm lies across the lower torso with the hand covering the left groin. Tuck your chin into your left shoulder and look at the opponents chest. This will give you a good view of their arms and legs. When you look at the opponents face, it is impossible to notice the subtle hip and leg actions that telegraph their intentions.
Keep your mouth closed. This will protect your teeth and tongue to a much better degree.
After two months sparring practice, you will learn to relax thix exaggerated stance. At this stage you will know what openings you have left in your defense. You must also spend as much time using the right leading stance. The right side of right handed people is much stronger than the left side. Attacks and defenses from the right leading stance will also confuse the opponent. This procedure can also be used by left handed individuals.
The Boxing Stance
The boxing stance is not ideal for close combat. This is because it leavesthe lower torso exposed to attack. The boxing stance in Figure 4 is not ideal for close combat. This is because it leaves the stomach area uncovered. If an opponent presents this stance, do not use hand techniques. Instead, concentrate on kicks (Fig 5), grappling and ground fighting.
Fig.4 & 5
The Karate Stance
The wide stance shown in Figure 6 is not very practical outside the karatehall.
Fig.6
Blocks and parries are useless exercises, on their own. They must form part of a fluid reflex action that involves a counter attack. A block or a parry should interrupt the path of a strike and deflect it, rather than stop it. The deflection of a strike will reduce its impact and also allow you to retaliate. The end product of your block and parry training must be a fast and fluid style as opposed to a jerky and mechanistic sequence (block, pause, punch, pause).
All blocking actions are very vulnerable to counter-attack. The opponent may trap your blocking arm and use a follow-up strike. Your basic training in blocking and parrying should go through four stages.
•
Stage 1
For a six minute period allow your partner to throw 300 punches at either yourface or body guard. These punches must be controlled so that there is no hard contact. The first 50 punches are done in slow time or until the partner can control the technique. With the development of control, the punches can be speeded up. Your partner must concentrate on developing speed, focus and recovery. Your role in this exercise is to watch your partner's arms, feet, shoulders and the attacking limb. Build up a thorough knowledge of the mechanics of that particular technique. Learn about it's path into your defensive zone. In the final 50 repetitions try to add more power to the punches. Power punches are not just generated through arm action alone. Learn to triple the speed, and the power, of the technique by using the full shoulder and hip extension as well as a shooting forward action. These three actions will be explained in more detail later on in this chapter.
•
Stage 2
Practice the blocking action in slow motion. Also learn to duck, dodge and parrythe punch.
•
Stage 3
Speed up the technique. Learn to use more hip and shoulder extension in bothyour partner's attack and your defense. At this stage, retaliation is not considered. There are other skills to be developed before you try counter attacks. Practice all the other skills that keep you from being an easy target. These include; Ducking, Weaving, Stepping out of line, Turning, Shooting forward and back, Bobbing and Crouching.
•
Stage 4
At this stage you can apply your counter attack. The first three stages will havegiven you a thorough working knowledge of a specific technique. You have not wasted your time watching the opponent's actions in feinting, stepping and attacking. By studying the path of the strike into your defensive zone, you have a broader concept of the potential follow ups you can use. When you can predict the opponent's actions, you can also attack first and upset their timing.
The Basic Block
When you are in the fighting stance, your arms are always directly betweenyour centre line and the opponents. From this fighting stance deflect the striking arm or leg by striking it with the outside of your forearm (Figures 7a & b)
.
Fig.7a & 7b
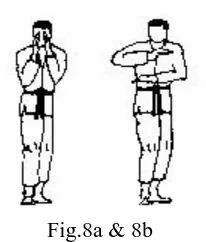
Smothering Block
Cushion the effects of kicks and punches to the upper body by holding both arms in front of your body. The forearms are at least six inches away from your body (Figures 8a & b).Fig.8a & 8b
Elbow Block
Snap your elbow up and deflect the punch with your forearm (Figure 9). If you usethis block from the fighting stance, the motion is reduced to a reflex jerk of the elbow. In this block, both your hands are free to grab the attacking arm.
[image:21.612.256.359.105.226.2]Fig, 9
Palm Heel Block
The palm heels can be used to parry and block hand attacks. In Figure 10 theopponent's biceps muscles were palm heeled and the elbows were then grabbed. This can be followed up with head butts or palm heels to the face.
.
Fig. 10
Out Parry
Keep the palm of your left hand facing the ground. With the palm still facing the [image:21.612.255.359.286.409.2] [image:21.612.274.341.477.605.2]Fig. 11a & 11b
At all times, keep the elbow of the parrying arm down to cover your ribs. The parry should not extend further than your left shoulder width. In the execution of this parry you can also step in and counter attack.
In Parry
Keep the upper part of your left arm close to your body. Move your left palm out to the [image:22.612.248.363.49.286.2]side in a circular motion. At the same time, step back with the right foot and turn your shoulders clockwise (Figures 12a & b).
Fig. 12a, 12b & 12c
In a successful parry, the little finger edge of your forearm should parry the opponents attacking forearm (Figure 12b). Add power to this parry by moving your left elbow to the front of your body. Also snap your left palm round to face you just before contact. Figure 12c illustrates the opposite side view of the final stages of the parry.
Basic Footwork
Foot Blocks
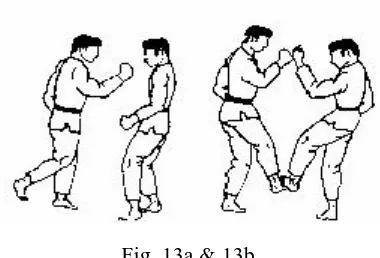
The threat of direct kicks to the groin will be reduced if you maintain the basic side [image:22.612.157.460.429.555.2]Fig. 13a & 13b
By staying close to someone who uses kicks you may neutralise their kicking ability. There is an inherent danger in getting too close to a kicker. Some of the most lethal kicks are the low sweeping hook kicks to the knee caps. This form of kicking will not be visible when you are too close to the opponent.
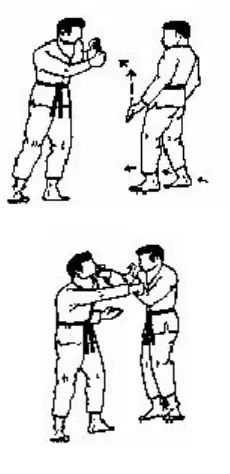
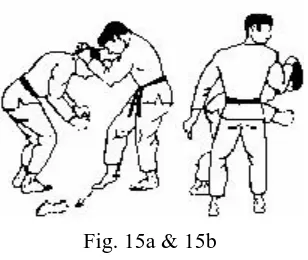
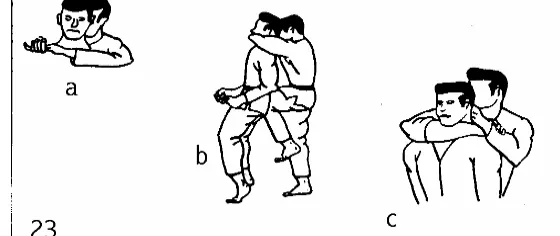
[image:23.612.212.402.52.181.2]Going Behind an Opponent
Fig. 14
•
Method 1
If the opponent has one of their arms extended, pull on that arm so that theopponent is moving forward off balance Fig 14 .Step forward on your right foot in order to swivel in behind the opponent (Figure 14). Ensure that you do not allow your legs to cross.
•
Method 2
Pull on the opponent's head or arm so that they are moving forward off balance [image:23.612.263.346.451.594.2]Fig. 15a & 15b
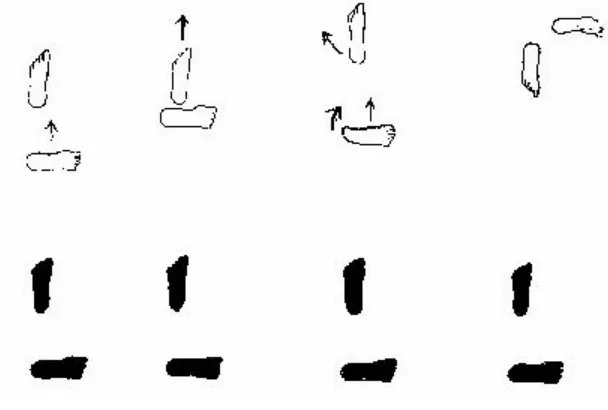
Stepping Drills
Retreating
Retreating should be carried out in such a way that one foot is on the ground at alltimes. It is equally important that your legs are never allowed to cross. Adherence to these two basic principles should ensure that you maintain a stable posture while under stress or strong attack. With practice, these two rules will become second nature.
Short Retreat
Start from the basic stance with the left foot leading as in Figure 16a. The left [image:24.612.231.385.51.181.2]foot slides back into contact with the right foot (Figure 16b). The right foot is then moved back so that you have returned to the basic fighting stance (Figure 16c).
Fig. 16a, 16b & 16c
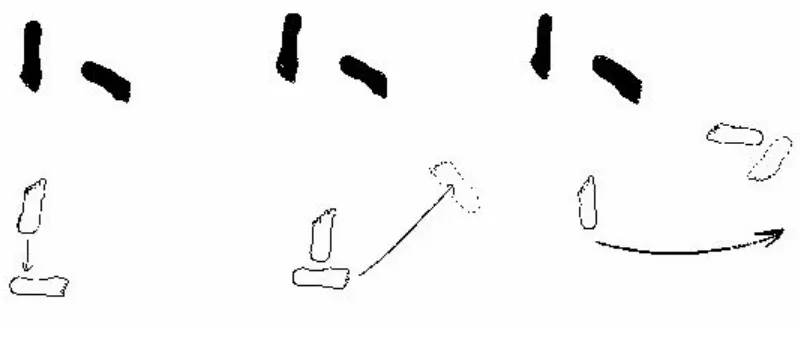
Moving From a Left Stance to a Right Stance
Move the leading left foot so that [image:24.612.176.437.320.520.2]Fig. 17a, 17b & 17c
Turning From Rear Attacks
Draw the rear foot away from the attack area (Figure18a)until it touches your leading foot (Figure 18b). Advance your leading leg (Figure 18c). Swivel on the toes of both your feet in order to turn and face the opponent (Figure 18d).
Fig. 18a, 18b, 18c & 18d
Short Advance
To advance, slide your right foot up to your left heel (Figure 19a). The leadingleft foot can be then advanced or used for kicking with (Figure 19b)
[image:25.612.154.458.336.541.2]Fig. 19a & 19b
Side Stepping
Long Side Step
To side step to the right start by sliding your left foot back into contact with [image:26.612.204.407.50.219.2]your right foot (Figure 20a). Take a wide step to the left of the opponents line of attack with your right foot (Figure 20b).
Fig. 20a, 20b & 20c
Swivel on the toes of the right foot (Figure 20c) and pull the left foot round so that you are in a right leading stance at right angles to your former position. This move can be used to retreat from the opponent.
Short Side Step
To close in much faster to the opponent, simply leave out the initial step inFigure 20a by immediately stepping out with your right foot. Maintain the left leading stance by then sliding your left foot up to the right foot.
Body Movement Tactics
The following seven tactics may be incorporated into your training program. These exercises have three main functions. First, they will add power to your attacks. Second, they will create the
opportunities for you to counterattack. Third, by your upper body mobile you will prove difficult to hit. Even when you fail to block an attack, the act of moving away from that attack will reduce the impact.
[image:26.612.108.508.323.494.2]much easier to duck or dodge a punch than it is to block a punch. A blocking technique will force you to fully commit yourself to a single punch when you are more likely to be faced with either multiple, simultaneous or combination attacks.
If you are inexperienced, the thinking process involved in blocking a punch is cumbersome. First you have to detect the punch coming. Next, you have to decide how to block it. Following that, you have to decide how to counter attack or even block the second punch. Get realistic about unrehearsed attacks, try to hit first. If you can't do that, either run for your life, move your body out of the line of fire or try these;
• Ducking. Bend forward slightly at the waist. This will allow punches directed at your face to go over your shoulder. Keep your eyes on the opponent at all times. Recover your stance by springing up again, but not to your former position, go to the side slightly.
• Crouching. Bend your knees slightly in order to allow punches directed at your head to go over your shoulder. Keep your eyes on the opponents chest area so that you can continue to observe their follow up. Crouching can also be used to get you close to the opponents lower targets for knife, stick and palm heel tactics.
• Weaving. Move your upper body sideways to the left and the right. Do this by bending sideways at the waist and pushing off from the legs. For example, to weave left, combine the actions of straightening the right leg, bending the left and bending at the waist.
• Shooting. Move your upper body either directly forward or back by flexing at the waist. Shooting forward will take you in close to the opponent as well as adding power to your strike. To shoot forward, the leading knee cap moves over the leading foot. At the same time, you straighten your rear leg and bend forward at the waist. Shooting back will allow you to escape the full force of the opponents attack. Do this by pushing off from the front leg and bending the back leg slightly. At the same time lean back slightly from the waist. Shooting forward can be modified and more committed by sliding the leading foot forward in the initial steps. Shooting back can be modified by sliding the rear leg back as well. For both these modifications, you must be certain that the terrain is safe and you will not stumble.
• Turning and Acceleration. The speed and impact effect of punches and kicks are not generated by the hands or feet in isolation. The act of turning the hips and shoulders into the target will accelerate all your techniques. To speed up your right punches from the left leading stance consider the following actions. Collapse the right knee in slightly. This will jerk the right side of your body forward. As your knee bends, turn your right shoulder and hip into the target. During this period, your fist will be accelerated towards the target. Further acceleration can be achieved when you extend your shoulder with the punch. This extension is achieved by relaxing the muscles around the shoulder joint and allowing the shoulder mass to move forward towards your chin. More acceleration can be added by shooting forward during this action. All these individual actions are not designed to increase the distance your fist has to travel. These actions are designed to accelerate your fist over the short distance it has to travel.
• Bobbing. Bobbing is a combination of weaving in one direction, ducking or crouching and then weaving in the other direction. This is a common tactic used in boxing. In this case the boxer weaves low to the right in order to avoid the opponents left jab. When the jab is over the left shoulder the defender ducks low and weaves to their left. This action will take them away from a possible right punch. Bobbing is used by counter punchers. While weaving right to avoid a left punch, they will use a left hook. When they weave to the left, they will use a right hook.
the attackers plans for a vital fraction of a second. That is long enough for you to mount a counter attack. Use hook kicks and punches after hopping.
Feinting
A feint is a physical action used on the opponent to induce a reaction. Your aim is to capitalise on their predicted reaction to that action. The opponents reaction can be anything from a simple knee jerk reaction to their counter attack. Your initial feint must be strong and deliberate enough to draw the opponents attention. As soon as you have the opponents attention drawn to one area, you attack at another point. Initial direct attacks are very rarely successful in their execution. Because of this fact, feints are essential for opening up the opponents defensive posture.
• Example 1 Open up the opponents defense with a palm heel jabs to the face. Follow up with a palm heel attack to the bladder or ribs.
• Example 2 Raise your right rear leg for the initial stages of a snap kick. Plant that right foot in the lead and palm heel the face.
• Example 3 Raise your right arm high in the air. Left jab at the face. Use a low roundhouse kick with your shins to the side of the opponents knee cap. This will break the opponents leg.
Drawing
Drawing is the act of deliberately leaving an opening, a small weakness, in your defense. The opening can be either subtle or obvious, but it must be enough to induce the opponent to attack that area. For example, lowering your hands will induce attacks to the face. As soon as the opponent commits themselves, you are in a position to ambush the predicted line of attack. The arts of drawing and feinting can only be learned through the trial and error of sparring. Drawing and feinting will induce the opponent to conform to your movements. You will take the initiative away from the opponent and actually control their movements.
Basic Sparring Drill
The two sparring drills from this section are designed to build up your sensitivity and reflexes to the opponents movements.
Drill No. 1 Right Punch and Out Parry
• Your partner shoots forward and attempts to punch your face. (Fig 15b)
• After forcing your partners arm down, you execute a punch of your own. (Fig 15c) Your partner continues the drill by carrying out the parry and returns the punch again.
Drill No. 2 Right Punch and Elbow Block
• Both you and your partner stand in the right leading stance with your forearms touching. Your partner executes a right punch while shooting forward.
• You shoot back and raise your elbow to parry the punch. At all stages of this drill you must maintain contact with your partners arm.
• You then drop your elbow and parry the partners arm in the opposite direction.
• Finish off with a right punch of your own. At this stage the drill continues. Always shoot forward on the attack and then shoot back on the defense.
Fighting Distance Fundamentals
In close combat there are three ranges to be considered. These are long range, close range and ground fighting. You must learn to recognise the fighting style of your opponent. Never fight an opponent on their own terms. Always go for the tactical moves they are not using. At the long and close ranges the tactics can be either offensive or defensive. There can also be single or multiple assailants and defenders.
The ground fighting range adds a more complex dimension to the tactics. This is because a ground fighter can be offensively orientated despite the fact that their opponent is standing. It is not
necessarily the case in ground fighting that both protagonists are on the ground. The tactics for ground fighting will be treated separately in the final chapter.
Long Range Offence
The opponent is usually taller than you and has the advantage of alonger reach. They will be attacking you with kicks and jabs, keeping you at arms length. Counter this type of attack by:
• Going to the ground and attacking their legs
• Retreating to force them into a forward momentum. This momentum can be side stepped or hopped away from before striking out.
• Parry the fist attacks and move in fast to counterattack at close range.
• Side step and kick.
Long Range Defense
The opponent is moving around you fast. They are using jabs, kicksand side stepping to keep away from you. They will concentrate on countering all your approaches. Counter this type of defense by:
• Using side steps to disrupt their circling tactics and close in.
• Covering up and closing in fast to use close range tactics.
Close Range Offence
The opponent may be shorter than you. They move inside your guardvery fast and attack with elbows, knees, head butts and grappling tactics. Counter this type of offence by:
• Using your knees and palm heel attacks to force them off you.
• Retreat fast at the first opportunity and keep them at bay with your kicks and long punches.
Close Range Defense
The opponent sticks close to you and spoils all your tactics byTHE TEXT BOOK OF CLOSE COMBAT
CHAPTER's 3 & 4
THE FIST AND OPEN HAND TECHNIQUES
General Warfare Tactics. For Public Information and Research Only.
General Comments on The Fist
The skin and bones of the fist are liable to suffer much more trauma than then objects they connect with in a fight. The skin covering the knuckles is very thin and liable to break open when it strikes a solid surface. When you punch an opponent in the mouth, the skin will cut open by the opponent's teeth. This will lead to other health problems, including infection with AIDS, hepatitis, jaundice, and other debilitating problems. Compared with other weapons of the hand the fist is not a reliable, long term, general-purpose weapon. Despite this reality, the fist remains the principal weapon in close combat for the novice fighter. This is because it is a natural, nurtured and cultural expression of aggression.
Natural
It is a natural expression of aggression because most people will clench their fists when they are understress. In many cases, individuals will telegraph their intentions by approaching you with their fists clenched. In conflict resolution, where the minimum amount of force is required, the approach of the individual who intends resolving the situation is open handed. This is instantly recognised as non-offensive. The individual who intends using a sucker punch will also use this open handed approach.
Nurtured
A false sense of security in the use of the fist can be nurtured throug