University of New Orleans University of New Orleans
ScholarWorks@UNO
ScholarWorks@UNO
University of New Orleans Theses and
Dissertations Dissertations and Theses
12-15-2006
The Native
The Native
Jeffrey J. Hartwick University of New Orleans
Follow this and additional works at: https://scholarworks.uno.edu/td
Recommended Citation Recommended Citation
Hartwick, Jeffrey J., "The Native" (2006). University of New Orleans Theses and Dissertations. 240.
https://scholarworks.uno.edu/td/240
This Thesis is protected by copyright and/or related rights. It has been brought to you by ScholarWorks@UNO with permission from the rights-holder(s). You are free to use this Thesis in any way that is permitted by the copyright and related rights legislation that applies to your use. For other uses you need to obtain permission from the rights-holder(s) directly, unless additional rights are indicated by a Creative Commons license in the record and/or on the work itself.
The Native
A Thesis
Submitted to the Graduate Faculty of the University of New Orleans in partial fulfillment of the requirements for the degree of
Master of Fine Arts in
Film, Theatre and Communication Arts
by
Jeffrey J. Hartwick
B.A. The College of New Jersey, 2002
DEDICATION
ACKNOWLEDGMENTS
Thank you to my family; Mom, Dad, Tim, and all the pets! You provided the love,
support, and means for this.
Thanks to Roxie, Bridgid, Karen, Laura and Monika. You will all forever be a
significant part of my life.
Thanks to all the friends throughout the years; Jon, Joe, Mark, Brett, Danny, Allen, Luke,
Jessica, Josh, Henderson, Sherng-Lee, Ryan, Val, Ebony, Samantha, etc, etc, etc.
Thanks to the UNO Filmmakers Student Organization, because they’re a great group of
motivated lads!
And thanks to all my professors who never lost hope in me! Robert, Steve, Hamp, David,
Terry, and Lorna. Who could ask for a better bunch of folks?
And thanks for the existence of coffee, beer, fast food, and video games. College
TABLE OF CONTENTS
List of Figures... v
Abstract...vi
Chapter 1...1
Introduction...1
Chapter 2...2
Concept... 2
Translating the Concept Into a Story... 2
Chapter 3...6
Directing... 6
Cinematography...8
Sound... 9
Chapter 4...10
Benefits of the HD/24p Formats... 10
The HD/24p Process in Avid... 15
Chapter 5...23
Conclusion... 23
References...25
LIST OF FIGURES
Figure 1... 13
Figure 2... 16
Figure 3... 17
Figure 4... 18
Figure 5... 18
Figure 6... 19
Figure 7... 19
Figure 8... 20
Figure 9... 20
Figure 10... 20
Figure 11... 21
Figure 12... 21
Figure 13... 22
ABSTRACT
This thesis paper discusses the emerging 24p and High Definition formats, and how they
were utilized in the production of a short film. The benefits of these new technologies and how
CHAPTER I – INTRODUCTION
This thesis discusses how the 24p and High Definition formats were used during the
production of the short film entitled “The Native”.
The 24p format is a recent development in the video industry. It mirrors the frame rate of
motion picture film cameras and projectors, allowing a more accurate option for presenting,
editing, and archiving films in video formats than do current methods. Its advantages concerning
the editing process will be specifically discussed.
High Definition, or “HD”, is fast becoming the film students’ new medium of choice, for
reasons of quality, expense, and resolution. The workflow for taking advantage of this new
medium in terms of producing a film will be discussed in greater detail. Because the students, as
of yet, do not have access to an HD camera, “The Native” was shot on super 16mm film and
transferred to HD. This is a logical solution in that the two formats compare in both resolution
and aspect ratio.
The process of making the film will be reviewed in some detail to both lend insight into
CHAPTER II – STORY DEVELOPMENT
The process of story development is a key part of the filmmaking process. Rewrites and
revisions of the screenplay give the screenwriter the opportunity to tighten the structure,
communicate the concept more clearly, and heighten the impact of the story. The first essential
step in story development is forming a good central idea.
Concept
Beginning filmmakers often concentrate on visual style, often under the assumption that a
“great looking” film is analogous with a “great” film. Through study and experience, one begins
to understand that visuals are only an aid to the underlying story and concept of the film. A great
film begins with a great idea, and this idea must be nurtured, expressed, and communicated
clearly through all facets of the production.
The concept statement for my film can be stated as such: Are human clones entitled to
the same rights as “real” humans? I chose to pose a question here as I find that films that ask
the audience for the answer or solution always seem to be more thought provoking and engaging.
Translating the Concept Into a Story
So how was this concept conveyed or translated into a movie? What context was chosen
for the story to take place in? What characters and plots were developed to best articulate the
The Original Story
The setting is a desert. And in this empty, barren world sits some kind of machine of the future. It whirls to life and out pops this Native American, somewhat confused and in obvious debate over who and where he is. He walks and walks, until he comes upon a dead body. Upon closer inspection, we find the body is his twin! And upon the back of his arm is a tattoo that reads “Made in China”. Bewildered, our hero checks the back of his own arm, only to find the same tattoo. He walks and walks, trying to find some explanation. Over a hill, he spots a vehicle moving toward him. He raises his arms to signal for help. A shot rings out, and our hero is dead. We see two hunters, congratulating themselves over a kill. And we end on the machine, whirling back up to life, and the door pops open.
This early version of the story is extremely simple, yet complex and disturbing in its
conclusion. It doesn’t make a moral or ethical statement, but rather just shows a highly
questionable and grim act. The involvement or interaction here is not necessarily through
character development, but more so by the revealing of the situation. We don’t learn much about
the characters themselves, instead we learn more and more about the seemingly nonsensical
environment they are present in. We give the audience small pieces of the puzzle along the way
to help them piece together the big picture. It is this struggle to make sense of this absurd world
that, in my opinion, keeps the audience’s attention and interest.
The idea of having a Native American as our protagonist is, I think, quite relevant to the
concept. Questionable, historical acts of violence, theft, and trickery inflicted by our own
country onto that of the Native American population show a past disregard for their rights. The
term “savages” was even attributed to them to further dehumanize their image. It is this ability
surface. It almost perfectly parallels our story’s concept of questioning the rights of human
clones.
The Rewrites
I chose to further experiment with the story, as there were definitely a few other
directions I could take it. What if I set the movie in what seems to be the past, and then reveal
that it was set in the future all along? What if we make the audience feel more for our hero? In
the original draft, he doesn’t really make any choices or reveal anything about his character.
Would increasing the audience’s feeling of attachment to this character heighten the emotional
impact of his death? Would the story be more disturbing and elicit more thought from the
audience?
The first notable change in the rewrites was the addition of the dog companion. My
intent in adding this character was to give the Indian a chance to show affection, to give him
human qualities. My reasoning was that the more human the Indian seems, the more horrific and
disturbing his death will be. And if this simple animal can befriend a human clone and be
saddened by his death, then this dog seems almost more “human” then the hunters at the
conclusion.
Another notable change was the removal of the machine from the story. Professor
Racine thought the machine gave too much away about the setting of the film, too soon in terms
of the reveal. He also felt it added an unneeded complication to the actual production.
Professor Racine made the criticism that many of the clues, such as the “Made in China”
tattoo or the twin dead body, were too obvious and transparent in their meanings. He felt they
ways to build to the reveal. For example, the tattoo was changed from text to a visual symbol.
At first, this is mistaken for some form of a tribal tattoo, but is unveiled at the conclusion to be
CHAPTER III - THE PRODUCTION
Once the screenplay has been reworked, revised, and polished, it is ready to be produced.
There are many areas of the production process which significantly impact the quality and
effectiveness of the film. Areas such as directing, cinematography, and sound all must support
and communicate the central meaning of the screenplay.
Directing
The function of the director is often misunderstood by beginning filmmakers. The
director’s ultimate function and responsibility is to translate what is on the page into moving
images and sound in a way that clearly communicates the message of the screenplay. On the set,
a large part of the technical and aesthetic work is delegated to the film crew. This way, the
director doesn’t have to think about cameras, lenses, microphones, cables, etc. Instead, he or she
can focus on sculpting the actors’ performances to best convey the idea. Student film sets are
often not run this way. Instead, student directors often produce, operate the camera, and assistant
direct their own films. Reasons run from budget, experience, available crew, etc. I wanted this
production to run like a professional set. I delegated much of the technical and organizational
responsibilities so that I could focus on the performances of my actors.
Finding a willing, available Native American to act in a student film proved to be quite a
trying experience. Most are active members of a Native American tribe, which leads to a
heightened concern of how they will be portrayed and what, if any, consequences will result. I
thought it was important to find someone of authentic Native American heritage, to avoid any
Native American roles. This practice is now viewed as somewhat derogatory and disrespectful
as the culture was often inaccurately presented. I cast the lead role to an inexperienced actress,
Kim Bazet, a Native American female from Houma, Louisiana. Although the role was originally
written for a male, I made the decision that the story would still work with a female as the lead,
but significant changes to the script had to be made.
I find that in too many student films, most of the cast is young and inexperienced. To
avoid the impression that this was a student film, I cast older, experienced actors in the roles of
the hunters. Carlos Gonzalez, whom I met through a previous project of mine, and Phil Karnell,
the FTCA department’s chairman and my acting professor, agreed to play the parts. I had Carlos
be an overly congratulatory, eager to please hunting guide and Phil play his egocentric, unskilled
client who is very used to taking credit for others’ accomplishments. I had Phil speak in a
Shakespearian-esque European accent to sound upper class. This hinting at class structure gives
the role, I think, even more depth and association with the concept of the film. It is the division
of classes amongst people that I think is an important point to communicate. Would human
clones become poor, lower class savages in the eyes of real humans?
The dog in the movie is Montana, a Hollywood stunt dog, who has been cast numerous
times in films, commercials, and theatrical roles. I kept my expectations of Montana simple
going into the production, and didn’t have any grand actions for him to perform. I dropped a few
of his shots before the shoot, on the advice of Professor Overton, to keep things as simple as
possible. The fewer shots Montana was in, the better my chances were for success. On many of
Montana’s scenes, I chose not to record sound at all to save setup time as his trainer had to shout
even a trained one, in a production is always risky. Any student with the thought of using one
should ask him or herself if it is absolutely necessary for the story.
Cinematography
When we talk of cinematography, we are usually referring to two things; lighting and
shot composition. While the latter is often a collaborative effort between the Director of
Photography and the Director, lighting is typically controlled by the DP. For this film, I was
fortunate enough to have Jennifer Ledet take on this position.
The entire film was set outdoors during daylight. We didn’t need any actual lights, but
planned to use silks and reflectors as needed. Originally, Jenn wanted to use the slowest speed
stock we could get. This way, she could avoid having to use filters if there was adequate light.
This also meant that shooting early in the morning and late in the evening would prove difficult
or impossible. An overcast day potentially meant trouble. We talked about the possibility of
using a faster speed stock in conjunction with varying degrees of Neutral Density filters to both
lengthen the shooting day and insure the availability of enough light, overcast or not. After Jenn
inspected the ND filters and adapters in the equipment room, she agreed to go with 250D Kodak
Vision2 film.
As for shot composition, I had storyboarded the entire film before Jenn was brought onto
the project. Jenn and I went over the storyboards and further simplified some of the shots, and
fixed any one-eighty degree rule discrepancies here and there. She seemed very positive about
the simplicity of the shots, and relieved that we weren’t going to drag any dollies out into the
During the actual production, we learned we had unintentionally complicated things by
using a faster stock. The lens adapter kit which permits the use of filters with the CP16 cameras
didn’t fit onto the zoom lens that we were using. Danny Bourque, the Assistant Camera
operator, had to rig the adapter on using gaff tape. The resultant device was functional, yet a bit
unstable and delicate. Had we gone with the slower speed stock, we probably wouldn’t have had
to use the lens adapter. It’s surprising that this wasn’t a known problem, as this camera and lens
had been used quite often and in the recent past. Either way, we made do, but I wouldn’t
recommend doing so in the future without finding a more stable solution.
Sound
Very much in line with the idea behind the script, there are two main forces at work in
the sound world of the film. There are those sounds that belong to the natural world, such as
birds, insects, wind, leaves swaying, etc. Then there are the sounds of the man-made industrial
world, specifically those of gunshots. The natural sounds are very drawn out, repetitive, and
almost set the pace of the film by themselves. The gunshots are quick, sudden, and highly
intrusive and destroy the somewhat peaceful feel of the environment.
Since the film is about humans and clones, natural versus man-made, these two groups of
sounds are a logical extension of the concept. Industry is getting more and more invasive upon
nature, as symbolically our gunshots are getting more and more invasive upon the life of our
Indian. In the end, the two worlds meet, and the reversal discloses industry’s disturbing control
CHAPTER IV - POST-PRODUCTION WORKFLOW
Until the advent of digital non-linear video editing systems, video was seen by the movie
industry as an inferior technology, useful only as a consumer format. When emerging video
editing technologies made the aging film editing process more efficient and cost-effective, the
industry began a rapid shift towards embracing video technology.
Benefits of the HD/24p Formats
Film, as we all know, runs at a playback rate of twenty-four frames per second. Video,
on the other hand, runs at a playback rate of about thirty frames per second. To understand how
video can be used to edit film, and how the 24p format offers more precision over current
methods, we will discuss the concepts of interlaced and progressive scanning, refresh rate,
matchback, cadence, and pulldown.
Interlaced Scanning
All televisions and video monitors within the NTSC world (USA, Canada, Japan, etc.)
prior to the introduction of Digital Television (DTV) display a fixed resolution of 525 vertical
lines per frame (the lines are technically horizontal, but stacked vertically like “pancakes”). The
electron gun behind the display tube scans at a fixed vertical rate of 60Hz (or sixty times per
second) with each pass being one-half of a video frame, commonly referred to as a field. One
field contains all of the even lines of the frame, and the other contains all of the odd lines. When
the fields are scanned one after another at 60Hz, the result is 30 frames per second. This process
significantly saves bandwidth and avoids flicker. To understand why, we need to discuss another
type of vertical scanning.
Progressive Scanning
Progressive scanning refers to when an entire frame of video is scanned vertically, from
top to bottom, in one pass. There are no fields in the progressive world. The drawback to
progressive scanning is that it has to be “refreshed” fast enough to avoid flicker.
“Refresh rate” can be defined as the number of times the screen is traced from top to
bottom per second. The refresh rate of typical NTSC video is 60Hz. This correlates with the
number of times a single field is drawn on the screen per second during standard NTSC
playback; sixty times per second.
If we were to watch thirty progressive scans (30Hz) on a television monitor, we would
hardly be able to stand it. This is because our eyes can begin to detect the electron gun’s scan at
refresh rates that are less than 60Hz. The phosphors at the top of the tube would have already
faded to black by the time the electron gun had finished lighting up those phosphors at the
bottom of the tube. The resultant visual effect is flicker.
There are two solutions to avoid flicker. If we interlace the image, then we arrive at a
vertical refresh rate of 60Hz, which masks the fading phosphors and therefore tricks are eyes into
seeing a constant image. Or, we can progressively scan each frame twice, which also increases
the refresh rate to 60Hz. Although both solutions are valid, interlaced scanning becomes the
preferred choice if bandwidth is a concern, such as in broadcast television. If we choose
interlaced scanning at 60Hz, then we are sending out sixty half-frames of information per
of information per second. The end result of both methods is a 30 fps image with exactly the
same resolution, but the interlaced image requires precisely one-half the bandwidth of the
progressive image. Although interlaced scanning is susceptible to distortions like the moiré
effect, its ability to save such a significant amount of bandwidth has led to its adoption as the
standard scanning system in the NTSC, PAL and 1080i HD formats.
2:3 Pulldown
Twenty-four frames of film runs one second when played back, but twenty-four frames of
NTSC video runs approximately 4/5ths of a second. This results from the differing frame rates
between the two mediums, and a transfer process commonly referred to as “2:3 pulldown” was
innovated to solve this discrepancy.
A 2:3 pulldown actually involves two steps. First, the film playback speed is slowed
down by 0.1%, which results in a frame rate of 23.976 fps. This slowing down of the playback
speed is called a “pulldown”. This is required because the NTSC video frame rate is technically
29.97 fps. This results in a 4 to 5 ratio between the frame rates of the two mediums. Next, a
“cadence” is introduced in the transfer. The standard cadence is 2:3:2:3. To understand this,
let’s take four frames of film and label them A, B, C, and D. The cadence exploits the interlaced
nature of NTSC video, and transfers two fields for frame A, three fields for frame B, two fields
for frame C, and three fields for frame D (2:3:2:3). The resultant interlaced video transfer now
contains five frames of video from four frames of film. These frames of video are referred to as
AA, BB, BC, CD, and DD (Figure 1). As a result, twenty-four frames of film, when transferred
with a 2:3 pulldown, will occupy thirty frames of video which runs approximately one second
Figure 1. Five frames of 2:3 cadenced video above the original four frames of film.
Matchback
The matchback process provides the ability to edit a video transfer at 29.97 fps, and
“match back” the cuts to the original film negative. Matchback takes advantage of film key
numbers, which are unique codes printed along the edge of the film by the manufacturer. Using
key numbers, a frame in the video transfer can be matched to a frame on the film negative.
Inaccuracies may arise during the matchback process because every four frames of film
occupy five frames of video in the transfer. This results in two difficulties. First, each video
frame does not relate to each film frame 1:1 in terms of running time or length. One video frame
runs 0.8 of one film frame in length. Because a frame of film cannot exist in fractional parts on
the negative, the matchback system inherently rounds each cut up or down a fraction of a film
frame in length.
Second, one out of every five frames of video never existed on film. Specifically, the
third frame or “BC” frame of the 2:3 cadence. The previous BB frame matches back to the B
frame of film and the following CD frame matches to the C frame of film. A cut made on a BC
frame may be matched back to a B or C frame of film, which introduces a potential one-frame
So what is “24p” and what are the benefits of using the format? The term “24p” has
become a trendy, often misunderstood term in the film and video world. In simple terms, 24p
refers to video that runs at a playback rate of twenty-four frames per second, with each frame
being progressively scanned instead of interlaced. The result being that there would now be a
video format capable of maintaining a 1:1 correlation with film and video frames. The difficulty
with utilizing this format in the past was based on the widespread dependence of the interlaced
NTSC 29.97 fps format.
The majority of the editing systems in use today still use NTSC for capturing, editing and
display purposes. Even more pressing, the current means of wide distribution is broadcast
television which is still rooted in 29.97 fps. In an effort to make the 24p format backwards
compatible with the 29.97 fps format, the industry standardized the video playback rate of
23.976 fps (0.1% slower than 24 fps). This way, footage running at 23.976 fps can be converted
to 29.97 fps on-the-fly without consequence. In contrast, when actual 24 fps source material
(film or video) is converted to 29.97 fps video, the sound must be slowed down 0.1% to avoid
sync drifting problems during playback.
A move to using the true 24p format would require that there is a widespread, common
format for storing 24p source material and a widely available means to display such material. In
other words, a cheap, available tape stock or flash memory device for storage, and widespread
integration of a viewing device that can display video at twenty-four progressive frames per
second without flicker. Digital Television and the emerging High Definition standards are the
solution for an available, widespread viewing device. When the technology is cheap enough, it
will become practical to view footage on an offline editing system at 24 fps. But how does
rate of 24 fps? As discussed above, each frame of video can be redrawn, from top to bottom,
two, three, or four times depending on the speed of the refresh rate. This solves the flicker
problem, and allows us to view native 24 frame material within the constraints of the video
world.
So why would one prefer to edit in the 24p (or 23.976) format rather than 29.97? Editing
24p video footage that originated as 24 fps film eliminates the inaccuracies encountered with the
matchback process. Each frame of video can be matched with exactly one frame of film. The
editor can now make edits without worry of the clips being lengthened or shortened by one frame
when the negative is cut.
The HD/24p Process in Avid
During the production of “The Native”, we shot about eighteen-hundred feet of super
16mm film. The footage was processed and prepped for video by Fotokem, and transferred to
video by Entertainment Post. It was transferred to Sony’s HDcam format at 23.976 fps at a
resolution of 1080p, and simultaneously dubbed (or simuldub for short) to the Betacam format at
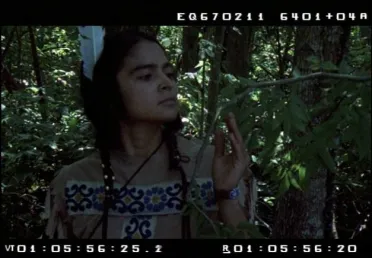
29.97 fps using the standard 2:3 pulldown process. I had the 30 and 24 fps timecode values
burned into the picture on the simuldub, as well as the film key numbers (Figure 2). This is a
standard procedure which I was exposed to during my internship in the editorial department on
the production of William Friedkin’s “Bug”. It allows for quick verification of the Avid’s
incremented timecode and key number values, as these values must be accurate when
Figure 2. A frame of video showing key number, 30, and 24 fps timecode values “burned in”.
Because super 16mm film’s aspect ratio is very close to the 16x9 aspect ratio of HD, it
has become common practice to shoot in super 16mm and finish in HD. Not only do the aspect
ratios closely match, but the resolutions of the two formats (assuming 1080p HD) are also very
close. When the transfer is performed, a small percentage of the top and bottom of the film
frame (approximately ten percent) is cropped to fit the 16x9 video frame. The option is
available, if requested, to perform a full frame transfer, but this will leave thin black vertical bars
on the left and right of the image. For this film, I chose to have the transfer house do the
cropping.
Typically, the transfer house will create FLX files to speed up the editing process. FLX
files contain timecode references for the clips, already broken up and organized by scene and
take. Once the FLX files are converted to the Avid Log Exchange (ALE) format, the Avid can
then batch capture the clips. For budget reasons, I chose to have a FLX file made containing one
clip for each camera roll. This reduces the transfer time, which therefore reduces the cost. The
downside being that I had to manually subclip each scene and take. You can opt not to have
FLX files made, but the advantage of having them is that the 30 and 24 fps timecode values,
along with the film key numbers, are already entered into the clips. This can all be done by
Once I received the tapes and the respective FLX file (which was already converted to an
ALE file), the next step was to capture the footage into the Avid. Currently, the Avid Xpress Pro
software cannot capture footage at twenty-four frames per second, but is capable of editing and
playback at that frame rate. To capture my footage, I needed to use the Avid Media Composer
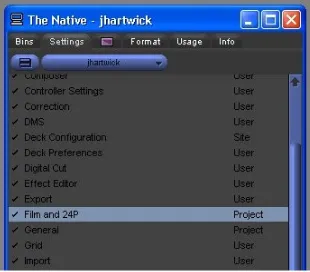
Adrenaline. First, I had to create a new 24p project so that the Avid knew I was going to be
using 24 fps media (Figure 3). The 23.976p project option is for footage that was shot at 23.976
fps with sound in sync with that frame rate, or for footage that used the “Advanced Pulldown”
cadence of 2:3:3:2.
Figure 3. Starting a new 24p project using the Avid Media Composer Adrenaline.
Next, I created a “Dailies” folder in the Project window, and within this folder I made a
“Tape 001” bin. Here, I imported the ALE file which the Avid converted into clips, one for each
camera roll (Figure 4). If this were a bigger production with multiple tapes, each tape would
have its own bin, with the associated clips for that tape inside the bin. Managing the dailies
footage, FLX files, and maintaining the organization of the project’s folder structures are
Figure 4. The Tape 001 bin, containing clips from the imported ALE file.
Then, I used the “modify” command on each clip in the bin to disable the capturing of the
audio channels since Entertainment Post did not transfer the sound. This prevented the Avid
from recording empty audio files which would have wasted disk space (Figure 5).
Figure 5. Only the video track will be captured by the Avid.
Next, I entered the “Film and 24P” settings dialog and selected the correct pulldown
cadence. This is necessary so that the Avid can correctly remove the extra frames introduced by
the frame rate conversion cadence to arrive at 24 fps material. Entertainment Post used a 2:3
Figure 6. The Film and 24P Project settings listed under the Settings tab in the Project window.
.
Figure 7. The Video Pulldown Cadence option in the Film and 24P Project settings dialog.
Then, I simply selected all the clips and chose the “batch capture” command. The Avid
then captured the footage from the Betacam tape (transferred at 29.97 fps), removed the 2:3
cadence and pulldown on-the-fly, and reconstructed the interlaced fields into progressive 24 fps
material that perfectly matched the film negative.
Next, the Avid must be given 24 fps timecode values for each clip, so that a conform
using the 24 fps timecode on the HDcam tape will be possible in the future. Although these
values had already been entered by Entertainment Post, they had been placed into the “Auxiliary
TC” column which the Avid increments at thirty frames per second. I consulted the Media
Composer help manual for the solution. I opened the Tape 001 bin, selected Bin > Headings
Figure 8. Adding the TC 24 column to the Bin View.
.
Next, I highlighted all values in the “Start” column of the bin and selected Edit >
Duplicate from the File menu. I selected the newly created TC 24 column as the target for the
copy (Figure 9).
Figure 9. Converting timecode formats using the Duplicate command.
The 30 fps timecode values from the “Start” column were then copied to the TC 24
column and converted to 24 fps timecode. The Avid then increments and manages the 24 fps
timecode correctly for each clip (Figure 10).
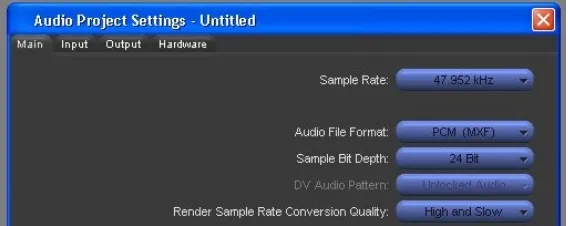
Then, I entered the “Film and 24P” Project settings and selected the edit play rate of
23.976. This slowed the Avid’s playback of video and audio by 0.1% for compatible output to
29.97 fps NTSC devices, such as monitors and recording devices. The audio sample rate was
automatically adjusted from 48 kHz to 47.952 kHz (Figures 11 and 12).
Figure 11. Adjusting the Edit Play Rate for NTSC compatibility.
Figure 12. The sample rate of the audio reflects the adjusted Edit Play Rate.
Next, I entered the “Composer” settings dialog and selected “Second Row of Info”. This
allowed the option of monitoring two rows of timecode, key numbers, or in/out durations (Figure
13). This allowed me to constantly and simultaneously verify the Avid’s incremented 30 and 24
Figure 13. The Composer User settings dialog.
Figure 14. Choosing to view 24 fps timecode as the first line of info in the Composer.
Finally, I began the process of creating subclips, syncing sound, and putting together a
rough cut. When 24p media is played back on the Avid Media Composer Adrenaline, the video
pulldown cadence is reapplied on-the-fly to play back properly on an NTSC monitor at 29.97
fps. Edits can be made on any frame, without worry of matchback frame additions or
subtractions. The 24 fps timecode values can be used to conform any constructed sequence to
HD at 1080p at 23.976 fps. Key numbers can be used to conform to the film negative, if desired.
CHAPTER V – CONCLUSION
Editing at 24 fps in HD is unmistakably the direction that the post-production world is
headed in. HD’s cost effectiveness over film, combined with 24p’s intuitiveness and accuracy
form enough justification for the eventual wide acceptance of the two formats.
What hinders this change currently is the confusing array of different HD resolutions,
frame rates, and formats. Having to understand the complexities of multiple formats and how
they are used together in a workflow is a lot to learn for the average filmmaker. For example,
the process of transferring 24 fps film to HD, and then to an interlaced 29.97 fps format for
offline editing and then back again to a progressive 23.976 fps format is perplexing. Though, it
will get easier as equipment costs drop and new, simpler formats emerge.
I did enjoy exploring new technologies with this project, but it was costly and expensive.
The process of editing, whether at 24 fps or 30 fps, doesn’t necessarily impact the caliber of the
film. A lot of time was spent figuring out frame rates, formats, and other technological
intricacies. Unfortunately, this took time away from the actual editing process, which does
significantly impact the quality of the film. I feel as though I made somewhat of a compromise
with this project, meaning that I believe the film suffered somewhat as I wrestled with
technological jargon. But I chose to pursue this subject, because that’s what I was interested in
learning more about. Were I given the opportunity to do this again, I would film some sort of
visual technological demonstration instead of trying to create a good short film because the
priority of the project is of a technical nature.
There are so many small details in dealing with these new formats, so many settings and
this in the future, unless the student has a firm understanding of the technical side of filmmaking.
The ratios, conversions, frame rates, and fractions are not for the faint of heart.
One thing I realized when working with these new formats is that there is not a lot of
technical support or information about them. This is a significant risk when choosing to
undertake such a project.
I hope that I’ve documented enough of the process here to provide a solid foundation for
the next person who wishes to further explore this area of post-production. There is a lot more to
REFERENCES
Avid Xpress Pro User’s Guide. Tewksbury: Avid Technology, Inc., 2004
Avid Xpress Pro Effects Guide. Tewksbury: Avid Technology, Inc., 2004
Field, Syd, Screenplay: The Foundations of Screenwriting. Delta, 2005
Mamet, David, On Directing Film. Penguin Books, 1992.
Zettl, Herbert, Video Basics 4. Belmont: Wadsworth/Thomson Learning, 2004
Seger, Linda, Creating Unforgettable Characters. Owl Books, 1990
Ascher, Steven, The Filmmaker’s Handbook: A Comprehensive Guide for the Digital
VITA
Jeffrey Hartwick was born in Rochester, NY and received his B.A. from The College of
New Jersey. His interests extend across the entire entertainment industry; including film,