Maintenance,
Troubleshooting, and
Reference Guide
InstrumentMaintenance Computer Maintenance Troubleshooting Data Collection Software Advanced Functions Reference Tables numlockcapslockscrolllock F15 F14 F13 F12 F11 F10 F9 F8 F7 F6 F5 F4 F3 F2 F1 esc esc2134567809_-+=delete R E W Q TYUIOP[] F D S A HGJKL"' V C X Z <M N B >? /returnshift control option shiftcontroloption capslock tab page up home helpxendpage down
3 2 1 4586 79 clear=* + enter 0
© Copyright 2007, 2010 Applied Biosystems. All rights reserved.
Information in this document is subject to change without notice. Applied Biosystems assumes no responsibility for any errors that may appear in this document. This document is believed to be complete and accurate at the time of publication. In no event shall Applied Biosystems be liable for incidental, special, multiple, or consequential damages in connection with or arising from the use of this document.
NOTICE TO PURCHASER:
This instrument is Authorized for use in DNA sequencing and fragment analysis. This authorization is included in the purchase price of this instrument and corresponds to the up-front fee component of a license under process claims of U.S. patent claims and under all process claims for DNA sequence and fragment analysis of U.S. patents now or hereafter owned or licensable by Applied Biosystems for which an Authorization is required, and under corresponding process claims in foreign counterparts of the foregoing for which an Authorization is required. The running royalty component of licenses may be purchased from Applied Biosystems or obtained by using Authorized reagents purchased from Authorized suppliers in accordance with the label rights accompanying such reagents. Purchase of this instrument does not itself convey to the purchaser a complete license or right to perform the above processes. This instrument is also licensed under U.S. patent claims and apparatus and system claims in foreign counterparts thereof. No rights are granted expressly, by implication or by estoppel under composition claims or under other process or system claims owned or licensable by Applied Biosystems. For more information regarding licenses, please contact the Director of Licensing at Applied Biosystems, 850 Lincoln Centre Drive, Foster City, California 94404, USA.
Applied Biosystems 3130 and 3130xl Genetic Analyzers: Covered by one or more of U.S. Pats. Nos. RE37,606; RE37,941.
NOTICE TO PURCHASER
The purchase price of this Applied Biosystems 3130/3130xl Genetic Analyzer includes a grant of a limited, non-transferable license under U.S. patent
claims and method claims of its foreign counterparts, and element claims of its foreign counterparts, to use this particular instrument for electrophoresis
methods employing fluorescence as a means of detection. No other licenses or rights are hereby conveyed either expressly, by implication, or estoppel including, but not limited to, any claims to a composition.
The Applied Biosystems 3130/3130xl Genetic Analyzers include patented technology licensed from Hitachi, Ltd. as part of a strategic partnership between Applied Biosystems and Hitachi, Ltd., as well as patented technology of Applied Biosystems
Trademarks
AB (Design), Applera, Applied Biosystems, AFLP, AmpFlSTR, BigDye, Cofiler, GeneMapper, Identifiler, Profiler, Profiler Plus, SeqScape, SGM Plus, SNaPshot, StockMarks, and Yfiler are registered trademarks and Hi-Di, POP, POP-4, POP-6, POP-7, and SEfiler are trademarks of Applied Biosystems or its subsidiaries in the U.S. and/or certain other countries.
Dell is a registered trademark of Dell Computer Corporation.
Microsoft, Windows, and Windows XP are registered trademarks of the Microsoft Corporation in the United States and other countries. Oracle is a registered trademark of the Oracle Corporation.
All other trademarks are the sole property of their respective owners.
Part Number 4352716 Rev. E
Contents
Preface
v
How to Use This Guide . . . v
How to Obtain More Information . . . vi
How to Obtain Support . . . vi
Safety
vii
Safety Conventions Used in This Document . . . viiiSymbols on Instruments . . . ix
Safety Labels on Instruments . . . x
General Instrument Safety . . . xi
Chemical Safety . . . xii
Chemical Waste Safety . . . xiv
Electrical Safety . . . xv
Physical Hazard Safety . . . xv
Laser Safety . . . xv
Workstation Safety . . . xvi
Safety and Electromagnetic Compatibility (EMC) Standards . . . xvii
Chapter 1
Maintenance
1
Polymer Delivery Pump . . . 2Performing Maintenance Tasks . . . 3
Routine Cleaning . . . 5
Resetting the Instrument . . . 5
Moving and Leveling the Instrument . . . 7
Shutting Down the Instrument . . . 8
Wizards . . . 11
Flushing and Filling the Water Trap . . . 13
Fluids and Waste . . . 15
Capillary Array . . . 18
Storing Capillary Arrays . . . 21
Autosampler Calibration . . . 23
iv
Applied Biosystems 3130/3130xl Genetic Analyzers Maintenance, Troubleshooting, and Reference GuideChapter 2
Computer Maintenance
27
Computer Task Lists . . . 28
Working With Drives . . . 28
Hard Disk and Database Status . . . 30
Archiving Data . . . 31
Defragmenting the Computer Hard Drive . . . 33
Deleting Records from the Database . . . 34
Chapter 3
Troubleshooting
37
Instrument Startup . . . 38 Instrument Status . . . 39 Spatial Calibration . . . 41 Spectral Calibration . . . 42 Plate Linking . . . 47 Run Performance . . . 49Chapter 4
Data Collection Software Advanced Functions
59
Customizing Run Modules . . . 60Run Priority Scheduling . . . 62
Edit > Fill Down Special Option for Plate Records . . . 65
Multi-application (Mixed) Plate Record . . . 69
Chapter 5
Reference Tables
75
Sequencing Summary Tables . . . 76Fragment Analysis Summary Tables . . . 81
Run Modules . . . 84
Appendix A
Parts List
85
Appendix B
Instrument Warranty Information
87
Computer Configuration . . . 87Limited Product Warranty . . . 87
Preface
How to Use This Guide
Purpose of This
Guide
The Applied Biosystems 3130/3130
xl
Genetic Analyzers
Maintenance, Troubleshooting,
and Reference Guide
provides instructions for maintaining the Applied Biosystems
3130/3130
xl
Genetic Analyzers. It includes how to troubleshoot hardware, software, and
chemistry issues. This manual also includes reference information.
Audience
This manual is written for principle investigators and laboratory staff who are planning
to operate and maintain the Applied Biosystems 3130/3130
xl
Genetic Analyzers.
Assumptions
This guide assumes the following background:
• Familiarity with Microsoft
®Windows
®XP operating system.
• Knowledge of general techniques for handling DNA samples and preparing them
for electrophoresis.
• A general understanding of hard drives and data storage, file transfers, and copying
and pasting.
If you want to integrate the 3130/3130
xl
genetic analyzers into your existing laboratory
data flow system, you need networking experience.
Text Conventions
This guide uses the following conventions:
•
Bold
indicates user action. For example:
Type
0
, then press
Enter
for each of the remaining fields.
•
Italic
text indicates new or important words and is also used for emphasis. For
example:
Before analyzing,
always
prepare fresh matrix.
• A right arrow bracket (>) separates successive commands you select from a
drop-down or shortcut menu. For example:
Select
File > Open > Spot Set
.
Right-click the sample row, then select
View Filter > View All Runs
.
User Attention
Words
Two user attention words appear in Applied Biosystems user documentation. Each word
implies a particular level of observation or action as described below:
•
Note
– Provides information that may be of interest or help but is not critical to the
use of the product.
Preface
How to Obtain More Information
vi
Applied Biosystems 3130/3130xl Genetic Analyzers Maintenance, Troubleshooting, and Reference GuideHow to Obtain More Information
Related
Documentation
The following related document is shipped with the system:
•
Applied Biosystems 3130/3130xl Genetic Analyzers Getting Started Guide
(P/N 4352715) - Contains procedures and information to start a run using the
instrument system.
•
Applied Biosystems 3130/3130xl Genetic Analyzers Site Preparation Guide
(P/N 4352717) - Contains the space, environmental, and electrical requirements to
support the 3130/3130xl Genetic Analyzer system.
•
Applied Biosystems 3730/3730xl DNA Analyzers and
Applied Biosystems
3130/3130
xl
Genetic Analyzers
AB Navigator Software Administrator Guide
(P/N 4359472) - Provides information and procedures for the administrator
maintaining the computer system and software files of the Applied Biosystems
3130/3130
xl
Genetic Analyzers.
•
Applied Biosystems 3130/3130xl Genetic Analyzers Quick Reference Card
(P/N 4362825) - Contains a flowchart on how to run your samples and instrument, a
table of maintenance tasks, and a Data Collection software reference guide.
Send Us Your
Comments
Applied Biosystems welcomes your comments and suggestions for improving its user
documents. You can e-mail your comments to:
How to Obtain Support
For the latest services and support information for all locations, go to
http://www.appliedbiosystems.com
, then click the link for
Support
.
At the Support page, you can:
• Search through frequently asked questions (FAQs)
• Submit a question directly to Technical Support
• Order Applied Biosystems user documents, MSDSs, certificates of analysis, and
other related documents
• Download PDF documents
• Obtain information about customer training
• Download software updates and patches
In addition, the Support page provides access to worldwide telephone and fax numbers
to contact Applied Biosystems Technical Support and Sales facilities.
Safety
This section covers the following topics:
Safety Conventions Used in This Document . . . .viii
Symbols on Instruments. . . ix
Safety Labels on Instruments . . . x
General Instrument Safety . . . .xi
Chemical Safety . . . xii
Chemical Waste Safety . . . .xiii
Electrical Safety . . . xiv
Laser Safety . . . xv
Workstation Safety . . . .xvi
Safety
Safety Conventions Used in This Document
viii
Applied Biosystems 3130/3130xl Genetic Analyzers Maintenance, Troubleshooting, and Reference GuideSafety Conventions Used in This Document
Safety Alert
Words
Four safety alert words appear in Applied Biosystems user documentation at points in
the document where you need to be aware of relevant hazards. Each alert
word–
IMPORTANT, CAUTION, WARNING, DANGER
–implies a particular level of
observation or action, as defined below:
Definitions
IMPORTANT!
– Indicates information that is necessary for proper instrument operation,
accurate chemistry kit use, or safe use of a chemical.
– Indicates a potentially hazardous situation that, if not avoided, may
result in minor or moderate injury. It may also be used to alert against unsafe practices.
– Indicates a potentially hazardous situation that, if not avoided,
could result in death or serious injury.
– Indicates an imminently hazardous situation that, if not avoided,
will result in death or serious injury. This signal word is to be limited to the most extreme
situations.
Except for IMPORTANTs, each safety alert word in an Applied Biosystems document
appears with an open triangle figure that contains a hazard symbol.
These hazard
symbols are identical to the hazard icons that are affixed to Applied Biosystems
Safety Symbols on Instruments
Examples
The following examples show the use of safety alert words:
IMPORTANT!
You must create a separate Sample Entry Spreadsheet for each 96-well
microtiter plate.
The lamp is extremely hot. Do not touch the lamp until it has cooled
to room temperature.
CHEMICAL HAZARD
.
Formamide
. Exposure causes eye, skin,
and respiratory tract irritation. It is a possible developmental and birth defect hazard.
Read the MSDS, and follow the handling instructions. Wear appropriate protective
eyewear, clothing, and gloves.
ELECTRICAL HAZARD.
Failure to ground the instrument
properly can lead to an electrical shock. Ground the instrument according to the provided
instructions.
Symbols on Instruments
Electrical
Symbols on
Instruments
The following table describes the electrical symbols that may be displayed on
Applied Biosystems instruments.
Symbol Description
Indicates the On position of the main power switch.
Indicates the Off position of the main power switch.
Indicates the On/Off position of a push-push main power switch.
Indicates a terminal that may be connected to the signal ground reference of another instrument. This is not a protected ground terminal.
Indicates a protective grounding terminal that must be connected to earth ground before any other electrical connections are made to the instrument.
Safety
Safety Labels on Instruments
x
Applied Biosystems 3130/3130xl Genetic Analyzers Maintenance, Troubleshooting, and Reference GuideSafety Symbols
The following table describes the safety
s
ymbols that may be displayed on
Applied Biosystems instruments. Each symbol may appear by itself or in combination
with text that explains the relevant hazard (see “Safety Labels on Instruments” on
page x). These safety symbols may also appear next to DANGERS, WARNINGS, and
CAUTIONS that occur in the text of this and other product-support documents.
Safety Labels on Instruments
The following CAUTION, WARNING, and DANGER statements may be displayed on
Applied Biosystems instruments in combination with the safety symbols described in the
preceding section.
Symbol Description
Indicates that you should consult the manual for further information and to proceed with appropriate caution.
Indicates the presence of an electrical shock hazard and to proceed with appropriate caution.
Indicates the presence of a hot surface or other high-temperature hazard and to proceed with appropriate caution.
Indicates the presence of a laser inside the instrument and to proceed with appropriate caution.
Indicates the presence of moving parts and to proceed with appropriate caution.
English Francais
CAUTION Hazardous chemicals. Read the
Material Safety Data Sheets (MSDSs) before handling.
ATTENTION Produits chimiques dangeureux.
Lire les fiches techniques de sûreté de matériels avant la manipulation des produits.
CAUTION Hazardous waste. Read the waste
profile (if any) in the site preparation guide for this instrument before handling or disposal.
ATTENTION Déchets dangereux. Lire les
renseignements sur les déchets avant de les manipuler ou de les éliminer.
CAUTION Hazardous waste. Refer to
MSDS(s) and local regulations for handling and disposal.
ATTENTION Déchets dangereux. Lire les
fiches techniques de sûreté de matériels et la régulation locale associées à la manipulation et l'élimination des déchets.
WARNING Hot lamp. AVERTISSEMENT Lampe brûlante.
WARNING Hot. Replace lamp with an
Applied Biosystems lamp.
AVERTISSEMENTComposants brûlants.
Remplacer la lampe par une lampe Applied Biosystems.
CAUTION Hot surface. ATTENTION Surface brûlante.
Safety General Instrument Safety
General Instrument Safety
PHYSICAL INJURY HAZARD.
Use this product only as
specified in this document. Using this instrument in a manner not specified by
Applied Biosystems may result in personal injury or damage to the instrument.
Moving and
Lifting the
Instrument
PHYSICAL INJURY HAZARD.
The instrument is to be moved
and positioned only by the personnel or vendor specified in the applicable site
preparation guide. If you decide to lift or move the instrument after it has been installed,
do not attempt to lift or move the instrument without the assistance of others, the use of
appropriate moving equipment, and proper lifting techniques. Improper lifting can cause
painful and permanent back injury. Depending on the weight, moving or lifting an
instrument may require two or more persons.
WARNING To reduce the chance of electrical
shock, do not remove covers that require tool access. No user-serviceable parts are inside. Refer servicing to Applied Biosystems qualified service personnel.
AVERTISSEMENT Pour éviter les risques
d'électrocution, ne pas retirer les capots dont l'ouverture nécessite l'utilisation d'outils. L’instrument ne contient aucune pièce réparable par l’utilisateur. Toute intervention doit être effectuée par le personnel de service qualifié de Applied Biosystems.
DANGER Class 3B laser radiation present
when open and interlock defeated. Avoid direct exposure to laser beam.
DANGER Class 3B rayonnement laser en cas
d’ouverture et d’une neutralisation des dispositifs de sécurité. Eviter toute exposition directe avec le faisceau.
DANGER Class 3B laser radiation when
open. Avoid direct exposure to laser beam.
DANGER Class 3B rayonnement laser en cas
d’ouverture. Eviter toute exposition directe avec le faisceau.
DANGER Class 2(II) laser radiation present
when open and interlock defeated. Do not stare directly into the beam
DANGER de Class 2(II) rayonnement laser en
cas d'ouverture et d'une neutralisation des dispositifs de securite. Eviter toute exposition directe avec le faisceau.
DANGER Class 2(II) laser radiation present
when open. Do not stare directly into the beam.
DANGER de Class 2(II) rayonnement laser en
cas d'ouverture. Eviter toute exposition directe avec le faisceau.
DANGER Class 2(II) LED when open and
interlock defeated. Do not stare directly into the beam.
DANGER de Class 2(II) LED en cas
d'ouverture et d'une neutralisation des dispositifs de securite. Eviter toute exposition directe avec le faisceau.
DANGER Class 2(II) LED when open. Do not
stare directly into the beam.
DANGER de Class 2(II) LED en cas
d'ouverture. Eviter toute exposition directe avec le faisceau.
CAUTION Moving parts. ATTENTION Parties mobiles.
Safety Chemical Safety
xii
Applied Biosystems 3130/3130xl Genetic Analyzers Maintenance, Troubleshooting, and Reference GuideMoving and
Lifting
Stand-Alone Computers
and Monitors
Do not attempt to lift or move the computer or the monitor without
the assistance of others. Depending on the weight of the computer and/or the monitor,
moving them may require two or more people.
Things to consider before lifting the computer and/or the monitor:
• Make sure that you have a secure, comfortable grip on the computer or the monitor
when lifting.
• Make sure that the path from where the object is to where it is being moved is clear
of obstructions.
• Do not lift an object and twist your torso at the same time.
• Keep your spine in a good neutral position while lifting with your legs.
• Participants should coordinate lift and move intentions with each other before
lifting and carrying.
• Instead of lifting the object from the packing box, carefully tilt the box on its side
and hold it stationary while someone slides the contents out of the box.
Operating the
Instrument
Ensure that anyone who operates the instrument has:
• Received instructions in both general safety practices for laboratories and specific
safety practices for the instrument.
• Read and understood all applicable Material Safety Data Sheets (MSDSs). See
“About MSDSs” on page xii.
Chemical Safety
Chemical Hazard
Warning
CHEMICAL HAZARD.
Before handling any chemicals, refer to
the Material Safety Data Sheet (MSDS) provided by the manufacturer, and observe all
relevant precautions.
CHEMICAL HAZARD.
All chemicals in the instrument, including
liquid in the lines, are potentially hazardous. Always determine what chemicals have
been used in the instrument before changing reagents or instrument components. Wear
appropriate eyewear, protective clothing, and gloves when working on the instrument.
About MSDSs
Chemical manufacturers supply current Material Safety Data Sheets (MSDSs) with
shipments of hazardous chemicals to
new
customers. They also provide MSDSs with the
first shipment of a hazardous chemical to a customer after an MSDS has been updated.
MSDSs provide the safety information you need to store, handle, transport, and dispose
of the chemicals safely.
Each time you receive a new MSDS packaged with a hazardous chemical, be sure to
replace the appropriate MSDS in your files.
Obtaining MSDSs
You can obtain from Applied Biosystems the MSDS for any chemical supplied by
Applied Biosystems. This service is free and available 24 hours a day.
Safety Chemical Safety
To obtain MSDSs:
1.
Go to
https://docs.appliedbiosystems.com/msdssearch.html
2.
In the Search field, type in the chemical name, part number, or other information
that appears in the MSDS of interest. Select the language of your choice, then click
Search
.
3.
Find the document of interest, right-click the document title, then select any of the
following:
•
Open
– To view the document
•
Print Target
– To print the document
•
Save Target As
– To download a PDF version of the document to a destination
that you choose
4.
To have a copy of a document sent by fax or e-mail, select
Fax
or
to the left
of the document title in the Search Results page, then click
RETRIEVE
DOCUMENTS
at the end of the document list.
5.
After you enter the required information, click
View/Deliver Selected Documents
Now
.
Chemical Safety
Guidelines
To minimize the hazards of chemicals:
• Read and understand the Material Safety Data Sheets (MSDS) provided by the
chemical manufacturer before you store, handle, or work with any chemicals or
hazardous materials. (See “About MSDSs” on page xii.)
• Minimize contact with chemicals. Wear appropriate personal protective equipment
when handling chemicals (for example, safety glasses, gloves, or protective
clothing). For additional safety guidelines, consult the MSDS.
• Minimize the inhalation of chemicals. Do not leave chemical containers open. Use
only with adequate ventilation (for example, fume hood). For additional safety
guidelines, consult the MSDS.
• Check regularly for chemical leaks or spills. If a leak or spill occurs, follow the
manufacturer’s cleanup procedures as recommended on the MSDS.
• Comply with all local, state/provincial, or national laws and regulations related to
chemical storage, handling, and disposal.
Safety
Chemical Waste Safety
xiv
Applied Biosystems 3130/3130xl Genetic Analyzers Maintenance, Troubleshooting, and Reference GuideChemical Waste Safety
Chemical Waste
Hazard
HAZARDOUS WASTE.
Refer to Material Safety Data Sheets and
local regulations for handling and disposal.
CHEMICAL WASTE HAZARD.
Wastes produced by Applied
Biosystems instruments are potentially hazardous and can cause injury, illness, or death.
Chemical Waste
Safety Guidelines
To minimize the hazards of chemical waste:
• Read and understand the Material Safety Data Sheets (MSDSs) provided by the
manufacturers of the chemicals in the waste container before you store, handle, or
dispose of chemical waste.
• Provide primary and secondary waste containers. (A primary waste container holds
the immediate waste. A secondary container contains spills or leaks from the
primary container. Both containers must be compatible with the waste material and
meet federal, state, and local requirements for container storage.)
• Minimize contact with chemicals. Wear appropriate personal protective equipment
when handling chemicals (for example, safety glasses, gloves, or protective
clothing). For additional safety guidelines, consult the MSDS.
• Minimize the inhalation of chemicals. Do not leave chemical containers open. Use
only with adequate ventilation (for example, fume hood). For additional safety
guidelines, consult the MSDS.
• Handle chemical wastes in a fume hood.
• After emptying the waste container, seal it with the cap provided.
• Dispose of the contents of the waste tray and waste bottle in accordance with good
laboratory practices and local, state/provincial, or national environmental and health
regulations.
Waste Disposal
If potentially hazardous waste is generated when you operate the instrument, you must:
• Characterize (by analysis if necessary) the waste generated by the particular
applications, reagents, and substrates used in your laboratory.
• Ensure the health and safety of all personnel in your laboratory.
• Ensure that the instrument waste is stored, transferred, transported, and disposed of
according to all local, state/provincial, and/or national regulations.
IMPORTANT!
Radioactive or biohazardous materials may require special handling, and
disposal limitations may apply.
Safety Electrical Safety
Electrical Safety
ELECTRICAL SHOCK HAZARD.
Severe electrical shock can
result from operating the Applied Biosystems 3130/3130
xl
Genetic Analyzers without
its instrument panels in place. Do not remove instrument panels. High-voltage contacts
are exposed when instrument panels are removed from the instrument.
Power
ELECTRICAL HAZARD.
Grounding circuit continuity is vital for
the safe operation of equipment. Never operate equipment with the grounding conductor
disconnected.
ELECTRICAL HAZARD.
Use properly configured and approved
line cords for the voltage supply in your facility.
ELECTRICAL HAZARD.
Plug the system into a properly
grounded receptacle with adequate current capacity.
Overvoltage
Rating
The Applied Biosystems 3130/3130
xl
Genetic Analyzers system have an installation
(overvoltage) category of II, and is classified as portable equipment.
Physical Hazard Safety
Moving Parts
PHYSICAL INJURY HAZARD.
Moving parts can crush and cut.
Keep hands clear of moving parts while operating the instrument. Disconnect power
before servicing the instrument.
Laser Safety
Laser
Classification
The Applied Biosystems 3130/3130
xl
Genetic Analyzers use an Argon laser. Under
normal operating conditions, the instrument laser is categorized as a Class I laser. When
safety interlocks are disabled during certain servicing procedures, the laser can cause
permanent eye damage, and, therefore, is classified under those conditions as a Class 3B
laser.
The Applied Biosystems 3130/3130
xl
Genetic Analyzers has been tested to and
complies with 21 CFR, 1040.10 and 1040.11, as applicable.”
The 3130/3130
xl
Genetic Analyzers
have been tested to and complies with standard
EN60825-1, “Radiation Safety of Laser Products, Equipment Classification,
Safety
Workstation Safety
xvi
Applied Biosystems 3130/3130xl Genetic Analyzers Maintenance, Troubleshooting, and Reference GuideLaser Safety
Requirements
To ensure safe laser operation:
• The system must be installed and maintained by an Applied Biosystems Technical
Representative.
• All instrument panels must be in place on the instrument while the instrument is
operating. When all panels are installed, there is no detectable radiation present. If
any panel is removed when the laser is operating (during service with safety
interlocks disabled), you may be exposed to laser emissions in excess of the Class
3B rating.
• Do not remove safety labels or disable safety interlocks.
Additional Laser
Safety
Information
Refer to the user documentation provided with the laser for additional information on
government and industry safety regulations.
LASER HAZARD.
Lasers can burn the retina causing permanent
blind spots. Never look directly into the laser beam. Remove jewelry and other items that
can reflect the beam into your eyes. Do not remove the instrument top or front panels.
Wear proper eye protection and post a laser warning sign at the entrance to the laboratory
if the top or front panels are removed for service.
LASER BURN HAZARD.
An overheated laser can cause severe
burns if it comes in contact with the skin. DO NOT operate the laser when it cannot be
cooled by its cooling fan. Always wear appropriate laser safety goggles.
Workstation Safety
Correct ergonomic configuration of your workstation can reduce or prevent effects such
as fatigue, pain, and strain. Minimize or eliminate these effects by configuring your
workstation to promote neutral or relaxed working positions.
MUSCULOSKELETAL AND REPETITIVE MOTION
HAZARD
. These hazards are caused by potential risk factors that include but are not
limited to repetitive motion, awkward posture, forceful exertion, holding static unhealthy
positions, contact pressure, and other workstation environmental factors.
To minimize musculoskeletal and repetitive motion risks:
• Use equipment that comfortably supports you in neutral working positions and
allows adequate accessibility to the keyboard, monitor, and mouse.
• Position the keyboard, mouse, and monitor to promote relaxed body and head
postures.
Safety Safety and Electromagnetic Compatibility (EMC) Standards
Safety and Electromagnetic Compatibility (EMC) Standards
This section provides information on:
•
U.S. and Canadian Safety Standards
•
Canadian EMC Standard
•
European Safety and EMC Standards
•
Australian EMC Standards
U.S. and
Canadian Safety
Standards
This instrument has been tested to and complies with standard UL 3101-1, “Safety
Requirements for Electrical Equipment for Laboratory Use, Part 1: General
Requirements.”
This instrument has been tested to and complies with standard CSA 1010.1, “Safety
Requirements for Electrical Equipment for Measurement, Control, and Laboratory Use,
Part 1: General Requirements.”
Canadian EMC
Standard
This instrument has been tested to and complies with ICES-001, Issue 3: Industrial,
Scientific, and Medical Radio Frequency Generators.
European Safety
and EMC
Standards
Safety
This instrument meets European requirements for safety (Low Voltage Directive
73/23/EEC). This instrument has been tested to and complies with standards EN
61010-1:2001, “Safety Requirements for Electrical Equipment for Measurement, Control and
Laboratory Use, Part 1: General Requirements” and EN 61010-2-010, “Particular
Requirements for Laboratory Equipment for the Heating of Materials.”
EMC
This instrument meets European requirements for emission and immunity (EMC
Directive 89/336/EEC). This instrument has been tested to and complies with standard
EN 61326 (Class B), “Electrical Equipment for Measurement, Control and Laboratory
Use – EMC Requirements.”
Australian EMC
Standards
This instrument has been tested to and complies with standard AS/NZS 2064, “Limits
and Methods Measurement of Electromagnetic Disturbance Characteristics of Industrial,
Scientific, and Medical (ISM) Radio-frequency Equipment.”
Safety
Safety and Electromagnetic Compatibility (EMC) Standards
1
Chapter 1
Maintenance
Overview
This chapter covers the following topics:
Polymer Delivery Pump . . . 2
Performing Maintenance Tasks . . . 3
Routine Cleaning . . . 5
Resetting the Instrument
. . . 5
Moving and Leveling the Instrument . . . 7
Shutting Down the Instrument
. . . 8
Wizards
. . . 11
Flushing and Filling the Water Trap
. . . 13
Fluids and Waste
. . . 15
Capillary Array
. . . 18
Storing Capillary Arrays
. . . 21
Autosampler Calibration
. . . 23
Chapter 1 Maintenance Polymer Delivery Pump
2
Applied Biosystems 3130/3130xl Genetic Analyzers Maintenance, Troubleshooting, and Reference GuideNotes
Polymer Delivery Pump
Components of the polymer delivery pump (PDP) are identified in the drawing below.
GR2459
PDP motor cover PDP motor
Double-tapered ferrule Array port
Capillary array tip
Piston Pump block Check valve
Polymer supply bottle cap with hole Mounting pin
Polymer supply tube Syringe fitting
Polymer supply bottle
Lower polymer block
Buffer fill-line Buffer jar (16 mL anode reservoir) Electrode
Overflow hole Water seal
Capillary array
Buffer valve pin
O-ring Mounting pin Mounting pin Interconnect tube Mounting pin
Capillary array knob Pump chamber
Waste fitting Water trap
Chapter 1 Maintenance Performing Maintenance Tasks
1
Performing Maintenance Tasks
Overview
This section lists common tasks required to maintain your Applied Biosystems
3130/3130
xl
Genetic Analyzers in good working condition. The tasks are divided into
tables based on how often you should perform each task.
Wear appropriate protection, including gloves, laboratory goggles,
and coat whenever you work with the fluids used on this instrument, or parts that may
come into contact with these fluids.
Daily Tasks
Perform these tasks at least once per day.
Maintenance Task Frequency
Ensure adequate levels of buffer and water in reservoirs. Before each run Ensure the plate assemblies are properly assembled.
IMPORTANT! The holes in the plate retainer must align with the holes in the septa, or the capillary tips will be damaged.
Before each run
Ensure the plate assemblies are positioned on the plate deck properly. Plates should sit snugly on the deck.
IMPORTANT! Never use warped plates.
Before each run
Check the level of buffer in the buffer jar. Ensure that the overflow hole faces the front of the instrument and is not occluded.
Before each run
Replace the water and 1X run buffer in the reservoirs on the instrument and make sure that the outside of the assemblies are dry.
Every 48 hours
Check for bubbles in the pump block, lower polymer block, interconnect tube, polymer supply tube, and channels. Remove all bubbles with the Bubble Remove wizard.
Daily or before each run
Check the loading-end header to ensure the capillary tips are not crushed or damaged.
Daily or before each run Check the level of polymer in the bottle to ensure sufficient volume for
runs.
Daily or before each run Check the pump block and the lower polymer block to ensure they fit
securely on the instrument.
Daily
Clean the instrument surfaces. Daily
Check for leaks around the array knob, interconnecting tube nuts, and check valve.
Chapter 1 Maintenance Performing Maintenance Tasks
4
Applied Biosystems 3130/3130xl Genetic Analyzers Maintenance, Troubleshooting, and Reference GuideNotes
Weekly Tasks
Perform these tasks at least once per week.
Monthly Tasks
Perform these tasks at least once per month.
As-Needed Tasks
Perform these tasks as needed.
Maintenance Task Frequency
Replace the polymer using the Replenish Polymer Wizard. Weekly or as needed Flush the water trap. See “Flushing and Filling the Water Trap” on
page 13.
Weekly
Check the storage conditions of the used arrays. Weekly Restart the computer and instrument. Weekly
Maintenance Task Frequency
Run the Water Wash Wizard.
Flush the array port during this wizard, whether or not bubbles are present in the array port.
Monthly or as needed
Defragment the hard drive. Monthly
Maintenance Task Frequency
Clean the drip tray. As needed
Change the array. As needed
Remove any dried polymer from the capillary tips. Use a lint-free wipe moistened with deionized water.
Chapter 1 Maintenance Routine Cleaning
1
Routine Cleaning
General Cleaning
1.
Ensure the oven and instrument doors are closed.
2.
Press the Tray button on the front of the
instrument to move the autosampler to the
forward position.
IMPORTANT!
Never use organic solvents to
clean the instrument.
3.
Wipe off any liquid on or around the autosampler
using a lint-free tissue.
4.
Clean off any polymer build-up (crystals) on the
instrument including the capillary tips and the
stripper plate with deionized water and lint-free
tissue.
5.
Clean the array port knob, plug, or opening
threads of these parts with moistened lab wipes.
6.
Clean out the drip trays with deionized water and
lint-free tissue.
Resetting the Instrument
Reset the instrument when:
• A fatal error as indicated by the red status light
• The instrument does not respond to the
3130/3130
xl
Data Collection software
Chapter 1 Maintenance Resetting the Instrument
6
Applied Biosystems 3130/3130xl Genetic Analyzers Maintenance, Troubleshooting, and Reference GuideNotes
Two procedures can reset the instrument:
• Press the reset button through the pin hole on the
front of the instrument to dump and reload the
firmware and to reset the electronics. Try this
method first.
• Shut down and restart the computer and the
instrument.
Resetting With the Reset Button
1.
Close the instrument doors.
2.
Using a long narrow implement, such as a
straightened paper clip, press the reset button on
the front of the instrument.
Resetting by Powering Down
1.
Close the instrument doors.
2.
Power off the instrument by pressing the on/off
button on the front of the instrument.
3.
Restart the computer.
a.
Select
Start
>
Turn off Computer
.
b.
In the dialog box, select
Restart
, then click
OK
.
IMPORTANT!
Wait until the computer has
completely restarted before proceeding.
4.
Turn on the instrument, then wait for the solid
green light.
5.
Launch the Data Collection software (Service
Console applications start automatically).
Reset button
Chapter 1 Maintenance Moving and Leveling the Instrument
1
Moving and Leveling the Instrument
PHYSICAL INJURY HAZARD
.
Do not attempt to lift the instrument or any other
heavy objects unless you have received related
training. Incorrect lifting can cause painful and
sometimes permanent back injury. Use proper lifting
techniques when lifting or moving the instrument.
Two or three people are required to lift the instrument,
depending upon instrument weight.
1.
Remove the following components from the
instrument:
• Any plate assemblies from the autosampler.
• Water and buffer reservoirs from the
autosampler.
• Capillary array, by selecting Instrument
Shutdown Wizard. (See
“Performing a
Long-Term Shutdown” on page 10
.)
• Anode buffer reservoir.
2.
Switch off the breaker on the back of the
instrument.
3.
Disconnect the power cord and the Ethernet
cable.
IMPORTANT!
While moving the instrument,
avoid any shock or vibration.
4.
Move the instrument.
5.
Place the bubble level on the autosampler deck.
6.
Turn the instrument legs to level the instrument.
To move the
instrument corner ... Turn the leg ...
up right (clockwise) down left (counterclockwise)
Chapter 1 Maintenance Shutting Down the Instrument
8
Applied Biosystems 3130/3130xl Genetic Analyzers Maintenance, Troubleshooting, and Reference GuideNotes
Shutting Down the Instrument
Perform the appropriate shutdown procedure based on
the information in the following table:
Performing a Short-Term Shutdown
Fill the Capillary With Fresh Polymer Using Manual Control
1.
Ensure the oven and instrument doors are closed.
2.
Collect polymer waste
:
a.
Click
GA Instruments
>
ga3130
or
ga3130
xl
>
instrument
name
>
Manual Control
.
b.
In the Send Defined Command drop-down
menu, select
Autosampler
.
c.
In the Command Name drop-down menu,
select
Move autosampler to site
.
d.
In the Value menu, select
Waste
.
e.Click
Send Command
. Wait for the
autosampler to stop moving and Send
Command becomes active, before
proceeding.
3.
Fill the capillaries:
a.
In the Send Defined Command for
drop-down menu, select
Polymer Delivery
Pump
.
If the instrument will be
unattended for ... Perform this shutdown procedure ...
no more than 1 week with a full buffer reservoir
Short-term
IMPORTANT! The key to a successful short-term shutdown is keeping the capillary array in 1X running buffer. This prevents the polymer from drying in the capillaries. for more than 1 week Long-term
Chapter 1 Maintenance Shutting Down the Instrument
1
b.In the Command Name, select the
appropriate Fill <length> cm capillary array
length.
c.
Click
Send Command
.The array fill is
finished when Send Command becomes
active.
d.
Return the buffer reservoir to the capillaries.
Cleaning the Reservoirs1.
Press the Tray button to move the autosampler
forward.
2.
Open the doors, then remove the:
• Plates
• Cathode buffer reservoir and water
reservoirs
3.
Dispose of remaining fluids and rinse out the
reservoirs with deionized water.
Note:
Follow your company’s waste disposal
practices for appropriate disposal procedures.
4.
Rinse the cathode reservoir with 1X running
buffer, and then fill to the line with 1X running
buffer (about 16 mL).
5.
Fill the three water reservoirs to the line with
quality deionized water (about 16 mL).
Be sure that the septa fit snugly
and flush on the tops of the reservoirs in order to
prevent damaging the capillary tips.
6.
Place a clean reservoir septa on each reservoir,
and dry the outside of the reservoirs using a
lint-free wipe.
GR1857b
Chapter 1 Maintenance Shutting Down the Instrument
10
Applied Biosystems 3130/3130xl Genetic Analyzers Maintenance, Troubleshooting, and Reference GuideNotes
7.
Place the reservoirs into position on the
autosampler as shown below.
8.
Close the instrument doors.
Note:
Closing the doors returns the autosampler
to the home position, placing the tips of the
capillaries in buffer.
9.
Shut down the computer and turn off the
instrument.
Performing a Long-Term Shutdown
Select
Instrument Shutdown
Wizard and follow the
prompts.
IMPORTANT!
Make sure all parts are completely
dry before long-term storage.
Water reservoir (waste) Cathode reservoir (1X running buffer) Water reservoir (rinse) Water reservoir (spare) Home position
Chapter 1 Maintenance Wizards
1
Wizards
Accessing
Wizards
In the tree pane of the Data Collection software, click
GA Instruments
>
ga3130
or
ga3130
xl
>
instrument name
or any topic
name below instrument name to see Wizards in the menu bar.
The wizards in the Data Collection software guide you through several maintenance
procedures.
If plates are linked in the Run Scheduler and you complete a wizard, the plates
automatically unlink. You will get a warning dialog box. Click
, and then relink the
plate if applicable.
General Use
Guidelines
The following table lists the wizards and when to use them.
Wizard Use to...
Install Array • Install a capillary array: – On a new instrument
– To reactivate an instrument that has been shut down • Replace an installed capillary array with another capillary array Change Polymer
Type
• Change to a different polymer type than the one presently being used
Replenish Polymer • Replenish the polymer supply
• Replace the polymer in the PDP with polymer of the same or different lot
• Enter polymer information when Data Collection software is installed or upgraded
Chapter 1 Maintenance Wizards
12
Applied Biosystems 3130/3130xl Genetic Analyzers Maintenance, Troubleshooting, and Reference GuideNotes
Water Wash • Wash the PDP chamber, lower polymer blocka, channels, and tubing
with water:
– As part of a monthly maintenance protocol – To remove any suspected contaminants in the PDP
– To remove persistent bubbles (followed by the Bubble Remove Wizard, if needed)
– To replace old polymer in the PDP Instrument
Shutdown
Prepare the instrument for a period of disuse of greater than one week
Autosampler Calibration
Calibrate the autosampler positions
Update Cap Array Info
• Update the capillary array information and the serial number • Correct an entry mistake after using a wizard
a The lower polymer block is cleaned on the instrument using this wizard and should not be removed.
Chapter 1 Maintenance Flushing and Filling the Water Trap
1
Flushing and Filling the Water Trap
Overview
The PDP water trap should be flushed with either
distilled or deionized water at least once per week to
wash out any diluted polymer and to clear bubbles.
Leave the trap filled with
e
ither distilled or deionized
water.
To flush the water seal trap:
1.
Fill the supplied 20 mL, all-plastic Luer lock
syringe
(in the PDP Cleaning kit, PN 4359572)
with distilled or deionized water. Expel any
bubbles from the syringe.
2.
Do not use a syringe smaller than 20 mL. Doing
so may generate excessive pressure within the
trap.
3.
Attach the syringe to the forward-facing Luer
fitting at the top of the pump block. Hold the
fitting with one hand while threading the syringe
onto the fitting with the other hand.
4.
Open the Luer fitting by grasping the body of the
fitting and turning it and the attached syringe
approximately one-half turn counterclockwise.
5.
Open the exit fitting at the top left side of the
pump block by turning it approximately one-half
turn counterclockwise.
Chapter 1 Maintenance Flushing and Filling the Water Trap
14
Applied Biosystems 3130/3130xl Genetic Analyzers Maintenance, Troubleshooting, and Reference GuideNotes
6.
Hold an empty tube or beaker under the exit
fitting to receive approximately 5 mL of waste.
Flush the trap by pushing steadily on the syringe
plunger.
IMPORTANT!
DO NOT USE EXCESSIVE
FORCE when you push the syringe plunger as
this may damage the trap seals. Take
approximately 30 seconds to flush 5 mL of either
distilled or deionized water through the trap.
Note:
Because the water trap volume is
approximately 325
µ
L, a relatively small volume
of water is adequate for complete flushing.
However, a larger volume only improves
flushing as long as force and flow rate are kept
within the limits given above.
7.
Close the fittings in this order by turning each
clockwise until the fittings seal against the block:
a.
Luer fitting
b.Exit fitting
IMPORTANT!
Do not over-tighten the fittings.
Very little pressure develops within the trap
during pump operation, so the fittings require
only enough tightening to prevent water leaks.
Excessive tightening can damage the fittings.
c.
Remove the syringe from the Luer fitting.
Hold the fitting with one hand while turning
the syringe counterclockwise with the other
hand.
Chapter 1 Maintenance Fluids and Waste
1
Fluids and Waste
When to Change the Buffer
CHEMICAL HAZARD.
10X
Genetic Analyzer Buffer with EDTA may cause eye,
skin, and respiratory tract irritation. Read the MSDS,
and follow the handling instructions. Wear
appropriate protective eyewear, clothing, and gloves.
Change the buffer before each batch of runs or at least
every 24 hours.
Making Buffer for a Single Run
To prepare 50 mL of 1X running buffer:
1.
Add 5 mL of 10X Genetic Analyzer buffer into a
graduated cylinder.
2.
Add deionized water to bring the total volume up
to 50 mL.
3.
Mix well.
Storing the Buffer
The 1X running buffer can be stored at:
• 2 to 8 °C for up to 1 month
• Room temperature for 1 week
50 mL
total 45 mL DI H2O
5 mL 10X Genetic Analyzer buffer
50 mL graduated cylinder
Buffer Storage Conditions
Option A Option B Su M T W Th F S 2°C to 8°C 1 month 20°C to 25°C 7 days Su M T W Th F S
Chapter 1 Maintenance Fluids and Waste
16
Applied Biosystems 3130/3130xl Genetic Analyzers Maintenance, Troubleshooting, and Reference GuideNotes
Polymer
Storing Polymer
Store any remaining POP
™polymer at 2 to 8 °C until
the expiration date printed on the jar.
Note:
Excessively hot environments may shorten the
working life of the polymer.
When to Change the Polymer
Change the polymer weekly. The polymer is good at
25 °C for about 7 days.
Before Using the Polymer
1.
Remove the polymer from 4
°
C storage.
2.
Loosen the cap and bring the polymer to room
temperature.
3.
To dissolve deposits, tighten the cap and gently
swirl the polymer.
Replenishing the Polymer
CHEMICAL HAZARD
. POP
™Polymers causes eye, skin, and respiratory tract
irritation. Read the MSDS, and follow the handling
instructions. Wear appropriate protective eyewear,
clothing, and gloves.
IMPORTANT!
Wear gloves when you
handle the polymer.
POP™-4 or POP™-6 Polymer
Storage Conditions Su M T W Th F S
Chapter 1 Maintenance Fluids and Waste
1
1.
Click
Wizards
>
Replenish Polymer Wizard.
2.
Follow the directions given in the wizard to load
fresh polymer on the instrument.
3.
Relink plate(s), if applicable.
Changing to a Different Polymer Type
CHEMICAL HAZARD
. POP
Polymers causes eye, skin, and respiratory tract
irritation. Read the MSDS, and follow the handling
instructions. Wear appropriate protective eyewear,
clothing, and gloves.
IMPORTANT!
Wear gloves when you
handle the polymer.
1.
Click
Wizards
>
Change Polymer Type
Wizard.
Chapter 1 Maintenance Capillary Array
18
Applied Biosystems 3130/3130xl Genetic Analyzers Maintenance, Troubleshooting, and Reference GuideNotes
Capillary Array
When to Change
a Capillary Array
A capillary array should last approximately 100 runs.
The following problems may indicate that a new capillary array is required:
• Poor sizing precision or allele calling
• Poor resolution and/or decreased signal intensity
Checking the
Cathode Bar
ELECTRICAL SHOCK/FIRE HAZARD.
Do not leave liquid on
the cathode header. This can lead to electric shock or even fire if not properly
maintained.
When placing a used array back on the instrument, be sure that the cathode bar is dry
(see figure below). A wet bar could lead to arcing.
Installing, Removing, or Replacing a Capillary Array
IMPORTANT!
Wear gloves when you handle the polymer blocks.
CHEMICAL HAZARD
.
POP polymer
causes eye, skin, and
respiratory tract irritation. Read the MSDS, and follow the handling instructions. Wear
appropriate protective eyewear, clothing, and gloves.
1.
Close the oven and instrument doors, and then press the Tray button.
Back view: Ensure the cathode header is dry – especially in the centerGR2146
Chapter 1 Maintenance Capillary Array
1
2.
Select
Wizards
>
Install Array Wizard
.
IMPORTANT!The capillary array length defined
in the wizard must match the array length you are
using.
3.
Open instrument and oven doors.
4.
Follow the directions given in the wizard to
install or replace an array.
5.
Click
when done.
6.
Close and lock the oven door, then close the
instrument doors.
IMPORTANT!
If you installed or replaced an
array that is a different length than the one you
were using, you must reset the active spectral
calibration or create a new spectral calibration
for the dye set and array length combination (see
“Activating a Spectral Calibration” in the
Applied Biosystems 3130/3130xl Genetic
Analyzers Getting Started Guide
).
Chapter 1 Maintenance Capillary Array
20
Applied Biosystems 3130/3130xl Genetic Analyzers Maintenance, Troubleshooting, and Reference GuideNotes
Updating
Capillary Array
Information
Use the Update Cap Array Info wizard to:
• Update the capillary array length and serial number information into the database
• Correct an entry error after using another wizard
IMPORTANT!
The capillary array length defined in the wizard must match the array
length you are using.
Caring for the
Capillary Array
and Work Area
Follow these guidelines to properly care for the capillary array and area:
• Wear gloves and handle the capillary array gently.
• Do not touch the detection cell.
• Keep the ends of the capillary array wet at all times.
• Do not overtighten the capillary array knob.
• Clean off any polymer buildup (crystals) on the instrument, including the capillary
electrodes and the stripper plate, with deionized water and lint-free tissue.
CHEMICAL HAZARD
.
POP polymer
causes eye, skin, and
respiratory tract irritation. Read the MSDS, and follow the handling instructions.
Wear appropriate protective eyewear, clothing, and gloves.
Note:
When cleaning the capillary electrodes, be careful not to bend them out of
position. If the electrodes do get bent, follow the procedure
“Storing Capillary
Arrays” on page 21
.
IMPORTANT!
Never use organic solvents to clean the instrument.
Filling the
Capillary Array
Using Manual
Control
See
“Fill the Capillary With Fresh Polymer Using Manual Control” on page 8
.
KeepChapter 1 Maintenance Storing Capillary Arrays
1
Storing Capillary Arrays
Storing a Capillary Array on the Instrument
Store the capillary array on the instrument only when
the capillary array will be
unused for less than 1 week.
To store the capillary array on the instrument, follow
the instructions to perform a short-term shutdown
described on
page 8
.
Storing a Capillary Array off the Instrument
Store the capillary array off of the instrument when
the capillary array will be unused for longer than
1 week.
IMPORTANT!
Before storing the capillary array for
long periods, fill the capillaries with fresh polymer.
IMPORTANT!
Wear gloves while performing the
following procedure, and any other time you handle
the capillary array, septa, or buffer reservoirs.
CHEMICAL HAZARD
.
POP
Polymer
causes eye, skin, and respiratory tract
irritation. Read the MSDS, and follow the handling
instructions. Wear appropriate protective eyewear,
clothing, and gloves.
1.
Remove the capillary array from the instrument
by selecting
Install Array Wizard
.
2.
Select
Store Array
and follow the prompts.
3.
Replace the cover over the detection cell.
4.
Fill a buffer reservoir with fresh 1X running
buffer and cover with a septa strip. Insert the
capillary tips into the buffer.
5.
Fill the shipping vial with fresh 1X running
buffer and insert the detection end of the
capillary array.
Chapter 1 Maintenance Storing Capillary Arrays
22
Applied Biosystems 3130/3130xl Genetic Analyzers Maintenance, Troubleshooting, and Reference GuideNotes
6.
Store the capillary array upright.
7.
Check the 1X running buffer level in the
reservoir and tube weekly and replenish the
buffer as needed.
Removing Bubbles from the Polymer
Blocks
Bubbles may be found in the polymer system,
especially after a polymer change or array installation.
Remove the bubbles from all parts of the polymer
system including the pump chamber, the pump block
channel, polymer supply and interconnect tubing and
the lower polymer block channel.
To clear bubbles:
1.
Select
Wizards
>
Bubble Remove Wizard
to
clear bubbles.
IMPORTANT!
Remove bubbles from the
interconnect tubing and the channel of the lower
polymer block. These areas are part of the
electrophoresis current path. Absence of bubbles
in the current path is important for problem-free
electrophoresis.
2.
Replace the buffer if excess polymer is expelled
into the anode buffer jar during bubble removal.
Chapter 1 Maintenance Autosampler Calibration
1
Autosampler Calibration
When to Calibrate the Autosampler
Calibrate the autosampler only as needed.
Symptoms of autosampler alignment problems may
include:
• Poor injection for a small number of capillaries
• Low signal strength
• No evidence of sample
Calibrating the Autosampler
1.
Close the oven and instrument doors.
2.
Select
Wizards
>
Autosampler Calibration
Wizard
.
3.
If plates are linked in the Run Scheduler, the
plates automatically are unlinked. In the Warning
dialog box, click
.
4.
Follow the directions given in the wizard to
calibrate the autosampler.
5.
Click
and turn the instrument power off
for 10 sec then on.
Chapter 1 Maintenance Manual Control
24
Applied Biosystems 3130/3130xl Genetic Analyzers Maintenance, Troubleshooting, and Reference GuideNotes
Manual Control
Note:
Manual control is active only if the oven and instrument doors are closed.
Table of
Commands
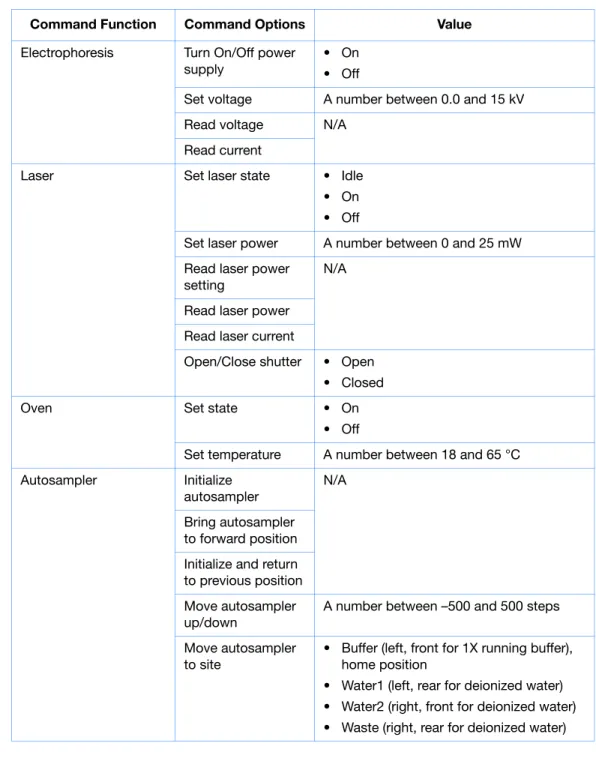
The following table displays the manual control options in the Data Collection software.
Command Function Command Options Value
Electrophoresis Turn On/Off power supply
• On • Off
Set voltage A number between 0.0 and 15 kV Read voltage N/A
Read current
Laser Set laser state • Idle • On • Off
Set laser power A number between 0 and 25 mW Read laser power
setting
N/A
Read laser power Read laser current
Open/Close shutter • Open • Closed
Oven Set state • On
• Off
Set temperature A number between 18 and 65 °C Autosampler Initialize
autosampler
N/A
Bring autosampler to forward position Initialize and return to previous position Move autosampler up/down
A number between –500 and 500 steps
Move autosampler to site
• Buffer (left, front for 1X running buffer), home position
• Water1 (left, rear for deionized water) • Water2 (right, front for deionized water) • Waste (right, rear for deionized water)
Chapter 1 Maintenance Manual Control
1
Polymer Deliver Pump Initialize polymer
delivery pump
N/A
Home piston Read piston position
Move piston down 1 to 38000 counts Move piston up 1 to 38000 counts Fill capillary array 1 to 38000 counts
Buffer Valve Close /Open buffer
valve
• Close • Open
Detection Cell Heater Turn On/Off
detection cell heater
• On • Off Read detection cell
heater temperature N/A
Oven Turn On/Off oven • On • Off Set oven
temperature
A number between 18 and 70 °C
Read oven temperature
N/A
Chapter 1 Maintenance Manual Control
26
Applied Biosystems 3130/3130xl Genetic Analyzers Maintenance, Troubleshooting, and Reference GuideNotes
Using Manual Control
Note:
Manual control functions cannot be used
during a run.
1.
In the tree pane of the Data Collection software,
click
GA Instruments
>
ga3130
or
ga3130
xl
>
instrument name
>
Manual
Control
.
2.
In the Send Defined Command For drop-down
list, select a function.
3.
In the Command Name drop-down list, select a
command and enter a value, if required.
Note:
The command names are filtered based
the function selected in
step 2
.
numlockcapslockscrolllock F15 F14 F13 F12 F11 F10 F9 F8 F7 F6 F5 F4 F3 F2 F1 esc esc1234 8 7 6 5 + _ 0 9-=delete R E W Q I U Y T OP[] F D S A GHJKL"' V C X Z < M N B
>? /returnshiftoptioncontrol shift controloption capslock tab page up home helpxendpage down
3 2 1 456 8 79 clear= * + enter 0
Chapter 2
2
Computer Maintenance
Overview
This chapter covers the following topics:
Computer Task Lists
. . . 28
Working With Drives
. . . 28
Hard Disk and Database Status . . . 30
Archiving Data . . . 31
Defragmenting the Computer Hard Drive
. . . 33
Deleting Records from the Database
. . . 34
Chapter 2 Computer Maintenance Computer Task Lists
28
Applied Biosystems 3130/3130xl Genetic Analyzers Maintenance, Troubleshooting, and Reference GuideNotes numlockcapslockscrolllock F15 F14 F13 F12 F11 F10 F9 F8 F7 F6 F5 F4 F3 F2 F1 esc esc2134568709-+_=delete RE W Q YTUIOP[] F D SA GHKJL"' V C
XZ BMN<>? /returnshiftoptioncontrol shiftcontroloption capslock tab
page up
home helpxendpage down
32 1465 879 clear=* + enter 0
Computer Task Lists
Weekly Tasks
Perform this task at least once per week.
Working With Drives
Checking
Available Space
on All Drives
Before a run or batch of runs, the Data Collection software checks the space on drives C,
D, E, and F to ensure that there is sufficient space to store the newly created database and
sample file data. The Data Collection software sends a warning message:
• Remove data– the drive is getting full
• Clean up the database (when the database is getting full, ~70 to 75% of capacity)
View the Errors pane’s Instrument Status window for generated errors and in the Event
Log window. Also, check the status light in the bottom left-hand corner of the data
collection window to see if it flashes red.
Full Database
Error
To view the error messages, click
GA Instruments
>
ga3130
or
ga3130
xl
>
instrument name
>
Instrument Status
>
Event Log
.
Database full error message
Maintenance Task Frequency
Check database space. Weekly
Delete plate records from the instrument database and archive sample files.
Chapter 2 Computer Maintenance Working With Drives
numlockcapslockscrolllock F15 F14 F13 F12 F11 F10 F9 F8 F7 F6 F5 F4 F3 F2 F1 esc esc2143576809+_=-delete R EW Q YTUIOP[] FD SA GJHKL"' VC XZ BMN<>? /returnshiftoptioncontrol shiftcontroloption capslock tab page up home helpendpage downx 32 146 58 79 clear=* + enter 0
2
Disk Drive Full
Error