OnCommand
®
Balance 4.0.0
Installation and Configuration Guide
NetApp, Inc. 495 East Java Drive Sunnyvale, CA 94089 U.S. Telephone: +1 (408) 822-6000 Fax: +1 (408) 822-4501 Support telephone: +1 (888) 463-8277 Web: www.netapp.com Feedback: [email protected] Part number 215-06625_A0
Contents
Contents
Chapter 1
Introduction ... 5
Balance overview ... 6 Functionality ... 6 Discovery... 6 Data collection ... 6 Analysis ... 6 Data reporting... 7 Conventions ... 7 Technical documentation ... 8Chapter 2
Setting up Balance ... 9
Installation overview ... 10
New installation ... 10
Upgrade ... 11
Virtual appliance requirements ... 12
vSphere requirements ... 12
ESX Server requirements ... 12
VA resource recommendations ... 12
Deploying the virtual appliance ... 13
Configuring the virtual appliance ... 14
Setting up the Balance Proxy ... 15
About multiproviders ... 16
Proxy host requirements ... 16
Proxy host requirements based on the number of monitored servers ... 17
Installing the Balance Proxy ... 18
Client system requirements ... 18
Web browser ... 18
Java Runtime Environment ... 19
Flash Player ... 19
Chapter 3
Configuring resources for data collection ... 21
VMware vCenter Server and ESX/ESXi Server requirements ... 22
vCenter Server... 22
VMware ESX/ESXi Server... 22
Windows and Hyper-V Server requirements ... 23
Contents
Discovering a NetApp storage system with a user account... 30
Dell EqualLogic ... 31
EMC CLARiiON ... 31
CLARiiON Domain ... 31
EMC Symmetrix... 32
Enabling data collection... 32
Configuring the proxy for Symmetrix DMX/VMAX arrays ... 32
Engenio... 34
Enabling discovery collection ... 34
HP EVA ... 34
HP XP ... 35
Enabling discovery collection ... 35
Enabling statistics collection ... 36
Hitachi Data Systems ... 36
Enabling discovery collection ... 36
Enabling statistics collection ... 37
IBM ... 37
IBM TotalStorage DS4000 and 5000 series/FAStT ... 37
IBM DS6000, DS8000, and ESS storage ... 37
IBM XIV ... 38
Enabling discovery collection ... 38
Virtualization software requirements ... 39
HMC, Virtual IO Servers, IBM LPAR ... 39
Preparing HMC VIO servers for discovery ... 39
Enabling discovery using a user account... 40
Enabling discovery using root... 40
IBM SAN Volume Controller (SVC) ... 41
Enabling statistics collection ... 41
HP SAN Virtualization Storage Platform (SVSP) ... 42
SAN device requirements... 42
Brocade ... 42
Cisco ... 43
Database requirements ... 43
Oracle ... 43
Microsoft SQL Server ... 44
Enabling topology views of database applications ... 44
Preparing an Oracle database for discovery... 45
Preparing a MS SQL Server for discovery... 45
Communication ports... 47
Configuring Ports Behind Windows Firewalls ... 47
Chapter 4
Advanced configuration options ... 49
Accessing the AMT ... 49
Using the AMT ... 49
Adding network adapters to Balance... 51
Index
1
Introduction
This guide explains how to set up OnCommand®Balance 4.0.0 in your data center. It also describes the minimum requirements for discovering and collecting data from each data center resource you want to monitor.
Balance overview
Balance is a software solution that exists on the Balance virtual appliance (VA). Balance provides a complete, end-to-end view of your data center, from the physical storage that holds your data to the applications that process and control that data. It monitors your data center to identify and alert you to performance bottlenecks, such as latency, storage contention, and over-utilization, before they occur, so that you can take corrective action. It also allows you to plan data center configurations, such as adding or removing servers or storage systems, to determine the potential impact to overall data center performance.
For a more detailed product overview, see theOnCommand Balance User Guide.
Functionality
The main Balance functionality is discovery, data collection, analysis, and data reporting. Balance provides access to configure Balance and begin discovery using the Hypertext Transfer Protocol (HTTP) or Secure Hypertext Transfer Protocol (HTTPS).
Discovery
Balance uses the IP network to discover data center resources. To add resources to Balance, you can import a seed list or manually add each resource you want to discover and monitor. During discovery, Balance collects information about the resource, such as the resource configuration and its relationship to other data center resources. Balance uses the information to build a topology that maps the path between each monitored application, server, and the connected storage systems.
Data collection
After the resources have been discovered, Balance begins to collect their
operational data into its database. The data includes information such as disk IOPS, disk latency, and server CPU and memory usage. If IOPS, for example, jump during a discrete time period on a particular LUN, Balance captures this information. Within a few hours of discovery, Balance can begin performance analysis against the collected data. As Balance collects more data the analysis beings to provide more accurate and meaningful performance statistics.
Analysis
The word “analysis”, as used by NetApp, refers to actions that Balance performs when examining data center statistics for performance issues. Balance collects quantitative data such as IOPS, latency, and memory paging, then uses the data to determine whether there are any problems with operations in the data center. If Balance identifies an existing or potential problem, it provides recommendations that you can use to resolve the problem.
Data reporting
Balance provides several reports that display configuration information for each monitored resource, including with statistics that show the current and trending performance. Balance analyzes these trends and provides recommendations for resolving potential problems it identifies. You can analyze the reported trends and make changes based on those trends at any time.
Conventions
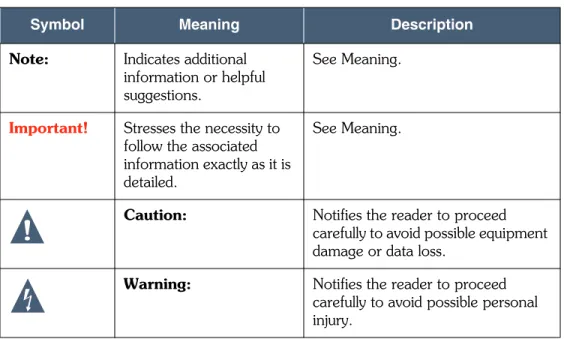
Textual conventions used throughout this guide are described inTable on page 7 andTable on page 7.
Table 1. Conventions
Symbol Meaning Description
Note: Indicates additional information or helpful suggestions.
See Meaning.
Important! Stresses the necessity to follow the associated information exactly as it is detailed.
See Meaning.
Caution: Notifies the reader to proceed carefully to avoid possible equipment damage or data loss.
Warning: Notifies the reader to proceed carefully to avoid possible personal injury.
Table 2. Text conventions
Convention Meaning Description
Screen and keyboard button callouts
Appear in bold type. default policy
Technical documentation
The technical documents for installing, configuring, administering, and using the Balance VA and Balance software are detailed inTable 3 on page 8. To provide comments on this document, seeHow to send your commentson page 55.
Table 3. Balance technical documentation
Document Name Description
Release Notes Current release information, known problems, and work-arounds.
Installation and Configuration Guide
Procedures for installing the VA on a VMware ESX Server and discovery requirements for each supported data center resource you want to monitor.
User Guide Available in both PDF and online Help format, the User Guide explains how to configure, manage, and use Balance. Note:For the latest electronic versions of Balance user documentation in PDF format, visit the NetApp Support Web site:www.netapp.com/support
2
Setting up Balance
This chapter explains how to install Balance 4.0.0 in your data center. See the following sections:
• Installation overviewon page 10
• Virtual appliance requirementson page 12
• Deploying the virtual applianceon page 13
• Configuring the virtual applianceon page 14
• Setting up the Balance Proxyon page 15
Installation overview
Balance is distributed as a virtual appliance (VA) in the OVA format. You can download the OVA from the NetApp Support Web site at:
www.netapp.com/support.
To install Balance, you deploy the OVA to an ESX Server from your vSphere Client. During deployment, the OVA converts to a virtual machine (VM). You then log in to Balance through a Web browser to configure the VA as a new installation or to upgrade an existing 3.6 VA.
New installation
Setting up a new Balance VA involves the following tasks:
1. Ensure that the ESX Server that will host the VA meets the minimum require-ments.
SeeVirtual appliance requirementson page 12. 2. Deploy the VA to an ESX Server.
SeeDeploying the virtual applianceon page 13.
3. In a Web browser, access Balance and select the option to configure it as a new server.
SeeConfiguring the virtual applianceon page 14.
4. Install and configure the Balance Proxy. Balance requires the proxy to discover Windows servers and some storage arrays. Depending on the storage array type, you may need to install and configure multiprovider software in addition to the proxy.
SeeSetting up the Balance Proxyon page 15.
5. Add data center resources you want to discover and monitor.
For the minimum requirements for discovering each resource, seeChapter 3, “Configuring resources for data collection”.
Upgrade
Upgrading an existing Balance 3.6 VA involves deploying the 4.0.0 VA and then migrating the historical data and configuration settings from the 3.6 VA to the 4.0.0 VA.
Important!Before proceeding, we strongly recommend that you clone or back up the VA.
Upgrading involves the following tasks:
1. Ensure that the ESX Server that will host the VA meets the minimum require-ments.
SeeVirtual appliance requirementson page 12. 2. Deploy the 4.0.0 VA to an ESX Server.
SeeDeploying the virtual applianceon page 13.
3. If you need to configure an additional network adapter on the 4.0.0 VA, to separate network traffic, for example, you must do so before you proceed with the upgrade.
Important!Adding a network adapter involves restarting Balance on the 4.0.0 VA. During the upgrade, Balance must remain powered-on until the data migration from the 3.6 VA has completed, or you risk data loss.
SeeAdding network adapters to Balanceon page 51.
4. In a Web browser, log in to Balance to configure the VA and select the option to migrate historical data and configuration settings from a 3.6 VA.
You specify the name and admin credentials for the 3.6 VA from which to migrate data to the 4.0.0 VA.
Note:If you specify credentials for an Active Directory account, the upgrade might fail to access the 3.6 VA.
The configuration settings migrate first, at which time the 3.6 VA is temporarily unavailable, and then the 4.0.0 VA begins data collection. The historical data migrates over time. You can still log in to the 3.6 VA, but it will no longer collect and display new data.
SeeConfiguring the virtual applianceon page 14.
5. On the Balance Dashboard, use the instructions in the data migration section, on the right, to upgrade the existing Balance Proxies to be compatible with Balance 4.0.0.
Virtual appliance requirements
The ESX Server on which you deploy the VA must meet minimum resource requirements. The VA resource requirements increase based on the number of servers you plan to monitor.
vSphere requirements
For deploying the VA, you can use VMware vSphere Client version 4.0, 4.1, or 5.0.
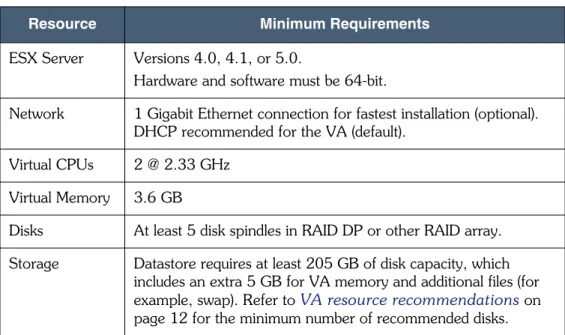
ESX Server requirements
Table 4 on page 12lists the minimum requirements for the VMware ESX Server that will host the VA.
Table 4. ESX Server requirements
Resource Minimum Requirements ESX Server Versions 4.0, 4.1, or 5.0.
Hardware and software must be 64-bit.
Network 1 Gigabit Ethernet connection for fastest installation (optional). DHCP recommended for the VA (default).
Virtual CPUs 2 @ 2.33 GHz Virtual Memory 3.6 GB
Disks At least 5 disk spindles in RAID DP or other RAID array. Storage Datastore requires at least 205 GB of disk capacity, which
includes an extra 5 GB for VA memory and additional files (for example, swap). Refer toVA resource recommendationson page 12 for the minimum number of recommended disks.
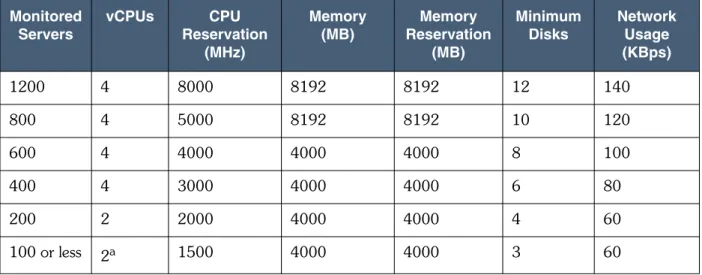
VA resource recommendations
Table 5 on page 13lists the VA resource recommendations based on the number of servers you plan to monitor. Additional virtual CPUs can be added through the vSphere Client.
The VA has a minimum memory reservation of 4000MB (the default). If this amount is not available on the ESX Server, the VA might not power on. You can lower the memory settings of the VA in an environment with 100 monitored servers or less.
Table 5. VA resource recommendations Monitored Servers vCPUs CPU Reservation (MHz) Memory (MB) Memory Reservation (MB) Minimum Disks Network Usage (KBps) 1200 4 8000 8192 8192 12 140 800 4 5000 8192 8192 10 120 600 4 4000 4000 4000 8 100 400 4 3000 4000 4000 6 80 200 2 2000 4000 4000 4 60 100 or less 2a
a For non-production/demo usage, you can configure Balance with 1 vCPU; this configuration is not otherwise recommended.
1500 4000 4000 3 60
Deploying the virtual appliance
This section explains how to use a VMware vSphere Client to deploy the VA to an ESX Server. The vSphere Client converts the VA to a virtual machine (VM).
Important!If you are upgrading from a 3.6 VA, we strongly recommend that you clone or back up the VA before proceeding.
To deploy the VA:
1. Download the VA from the NetApp Support Web site at www.netapp.com/sup-port
2. Save the OVA file to a local or network location that is accessible to your vSphere Client.
3. In the vSphere Client, on theFilemenu, selectDeploy OVF Template. 4. Complete the Deploy OVF Template wizard to deploy the VA.
Note:For the VM disk format, we recommend selectingThin Provisioned. Thin provisioning allows the Balance database to efficiently grow to the maximum available capacity, as you add resources to your data center. vSphere 4.0 does not
• Balance uses DHCP to assign an IP address to the VA. If DHCP is not detected, you are prompted to specify the network settings for assigning an IP address to the VA. You enter this IP address in a Web browser to access and use the Balance Web client.
7. Proceed toConfiguring the virtual applianceon page 14.
Configuring the virtual appliance
After deploying the VA and powering it on, you can then open a Web browser and use the IP address assigned to the VA to access Balance and begin the
configuration. When you first log in, you can select to set up Balance as a new server or migrate configuration settings and historical data from an existing Balance 3.6 VA to the new VA.
Note:If you are migrating settings and data from an existing Balance 3.6 VA, ensure that the existing VA is powered on. If you have changed the root password on the existing VA from the default, you will be prompted to enter the root password during the upgrade.
To configure the VA: 1. Open a Web browser.
Note:For the minimum client system requirements, seeClient system requirementson page 18.
2. In the address bar, enter the FQDN/IP address assigned to the VA when it was deployed.
3. Follow the on-screen instructions to configure a new VA or upgrade an existing VA. After you complete the configuration, the login page appears.
4. Enter your login credentials. If upgrading, enter the credentials for the 3.6 VA. Default is the following (all lowercase):
• User:admin
• Password:password
For new installations, the Welcome page appears.
Note:If you choose to migrate settings and data from an existing VA, the data continues to migrate in the background. Balance 4.0.0 and the existing source Balance VA both display the migration status, but Balance 4.0.0 is more accurate. 5. In Balance, clickHelpand complete the tasks listed in the topic “Getting started
with Balance” for instructions on configuring Balance and adding data center resources you want to monitor.
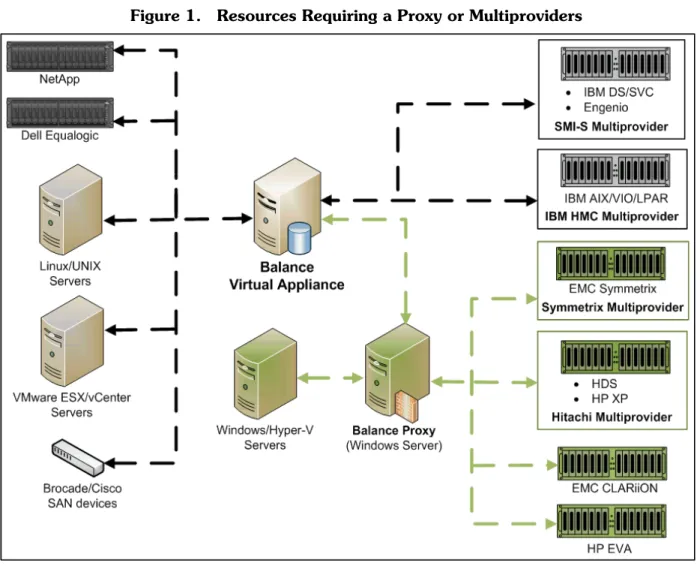
Setting up the Balance Proxy
The Balance Proxy is required to discover Windows servers and some storage arrays. Install the proxy on a physical or virtual host. Balance uses the proxy to perform discovery collections on the monitored resources.
Figure 1 on page 15shows which resources, in green, must be discovered through the Balance Proxy and which resources also require a multiprovider, either
standalone or in addition to the proxy.
About multiproviders
To discover and collect data from some storage arrays, Balance requires multiprovider software, either standalone or in addition to the Balance Proxy. Depending on the storage array type, the multiprovider must be on either the Balance Proxy server or on a server accessible to Balance. To reach the storage array, Balance can communicate with the appropriate multiprovider directly or communicate with the proxy, which communicates with the multiprovider.
During the proxy installation, you can browse to the location of some multiprovider software that is installed on the proxy host, while other multiproviders require more advanced configuration.
The following storage systems require multiproviders: • EMC CLARiiONon page 31
• EMC Symmetrixon page 32
• Engenioon page 34
• HP EVAon page 34
• HP XPon page 35
• Hitachi Data Systemson page 36
Proxy host requirements
The host on which you install the Balance Proxy must meet the following minimum requirements:
• Dedicated Windows Server 2003 SP1 or greater.
• Dedicated Windows Server 2008 R2 with User Account Control (UAC) disabled.
Note:Other Windows versions are not supported.
• Firewall disabled or open port 9443 for proxy communication. See
Communication portson page 47.
• 32-bit version of Java is required for both 32- and 64-bit systems. SeeJava Runtime Environmenton page 19.
• At least 20 GB of disk space assigned to the proxy, approximately 10 GB should be available after installation.
• If antivirus software is installed on the proxy host, script scan functions must be disabled. We recommend excluding the following directory from virus scan: C:\Program Files\netapp
• The proxy should be accessed by a single Balance VA only.
Proxy host requirements based on the number of monitored
servers
Table 6 on page 17lists the resource limitations for the Windows Server hosting the Balance Proxy. The values are based on the number of servers (physical and virtual) that you plan to monitor.
Table 6. Proxy host requirements Monitored Servers vCPUs CPU Reservation (MHz) Memory Reservation (MB) Minimum Disks Network Usage (KBps) 1200 2 4000 2048 4 360 800 2 3400 2048 4 340 600 2 2600 2048 2 260 400 2 1800 2048 2 180 200 2 1000 2048 1 80 100 or less 2 500 2048 1 40
Note:Values apply specifically to Windows Server 2003 hosts. Values for Windows Server 2008 hosts might be higher.
There is a Microsoft bug where thelsass.exeprocess consumes 100% of Java CPU. This causes a slow response logging into the Balance Proxy as well alerts regarding high CPU utilization from the Virtual Center hosting the proxy. This problem was found on Windows 2003 and 2008 standard. However, Windows 2008 r2 is not affected.
For information about Windows 2003lsass.exe, see the Knowledge Base article athttp://support.microsoft.com/kb/2028484
AntiVirus “script scan” capability might also cause high CPU utilization. Disable the script scan on the Balance Proxy.
Installing the Balance Proxy
This section explains how to install or upgrade the Balance Proxy. You use a wizard that steps you through installing the proxy and specifying the multiproviders that the proxy requires to communicate with some resources. For a list of resources that require multiproviders, seeAbout multiproviderson page 16.
To install or upgrade the proxy:
1. Review the proxy host requirements inProxy host requirementson page 16. 2. Open a Web browser window and log in to Balance.
3. On theDiscoverymenu, selectProxies > Add proxy.
Note:If upgrading a 3.6 VA, the Dashboard displays instructions for upgrading the existing proxies.
4. Follow the on-screen instructions to install the proxy.
The installer file displays and you can choose to open and run the proxyinstall.jnlpfile, which starts the proxy installation wizard. 5. Select to open the installer file.
6. Use the wizard to install or upgrade the proxy.
On the step for installing multiproviders, the proxy installer displays the default paths where it expects to find multiproviders installed on the proxy host. If any of the paths are incorrect, clickBrowseto locate the multiprovider and update the path.
Important!If you do not install all multiproviders initially, but install them at a later time, you must reinstall the proxy and select the appropriate check boxes for each new multiprovider you added.
Client system requirements
This section lists the client system requirements for accessing Balance through a Web browser.
Web browser
To ensure that the Balance interface displays properly, use one of the following browsers:
• Mozilla Firefox 6.0 or greater.
• Microsoft Internet Explorer (IE) 7 or greater. IE 8 or 9 recommended.
Note:For IE 8, ensure Compatibility Mode (Compatibility View) is disabled. For IE 9, ensure Compatibility Mode is enabled. See the Microsoft IE online help for information on enabling and disabling Compatibility Mode.
Java Runtime Environment
Balance requires a minimum of JRE v1.6 with update 24 or greater for optimal graphing capabilities.
Flash Player
To display the Data Topology pages in Balance, the client system must have Adobe Flash Player 10.1.82.76 or greater.
3
Configuring resources for data
collection
Before Balance can discover and collect performance statistics from your data center resources, you must make sure that each resource meets the minimum software requirements. If the resource requires the Balance Proxy, the proxy may require multiprovider software to discover the resource.
Balance supports equipment from several vendors. See the following sections to ensure that each of your resources meet the minimum requirements for discovery: • VMware vCenter Server and ESX/ESXi Server requirementson page 22
• Windows and Hyper-V Server requirementson page 23
• Linux/UNIX server requirementson page 25
• Storage system requirementson page 29
• Virtualization software requirementson page 39
• SAN device requirementson page 42
• Database requirementson page 43
VMware vCenter Server and ESX/ESXi Server
requirements
Balance supports VMware vCenter Servers and allows for the discovery of hosts and guests associated with physical ESX servers. You can also add ESX Servers as standalone hosts.
Important! The user account for accessing the vCenter Server or ESX/ESXi Server must have a user role at the data center level (top of the tree) with the Browse Datastore privilege. Balance requires this role to collect statistics for VM datastores.
vCenter Server
Balance supports monitoring of the following versions of vCenter Server: • vCenter 5.0 (for ESX 4.0.x and 4.1.x ESX hosts)
• vCenter 4.0 and 4.1 (for ESX 4.0.x, and 4.1.x ESX hosts) • vCenter Server 2.5 (for ESX 3.5.x hosts)
Note:Each vCenter Server you add to Balance must have a unique vCenter ID.
VMware ESX/ESXi Server
Balance supports standalone VMware ESX/ESXi Server 4.0 or greater. It can also track VMotion activity.
To discover ESX/ESXi Servers, Balance has the following discovery requirements: • FQDN/IP address of the server.
• Username and password for the server.
Note:VM guests must have VMTools installed before they can be monitored. ESX/ESXi Servers have the following limitations:
• ESX hostd process stops and restarts with 'exceed hard limit' memory errors when monitored by multiple Balance systems. A patch from VMWare is required. The patch is available at:
http://kb.vmware.com/selfservice/microsites/search.do?language=en_US&cm d=displayKC&externalId=1012543
• VMware Tools must be installed and up-to-date on all guests for statistics gathering. See the Hypervisor Tools section ofAccessing the AMTon page 49 for more information.
• Balance uses the VMware SDK (Software Development Kit) to communicate with VMware ESX servers (installed by default on most systems).
http://www.vmware.com/download/sdk/
The SDK retrieves data via SOAP requests over HTTP.
Note:If you want to configure this host or its cluster for vCenter Server discovery, seeVMware vCenter Server and ESX/ESXi Server requirementson page 22.
Important! Balance only supports Raw Disk Mappings (RDM) in physical compatibility mode.
Windows and Hyper-V Server requirements
See the following sections for Window and Hyper-V discovery requirements: • Windows Serveron page 23
• Hyper-V Serveron page 25
Important! If you are monitoring Windows or Hyper-V servers that have physical mappings to Symmetrix DMX/V-Max (SE only) arrays, you must install the inq.exe in the following path on the Balance Proxy host:
c:\Program Files\NetApp\bin
Note:Balance uses WMI to discover Windows and Hyper-V servers. If the servers are behind a firewall, seeConfiguring Ports Behind Windows Firewallson page 47 to ensure that Balance can access the necessary ports.
Windows Server
Table 7 on page 24lists the supported versions of Windows and the configuration requirements for discovering each server as a standalone or physical server. Note:If your Windows server is part of a cluster, seeMicrosoft cluster multiprovideron page 24.
Table 7. Windows Server requirements
Version Software Requirements
• Windows Server 2008 with SP1 or SP2 • Windows Server 2008
R2
• Have a local user account or domain account with valid username and password that is a member of the administrators group.
• Have firewall disabled or open port 9443. SeeCommunication portson page 47.
• Be accessible to the Balance Proxy. • You can optionally run the following:
– FCINFO (Fibre Channel Info Tool)
– Multipathing software (for example, Powerpath, SecurePath, or MPIO are supported).
Windows Server 2003 with SP2
• Have a valid username and password with local administrator permissions on the server or domain administrator permissions. • Have firewall disabled or open port 9443. SeeCommunication
portson page 47.
• Be accessible to the Balance Proxy. • You can optionally run the following:
– FCINFO (Fibre Channel Info Tool)
– Multipathing software (for example, Powerpath, SecurePath, or MPIO are supported).
Microsoft cluster multiprovider
For Microsoft clusters, create a credential for the Windows 2003/2008 servers in your cluster, use an existing Balance Proxy machine, and specify the cluster FQDN or IP address in Balance when adding the Microsoft Cluster multiprovider. Do not configure the individual cluster nodes for discovery. When Balance discovers the Microsoft Cluster multiprovider, all nodes in the cluster will appear in Balance as unmonitored. You will need to manually change each node to monitored.
Note:If you are using STORport Miniport drivers, multipathing software is required (for example, Powerpath, SecurePath, or MPIO are
supported). Supported drivers include STORport and SCSIport Miniport drivers.
Hyper-V Server
Table 8 on page 25lists the supported versions of Windows Hyper-V Server and the software requirements for discovering the server.
Table 8. Hyper-V Server requirements
Version Software Requirements
Windows Server 2008 R2 • Have a local user account or domain account with valid username and password that is a member of the administrators group. • Have firewall disabled or open port 9443. See
Communication portson page 47. • Be accessible to the Balance Proxy. • You can optionally run the following:
– FCINFO (Fibre Channel Info Tool)
– Multipathing software (for example, Powerpath, SecurePath, or MPIO are supported).
Note:Balance does not support clustering for Hyper-V. Balance discovers Hyper-V virtual machines and adds Windows guests to the Unmonitored list.
Linux/UNIX server requirements
To prepare each Linux/UNIX server for discovery and user authentication, see the following sections:
• Linux/UNIX discovery requirementson page 25
• Configuring password authentication for Linux/UNIX serverson page 28
• Configuring RSA authentication for Linux/UNIX serverson page 29
Linux/UNIX discovery requirements
Table 9 on page 26lists the system requirements for discovering physical
(standalone) Linux/UNIX servers. For Balance to discover Linux/Unix servers, the Note:STORport Miniport drivers are supported by default.
Table 9. Linux/UNIX discovery requirements
Platform Type Requirements
Linux Red Hat Enterprise Linuxversion ES4 or ES5
• Root access to the server or a valid credentials for the sudo account. The username must be entered in the sudoers file or equivalent in PowerBroker. Balance uses an ssh login via password or key exchange to communicate with Linux servers. • SSH installed.
• Oracle Automatic Storage Management (ASM) is currently supported for Red Hat Enterprise Linux, including the option for multipathing. RAC is not supported. SeeDatabase requirementson page 43.
SUSE version 9, 10, or 11
• Root access to the server or a valid credentials for the sudo account. The username must be entered in the sudoers file or equivalent in PowerBroker. Balance uses an ssh login via password or key exchange to communicate with Linux servers. • SSH installed.
Solaris 9 on SPARC, Solaris 10 on SPARC or x86
• Root access to the server or a valid credentials for the sudo account. The username must be entered in the sudoers file or equivalent in PowerBroker. Balance uses an ssh login via password or key exchange to communicate with Linux servers. • Solaris Volume Manager (SVM) and Veritas Volume Manager
(VxVM) 3.5 or higher are required for correct data collection. If you have incorporated multipathing, Balance supports DMP and/or PowerPath.
• SSH installed.
• HBA software utilities, such as Emulex HBAnyware or QLogic SanSurfer:
– hbanyware/hbacmdCLI suite of tools installed, for data collection from Emulex HBAs.
– SANsurfer (scli) suite of tools installed, which facilitates the gathering of configuration and statistical data for Q-Logic HBAs.
– PowerBroker (or sudo installed for Balance to gain root privileges while running HBA tools. Thesudoutility does not come standard with Solaris, but is available free online.
• Sun::Solaris::Kstat Perl module (kstat) installed.
• prtvtoccommand in either the sudoers file or PowerBroker to provide access privileges for discovering disk partitions.
UNIX • HP-UX 11i v1 (11.11) • HP-UX 11i v2 (11.23) • HP-UX 11i v3 (11.31)
• Root access to the server or a valid credentials for the sudo account. The username must be entered in the sudoers file or equivalent in PowerBroker. Balance uses an ssh login via password or key exchange to communicate with UNIX servers.
• Have SSH installed - Balance uses an ssh login via password or key exchange to communicate with HP-UX servers and requires a username and password with read-only permissions on the server.
• Be running HP-UX 11.11 / HP-UX 11.23 with Logical Volume Manager (LVM).
• Have HP OpenView GlancePlus installed.
• You can optionally install HBA software utilities (i.e. Emulex HBAnyware or QLogic SanSurfer). You will not get HBA and FCPort information without installing the utilities.
IBMAIX 5.2, 5.3, & 6.1
• Root access to the server or a valid credentials for the sudo account. The username must be entered in the sudoers file or equivalent in PowerBroker. Balance uses an ssh login via password or key exchange to communicate with UNIX servers.
Note:Sudo is also in the AIX Toolbox for Linux Applications. • Have SSH installed. This is included with the AIX Toolbox for
Linux that is distributed with AIX. For more information, go to the IBM Web site at: http://www.ibm.com/developerworks/. • Have disk collection enabled. You can run 'lsattr -E -l sys0 -a
iostat' to check the current setting. Run the command 'chdev -l sys0 -a iostat=true' on the AIX host to enable collection of disk statistics.
• A volume manager and an appropriate ODM driver for the connected Storage Array. If the AIX machine is connected to a CLARiiON array, and you have Powerpath installed, the appropriate ODM driver is installed automatically by Powerpath. If the AIX machine is connected to an HP EVA array, and you have SecurePath installed, the appropriate ODM driver is installed automatically by SecurePath. Table 9. Linux/UNIX discovery requirements
Configuring password authentication for Linux/UNIX servers
If you are using password authentication with a Linux/UNIX server, add the Balance user to /etc/sudoers using the visudo command.
Important!The following entries must be in yoursudoersfile, which can only be modified by running visudo as root. Visudo can be found in /usr/local/sbin
Defaults !env_reset Syntax:
username hostname = NOPASSWD:
/sbin/lvm,/sbin/scsi_id,/sbin/dmsetup,/sbin/fdisk where:
• usernameis the username for accessing the Linux/UNIX server. • hostnameis the FQDN/IP of the Linux/UNIX server.
If you are using one or more of the following tools, add their associated paths to your sudoers file.
QLogic Host Bus Adapter Simple Command Line Interface (SCLI): /usr/local/bin/scli
Powerpath: /sbin/powermt
Veritas Volume Manager:
/usr/lib/vxvm/diag.d/vxdmpinq,/usr/sbin/vxdisk
Note:When running Veritas Volume Manager 5.1 or greater, replace the use of the vxdmpinqutility, with the vxscsiinqutility.
MD devices: /sbin/mdadm
The hostname can be ALL to allow a connection from any host. (ALL) after the “=” is the UID with which you are allowed to sudo. Replaceusernameandhostname with the appropriate values. Note that the default locations are assumed for these utilities.
Note:To enable a password prompt, change NOPASSWD to PASSWD in the previous sudo entry.
Configuring RSA authentication for Linux/UNIX servers
If you are using RSA authentication with Linux/UNIX, perform the following steps: 1. Do one of the following to create the RSA keys:
• For RSA authentication on the Balance VA, use the read-only self monitor credentials.
• For RSA authentication on Linux/UNIX servers, create an RSA keypair using the ssh-keygen program from the read-only Balance user account.
Important! Do not use a third-party key generator, such as PuTTy, to create the RSA keys.
2. In the user directory where the newly created RSA keys are located, copy or rename the id_rsa.pub key to authorized_keys. The private id_rsa key file or the ASCII contents of this file will be used when creating the RSA credential on Balance.
Note:If you created the RSA keys on the Balance VA, copy the public key file to all Linux/UNIX hosts that will use RSA authentication.
3. In Balance, create the RSA credentials.
4. On the Add Credentials page, forRSA File, upload the private side of the RSA keypair to Balance and specify the RSA key to use.
Note:The private key must be accessible to Balance.
Storage system requirements
This section lists the requirements for collecting discovery and statistical data from storage systems in your data center. Balance can communicate with some storage systems directly, while others require the Balance Proxy and some require the proxy with multiprovider software.
Statistics collection support
Balance collects performance statistics for the following storage systems. For storage systems not listed, Balance collects the statistics from the connected servers. • NetAppon page 30
NetApp
To discover and collect statistics from NetApp FAS storage systems, Balance has the following requirements:
• Data OnTap 7.2.6 or greater.
• To discover the storage system, use the administrator (root) account. To use a user account, seeDiscovering a NetApp storage system with a user
accounton page 30.
Discovering a NetApp storage system with a user account
To have Balance access your NetApp storage system with a user account and not an administrator (root) account:
1. Log in to the Data OnTap operating system on the NetApp storage system. 2. Select the NetApp storage system and clickUse Command Line.
3. Enter the following command to create the user role: useradmin role add balance_user -a
login-http-admin,api-system-get-info,api-system-get-version,api-fcp-adapte r-list-info,cli-ifconfig,api-lun-list-info,api-lun-get-geometry,api-aggr-l ist-info,api-disk-list-info,api-lun-map-list-info,api-volume-list-info,api -qtree-list,api-lun-get-serial-number,api-lun-stats-list-info,api-cifs-sha re-list-iter-start,api-nfs-exportfs-list-rules,api-nfs-exportfs-list-rules -2,api-cifs-share-list-iter-next,api-cifs-share-list-iter-end,api-perf-obj ect-list-info,api-perf-object-counter-list-info,api-perf-object-get-instan ces,api-perf-object-get-instances-iter-start,api-perf-object-get-instances -iter-next,api-perf-object-get-instances-iter-end,api-license-list-info,ap i-cf-status,api-cifs-status,api-nfs-status,api-volume-get-root-name,api-sy stem-cli,api-useradmin-role-list,api-useradmin-group-list,api-useradmin-us er-list,cli-rdfile,cli-fcp,api-vfiler-list-info,security-api-vfiler
where,balance_useris the name of your user role.
Note:If you previously added abalance_user, you only need to update the role. You can replaceaddwithmodify.
Important!Adding the user role requires all commands to be on one line. You may want to copy the commands to a .txtfile, with Wordwrap disabled, and then copy into the Use Command Line.
4. Enter the following command to create the user group:
useradmin group add group -r balance_user
where,groupis name of the user group.
5. Enter the following command to add the user role to the user group:
Note:For NetApp clusters, only enter the FQDN/IP address for one of the storage systems; both are monitored and summarized information displays for the NetApp Cluster. If you were monitoring NetApp clusters previous to Balance 3.0, delete both storage systems and re-add one. You must add thebalance_user, listed above, to both storage systems in the cluster.
Dell EqualLogic
To discover Dell EqualLogic storage arrays, Balance has the following requirements: • In Balance, create credentials for accessing the storage array. On the Add
credentials page:
– Leave the Login field blank.
– For the Password field, type the SNMP community name password. Default ispublic. If an SNMP community name does not exist, use the EqualLogic management software to create it.
• In Balance, on the Add storage array page, for the FQDN/IP Address field, type the storage array IP address, also referred to as the Group IP address.
EMC CLARiiON
To discover and collect statistics from EMC CLARiiON storage arrays, Balance has the following requirements:
• Multiprovider: Latest version of EMC Unisphere or NaviSECCLI.exe 6.19 or greater installed on the Balance Proxy host.
• A valid username withglobal scopemonitor rights.
Recommended:Use Unisphere or Navisphere to enable array statistics logins.
CLARiiON Domain
Add the CLARiiON Domain multiprovider so that Balance can discover all associated storage arrays and connected physical servers. Depending on how you configure the multiprovider, the arrays may display as unmonitored or monitored. All discovered physical servers display on the Unmonitored Servers page. For adding hosts and guests associated with an ESX server, seeVMware vCenter Server and ESX/ESXi Server requirementson page 22.
EMC Symmetrix
To discover and collect statistics from EMC Symmetrix DMX/VMAX storage arrays, Balance has the following requirements:
• Multiprovider: EMC Solutions Enabler 6.4 or greater installed on the Balance Proxy host.
• On the Solutions Enabler host that is connected to the Symmetrix array, the following services are running:
– EMC storapid – EMC storsrvd
As a best practice, ensure that the Solutions Enabler version is consistent with the remote client. Collection errors might occur if different versions are used.
Enabling data collection
To enable data collection for Symmetrix arrays, add the storage array as a Symmetrix multiprovider:
1. In Balance, selectDiscovery>Credentials. 2. SelectDiscovery>Multiproviders.
3. ClickAdd multiprovider.
4. Add the array as a Symmetrix multiprovider. 5. ClickSave.
6. SelectDiscovery>Proxies.
In the Discovery Collection column, when Up appears, the proxy is discovering the array. Once discovered, the array appears on the Unmonitored Storage Arrays page.
7. SelectDiscovery>Storage Arrays. and clickUnmonitored Storage Arrays.
8. Select the array and clickMonitor Selectedto move the array to the Monitored list.
Configuring the proxy for Symmetrix DMX/VMAX arrays
For EMC Symmetrix DMX/VMAX (SE only), you can install the proxy out-of-band or in-band of the Symmetrix array:
• Out-of-band configuration (recommended) involves running the proxy and a copy of Solutions Enabler 6.4 or greater on a dedicated Windows Server host that is not connected to the Symmetrix array. The proxy communicates with the Symmetrix array by communicating through the Solutions Enabler host that is connected to the array.
• In-band configuration involves running both the proxy and Solutions Enabler on the same Windows Server host that is connected to the Symmetrix array. The in-band configuration is not recommended since the proxy service can put additional load on the server and the version of Solutions Enabler must be 6.4 or greater.
To configure out-of-band communication:
1. On the Balance Proxy host, locate the following configuration file: C:\Program Files\EMC\SYMAPI\config\netcnfg
2. In a text editor, open thenetcnfgfile
3. Add the following line, or edit one of the examples, to specify the name and address of the Solutions Enabler host that is connected to the Symmetrix array:
SE_Host - TCPIP node001 SE_IP SE_Port -where,
• SE_Hostis the name of the Solutions Enabler host connected to the Symmetrix array.
• SE_IPis the IP address of the Solutions Enabler host connected to the Symmetrix array.
• SE_Portis the port on the Solutions Enabler host connected to the Symmetrix array.
4. Add the following Windows System Variables: • SYMCLI_CONNECT_TYPE = REMOTE • SYMCLI_CONNECT = SE_Host
where,SE_Hostmatches the value forSE_Hostinstep 3 on page 3-33. The proxy associates this value with the value in thenetcnfgfile to locate the Solutions Enabler server connected to the Symmetrix array.
5. Restart the Balance Proxy service.
6. To validate the out-of-band configuration, open a command prompt and type the following:
symcfg list
The list of Symmetrix arrays appears.
Note:To discover Symmetrix DMX/V-Max volumes on an ESX 3.0 host, set the SPC-2 bit.
Engenio
To discover Engenio storage arrays, Balance has the following requirements: Multiprovider: Engenio/LSI SMI-S CIM Agent is accessible to Balance. To download the SMI-S CIM Agent, go to the LSI Web site at:
http://www.lsi.com/storage_home/products_home/external_raid/management_s oftware/smis_provider/index.html
Note:Search the Engenio Web site for information about downloading, installing, and operating the Engenio SMI-S Provider (Legacy version).
Enabling discovery collection
To enable discovery collection for Engenio storage arrays: 1. In Balance, selectDiscovery>Multiproviders. 2. ClickAdd multiprovider.
3. Add the array as a SMI-S multiprovider. 4. ClickSave.
5. SelectDiscovery>Storage Arraysand clickUnmonitored Storage Arrays.
6. Select the array and clickMonitor Selectedto move the array to the Monitored list.
HP EVA
To discover and collect statistics from HP EVA storage arrays, Balance has the following requirements:
• Multiprovider: HP StorageWorks Command View EVA 8.0.2 or greater suite is installed on the Balance Proxy host.
• After installing the HP StorageWorks Command View EVA software, install, or reinstall, the Balance Proxy and select the following Command View files in the installation wizard:
– EVAPerf— Enterprise Virtual Array Performance Monitor (EVAPerf) for statistics collection.
– SSSU— Storage System Scripting Utility (SSSU) for discovery collection. Although HP supports up to 16 EVAs per Command View server, a best practice is to configure no more than four.
Important! Do not install the Balance Proxy on the same server with
StorageWorks Command View EVA that is connected directly to the HP EVA array. Set up a separate dedicated server to host the Balance Proxy and StorageWorks Command View EVA suite.
Important!In Balance, the array name you enter in theArray Namefield on the Add new storage array page, must be identical to the actual array name.
HP XP
To discover and collect statistics from HP XP storage arrays, Balance has the following requirements:
• Multiprovider: HP StorageWorks XP Array Manager (Command View Ae) is installed on the Balance Proxy host.
• For statistics collection, the array must have LUSE LUNs. • Enable discovery and statistics collection:
– Enabling discovery collectionon page 35. – Enabling statistics collectionon page 36.
Enabling discovery collection
To enable discovery collection for HP XP arrays: 1. In Balance, selectDiscovery>Credentials. 2. ClickAdd credentials.
3. Add credentials for discovery collection, which is the login for Command View AE. Default login issystemand default password ismanager.
4. ClickSave.
5. SelectDiscovery>Multiproviders. 6. ClickAdd multiprovider.
7. Add the array as a Hitachi multiprovider. 8. ClickSave.
9. SelectDiscovery>Proxies.
In the Discovery Collection column, when Up appears, the proxy is discovering the array. Once discovered, the array appears on the Unmonitored Storage Arrays page.
10.SelectDiscovery>Storage Arrays. and clickUnmonitored Storage Arrays.
Enabling statistics collection
Only HP XP arrays with LUSE LUNs are supported. To enable statistics collection for HP XP storage arrays:
1. Install the HP XP Export Tool and the following JAR files on the Balance Proxy host:
• JSanExport.jar • JSanRmiServerEx.jar
Important!You must install the export tool from the exact RAID Manager CD that shipped with your HP XP array.
2. In Storage Navigator, underEdit Storage Arrays,from theStat Proxymenu select the point to the Balance Proxy host.
3. In Balance, create a credential based on the Storage Navigator user you created for each HP XP array.
Hitachi Data Systems
To discover and collect statistics from HDS 9900 or TagmaStore USP/NSC storage arrays, Balance has the following requirements:
• Multiprovider: High Command Device Manager (HDvM) 5.1 or greater is installed on the Balance Proxy host or is installed on a host that is accessible to Balance over the IP network.
• Enable discovery and statistics collection: – Enabling discovery collectionon page 36. – Enabling statistics collectionon page 37.
Enabling discovery collection
To enable discovery collection for HDS storage arrays: 1. In Balance, selectDiscovery>Credentials. 2. ClickAdd credentials.
3. Add credentials for discovery collection, which is the login for High Command Device Manager. Default login issystemand default password ismanager. 4. ClickSave.
5. SelectDiscovery>Multiproviders. 6. ClickAdd multiprovider.
7. Add the array as a Hitachi multiprovider. 8. ClickSave.
9. SelectDiscovery>Proxies.
In the Discovery Collection column, when Up appears, the proxy is discovering the array. Once discovered, the array appears on the Unmonitored Storage Arrays page.
10.SelectDiscovery>Storage Arrays. and clickUnmonitored Storage Arrays.
11.Select the array and clickMonitor Selectedto move the array to the Monitored list.
Enabling statistics collection
To collect statistics from HDS storage arrays: Note:Arrays with LUSE LUNs are supported.
1. Install the Hitachi Performance Monitor Export Tool on the Balance Proxy host.
Important! You must install the export tool from the exact CD that shipped with your TagmaStore array.
2. On the storage array, create a user in Storage Navigator.
3. In Balance, create a credential and edit your storage array for statistics collection.
IBM
To discover IBM storage arrays, Balance has the following requirements:
IBM TotalStorage DS4000 and 5000 series/FAStT
Multiprovider: Engenio/LSI SMI-S v1.1 CIM Agent installed on a host that is accessible to Balance over the IP network. To download the SMI-S CIM Agent, go to the LSI Web site at:
http://www.lsi.com/storage_home/products_home/external_raid/management_s oftware/smis_provider/index.html
IBM DS6000, DS8000, and ESS storage
• Multiprovider: DS Open API SMI-S v1.1 for DS6000 and ESS storage and v1.2 for DS8000 CIM Agent is installed on a host that is accessible to Balance
IBM XIV
• Multiprovider: SMI-S CIM Agent integrated into the XIV. The XIV must be accessible to Balance over the IP network.
• Balance requires the IP address and port number of the XIV along with CIM Agent credentials. Refer to the following Web site for installation and configuration details.
www.ibm.com
Enabling discovery collection
To enable discovery collection for IBM arrays, add the array to Balance as a SMI-S multiprovider:
1. In Balance, selectDiscovery>Multiproviders. 2. ClickAdd multiprovider.
3. Add the array as a SMI-S multiprovider. 4. ClickSave.
5. SelectDiscovery>Storage Arraysand clickUnmonitored Storage Arrays.
6. Select the array and clickMonitor Selectedto move the array to the Monitored list.
Virtualization software requirements
Balance supports the following virtualization software: • HMC, Virtual IO Servers, IBM LPARon page 39
• IBM SAN Volume Controller (SVC)on page 41
• HP SAN Virtualization Storage Platform (SVSP)on page 42
HMC, Virtual IO Servers, IBM LPAR
The following minimum versions are recommended when using IBM LPAR & VIOS on an IBM pSeries for HMC and VIOS for proper interaction with Balance: • HMC - v6.1.2
• VIOS - v1.4.0.0, v2.1.0.10-FP-20.1.
Preparing HMC VIO servers for discovery
There are two options to choose from when setting up communication between Balance and HMC VIO servers:
• Enabling discovery using a user accounton page 40
• Enabling discovery using rooton page 40
For IBM LPAR configuration, seeLinux/UNIX server requirementson page 25.
For either option, VIOS requires an appropriate ODM driver for the connected Storage Array. If the VIOS machine is connected to a CLARiiON array, and you have Powerpath installed, the appropriate ODM driver is installed automatically by Powerpath. If the VIOS machine is connected to an HP EVA array, and you have SecurePath installed, the appropriate ODM driver is installed automatically by SecurePath.
Important! The latest VIOS should have the latest ODM drivers. If you run into any issues, you should upgrade to the latest VIOS (i.e. v2.1.0.10-FP-20.1).
Enabling discovery using a user account
To communicate with HMC and VIO servers, Balance has the following requirements:
• Install sudo on all VIO servers to be monitored; sudo is not required on the HMC.
• Have a valid username and password for access to the HMC and VIO servers. On the VIO Servers, the username must be listed in the sudoers file or
equivalent in PowerBroker, and be a member of the “staff” group. The recommended HMC Task Role is "hmcviewer".
Note:The accounts (username and password) for HMC and VIO servers do not need to be the same. However, the same VIO server account must be used on all VIO servers for a given HMC.
• Have SSH installed on the HMC and VIO servers. Balance uses an ssh login via password or key exchange to communicate with HMC and VIO servers. • Add the Balance user to /etc/sudoers using the sudoedit command.
Important!The following entries must be in your sudoers file, which you modify by runningsudoeditas root. Sudoedit is generally found in /usr/bin. The entry you choose depends on your security requirements (password or no password).
Defaults !env_reset
username hostname = PASSWD: /tmp/aixhba or
Defaults !env_reset
username hostname = NOPASSWD: /tmp/aixhba
Enabling discovery using root
To communicate with HMC and VIO servers, Balance requires the following root privileges:
• VIO Server:username (padmin) and password. • HMC Server:hscroot and password
Note:All VIO servers must have the same root account credentials. At least one of the following prerequisites is also required:
• Copy theaixhbautility to all VIO servers in the /usr/bin directory. • INQ:
Note:Part of the previous Inq path (/usr/local/bin/inq) must be a symbolic link to the location where symcli is installed, due to the fact that your particular version cannot be hard coded. See the following example for clarification:
ln -s /usr/bin/inq /usr/local/bin/inq
IBM SAN Volume Controller (SVC)
SVC virtual disks are modeled as server volumes and the managed disks as server LUNs. Cross-reference the list of supported storage systems inStorage system requirementson page 29 and IBM’s support matrix to determine the storage devices supported for SVC.
The minimum supported SVC version to collect statistics is 4.3.1.7.
Balance uses ssh login via key exchange to communicate with IBM SVC (SAN Volume Controller); SVC requires public/private SSH RSA key for an account on the server, logging in with the username, admin; note that this username does not provide administrative privileges; it is simply a naming convention.
To configure RSA authentication, seeConfiguring RSA authentication for Linux/UNIX serverson page 29.
Refer to IBM documentation for SVC setup (www.ibm.com)
Multiprovider: IBM SVC installs an SMI-S provider by default. If you are using IBM storage, its SMI-S provider must be installed on a separate system from the SVC and its SMI-S provider since both utilize port 5989.
Enabling statistics collection
To enable SVC statistics collection: 1. Open the SVL CLI interface.2. Type the following command to start statistics generation at an interval of 1 minute:
svctask startstats -interval 1
3. In Balance, selectDiscovery>SAN Devices. 4. Click the name link of the SVC device.
HP SAN Virtualization Storage Platform (SVSP)
Balance has the following requirements for HP SVSP:
Multiprovider: Balance communicates with the SMI-S CIM Agent integrated into the SVSP. The SVSP must be accessible on the IP network to the Balance VA. Balance requires the IP address and port number of the SVSP along with CIM Agent credentials. SMI-S is a separate installation option with the SVSP SVM which requires assistance from an HP representative to configure.
The HP SVSP has no detail page in Balance and will only manifest itself in the topology view of a Server or Array in which it is in the I/O topology.
Refer to your HP SVSP documentation for further detail.
SAN device requirements
Balance supports the following SAN devices (switches): • Brocadeon page 42
• Ciscoon page 43
Note:Balance supports the SNMPv1 and SNMPv2c protocols only. For Balance to communicate with SAN devices that have the SNMPv3 protocol enabled, the v1 and/or v2c protocols must also be enabled.
Brocade
Balance has the following discovery requirements:
• In Balance, create credentials for accessing the switch. On the Add credentials page:
– Leave the Login field blank.
– For the Password field, type the SNMP community name password. Default ispublic. If an SNMP community name does not exist, use the Brocade management software to create it.
Cisco
Balance has the following discovery requirements:
• In Balance, create credentials for accessing the switch. On the Add credentials page:
– Leave the Login field blank.
– For the Password field, type the SNMP community name password. Default ispublic. If an SNMP community name does not exist, use the Cisco management software to create it.
• For the FQDN/IP Address field, type the switch IP address.
Database requirements
The Data Topology view in Balance can show the end-to-end topology between the monitored server hosting a database application and its associated resources, such as connected storage arrays. To display database topology objects, such as the schema and data types, you must configure Balance to discover the database as an application.
Note:Balance does not monitor applications hosted on Microsoft clusters.
Oracle
Balance supports the following Oracle database versions: • Oracle 9i & 10g are supported on:
– Sun Solaris 9
– IBM AIX 5.2 (or greater) – Red Hat Enterprise Linux 4 – Windows 2003 and 2008 • Oracle 9i on Windows 2003 • Oracle 11g on Windows 2008
Microsoft SQL Server
Balance supports the following versions of MS SQL Server: • Microsoft SQL Server 2005
• Microsoft SQL Server 2008
To view the database in the Data Topology view, seeEnabling topology views of database applicationson page 44.
Enabling topology views of database applications
When you discover a database in Balance, all volumes on the hosting server are assigned to a default application for that server and the database objects do not automatically appears in the Data Topology view.
To display database objects in the Data Topology view, complete the following for each database you want to monitor,in this order:
1. In Balance, add and discover each storage array associated with the database. 2. In Balance, add and discover the server hosting the database.
3. Prepare each database for discovery:
– Preparing an Oracle database for discoveryon page 45. – Preparing a MS SQL Server for discoveryon page 45.
4. In Balance, on theApplications>Add Applicationpage, add each database as an application. For Application Type, select a DB type.
5. In Balance, on the Configuration page for the database application, map the volumes of the hosting server to the database.
6. Discover each database, or wait for the next discovery collection.
Balance discovers each database topology and populates the Data Topology view. Each discovery collection queries the hosting server to identify changes to the database topology.
Preparing an Oracle database for discovery
To prepare an Oracle database for discovery:1. On each Oracle database that you want to monitor, create a user account with the following system rights:
• create session
• select any dictionary For example:
User Name: APPMAP Password: appmap
System Privileges Granted: CREATE SESSION, SELECT ANY
DICTIONARY
2. In Balance, create access credentials using the user login credentials fromstep 3 on page 3-45. For Method, selectLogin.
Preparing a MS SQL Server for discovery
To prepare a MS SQL Server for discovery:1. Ensure that the MS SQL authentication service is enabled. Balance cannot use Windows authentication to communicate with MS SQL Server.
2. Ensure Mixed Mode is enabled (default) on each MS SQL database. Changing the mode might require a full restart of the SQL server. See the MS SQL online help for instructions.
3. On the MS SQL Server, create a local, read-only user login. 4. Add the following user mapping permissions to each login:
• db_reader • public
Figure 2, “MS SQL user mapping permissions,” on page 46shows an example of the user mapping permissions in SQL Server 2005.
Figure 2. MS SQL user mapping permissions
5. In Balance, create access credentials using the user login credentials fromstep 3 on page 3-45. For Method, selectLogin.
Communication ports
The Balance VA and the Balance Proxy use different ports to communicate with each resource. Figure 3 on page 47 shows the port number and protocol for each resource type accessed by the VA and the default ports accessed by the proxy after the VA opens port 9443 on the proxy host. Two port numbers separated by an ellipsis indicates the first and second ports that the VA opens.
Figure 3. Resource Ports accessed by Balance
Configuring Ports Behind Windows Firewalls
To communicate with Windows servers, Balance uses the WMI protocols and initially accesses port 445. The first exchanges occur on ports 135-139. After establishing a connection with the servers, and a remote instance has been created, the communication switches over to other lesser-known ports 1024-65535. This process ensures that well-known ports are free for other applications.
For the return communications, WMI ports are assigned by DCOM and they can use any random port between 1024~66535. No port exception is required. To configure ports behind a Windows firewall:
1. Open up TCP port 135 in the firewall. 2. Configure a port range for DCOM protocols.
4
Advanced configuration options
This section explains using the Advanced Management Tool (AMT) to perform advanced configuration options, such as configuring network settings and backing up the Balance database.
Accessing the AMT
You can use the following methods to access the AMT:
• vSphere Client- In a vSphere Client, select the VA and then select the Consoletab. Click inside the console to log in.
• SSH- Log in to the IP address or fully-qualified domain name (FQDN) of eth0. The username and password for both methods isnetapp(all lowercase). You can change the default password after logging in.
Using the AMT
When you first log in to the AMT, the Main Menu displays the following options: • UpdateBalance - Initiates the Balance virtual appliance (VA) upgrade. • Hypervisor Tools - Provides options for installing and uninstalling VMware
Tools on the VA.
– Uninstall- Uninstalls VMware Tools from the VA. We recommend using this option for diagnostic purposes only.
• IP Management Options- Provides options for configuring and maintaining your Balance network settings. The following options are displayed:
– Display Current Management IP Address Settings- Displays the current network settings for Balance, such as the management IP address, netmask, gateway, etc.
– Change Management IP Address Settings- Provides options for changing the Balance network settings.
Note:If you want to change the IP address and Balance has obtained its address using DHCP, in Balance, selectAdmin > Configuration> Network taband enter change the appropriate settings.
– Display Domain Name Search Settings- Searches for servers across multiple domains configured inChange Management IP Address Settingsand displays the results.
– Change Domain Name Search Settings - Provides options for adding or changing domain names you want to search on (for example,
yourcompany.com, yourcompany.local). Domain names added manually require a space between, but no commas. If the DHCP server is properly configured, DNS names are added automatically.
Note:The domain names you want to search on can be added using this option or through the Balance UI in the Network Adapter section atAdmin > Configuration > Network. Balance must then be restarted.
– Display Static Routes- Displays configured static IP routes.
– Modify Static Routes- Provides options for configuring static IP routes. – Disable Interface- Provides options for disabling network adapters. – Enable Interface- Provides options for enabling disabled network
adapters.
– Commit Changes- Applies any changes made in the options above. Changes do not take affect until you commit them with this option. After committing your changes, you are given the option to abort.
– Ping A Host- Pings a target host for confirming IP address changes or proper DNS configuration.
• BalanceBackup Options- Provides options for backing up the Balance database, which contains the collected data about your data center resources. The following options are displayed:
– Database Backup and Offload- Packages and encrypts the database as a.gpgfile. You can back up the file locally to the /home/selfmonitor directory, or use FTP to transfer it to another location. The file is encrypted with a static passphrase.
Note:If you back up the file locally, you could use SCP to transfer the file to another location.