ClearPass 6.5.0
R
e
le
a
se
N
o
te
s
ClearPass Policy Manager 6.5.0 | Release Notes 0511730-1| February 2015 Copyright
© 2015 Aruba Networks, Inc. Aruba Networks trademarks include , Aruba Networks®, Aruba Wireless Networks®, the registered Aruba the Mobile Edge Company logo, Aruba Mobility Management System®, Mobile Edge Architecture®, People Move. Networks Must Follow®, RFProtect®, Green Island®. All rights reserved. All other trademarks are the property of their respective owners.
Open Source Code
Certain Aruba products include Open Source software code developed by third parties, including software code subject to the GNU General Public License (GPL), GNU Lesser General Public License (LGPL), or other Open Source Licenses. Includes software from Litech Systems Design. The IF-MAP client library copyright 2011 Infoblox, Inc. All rights reserved.This product includes software developed by Lars Fenneberg et al. The Open Source code used can be found at this site:
http://www.arubanetworks.com/open_source Legal Notice
The use of Aruba Networks, Inc. switching platforms and software, by all individuals or corporations, to terminate other vendors’ VPN client devices constitutes complete acceptance of liability by that individual or corporation for this action and indemnifies, in full, Aruba Networks, Inc. from any and all legal actions that might be taken against it with respect to infringement of copyright on behalf of those vendors.
Warranty
This hardware product is protected by the standard Aruba warranty. For more information, refer to the ArubaCare service and support terms and conditions.
ClearPass 6.5.0 | Release Notes Contents | 3
Contents
About ClearPass 6.5.0
5
Related Documents 5 Use of Cookies 5 Contacting Support 6System Requirements for ClearPass 6.5
7
End Of Support 7
Virtual Appliance Requirements 7
Supported Hypervisors 8
CP-VA-500 8
CP-VA-5K 8
CP-VA-25K 8
CP-SW-EVAL (Evaluation Version) 8
Supported Browsers 9
ClearPass OnGuard Unified Agent Requirements 9
Supported Antivirus Versions, OnGuard 9
ClearPass OnGuard Dissolvable Agent Requirements 10
ClearPass OnGuard Native Agent Version Information 10
ClearPass OnGuard Java-Based Agent Version Information 11
ClearPass Onboard Requirements 13
Upgrade and Update Information
15
Upgrading to ClearPass 6.5 from 6.2.6, 6.3.6, or 6.4.x 15
Before You Upgrade 16
Sample Times Required for Upgrade 16
After You Upgrade 17
Restoring the Log DB Through the User Interface 17
Restoring the Log DB Through the CLI 18
Updating Within the Same Major Version 18
Installation Instructions Through the User Interface 18
Installation Instructions for an Offline Update 19
What’s New in This Release
21
Release Overview 21
New Features and Enhancements in the 6.5.0 Release 21
4 | Contents ClearPass 6.5.0 | Release Notes Dissolvable Agent 39 Guest 39 Insight 41 MDM 43 Onboard 50 OnGuard 53
Issues Resolved in the 6.5.0 Release 55
Policy Manager 55 AirGroup 58 CLI 58 Dissolvable Agent 58 Guest 59 Insight 60 MDM 60 Onboard 61 OnGuard 62 QuickConnect 63
New Known Issues in the 6.5.0 Release 64
Policy Manager 64 Dissolvable Agent 66 Guest 66 Insight 67 MDM 67 Onboard 67 OnGuard 68 QuickConnect 68
Known Issues Identified in Previous Releases
69
Policy Manager 69 Dissolvable Agent 72 Guest 73 Insight 73 Onboard 74 OnGuard 75 QuickConnect 77
ClearPass 6.5.0 | Release Notes About ClearPass 6.5.0 | 5
Chapter 1
About ClearPass 6.5.0
ClearPass 6.5.0 is a major release that introduces new features and provides fixes to previously outstanding issues. These release notes contain the following chapters:
l "System Requirements for ClearPass 6.5" on page 7—Provides important system requirements information for this release.
l "Upgrade and Update Information" on page 15—Provides considerations and instructions for version upgrades and patch updates.
l "What’s New in This Release" on page 21—Describes new features and issues introduced in this 6.5.0 release as well as issues fixed in this 6.5.0 release.
l "Known Issues Identified in Previous Releases" on page 69—Lists currently existing issues identified in previous releases.
Related Documents
The following documents are part of the complete documentation set for the ClearPass 6.5.0 platform: l ClearPass Policy Manager 6.5 User Guide
l ClearPass Guest 6.5 User Guide
l ClearPass Policy Manager Configuration API Guide l ClearPass Insight 6.5 User Guide
l ClearPass Policy Model: An Introduction
l ClearPass Policy Manager 6.5 Getting Started Guide
l Tech Note: Installing or Upgrading ClearPass 6.5 on a Virtual Machine l Tech Note: Upgrading to ClearPass 6.5
Use of Cookies
Cookies are small text files that are placed on a user’s computer by Web sites the user visits. They are widely used in order to make Web sites work, or work more efficiently, as well as to provide information to the owners of a site. Session cookies are temporary cookies that last only for the duration of one user session.
When a user registers or logs in via an Aruba captive portal, Aruba uses session cookies solely to remember between clicks who a guest or operator is. Aruba uses this information in a way that does not identify any user-specific information, and does not make any attempt to find out the identities of those using its ClearPass products. Aruba does not associate any data gathered by the cookie with any personally identifiable
information (PII) from any source. Aruba uses session cookies only during the user’s active session and does not store any permanent cookies on a user’s computer. Session cookies are deleted when the user closes his/her Web browser.
6 | About ClearPass 6.5.0 ClearPass 6.5.0 | Release Notes
Contacting Support
Main Site arubanetworks.com
Support Site support.arubanetworks.com Airheads Social Forums and
Knowledge Base
community.arubanetworks.com
North American Telephone 1-800-943-4526 (Toll Free) 1-408-754-1200
International Telephones arubanetworks.com/support-services/support-program/contact-support/ Software Licensing Site licensing.arubanetworks.com
End of Support information arubanetworks.com/support-services/end-of-life-products/end-of-life-policy/
Security Incident Response Team (SIRT)
arubanetworks.com/support-services/security-bulletins/
Support Email Addresses
Americas, APAC, and EMEA [email protected]
Security Incident Response Team (SIRT)
ClearPass 6.5.0 | Release Notes System Requirements for ClearPass 6.5 | 7
Chapter 2
System Requirements for ClearPass 6.5
This chapter provides important system requirements information specific to this release. It should be read carefully before upgrading to ClearPass 6.5.
ClearPass Guest and ClearPass Onboard are part of the ClearPass Policy Manager platform. ClearPass comes pre-installed when you purchase an appliance. ClearPass can also be installed on a virtual appliance.
This chapter provides the following information: l "End Of Support" on page 7
l "Virtual Appliance Requirements" on page 7 l "Supported Browsers" on page 9
l "ClearPass OnGuard Unified Agent Requirements" on page 9, including: n "Supported Antivirus Versions, OnGuard" on page 9
n "ClearPass OnGuard Dissolvable Agent Requirements" on page 10 l "ClearPass Onboard Requirements" on page 13
The IP address to access the licensing server clearpass.arubanetworks.com changed from 199.127.104.89 to 104.36.248.89 on September 27th, 2014. If you have any firewall protections allowing access, please be sure to update the IP address information accordingly.
End Of Support
Please be aware that the following vendors have officially stopped supporting their respective operating systems on the stated dates. Aruba Networks will not remove existing ClearPass features or software agents (such as OnGuard) that are compatible with these operating systems. We will not, however, be providing any further bug fixes or feature enhancements related to supporting these operating systems. Our TAC
organization will also not be able to service customer support requests related to clients running these operating systems. Customers should consider these operating systems as unsupported with ClearPass: l Microsoft Corporation:
n Windows XP — April 8, 2014 l Apple, Inc:
n Mac OS X 10.6 (Snow Leopard) — February 26, 2014
Virtual Appliance Requirements
Please carefully review all VA requirements, including functional IOP ratings, and verify that your system meets these requirements. These recommendations supersede earlier requirements that were published for
ClearPass Policy Manager 6.x installations.
Virtual appliance recommendations have been adjusted to align with the shipping ClearPass hardware appliance specifications. If you do not have the VA resources to support a full workload, then you should consider ordering the ClearPass Policy Manager hardware appliance.
8 | System Requirements for ClearPass 6.5 ClearPass 6.5.0 | Release Notes
Supported Hypervisors
The following hypervisors are supported. Hypervisors that run on a client computer such as VMware Player are not supported.
l VMware ESX 4.0 (Recommended minimum version of software for CP-VA-500 and CP-VA-5K. It does not support greater than 8 virtual CPUs required for the CP-VA-25K.)
l VMware ESXi 5.0 l VMware ESXi 5.1 l VMware ESXi 5.5
CP-VA-500
l 2 Virtual CPUs l 500 GB disk space l 4 GB RAMl 2 Gigabit virtual switched ports
l Functional IOP rating for a 40-60 read/write profile for 4K random read/write = 75
CP-VA-5K
l 8 Virtual CPUs l 1000 GB disk space l 8 GB RAMl 2 Gigabit virtual switched ports
l Functional IOP rating for a 40-60 read/write profile for 4K random read/write = 105
CP-VA-25K
l 24 Virtual CPUs l 2000 GB disk spacel 64 GB RAM
l 2 Gigabit virtual switched ports
l Functional IOP rating for a 40-60 read/write profile for 4K random read/write = 350
CP-SW-EVAL (Evaluation Version)
l 2 Virtual CPUsl 80 GB disk space l 4 GB RAM
l 2 Gigabit virtual switched ports
An evaluation version can be upgraded to a later evaluation version in a manner similar to a production upgrade.
Supported Browsers
For the best user experience, we recommend you update your browser to the latest version available. Supported browsers for ClearPass are:
l Mozilla Firefox on Windows Vista, Windows 7, Windows 8.x, and Mac OS X l Google Chrome for Mac OS X and Windows
l Apple Safari 3.x and later on Mac OS X l Mobile Safari 5.x on iOS
l Microsoft Internet Explorer 10 and later on Windows 7 and Windows 8.x
ClearPass OnGuard Unified Agent Requirements
Be sure that your client system meets the following requirements before installing the ClearPass OnGuard Unified Agent:
l 1 GB RAM recommended, 512 MB RAM minimum l 200 MB Disk Space
l Mac OS X: Version 10.6 or higher (64-bit only) l Windows XP: Service Pack 3 or higher
l Windows 2003: Service Pack 2 or higher l Ubuntu: 12.04 LTS and 14.14 LTS
Windows 7, Windows 8.x Pro, Windows Vista, and Windows Server 2008 are all supported with no Service Pack requirements. OnGuard does not support Windows 8.x RT or Windows 8.x Phone.
Installing the Unified Agent will remove an existing VIA installation. To continue using VPN functionality, log in to CPPM as the administrator, go toAdministration > Agents and Software Updates > OnGuard Settings, and selectInstall and enable Aruba VPN componentfrom theInstaller Modedrop-down list.
Supported Antivirus Versions, OnGuard
For OnGuard to work properly, please whitelist the following executable files and installation folders in your antivirus products:
ClearPassOnGuard.exe ClearPassAgentController.exe
C:\Program Files (x86)\Aruba Networks\ClearPassOnGuard\ C:\Program Files\Aruba Networks\ClearPassOnGuard\
In the lab, we use the following antivirus software for our validations. Due to the large number of products available, this list may change at any time:
l Avast l AVG
l COMODO
l Kaspersky: IS-11 and above l MacAfee
l Windows Defender Firewall
l Microsoft Forefront Endpoint Protection-2008
10 | System Requirements for ClearPass 6.5 ClearPass 6.5.0 | Release Notes l Microsoft Security Essentials
l Microsoft Windows Firewall l Sophos: 9 and above l Trend Micro
Some third-party anti-malware products are not supported by ClearPass OnGuard. For a complete list of supported third-party products, in CPPM go toAdministration > Agents and Software Updates > OnGuard Settings, click theHelplink, and then click theOnGuard Agent Support Chartslink.
ClearPass OnGuard Dissolvable Agent Requirements
This section provides version information for both the Java-based Dissolvable Agent and the Native Dissolvable Agent. For more information on the Dissolvable Agent, refer to the ClearPass Policy Manager online help.
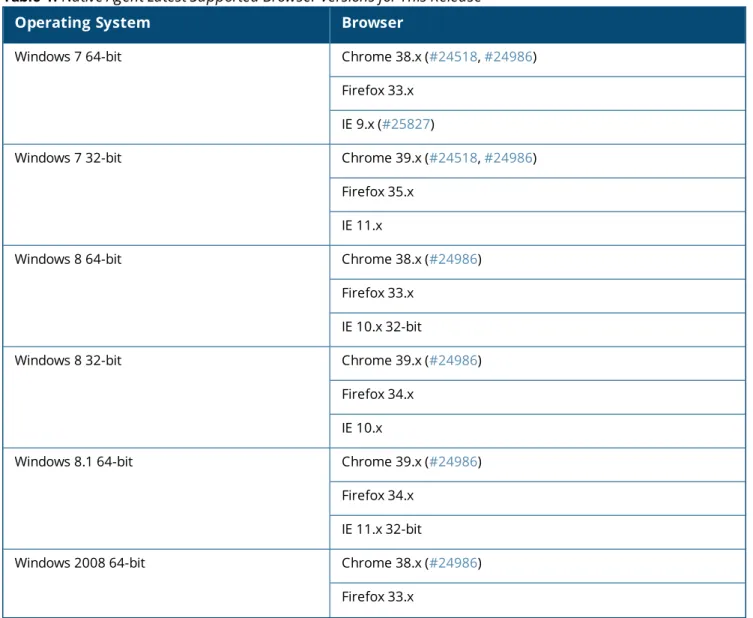
ClearPass OnGuard Native Agent Version Information
In current laboratory tests for ClearPass 6.5.0, the browser versions shown inTable 1were verified for the ClearPass OnGuard Native Dissolvable Agents. There are considerations to be aware of with some browser versions. For more information, click the ID number next to the browser’s name.
Operating System Browser
Windows 7 64-bit Chrome 38.x (#24518,#24986)
Firefox 33.x IE 9.x (#25827)
Windows 7 32-bit Chrome 39.x (#24518,#24986)
Firefox 35.x IE 11.x
Windows 8 64-bit Chrome 38.x (#24986)
Firefox 33.x IE 10.x 32-bit
Windows 8 32-bit Chrome 39.x (#24986)
Firefox 34.x IE 10.x
Windows 8.1 64-bit Chrome 39.x (#24986)
Firefox 34.x IE 11.x 32-bit
Windows 2008 64-bit Chrome 38.x (#24986)
Firefox 33.x
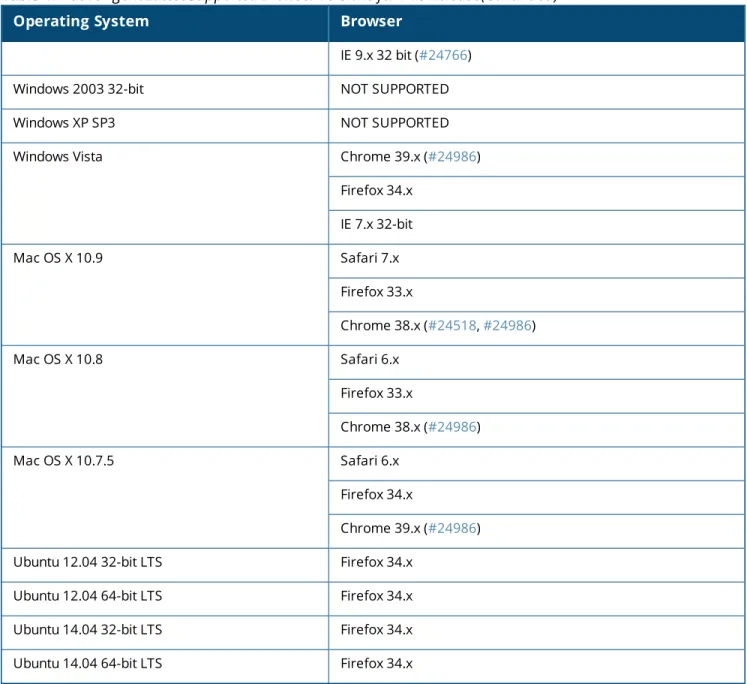
Operating System Browser
IE 9.x 32 bit (#24766)
Windows 2003 32-bit NOT SUPPORTED
Windows XP SP3 NOT SUPPORTED
Windows Vista Chrome 39.x (#24986)
Firefox 34.x IE 7.x 32-bit Mac OS X 10.9 Safari 7.x Firefox 33.x Chrome 38.x (#24518,#24986) Mac OS X 10.8 Safari 6.x Firefox 33.x Chrome 38.x (#24986) Mac OS X 10.7.5 Safari 6.x Firefox 34.x Chrome 39.x (#24986)
Ubuntu 12.04 32-bit LTS Firefox 34.x
Ubuntu 12.04 64-bit LTS Firefox 34.x
Ubuntu 14.04 32-bit LTS Firefox 34.x
Ubuntu 14.04 64-bit LTS Firefox 34.x
Table 1:Native Agent Latest Supported Browser Versions for This Release(Continued)
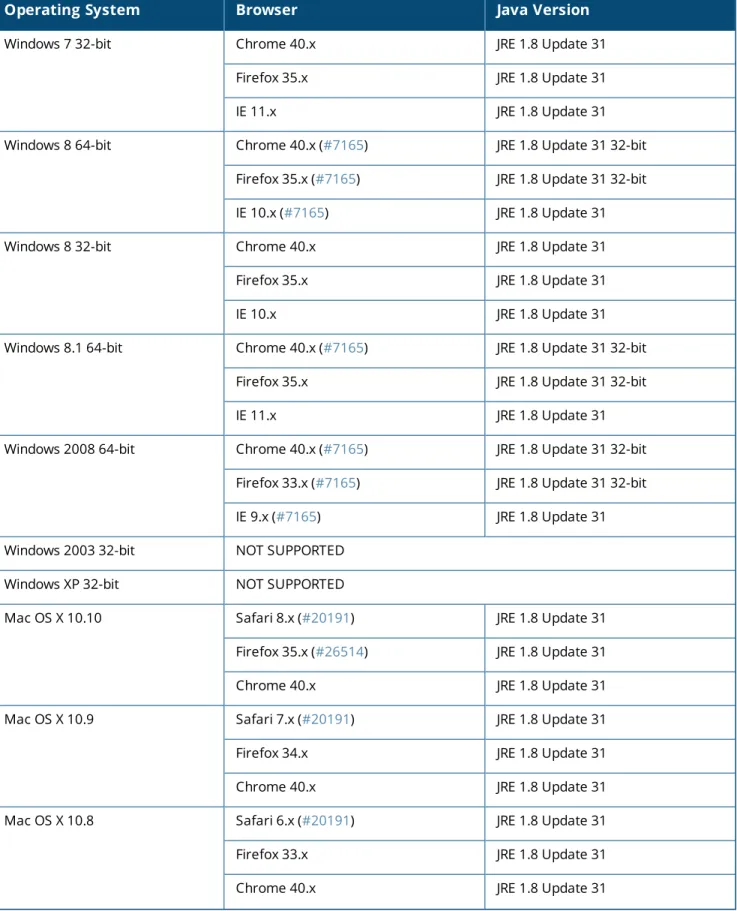
ClearPass OnGuard Java-Based Agent Version Information
In current laboratory tests for ClearPass 6.5.0, the browser and Java versions shown inTable 2were verified for the ClearPass OnGuard Java-based dissolvable agents. There are considerations to be aware of with some browser versions. For information, click the ID number next to the browser’s name.
The latest Java version is required in order to perform client health checks.
Operating System Browser Java Version
Windows 7 64-bit Chrome 40.x (#7165) JRE 1.8 Update 31 32-bit Firefox 33.x (#7165) JRE 1.8 Update 31 32-bit
IE 8.x JRE 1.8 Update 31
Table 2:Supported Browser and Java Versions
12 | System Requirements for ClearPass 6.5 ClearPass 6.5.0 | Release Notes
Operating System Browser Java Version
Windows 7 32-bit Chrome 40.x JRE 1.8 Update 31
Firefox 35.x JRE 1.8 Update 31
IE 11.x JRE 1.8 Update 31
Windows 8 64-bit Chrome 40.x (#7165) JRE 1.8 Update 31 32-bit Firefox 35.x (#7165) JRE 1.8 Update 31 32-bit IE 10.x (#7165) JRE 1.8 Update 31
Windows 8 32-bit Chrome 40.x JRE 1.8 Update 31
Firefox 35.x JRE 1.8 Update 31
IE 10.x JRE 1.8 Update 31
Windows 8.1 64-bit Chrome 40.x (#7165) JRE 1.8 Update 31 32-bit
Firefox 35.x JRE 1.8 Update 31 32-bit
IE 11.x JRE 1.8 Update 31
Windows 2008 64-bit Chrome 40.x (#7165) JRE 1.8 Update 31 32-bit Firefox 33.x (#7165) JRE 1.8 Update 31 32-bit IE 9.x (#7165) JRE 1.8 Update 31 Windows 2003 32-bit NOT SUPPORTED
Windows XP 32-bit NOT SUPPORTED
Mac OS X 10.10 Safari 8.x (#20191) JRE 1.8 Update 31
Firefox 35.x (#26514) JRE 1.8 Update 31
Chrome 40.x JRE 1.8 Update 31
Mac OS X 10.9 Safari 7.x (#20191) JRE 1.8 Update 31
Firefox 34.x JRE 1.8 Update 31
Chrome 40.x JRE 1.8 Update 31
Mac OS X 10.8 Safari 6.x (#20191) JRE 1.8 Update 31
Firefox 33.x JRE 1.8 Update 31
Chrome 40.x JRE 1.8 Update 31
Operating System Browser Java Version
Mac OS X 10.7.5 Safari 6.x (#20191) JRE 1.8 Update 31
Firefox 35.x (#23340) JRE 1.8 Update 31
Chrome 40.x JRE 1.8 Update 31
Table 2:Supported Browser and Java Versions(Continued)
ClearPass Onboard Requirements
Onboard does not support Windows 8.x RT or Windows 8.x Phone.
ClearPass 6.5.0 | Release Notes Upgrade and Update Information | 15
Chapter 3
Upgrade and Update Information
This chapter provides considerations and instructions for upgrading or updating your ClearPass application:. l The term “upgrade” refers to moving from one major release version to another—for example, from 6.4.x
to 6.5. For information on upgrading from a version prior to 6.5, see"Upgrading to ClearPass 6.5 from 6.2.6, 6.3.6, or 6.4.x" on page 15.
l The term “update” refers to applying a patch release within the same major version—for example, from 6.4.3 to 6.4.4, or from 6.5.0 to 6.5.1. For information on updating from an earlier 6.5.x release to 6.5.0, see"Updating Within the Same Major Version" on page 18.
Upgrading to ClearPass 6.5 from 6.2.6, 6.3.6, or 6.4.x
An upgrade is the process of moving from one major release version to another—for example, from 6.4.x to 6.5. This section describes accessing upgrade images, considerations to be aware of, and instructions for restoring the log database after the upgrade (optional).
You can upgrade to ClearPass 6.5 from ClearPass 6.2.6, 6.3.6, or 6.4.x. Before you proceed with the upgrade, we recommend that you apply the latest available patch updates to your current release. For information on the patch update procedure, see"Updating Within the Same Major Version" on page 18.
l For 6.4.x upgrades through the Software Updates portal in the Policy Manager user interface, or through the Web service, upgrade is supported for any 6.4.x version.
l For 6.4.x upgrades through the CLI, there are two options:
n If you are on 6.4.2 or later, you can upgrade directly to 6.5 through the CLI.
n If you are on 6.4.0 or 6.4.1, you must first download and install the 6.4.0 CLI updates patch. At support.arubanetworks.com, go toDownload Software > ClearPass > Policy Manager > Current Releaseand selectCPPM-x86_64-20140919-cli-der-support-patch. After you have installed the patch, update to 6.4.2 or higher. You can then upgrade to 6.5 through the CLI.
l For 6.3.x, upgrade is only supported from the latest cumulative patch. You must update to 6.3.6 before upgrading to 6.5.
l For 6.2.x, upgrade is only supported from the latest cumulative patch. You must update to 6.2.6 before upgrading to 6.5.
l For 6.1.x, direct upgrades are not supported. Customers on 6.1.x must intermediately upgrade to 6.2.6, 6.3.6, or 6.4.x first before upgrading to 6.5.
l For appliance upgrades from 5.2.0, you must upgrade to 6.2.6, 6.3.6, or 6.4.x before upgrading to 6.5. l Upgrade images are available within ClearPass Policy Manager from the Software Updates portal at
Administration > Agents and Software Updates > Software Updates.
l Upgrade images are also available for download on the Support site underClearPass > Policy Manager > Archives.
If you are upgrading from 6.4.0, the Software Updates portal incorrectly shows a warning during upgrade asking for two hard drives. This message can be ignored. (#27736)
16 | Upgrade and Update Information ClearPass 6.5.0 | Release Notes require MySQL can contact Aruba support to get the required patch. Users should be aware that this patch does not persist across upgrades, so customers using MySQL should contact support before they upgrade.
Before You Upgrade
Before you begin the upgrade process, please review the following important items:
l Plan downtime accordingly. Upgrades can take longer (several hours) depending on the size of your configuration database. A large number of audit records (hundreds of thousands) due to MDM integration can significantly increase upgrade times. Refer to the sample times shown inTable 3in"Sample Times Required for Upgrade" on page 16.
l Review the VMware disk requirements. These are described in"System Requirements" on page 1of the “About ClearPass 6.5.0” chapter.
l Any log settings that were modified prior to the upgrade are not retained, and are reset to the default. The administrator should configure any custom log settings again after the upgrade.
Log Database and Access Tracker records are not restored as part of the upgrade. If required, you can manually restore them after the upgrade. For more information, please review"After You Upgrade" on page 17.
l Before initiating the Upgrade process in CPPM, we recommend you set theAuto Backup Configuration OptionstoOff(if it was set to other values such as Config or Config|Session). The reason for disabling this setting is to avoid interference between the Auto Backup process and the Migration process.
To change this setting:
Navigate toAdministration > Cluster Wide Parameters > General > Auto Backup Configuration Options = Off.
l If you have a custom authentication source configured to use the session log database, additional steps are required after upgrade. You have such an authentication source configured if you have a source of type Generic SQL DBinClearPass Policy Manager > Configuration > Sourceswith server namelocalhost or127.0.0.1and with the database nametipsLogDb. In such cases, manually restoring the session log database is required after the upgrade completes (see"After You Upgrade" on page 17). Please contact Customer Support for configuration recommendations to move away from using the session log database as an authentication source.
l VM only: If you have two disks already loaded with previous ClearPass versions—for example, 6.2 on SCSI 0:1 and 6.3 on SCSI 0:2—then drop the inactive disk before upgrading. You must then add a newer disk based on the 6.5 disk requirements. For current requirements, see"Virtual Appliance Requirements" on page 7.
Never remove SCSI 0:0
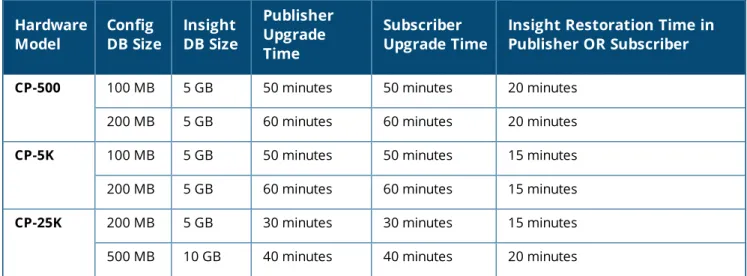
Sample Times Required for Upgrade
To help you estimate how much time the upgrade might take, Table 1 shows representative numbers for upgrade times under test conditions. Remember that the figures here are only examples. The actual time required for your upgrade depends on several factors:
l Your hardware or virtual appliance model. In the case of VM installations, upgrade times vary significantly based on the IOPS performance of your VM infrastructure.
l The size of the configuration database to be migrated. l For Insight nodes, the size of the Insight database.
l For subscriber nodes, the bandwidth and latency of the network link between the subscriber and the publisher. Hardware Model Config DB Size Insight DB Size Publisher Upgrade Time Subscriber Upgrade Time
Insight Restoration Time in Publisher OR Subscriber
CP-500 100 MB 5 GB 50 minutes 50 minutes 20 minutes 200 MB 5 GB 60 minutes 60 minutes 20 minutes CP-5K 100 MB 5 GB 50 minutes 50 minutes 15 minutes 200 MB 5 GB 60 minutes 60 minutes 15 minutes CP-25K 200 MB 5 GB 30 minutes 30 minutes 15 minutes 500 MB 10 GB 40 minutes 40 minutes 20 minutes Table 3:Sample Times Required for Upgrade
After You Upgrade
To reduce downtime, the default upgrade behavior will now back up Log Database and Access Tracker records but will not restore them as part of the upgrade. If required, you can manually restore them after the upgrade through either the application or the CLI. The session log database contains:
l Access Tracker and Accounting records l Event Viewer
l ClearPass Guest Application Log
The Insight database is not part of the session log database, and will be migrated as part of the upgrade.
Restoring the Log DB Through the User Interface
To restore the Log DB after upgrade through the UI, restore from the auto-generatedupgrade-backup.tar.gz file (available atAdministration > Server Manager > Local Shared Folders).
The restoration process could take several hours, depending on the size of your session log database. All services are accessible and will handle requests during the restoration, but there will be a performance impact while the restoration is in progress. We recommend that you perform this operation during a planned change window.
The restoration process will continue in the background even if the UI is closed or the session times out. A “Restore complete” event is logged in the Event Viewer when the restoration is complete.
This process needs to be repeated on each server in the cluster that should retain the session log database. 1. Go toAdministration > Server Manager > Server Configurationand clickRestorefor the server. 2. In theRestore Policy Manager Databasewindow, select theFile is on serveroption, and select the
upgrade-backup.tar.gzfile. 3. Also select the following options:
l Restore CPPM session log data (if it exists on the backup) l Ignore version mismatch and attempt data migration
18 | Upgrade and Update Information ClearPass 6.5.0 | Release Notes l Do not back up the existing databases before this operation
4. Uncheck theRestore CPPM configuration dataoption. 5. ClickStart.
Restoring the Log DB Through the CLI
To restore the Log Database after the upgrade process is complete, use therestorecommand. Go to Administration > Server Manager > Local Shared Foldersand download theupgrade-backup.tar.gz file. Host the file at anscporhttplocation accessible from the ClearPass server and execute the command restore <location/upgrade-backup.tar.gz> -l –i –b.
The restoration process could take several hours depending on the size of your session log database. All services are accessible and handling requests during the restoration, but there will be a performance impact while the restoration is in progress. We recommend that you perform this operation during a planned change window.
The restoration process will abort if the CLI session is closed or times out. We recommend that you initiate the restoration from the User Interface, especially if you have a large number of Access Tracker and Accounting records.
This process needs to be repeated on each server in the cluster that should retain the session log database. Therestorecommand syntax is as follows:
Usage:
restore user@hostname:/<backup-filename> [-l] [-i] [-b] [-c] [-r] [-n|-N] [-s] restore http://hostname/<backup-filename>[-l] [-i] [-b] [-c] [-e] [-n|-N] [-s] restore <backup-filename> [-l] [-i] [-b] [-c] [-r] [-n|-N] [-s]
-b -- do not backup current config before restore -c -- restore CPPM configuration data
-l -- restore CPPM session log data as well if it exists in the backup -r -- restore Insight data as well if it exists in the backup
-i -- ignore version mismatch and attempt data migration
-n -- retain local node config like certificates etc. after restore (default) -N -- do not retain local node config after restore
-s -- restore cluster server/node entries from backup.
The node entries will be in disabled state on restore
Updating Within the Same Major Version
An update is the process of applying a minor patch release within the same major version—for example, from 6.4.3 to 6.4.4. Updates are available from the Software Updates page in ClearPass Policy Manager. This section describes how to install a patch update either through the user interface or as an offline update.
When you install the patch on a cluster, update the publisher first before applying the update on subscriber nodes.
During a patch update, the log database is retained. No extra steps are needed to retain the session log history during a patch update.
Installation Instructions Through the User Interface
If access is allowed to the Web service, ClearPass servers will show the latest patch update on the Software Updates portal:
1. In ClearPass Policy Manager, go toAdministration > Agents and Software Updates > Software Updates.
2. In theFirmware and Patch Updatesarea, find the latest patch update and click theDownloadbutton in its row.
3. After the patch is downloaded, clickInstall.
4. When the installation is complete, if the status on theSoftware Updatespage is shown as Needs Restart , click theNeeds Restartbutton to restart ClearPass. The status for the patch is then shown asInstalled.
Installation Instructions for an Offline Update
If you do not have access to the Web service and you need to do an offline update, you may download the signed patch from the Support site, upload it to the CPPM server, and then install it through the user interface: 1. Download the appropriate patch update from the Support site (http://support.arubanetworks.com). 2. Open ClearPass Policy Manager and go toAdministration > Agents and Software Updates > Software
Updates.
3. At the bottom of theFirmware and Patch Updatesarea, clickImport Updatesand browse to the downloaded patch file.
4. ClickInstall. When the installation is complete, if the status on theSoftware Updatespage is shown as Needs Restart , click theNeeds Restartbutton to restart ClearPass. The status for the patch is then shown asInstalled.
ClearPass 6.5.0 | Release Notes What’s New in This Release | 21
Chapter 4
What’s New in This Release
This chapter provides a summary of the new features and changes in the ClearPass 6.5.0 release. This chapter contains the following sections:
l "Release Overview" on page 21
l "New Features and Enhancements in the 6.5.0 Release" on page 21 l "Issues Resolved in the 6.5.0 Release" on page 55
l "New Known Issues in the 6.5.0 Release" on page 64
Release Overview
ClearPass 6.5.0 is a major release that introduces new features and provides fixes for known issues. The 6.5.0 upgrade is available in ClearPass Policy Manager underAdministration > Agents and Software Updates > Software Updates.
New Features and Enhancements in the 6.5.0 Release
The following new features were introduced in the ClearPass 6.5.0 release.
Policy Manager
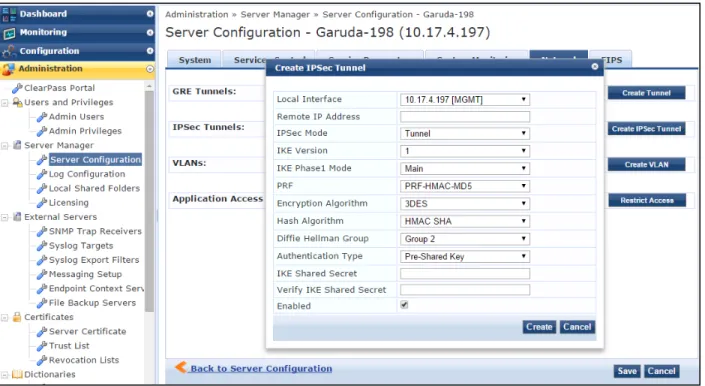
l Support was added for terminating IPSec VPN tunnels. To use this feature, go toAdministration > Server Manager > Server Configurationand click the server in the list. On theNetworktab, click theCreate IPSec Tunnelbutton. Items that can be configured for an IPSec tunnel include: (#8378)
n Local Interface n Remote IP Address n IPSec Mode n IKE Version n IKE Phase1 Mode n Encryption Algorithm n Hash Algorithm n Diffie Hellman Group n Authentication Type n IKE Shared Secret
22 | What’s New in This Release ClearPass 6.5.0 | Release Notes Figure 1 Support for IPSec VPN Tunnels
l Support was added for broadcasting a RADIUS accounting request to proxy targets configured in the service. A newAccounting Proxyoption is available when you configure new or modify existing RADIUS services, providing the ability to proxy RADIUS accounting events. (#15002, #25647)
To use this feature, go toConfiguration > Servicesand select or add a RADIUS service. On its
configuration form, click theServicetab. Complete the fields as needed and, in theMore Optionsfield, select theAccounting Proxycheck box. AnAccounting Proxytab is added to the form. Fields on this tab let you configure a hierarchical list of proxy targets to which the RADIUS server should be forwarded, and configure attributes to include in the accounting packet. Attribute values can be static or any parameterized value. These options are shown in the figures below.
Figure 3 RADIUS Accounting Proxy Configuration, Accounting Proxy Tab
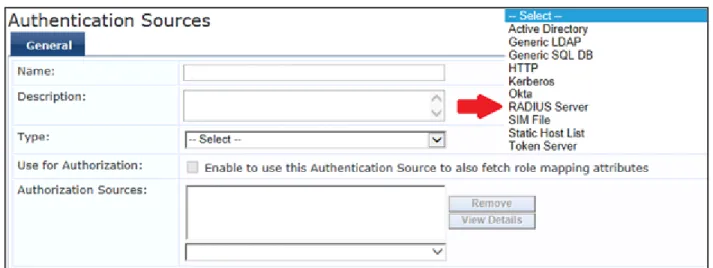
l RADIUS is now supported as an authentication and authorization source, allowing ClearPass to query third-party RADIUS servers. When you add a new authentication source, the newRADIUS Serversource type is available in theTypedrop-down list atConfiguration > Authentication > Sources > General tab. The RADIUS Server source type can be used with any RADIUS-based authentication service. Extra
RADIUS attributes can be added before sending the RADIUS request to a RADIUS-based remote server, and the response attributes can be used as role or authorization attributes. (#20550, #25646)
Figure 4 Authentication Sources, RADIUS Server Option
l Four service templates were enhanced to streamline workflows for some common ClearPass
configurations. To use these features, go toConfiguration > Start Hereand select the following service template links: (#20659)
n 802.1X Wired —APosture Settingstab was added. Options on this tab let you enable or disable posture checks, specify host operating systems (Windows, Linux, or Mac OS X), and provide a quarantine message.
24 | What’s New in This Release ClearPass 6.5.0 | Release Notes Figure 5 802.1X Wired Service Template Configuration, Posture Settings Tab
n 802.1X Wireless —APosture Settingstab was added. Options on this tab let you enable or disable posture checks, specify host operating systems (Windows, Linux, or Mac OS X), and provide a quarantine message.
Figure 6 802.1X Wireless Service Template, Posture Settings Tab
n Guest Access - Web Login —TheService Ruletab now includes a link to open theClearPass Guest > Configuration > Web Loginspage, where you can create a new guest Web login page.
Figure 7 Guest Access - Web Login Service Template, Link to Guest Web Logins Config
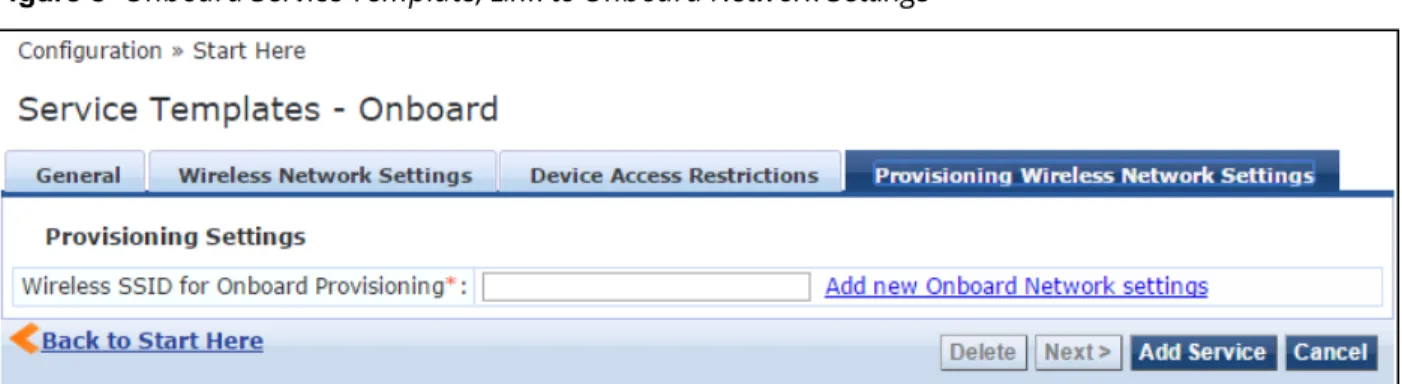
n Onboard —TheProvisioning Wireless Network Settingstab now includes a link to open the Onboard > Configuration > Network Settingspage, where you can add new Onboard network settings.
Figure 8 Onboard Service Template, Link to Onboard Network Settings
l Enhancements to the Access Tracker provide additional information. To see this feature, go toMonitoring > Live Monitoring > Access Trackerand click a server in the list. TheRequest Detailsform opens. Changes to this form include: (#20660, #26127)
n TheInputtab now shows the category, family, and OS of the device, and the name of the vendor. This tab also includes a newShow Configurationbutton, which adds a tab to the Request Details form.
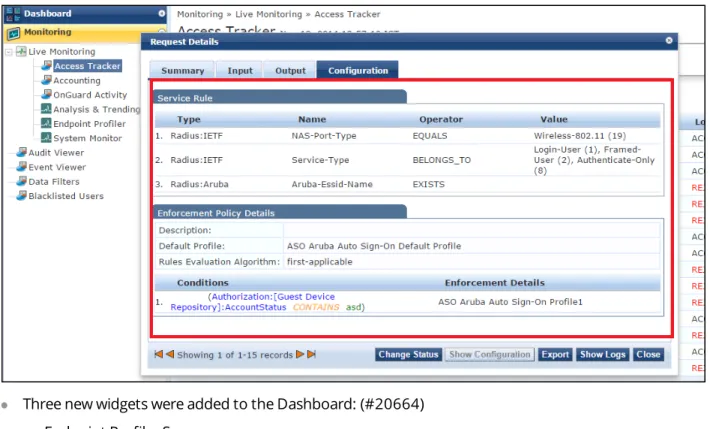
n When you click theShow Configurationbutton on theInputtab, theConfigurationtab is added to theRequest Detailsform. This tab providesService Rule,Role Mapping Policy Details, and Enforcement Policy Detailsinformation.
26 | What’s New in This Release ClearPass 6.5.0 | Release Notes Figure 9 Configuration Tab on Access Tracker > Request Details
l Three new widgets were added to the Dashboard: (#20664) n Endpoint Profiler Summary
n MDM Discovery Summary n OnGuard Client Summary
Figure 10 Policy Manager Dashboard: Three New Widgets
l Several enhancements were made related to Common Criteria Protection Profile and FIPS 140. Changes were made in the areas of password complexity policies, idle session timeout configuration, admin passwords, and performance monitor rendering. As part of this feature: (#20667, #23819, #24191, #26272, #26273, #26274, #27208, #27475)
n Password security was strengthened.
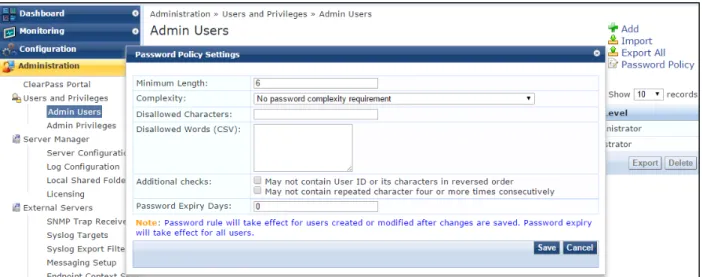
n A newPassword Policy Settingsform was added for both local users and admin users. To use this feature, go to eitherAdministration > Users and Privileges > Admin Users > Password Policyor Configuration > Identity > Local Users > Password Policy. Options that can be configured for the
password include length, complexity, disallowed characters, disallowed words, disallowed user ID or repeated characters, and the number of days to expiration.
Figure 11 Password Policy Settings
n A new cluster-wide parameter,Admin Session Idle Timeout, allows administrators to configure the maximum idle time permitted for a session before it times out. To use this feature, go to
Administration > Server Manager > Server Configuration > Cluster-Wide Parameters > General tab. Scroll to theAdmin Session Idle Timeoutrow and enter the number of minutes to allow before timeout. The default value is 30 minutes.
Figure 12 Cluster-Wide Parameters, Admin Session Idle Timeout Parameter
n A new cluster-wide parameter,Performance Monitor Rendering Port, controls performance metrics rendering among the nodes in the cluster. The port can be altered depending on the firewall
requirements in deployments.
28 | What’s New in This Release ClearPass 6.5.0 | Release Notes Figure 13 Cluster-Wide Parameters, Performance Monitor Rendering Port
l Default values have changed for two items in the Administration module: (#25998)
n The default value ofOld Audit records cleanup intervalis changed from 30 days to 7 days under the Administration > Server Manager > Server Configuration > Cluster-Wide Parameters >
Cleanup Intervalstab.
n The default value of theLimit each log file sizeparameter underAdministration > Log Configuration > System Levelis changed from 25 MB to 50 MB.
l ClearPass now provides the ability to add a number of devices that have contiguous IP addresses. To use this feature, go toConfiguration > Network > Devices > Add Device. In theIP Address or Subnet field, use a hyphen to indicate the range of device IP addresses, following the formata.b.c.d-e(for example, 192.168.1.1-20). (#20841, #26134)
l A new option lets you clear the machine authentication cache on all the nodes. This option is available at Administration > Server Manager > Server Configuration > Clear Machine Authentication Cache. (#20959)
l Information retrieved by API queries to the Endpoints table now includes endpoint profile information. (#21004)
l A new RADIUS service parameter,Enable signing for OCSP Request, was added for specifying whether ClearPass should sign an OCSP request with a RADIUS server certificate. To use this feature, go to
Administration > Server Manager > Server Configurationand click the server in the list. On the Service Parameterstab, selectRADIUS serverin theSelect Servicedrop-down list. Scroll to theEnable signing for OCSP Requestrow and set the value to either TRUE or FALSE. The default value is FALSE to disable the signing process. (#21677)
l Administrators and guest operators can now log in to ClearPass using smart cards and TLS certificates. To use this feature: (#23050)
1. InClearPass Policy Manager, go toConfiguration > Start Here, clickCertificate/Two-factor Authentication for ClearPass Application Login, and configure the service template and add it. It will then be available in the list atConfiguration > Services.
Figure 14 Services List, TLS-SSO Authentication
2. InClearPass Guest, go toConfiguration > Pages > Web Loginsto create a Web login page. In the Vendor Settingsdrop-down list, selectSingle Sign-On - SAML Identity Provider. In theLogin Form area, select the appropriate values in theClient CertificateandAuthenticationfields to allow admins and guests to log in via smart cards and TLS certificates.
l The following additional OIDs are now exposed for reporting CPU load averages for one minute, five minutes, and fifteen minutes: (#24057)
n .1.3.6.1.4.1.2021.10.1.3.1 n .1.3.6.1.4.1.2021.10.1.3.2 n .1.3.6.1.4.1.2021.10.1.3.3
l A new attribute,Mac-Address-Upper-Hyphen, was added to the Connection namespace. This attribute contains the client’s MAC address in uppercase with a hyphen delimiter. (#24074)
l Support was added for the EAP-PWD authentication method. To use this feature, go toConfiguration > Authentication > Methodsand scroll to the[EAP PWD]method in the list. The EAP-pwd protocol method uses a shared password for authentication. For more information, see http://www.rfc-base.org/rfc-5931.html. (#24149)
Figure 15 Support for the EAP-PWD Authentication Method
30 | What’s New in This Release ClearPass 6.5.0 | Release Notes l The Cisco Adaptive Security Appliance (ASA) RADIUS dictionary was added. When you upgrade or restore
from a previous version, the Cisco ASA dictionary automatically replaces the Cisco VPN3000 RADIUS dictionary. If you require the Cisco VPN3000 dictionary, you may import it. (#24337)
l A new service parameter,Include Nonce in OCSP request, was added for specifying whether an OCSP request should contain a nonce or not. A nonce is a unique identifier for an OCSP request. To use this feature, go toAdministration > Server Manager > Server Configurationand click the server in the list. On theService Parameterstab, selectRADIUS serverin theSelect Servicedrop-down list. Scroll to the Include Nonce in OCSP requestrow and set the value to either TRUE or FALSE. The default value is TRUE. If the OCSP server does not support nonce, set the value of this parameter to FALSE to avoid an EAP-TLS authentication failure. (#24443)
l ClearPass now provides the ability to authenticate users belonging to trusted domains when the Global Catalog server is configured as an authentication source and the username does not contain the domain name. (#24731)
l ClearPass now displays information from the SNMP Management Information Base (MIB). On an SNMP query, the information is exposed beginning one minute after changes are made to the configuration. Details include: (#24850)
n System information n Authentication counters n Authorization counters n Network traffic counters
n Traps for various system and application events For more information, see
http://support.arubanetworks.com/DownloadSoftware/tabid/75/DMXModule/510/Default.aspx?EntryId= 16480.
l A new service template was added for to provide authentication sources for social logins. To see this feature, go toConfiguration > Start Hereand selectGuest Social Media Authentication. (#25183) Figure 16 Guest Social Media Authentication Service Template
l Data about the various posture classes and their status for endpoints, as derived by the OnGuard agent, can now be sent to Palo Alto Networks devices. To use this feature, when configuring a Palo Alto firewall or panorama device as an external context server, go toAdministration > Server Manager > Server Configuration, open the server’s configuration form, and click theService Parameterstab. Set theSend Posture Dataoption toTRUE, and enter a value higher than two minutes for theEager handler polling intervaloption. Because this feature can be resource-intensive, the eager handler-polling interval must be two minutes or more. (#25217)
Figure 17 Enable GlobalProtect for a Palo Alto Firewall
l A new option,Join Server Back to Cluster, was added to theServer Configurationpage for nodes whose replication status is DISABLED. This option is only available to users with the Admin role. The Join Server Back to Cluster option lets administrators join a failed node back to the cluster. The node can also be promoted to publisher. This option can only be triggered from a node that is currently active in the cluster. To use this option, go toAdministration > Server Manager > Server Configurationand click the node whose replication status is DISABLED. (#25304)
Figure 18 Server Configuration, Join Server Back to Cluster Dialog
l TheCertificate Trust ListatAdministration > Certificates > Trust Listnow includes DoD
(Department of Defense) certificates. These are disabled by default, and can be enabled as needed. A DoD certificate allows a browser to trust Web sites whose secure communications are authenticated by a Department of Defense agency. (#25329)
l For wired network profiling, MAC OUI (Organizationally Unique Identifier) information is now populated for all endpoints even when no other profiling information is available for an endpoint. This feature is available atConfiguration > Identity > Endpoints > Edit Endpoint. (#25377)
32 | What’s New in This Release ClearPass 6.5.0 | Release Notes Figure 19 Edit Endpoint, MAC OUI Information
l For wired network profiling, a list of multiple SNMP community strings can now be configured and used to query static IP devices discovered by the Profiler. If a static IP device does not respond to queries from the default public community string, the SNMP service can use the credentials from this custom list to query the device. This feature is available at Configuration > Profile Settings > SNMP Configuration. (#25417, #25837)
l For wired network profiling, a one-time scan can now be triggered to discover and profile devices in specified network IP subnets. To use this feature, go toConfiguration > Profile Settings > Subnet Scansand click theOn-Demand Subnet Scanlink. Enter the subnets to scan and clickSubmit. (#25418) l Insight now records the last connected location for an endpoint when such information is available. This
information is determined from RADIUS authentication and accounting information, and from SNMP queries of network devices that have been set up for SNMP read and trap notification. Insight reports based on the Endpoints template can report on the following columns related to device location: (#25421) n NadIp (switch or controller IP)
n NadPort (port information for wired devices) n Access Point (AP for wireless devices)
n Ssid (SSID for wireless devices)
l For wired network profiling, an SNMP scan of an endpoint can now be triggered from itsAccess Tracker authentication record orEndpointsconfiguration in order to profile the endpoint. The option for the SNMP scan of the endpoint is only available if the client IP address is available. Only one endpoint can be scanned at a time. (#25456, #25420)
n To use this feature fromMonitoring > Live Monitoring > Access Tracker, click the server in the list to open theRequest Detailsform. On theSummarytab, clickChange Status. On theAccess Control Capabilitiestab, select theServer Actionradio button. SelectSNMP Scanin theServer Actiondrop-down list, and then clickSubmit.
Figure 20 Access Tracker, Trigger SNMP Scan of Endpoint Option
n To use this feature fromConfiguration > Identity > Endpoints, mark the check box for the endpoint in the list and clickTrigger Server Action. In theServer Actiondrop-down list selectSNMP Scan, and then clickSubmit.
Figure 21 Endpoints, Trigger SNMP Scan of Endpoint Option
l A new cluster-wide service parameter,Replication Batch Interval, was added. This parameter can be used to change the number of seconds for the minimum replication time. This parameter should only be
modified as instructed by Support. (#25461)
l The Policy Server now logs an alert message if an authentication source filter takes a long time (more than 6 to 10 seconds) or times out. The alert message can be viewed in the logs atMonitoring > Live
Monitoring > Access Tracker. (#25508)
l Ubuntu was added to the list of Linux Posture configuration settings atConfiguration > Posture > Posture Policies > Posture Plugins. (#25676)
34 | What’s New in This Release ClearPass 6.5.0 | Release Notes Figure 22 Posture Policies, Ubuntu in Linux Posture Configuration
l ClearPass now supports two new event type formats, CEF (Common Event Format) and LEEF (Log Event Extended Format). On theAdministration > External Servers > Syslog Export Filtersconfiguration form, theExport Event Format Typefield includes theLEEFandCEFoptions in addition to theStandard option. (#25764)
l TheCertificate Trust ListatAdministration > Certificates > Trust Listnow includes Alcatel root certificates. These are disabled by default, and can be enabled as needed. An Alcatel root certificate allows Alcatel Lucent IP phones to authenticate via EAP-TLS. (#25782)
l The Linux Posture plugin was modified to simplify AV health class configuration under each Linux distribution. (#25792)
l The following Graphite counters were added to the RADIUS server: (#25862) n Kerberos Authentication Time
n Number of RADIUS Accounting Packets Processed n Number of Timed Out Requests
n RADIUS Accounting Packets Processed n RADIUS Duplicate Packets Received n RADIUS Policy Evaluation Time n RADIUS Service Evaluation Time
n Time Taken for a RADIUS Request Process
n Time Taken to Verify the Certificate Against OCSP Server
l A new MAC Caching service template was added. Instead of using Insight as the authorization source, this service uses an endpoint attribute containing the MAC cache expiry date, and checks this attribute against the authentication date. If the authentication date is earlier than the expiry date, access is granted. To see
this feature, go toConfiguration > Start Hereand select theUser Authentication with MAC Caching template. (#25900)
Figure 23 User Authentication with MAC Caching Service Template
l An Nmap scan of an endpoint can now be triggered from itsAccess Trackerauthentication record or Endpointsconfiguration in order to profile the endpoint. The option for the Nmap scan is only available if the endpoint’s IP address is available. Only one endpoint can be scanned at a time. (#25943)
n To use this feature fromMonitoring > Live Monitoring > Access Tracker, click the server in the list to open theRequest Detailsform. On theSummarytab, clickChange Status. On theAccess Control Capabilitiestab, select theServer Actionradio button. SelectNmap Scanin theSelect Actiondrop-down list, and then clickSubmit.
Figure 24 Access Tracker, Trigger Nmap Scan of Endpoint Option
n To use this feature fromConfiguration > Identity > Endpoints, mark the check box for the endpoint in the list and clickTrigger Server Action. In theServer Actiondrop-down list selectNmap Scan, and then clickSubmit.
36 | What’s New in This Release ClearPass 6.5.0 | Release Notes Figure 25 Endpoints, Trigger Nmap Scan of Endpoint Option
l An alert is now shown in the Access Tracker if an enforcement action fails with an error code returned from the external context server. Alerts indicate the details of the HTTP request, and are shown on theAlertstab of theRequest Detailsform when you select a server in the list atMonitoring > Live Monitoring > Access Tracker. (An example of an enforcement action would be an HTTP enforcement invoking a GET/POST/PUT to an external context server such as a generic HTTP server or an MDM context server) (#25972)
l ClearPass Profile can now determine device type using TCP OS Fingerprinting. It also uses ARP (Address Resolution Protocol) packets to get the MAC:IP binding. To support TCP fingerprinting, theAdministration > Server Manager > Server Configuration > System tab > Span Port fieldnow includes anEnable TCP fingerprintingcheck box. This option is disabled by default. When the check box is selected to enable TCP fingerprinting, a warning message is displayed that advises the user of the potential impact on system performance. TCP session-based fingerprinting is a CPU-intensive operation, and the server should not be used for request processing while this option is enabled. (#25984, #26168)
l A new service template, Device MAC Authentication, was added. This service template can be used for plain device accounts that do not have a user directly associated with them. (#26033)
l Support was added for notifications to registered subscribers when a device profile changes. (#26106) l New UI options and CLI commands let users perform on-demand cleanup operations. In addition, the
system checks disk utilization every hour and purges data if the configured disk threshold is met: (#26121, #24005)
n To use this feature in the UI, go toAdministration > Server Manager > Server Configuration, select the radio button in the rows of the servers you wish to clean up, and click theCleanupbutton. A pop-up window lets you specify, in days, the age of the files to remove. File types that are removed include: n System and application log files
n Past authentication records n Audit records
n Expired guest accounts
n Past auto and manual backups n Stored reports
n To use this feature in the CLI, the newsystem cleanupcommand performs on-demand cleanup. The newsystem sysinfocommand provides information on disk and memory utilization.
l New endpoint attributes capture information about endpoints that have generated threat events. Administrators can create policies based on a threat’s category, risk, or severity level, or a combination thereof. A device’s threat resolution status can also be captured for logging purposes. The attributes are
shown inTable 4, and are available in the Attributes dictionary (Administration > Dictionaries > Attributes) (#26222)
Endpoint Attribute Data Type
[Threat Category] String
[Threat Detection Device IP] IPv4Address [Threat Detection Device Name] String
[Threat Name] String
[Threat Risk] Integer32
[Threat Severity] List
[Threat Status] List
[Threat Timestamp] Date-Time
Table 4:New Endpoint Attributes for Threat Information
l User passwords are now stored as password hashes instead of the reversible AES-256 encrypted form. This feature also supports MSCHAPv2 authentication. As part of this feature: (#26288, #26310, #26324, #26325, #26346)
n Support was added for password hash-based user authentication for SQL authentication sources. n Async netd modifications were made to support hashed admin user passwords.
n PostAuth modifications were made to support hashed user passwords. n API modifications were made to support exporting password hash fields.
n An option is provided to store password hashes in a format compatible with MSCHAP authentication. This can be controlled from a cluster-wide parameter.
If you disable this feature, RADIUS MSCHAP authentications against the Local User and Admin User repositories are not possible because NTLM hashes are reset for all local and admin users. To re-enable RADIUS MSCHAP
authentication against the user repositories, you must reset all the affected passwords in addition to enabling this feature.
l The RADIUS server was modified to integrate with Vasco IdentiKey Authentication Server. The changes also ensure that the State attribute does not contain any non-printable (non-ASCII) characters. (#26320, #27103)
l New System Monitoring graphs are available. To view these graphs, go toMonitoring > Live Monitoring > System Monitorand click theClearPasstab. Select the newAdvancedoption, and then select the Type. The following graph types were added: (#26362)
n RADIUS Accounting Packets processed n RADIUS Duplicate Packets received
n Time taken to verify the certificate against OCSP server n RADIUS Policy Evaluation Time
n RADIUS Service Evaluation Time n Number of RADIUS timed out requests
38 | What’s New in This Release ClearPass 6.5.0 | Release Notes Figure 26 System Monitoring, Advanced Graphs
l The following RADIUS counters are now logged at the INFO level instead of the DEBUG level: (#26419) n Service Categorization Time
n User Lookup time in rlm_ldap and rlm_sql modules n User authentication time in rlm_mschap module n Policy Evaluation time
n End-to-End request processing time
l A new Service Template,Guest Social Media Authentication, was added to provide a step-wise wizard for easy setup of CPPM policies that allow social logins for Guest access.(#26434)
l The RADIUS dictionary was updated with the latest information for all CheckPoint platforms. (#26616) l For users who connect to a Microsoft SQL server using Integrated Authentication, the login username in the
authentication source now allows the backslash ( \ ) and at-sign (@) characters in addition to the hyphen and underscore characters. Only the DOMAIN\\Username format is supported for Integrated
Authentication (UPN format is not supported). To use this feature, go toConfiguration > Authentication > Sources > Addand create a new source of typeGeneric SQL DB. On thePrimarytab, enter the
username in the format DOMAIN\\Username in theLogin Usernamefield, and selectMSSQLin theODBC Driverfield. (#26670)
l A newEndpoint Details APIcan be used to query the endpoint attributes for a given IP address or MAC address. The admin should always use this API on nodes where Insight is enabled, and make sure that RADIUS accounting is enabled. The following endpoint attributes can be retrieved using this API: (#26778) n mac n ip n user n device_category n device_family n device_name n is_online n updated_at
l To improve the efficiency of error handling, ClearPass now excludes the following errors from the Active Directory errors that are used for recovery actions: (#26946)
n 0xC000006D - STATUS_LOGON_FAILURE n 0xC000006E - STATUS_ACCOUNT_RESTRICTION n 0xC000006F - STATUS_INVALID_LOGON_HOURS n 0xC0000071 - STATUS_PASSWORD_EXPIRED n 0xC0000072 - STATUS_ACCOUNT_DISABLED n 0xC0000064 - STATUS_NO_SUCH_USER n 0xC000006C - STATUS_PASSWORD_RESTRICTION n 0xC000006A - STATUS_WRONG_PASSWORD n 0xC0000193 - STATUS_ACCOUNT_EXPIRED n 0xC0000234 - STATUS_ACCOUNT_LOCKED_OUT n 0xC0000224 - STATUS_PASSWORD_MUST_CHANGE
Dissolvable Agent
l TheOnGuard Mac Health Checker.dmgfile for the Mac OS X Native Dissolvable Agent now uses the Native Agent Installer instead of the Native Agent App. This allows users to easily uninstall the agent. (#25063)
l The Native Dissolvable Agent is now supported for the Ubuntu operating system with the Firefox browser (it is not supported for the Chrome browser). The following Ubuntu OS versions are supported:
l 12.04 32-bit LTS l 12.04 64-bit LTS l 14.04 32-bit LTS l 14.04 64-bit LTS
For more information, see #20656 under"OnGuard" on page 53. (#25271)
l To uninstall the Native Agent from Mac OS X, you can now run the following command: (#27163) open ~/Library/Application\ Support/ClearPassWebAgent/Uninstaller.app/
Guest
l Support was added to Transaction Services for the following Property Management Systems (PMS): (#19271, #23108, #25239)
n Agilysys hotel PMS n Protel PMS
l A new Web Analytics plugin was added. This plugin can be used to inject a Web analytics tracking code into guest-facing application pages. This functionality doesnotcollect any user information. (#20552)
l The sponsor can now confirm or reject a guest account or device account directly from theGuest >
Manage AccountsorGuest > Manage Devicespage, respectively, instead of by email. To configure this option, go toConfiguration > Pages > Guest Self-Registrationsand click theEditlink for a Guest Self-Registration (GSR). In the diagram, click theSponsor Confirmationlink. Select theEnabledcheck box for sponsorship confirmation and save your changes. Register the guest account. On theGuest > Manage Accountslist, the account’s row will include theSponsorlink. (#20633)
40 | What’s New in This Release ClearPass 6.5.0 | Release Notes Figure 27 Sponsor Confirmation for Guest Access
l The PHP opcode cache was updated to OPcache 7. (#21188)
l Web Pageswas added toConfiguration > Pages. You can manage your list of custom Web pages and create simple new custom pages. The Web Pages list also provides four page templates:Browser Unsupported,Jailbroken Device,Posture Check, andService Unavailable. (#24439)
If you have configured Bulk SMS as your SMS provider, the outgoing port has changed from TCP port 5567 to TCP port 80. Please review any firewall settings you may have configured. An override is available in theConfiguration > SMS Services > Gatewaysconfiguration form to override the default port. (#24453)
l TheSelf-Service Portalsummary page now displays the NAT IP if it is available in the authentication session of the user. (#25165)
l Transaction processors using the FIAS protocol will now adhere to the No Post NP flag and deny access. Previously guests were still able to attempt a charge or otherwise be granted access. (#25240)
l Support was added for the Media4u SMS gateway (Japan). (#25551)
l TheAdministration > API Services > API Clientspage includes a new link,API Explorer, that provides access to the various APIs used for configurations in Guest and Onboard. (#25556)
l TheGuest > Active Sessions > Show Detailswindow now includes the ClearPass Policy Manager service and the session ID of the user’s connection. TheService TypeandSSIDfields can be added to theGuest > Active Sessionslist as a custom view. To add these columns, click theMore Optionslink above the table, clickChoose Columns, click the field name you want to add, and then clickEnable Field. (#25633) l Two new skins have been added to the list of available skins atAdministration > Plugin Manager. The
Galleria SkinandGalleria Skin 2provide a customizable and dynamic full-screen user experience for guests. (#25672)
l In Transaction Processor configuration, for matching names against Property Management Systems (PMS) you can now configure how many characters of the name require matching. To use this feature, go to Configuration > Hotspot Manager > Transaction Processorsand open the configuration form for a new or existing processor. In theProcessing Gatewaydrop-down list, select one of the PMS providers. In theName Matchfield, you can specify either an exact name match or matching just the first 3, 4, 5, 6, or 7 letters of the last name. (#25783)
l The performance of captive portal pages was improved. (#25965)
l When you configure a guest self-registration to use a Facebook Wi-Fi social login, a new option lets you enable a RADIUS Change of Authorization (CoA) when the guest’s session expiration time is reached. To use this feature, go toConfiguration > Pages > Guest Self-Registrations > Advanced Editor link. In the Customize Guest Registrationpage, scroll to theSocial Loginsarea and select the check box in the Social Loginrow, and then select the Advanced check box. The newDisconnect Actiondrop-down list specifies the action to take when a disconnect is requested by Facebook. If a CoA Enforcement Profile is selected, it must be compatible with the NAD the guests are connecting to. (#26001)
l WhenSingle Sign-On _ SAML Identity Provideris selected in theVendor Settingsfield at
Configuration > Pages > Web Logins, a new configuration option,Client Certificate, lets you request a client certificate from the user to be used for authentication. (#26046)
l Access control lists in Guest and Onboard now support IPv6 addresses in addition to IPv4. These access control lists include any “allow access”, “deny access”, or “enable access” fields , found on forms such asWeb Logins,Guest Self Registration,Provisioning Settings, or the SCEP server settings inCertificate Authority Settings. (#26079)
l Significant performance enhancements were made to guest-facing pages such as Web Logins and Guest Self-Registration pages, improving performance by 32% to 166% more requests per second. (#26119) l Support was added for specifying security options for Cross-Origin Resource Sharing (CORS). This applies to
API requests made from Web applications. The default is to not permit any cross-origin requests. To configure this behavior, you can specify a list of hostnames, optionally including wildcards, at
Administration > Plugin Manager > API Framework > Configuration > Allowed Origins. (#26179)
Insight
l Support was added for WYSIWYG graphical report design in Insight. This feature includes the following changes: (#20541)
n On the InsightDashboard, aReportbutton was added. You can click this button to open theAdd Reportsform and generate a report of the currently-displayed Dashboard widgets.
n On theAdd Reportsform, you can add a Dashboard report by selecting the newDashboardtemplate. The report uses the current Dashboard widgets in the configuration. To change the widgets in the report, first change them in the Dashboard and then return to the report configuration.
n TheAdd Reportsform also includes a newDesigntab. You can click theHeader,Title, orFooterrow to edit the HTML, or theImagerow to add a file.
42 | What’s New in This Release ClearPass 6.5.0 | Release Notes Figure 28 Insight Reports, Design Tab
l Insight reports now support OnGuard AgentTypeandVersionfields in WebAuth reports. (#22689) l A new template,Endpoint Latest, was added to Insight report configuration to allow reporting on location
attributes. (#23219, #24079)
l A new template,MAB, is now supported in Insight report configuration for MACAUTH BYPASS reports. (#23421)
l A new widget,Insight Disk Usage, was added to the Insight Dashboard. It displays Insight resource consumption statistics such as disk usage of the Insight DB and the Reports Directory. (#23620)
l A sample report can now be viewed for each of the template types within a template group. In theSelect Templatefield on Insight’sReports > Configurationtab, theSample Reportlink downloads an example of the selected report in PDF format. (#25123)
l Support was added for including endpoint connection information such as Switch Port/Controller and Access Point in Insight reports. (#25422)
l Insight report configuration now displays uploaded images in the Design Tab. Support was also added for uppercase image file extensions for JPEG and PNG. GIF images are not supported. (#25514)
l Insight reports now include the following newPosturefields for the File Check Health class: (#25575) n Files Missing
n Files Not Allowed n Invalid MD5 Sum Files
l Enhancements to Insight’sSearchtab provide additional information. Changes to this form include: (#26125, #26126, #20660)
n ASummary Viewbutton was added to theSearch Typeoptions. You can configure the Summary View for and endpoint, a network device, or a user and specify the widgets to include. When you select
Figure 29 Summary View for a User
n TheList Viewshows details in report format and correlates details across users, endpoints, and devices. Figure 30 List View
MDM
l ClearPass now provides the ability to turn off HTTP Basic authentication for context server actions, and to specify user credentials as Action Attributes. To see this feature, go toAdministration > Dictionaries > Context Server Actionsand either click a server type in the list or clickAddto add a new server. The Endpoint Context Server Detailswindow opens. (#18919)
n To use the HTTP Basic authentication option, on theActiontab, use the check box in theSkip HTTP Authfield to enable or disable HTTP Basic authentication.
n To use the Action Attributes option, on theAttributestab, add the attributes in the following formats: