Exam 70-642: Windows Server 2008 Network
Infrastructure, Configuring
Objective chapter LessOn
1. cOnfiguring addressing and services
1.1 Configure IPv4 and IPv6 addressing. Chapter 1 Lessons 2 and 3
1.2 Configure Dynamic Host Configuration Protocol (DHCP). Chapter 4 Lessons 1 and 2
1.3 Configure routing. Chapter 5 Lesson 1
1.4 Configure Windows Firewall with Advanced Security. Chapter 6
Chapter 8 Lesson 1 Lesson 1 2. cOnfiguring names resOLutiOn
2.1 Configure a Domain Name System (DNS) server. Chapter 2 Lesson 2
2.2 Configure DNS zones. Chapter 3 Lessons 1 and 3
2.3 Configure DNS records. Chapter 3 Lesson 1
2.4 Configure DNS replication. Chapter 3 Lesson 2
2.5 Configure name resolution for client computers. Chapter 2 Lesson 3 3. cOnfiguring netwOrk access
3.1 Configure remote access. Chapter 7 Lessons 2 and 3
3.2 Configure Network Access Protection (NAP). Chapter 8 Lesson 2
3.3 Configure DirectAccess. Chapter 7 Lesson 4
3.4 Configure Network Policy Server (NPS). Chapter 7 Lesson 1
4. cOnfiguring fiLe and print services
4.1 Configure a file server. Chapter 11 Lessons 1 and 2
4.2 Configure Distributed File System (DFS). Chapter 11 Lesson 2
4.3 Configure backup and restore. Chapter 11 Lesson 3
4.4 Manage file server resources. Chapter 11 Lesson 2
4.5 Configure and monitor print services. Chapter 12 Lesson 1
5. mOnitOring and managing a netwOrk infrastructure
5.1 Configure Windows Server Update Services (WSUS) server settings. Chapter 9 Lessons 1 and 2
5.2 Configure performance monitoring. Chapter 10 Lessons 1 and 2
5.3 Configure event logs. Chapter 10 Lesson 1
5.4 Gather network data. Chapter 10
Self-Paced Training Kit
(Exam 70-642):
Configuring
Windows Server
®2008
Network Infrastructure
(2nd Edition)
Tony Northrup
J.C. Mackin
PUBLISHED BY Microsoft Press
A Division of Microsoft Corporation One Microsoft Way
Redmond, Washington 98052-6399
Copyright © 2011 by Tony Northrup and J.C. Mackin
All rights reserved. No part of the contents of this book may be reproduced or transmitted in any form or by any means without the written permission of the publisher.
Library of Congress Control Number: 2011924391 ISBN: 978-0-7356-5160-9
9 10 11 12 13 14 15 16 17 QG 8 7 6 5 4 3
Printed and bound in the United States of America.
Microsoft Press books are available through booksellers and distributors worldwide. If you need support related to this book, email Microsoft Press Book Support at [email protected]. Please tell us what you think of this book at http://www.microsoft.com/learning/booksurvey.
Microsoft and the trademarks listed at http://www.microsoft.com/about/legal/en/us/IntellectualProperty /Trademarks/EN-US.aspx are trademarks of the Microsoft group of companies. All other marks are property of their respective owners.
The example companies, organizations, products, domain names, email addresses, logos, people, places, and events depicted herein are fictitious. No association with any real company, organization, product, domain name, email address, logo, person, place, or event is intended or should be inferred.
This book expresses the author’s views and opinions. The information contained in this book is provided without any express, statutory, or implied warranties. Neither the authors, Microsoft Corporation, nor its resellers, or distributors will be held liable for any damages caused or alleged to be caused either directly or indirectly by this book.
Acquisitions Editor: Jeff Koch Developmental Editor: Karen Szall Project Editor: Carol Dillingham
Editorial Production: Online Training Solutions, Inc.
Technical Reviewer: Bob Dean; Technical Review services provided by Content Master, a member of CM Group, Ltd.
Copy Editor: Victoria Thulman; Online Training Solutions, Inc. Indexer: Jan Bednarczuk; Online Training Solutions, Inc. Cover: Twist Creative • Seattle
What do you think of this book? We want to hear from you! Microsoft is interested in hearing your feedback so we can continually improve our books and learning resources for you. To participate in a brief online survey, please visit:
Contents
introduction . . . xvii
System Requirements . . . xvii
Using the CD . . . .xix
Acknowledgments . . . xxii
Support & Feedback . . . xxii
preparing for the exam . . . xxiv
chapter 1 understanding and configuring tcp/ip
1
Before You Begin . . . 1Lesson 1: Introducing Windows Networking . . . 2
What Are Network Layers? 2 Exploring the Layers of the TCP/IP Networking Model 5 Configuring Networking Properties in Windows Server 2008 R2 14 Lesson Summary 39 Lesson Review 39 Lesson 2: Understanding IPv4 Addressing . . . 40
The Structure of IPv4 Addresses 40
Understanding Routing and Default Gateways 50
Understanding IPv4 Address Ranges 51
What Is Subnetting? 61
Advantages of Subnetting 63
The Subnet ID 65
Creating Equally Sized Subnets 66
Enumerating Subnets in an Address Space 68 Verifying Subnet Ownership and Configuration 76
Lesson Summary 84
Lesson Review 84
Lesson 3: Understanding IPv6 Addressing . . . 86
Introducing IPv6 Addresses 86
Understanding IPv6 Address Types 87
IPv6 Transition Technologies 92
Working with IPv6 Subnets 96
Lesson Summary 103 Lesson Review 104 Chapter Review . . . 105 Chapter Summary 105 Key Terms 106 Case Scenarios 106 Suggested Practices 107
Take a Practice Test 107
chapter 2 configuring name resolution
109
Before You Begin . . . 109 Lesson 1: Understanding Name Resolution
in Windows Server 2008 Networks . . . 111
Name Resolution Methods in Windows 111
What Is Link Local Multicast Name Resolution? 112
What Is NetBIOS Name Resolution? 116
What Is DNS Name Resolution? 120
DNS Components 122
Understanding How a DNS Query Works 124
Understanding How Caching Works 131
Lesson Summary 134
Lesson Review 135
Lesson 2: Deploying a DNS Server . . . 136 Deploying a DNS Server on a Domain Controller 137
Deploying a DNS Server on a Server Core Installation
of Windows Server 2008 R2 140
Configuring a Caching-Only DNS Server 142
Configuring Server Properties 143
Configuring DNS Socket Pooling 151
Configuring DNS Cache Locking 151
Lesson Summary 156
Lesson Review 156
Lesson 3: Configuring DNS Client Settings . . . 158
Specifying DNS Servers 158
Specifying a Computer Name and DNS Suffixes 160
Configuring a Suffix Search List 162
Configuring Dynamic Update Settings 165
Viewing and Clearing the DNS Client Cache 168
Lesson Summary 169 Lesson Review 170 Chapter Review . . . 171 Chapter Summary 171 Key Terms 172 Case Scenarios 173 Suggested Practices 174
Take a Practice Test 174
chapter 3 configuring a dns Zone infrastructure
175
Before You Begin . . . 175 Lesson 1: Creating and Configuring Zones. . . 176Creating Zones 177
Examining Built-in Resource Records 185
Creating Resource Records 189
Enabling DNS to Use WINS Resolution 195
Aging and Scavenging 196
Using a GlobalNames Zone 199
Lesson 2: Configuring Zone Replication, Transfers, and Delegations . . .204 Configuring Zone Replication for Active Directory–
Integrated Zones 205
Using Zone Transfers 210
Understanding Zone Delegations 213
Implementing Stub Zones 215
Lesson Summary 221
Lesson Review 222
Lesson 3: Implementing DNSSEC . . . 223 Understanding Public Key Cryptography in DNSSEC 224
Understanding DNSSEC Name Resolution 227
Configuring DNSSEC 234 Lesson Summary 246 Lesson Review 247 Chapter Review . . . 248 Chapter Summary 248 Key Terms 249 Case Scenarios 250 Suggested Practices 251
Take a Practice Test 251
chapter 4 creating a dhcp infrastructure
253
Before You Begin . . . 253 Lesson 1: Installing a DHCP Server. . . 254
Understanding DHCP Address Assignment 254
Adding the DHCP Server Role 258
Lesson Summary 268
Lesson Review 269
Lesson 2: Configuring a DHCP Server . . . 270
Performing Post-Installation Tasks 270
Understanding DHCP Options Classes 276
Controlling DHCP Access Through MAC Filtering 279
Using the DHCP Split-Scope Configuration Wizard 281 Configuring DHCP to Perform Dynamic DNS Updates for Clients 282 Installing and Configuring DHCP on a Server Core Installation 285
Lesson Summary 286 Lesson Review 287 Chapter Review . . . 288 Chapter Summary 288 Key Terms 289 Case Scenarios 289 Suggested Practice 290
Take a Practice Test 290
chapter 5 configuring ip routing
291
Before You Begin . . . 291 Lesson 1: Routing . . . 292
Routing Overview 292
Examining Network Routes 294
Routing Protocols 295 Demand-Dial Routing 299 Static Routing 300 Lesson Summary 310 Lesson Review 310 Chapter Review . . . 311 Chapter Summary 311 Key Terms 311 Case Scenarios 312 Suggested Practices 313
Take a Practice Test 313
chapter 6 protecting network traffic with ipsec
315
Before You Begin . . . 315 Lesson 1: Configuring IPsec . . . 316Authentication Methods for IPsec 323
Assigning a Predefined IPsec Policy 324
Creating a New IPsec Policy 325
Creating and Configuring a Connection Security Rule 330
Lesson Summary 342 Lesson Review 343 Chapter Review . . . .344 Chapter Summary 344 Key Terms 344 Case Scenario 345 Suggested Practices 345
Take a Practice Test 346
chapter 7 connecting to networks
347
Before You Begin . . . .348 Lesson 1: Configuring Network Policy Server . . . 349
Wireless Security Standards 350
Infrastructure and Ad Hoc Wireless Networks 352 Configuring the Public Key Infrastructure 352 Authenticating Wireless Networks by Using
Windows Server 2008 R2 353
Connecting to Wireless Networks 361
Deploying Wireless Networks with WPA-EAP 362
Wired Network Security 363
Using NPS Templates 365
Lesson Summary 370
Lesson Review 371
Lesson 2: Configuring Network Address Translation . . . 372
Network Address Translation Concepts 372
Configuring Internet Connection Sharing 374 Configuring Network Address Translation by Using Routing
And Remote Access 376
Troubleshooting Network Address Translation 378
Lesson 3: Connecting to Remote Networks . . . 382
Remote Access Overview 382
Configuring Dial-Up Connections 385
Configuring VPN Connections 391
Troubleshooting VPN Connection Problems 395
Configuring Connection Restrictions 395
Testing Connectivity 397
Lesson Summary 404
Lesson Review 404
Lesson 4: Configuring DirectAccess . . . .405
DirectAccess Connection Types 407
Using DirectAccess on IPv4 Networks 408
DirectAccess and Name Resolution 409
The Network Location Server 410
DirectAccess Requirements 410
DirectAccess Limitations 412
Firewall Configuration 412
Running the DirectAccess Setup Wizard 413
Lesson Summary 422 Lesson Review 422 Chapter Review . . . 423 Chapter Summary 423 Key Terms 424 Case Scenarios 424 Suggested Practices 426
Take a Practice Test 427
chapter 8 configuring windows firewall and
network access protection
429
Before You Begin . . . 429 Lesson 1: Configuring Windows Firewall . . . 430
Why Firewalls Are Important 431
Filtering Outbound Traffic 434
Configuring Scope 435
Authorizing Connections 436
Configuring Firewall Settings with Group Policy 438
Enabling Logging for Windows Firewall 439
Identifying Network Communications 439
Lesson Summary 442
Lesson Review 443
Lesson 2: Configuring Network Access Protection . . . .444
Network Access Protection Concepts 445
Planning a NAP Deployment 450
Installing and Configuring the Network Policy Server 450
Configuring NAP Enforcement 453
Configuring NAP Components 463
NAP Logging 474 Lesson Summary 480 Lesson Review 481 Chapter Review . . . .482 Chapter Summary 482 Key Terms 482 Case Scenarios 483 Suggested Practices 484
Take a Practice Test 485
chapter 9 managing software updates
487
Before You Begin . . . .488 Lesson 1: Understanding Windows Server Update Services . . . 489
WSUS Overview 489
Windows Update Client 490
WSUS Architecture 492
WSUS Requirements 494
Planning the WSUS Installation 495
Lesson 2: Using Windows Server Update Services . . . 499 Installing Windows Server Update Services 499 Configuring Windows Server Update Services 500 Troubleshooting Problems Installing Updates 510
Removing Updates 513 Lesson Summary 516 Lesson Review 516 Chapter Review . . . 517 Chapter Summary 518 Key Terms 518 Case Scenarios 518 Suggested Practice 520
Take a Practice Test 520
chapter 10 monitoring computers
521
Before You Begin . . . 521 Lesson 1: Monitoring Events . . . 523
Using Event Viewer 523
Automatically Responding to Events 525
Configuring Event Forwarding 526
Lesson Summary 537
Lesson Review 538
Lesson 2: Monitoring Performance and Reliability . . . 539
Using Performance Monitor 539
Using Reliability Monitor 542
Using Data Collector Sets 543
Configuring Virtual Memory 549
Lesson Summary 552
Lesson Review 553
Lesson 3: Using Network Monitor and Simple Network
Management Protocol . . . 554
Installing Network Monitor 554
Configuring SNMP 561 Lesson Summary 564 Lesson Review 564 Chapter Review . . . 565 Chapter Summary 566 Key Terms 566 Case Scenarios 566 Suggested Practices 567
Take a Practice Test 568
chapter 11 managing files
569
Before You Begin . . . 569 Lesson 1: Managing File Security . . . 570
NTFS File Permissions 571
Encrypting File System 573
BitLocker 578
Lesson Summary 584
Lesson Review 584
Lesson 2: Sharing Folders . . . 585 Installing the File Services Server Role 586
Quotas 587
Folder Sharing 592
Classification Management 596
Distributed File System 599
Offline Files 604
BranchCache 606
Lesson Summary 613
Lesson Review 614
Lesson 3: Backing Up and Restoring Files . . . 615
Shadow Copies 616
Windows Server Backup 617
Lesson Summary 626
Chapter Review . . . 627
Chapter Summary 628
Key Terms 628
Case Scenarios 628
Suggested Practices 629
Take a Practice Test 630
chapter 12 managing printers
631
Before You Begin . . . 631 Lesson 1: Managing Printers . . . 632 Installing the Print And Document Services Server Role 633
Installing Printers 634
Sharing Printers 638
Configuring Print Server and Printer Permissions 640
Adding Printer Drivers 640
Configuring Printer Pooling 642
Configuring Printer Priorities 643
Managing Internet Printing 643
Generating Notifications 644
Deploying Printers with Group Policy 646
Migrating Printers 647
Managing Printers from a Command Prompt or Script 648
Monitoring Printers 650 Lesson Summary 653 Lesson Review 654 Chapter Review . . . 655 Chapter Summary 655 Key Terms 655 Case Scenario 655 Suggested Practices 656
What do you think of this book? We want to hear from you! Microsoft is interested in hearing your feedback so we can continually improve our books and learning resources for you. To participate in a brief online survey, please visit:
Answer 657
Glossary 693
Index 697
Introduction
T
his training kit is designed for information technology (IT) professionals who work in the complex computing environment of medium-sized to large companies and who also plan to take Exam 70-642. We assume that before you begin using this training kit, you have a basic understanding of Windows server operating systems and common Internet technologies.Note WINDOWS SERVER 2008 CERTIFICATION
Exam 70-642 is one of three required exams for MCSA: Windows Server 2008 certification. For a limited time, it is also valid for the MCTS certification, which will be retired. Please visit the Microsoft Learning website for the most current information about Microsoft certifications:
http://www.microsoft.com/learning/
The material covered in this training kit and on the 70-642 exam relates to fundamental net-working features such as addressing, name resolution, remote access, and printing. The topics in this training kit cover what you need to know for the exam as described in the Preparation Guide for the 70-642 exam, which is available at http://www.microsoft.com/learning/en/us /exam.aspx?ID=70-642.
By using this training kit, you will learn how to do the following: ■ Configure IP addressing, routing, and IPsec.
■ Configure name resolution by using Domain Name System (DNS). ■ Configure remote and wireless network access.
■ Configure Network Access Protection (NAP). ■ Configure file and print services.
■ Monitor and manage a network infrastructure.
Refer to the objective mapping page in the front of this book to see where in the book each exam objective is covered.
System Requirements
The following are the minimum system requirements your computer needs to meet to complete the practice exercises in this book and to run the companion CD.
Hardware Requirements
We recommend that you use a single physical computer and virtualization software to perform the exercises in this training kit. The physical computer should meet the following requirements:
■ If you are using Hyper-V for virtualization software, the processor must support
hardware-assisted virtualization, No eXecute (NX) bit technology, and data execution prevention (DEP).
■ 2 GB RAM (8 GB is recommended).
■ 100 GB of hard disk space (25 GB for each of three virtual machines plus 25 GB for the
base system).
Software Requirements
The following software is required to complete the practice exercises:
■ Windows Server 2008 R2. You can download an evaluation edition of Windows Server
2008 R2 at the Microsoft Download Center at http://www.microsoft.com/downloads.
■ A web browser such as Windows Internet Explorer 7, Internet Explorer 8, or Internet Explorer 9. ■ An application that can display PDF files, such as Adobe Acrobat Reader, which can be
downloaded from http://www.adobe.com/reader.
Lab Setup Instructions
Most of the exercises in this training kit require two computers or virtual machines running Windows Server 2008 R2. (The exercises in Chapter 6, “Protecting Network Traffic with IPsec,” several Lesson 4 exercises in Chapter 7, “Connecting to Networks,” and Lesson 2 of Chapter 8, “Configuring Windows Firewall and Network Access Protection,” require a third such comput-er or virtual machine.) All lab computcomput-ers must be physically connected to the same network for most lessons. However, some lessons will describe different network configurations. We recommend that you use an isolated network that is not part of your production network to perform the practice exercises in this book.
To minimize the time and expense of configuring physical computers and networks, we recom-mend that you use virtual machines for the lab computers. To run computers as virtual machines within Windows, you can use Hyper-V or third-party virtual machine software such as the free Vir-tualBox. Both of these options allow you to run 64-bit guest operating systems in a virtual environ-ment, and this feature is required to support Windows Server 2008 R2, which is 64-bit only. (Note that neither Virtual PC nor Virtual Server support 64-bit guests.) For more information about Hyper-V, visit http://www.microsoft.com/hyperv. To download VirtualBox, visit http://www.virtualbox.org.
Using a virtual environment is the simplest way to prepare the computers for this training kit. To isolate the lab computers within a single network, configure the settings in each virtual machine so that the network adapter is assigned to a private or an internal network. (Note that virtual network adapters are not assigned to such private or internal networks by default in either Hyper-V or VirtualBox.) In addition, some exercises need Internet access, which will require you to connect the network adapter to an external network. You can perform these exercises by temporarily connecting the network adapter to an external network, or you can perform them on
Preparing the Windows Server 2008 R2 Computers
Perform the following steps to prepare the first Windows Server 2008 computer for the exercises in this training kit.
On the three lab computers, perform a default installation of Windows Server 2008 R2. Do not add any roles or adjust the networking settings. In Control Panel, use System to specify the computer name of the first computer as dcsrv1, the second computer as boston, and the third computer as binghamton.
If you are using virtual machines, you should save a snapshot of the virtual machine after setup is complete so that you can quickly return the computer to that state.
Note take snapshOts after each exercise
Virtual machine software allows you to take a snapshot of a virtual machine, which is the complete state of a virtual machine at any point in time. After each exercise, you should take a snapshot of any computers on which changes have been made. After Dcsrv1 is promoted to a domain controller, be sure to always take a snapshot of this virtual machine even when exercises are performed on another computer. (Changes made to member servers often modify settings on the domain controller.)
using the cd
The companion CD included with this training kit contains the following:
■ practice tests You can reinforce your understanding of how to configure Windows Server 2008 R2 network infrastructure by using electronic practice tests you customize to meet your needs from the pool of Lesson Review questions in this book. Or you can practice for the 70-642 certification exam by using tests created from a pool of about 200 realistic exam questions, which give you many practice exams to ensure that you are prepared.
■ webcast To supplement your learning, the CD includes a webcast about IPsec. ■ ebook An electronic version (eBook) of this book is included for when you do not
want to carry the printed book with you. The eBook is in Portable Document Format (PDF), and you can view it by using Adobe Acrobat or Adobe Reader.
Companion Content for Digital Book Readers: If you bought a digital edition of this book, you can enjoy select content from the print edition’s companion CD.
Visit http://go.microsoft.com/FWLink/?Linkid=215050 to get your downloadable content. This content is always up-to-date and available to all readers.
How to Install the Practice Tests
To install the practice test software from the companion CD to your hard disk, do the following:
1. Insert the companion CD into your CD drive, and accept the license agreement. A CD menu appears.
Note if the cd menu dOes nOt appear
If the CD menu or the license agreement does not appear, AutoRun might be disabled on your computer. Refer to the Readme.txt file on the CD-ROM for alternate installation instructions.
2. Click Practice Tests, and follow the instructions on the screen.
How to Use the Practice Tests
To start the practice test software, follow these steps:
1. Click Start\All Programs\Microsoft Press Training Kit Exam Prep. A window appears that shows all the Microsoft Press training kit exam prep suites installed on your computer. 2. Double-click the lesson review or practice test you want to use.
Note LessOn reviews vs. practice tests
Select the (70-642) Configuring Windows Server 2008 Network Infrastructure (2nd Edition) lesson review to use the questions from the “Lesson Review” sections of this book. Select the (70-642) Configuring Windows Server 2008 Network Infrastructure (2nd Edition) practice test to use a pool of about 200 questions similar to those that appear on the 70-642 certification exam.
Lesson Review Options
When you start a lesson review, the Custom Mode dialog box appears so that you can con-figure your test. You can click OK to accept the defaults, or you can customize the number of questions you want, how the practice test software works, which exam objectives you want the questions to relate to, and whether you want your lesson review to be timed. If you are retaking a test, you can select whether you want to see all the questions again or only the questions you missed or did not answer.
After you click OK, your lesson review starts. The following list explains the main options you have for taking the test:
■ To take the test, answer the questions and use the Next, Previous, and Go To buttons to move from question to question.
■ After you answer an individual question, if you want to see which answers are correct— along with an explanation of each correct answer—click Explanation.
■ If you prefer to wait until the end of the test to see how you did, answer all the questions and then click Score Test. You will see a summary of the exam objectives you chose and the percentage of questions you got right overall and per objective. You can print a copy of your test, review your answers, or retake the test.
Practice Test Options
When you start a practice test, you choose whether to take the test in Certification Mode, Study Mode, or Custom Mode:
■ certification mode Closely resembles the experience of taking a certification exam. The test has a set number of questions. It is timed, and you cannot pause and restart the timer. ■ study mode Creates an untimed test in which you can review the correct answers
and the explanations after you answer each question.
■ custom mode Gives you full control over the test options so that you can customize them as you like.
In all modes, the user interface you see when you are taking the test is basically the same but with different options enabled or disabled depending on the mode. The main options are discussed in the previous section, “Lesson Review Options.”
When you review your answer to an individual practice test question, a “References” section is provided that lists where in the training kit you can find the information that relates to that question and provides links to other sources of information. After you click Test Results to score your entire practice test, you can click the Learning Plan tab to see a list of references for every objective.
How to Uninstall the Practice Tests
To uninstall the practice test software for a training kit, use Add Or Remove Programs option (Windows XP) or the Program And Features option (Windows 7 and Windows Server 2008 R2) in Windows Control Panel.
acknowledgments
This book was put together by a team of respected professionals, and we, the authors, would like to thank them each for the great job they did.
At Microsoft, Jeff Koch worked out our contracts as the acquisitions editor, Karen Szall was our developmental editor, and Carol Dillingham was our project editor.
Kathy Krause of Online Training Solutions, Inc., managed the editorial and production teams. Victoria Thulman, our copy editor, was responsible for making sure the book was readable and consistent, and Jaime Odell provided additional proofreading.
Bob Dean provided a technical review to help make the book as accurate as possible. Jan Bednarczuk created the index that you’ll find at the back of the book.
Many people helped with this book, even though they weren’t formally part of the team. Tony Northrup would like to thank his friends, especially Brian and Melissa Rheaume, Jose and Kristin Gonzales, Chelsea and Madelyn Knowles, Eddie and Christine Mercado, Papa Jose, and Nana Lucy.
J.C. Mackin would like to thank his friends and family for always being so supportive. It makes a huge difference when you consider the people you work with to be friends. Having a great team not only improves the quality of the book, it makes it a more pleasant experience. Writing this book was most enjoyable, and we hope we get the chance to work with everyone in the future.
support & feedback
The following sections provide information on errata, book support, feedback, and contact information.
Preparing for the Exam
M
icrosoft certification exams are a great way to build your resume and let the world know about your level of expertise. Certification exams validate your on-the-job experience and product knowledge. Although there is no substitute for on-the-job experience, preparation through study and hands-on practice can help you prepare for the exam. We recommend that you augment your exam preparation plan by using a combination of available study materials and courses. For example, you might use the Training Kit and another study guide for your “at home” preparation, and take a Microsoft Official Curriculum course for the class-room experience. Choose the combination that you think works best for you.c h a p t e r 3
Configuring a DNS Zone
Infrastructure
D
eploying a DNS server is a fairly simple procedure, especially on a domain controller. But to manage and troubleshoot DNS, you need to understand zones in more detail. Zones are the databases in which DNS data is stored. A DNS zone infrastructure essentially consists of the various servers and hosted zones that communicate with one another in a way that ensures consistent name resolution. This chapter introduces you to the types of zones that make up a DNS infrastructure, the options for zone replications and transfers among them, and the configurable settings within zones that you need to understand in order to manage DNS effectively on your network.Exam objectives in this chapter:
■ Configure DNS zones. ■ Configure DNS records. ■ Configure DNS replication.
Lessons in this chapter:
■ Lesson 1: Creating and Configuring Zones 176
■ Lesson 2: Configuring Zone Replication, Transfers, and Delegations 204 ■ Lesson 3: Implementing DNSSEC 223
before You begin
To complete the lessons in this chapter, you must have the following: ■ Two networked computers running Windows Server 2008 R2.
■ The first computer must be a domain controller named Dcsrv1 in a domain named nwtraders.msft. Dcsrv1 must be assigned the static address 192.168.0.1/24 with the DNS server specified as the same address. Dcsrv1 includes the server roles Active Directory Domain Services and DNS Server.
■ The second computer must be named Boston.nwtraders.msft and must be assigned the address 192.168.0.2/24. Its DNS server must be specified as 192.168.0.1. Finally, Boston
Real WoRld
J.C. MackinD
NS Manager is the main administration tool for DNS servers, but if you need to manage DNS for your job, it’s a good idea to become familiar with some other DNS tools as well. Of all the alternate tools available, the Dnscmd command-line tool is the most important and the most powerful. By typing dnscmd at a command prompt, you can see all 40 or so of its subcommands. Some of the most important of these include dnscmd /clearcache, which clears the server cache;dnscmd /enumdirectorypartitions, which shows the application directory partitions available on the local server; and dnscmd /info (which provides a basic overview of the DNS server configuration).
If your network includes Active Directory–integrated zones, you should also review tools for managing Active Directory replication. If you want to test replication on a domain controller, type dcdiag /test:replications. If you want to show replication partners, type repadmin /showrepl. Finally, if you want to force replication with another domain controller, use the Active Directory Sites and Services console to browse to the NTDS settings beneath your server, right-click the connection object in the details pane, and click Replicate Now.
Lesson 1: creating and configuring Zones
A zone is a database that contains authoritative information about a portion of the DNS namespace. When you install a DNS server with a domain controller, the DNS zone used to support the Active Directory domain is created automatically. However, if you install a DNS server at any other time, either on a domain controller, domain member server, or stand-alone server, you have to create and configure zones manually.
This lesson describes the steps required to create and configure a zone, as well as the under-lying concepts you need to understand to configure a zone properly.
After this lesson, you will be able to: ■ Create and configure DNS zones. ■ Create and configure resource records. Estimated lesson time: 120 minutes
Creating Zones
A DNS zone is a database containing records that associate names with addresses for a defined portion of a DNS namespace. Although a DNS server can use cached information from other servers to answer queries for names, it is only through a locally hosted zone that a DNS server can answer queries authoritatively. For any portion of a DNS namespace repre-sented by a domain name such as “proseware.com,” there can be only one authoritative source of zone data.
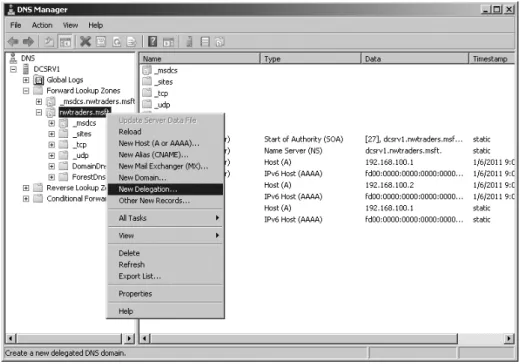
To create a new zone on a DNS server, you can use the New Zone Wizard in DNS Manager. To launch this wizard, right-click the server icon in the DNS Manager console tree, and then choose New Zone, as shown in Figure 3-1.
The New Zone Wizard includes the following configuration pages: ■ Zone Type
■ Active Directory Zone Replication Scope ■ Forward or Reverse Lookup Zone ■ Zone Name
■ Dynamic Update
The sections that follow describe the configuration concepts related to these five wizard pages.
Choosing a Zone Type
The Zone Type page of the New Zone Wizard, shown in Figure 3-2, enables you to create your choice of a primary zone, a secondary zone, or a stub zone. If you are creating a primary or stub zone on a domain controller, you also have the option to store zone data in Active Directory.
figure 3-2 Choosing a zone type PRIMARY ZONES
A primary zone is the main type of DNS zone. A primary zone provides original read-write source data that allows the local DNS server to answer DNS queries authoritatively about a portion of a DNS namespace.
When the local DNS server hosts a primary zone, the DNS server is the primary source for information about this zone, and the server stores the master copy of zone data in a local file or in Active Directory Domain Services (AD DS). When the zone is stored in a file instead of Active Directory, by default the primary zone file is named zone_name.dns, and this file is located in the %systemroot%\System32\Dns folder on the server.
SECONDARY ZONES
A secondary zone provides an authoritative, read-only copy of a primary zone or another secondary zone. Secondary zones provide a means to offload DNS query traffic in areas of the network where a zone is heavily queried and used. Additionally, if the zone server hosting a primary zone is unavailable, a secondary zone can provide name resolution for the namespace until the primary server becomes available again.
The source zones from which secondary zones acquire their information are called masters, and the data copy procedures through which this information is regularly updated are called zone transfers. A master can be a primary zone or other secondary zone. You can specify the master of a secondary zone when the secondary zone is created through the New Zone Wizard. Because a secondary zone is merely a copy of a primary zone that is hosted on another server, it cannot be stored in AD DS.
STUB ZONES
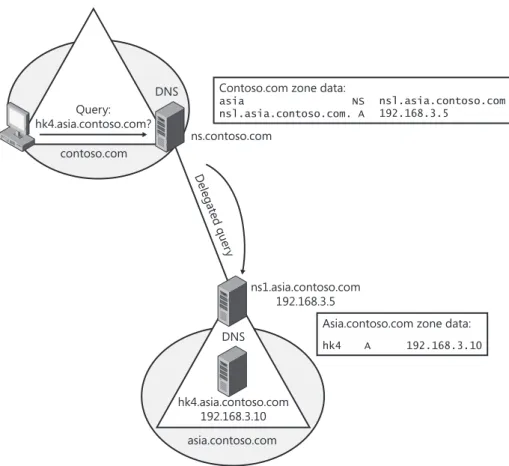
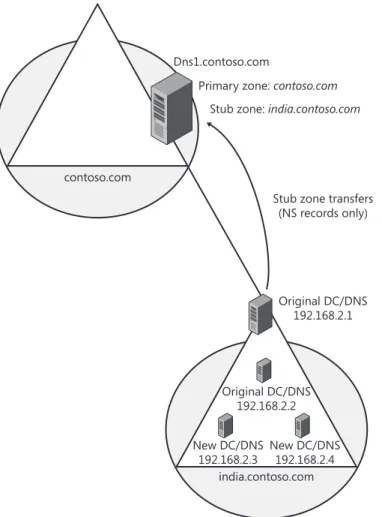
A stub zone is similar to a secondary zone, but it contains only those resource records neces-sary to identify the authoritative DNS servers for the master zone. Stub zones are often used to enable a parent zone like proseware.com to keep an updated list of the name servers available in a delegated child zone, such as east.proseware.com. They can also be used to improve name resolution and simplify DNS administration.
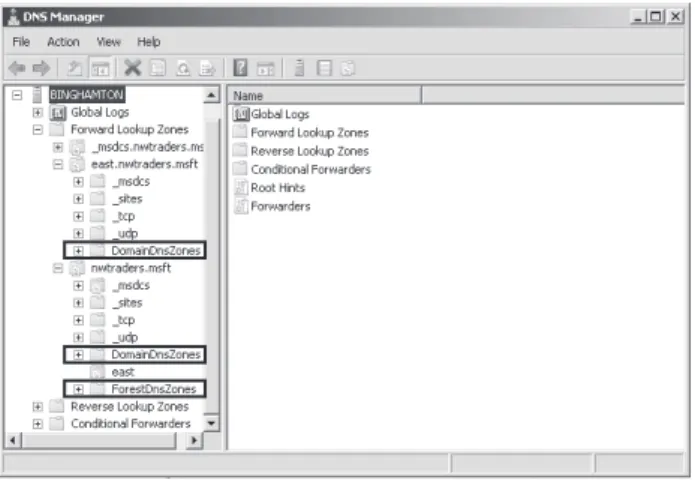
STORING THE ZONE IN ACTIVE DIRECTORY
When you create a new primary or stub zone on a domain controller, the Zone Type page gives you the option to store the zone in Active Directory. In Active Directory–integrated zones, zone data is automatically replicated through Active Directory in a manner determined by the settings you choose on the Active Directory Zone Replication Scope page. In most cases, this option eliminates the need to configure zone transfers to secondary servers.
Integrating your DNS zone with Active Directory has several advantages. First, because Active Directory performs zone replication, you do not need to configure a separate mecha-nism for DNS zone transfers between primary and secondary servers. Fault tolerance, along with improved performance from the availability of multiple read/write primary servers, is automatically supplied by the presence of multimaster replication on your network. Second, Active Directory allows for single properties of resource records to be updated and replicated among DNS servers. Avoiding the transfer of many and complete resource records decreases the load on network resources during zone transfers. Finally, Active Directory–integrated zones also provide the optional benefit of requiring security for dynamic updates, an option you can configure on the Dynamic Update page.
Note read-OnLY dOmain cOntrOLLers and active directOrY–integrated ZOnes For traditional domain controllers, the copy of the zone is a read-write copy. For read-only domain controllers (RODCs), the copy of the zone will be read-only.
STANDARD ZONES
By default, on the Zone Type page, the option to store the zone in Active Directory is selected when you are creating the zone on a domain controller. However, you can clear this check box and instead create what is called a standard zone. A standard zone is also the only option for a new zone when you are creating the zone on a server that is not a domain controller; in this case the check box on this page cannot be selected.
As opposed to an Active Directory–integrated zone, a standard zone stores its data in a text file on the local DNS server. Also unlike Active Directory–integrated zones, with standard zones, you can configure only a single read-write (primary) copy of zone data. All other copies of the zone (secondary zones) are read-only.
The standard zone model implies a single point of failure for the writable version of the zone. If the primary zone is unavailable to the network, no changes to the zone can be made. However, queries for names in the zone can continue uninterrupted as long as secondary zones are available.
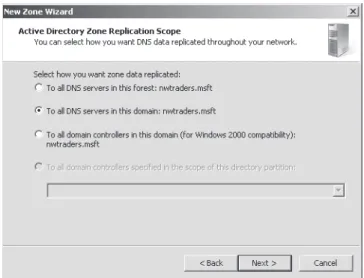
Choosing an Active Directory Zone Replication Scope
On the Active Directory Zone Replication Scope page of the New Scope Wizard, you can choose which domain controllers in your network will store the zone. This page, shown in Figure 3-3, appears only when you have configured the zone to be stored in Active Directory. Note that the choice of where you store the zone determines the domain controllers among which the zone data will be replicated.
You have four choices:
■ Store the zone in all domain controllers that are also DNS servers in the entire Active Directory forest.
■ Store the zone in all domain controllers that are also DNS servers in the local Active Directory domain.
■ Store the zone in all domain controllers in the local Active Directory domain (used for compatibility with Windows 2000).
■ Store the zone in all domain controllers specified in the scope of a custom Active Directory directory partition.
These options are described in more detail in Lesson 2, “Configuring Zone Replication, Transfers, and Delegations.”
Creating a Forward or Reverse Lookup Zone
On the Forward Or Reverse Lookup Zone page of the New Zone Wizard, you determine whether the new zone you are creating should act as a forward or reverse lookup zone. This page is shown in Figure 3-4.
figure 3-4 Choosing a forward or reverse lookup zone
In forward lookup zones, DNS servers map fully qualified domain names (FQDNs) to IP addresses. In reverse lookup zones, DNS servers map IP addresses to FQDNs. Forward lookup zones thus answer queries to resolve FQDNs to IP addresses, and reverse lookup zones answer queries to resolve IP addresses to FQDNs. Note that forward lookup zones adopt the name of the DNS domain name for whose names you want to provide resolution service, such as “proseware.com.” Reverse lookup zones are named by a reverse order of the
network ID octets in the address space for which you want to provide reverse name resolu-tion service plus the final tag “in-addr.arpa.” For example, if you want to provide reverse name resolution service for the subnet 192.168.1.0/24, the name of the reverse lookup zone will be “1.168.192.in-addr.arpa.” Within a forward lookup zone, a single database entry or record that maps a host name to an IPv4 address is known as a host or an A record. (For an IPv6 address, the host record is also known as AAAA, or a “quad A” record.) In a reverse lookup zone, a single database entry that maps an address host ID to a host name is known as pointer or PTR record.
A forward lookup zone is illustrated in Figure 3-5, and a reverse lookup zone is illustrated in Figure 3-6.
DNS server Reverse lookup zone: 1.168.192.in-addr.arpa Forward lookup zone:
proseware.com What is the address of
the host whose name is client1.proseware.com?
Query
Zone data:
client1 A 192.168.1.99
FiguRE 3-5 A forward lookup zone
DNS server Reverse lookup zone: 1.168.192.in-addr.arpa Forward lookup zone:
proseware.com What is the name of
the host whose address is 192.168.1.99?
Query
Zone data:
Note the cOnfigure a dns server wiZard
To create forward and reverse lookup zones at one time, you can use the Configure A DNS Server Wizard. To open this wizard, right-click the server icon in the DNS Manager console tree, and then choose Configure A DNS Server.
Choosing a Zone Name
The Zone Name page of the New Zone Wizard enables you to choose a name for the forward lookup zone you are creating. (Reverse lookup zones have specific names corresponding to the IP address range for which they are authoritative.) The Zone Name page is shown in Figure 3-7.
figure 3-7 Choosing a zone name
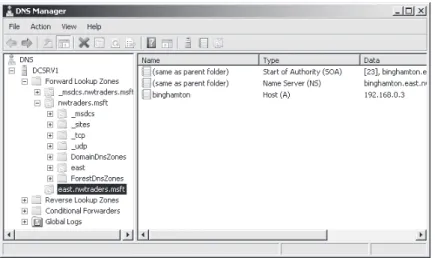
In general, if the zone you are creating is going to be providing name resolution for an Active Directory domain, you want the zone to match the name of that Active Directory domain. For example, if your organization includes two Active Directory domains named proseware.com and east.proseware.com, your name resolution infrastructure should include two zones with names that match those Active Directory domains.
If you are creating a zone for a DNS namespace outside of an Active Directory environ-ment, you should supply the name of your organization’s Internet domain name, such as fabrikam.com.
Note adding a dns server tO a dOmain cOntrOLLer
If you want to add a DNS server to an existing domain controller, you normally want to add a copy of the primary zone providing name resolution for the local Active Directory domain. To achieve this, create a zone whose name corresponds to the name of the existing zone in the local Active Directory domain, and the new zone will be populated with data from other DNS servers in the domain.
Configuring Dynamic Update Settings
DNS client computers can register and dynamically update their resource records with a DNS server. By default, DNS clients that are configured with static IP addresses attempt to update host (A or AAAA) and pointer (PTR) records, and DNS clients that are DHCP clients attempt to update only host records. In a workgroup environment, the DHCP server updates the pointer record on behalf of the DHCP client whenever the IP configuration is renewed.
For dynamic DNS updates to succeed, the zone in which the client attempts to register or update a record must be configured to accept dynamic updates. Two types of dynamic updates are allowed:
■ secure updates Allow registrations only from Active Directory domain member computers and updates only from the same computer that originally performed the registration
■ nonsecure updates Allow updates from any computer
The Dynamic Update page of the New Zone Wizard enables you to specify whether the zone you are creating should accept secure, nonsecure, or no dynamic updates. The Dynamic Update page is shown in Figure 3-8.
figure 3-8 Configuring dynamic updates on a zone DYNAMIC UPDATES AND DNS RECORD SECURITY
If you look at the security properties of a resource record, you can see that various users and groups are assigned permissions to the record, just as with any resource in Windows. These security permissions are used for secure dynamic updates. When only secure dynamic updates are allowed in a zone, the user listed as the owner of the resource record (in the advanced security settings) is the only user that can update that record.
The owner of a resource in Windows by default is the user who created that resource. For this reason, when a computer first registers in DNS by creating an A record, that computer becomes the owner of the record.
Note user accOunts fOr cOmputers in ad ds
Every computer in AD DS gets a user account corresponding to its computer name plus the “$” symbol, such as Client1$ or Server1$.
exam tip
To manually force a DNS client to perform a dynamic update, use the Ipconfig/registerdns command.
Quick check
■ What are the server requirements for storing a zone in Active Directory?
Quick check answer
■ The DNS server needs to be a domain controller.
Examining Built-in Resource Records
When you create a new zone, two types of records required for the zone are automatically created. First, a new zone always includes a Start of Authority (SOA) record that defines basic properties for the zone. All new zones also include at least one NS record signifying the name of the server or servers authoritative for the zone. Figure 3-9 shows a new zone populated by these two records.
The following section describes the functions and features of these two resource records.
Start of Authority (SOA) Records
When a DNS server loads a zone, it uses the SOA resource record to determine basic and authoritative properties for the zone. These settings also determine how often zone transfers are performed between primary and secondary servers.
If you double-click the SOA record, you open the Start Of Authority (SOA) tab of the zone properties dialog box, shown in Figure 3-10.
figure 3-10 SOA record settings
On this tab, you can modify the following settings:
■ serial number The Serial Number text box on the Start Of Authority (SOA) tab con-tains the revision number of the zone file. This number increases each time a resource record changes in the zone or when you manually increment the value in this tab by clicking Increment.
When zones are configured to perform zone transfers to one or more secondary servers, the secondary servers query the master server intermittently for the serial number of the zone. This query is called the SOA query. If, through the SOA query, the serial number of the master zone is determined to be equivalent to the serial number stored on the secondary, no transfer is made. However, if the serial number for the zone at the master server is greater than that at the requesting secondary server, the secondary server initiates a transfer.
Note fOrcing a ZOne transfer On the master When you click the Increment button, you force a zone transfer.
■ primary server The Primary Server text box on the Start Of Authority (SOA) tab contains the full computer name for the primary DNS server of the zone. This name must end with a period.
■ responsible person When this text box is configured, it contains the name of a respon-sible person (RP) resource record that specifies a domain mailbox name for a zone administrator. The name of the record entered into this field should always end with a period. The name “hostmaster” is used in this field by default.
■ refresh interval The value you configure in the Refresh Interval text box determines how long a secondary DNS server waits before querying the master server for a zone renewal. When the refresh interval expires, the secondary DNS server requests a copy of the current SOA resource record for the zone from its master server source, which then answers this SOA query. The secondary DNS server then compares the serial number of the source server’s current SOA resource record (as indicated in the master’s response) with the serial number of its own local SOA resource record. If they are different, the secondary DNS server requests a zone transfer from the primary DNS server. The default value for this setting is 15 minutes.
exam tip
Increasing the refresh interval decreases zone transfer traffic.
■ retry interval The value you configure in the Retry Interval text box determines how long a secondary server waits before retrying a failed zone transfer. Normally, this time is less than the refresh interval. The default value is 10 minutes.
■ expires after The value you configure in the Expires After text box determines the length of time that a secondary server, without any contact with its master server, con-tinues to answer queries from DNS clients. After this time elapses, the data is considered unreliable. The default value is one day.
■ minimum (default) ttL The value you configure in the Minimum (Default) TTL text box determines the default Time to Live (TTL) that is applied to all resource records in the zone. The default value is one hour.
TTL values are not relevant for resource records within their authoritative zones. Instead, the TTL refers to the cache life of a resource record in nonauthoritative servers. A DNS server that has cached a resource record from a previous query discards the record when that record’s TTL has expired.
■ ttL for this record The value you configure in this text box determines the TTL of the present SOA resource record. This value overrides the default value setting in the preceding field.
After you create it, an SOA resource record is represented textually in a standard zone file in the manner shown in this example:
@ IN SOA computer1.domain1.local. hostmaster.domain1.local. ( 5099 ; serial number 3600 ; refresh (1 hour) 600 ; retry (10 mins) 86400 ; expire (1 day) 60 ) ; minimum TTL (1 min)
Name Server Records
A name server (NS) record specifies a server that is authoritative for a given zone. When you create a zone in Windows Server 2008 or Windows Server 2008 R2, every server hosting a primary copy of an Active Directory–integrated zone will have its own NS record appear in the new zone by default. If you are creating a standard primary zone, an NS record for the local server appears in the zone by default. However, you need to manually add NS records for servers hosting secondary zones on a primary copy of the zone.
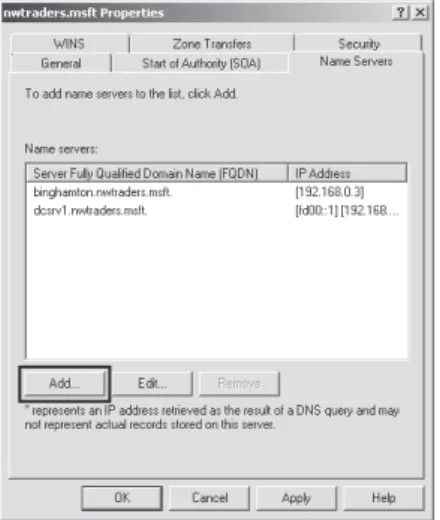
Creating an NS record requires a procedure that is different from the one used for creating other resource record types. To add an NS record, double-click any existing NS record in DNS Manager. This step opens the Name Servers tab of the zone properties dialog box, shown in Figure 3-11. On the Name Servers tab, click the Add button to add the FQDN and IP address of the server hosting the secondary zone of the local primary zone. When you click OK after adding the new server, a new NS record pointing to that server appears in DNS Manager.
figure 3-11 Adding an NS record to specify a server hosting a secondary zone
Note enabLing transfers tO secOndarY ZOnes
A secondary zone will not be recognized as a valid name server until it contains a valid copy of zone data. For the secondary zone to obtain this data, you must first enable zone transfers to that server by using the Zone Transfers tab in the Zone Properties dialog box. This tab is discussed in more detail in Lesson 2.
After you create the record, a line such as the following appears in the standard zone file: @ NS dns1.lucernepublishing.com.
In this record, the “@” symbol represents the zone defined by the SOA record in the same zone file. The complete entry, then, effectively maps the lucernepublishing.com domain to a DNS server named dns1.lucernepublishing.com.
Creating Resource Records
Beyond the SOA and NS records, some other resource records are also created automatically. For example, if you choose to install a new DNS server when promoting a server to a domain controller, many SRV records for AD DS services are automatically created in the locally hosted zone. In addition, through dynamic updates, many DNS clients automatically register host (A or AAAA) and pointer (PTR) records in a zone by default.
Even though many resource records are created automatically, in a production environment, you usually need to create some resource records manually as well. Such records might include mail exchanger (MX) records for mail servers, alias (CNAME) records for web servers or applica-tion servers, and host records for servers or clients that cannot perform their own updates.
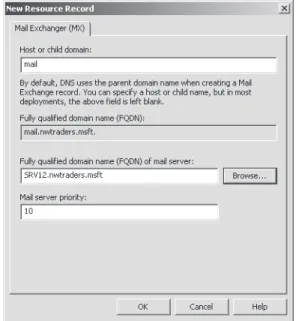
To add a resource record for a zone manually, right-click the zone icon in the DNS Manager console, and then choose the type of resource record you want to create from the shortcut menu. Figure 3-12 demonstrates the creation of a new MX record.
After you make your selection from the shortcut menu, a new dialog box appears in which you can specify the name of the record and the computer associated with it. Figure 3-13 shows the New Resource Record dialog box that appears for the creation of a new MX record. Note that only host records associate the name of a computer with the actual IP address of the com-puter. Most record types associate the name of a service or alias with the original host record. As a result, the MX record shown in Figure 3-13 relies on the presence in the zone of a host record named SRV12.nwtraders.msft.
figure 3-13 Defining a new MX record
Record Types
The most common resource records you need to create manually include the following: ■ Host (A or AAAA)
■ Alias (CNAME) ■ Mail exchanger (MX) ■ Pointer (PTR)
■ Service location (SRV) HOST RESOURCE RECORDS
For most networks, host (A or AAAA) resource records make up the majority of resource records in a zone database. These records are used in a zone to associate computer names (host names) to IP addresses.
After you create them in the DNS Manager console, an A resource record that maps the host name server1.lucernepublishing.com to the IPv4 address 192.168.0.99 and an AAAA resource record that maps the same name to the IPv6 address fd00:0:0:5::8 would be represented textually within the standard zone file lucernepublishing.com.dns in the following way: ; ; Zone records ; server1 A 192.168.0.99 AAAA fd00:0:0:5::8
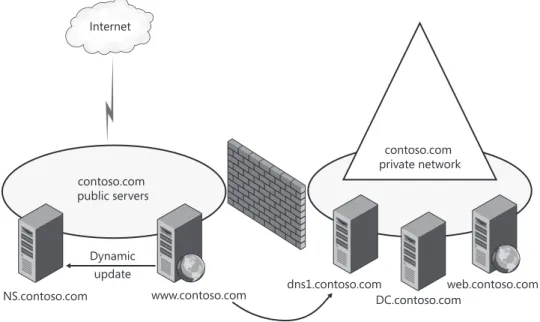
Even when dynamic updates are enabled for a particular zone, in some scenarios it might be necessary to add host records manually to that zone. For example, in Figure 3-14, a company named Contoso, Ltd., uses the domain name contoso.com for both its public namespace and its internal Active Directory domain. In this case, the public web server named www.contoso.com is located outside the Active Directory domain and performs updates only on the public DNS server authoritative for contoso.com. Internal clients, however, point their DNS requests toward internal DNS servers. Because the A record for www.contoso.com is not updated dynamically on these internal DNS servers, the record must be added manually for internal clients to resolve the name and connect to the public web server.
Another case in which you might need to add host records manually is when you have a UNIX server on your network. For example, in Figure 3-15, a company named Fabrikam, Inc., uses a single Active Directory domain named fabrikam.com for its private network. The network also includes a UNIX server named App1.fabrikam.com that runs an application critical to the company’s daily operations. Because UNIX servers often do not perform dynamic updates (or especially secure dynamic updates) with Microsoft DNS servers, you might need to add a host record manually for App1 on the DNS server hosting the fabrikam.com zone. Otherwise, users will not be able to connect to the application server when they specify it by FQDN.
contoso.com public servers
Internet
NS.contoso.com www.contoso.com dns1.contoso.com Manual creation of a record needed
contoso.com private network DC.contoso.com web.contoso.com Dynamic update
dc.fabrikam.com Manual creation of a record needed fabrikam.com private network dns.fabrikam.com App1.fabrikam.com (UNIX)
figure 3-15 Adding a host record for a private UNIX server
exam tip
If you can ping a computer by IP address but not by name, the computer might be missing a host record in DNS. You can attempt to remedy this situation by executing the Ipconfig /registerdns command at that computer—but only if the client com-puter is running Windows 2000 or later.
ALIAS RESOURCE RECORDS
Alias (CNAME) resource records are sometimes called canonical names. These records allow you to use more than one name to point to a single host. For example, the well-known server names (ftp, www) are typically registered using CNAME resource records. These records map the host name specific to a given service (such as ftp.lucernepublishing.com) to the actual A resource record of the computer hosting the service (such as server-boston.lucernepublishing.com).
CNAME resource records are also recommended for use in the following scenarios: ■ When a host specified in an A resource record in the same zone needs to be renamed ■ When a generic name for a well-known server such as www needs to resolve to a
group of individual computers (each with individual A resource records) that provide the same service (for example, a group of redundant web servers)
After you create it in the DNS Manager console, a CNAME resource record that maps the alias ftp.lucernepublishing.com to the host name ftp1.lucernepublishing.com would be represented textually within the lucernepublishing.com.dns standard zone file as follows: ftp CNAME ftp1.lucernepublishing.com.
Mail ExchangEr rEsourcE rEcords
The mail exchanger (MX) resource record is used by SMTP (mail) agents to locate other SMTP servers in a remote domain, typically for the purpose of routing mail to that domain. An MX record maps the domain name found in an email address (such as [email protected]) to a particular server hosting the mail server in that domain.
Multiple MX records are also often used to specify a preferred SMTP server and a backup SMTP server. Each MX record is assigned a Mail Server Priority value, with the lower values representing higher preference. The DNS server responds to the original query by returning all the MX records matching the domain name. Finally, the SMTP agent that has queried the DNS server looks at the MX records it has received and then contacts the server whose record is assigned the lowest Mail Server Priority value. If the server assigned the lowest value is unavailable, the server assigned the next lowest value is contacted.
When two or more MX records are assigned the lowest preference value, DNS round robin can be used to balance the workload evenly among the SMTP servers corresponding to those MX records. For example, if you create three MX records in DNS Manager for mailserver1, mailserver2, and mailserver3, and then assign these records preference values of 10, 10, and 20, respectively, the workload would be split evenly between mailserver1 and mailserver2. Mailserver3 would be used as a backup. These resource records would be represented textually within the lucernepublishing.com.dns zone file as follows:
@ MX 10 mailserver1.lucernepublishing.com. @ MX 10 mailserver2.lucernepublishing.com. @ MX 20 mailserver3.lucernepublishing.com.
Note WHAT doEs THE @ symbol mEAn?
in this example, the @ symbol represents the local domain name contained in an email address.
Real WoRld
J.c. MackinI
n theory as well as in Microsoft exams, the Mail server Priority value you set for Mx records takes precedence over round-robin distribution in dns. it doesn’t always work that way in reality, however.at first, everything works according to plan. an sMTP agent queries a dns server for an Mx record corresponding to a particular domain name, and the dns server responds with a list of all matching Mx records. The order of that list rotates from response to response if round robin is left enabled on the dns server. so far, so good, but what happens after that point is inconsistent. The sMTP agent is then supposed to scan through the response list and contact the server whose Mx record is weighted with the lowest preference value. in reality, this happens only sometimes. reports are common of sMTP agents ignoring the preference values in Mx records and con-tacting merely the first server in the dns response list.
The take-away? if you want to use preference values to set load balancing and specify a backup mail server, go ahead. Know, however, that this configuration is only approximate, and that your mail server workload will be distributed in a way that is hard to predict accurately.
PoinTEr rEsourcE rEcords
The pointer (PTR) resource record is used in reverse lookup zones only to support reverse look-ups, which perform queries to resolve IP addresses to host names or FQDNs. Reverse lookups are performed in zones rooted in the in-addr.arpa domain. PTR resource records can be added to zones manually or automatically.
After you create it in the DNS Manager console, a PTR resource record that maps the IP address 192.168.0.99 to the host name server1.lucernepublishing.com would be represented textually within a zone file as follows:
99 PTR server1.lucernepublishing.com. Note WHy is THE PTR RECoRd nAmEd 99?
in a reverse lookup zone, the host id portion of an iPv4 address is equivalent to a host name. The 99 therefore represents the name assigned to the host within the 0.168.192.in-addr.arpa zone. This zone corresponds to the 192.168.0.0 subnet.
sErvicE rEsourcE rEcords
Service location (SRV) resource records are used to specify the location of specific services in a domain. Client applications that are SRV-aware can use DNS to retrieve the SRV resource records for given application servers.
Active Directory Directory Service (AD DS) is an example of an SRV-aware application. The Netlogon service uses SRV records to locate domain controllers in a domain by search-ing the domain for the Lightweight Directory Access Protocol (LDAP) service. (LDAP is the protocol used to query AD DS.)
If a computer needs to locate a domain controller in the lucernepublishing.com domain, the DNS client sends an SRV query for the name:
_ldap._tcp.lucernepublishing.com.
The DNS server then responds to the client with all records matching the query.
Although SRV resource records for AD DS are created automatically, you might need to create SRV records manually for other services or if some records have been accidentally deleted. The following example shows the textual representation of two SRV records that have been configured manually in the DNS Manager console:
_ldap._tcp SRV 0 0 389 dc1.lucernepublishing.com. SRV 10 0 389 dc2.lucernepublishing.com.
In the example, an LDAP server (domain controller) with a priority of 0 (highest) is mapped to port 389 at the host dc1.lucernepublishing.com. A second domain controller with a lower priority of 10 is mapped to port 389 at the host dc2.lucernepublishing.com. Both entries have a 0 value in the weight field, which means that no load balancing has been configured among servers with equal priority.
Enabling dns to use Wins resolution
You can use the WINS tab in the properties of a zone to specify a WINS server that the DNS Server service can contact to look up names not found through DNS queries. When you specify a WINS server on the WINS tab in the properties of a forward lookup zone, a special WINS resource record pointing to that WINS server is added to the zone. When you specify a WINS server on the WINS tab in a reverse lookup zone, a special WINS-R resource record pointing to that WINS server is added to the zone.
For example, if a DNS client queries for the name ClientZ.contoso.com and the preferred DNS server cannot find the answer through any of its usual sources (local zone data, cache, queries to other servers), the server then queries the WINS server specified in the WINS re-cord for the name “CLIENTZ.” If the WINS server responds with an answer to the query, the DNS server returns this response to the original client.
exam tip
For the 70-642 exam, you need to understand the function of the Wins and Wins-r records in a dns zone.
Aging and Scavenging
Aging in DNS refers to the process of using time stamps to track the age of dynamically regis-tered resource records. Scavenging refers to the process of deleting outdated resource records on which time stamps have been placed. Scavenging can occur only when aging is enabled. Together, aging and scavenging provide a mechanism to remove stale resource records, which can accumulate in zone data over time. Both aging and scavenging are disabled by default.
Enabling Aging
To enable aging for a zone, you have to enable this feature either at the server level or at the zone level.
To enable aging at the server level, first open the Server Aging/Scavenging Properties dialog box by right-clicking the server icon in the DNS Manager console tree and then choosing Set Aging/Scavenging For All Zones, as shown in Figure 3-16. Next, in the Server Aging/Scavenging Properties dialog box that opens, select the Scavenge Stale Resource Records check box. Although this setting enables aging and scavenging for all new zones at the server level, it does not automatically enable aging or scavenging on existing Active Directory–integrated zones at the server level. To do that, click OK, and then, in the Server Aging/Scavenging Confirmation dialog box that appears, enable the option to apply these settings to existing Active Directory–integrated zones, as shown in Figure 3-17.
To enable aging and scavenging at the zone level, open the properties of the zone and then, in the General tab, click Aging, as shown in Figure 3-18. Then, in the Zone Aging/Scavenging Properties dialog box that opens, select the Scavenge Stale Resource Records check box, as shown in Figure 3-19.
figure 3-17 Enabling aging on Active Directory–integrated zones
figure 3-18 Accessing aging properties for a zone