QAS Pro Web Getting Started Guide
Browser Typedown
1.
Introduction
This guide is intended to walk a Developer or Project Manager through the process of integrating the Browser Typedown implementation of QAS Pro Web into their browser-based application. It does not seek to provide low-level information about the underlying APIs or Web Services used. Details of extra resources can be found in ‘Appendix A – Further Reading’
2.
What is Browser Typedown?
Browser Typedown utilizes the QAS Pro Web Typedown Engine to interactively guide users through validating address information. Potential errors are highlighted as the address is typed, reducing the time it takes to capture an address. It is intended for use in high volume environments such as call-centers. Implementation times are quick due to the simple nature of the integration.
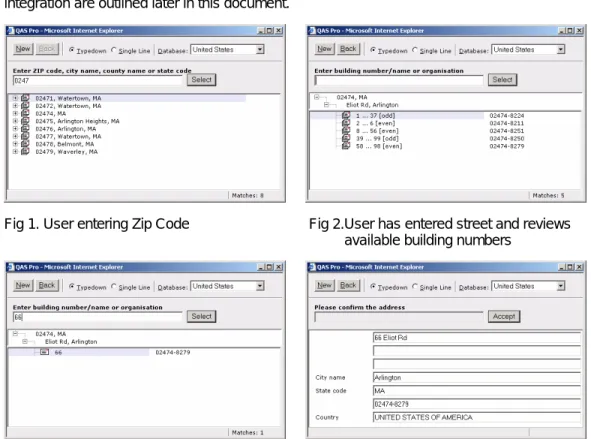
Below are four screenshots of a typical user experience with the implementation. When the user clicks the ‘Accept’ button, as shown in ‘Fig 4’, the Browser Typedown window populates into the address fields in the target application. Details of the architecture and actual integration are outlined later in this document.
Fig 1. User entering Zip Code Fig 2.User has entered street and reviews
available building numbers
3.
Implementation Overview and Expected Timescales
The following steps cover a typical implementation steps and expected timescales of QAS Pro Web.
1. Install QAS Pro Web (1 hour)
2. Integrate sample code into a single address touch point* (1 day)
3. Test and review with project stakeholders (1 day)
4. Replicate across remaining address touch points (0.5 days per touch point)
5. Deploy to production environment (2 hours)
*In order to make use of the technology a set of pages must be hosted on the same site as the target application. The estimate of one day assumes a skilled developer who understands the related technologies and modifying the target application.
4.
Implementation Architecture
• QAS Pro Web can be installed as a locally hosted Web Service on most major releases of Windows, UNIX and Linux.
• The application includes a built-in HTTP listener so can run standalone from a Web Server.
• Reference postal data is made available on CDs or via FTP download every two months by default. It takes up approximately 1GB of storage for USA and 80MB for Canada.
• Reference postal data is installed to the local file system alongside QAS Pro Web. No third-party database tools are required to host the data and ‘Live Data Updates’ allow the data updates to be applied without any website downtime.
• QAS Pro Web is also available in a ‘Software as a Service’ (SaaS) model through Experian, QAS’ On Demand
platform. NOTE: On Demand
implementations are currently limited to the PHP 5, C#.NET and JSP languages.
Postal Database 0 Browser Typedown pages QAS Pro Web Service/Daemon Browser based application or website Invoked via JavaScript SOAP/XML
5.
Installation Overview
The installation of QAS Pro Web should take up to one hour on average. Full step by step instructions are included in the file ‘webinst.pdf’ available in the ‘Docs’ directory on the QAS Pro Web installation image. Windows installation instructions start on page 30 of the PDF page count and for UNIX/Linux on page 45 of the PDF page count
In order to complete the installation you will need the following:
- QAS Pro Web installation image (available via FTP at ftp://ftp.usa.qas.com/Product)* - Postal data installation image(s) (available via FTP at ftp://ftp.usa.qas.com/Data)* - QAS Pro Web License Key(s) (available from your Customer Account Manager) - A machine with ample disk space (1.1GB for USA data, 100MB for Canada)
- A user account with at least local administrator privileges on the target installation machine
*NOTE: All zip files on the FTP site are protected with a weekly refreshed password available from you Customer Account Manager or Technical Solutions Consultant. Alternative CD images are also available.
Things to Remember
- Make a note of where you set the sample code to install to. This is required later on. - WINDOWS ONLY: When the installer has completed, it is necessary to activate the new
data using the ‘Administrator Console’ for Windows installations. This tool is available through ‘Start’, ‘Programs’, ‘QAS Pro Web 5.xx’, ‘Administrator Console’. The data Updating section can be found under the Current Data option in the left hand pane. Select the Data set to be activated and click ‘Update Data’. This will make the data available to QAS Pro Web.
6.
Coding Overview
This section outlines the coding changes necessary to implement the QAS Pro Web integration code into your site. Knowledge of your website’s language, HTML and JavaScript is assumed.
6.1 Make sure you have the correct sample code
The Browser Typedown sample code is optionally installed as part of the standard installation of QAS Pro Web. The code is also available on the QAS Pro Web product image. Each language has its own directory stored under the ‘Program’ directory. i.e. ’Samples.ASP’, ‘Samples.JSP’.
Browser Typedown sample code is available for PHP5, C#.NET, VB.NET, Classic ASP and JSP
NOTE: The Browser Typedown sample code must be installed under the same website as the pages invoking it. If not, address information will be prevented from being returned to the pages by JavaScript’s cross browser scripting security measures.
6.2 Configure the format of the returned address
The format of the returned address is controlled via a configuration file called ‘QAWSERVE.INI’. This file can be found within the installed image (default directory: ‘C:\Program Files\QAS\QAS Pro Web’).
The ‘QAWSERVE.INI’ configuration file is split into separate sections called layouts. The Windows based ‘Configuration Editor’, available at ‘Start’, ‘Programs’, QAS Pro Web’, ‘Configuration Editor’, should be used to modify these Layouts. A simple layout that covers the majority of formatting needs has been created for you called ‘Database layout’. The ‘Database layout’ format is as follows:
Field name Max width Capitalized
Address Line 1 60 characters Title Case Address Line 1 60 characters Title Case Address Line 1 60 characters Title Case City 60 characters Title Case State 60 characters Yes Zip, +4 Code 60 characters N/A Country 60 characters Yes
NOTE: All Address line information is automatically populated across the address line fields according the United States Postal Service or Canada Post standards. Street and Secondary number descriptors like Road or Apartment are abbreviated by default.
Once you have configured the desired format of the returned address the Layout name needs to be specified within the Browser Typedown code. This is achieved by setting a variable in the relevant Browser Typedown configuration file. To determine the correct file and variable name to edit please refer to the table below:
Language Browser Typedown configuration file name
Variable containing layout name
Classic ASP Constants.asp CONTROL_LAYOUT
JSP WEB-INF\Web.xml QasLayout
PHP 5 Constants.inc CONTROL_LAYOUT
VB.NET / C#.NET Web.config com.qas.proweb.layout
6.3 Configure the location of QAS Pro Web in the Browser Typedown pages
In order for address lookups to be successful it is necessary for the Browser Typedown pages to know where QAS Pro Web application is located on the network. If both the Browser Typedown pages and QAS Pro Web are installed on the same machine the default location of ‘http://localhost:2021/’ can be used.
If you wish to use QAS Pro Web with applications installed across multiple web servers use the table below to determine the correct file and variable name to update:
Language Browser Typedown configuration file name
Variable containing location of QAS Pro Web
Classic ASP Constants.asp CONTROL_WSDL_URN
JSP WEB-INF\Web.xml QasEndpoint
PHP 5 Constants.inc CONTROL_WSDL_URN
VB.NET / C#.NET Web.config com.qas.proweb.serverURL
NOTE: The Web Service must be accessible from the machine where the Browser Typedown pages are installed. To test this connectivity open a web browser on the machine where the Browser Typedown pages are installed and browse to the location of the Web Service: i.e. http://my_qas_server:2021/proweb.wsdl *
* where ‘my_qas_server’ is the server on which QAS Pro Web is installed.
If the port is open on that machine you should see a list of XML displayed. If you do not then you need to contact your network administrator to open up port 2021 to the machine(s) on which the browser Typedown pages are installed.
6.4 Test the functionality outside of your application
• Open a web browser and browse to ‘RapidIndex.htm’ within the directory where you installed the sample code during installation. e.g. for Classic ASP:
http://localhost/ProWebASP/RapidIndex.htm
NOTE: JSP is provided in the form of a war file which will need to be deployed as per the documentation of your Web Server.
Click the ‘Find Address’ Button to invoke the Browser Typedown pages. Enter in the ZIP ‘12345’. This should resolve to 12345, Schenectady, NY.
Click on the ‘Select’ button to display the full address as below and then ‘Accept’ button to display the full address in the original page.
This confirms the Browser Typedown functionality is working outside of your application.
6.5 Modify your target page
In order to implement the sample code into your application the following steps need to be carried out:
6.5.1 Determine how the functionality is triggered
In order to get the quickest user adoption and encourage usage there are two recommended ways to trigger the Browser Typedown functionality:
- A new button called ‘Capture Address’
- The event of tabbing into the first address field on your form but only when that field is empty*
*The check on whether the address is populated is to prevent the Browser Typedown pages invoking automatically when the user is simply tabbing through address information that is already populated.
6.5.2 Create a function that will load the Browser Typedown pages into a new browser window
A single function called ‘popupPro’ should be created that is then assigned to the new ‘Capture Address’ button or event. ‘popupPro’ will contain a single line of JavaScript that opens a new browser window containing the Browser Typedown pages and then calls a function to handle the returned address when the user has found an address. The JavaScript varies slightly across different languages and can be found in the installed ‘RapidIndex.htm’. The example from the C#.NET sample code is below:
// Pop-up the Pro window for rapid address searching
function popupPro()
{
var ProPopup = window.open(
"RapidSearch.aspx?DataID=&Callback=handleProClose",
"ProPopup",
"scrollbars=no,resizable=yes,width=590,height=560");
}
6.5.3 Create a function to be called when the Address is returned
When the address is returned from the Browser Typedown pages a function called ‘handleProClose’ must be created to handle the return address and populate the relevant fields in your page. An example of this function is listed below.
function handleProClose(asAddress)
{
var aFields = document.getElementsByName("Address");
for (i = 0; i < aFields.length; i++)
{
aFields[i].value = (i < asAddress.length) ? asAddress[i] : "";
}
aFields[0].focus();
}
NOTE: This assumes that you have an array of address lines with the name “Address” on your calling page. This would need to be modified according to the structure of your address fields in your application.
7.
Testing your implementation
This section outlines how you should approach testing the QAS Pro Web functionality within your application. It is important to confirm that you can replicate the expected behavior of QAS Pro Web and that the implementation had not negatively impacted any of your existing functionality.
7.1 Impact to existing processes when QAS Pro Web is unavailable
If QAS Pro Web is not maintained correctly the product may cease to work. In this unlikely event it is important that your users are not impacted by any QAS Pro Web downtime.
For Windows, installs stop the ‘QAS Pro Server 5.xx’ service; for UNIX/Linux installs ‘kill’ the ‘qaswvd’ daemon.
Are you able to still complete your standard business processes with QAS Pro Web integrated but not functioning? The Browser Typedown pages should invoke with an error but allow users to enter the address into the new form or close the window and enter the information directly into your application.
7.2 Invoking the Browser Typedown pages
The Browser Typedown pages should invoke automatically when tabbing into the first address line in your application but only when that field is empty. If the field is populated the Browser Typedown pages should not invoke.
7.3 Populating address fields
It is important that the configuration of the returned address matches your business requirements. Capture a selection of addresses and confirm that the addresses are populated into your application as expected. A table of sample addresses to locate is below:
Type of Address US Example Canada Example
Standard 62 Eliot Rd
Arlington MA 02474-8279
115 Tweed Cres LONDON ON N5X 1Z5 High Rise 1889 Broadway Apt 306
San Francisco CA 94109-2291
101-5625 13 Ave EDSON AB T7E 0A4
PO Box PO Box 121
San Francisco CA 94104-0121
PO Box 1 Stn A
TORONTO ON M5W 1A2 Organizational Experian QAS
125 Summer St Ste 1910 Boston MA 02110-1615
Canada Trust Bank 1511 Bayview Ave
EAST YORK ON M4G 4E2
NOTE: If you have multiple touchpoints throughout your application you should ensure these are tested thoroughly as well.
8.
Deployment and Maintenance Considerations
8.1 DeploymentOnce the sample code is integrated and full tested across all touchpoints of your application it will be ready to be moved into a product environment. In order the make this transition as smooth as possible it is important to follow these steps:
• Install QAS Pro Web and data onto your production machine and activate the data using the Administrator Console (details in section 5)
• Copy across your layout from your initial QAWSERVE.INI and add to the equivalent file on your newly installed production installation of QAS Pro Web. Restart the ‘QAS Pro Server 5.x’ service to refresh the configuration changes.
• Update the layout and location of the QAS Pro Web installation as per sections 6.2 and 6.3.
8.2 Maintenance
Once you are live in a production environment with QAS Pro Web it is highly recommended that you record the following information and email it to your Customer Account Manager.
• Server name where QAS Pro Web is installed
• Name of Layout used
• Copies of QAWSERVE.INI and QAWORLD.INI
This will help us when we need to provide support to you should you lose your QAS environment or unexpectedly change the staff responsible for the administration of QAS. Data updates need to be applied at least every two months by default. If these data updates are not applied and a whole update cycle is missed your installation will cease to work. When you initially purchased QAS Pro Web a contact at your organization was specified to receive the Data Updates and related information. It is important to let us know if that contact changes to allow for continuity of support. You can also sign up alternative contacts to receive the same data updates related correspondence as a back up or sign up our FTP updates program.
Details on the update schedule and installation process can be found here:
http://www.qas.com/updates
http://www.qas.com/us/support/quicksupport/data-updates.asp
9.
Conclusion
By following this guide you should have been able to implement QAS Pro Web using the Browser Typedown implementation method. We hope that you found this guide useful and welcome your feedback, positive or negative at ‘[email protected]’.
For further assistance with your integration project you can contact us or access resources in the following ways:
Support Email: [email protected] Support Phone: (888) 712 3332
Customer forum: www.qas.com/customers
Main company website: www.qas.com
Appendix A – Further Reading
The full documentation for the QAS Pro Web product is available within the ‘Docs’ directory on the QAS Pro Web installation image. The files are as follows:
• Web.pdf: Generic Integration guide
• Webinst.pdf: Installation and Administration Guide