Distributed
License
Management
Licensing Guide
Technical support is available from our Technical Support Hotline or via our FrontLine Support web site.
Technical Support Hotline: 1-800-538-7822 FrontLine Support Web Site: http://frontline.compuware.com
This document and the product referenced in it are subject to the following legends:
Access is limited to authorized users. Use of this product is subject to the terms and conditions of the user’s License Agreement with Compuware Corporation.
© 2004 Compuware Corporation. All rights reserved. Unpublished - rights reserved under the Copyright Laws of the United States.
U.S. GOVERNMENT RIGHTS
Use, duplication, or disclosure by the U.S. Government is subject to restrictions as set forth in Compuware Corporation license agreement and as provided in DFARS 227.7202-1(a) and 227.7202-3(a) (1995), DFARS 252.227-7013(c)(1)(ii)(OCT 1988), FAR 12.212(a) (1995), FAR 52.227-19, or FAR 52.227-14 (ALT III), as applicable. Compuware Corporation. This product contains confidential information and trade secrets of Com-puware Corporation. Use, disclosure, or reproduction is prohibited with-out the prior express written permission of Compuware Corporation. All Compuware products and services listed within are trademarks or registered trademarks of Compuware Corporation.
Acrobat® Reader copyright © 1987-2003 Adobe Systems Incorporated. All rights reserved. Adobe, Acrobat, and Acrobat Reader are trademarks of Adobe Systems Incorporated.
Java and all Java-based marks are the trademarks or registered trademarks of Sun Microsystems, Inc. in the United States and other countries. All other company or product names are trademarks of their respective owners.
Doc. CWDLIX4A October 18, 2006
Table of Contents
Preface
Summary of Changes . . . 7 Release 4.1 Changes . . . 7Chapter 1
Introduction
About This Guide . . . 9Who Should Read This Guide . . . 9
Conventions . . . 10
Terminology . . . 10
Online Help . . . 12
World Wide Web Information . . . 12
Getting Help . . . 12
Chapter 2
Overview of Licensing
Introducing Licensing . . . 15 License Components . . . 15 License Types . . . 16 Permanent . . . 17 Temporary . . . 17 Rolling Trial . . . 17 License Models . . . 17 Node-Locked . . . 17 Concurrent . . . 17 Borrow-Enabled . . . 18 User Manage . . . 18 Redundant . . . 19First-Come, First-Served (FCFS) . . . 19
License Environment . . . 20
Determine if You Need the Compuware License Service . . . 20
License Server is Required (Concurrent) . . . 21
License Server is Not Required (Node-Locked) . . . 22
Redundant License Servers . . . 22
How a redundant license is defined . . . 22
Components of a redundant object . . . 23
Request a License from Compuware . . . 24
Supported Platforms . . . 25
Impact to System Performance . . . 25
Getting Started . . . 25
License Installation Checklists . . . 26
Installing the Compuware License Service . . . 26
License Borrowing for Administrators . . . 27
Using the Distributed License Management Web Interface . . . 27
Chapter 3
License Installation and Configuration for Windows
Overview . . . 29Installing the Compuware License Service . . . 29
Installation for Windows 32 & 64-Bit Platforms . . . 29
Chapter 4
License Installation and Configuration for UNIX
Overview . . . 31Installing the Compuware License Service for UNIX . . . 31
Configuring the Compuware License Service . . . 32
Installation for UNIX Clients . . . 34
Redundant Servers . . . 37
UNIX Components . . . 37
Troubleshooting . . . 38
Comparing Compuware License Service Versions . . . 38
Chapter 5
Distributed License Management Application
Overview . . . 39Starting the DLM application . . . 39
Concurrent License . . . 40
Node-locked License . . . 40
Defining a Local License Environment . . . 40
Server Machine . . . 41
Setting Up Redundant Servers . . . 41
Auditing . . . 42
Description of Data in Audit file . . . 43
Chapter 6
License Borrowing
Overview . . . 45Chapter 7
Distributed License Management Web Interface
Overview of Distributed License Management Web Interface . . . 47Tested Environments . . . 48
Web Servers . . . 48
Browsers . . . 49
Supported Platforms . . . 49
Installing the DLM Web Interface . . . 49
Installing the DLM Web Interface . . . 49
Installation for UNIX . . . 50
Creating User Accounts . . . 50
Defining the Compuware License Service . . . 52
Configuring the DLM Web Interface . . . 53
Starting the DLM Web Interface . . . 54
Where to Go Next . . . 54
Appendix A
Host Name and Host ID
Overview . . . 55Determine Host Information of a Computer . . . 56
Appendix B
License Files
Overview . . . 57 Parameters . . . 58 App . . . 58 Vers . . . 59Start . . . 59
End . . . 59
Count . . . 59
Hostid and hostid . . . 60
Fcfs . . . 60 Borrowing . . . 61 Umanage . . . 61 Dup_usr . . . 61 Usr_session_limit . . . 61 Parameters . . . 62
Appendix C
Client-Server Configuration Files
Overview . . . 63Client Configuration File . . . 63
.compuware Directory . . . 63
Configuration File Format . . . 64
File Keys . . . 64 license . . . 64 connection_timeout . . . 64 nagle_algorithm . . . 65 server_loading . . . 65 port . . . 65 user_case, host_case . . . 66 pool . . . 66
Server Configuration File . . . 66
Parameters . . . 67 port . . . 67 max_threads . . . 67 connection_timeout . . . 68 audit . . . 68 new_log_on_start . . . 68 max_log_size . . . 68 license . . . 68 net_security . . . 69 user_management . . . 71 pools . . . 72 Borrow/Concurrent . . . 73 Borrow . . . 74 Concurrent . . . 74
Index
Preface
Summary of Changes
This section summarizes the enhancements to Distributed License Management (DLM) Release 4.1.
Release 4.1 Changes
This release offers the following enhancements:
An improved Distributed License Management application E-mail notification for license-related issues
Added support for Windows 2000 Server, Windows 2003 Server - Web Edition, and Windows XP 64-bit.
Chapter 1
Introduction
About This Guide
The Distributed License Management Licensing Guide provides information and procedures to:
Obtain a license.
Install concurrent (multi-user) or node-locked (single-user) licenses. Configure the license environment.
Troubleshoot license installation errors.
Who Should Read This Guide
The Distributed License Management Licensing Guide is intended for admin-istrators who are installing Compuware products. You can find reference and usage information in the online help of Distributed License Manage-ment’s (DLM) licensing components. See “License Components” on page 15 for more information on DLM’s licensing components.
Compuware assumes that you are familiar with basic Microsoft Windows and Web browser navigation. If this is not the case, familiarize yourself with the documentation for Microsoft Windows and Internet Explorer or Netscape Navigator before reading this guide.
Conventions
The following conventions are used to draw your attention to special information:
Caution: Situations to be avoided.
Required: Required tasks or situations.
Note: Important information.
Tip: Helpful hints or alter-native methods.
Terminology
Understanding the following terms will facilitate the user’s understand-ing of this guide:
Boldface Information that you type, choices you select from a dialog box or menu, and keys that you press. Boldface is also used to emphasize important information.
italic Placeholders for items you must supply. For instance, when the guide says x:\, x is the letter of the drive that exists on your computer.
Licensed client
A licensed client is any workstation authorized, through a license source, to run one or more Compuware products. License
source
A license source can be a license file or a reference to a licensed server.
Client A client is the licensing component of a program that has the capacity to authorize or deny a program’s startup. The authorization process is dependent on license sources. Licensed
product
A licensed product is one or more purchased Compuware programs, licensed by a license source.
License key
A license key is an XML object, a sub-component of a license object, which contains application-client specific information and system specific information that defines the extent to which one or more associated applications can run.
Key See license key. License
object
A license object contains one or more license keys.
License file
A license file is an XML based file that contains a single license object.
License See license key. License
service
A license service is a service that runs as a background process on a licensed server. It provides a searchable database of license keys to facilitate the process of networked licensing.
Node A node is a single workstation. Networks consist of one or more nodes.
License server
A license server is a single networked node that hosts the Compuware License Service.
Served key
A served key is any licensed key that is loaded into the Compuware License Service database for networked licensing.
Concur-rent key
See Counted key.
Counted key
A counted key is any served key that contains an attribute that specifies a physical limit on the number of licensed clients authorized to run a licensed product concurrently. The limit is enforced by a combination of the Compu-ware License Service and its clients.
Uncount ed key
An uncounted key is any key associated with a product whereby usage of the product is not dependent on a predetermined limit.
Node-locked
See uncounted key.
License token
A license token is the result of a successful license request. It is a copy of a valid key. In the case of counted keys, license tokens are like virtual toll tickets, returned to the Compuware License Service when the licensed product no longer needs it.
Floating key
Online Help
In addition, online help for Distributed License Management is provided. It includes help on using the following DLM licensing components: Distributed License Management application
Distributed License Management Web Interface
There are two ways to access the online help from within a licensing component:
From the Help menu, choose Index to browse for help for the licens-ing component belicens-ing used.
Click [F1] to open the Help menu.
World Wide Web Information
To access Compuware Corporation’s site on the World Wide Web, point your browser to http://www.compuware.com. The Compuware site provides a variety of product and support information.
FrontLine Support Web Site: You can access online technical support for Compuware products via our FrontLine support Web site at
http://frontline.compuware.com. FrontLine provides fast access to criti-cal information about yourCompuware product. You can read or download documentation, frequently asked questions, and product fixes, or e-mail your questions or comments. The first time you access Front-Line, you are required to register and obtain a password.
Getting Help
At Compuware, we strive to make our products and documentation the best in the industry. Feedback from our customers helps us maintain our quality standards. If you need support services, please obtain the follow-ing information before callfollow-ing Compuware’s 24-hour product support hotline:
The name and release number (version) of the Compuware product you are using, in addition to the name and release number of the Host id A host id is any identifier that uniquely identifies a
DLM component. Access this information by choosing About from the product’s Help menu. The name and release number are also displayed on the covers of the product and DLM documentation. Installation information, including:
Installed options
Whether the product uses local or network databases Whether it is installed in the default directories Whether it is a stand-alone or network installation Whether it is a client or server installation
Environment information, such as the operating system and release on which the product is installed, memory, hardware/network speci-fications, and the names and releases of other applications that were running.
The location of the problem in the DLM or product software, and the actions taken before the problem occurred.
The exact product error message, if any.
The exact application, licensing, or operating system error messages, if any.
Your Compuware client, office, or site number if available. Distributed License Management Technical Support
Compuware Corporation One Campus Martius Detroit, MI 48226-5099
Chapter 2
Overview of Licensing
Introducing Licensing
Compuware's software products are protected from unauthorized usage via a standard licensing mechanism. Compuware's Distributed License Management (DLM) software components validate that an appropriate license is available and facilitate the license management and administra-tion needs for your Compuware products.
The licenses are provided in files that can be installed on individual end-user desktops for temporary or node-locked licenses, or can be installed on a central license server for centralized administration of licenses. When a central license server is used, individual end-user (client) machines or servers running Compuware products must connect to a license service to obtain their license. To do this in Windows, use the Distributed License Management (DLM) application on each target machine. On UNIX, use the Distributed License Management -
Command Line Version (DLMCV) to establish the host name and port number of the server machine running the license server.
Licensing your Compuware product depends on several factors: The type of license file you received from Compuware. The number of users specified in your license file. The use of Compuware License Service, or not.
License Components
This document provides all of the necessary information to install and configure the license components required to run your Compuware
product. Compuware’s licensing software consists of the following key components:
Distributed License Management (DLM) Application– A Windows-based administration tool that can display all Compuware product license information available on both the client and server environ-ments. The DLM application is also used for license configuration. On systems where the Compuware License Service is installed, the user-definable attributes of a license server can be changed.
Compuware License Service(cpwr.exe) – An application (invoked by the DLM application or executed from the command line) that manages and services requests for the license(s) of your Compuware product(s). The Compuware License Service can be installed on Win-dows and UNIX platforms. In many cases, it is recommended that you co-locate the Compuware License Service with the server-based components of one of the Compuware products you are installing. License File – A data file that contains information about the license
you have obtained for one or more of your Compuware products. To review the contents of your license file, open it with Internet
Explorer.
Distributed License Management (DLM) Web Interface – A Web-based tool that allows an administrator to perform simple license server administration within a browser window.
Note: Some Compuware products do not support all of the product components listed above.
License Types
Some Compuware products allow a time-limited trial license automati-cally without requiring installation of a license file. Other products require a license file even for a trial. If you start your Compuware product without a license, it either informs you that the license is missing or indicates that an automatic time-limited trial has started. Each time you start a product on an automatic time-limited trial, you may be asked if you want to install a permanent license or to continue the trial. Before the trial runs out, you should acquire a permanent license from Compu-ware. See “Request a License from Compuware” on page 24.
Compuware offers several types of licenses. These licenses types are described below.
Permanent
A permanent license has no ending date.
Temporary
A temporary license has a fixed expiration date. You must request this license from Compuware’s sales team.
Rolling Trial
A rolling trial license is automatically installed when you install some Compuware products. When this is provided, it allows you to run the product for a specific time period (14–45 days from the day you install the product) and is locked to a specific system. Each time you start your Compuware product, a message appears informing you of the time left before the trial license expires. With a rolling trial license, you have the ability to review the product before deciding to purchase it.
License Models
Compuware offers two license models: node-locked and concurrent.
Node-Locked
A node-locked license is a license that is tied to a particular machine via a unique identifier (generally the NIC MAC Address, but optionally a hard disk signature). There are two types of node-locked licenses: trial (demo) and permanent.
For node-locked licenses, the use of the Compuware License Service is not required, but can be used if you want a central place to store all of your licenses. A node-locked license is denoted by the absence of the <count> tag for the licensed feature. For more information on installing a node-locked license, see “License Server is Not Required (Node-Locked)” on page 22.
Concurrent
A concurrent (counted) license is server-based and requires the use of the Compuware License Service. This license allows you to share the use of a product with more than one user. There are several types of concurrent license models: borrow-enabled, user manage, redundant, and first come, first served (FCFS).
A concurrent license is denoted by the <count> tag for the licensed feature. It allows you to use a specific number of licenses without assign-ing them to a particular workstation. When all available licenses are checked out, no additional users can run the product until a license is checked back in.
User duplication allows the user to run an unlimited number of instances of an application as long as it is the same user on the same machine. The net usage in this case is always one for the individual user, regardless of the number of instances running.
For more information on installing a concurrent license, see “License Server is Required (Concurrent)” on page 21.
Borrow-Enabled
Borrow-enabled is a type of concurrent license model that allows a user to borrow a feature or product up to a specified amount of days. The user checks out a feature and indicates how long to borrow it without exceed-ing the 365-day limit.
Each checkout is exclusive to each user, meaning multiple users could use the same machine, but have access only to the keys checked out by their user ID. Users can check in the key at any time within the borrow time frame specified. If this is not done, once the time expires the user is no longer able to use that key and it goes back into the server for other users to borrow.
A disadvantage to using this type of concurrent model is that if a machine with a borrowed license on it becomes disabled or lost, the borrowed license remains checked out until the time limit has expired. A good rule of practice is to keep the checkout duration to a minimum.
User Manage
User manage is a type of concurrent license model that allows the license administrator to control user access to specific options or features. Administrators can grant or deny access to specified users or groups of users. The following is the code in the server configuration file:
<user_management>
<application>
<user/>
<everyone/>
</application>
</user_management>
The systems administrator using the configuration object
user_management can manage only licenses that contain keys that have the Umanage option (See “Umanage” on page 61.). User Manage-enabled keys authorize an administrator to control which users have access to the key that has the keyword Umanage defined.
Before setting up a user_management section, the administrator must get the App name from the key or keys that support User Management (For more on the license file format, see Appendix B regarding “License Files” on page 57.). Using the App name as a parameter, the administrator then defines which users have access to the application, identified by App. For example:
<fileAid>
<everyone/>
< pfhwec0/>
< pfhddg0/>
</fileAid>
In the above example, the keyword everyone instructs the license service that all users are authorized to access the key. When the everyone keyword is specified, individual users that are added to the definition are perceived by the license service as excluded from the set of “everyone”. Hence, the above example would read "allow everyone to use the key fileAid except pfhwec0 and pfhddg0." The absence of the everyone keyword means that only identified users are to be granted access to the license key. Users that are not listed will be denied access. A separate entry must exist for each key that supports the Umanage option. Users can be defined by either their host id or LAN id (login id).
Redundant
A redundant server license is a type of concurrent license model that provides limited protection against license server failure. It disperses the responsibility of managing the license files over a predetermined amount of servers. To read more about how redundant servers work, see “Redun-dant License Servers” on page 22.
First-Come, First-Served (FCFS)
First-come, first-served is a type of concurrent license model that limits the number of physical users to a defined set. A physical user is defined as a login id and is allowed to run on one machine per network. The set of defined users is based on a registration process whereby the Compuware
License Service registers each licensed user up to N users, where N is based on the license count. The Nth+one user that attempts to register is denied.
License Environment
It is often the case that multiple license sources (or license servers) are defined in a user's license environment. When a request is made to check out a license for a Compuware product, all license sources in the license environment are scanned until a valid key is found.
For information on configuring the license environment, see: For Windows, “License Configuration” on page 39. For UNIX, “Installation for UNIX Clients” on page 34.
Before you attempt to run a particular product, be sure that one of the license sources you have defined contains information for the product you want to run. Also, if there are old or obsolete license sources in your environment setting, you should delete them to improve product response time. Only currently operating servers should be specified in the license environment setting.
Determine if You Need the Compuware License Service
The first step in the licensing process is to determine whether it is neces-sary to install and run the Compuware License Service. The Compuware License Service is a long running process serving multiple client
machines, so most often you install it on one central server machine for your entire organization.
The Compuware License Service can serve all of Compuware’s product lines—you do not need multiple license services unless you are running redundant servers (see “Redundant License Servers” on page 22). The Distributed License Management (DLM) application, for Windows only, provides an interface to configure the Compuware License Service. The DLM application determines the need for the Compuware License Service based on the license files provided to it. If a license file requires the Compuware License Service, DLM will automatically install, start, and configure the Compuware License Service with the default settings. On non-Windows platforms, the administrator must view the license to determine if the Compuware License Service is necessary. In general, the Compuware License Service should be started for all counted licenses. As
mentioned earlier, any license containing a “<count>” tag is a counted-concurrent license. On non-Windows platforms, the Compuware License Service can be administered using the Distributed License Management - Command Line Version (DLMCV).
License Server is Required (Concurrent)
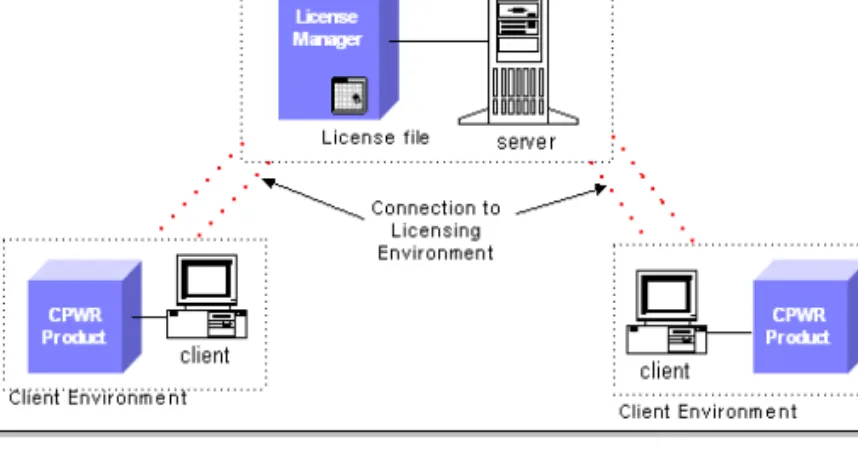
A license file containing the <count> tag is considered to be concurrent or floating and requires use of the Compuware License Service. A concur-rent license allows you to run a Compuware product on more than one client so that multiple users can access the product. This means that you purchase a specific number of licenses without assigning these licenses to particular clients or having to obtain their unique node identifiers. The Compuware License Service keeps track of licenses as they are checked out and checked in by users. Licenses are checked out by users on a first-come, first-served basis when they access the product. After all available licenses are issued, no additional users can run the product until another user exits and a license is checked in. Your license deter-mines how many users can access the product at one time.
Figure 2-1. Typical License Configuration for a Concurrent License
The Compuware License Service must be running on a computer or server that is always available to all clients needing access to the product. For Windows, see Chapter 3, “License Installation and Configuration
for Windows”.
For UNIX, see Chapter 4, “License Installation and Configuration for UNIX”.
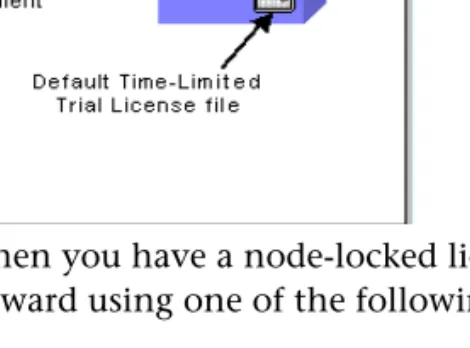
License Server is Not Required (Node-Locked)
A node-locked license is tied to a particular machine via its NIC card address or disk ID.
Figure 2-2. Typical License Configuration for a Trial or Node-Locked License
When you have a node-locked license, installation is very straight-forward using one of the following options:
You can install the license directly on the end-user desktop, in which case you do not need the Compuware License Service.
You can install the Compuware License Service on a remote node to consolidate your licenses in one location.
Redundant License Servers
Tip: If a large number oflicenses are governed by a single license server, failure of the server becomes a major event. To prevent problems, you should set up redundant servers so that if one server goes down, the Compuware License Service can still function.
License server redundancy provides quality of state by eliminating a single point of failure. Under license server redundancy, multiple license servers are deployed to support a single license. In the event of a partial failure (that is, the failure of one or more license servers), the subset of remaining servers are able to maintain a temporary state of license support until the initial state is restored.
Most redundant license systems rely on communications between license servers to maintain a consistent count of usage. The Compuware License Service relies on its clients to maintain license count consistency across redundant license servers.
How a redundant license is defined
A license object that supports redundancy contains a redundant-object, identified by the keyword 'redundant', and one or more license-key objects that reference the redundant-object. Redundant objects begin with “<redundant protected=’security key’>” and end with “</redun-dant>”. License keys that reference redundant objects contain the field
“<redundant>”. Only keys containing the keyword “redundant” have redundancy. As with license key definitions, a security key to prevent content modification protects redundant objects. Not all keys in a license file that contain a redundant object are necessarily redundant. Hence, a single Compuware License Service can support both redundant and simple concurrent at the same time. Simple concurrent is defined as any non-redundant concurrent license key. This is contrary to other licensing solutions which can only support redundant or simple concur-rent at any given time. A license file can contain multiple redundant objects. Only those servers, identified by id in a particular redundant object, provide support for the redundant policy for that key. A license key is considered redundant only if it contains the keyword 'redundant'.
Components of a redundant object
Redundant objects contain four key fields:
Policy_id - ties the redundant definition to its corresponding license keys.
Failsafe_count - identifies the minimum number of servers that can be running to support a corresponding redundant key.
Initial_state - contains the total number of servers that provide redundancy support for corresponding redundant keys.
Failsafe_duration - identifies the maximum number of days that a failsafe state can exist before the initial state must be restored.
Redundant license management provides limited protection against license server failure by dispersing the responsibility of maintaining client licenses over three independent servers.
When using redundant server licensing, you need to configure the same license file on all of the identified server systems. Server systems are identified by the host ids contained in the license key.
The servers can be brought up in any order.
For more information on setting up redundant servers on UNIX or Windows, see:
For UNIX, see “Redundant Servers” on page 37.
For Windows, see “Setting Up Redundant Servers” on page 41. Caution: Redundant license servers do not work with borrow-enabled licenses.
Request a License from Compuware
Tip: You can also contactyour Compuware sales representative.
To obtain a permanent license, you must provide Compuware with the host information of the machine on which the license will reside. You can either contact Compuware’s Worldwide License Management depart-ment at [email protected] or determine the host informa-tion using the Distributed License Management applicainforma-tion and e-mail that information to Compuware.
When you receive your license file from Compuware, copy the file to a directory on the machine identified in the license file (See Appendix B, “License Files” for license file format.).
Supported Platforms
The following table lists the platforms upon which DLM components can be installed, licensed, and run.
Impact to System Performance
The following table identifies the impact on a system due to the Compu-ware License Service running on a machine.
Getting Started
The remaining chapters in this manual discuss installing and configuring the Distributed License Management (DLM) application, Compuware License Service, and Distributed License Management Web Interface.
Table 2-1. Supported Platforms Platforms
Windows - NT 4.0, 2000, 2000 Server, Server 2003, XP (32-/64-bit), Vista AIX 5L V5.2 (32-/64-bit), AIX 5L V5.3 (32-/64-bit)
OS/400 - V5R3
Open VMS Alpha - V7.2, V7.3, V7.3-2, V8.2 Open VMS Itanium - V8.2, V8.3
HP-UX PA-RISC 11i V1.0 (32-/64-bit) HP-UX Itanium 11i - v2.0, v3.0 Tru64 UNIX V5.1b
Solaris 8 (32-/64-bit), 9 (32-/64-bit), 10 (32-/64-bit) Red Hat Enterprise Linux ES - 2.1, 3.0 4.0
Asian UX 32 bit (Redflag 4.1) SuSE Linux Enterprise Server - V8, V9
Table 2-2. Impact to System Performance
Service File Name Memory Space License Server cpwr.exe 3 MB 320 KB
To begin installation and configuration, see the appropriate License Installation Checklist below.
License Installation Checklists
If you are installing a Compuware product with an rolling trial capability, you do not need to take any further action until you obtain your perma-nent license. Your trial license allows you to use your Compuware product between 14–45 days, depending on the product.
The following checklists can assist you in the licensing process after your rolling trial has expired, or if you are installing your permanent license. Please begin with the following:
Installing the Compuware License Service
o
Determine the type of license model you have (node-locked or con-current). See “License Models” on page 17.o
See “Determine if You Need the Compuware License Service” on page 20.o
If you are required to install the Compuware License Service, see the“Installing the Compuware License Service”checklist below.
o
If you have a node-locked license and do not require DLM, install the Compuware product.o
Select the platform (Windows or UNIX) on which the Compuware License Service may run.• For Windows, see “License Installation and Configuration for Win-dows” on page 29.
• For UNIX, see “License Installation and Configuration for UNIX” on page 31.
o
Use the Distributed License Management application to perform one of the following:• Configure the license.
• Assign the license file to the Compuware License Service.
o
Have end-users add the license service source to their license environ-ment using either the Distributed License Manageenviron-ment application (Windows only) or the Distributed License Management - Command Line Version. See “Defining a Local License Environment” on page 40.License Borrowing for Administrators
Using the Distributed License Management Web Interface
o
If license borrowing is enabled (for concurrent licenses only):• For administrators, see the “License Borrowing for Administrators”
checklist.
• For clients, see the “Using the Distributed License Management Web Interface”checklist.
o
If you are using the Distributed License Management Web Interface, see the “Using the Distributed License Management Web Inter-face”checklist.o
If the tag <Umanage> is in your license files, See “Umanage” on page 61.o
Check that you have a concurrent license, which is required in order to use license borrowing.o
If your license file has the <borrow> tag, see Chapter 6, “License Bor-rowing”.o
See “Overview of Distributed License Management Web Interface” on page 47.Chapter 3
License Installation and
Configuration for Windows
Overview
The procedures in this chapter describe how to install the Distributed License Management (DLM) license components on a Windows server. You can use Windows NT, 2000, XP or XP 64-bit as the server to host DLM.
Installing the Compuware License Service
Tip: If you are on a clientthat may be a server, see
“Defining a Local License Environment” on page 40 to install the Compuware License Service and bypass the following steps.
Follow the instructions below to install the Compuware License Service. For best results, close all programs before installing your Compuware product and the DLM components.
Installation for Windows 32 & 64-Bit Platforms
The following steps apply to installing the Compuware License Service on Windows 32 & 64-bit platforms.
1 From your Compuware product installation CD, select Install (Com-puware) License Service. This starts the InstallShield Wizard for the Compuware License Service. You need to navigate through several screens to proceed through the InstallShield Wizard. These screens require you to perform tasks such as:
Read and accept the License Agreement. Provide Customer Information.
2 Click Next after completing each screen of the InstallShield Wizard. 3 After the files are copied, click Finish to complete the installation
(reboot the machine, if specified).
4 Click the taskbar’s Start button and choose Programs>Compu-ware>Distributed License Management to implement your Com-puware license.
5 Click the Add button to specify the location of the served license and click OK (see Figure 3-1). DLM will verify that the license is valid and install and start the Compuware License Service.
Chapter 4
License Installation and
Configuration for UNIX
Overview
The licensing process varies based on the Compuware product being installed, your agreement with Compuware, and the platform on which the Compuware License Service is installed.
When the Compuware License Service is needed, setup involves the following steps:
1 Install the Compuware License Service and its components. See “Installing the Compuware License Service for UNIX” on page 31. Installation of the Compuware License Service is only required for concurrent license types (denoted by the <count> tag for the licensed feature). Installing the Compuware License Service is not required if you have a node-locked license. If you have a node-locked license for a client machine, see “Installation for UNIX Clients” on page 34. 2 Configure the Compuware License Service to start. See “Configuring
the Compuware License Service” on page 32.
3 Configure each client to access the Compuware License Service. See “Installation for UNIX Clients” on page 34.
Installing the Compuware License Service for UNIX
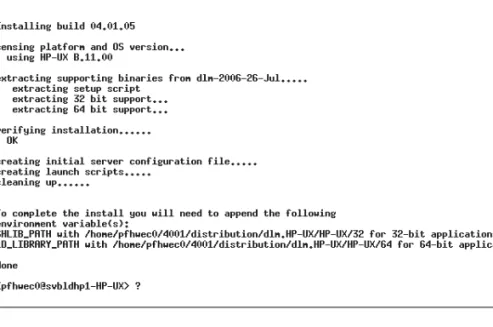
Follow the steps below to install the Compuware License Service. 1 Mount the CD-ROM on your system (root access required).
2 Change to the mount directory. For example, if /cdrom is the mount directory, type the following:
3 Navigate to the directory on the CD that contains the Compuware License Service installation files. See the product documentation for the specific Compuware product for the location of the license instal-lation component.
4 To install the Compuware License Service on your system, type:
install.sh install_bundle target
Note: If you do not specify a target, the installation will be placed in: /opt/compuware/dlm (Root access may be required to create the directory.). If you do specify a target, the Compuware License Service files will be installed directly into the target directory.
Figure 4-2. Install the Compuware License Service
5 You are notified when the installation is completed (If the installa-tion has a problem creating the directory, you are notified of the error and are forced to exit.).
Configuring the Compuware License Service
Before a client can access a served license, the corresponding server must have the Compuware License Service installed and running. You can configure the Compuware License Service to start automatically (each time the server boots) or to be started manually.
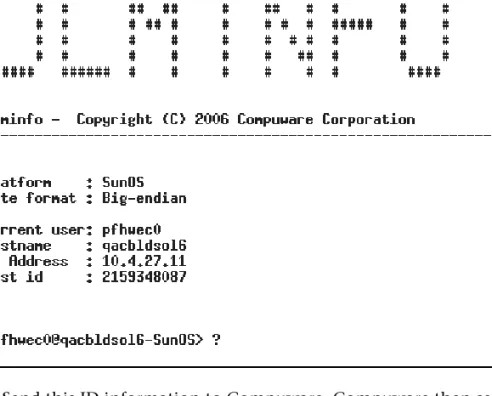
1 Before you can start the Compuware License Service, you must sup-ply Compuware with the host ID of the node on which you plan to run the Compuware License Service. In return, Compuware will send you a license file. To obtain the host ID, perform the following com-mands:
cd /target
dlminfo.sh
The ID, which the licensing system uses for validation, is displayed:
Figure 4-3. Host ID Information
2 Send this ID information to Compuware. Compuware then sends back a license file.
3 Copy the license file you receive from Compuware to:
/target/license
Required: You must receive a new license file from Compuware before proceeding with configuring the Compuware License Service.
Required: You cannot run two Compuware License Services simultaneously and must shut one down before starting a new one.
4 Do one of the following:
To start the Compuware License Service manually (required each time the server reboots), type:
cpwr.sh -start
To start the Compuware License Service automatically each time the server reboots, follow the suggested procedure below for the appropriate platform:
Installation for UNIX Clients
If the Compuware License Service is required (concurrent license), each client must be configured to access the Compuware License Service’s license key database. If the Compuware License Service is not required (node-locked license), a license file is required on each client machine. The Distributed License Management - Command Line Version (DLMCV) is the command line version of the Windows GUI-based Distributed License Management application. While limited in functionality, the DLMCV mirrors most of the functionality provided by its GUI-based counterpart, DLM. The purpose of DLMCV is to provide a simple text interface that is platform and display independent. It provides UNIX text-based support and support for script-based configurations.
The DLMCV application is located in the license installation directory on the same directory level as the Compuware License Service.
To launch the command line version of the DLM application, type:
Table 4-3. Suggested Automatic Startup Per Platform (UNIX) Platform Action
AIX In etc/rc.local, type the following command on one line:
/target/cpwr.sh -start
HP-UX In /sbin/rc3.d, create a file named s95cwlm.server
and add the following command to the file:
/target/cpwr.sh -start
Linux In /etc/rc.d/rc2.d, create a file named
s95cwlm.server and add the following command to the file:
/target/cpwr.sh -start
Sun Solaris In /etc/rc2.d, create a file named s95cwlm.server and add the following command to the file:
dlmcv.sh
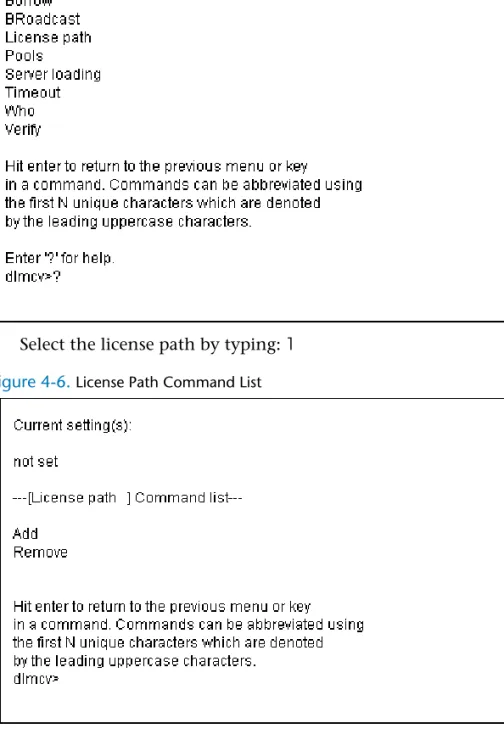
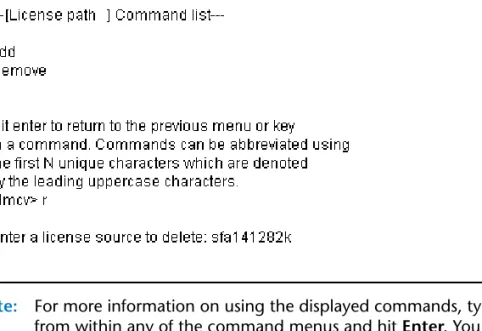
The DLMCV user interface uses a series of text-based menus, called command lists. Each command list and its submenu is hierarchically organized by category and is based on the functionalities provided by each menu tree. Each menu label begins with one or more uppercase letters. Entering either the label of a menu or its abbreviated character set (denoted by the uppercase characters) provides access to the menu item. Menu items are either references to submenus or commands. Clicking the <Enter> key from any sub-menu returns you to the next highest menu level.
When the DLMCV is launched, the DLMCV Main Menu is displayed. It contains two submenus: Client and License Service.
Figure 4-4. DLMCV Main Menu
To add a license to the Client environment: 1 Access the Client menu by typing either:
The DLMCV's Client Menu displays the following list of configura-tion and diagnostics commands for the administraconfigura-tion of a license client:
Figure 4-5. Client Menu
2 Select the license path by typing: l
3 At the prompt, specify the port@host to your license server or the fully qualified path to a local license file and hit Enter.
Figure 4-7. License Path defined
Note: For more information on using the displayed commands, type ?
from within any of the command menus and hit Enter. You can also refer to the DLM application’s Online Help.
Redundant Servers
After you install the Compuware License Service on all three server machines in the redundant configuration, you must add all three license server sources to the license environment for each client.
UNIX Components
The installation directory for the UNIX platform includes the following files:
Readme Additional Compuware License Service information.
/bin For Compuware use only.
/config Directory containing server configuration file config.xml.
cpwr.sh Compuware License Service.
install.log Contains data from the installation process.
dlmcv.sh Distributed License Management - Command Line Version.
libdlm32.so Runtime library used by clients.
libdlm64.so Runtime library used by clients.
/license Directory containing license files.
os Multi-platform support.
vlog.sh Compuware License Service log file.
Troubleshooting
Comparing Compuware License Service Versions
Follow the instructions below to compare the Compuware License Service version number already on the license server with the version number on the product CD.
1 Determine the version number already on the license server: a Navigate to the directory on the server where the Compuware
License Service is located. b Type:
cat/target/dlm_version
Make note of the Compuware License Service version number located in the response message.
2 Determine the version number on the product CD:
a Insert the product CD, open a command prompt, and navigate to the directory of the CD containing the install bundle.
b To display the version information, type:
cat dlm_version
3 If the CD has a newer version, see “Installing the Compuware License Service for UNIX” on page 31.
Chapter 5
Distributed License
Management Application
Overview
The Distributed License Management (DLM) application is a Windows-based administration tool that can display all Compuware product license information available on both the client and server environ-ments. The DLM application is used for license configuration and admin-istration. On systems where the Compuware License Service is installed, its user-definable attributes can be modified.
Starting the DLM application
To start the DLM application, click the taskbar’s Start button and choose (All) Programs>Compuware>Distributed License Management
License Configuration
All client and server systems require that one or more valid license sources be added to their license environments in order to use a licensed Compuware product. A license source can be a local file or a server refer-ence (for example, port@host). In either case, the license source must authorize the system and the Compuware products for which it is deployed.
The DLM application simplifies this process by providing an identical method for configuring both client and server systems. It facilitates licensing on client systems by placing the license source in a configura-tion file. The server system also has a configuraconfigura-tion file containing its license sources.
Concurrent License
When using a concurrent license model, each client machine must be configured to reference the licensed server. The licensed server is defined as any system that has been authorized by a valid license file to provide remote start-up authorization for Compuware applications. Before a licensed server can authorize remote application start-up, it must be running the Compuware License Service (cpwr.exe).
The Compuware License Service is automatically registered and started on the licensed server machine by DLM when a valid server license is presented to DLM.
In addition to the registration, configuration, and activation of the Compuware License Service, DLM also creates the Borrow License Server Tab for those server licenses that support license borrowing. On client systems that reference licensed servers that support license borrowing, the Borrow License Client Tab is automatically created by DLM. For more information on license borrowing, see Chapter 6, “License Borrow-ing”.
Node-locked License
In the case of a node-locked license model, only the system designated in the license file is authorized to run the specified Compuware applica-tions. DLM only accepts a node-locked license on the system that it authorizes.
Defining a Local License Environment
Follow the steps below to define a local license environment by adding a license source.
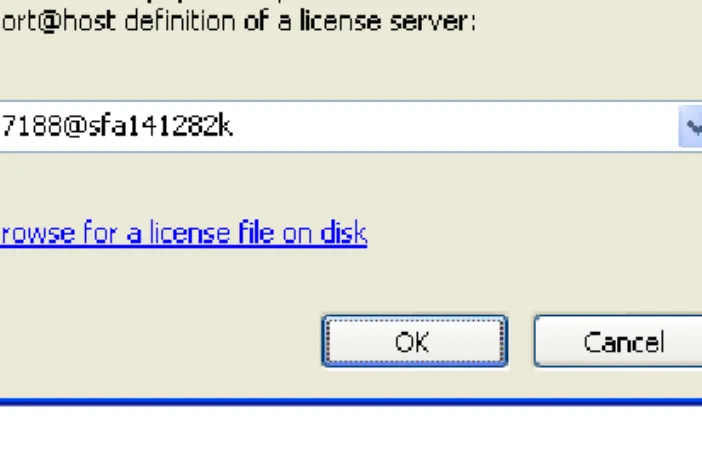
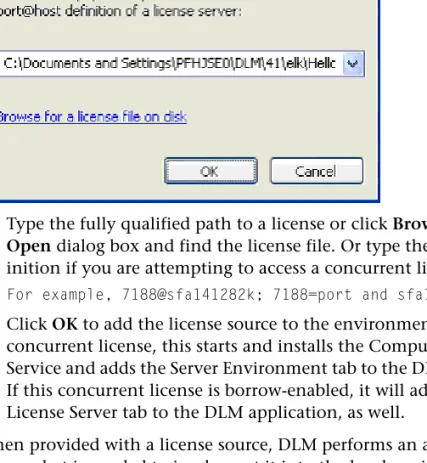
1 Start DLM. (See “Starting the DLM application” on page 39.) 2 Click the Local Environment tab.
3 Click Add to open the Add License dialog box.
Figure 5-1. DLM: Add License Dialog Box
Tip: The port number is typically 7188.
4 Type the fully qualified path to a license or click Browse to open the Open dialog box and find the license file. Or type the port@host def-inition if you are attempting to access a concurrent license.
For example, 7188@sfa141282k; 7188=port and sfa141282k=host.
5 Click OK to add the license source to the environment. If this is a concurrent license, this starts and installs the Compuware License Service and adds the Server Environment tab to the DLM application. If this concurrent license is borrow-enabled, it will add the Borrow License Server tab to the DLM application, as well.
When provided with a license source, DLM performs an analysis, deter-mines what is needed to implement it into the local environment, and checks for errors.
Server Machine
If the license source is for a server machine, DLM verifies the license is a match for the current machine. If it is a match and the Compuware License Service has not been installed, DLM installs it, adds the Server Environment tab, and incorporates the license source into the configura-tion files. If the concurrent license is borrow-enabled, DLM will also add a Borrow License Server tab. However, if the license is not a match, a dialog box appears, notifying you that the license is invalid.
Setting Up Redundant Servers
Each client machine must have an entry in its license path to each of the three redundant servers. Perform the following steps using the Local
Environment tab on DLM to add each of the three redundant servers to the local license environment.
Figure 5-2. DLM: Local Environment Tab
1 Click Add to open the Add License dialog box (see Figure 5-1). Type the port@host server location of the Compuware License Service in the field next to the Browse button.
2 Click OK to add the license source to the environment.
Auditing
The Auditing feature is controlled by the config.xml file in the compu-ware\config directory. The Compuware License Service administrator is responsible for turning the Auditing feature on or off on the Advanced Configuration tab of the DLM application. When auditing is enabled, there can be performance issues due to the amount of data being captured and written to a file.
Figure 5-3. DLM: Advanced Configuration Tab
The Auditing feature gathers data for all users attached to a server and writes them to a comma delimited file called audit.txt in the Compu-ware\logging directory. The data from this file can be imported into an Excel spreadsheet for easy viewing. The first line in the file is a header describing the data found in each column. The captured data is described in greater detail below.
Description of Data in Audit file
Date: The date and time this data was written to the file.
Request: The type of request processed by the server. The following can be found in this column:
OUT
IN
BORROW
BORROW/IN
GRACE/EXIT
App[version]: The application and version being requested and processed by the server.
Count: The number of license tokens requested.
Status: The status of the request to the server. The following can be found in this column:
OK
Denied, with a reason for the denial.
Chapter 6
License Borrowing
Overview
Configuration of the license borrowing components is handled automat-ically when a license is installed via the Distributed License Management (DLM) application on Windows. For UNIX, use the Distributed License Management - Command Line (DLMCV) application.
Windows Only: On client systems that reference licensed servers that support license borrowing, the Borrow License Client Tab is automati-cally configured and added to DLM. From this tab, you will be able to borrow and return available licenses. On server systems that add a license that supports license borrowing, the Borrow License Server Tab is
automatically configured and added to DLM. From this tab, the system administrator will be able to manage the borrow features. The Borrow License Client Tab and the Borrow License Server Tab cannot coexist in DLM. DLM will handle this issue and display a message stating this restriction.
Chapter 7
Distributed License
Management Web Interface
Overview of Distributed License Management Web Interface
Compuware’s Distributed License Management Web Interface provides a central point of license administration. It runs on an HTTP server and is configured and administered by using the cpwrCGIAdmin.exe file. The DLM Web Interface allows the administrator to monitor and maintain the Compuware client/server licensing environment from a remote location via a Web browser (see Figure 7-1).Figure 7-1. The DLM Web Interface
The DLM Web Interface consists of three components: Java applet (dlm.jar)
User configuration tool (cpwrCGIAdmin.exe) CGI (cpwrCgi.exe)
Unlike the applet portion of the DLM Web Interface, the CGI module and user configuration tool are non-Java applications, which means that unique binaries exist for each supported platform.
The following steps are necessary to install and operate the DLM Web Interface in your environment:
1 Install the Compuware License Service, its components, and a con-current license for the server.
For Windows, see the section “Installing the Compuware License Service” on page 29.
For UNIX, see the section “Installing the Compuware License Ser-vice for UNIX” on page 31.
2 Install the DLM Web Interface and its components. See the section “Installing the DLM Web Interface” on page 49.
3 Create user accounts. See “Creating User Accounts” on page 50. 4 Define the Compuware License Service. See “Defining the
Compu-ware License Service” on page 52.
5 Configure the DLM Web Interface. See the section “Configuring the DLM Web Interface” on page 53.
6 Start the DLM Web Interface. See the section “Starting the DLM Web Interface” on page 54.
Tested Environments
Required: The Java applet component requires that client systems that access the applet via a browser, such as Netscape or Explorer, have a minimum of Java 1.4.2 installed for Java support.
The DLM Web Interface was tested and works properly in the following environments:
Web Servers
Apache on UNIX Solaris 8.0 IIS on Windows 2000 Server
Browsers
Internet Explorer 5.5 and 6.0 Netscape 6.2
Note: Java Plug-in 1.3 and 1.4 for Netscape 6.2 are not supported in the AIX, HP, and RedHat environments.
Supported Platforms
The following table lists the platforms and components upon which the DLM Web Interface can be installed, licensed and run. The table also shows the binary-to-platform relation of all binary components provided for the DLM Web Interface. An administrator with root access to the machine should perform installation and configuration of these compo-nents.
Installing the DLM Web Interface
Follow the instructions below to install the DLM Web Interface compo-nents.
Installing the DLM Web Interface
Required: You should have root or administrative access to the HTTP server before running the InstallShield Wizard.
1 From your Compuware product installation CD, select and double-click the Remote_Licensing_Tool to start the InstallShield Wizard for the DLM Web Interface. If your CD does not have this entry, con-tact Compuware support and request the DLM Web Interface
tool.You need to navigate through several screens to proceed through
Table 7-1. Supported Platforms
Platforms Component List Windows NT 4.0, 2000,
XP
cpwrCGIAdmin.exe, cpwrCGI.exe
Linux, HP-UX, HP-UX 64, OSF/Digital, AIX, AIX 64-bit, SunOS/ Solaris, and SunOS/ Solaris 64-bit
the InstallShield Wizard. The screens require you to perform tasks such as:
Tip: There is no default for the Destination Location, therefore, you must specify a destination before continuing. This location must be on your HTTP server and it should be designated as the site location for the DLM Web Interface.
Read and accept the License Agreement. Provide Customer Information.
Choose your Destination Location - there is no default for the Destination Location; therefore, you must specify a destination before continuing. This location must be on your HTTP server and it should be designated as the site location for the DLM Web Interface.
Start Copying Files.
2 Click Next after completing each screen of the InstallShield Wizard. 3 Click Finish to complete the installation.
Installation for UNIX
The steps used to install the DLM Web Interface for Windows also apply to installing the DLM Web Interface components on a UNIX platform.
Creating User Accounts
To create user accounts, run the cpwrCGIAdmin.exe executable file for the platform that corresponds to the system you have designated as your HTTP server. The cpwrCGIAdmin.exe file has a text-based GUI, which means that it can be run in a text-based terminal window, such as Telnet. Required: You should have root or administrative access to the HTTP server
To run the cpwrCGIAdmin component:
1 At the command prompt, type cpwrCGIAdmin to display the cpwrCGIAdmin Main Menu screen (see Figure 7-2).
Figure 7-2. cpwrCGIAdmin Main Menu Screen
2 Type U and press Enter to access the User Database Menu (see Figure 7-3).
Figure 7-3. cpwrCGIAdmin User Database Menu Screen
3 Type N and press Enter to add a New User to the User Database. 4 Type a user name and press Enter.
5 Type a password for the newly created user and press Enter. 6 Re-type the password for confirmation and press Enter. A message
appears on the screen to confirm that the user was added to the User Database.
8 To return to the Main Menu, press Enter three times.
Only users with accounts can access the Compuware License Service. User accounts are added to the dlm_password file that is located in the / etc directory for UNIX platforms and the C:\Windows directory for Microsoft OS platforms.
Defining the Compuware License Service
Before interaction between a client (applet) and a Compuware License Service can occur, you must identify the Compuware License Service to the CGI. To define the Compuware License Service:
1 From the Main Menu of cpwrCGIAdmin, type H and press Enter to access the Host Database Menu screen (see Figure 7-4).
Figure 7-4. cpwrCGIAdmin Host Database Menu Screen
2 Type A and press Enter to add a host name or TCP/IP address.
3 Type the host name or TCP/IP address of the Compuware License Ser-vice to be added and press Enter.
Note: The TCP/IP address can be either the hostname-alias or the actual IP address of a system that is running the Compuware License Service.
4 Type an alias name for the host and press Enter.
If an alias is specified, the alias is displayed on the client instead of the TCP/IP identifier of the Compuware License Service. Refer-ences to the Compuware License Service can use either the alias or the host name.
If an alias is not specified, only the host name or TCP/IP address, whichever is supplied during the creation of the host entry, can be used to identify the Compuware License Service.
5 Type the port number where the Compuware License Service is lis-tening and press Enter. The port number is specified within the server configuration file. A message appears on the screen to confirm that the alias and host was added to the Host Database.
6 Press Enter to add another host, and repeat steps 3 through 5. 7 Press Enter three times to return to the Main Menu.
8 Type U and press Enter to access the User Database Menu. 9 Type A and press Enter to add a host to a user's account.
10 Type the name of the user from the list displayed and press Enter. 11 Type the host name, or TCP/IP address, or alias of the Compuware
License Service where the user needs access and press Enter. A mes-sage appears on the screen to confirm that the reference to the host name was added for the user.
12 Press Enter to add another host reference to a user’s account, and repeat steps 10 and 11.
13 Press Enter three times to return to the Main Menu. 14 Type E and press Enter to exit.
Configuring the DLM Web Interface
After you have configured your user accounts (see “Creating User Accounts”) and the individual License Services (see “Defining the Compuware License Service”), copy the cpwrcgi.exe file to the cgi-bin location on the web server.
Note: The cpwrcgi.exe file is located in the \exec folder, which was installed during the DLM Web Interface installation.
The CGI only allows one client at a time to communicate with an individual Compuware License Service.
After the CGI has been configured, perform the steps below to set up the DLM Web Interface:
1 Go to the location where the InstallShield Wizard placed the DLM Web Interface.
Example: http://sitename/dlmweb/dlm.html
3 Open the dlm.html file.
4 Modify the dlm.html source file in the following areas:
a The <param name=cgidir> must be changed to point to the location of cpwrcgi.exe.
b The <param name=timeout> value must reflect how long you want to wait before time-out occurs for the user.
Starting the DLM Web Interface
After you configure the DLM Web Interface, users can access it in a browser window. To start the DLM Web Interface:
1 Open a browser window, such as Internet Explorer or Netscape Navi-gator.
2 Type the intranet site address in the Address field of the browser win-dow.
3 Press Enter.
Required: In order to run the DLM Web Interface, you must have the Java Runtime Environment (JRE) version 1.4.2 or later. If you do not have this JRE, you are prompted by a series of dialog boxes to install the correct version of the JRE.
Where to Go Next
For instructions on how to log in to the DLM Web Interface, access the online help by clicking the Global Help button on the Login screen of the DLM Web Interface.
Appendix A
Host Name and Host ID
Overview
The Host Name is the unique name that identifies a computer on a network. A computer may have several of these (aliases). The Host ID is the machine identification number of a Host. For Windows PCs, this is the Ethernet Card ID.
To obtain a license for your Compuware product, you must provide the host information of the machine on which the license will reside. If a Compuware License Service is required, this is the server machine. You need to supply Compuware with the Host ID of the server on which the Compuware License Service will run, not the Host IDs of all of your clients. If no Compuware License Service is required, this is the same machine on which the product is installed.
Determine Host Information of a Computer
To determine the Host information needed in order to request a perma-nent license from Compuware, follow the steps below according to the platform you are using:
Table A-1 Determining Host Information of Computer Platform Step Action
Windows 1 Start the Distributed License Management (DLM) applica-tion.
2 Click the System Information tab to view the host informa-tion.
To save the host information:
1 Click Save As to open the Save As dialog box.
2 In the Save in drop down list, select a directory and type the name of the text file (usually hostinfo.txt) in the File name
field. 3 Click Save.
4 Send the file via e-mail to Compuware's Worldwide License Management department at [email protected].
UNIX 1 Navigate to the directory in which the Compuware License Service is located (for example, /opt/compuware/
cpwr_4.0). 2 Type dlminfo.sh
A message like the following is displayed: Byte format : Little-endian
Current user: fhcwlm Hostname : stizus Ip Address : 172.16.18.66 Host id : 18f6ce29
3 Provide the Host Name and Host ID information to Compu-ware's Worldwide License Management department at [email protected].
Appendix B
License Files
Overview
All license files contain a single license object. Each license object contains one or more sub-objects called license keys. Each licensed product and/or product option has a corresponding license key. A license key identifies, through sub-object definitions, the usage extent of a purchased product. The usage extent defined by the license key, is based on the contractual agreement that was established, with Compuware, when the product was purchased. The modification of license keys within a licensed object by an end-user invalidates the purchase agree-ment preventing the associated application or application option from functioning.
End-users are free to cut and paste license keys from one license object
to another provided that the key shares the same customer id as the
target license object. Hence, license keys from different companies
cannot be interchanged or merged. The customer id is a sub-object of
the license object and is contained within the customer_id tag.
A license key begins with the tag “<key protected=’security key’ >” and ends with the tag “</key>.” The sub-objects of a key are protected by the key tag, “<key protected=’security key’>”. These sub-objects include App, Vers, Start, End, Count, hostid, Hostid, Fcfs, etc. Each sub-object/parame-ter within the key defines a particular usage limitation or behavior limita-tion for the product authorized by the key. A license key can consist of thirteen or more possible parameters/sub-objects.
The parameters shown in the figure above are defined below.
Parameters
The following parameters can be used to define a license key:
App
The
App
parameter can contain one of three possible value-types:
the name/abbreviation of the application authorized by the key
an alias-list
the keyword
undefined
.
Undefined: