Apples: Safe Methods to Store,
Preserve, and Enjoy
LINDA J. HARRIS, Food Safety and Applied Microbiology Specialist, Department of Food Science and Technology, UC Davis; SYLVIA YADA, Scientist, Department of Food Science and Technology, UC Davis; and ELIZABETH MITCHAM, Postharvest Extension Specialist, Department of Plant Sciences, UC Davis
WHAT ARE APPLES?
The apple (Malus domesticus) is a pome (from the Latin word for apple), a fruit with a papery central cavity surrounding the seeds (fig. 1). Pomes are members of the Roseaceae (rose) family, which also includes pear, crabapple, and quince.
Archeological data show that humans were eating apples as early as 6500 b.c. Evidence indicates that the fruit was first cultivated between the Caspian Sea and the Black Sea.
The apple was brought to North America by the Europeans nearly 400 years ago. Pilgrims planted orchards in the Massachusetts Bay Colony. Some people who came to California for the Gold Rush brought apple seeds with them. Soon after California joined the Union in 1850, apple orchards were planted. Today, apples are grown in California on farmlands surrounding the communities of Mendocino and Sonoma in the north, in the San Joaquin Valley and coastal areas of Central California, and in Tehachapi and Julian (near San Diego) in the south.
California is an important apple-producing state, growing more varieties than any other state west of the Rocky Mountains. Heritage varieties, such as Pippins, Gravensteins, and Winesaps, do well throughout California, as do old favorites like Red and Golden Delicious, Granny Smith, and Jonathan. Cooking apples, such as Northern Spy and Rome Beauty, and newer varieties like Pink Lady, Fuji and Gala, all grow successfully in California orchards (table 1).
UNIVERSITY OF CALIFORNIA Division of Agriculture and Natural Resources
NUTRITION
Apples are a significant source of pectin fiber (3 g per medium apple), and they pro-vide carbohydrates and vitamins while contributing few calories and no fat, sodium, or cholesterol (fig.2).
GROWING APPLES IN THE HOME GARDEN
Information on growing apples is available online through the University of California, Davis, Backyard Orchard homepage at http://homeorchard.ucdavis.edu/. The site contains useful information on apple varieties for planting in the home garden, man-agement of apple pests, such as aphids and mites, and control of disorders, such as San Jose scab and powdery mildew. A free online publication from the University of California, Key Points of Control and Management of Microbial Food Safety: Edible
Landscape Plants and Home Garden Produce, (UC ANR Publication 8101), pro-vides information on ways to minimize contamination of fruits and vegetables in the home garden by organisms that can cause foodborne illness. You can access the publication at http://anrcatalog.ucdavis.edu/.InOrder/Shop/ItemDetails. asp?ItemNo=8101.
SELECTING APPLES FROM THE HOME GARDEN OR
PICK-YOUR-OWN SITE
Select firm apples, free of breaks in the skin, and with a background color (the non-red part of the apple skin) that is light yellow or yellow-green. Harvest the fruit by lifting toward the sky to release the stem from the tree, rather than by pulling, which can tear out the stem, damage the tissue, and shorten the storage life of the apple.
SELECTING APPLES AT THE GROCERY STORE
Choose apples that are firm, with a good aroma. Avoid fruit with bruises, shriv-eling, or skin breaks. The amount of red color on the surface of a red or striped apple is not an indicator of its eating quality. In fact, some studies have shown that redder apples may have fewer flavor compounds. The taste quality of the apple depends on when it was harvested during its development, how long it has been in storage, and the environmental conditions in storage.
Figure 2. Nutrition facts for apples with skin on (1 medium, 23/4” diameter).
Source: USDA National Nutrient Database.
Nutrition Facts
Serving Size (138 g)
Amount Per Serving
Calories 72 Calories from Fat 2 % Daily Value* Total Fat 0 g 0% Saturated Fat 0 g 0% Cholesterol 0 mg 0% Sodium 1 mg 0% Total Carbohydrate 19 g 6% Dietary Fiber 3 g 13% Sugars 14 g Protein 0 g Vitamin A 1% • Vitamin C 11% Calcium 1% • Iron 1%
*Percent Daily Values are based on a 2,000 calorie diet. Your daily values may be higher or lower depending on your calorie needs.
Table 1. Selected California apple varieties, flavors, and uses
Variety Flavor Recommended uses
Fuji sweet fresh, sauce, freezing Gala sweet fresh, sauce, drying, freezing Golden Delicious sweet, mellow fresh, pies, sauce, canning, freezing Granny Smith tart to slightly sweet fresh, pies, sauce, canning, freezing Gravenstein sweet to tart fresh, pies, sauce, drying, freezing Jonathan slightly tart fresh, pies, sauce, freezing Pink Lady sweet to tart fresh, pies, sauce, freezing Red Delicious sweet fresh
Rome Beauty slightly tart baking whole, sauce, drying, freezing
STORING FRESH APPLES
Apples keep best in your refrigerator, preferably in the crisper drawer or in an
unsealed plastic bag. Refrigerate apples separately from vegetables because apples nat-urally release small amounts of ethylene gas that can be damaging to lettuce and other produce. Apples can be held in an open container on a table for a few days before eat-ing, if desired, but more time at room temperature will lead to shriveling and a loss of flavor and crispness.
Small brown pits sometimes develop on the skin of apples in storage, and the underlying apple tissue is also brown. This is a common disorder of apples, called bit-ter pit, caused by a deficiency of calcium within the fruit as it develops on the tree. It is particularly common in large apples. These apples can be eaten without worry, but you may want to cut away the affected tissue prior to eating.
SAFETY TIPS FOR HANDLING FRESH APPLES
General SanitationContaminated produce and unpasteurized apple juice or cider have been known to cause foodborne illness. Like any other fresh fruit or vegetable, apples can be con-taminated by bacteria from soil, water, and animal sources, or from lack of sanitation during preparation or processing. Contamination from human sources may occur during or after harvest, right up to the point of eating. Contamination at home may also occur when poorly washed utensils or cutting boards (especially those used to handle raw meats) are used to prepare fresh fruits or vegetables. For this reason, it is important that you wash your hands with soap and water before and after preparing produce, and use clean equipment, utensils, and cutting surfaces.
Washing Apples
Apples should be washed just before eating or preserving. To wash, rub each apple under running water or use a clean scrub brush, and then dry it with a clean paper towel.
Washing the fruit in a sink filled with water is not recommended since the stand-ing water can spread contamination from one apple to another. The use of soap or detergent is not recommended or approved for washing fruits and vegetables because the produce can absorb detergent residues. The stem area and blossom end of apples are the most difficult to clean. To avoid these areas you can cut around the core rather than through it or you can use an apple coring device.
Cut Apples
Cut or sliced apples should be covered and refrigerated if they are not eaten within 2 hours of preparation; this reduces browning and maintains quality and safety.
METHODS FOR PRESERVING APPLES
Light-colored fruits, such as apples, will “brown” after they are cut or peeled because of enzyme activity in the fruit. There are several ways to reduce browning during preparation and storage, and details of recommended treatments are provided with each preservation method. In general, you need to use the strongest treatments for drying apples, less for freezing, and the least strong for canning apples.
NOTE
To reduce browning and to maintain both quality and safety, always cover and refrigerate cut or sliced apples when pre-paring them in advance or after purchasing precut apples at the grocery store.
Using ascorbic acid to prevent browning
A common and effective treatment to keep apples from browning is to use ascorbic acid (Vitamin C) in a dipping solution or by adding it directly to the fruit or syrup. Ascorbic acid dissolves easily in cold liquids and will not change the flavor of fruit treated with it. You can buy pure ascorbic acid crystals from pharmacies and also in the canning supply section of some supermarkets or hardware stores, or you can buy ascorbic acid in the form of Vitamin C tablets. Make sure you get regular Vitamin C tablets, not fruit-flavored or timed-release tablets. Note that 1⁄
2 teaspoon of ascorbic
acid crystals is equivalent to 1,500 mg of Vitamin C in tablet form (for example, three 500-mg tablets). Tablets need to be finely crushed (between the nested bowls of two spoons) and dissolved in water or other liquid before use. Fillers in the tablets will make the liquid cloudy but this is not harmful.
Commercially prepared antibrowning products are also available among canners’ supplies. For example, Fruit-Fresh is a commercial product that contains ascorbic acid and citric acid (common in citrus and other fruits) in a sugar base. Such mixtures are more expensive and less effective, volume to volume, than pure ascorbic acid, but they are easy to use and dissolve readily. Follow label directions when using these products for freezing, canning, or pre-drying treatments or use the suggested equivalent as rec-ommended in this publication (see “NOTE: Antibrowning equivalents”). You may be able to buy pure citric acid but it is less effective at preventing browning—the larger amount you need to use for apples may mask the natural fruit flavors. You can also use lemon juice, which is a dilute natural solution of both ascorbic and citric acid—it will add a lemony taste to the treated fruit.
FREEZING APPLES
Select full-flavored apples that are crisp and firm, not mealy in texture. You will need about 6 medium apples (about 2 pounds) to make a quart of slices. For approximate equivalents between U.S. and metric systems of measurement, a conversion table is provided at the end of this publication.
To reduce browning, work with only enough fruit to fill one quart or two pint containers at one time, and use ascorbic acid as described with each type of pack. A syrup pack is recommended for apples intended for uncooked desserts or fruit cocktail. A sugar pack or unsweetened dry packs are good for apples to be used in pie making. Wash the fruit as described in “Washing Apples,” above. Peel and core the fruit. For apple slices, slice medium apples into twelfths or large apples into six-teenths. For applesauce, follow the instructions in the “Applesauce”recipe.
Containers for freezing
Rigid plastic containers and glass freezing and canning jars make good freezer con-tainers. The glass in these jars has been tempered to withstand heat and cold. Glass jars not designed for freezing can easily break in the freezer. Flexible plastic freezer bags also work well. Ordinary waxed papers or paper cartons from ice cream or milk do not work well because they do not keep air or moisture from moving in or out of the container.
Syrup pack
Prepare the syrup before you prepare the apples. Make a heavy (40%) sugar syrup (table 2) and chill. Just before use, add 1⁄
2 teaspoon of ascorbic acid or equivalent
(see “NOTE: Antibrowning equivalents”) to each quart of syrup and stir well. Partially fill clean containers with cold syrup: 1⁄
2 cup of syrup in pint containers and 1 cup in
NOTE
Antibrowning equiva-lents: 1/2 teaspoon of
ascorbic acid crystals = 3 finely crushed 500-mg Vitamin C tablets = 3 teaspoons Fruit-Fresh = 11/2 teaspoons citric acid = 3 teaspoons lemon juice.
quart containers. Slice apples directly into the syrup in the containers. Press fruit down and cover slices with cold syrup. Leave the appropriate headspace, as shown in table 3. Keep the apple slices submerged in the syrup by placing a small piece of crumpled waxed paper or parchment paper (not aluminum foil) on top of the fruit in each container. Seal the containers and freeze.
Sugar pack
For each quart of apple slices, dissolve 1⁄
2 teaspoon of ascorbic acid or equivalent
(see “NOTE: Antibrowning equivalents”) in 3 tablespoons of water. As you slice the apples, sprinkle the mixture over portions of the sliced fruit and mix gently. Add 1⁄
2
cup of sugar and mix thoroughly to coat apple slices. Pack slices into containers and press fruit down, leaving the appropriate headspace (see table 3). Seal the containers and freeze.
Unsweetened dry packs
Follow directions for sugar pack, omitting the sugar. Pack apple slices treated with ascorbic acid into containers, leaving headspace. Or spread treated slices in single lay-ers on trays and freeze until hard. Immediately pack frozen slices into freezer bags or containers to prevent freezer burn.
Alternatively, apple slices may be steam blanched—this method is especially suited for pie apples and yields a good quality product without added sugar. To steam blanch, place apple slices loosely, and less than 2 inches deep, in a steamer basket or wire strainer over boiling water and cover. Keep heat high and steam fruit for 3 min-utes, stirring occasionally to ensure that all fruit is reached by the steam. Plunge the basket of fruit in cold running water or iced water for 3 minutes and drain. Measure and pack slices into containers and press fruit down, leaving the appropriate head-space (see table 3). Seal the containers and freeze.
Other unsweetened packs
In addition to unsweetened dry packs, you can pack apple slices in water, unsweet-ened juice, or pectin syrup. Unsweetunsweet-ened packs generally yield products that lack the plump texture and good color of fruit packed with sugar. The apples freeze harder and take longer to thaw. Fruit packed in pectin syrup may retain its texture better than if frozen in water or juice.
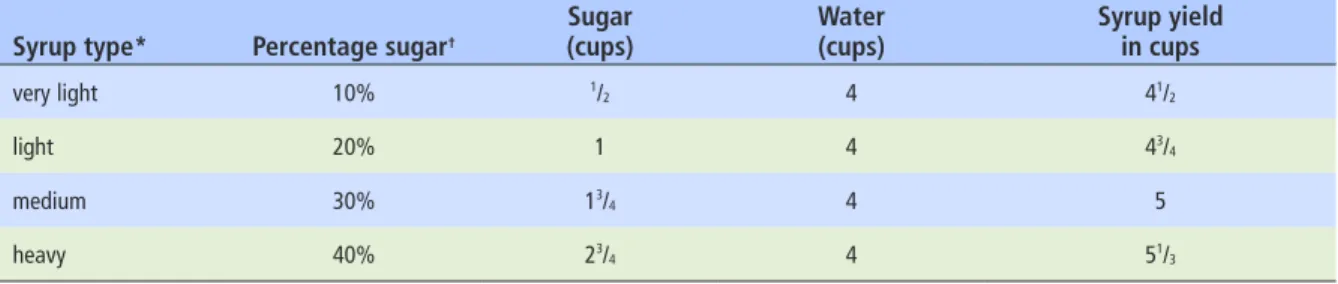
Table 2. Syrups for freezing or canning apples Syrup type* Percentage sugar†
Sugar
(cups) Water (cups) Syrup yield in cups
very light 10% 1/ 2 4 41/2 light 20% 1 4 43/ 4 medium 30% 13/ 4 4 5 heavy 40% 23/ 4 4 51/3 Notes:
* To make syrup, add the sugar to the water and stir, heating as necessary to dissolve.
† Approximate amount. In general, up to one-half of the sugar for canning syrups or up to one-quarter of the sugar for freezing syrups may
Prepare the packing liquid before you prepare the apples. Add 1⁄
2 teaspoon of
ascorbic acid or equivalent (see “NOTE: Antibrowning equivalents”) to each 1 quart of water or pectin syrup (preparation of pectin syrup is described below). Partially fill containers with cold water, pectin syrup, or unsweetened juice, as described for syrup pack, and slice apples directly into the liquid. Press down the slices and cover with liquid, leaving the appropriate headspace (see table 3). Keep the fruit submerged by placing a small piece of crumpled waxed paper or parchment paper on top of the apple slices in each container. Seal the containers and freeze.
Pectin syrup
Combine 1 package of powdered pectin with 1 cup of water in a saucepan. Heat to boiling and maintain the boil for 1 minute. Remove from the heat and add 13⁄4 cups
of water. Add more water if you want a thinner syrup. Cool. Yield is about 3 cups of moderately thick syrup.
Using artificial sweeteners
Apple slices can be packed in a sweet solution made by mixing water with sugar sub-stitutes such as saccharin (e.g., Sweet’N Low), aspartame (e.g., Equal), or sucralose (Splenda). These artificial sweeteners work well in frozen products, or you can add them to the unsweetened, thawed fruit just before serving.
Artificial sweeteners give a sweet flavor but do not provide the beneficial preser-vation effects of sugar, color protection, or thickness of syrup. The label on a sweet-ener package will tell you how much sweetsweet-ener is equivalent to standard amounts of sugar. Use the label directions to determine the amount needed.
Sealing, labeling, and storing
Before you close the containers, make sure sealing edges are free of moisture or food. Leave sufficient headspace in rigid containers to allow for expansion of food as it freezes (see table 3). Placing a small piece of crumpled waxed or parchment paper between the apples and the lid of liquid-packed apples will help keep the fruit sub-merged. Do not use aluminum foil because it will partly disintegrate as it reacts with the acids in the fruit. Seal each container tightly. Label containers plainly—include name of food, date, and type of pack.
Freeze packaged apples as quickly as possible at 0°F (−18°C) or below. For quickest freezing, place containers in single layers in the freezer. Freeze no more than 2 to 3 pounds of fresh food per cubic foot of freezer space at one time—a larger amount will raise the temperature in the freezer and lengthen the freezing time. The fruit should be thoroughly frozen within 24 hours and then you can rearrange the containers to store them more closely together.
Table 3. Headspace (inches) needed between packed food and lid for freezing fruit
Container with wide top opening Container with narrow top opening
Type of pack Pint (in) Quart (in) Pint (in) Quart (in)
liquid pack* 1/2 1 3/4 11/2
dry pack† 1/2 1/2 1/2 1/2
Notes:
*For applesauce and for apple slices packed in syrup, sugar, water, or juice.
Most fruits maintain high quality for 8 to 12 months at 0°F (−18°C) or below. Unsweetened apples lose quality faster than those packed in sugar or syrup. Fruits stored longer will lose quality but will continue to be safe to eat.
DRYING APPLES
Drying (dehydration) is the process of slowly removing water from food in order to preserve the food. Apples are considered excellent candidates for drying.
Oven drying
It is possible to dry apples in your kitchen oven, but we do not recommend it since it takes so long: over 25 hours to dry the slices adequately. The process heats up the kitchen, makes the oven unavailable for other uses, and is unsafe in homes with small children. If you wish to pursue oven drying, please consult other reliable references on the subject. One good online source is Preserving Food: Drying Fruits and Vegetables at theNational Center for Home Food Preservation Web site, http://www.uga.edu/nchfp.
Microwave drying
Do not attempt to use a microwave oven to dry apples. Fruit requires constant atten-tion during drying, and the oven door would have to be opened frequently to allow moisture to escape. Microwave-dried apples do not dry evenly and can easily scorch or burn.
Sun drying
The high sugar and acid content of apples makes them safe to dry outdoors when conditions are right for drying (minimum temperature of 85°F [29°C] and humidity less than 60 percent). However, insects and birds are attracted to drying apples, and may contaminate them. If you wish to try sun drying, please consult other reliable ref-erences such as the site listed under “Oven drying,” above.
Dehydrator drying
Unlike sun drying, which depends on proper weather conditions, dehydrator drying can be done at any time. There is an initial expense involved in buying a dehydrator (fig. 3), but many people think that a dehydrator produces the best quality dried food. An electric dehydrator can maintain low, even temperatures, circulating the heated air by means of a blower or fan. Most dehydrators are equipped with thermostats to maintain a constant temperature, and some have timers. Larger units with many shelves have room for more food than most ovens.
Preparing Apples for Drying
Wash apples thoroughly as described in “Washing Apples,”above. Peel the apples if desired, core, and slice into 1⁄4-inch rings, wedges, or chips (fig. 4). Fruit sliced into
uniform pieces will dry more evenly—thin, uniform, peeled slices dry the fastest. You can leave the peel on the apples, but unpeeled slices take longer to dry. Treat apples before drying, using one of the antibrowning treatments described below. You can safely dry fruits without pretreating them but untreated apples will continue to brown during and after drying. The treatments also help to preserve the flavor and vitamins of the fruit.
Figure 3.
Pre-drying Treatments
Sulfuring (an old method no longer recommended) or sulfite dips are the most effec-tive antibrowning treatments to use when drying apples for long-term storage (more than 1 year). However, sulfite residues remaining in the food after either of these treatments may cause serious reactions in a small percentage of people who are prone to asthma or allergy. Alternative treatments, such as blanching or ascorbic acid dips, are effective for shorter-term storage. If you plan to eat home-dried apples within 6 months after preparation, you probably wouldn’t notice much difference in the appearance of apples treated by the various methods.
Sulfite dips
Sulfite dips can produce the same long-term antibrowning effect as sulfuring, but more quickly and easily. Use either sodium bisulfite, sodium sulfite, or sodium metabisulfite that are labeled U.S.P. (food grade) or Reagent Grade (pure). These chemicals are available from drugstores or suppliers of wine-making materials. To prepare the dipping solution for apples, dissolve 3⁄4 teaspoon of sodium bisulfite in 1
quart of water. Alternatively, use 11⁄2 teaspoons of sodium sulfite, or 1 tablespoon of
sodium metabisulfite, per 1 quart of water. Soak apple slices in the solution for 10 minutes—avoid soaking longer or slices will absorb excess water and take longer to dry. Remove the fruit and drain well on paper towels. (One quart of this solution can be used to treat about 3 quarts of apple slices. Make fresh solution to treat additional fruit to be dried.)
Ascorbic acid dips
You can quite effectively control apple browning by dipping fruit in a strong solution of ascorbic acid (Vitamin C) or a commercial ascorbic acid-citric acid mixture (e.g., Fruit-Fresh). To prepare the ascorbic acid dipping solution, dissolve 2 teaspoons of ascorbic acid crystals or equivalent (see “NOTE: Antibrowning equivalents” on page 4) in a quart of water. Soak apple slices in the solution for 10 minutes (no longer or they will absorb too much water). Remove the slices and drain well on paper towels. One quart of solution will treat about 3 quarts of sliced apples. Make fresh solution to treat addi-tional fruit to be dried.
Fruit juice dips
You can use a fruit juice high in Vitamin C as an antibrowning treatment, but it is not as effective as a pure ascorbic acid dip. Use citrus juices, such as lemon, lime, and orange, which are also high in citric acid, or use pineapple, grape, and cranberry juices that have Vitamin C added. Each juice adds its own flavor and color to the apples. To treat apples, place slices in a bowl, add enough juice to cover the cut fruit, and soak for 10 minutes (no longer or they will absorb too much water). Remove the pieces and drain well. You can use the same juice dip for two batches of apple slices, but use fresh juice to treat additional fruit. (You can drink the used juice if you wish.)
CAUTION
Anyone who suffers from asthma, or who has an allergy or sensitivity to sulfur and/or sulfite resi-dues, should avoid dried apples or other dehy-drated fruit pretreated with sulfur or sulfite com-pounds.
Figure 4. Peel, core, and slice apples into rings, wedges, and chips.
Honey dip
Many commercially dried fruits have been pretreated with a honey solution to reduce browning. You can make a similar dip at home. Honey-dipped apples may take on the flavor of the honey. To make a honey solution, mix 1⁄
2 cup of sugar with 11⁄2 cups
of boiling water, cool to a lukewarm temperature, and add 1⁄2 cup of honey. Stir
thor-oughly. Place apple slices in the solution and soak for 5 (no longer than 10) minutes. Remove the fruit and drain well.
Steam blanching
Steam blanching is an effective but more labor-intensive pre-drying treatment. To steam blanch, put several inches of water in a large pot that has a tight-fitting lid and heat the water to boiling. Place prepared apple slices loosely, and less than 2 inches deep, in a steamer basket or wire strainer over the boiling water. Cover pot tightly with the lid and start timing immediately. Steam slices for 5 minutes, stirring occa-sionally to ensure that all fruit is reached by the steam. Remove fruit and drain well on paper towels.
Syrup blanching
Apple pieces blanched in a sugar syrup and then dried will have a texture similar to candied fruit. To make the syrup, combine 1 cup sugar, 1 cup light corn syrup, and 2 cups water in a saucepan. Add about 3 cups of apple slices to the syrup mixture and simmer for 10 minutes. Remove saucepan from the heat and let fruit stand in the hot syrup for 30 minutes. Lift apple slices out of the syrup with a slotted spoon and drain well.
Dehydrating Method
Set the dehydrator temperature at 140°F (60°C). If your dehydrator does not have a thermostat, place an accurate, easy-to-read thermometer on the bottom tray. Arrange the pretreated (see “Pre-drying Treatments,”above) and well-drained apple slices in a single layer on the drying trays. The pieces should not touch or overlap. Leave 1 to 2 inches between trays in the dehydrator. It may be necessary to turn the slices and rotate the racks’ positions up and down the stack during the drying process. Continue dehydrating until the fruit tests dry, as described below under “Testing for dryness.” Food dries much more quickly toward the end of the drying time, so watch it closely and remove individual pieces as they dry.
The amount of time it takes to dry apple slices depends on the apple variety, initial moisture content, the volume being dried, the size and thickness of the pieces, the air’s humidity during the drying process, and the dehydrator’s efficiency. The esti-mated drying time is 6 to 12 hours in a food dehydrator.
Testing for dryness
To test for dryness, remove several apple pieces from the dehydrator. After they have cooled, cut the pieces in half. There should be no visible moisture, and you should not be able to squeeze any moisture from the pieces. Some apple pieces may remain pliable, but they should not be sticky or tacky. If you fold a piece in half, it should not stick to itself.
After drying, cool the fruit for 30 to 60 minutes before packaging. Avoid packag-ing warm fruit, since that could lead to sweatpackag-ing and moisture buildup. You should also avoid long delays before you package because the apples may have an opportu-nity to reabsorb moisture from the air.
Post-drying
Conditioning dried apples
The water content of home-dried apples should be about 20 percent. When you take the fruit from the dehydrator, the pieces may not have the same moisture level because of their size or their location in the dehydrator. Conditioning is the process used to make sure that all pieces are equally moist. This reduces the risk of mold growth.
To condition the apple pieces, pack the dried, cooled fruit loosely in clean plas-tic or glass jars. Seal the containers and allow them to stand for 7 to 10 days. Excess moisture in some pieces will be absorbed by the drier pieces. Shake the jars daily to separate the apple pieces, checking for any water condensation. If condensation devel-ops in a jar, return the fruit to the dehydrator for further drying. After conditioning, package and store the fruit.
Packaging and storage
Dehydrated apples require very little storage space. Completely dried apple pieces can be stored in sealed plastic bags or airtight jars and cans. Pack the fruit tightly in the bag or container, removing as much air as possible. If you use metal containers, place the fruit in a plastic bag first in order to prevent reaction with the metal. The dried fruit should be stored in a dark, cool (60°F [15°C]) place. The apple’s color, flavor, aroma, and nutritive value will start to decrease after about a year. For longer stor-age, you can keep well-wrapped apples in the freezer. For best flavor and quality, use within 2 years of frozen storage.
Check dried apples occasionally during storage to make sure the product is still dry. Glass containers are excellent for storage because any moisture that collects on the inside is seen easily. Apple pieces that are affected by moisture but not spoiled should be used immediately or redried and repackaged. Moldy apples should be discarded.
Using dried apples
Home-dried apples can be eaten as a snack or can be chopped and used instead of raisins in cakes, quick breads, and cookies. You can also reconstitute the home-dried apples in water to plump the fruit and make it softer. To reconstitute, cover dried apple pieces with boiling water and soak until tender (at least 30 minutes). Avoid oversoaking, which causes a loss of flavor and a mushy, waterlogged texture. Also, if the fruit is soaked too long it may start to ferment and spoil. Refrigerate the apples if soaking time is more than 1 or 2 hours. Drain and use the fruit, or cook soon after reconstituting.
Use reconstituted apples in favorite recipes for pies, breads, stuffing, gelatin sal-ads, cobblers, fruit crisps, homemade ice cream, and cooked cereals. To retain nutri-ents, you can use the leftover soaking liquid as part of the water needed in the recipe.
To cook reconstituted dried apples, simmer them covered in the soaking liquid for 10 to 15 minutes, depending on the size of the pieces. Some starch in the apples may be converted to sugar during the drying process, so less sugar may be needed when cooking dried apples than when cooking the fresh fruit. Add sugar, if needed, at the end of the cooking process so it does not interfere with the apples’ absorption of water. Adding a few grains of salt enhances the natural sweetness of dried apples. Lemon, orange, or grapefruit juices added to the cooked dried apples just before serv-ing helps give them a fresh fruit flavor and adds Vitamin C.
CANNING APPLES
At pH 3.1 to 4.0 apples are considered acidic. Foods high in acid are quite simple to preserve because the acid inhibits the growth of bacteria. The main spoilers of acidic foods are molds, yeasts, and enzymes, all of which are destroyed at the temperatures reached in a boiling water bath, the recommended treatment.
Using the Right Equipment
Containers for canning
Make sure all jars are free of cracks and chips. These defects will prevent airtight seals. Jars that are manufactured specifically for home canning are recommended. Glass mayonnaise jars and similar jars are not recommended for use in home can-ning because they are not manufactured for repeated heating and have a higher rate of breakage. Wash the jars in hot, soapy water and rinse them, or you can wash them in a dishwasher. Keep jars hot until you fill them to prevent breakage when filled with hot product.
Lids and rings
Select the correct size of lids to fit your jars. Always use new lids each time you do canning. Rings can be reused if they are in good condition. Wash and thoroughly dry the rings before you store them and they will remain in good condition for years. Follow the manufacturer’s instructions for pretreating the canning lids. Metal lids have a sealing compound and usually need to be heated prior to use.
Filling jars
Do not overfill the jars. Pack the apples to the shoulder of the jar, leaving room for the covering liquid and recommended headspace (fig. 5). After adding liquid to the recommended headspace, use a plastic knife or spatula to dislodge air bubbles trapped on the inner side of the jars.
Adjusting seals
With a clean, damp cloth or towel, carefully wipe the rim and threads of the jar. Place the clean, prepared lid on the rim of the jar and screw the ring band on finger tight. Do not overtighten. If tightened too much, the lids will not vent correctly, causing buckling of the lid, loss of the seal a day or two after processing, and possibly glass breakage during processing.
Using a boiling water bath canner
Any large covered kettle or pot may be used as a boiling water bath canner, if it is deep enough to allow water to cover the tops of the jars by 1 to 2 inches
(fig. 6). Fill the canner half full with water. Preheat the water to 140°F (60°C). Place jars on a rack in the canner (fig. 6); any jars that come in direct contact with the bot-tom of the canner may break. Add enough boiling water to cover the tops of the jars by at least 1 inch. When water comes to a boil, begin to count the processing time indicated in the recipe. At the end of the recommended processing time, remove jars from canner and cool them, undisturbed, at room temperature. Avoid placing jars directly on cold surfaces like tile countertops as that may cause the jars to crack. Setting the jars on a towel over the countertop rather than directly on the counter-top can help protect jars from breaking. After the jars have cooled, check them for a tight seal. In a tight seal the metal lid will have snapped down and is curved slightly
CAUTION
When the processing time is less than 10 min-utes (e.g., see “Canning apple juice”), you must use sterilized jars. To sterilize, heat the jars in boiling water for 10 minutes. Keep these jars hot by leaving them in the hot water until you fill them.
Figure 5. Leave adequate headspace in canning jars.
Figure 6. Boiling water bath canner and jars.
inwards. Press down on the center of the lid. If it springs back, there is no seal— either place this jar in the refrigerator and use within the next few days, freeze the jar, or reprocess the contents using a new jar and lid. Remove the rings of the sealed jars and wash the jars gently before storage to remove any syrup residues. Store in a dark, dry, cool place.
Using a boiling water bath at higher altitudes
The processing times given in the following recipes are for elevations of 0 to 1,000 feet. At higher altitudes, you must increase the processing time as recommended for that recipe (table 4). Local elevations may be found online, typically at sites that also report climate. You may also check with your county extension office.
Canning Apple Products
Hot pack
Use a hot pack for all apple products. In a hot pack, the food is precooked and packed “hot” into canning jars. The filled jars are then processed in a boiling water bath.
Antibrowning solution
To prevent browning of cut apples during preparation for canning, place apple pieces into a treatment solution as they are peeled and sliced. Make an effective antibrown-ing solution for cut apples by combinantibrown-ing 1⁄
2 teaspoon of ascorbic acid or equivalent
(see “NOTE: Antibrowning equivalents” on page 4) with 2 quarts of water.
Canning apples
Apples may be canned in water, sugar syrup, or juice. The sugar in the syrup or juice will help the fruit pieces hold their shape, color, and flavor, but sugar is not neces-sary to prevent spoilage. If you use syrup, make it before you prepare the fruit. Make a very light, light, or medium syrup, using the proportions given in table 2 (in section “Freezing Apples”), keeping in mind that the lighter the syrup, the softer the final product will be. Bring the water, juice, or syrup to a boil and keep it hot.
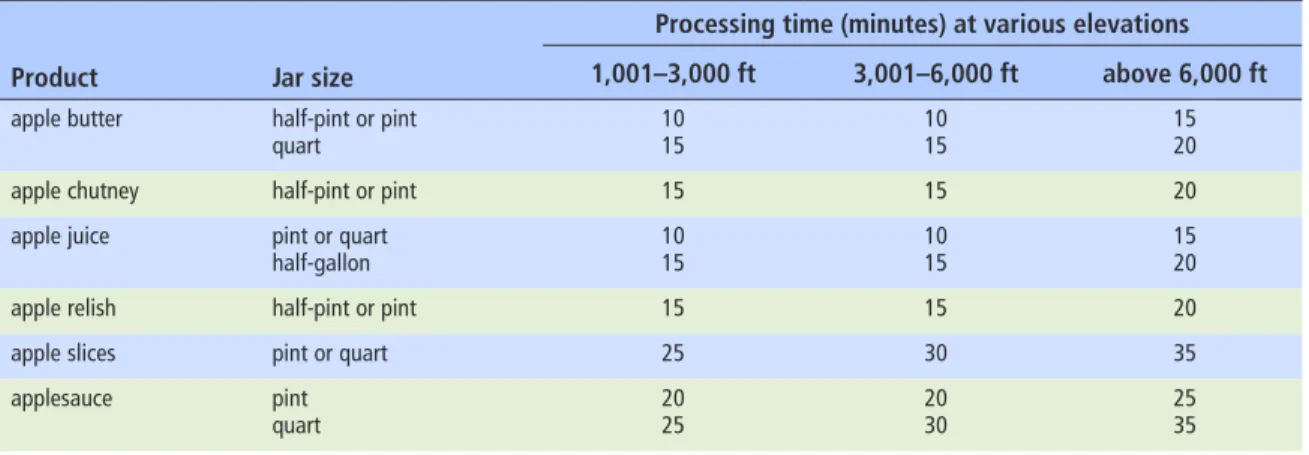
Select apples that are juicy, crisp, and use preferably both sweet and tart varieties (see table 1). Approximately 10 pounds of apples will yield 3 quart jars or 7 pint jars. Wash the fruit as described in “Washing Apples,” on page 3. Peel, core, and slice the Table 4. Recommended processing times for apple products (hot pack) in a boiling water bath canner at higher altitudes
Product Jar size
Processing time (minutes) at various elevations 1,001–3,000 ft 3,001–6,000 ft above 6,000 ft
apple butter half-pint or pint
quart 10 15 10 15 15 20 apple chutney half-pint or pint 15 15 20 apple juice pint or quart
half-gallon 10 15 10 15 15 20 apple relish half-pint or pint 15 15 20 apple slices pint or quart 25 30 35 applesauce pint
apples. Immerse cut apples in antibrowning solution (described above) while prepar-ing additional fruit. Drain fruit and place in a large saucepan. Cover with hot syrup, juice, or water—you will need about 4 cups of liquid for every 10 pounds of apples, prepared and sliced. Bring mixture to a boil and boil for 5 minutes, stirring occasion-ally. Fill hot, clean jars with hot apple slices and cover with hot liquid, leaving a 1⁄2
-inch headspace. Remove air bubbles using a plastic knife or spatula. Wipe the jar rims and adjust the lids. Process in a boiling water bath canner for 20 minutes for both pints and quarts; at altitudes above 1,000 feet, refer to table 4for the recommended increase in processing time.
Using artificial sweeteners in no-sugar canning
Saccharin-based sweeteners (e.g., Sweet’N Low) can turn bitter in foods that are heat-ed after adding the sweetener. Aspartame-basheat-ed sweeteners (e.g., Equal) lose sweeten-ing power when exposed to heat. Both of these artificial sweeteners should be added to canned apples or applesauce just before serving in order to avoid unpleasant flavor changes. However, sucralose (Splenda) is not affected by heat, so you can use this sweetener when preparing apple products for canning. It is important to remember that canning apples in water, with or without artificial sweeteners, will produce a very mushy-textured product, similar to applesauce.
Canning apple juice
Good quality apple juice is made from a blend of different apple varieties. For best results, buy fresh apple juice from a local cider maker within 24 hours after press-ing. Freshly pressed apple juice is cloudy. Refrigerate juice for 24 to 28 hours to allow sediment to settle.
Thoroughly wash hands, utensils and work surfaces. Without mixing the cooled cider, carefully pour off clear liquid and discard the sediment. Strain the clear liquid through a paper coffee filter or a double layer of clean, damp cheesecloth.
Prepare canning jars as described in “Using the Right Equipment”above, mak-ing sure that you sterilize pint and quart jars before fillmak-ing them with juice. Heat juice, stirring occasionally until it begins to boil. Pour the hot juice into hot, clean jars, leaving a 1⁄
4-inch headspace. Wipe the jar rims and adjust the lids. Process in a boiling
water bath canner for 5 minutes for pints or quarts, or 10 minutes for half-gallons; at altitudes above 1,000 feet, refer to table 4for the recommended increase in processing time.
HOW MANY
APPLES?
1 bushel weighs 42 to 48 pounds; a 4-quart basket holds about 5 pounds; 1 pound equals about two large, three medium, or four small apples.
RECIPE: Applesauce
Makes 9 pint (500 ml) jars
Ingredients4 pounds (1.8 kg) tart apples (about 12 medium) 10 pounds (4.5 kg) sweet apples (about 30 medium)
2 cups (500 ml) water
1⁄
2 cup (125 ml) sugar (optional)
Preparation
1. Thoroughly wash your hands, utensils, and work surfaces, and then prepare the ingredients.
2. Select apples that are sweet, juicy, and crisp. A combination of cooking apple varieties produces a better-flavored applesauce (see table 1); use a ratio of 1 or 2 pounds of tart apples to 3 pounds of sweeter apples. 3. Wash the fruit as described in “Washing Apples,” on page 3.
4. Peel and core apples, and chop coarsely. Drop cut apples into an anti-browning solution while preparing additional fruit—to make the solution combine 1⁄2 teaspoon (2.5 ml) of ascorbic acid or equivalent (see “NOTE:
Antibrowning equivalents” on page 4) with 2 quarts (2 l) of water. 5. Drain apples and place in a large enameled or stainless steel kettle;
add water.
6. Bring to a boil and cook until apples are tender (5 to 20 minutes,
depending on the variety and maturity of the apples), stirring occasionally to prevent sticking.
7. Press through a sieve or food mill, if you want a smooth applesauce. If you prefer chunky-style sauce, omit this step. (Adding the sugar early in the cooking process will also increase “chunkiness” of the applesauce.) 8. Sweeten to taste, if desired.
9. Reheat sauce to boiling.
10. Pack hot applesauce into clean, hot jars, leaving 1⁄2-inch headspace.
11. Remove air bubbles using a plastic knife or spatula; wipe the jar rims and adjust the lids.
12. Process in a boiling water bath canner for 15 minutes for pints, or 20 minutes for quarts; at altitudes above 1,000 feet, refer to table 4 for the recommended increase in processing time.
Freezing applesauce
1. Make applesauce according to the recipe above, Steps 1 to 8.
2. Cool quickly; pack in rigid air- and water-resistant containers, leaving
1⁄2-inch headspace.
RECIPE: Apple Butter
Makes 8 to 9 pint (500 ml) jars
Ingredients8 pounds (3.6 kg) apples (about 24 medium) 2 cups (500 ml) vinegar (5% acetic acid) 2 cups (500 ml) apple cider
21⁄4 cups (575 ml) white sugar
21⁄
4 cups (575 ml) brown sugar, packed
2 tablespoons (30 ml) ground cinnamon 1 tablespoon (15 ml) ground cloves*
*You can also add or substitute allspice, nutmeg, and/or maple syrup if desired.
Preparation
1. Thoroughly wash your hands, utensils, and work surfaces, and then prepare the ingredients.
2. Wash the fruit as described in “Washing Apples,” on page 3.
3. Quarter and core apples, and cut into pieces. It is not necessary to peel the apples. 4. Combine apples with vinegar and cider in a large enameled or stainless steel saucepan
and heat slowly over medium heat; simmer about 20 to 25 minutes or until soft. 5. Press fruit mixture through a colander, food mill, or strainer to give apple pulp.
6. Cook pulp mixture using either the Stove-top method or the Oven method, described below. Apple butter sticks easily when cooked on top of the stove and must be watched carefully. The oven method produces a darker product and takes longer, but requires less watching. To test for doneness: Remove a spoonful of apple butter and hold it away from the steam for 2 minutes—the apple butter is done if it is thick enough to remain mounded on the spoon. Or spoon a small quantity of apple butter onto a plate—it is done if no rim of liquid separates around the edge of the butter. Stove-top method: Combine pulp with sugar and spices in a large heavy-bottomed
saucepan, and bring mixture to a boil, stirring constantly. Continue to boil over moderate heat, stirring fairly constantly to prevent scorching. As the apple butter thickens, reduce the heat and simmer for about 1 hour, stirring frequently, until the butter is thick. Pack into jars (Step 7).
Oven method: Preheat oven to 300°F (150°C). Combine pulp with sugar and spices and mix thoroughly. Pour mixture into a large heat-proof dish or enameled roasting pan and cover loosely with foil to prevent spattering. Leave the ends of the foil loose so the moisture can vent out of the pan. Bake apple butter for about 2 to 3 hours, stirring occasionally to prevent a film from forming on the surface. When the butter is thick, but still moist on top, remove from oven. Pack into jars (Step 7).
7. Pour hot thickened apple butter into sterilized, hot half-pint or pint jars (see “Using the Right Equipment” above), or clean, hot quart jars, leaving 1⁄
4-inch headspace.
8. Wipe the jar rims and adjust the lids.
9. Process in a boiling water bath canner for 5 minutes for half-pints and pints, or for 10 minutes for quarts; at altitudes above 1,000 feet, refer to table 4 for the recommended increase in processing time.
PICKLING APPLES
Chutneys and relishes are forms of pickling that are well suited to apples. The level of acidity in these products is important to their safety. Never alter the proportions of vinegar, food, or water in a recipe and use only tested recipes. Home-pickled products must be processed in a boiling water bath as described in “Canning Apples,” above.
RECIPE: Apple Chutney
Makes 6 pint (500 ml) jars
Ingredients2 quarts (2 l) chopped tart apples (about 10 medium) 1 cup (250 ml) chopped onions
2 sweet red bell peppers (medium),
seeded and chopped
2 hot red peppers, seeded and chopped
4 cups (1 l) raisins (seedless)
4 cups (1 l) brown sugar
3 tablespoons (45 ml) mustard seed 2 tablespoons (30 ml) ground ginger 2 teaspoons (10 ml) ground allspice 2 teaspoons (10 ml) salt
1 clove garlic, crushed
1 quart (1 l) white vinegar (5% acetic acid)
Preparation
1. Thoroughly wash hands, utensils, and work surfaces, and then prepare ingredients.
2. Wash the fruit as described in “Washing Apples,” on page 3. 3. Peel and core apples, and chop coarsely.
4. Combine all ingredients in a large enameled or stainless steel saucepan and heat slowly over medium heat; simmer until thick, about 1 hour and 15 minutes.
5. As mixture thickens, stir frequently to prevent sticking.
6. Pour hot chutney into clean, hot jars, leaving 1⁄2-inch headspace.
7. Wipe the jar rims and adjust the lids.
8. Process in a boiling water bath canner for 10 minutes for half-pint and pint jars; at altitudes above 1,000 feet, refer to table 4 for the recommended increase in processing time.
RECIPE: Sweet Apple Relish
Makes about 4 pint (500 ml) jars
Ingredients4 pounds (1.8 kg) apples (about 10 medium) 11⁄
4 cups (325 ml) white vinegar (5% acetic acid)
1 cup (250 ml) sugar
1⁄
2 cup (125 ml) light corn syrup 2⁄3 cup (175 ml) water
11⁄
2 teaspoons (8 ml) whole cloves
2 sticks cinnamon (3-inch pieces), broken up
1 teaspoon (5 ml) whole allspice
Preparation
1. Thoroughly wash hands, utensils, and work surfaces, and then prepare ingredients.
2. Wash the fruit as described in “Washing Apples,” on page 3. 3. Peel and core apples, and slice thinly. Drop cut apples into an
antibrowning solution while preparing additional fruit—to make the solution combine 1⁄
2 teaspoon (2.5 ml) of ascorbic acid or equivalent
(see “NOTE: Antibrowning equivalents” on page 4) with 2 quarts (2 l) of water.
4. Combine vinegar, sugar, corn syrup, water, and spices in a large enameled or stainless steel saucepan; bring to a boil.
5. Drain apples and add to the syrup mixture.
6. Bring to a boil; simmer 3 minutes, stirring occasionally.
7. Pack hot apple slices into clean, hot jars, leaving enough headspace to allow room for syrup.
8. Fill jars with boiling hot syrup to cover apples completely, leaving
1⁄
2-inch headspace.
9. Remove air bubbles using a plastic knife or spatula. 10. Wipe the jar rims and adjust the lids.
11. Process in a boiling water bath canner for 10 minutes for half-pint and pint jars; at altitudes above 1,000 feet, refer to table 4 for the recommended increase in processing time.
ADDITIONAL RESOURCES
UC Food Safety at UC Davis provides information about food safety and has links
to resources on home food preservation. http:// www.ucfoodsafety.ucdavis.edu.
UC Davis Fruit and Nut Research and Information Center provides information
on growing apples in the home garden. Their Web site contains useful infor-mation on apple pest and disease management, and control of disorders. http://fruitsandnuts.ucdavis.edu/ and http://homeorchard.ucdavis.edu/.
The Postharvest Technology Research and Information Center at
UC Davis provides information on storing fresh fruits and vegetables. http://postharvest.ucdavis.edu/produce/storage/index.shtml.
The National Center for Home Food Preservation provides science-based
infor-mation on home food preservation for educators and home food preservers. http://www.uga.edu/nchfp/.
Drying Fruits is an online publication available through Colorado State University Cooperative Extension. http://www.ext.colostate.edu/pubs/foodnut/09309.pdf.
ACKNOWLEDGMENTS
The University of California’s Division of Agriculture and Natural Resources provided support for the development and production of this publication. FDA-CFSAN grant number 001629-01-1 and USDA-CSREES grant number 00-52102-9637 provided funding for research related to washing fruit.
The authors offer special thanks to Donna Gaboury, Janice Hsiao, and Judy Howard for editorial and design assistance. Diagrams and recipes have been used or adapted with permission from the 1999 edition of So Easy to Preserve by Elizabeth L. Andress and Judy A. Harrison (Bulletin 989, 4th edition, Cooperative Extension Service, The University of Georgia, Athens).
Approximate metric equivalents
U.S. unit Metric
1 teaspoon (tsp) 5 milliliters (ml) 1 tablespoon (tbsp) 15 milliliters (ml) 1 ounce (oz) 28 grams (g) 1 cup 250 milliliters (ml) 1 pint (pt) 500 milliliters (ml) or
0.5 liter (l) 1 quart (qt) 1 liter (l) 1 gallon (gal) 4 liters (l) 1 bushel (bu) 35 liters (l) 1 pound (lb) 454 grams (g) or
0.45 kilogram (kg) 1 inch (in) 2.5 centimeters (cm) 1 foot (ft) 0.3 meters (m)
For more inFormation
You’ll find detailed information on many aspects of food preservation and preparation in these titles and in other publications, slide sets, CD-ROMs, and videos from UC ANR:
Cantaloupe: Safe Methods to Store, Preserve, and Enjoy (ANR publication 8095), 2003. Oranges: Safe Methods to Store, Preserve, and Enjoy (ANR publication 8199), 2006. Peppers: Safe Methods to Store, Preserve, and Enjoy (ANR publication 8004), 1998. Safe Methods of Canning Vegetables (ANR publication 8072), 2003.
Strawberries: Safe Methods to Store, Preserve, and Enjoy (ANR publication 8256), 2007. Tomatoes: Safe Methods to Store, Preserve, and Enjoy (ANR publication 8116), 2004.
To order or obtain printed ANR publications and other products, visit the ANR Communication Services online catalog at http://anrcatalog.ucdavis.edu. You can also place orders by mail, phone, or FAX, or request a printed catalog of our products from:
Agriculture and Natural Resources Communication Services
6701 San Pablo Avenue, 2nd Floor Oakland, California 94608-1239
Telephone: (800) 994-8849 or (510) 642-2431 FAX: (510) 643-5470
E-mail inquiries: danrcs@ucdavis.edu
An electronic version of this publication is available on the ANR Communication Services Web site at http://anrcatalog.ucdavis.edu.
Publication 8229
ISBN-13: 978-1-60107-449-2
© 2007 by the Regents of the University of California, Division of Agriculture and Natural Resources. All rights reserved.
To simplify information, trade names of products have been used. No endorsement of named or illustrated products is intended, nor is criticism implied of similar products that are not men-tioned or illustrated.
The University of California prohibits discrimination or harassment of any person on the basis of race, color, national origin, religion, sex, gender identity, pregnancy (including childbirth, and medical conditions related to pregnancy or childbirth), physical or mental disability, medical condition (cancer-related or genetic characteristics), ancestry, marital status, age, sexual orienta-tion, citizenship, or status as a covered veteran (covered veterans are special disabled veterans, recently separated veterans, Vietnam era veterans, or any other veterans who served on active duty during a war or in a campaign or expedition for which a campaign badge has been autho-rized) in any of its programs or activities. University policy is intended to be consistent with the provisions of applicable State and Federal laws.
Inquiries regarding the University’s nondiscrimination policies may be directed to the Affirmative Action/Staff Personnel Services Director, University of California, Agriculture and Natural Resources, 1111 Franklin Street, 6th Floor, Oakland, CA 94607-5201, (510) 987-0096. For a free catalog of other publications, call (800) 994-8849. For help downloading this publication, call (530) 297-4445.
This publication has been anonymously peer reviewed for technical accuracy by University of California scientists and other qualified professionals. This review process was managed by the ANR Associate Editor for Food and Nutrition.
To simplify information, trade names of products have been used. No endorsement of named or illustrated products is intended, nor is criticism implied of similar products that are not men-tioned or illustrated.