Aspire
Automatic Call Distribution
(ACD)
This manual has been developed by NEC America. It is intended for the use of its customers and service personnel, and should be read in its entirety before attempting to install or program the system. Any comments or suggestions for improving this manual would be appreciated. Forward your remarks to:
NEC America, Inc., Corporate Networks Group 4 Forest Parkway, Shelton, CT 06484
cng.nec.com
Nothing contained in this manual shall be deemed to be, and this manual does not constitute, a warranty of, or representation with respect to, any of the Equipment covered. This manual is subject to change without notice and NEC America has no obligation to provide any updates or corrections to this manual. Further, NEC America also reserves the right, without prior notice, to make changes in equipment design or components as it deems appropriate. No representation is made that this manual is complete or accurate in all respects and NEC America shall not be liable for any errors or omissions. In no event shall NEC America be liable for any incidental or consequential damages in connection with the use of this manual. This document contains proprietary information that is protected by copyright. All rights are reserved. No part of this document may be photocopied or reproduced without prior written consent of NEC America.
Table of Contents
Automatic Call Distribution (ACD) ◆ Table of Contents- 1
Introduction . . . 1
About ACD . . . 1
Setting Up ACD for the First Time . . . 5
Step 1: Arrange Extensions into ACD Groups . . . 7
Step 2: Set Up Work Schedules and Work Periods . . . 10
Step 3: Assign Extensions to ACD Groups for Each Work Period . . . 12
Step 4: Arrange Trunks Into Incoming Ring Groups . . . 15
Step 5: Determine Trunk Work Schedules . . . 17
Step 6: Assign Incoming Ring Groups to ACD Groups . . . 19
Basic Programming . . . 22
Basic Operation . . . 24
Advanced ACD Features . . . 27
Advanced
Feature Guide . . . 29
ACD Queue Announcement . . . 30
ACD Setup Options . . . 31
Emergency Call . . . 33
Headset Operation (with Automatic Answer) . . . 35
Hotline for ACD Agents . . . 38
Identification Codes for ACD Agents . . . 41
Multiple Directory Numbers / Call Coverage for ACD Groups . . . 46
Off Duty Mode . . . 49
Overflow Options . . . 52
Queue Status Display . . . 67
Supervisor, ACD Group . . . 71
Supervisor, ACD System . . . 75
Supervisor, DSS Console . . . 79
Supervisor Monitor / ACD Monitor . . . 83
Traffic Reports . . . 85
Table of Contents
ACD Programming . . . 91
Before You Start Programming . . . 93
Program 10 : System Configuration Setup . . . 99
10-07 : Conversation Record Circuits . . . 99
Program 11 : System Numbering . . . 101
11-13 : Service Code Setup (for ACD) . . . 101
11-17 : ACD Group Pilot Number . . . 103
Program 15 : Extension, Basic Setup . . . 105
15-02 : Multi-Line Telephone Basic Data Setup . . . 105
15-07 : Programmable Function Keys . . . 107
15-08 : Incoming Virtual Extension Ring Tone Setup . . . 114
15-09 : Virtual Extension Ring Assignment . . . 116
15-10 : Incoming Virtual Extension Ring Tone Order Setup . . . 118
15-11 : Virtual Extension Delayed Ring Assignment . . . 120
Program 20 : System Option Setup . . . 122
20-02 : System Options for Multi-Line Telephones . . . 122
20-04 : System Options for Virtual Extensions . . . 124
20-06 : Class of Service for Extensions . . . 126
20-13 : Class of Service Options (Supplementary Service) . . . 128
Program 22 : Incoming Call Setup . . . 130
22-01 : System Options for Incoming Calls . . . 130
Program 22 : Incoming Call Setup . . . 132
22-03 : Trunk Ring Tone Range . . . 132
22-05 : Incoming Trunk Ring Group Assignment . . . 134
Program 30 : DSS/DLS Console Setup . . . 136
30-01 : DSS Console Operating Mode . . . 136
30-02 : DSS Console Extension Assignment . . . 138
30-03 : DSS Console Key Assignment . . . 140
30-04 : Alternate DSS Console Extension Assignment . . . 147
Table of Contents
Automatic Call Distribution (ACD) ◆ Table of Contents- 3
Program 41 : ACD Setup . . . 151
41-01 : System Options for ACD . . . 151
41-02 : ACD Group and Agent Assignments . . . 152
41-03 : Incoming Ring Group Assignment for ACD Group . . . 154
41-04 : ACD Group Supervisor . . . 156
41-05 : ACD Agent Work Schedules . . . 158
41-06 : Trunk Work Schedules . . . 160
41-07 : ACD Weekly Schedule Setup . . . 162
41-08 : ACD Overflow Options . . . 164
41-09 : ACD Overflow Table Setting . . . 166
41-10 : PGDAD Delay Announcement . . . 168
41-11 : VRS Delay Announcement . . . 170
41-12 : Night Announcement Setup . . . 172
41-13 : VRS Night Announcement . . . 174
41-14 : ACD Options . . . 176
41-15 : ACD Queue Alarm Information . . . 178
41-16 : ACD Threshold Overflow . . . 180
41-17 : ACD Login Mode Setup . . . 182
41-18 : ACD Agent Identity Code Setup . . . 184
41-19 : Voice Mail Delay Announcement . . . 186
Program 90 : Maintenance Program . . . 188
90-20 : Traffic Report Data Setup . . . 188
Introduction
About ACD
Automatic Call Distribution (ACD) ◆ 1
Introduction
About ACD
What is ACD?
Equitable Distribution of Calls Among Agents
Automatic Call Distribution (ACD) uniformly distributes calls among member agents of a programmed ACD Group. When a call rings into an ACD Group, the system automatically routes the call to the agent that has been idle the longest. Automatic Call Distribution is much more sophisticated and comprehensive than Department Calling and other group services — it can accurately judge the work load at each agent and dis-tribute calls accordingly. Automatic Call Distribution operation is further enhanced by:
● ACD Announcements (which play to incoming callers)
● ACD Call Queuing
● ACD Overflow
● Agent Log In and Log Out Services
● Call Monitoring
● Enhanced DSS Operation
● Flexible Time Schedules
Introduction
About ACD
Using This Manual
This manual is in three sections:
● Section 1: Setting Up ACD for the First Time
This section guides you step by step in setting up a basic ACD system. You'll learn how to: - Arrange extensions into ACD Groups.
- Set up Work Schedules for ACD Groups and outside calls. - Configure the ACD Groups to work with your Work Schedules. - Program trunks to directly ring into ACD Groups.
- Use basic ACD features like transferring calls into a group and taking agents in and out of service.
Each step includes a worksheet in which you can record your data, as well as a sample work-sheet that illustrates how an option can be set up.
● Section 2: Advanced ACD Features
Use Section 2 to set up the more advanced ACD features. The advanced ACD features in this section are in alphabetical order, like a dictionary. This section subdivides each feature defini-tion into headings as follows:
- Description tells what the feature is and describes its benefits. Along with the Description are the Conditions and the Default Setting. Conditions provides the feature's operational limits (if any). Default Setting outlines how the feature works with the default program-ming. When initially installed, the system uses the default setting.
- Programming explains the system programming that lets you customize the feature. Some features require programming; other's don't. If you decide to customize a feature, use Sec-tion 3 to enter the change into the system
- Related Features presents the feature interaction.
- Operation consists of instructions on how to use each feature.
● Section 3: Programming
This section lists each ACD program in numerical order. The information on each program is subdivided into the following headings:
- Description tells what options the program defines. Along with the Description are the Conditions and Default Setting. Conditions describes any limits or special considerations that may apply to the program. Default Setting lists the default (factory-installed) program data. When you first install the system, it uses the Default Setting for all programs. The reverse type (white on black) just beneath the Description heading is the program's access level. You can only use the program if your access level meets or exceeds the level the program requires. Refer to How to Enter the Programming Mode (page 95) for a list of the system's access levels and passwords.
Introduction
About ACD
Automatic Call Distribution (ACD) ◆ 3
Using This Manual (Cont'd)
Telephone Programming Instructions shows you how to enter the program's data into system memory. For example:
1. Enter the programming mode. 2. 41 03
3. Enter the number of the item you want to program.
4. Select the Incoming Ring Group number to be programmed by pressing the FLASH or the VOLUME
▲
or VOLUME▼
keys.5. Enter data for the item you selected + HOLD. 6. Enter data for the next item in the program.
OR
Press MSG once to enter a new item number. OR
Press MSG until you’ve exited that series’s programming section.
These steps tell you to enter the programming mode, dial “41 03 nn” from the telephone dial pad. After you do, you'll see the message "INC Group1 Mode1 Group 0?" on the telephone display. (To learn how to enter the programming mode, see How to Enter the Programming Mode (page 95).)
41-03-01 INC Group1 Mode1 Group 0
back
↑↑↑↑ ↓↓↓↓
select41-03-nn INC Groupnnn nnnnn
Introduction
About ACD
Unique Considerations
Simplifying Keyset Operation with One-Touch Keys...
A keyset user can access many features through Service Codes (e.g., Service Code *0 answers a Message Waiting from a co-worker). To streamline the operation of their phone, a keyset user can store these codes under One-Touch Keys. This provides one-button operation for almost any feature. To find out more, read the One-Touch Calling and One-Touch Serial Operation features in your Software Manual.
Programmable Keys...
When reading an instruction using programmable keys, you will see a notation similar to (PGM 15-07 or SC 851: 05). This means that the key requires function code 05, and you can program this code through Pro-gram 15-07 or by dialing Service Code 851. Service Code 852 is also used and requires a previously pro-grammed “851” key to be undefined before the system will accept the 852 programming (if a key is programmed with a function using the 851 code, undefine the key using 851 + 000). Refer to the Program-mable Function Keys feature in your Software Manual if you need more information.
Using Handsfree...
The manual assumes each extension has Automatic Handsfree. This lets a user just press a line key or CALL key to answer or place a call. For extensions without Automatic Handsfree, the user must:
● Lift the handset or press SPK for Intercom dial tone
● Lift the handset or press SPK, then press a line key for trunk dial tone
ACD Agents and Non-ACD Ring Groups...
If an ACD agent is assigned to several different ring groups (Program 22-04-01), while they are logged into the ACD group, they will only receive calls from the ACD ring group. Calls from other ring groups will only ring the agent's extension while they are logged out.
Setting Up ACD for the First Time
Automatic Call Distribution (ACD) ◆ 5
Setting Up ACD for the First Time
Section 1:
Setting Up ACD for the First Time
Step 1: Arrange Extensions into ACD Groups
Automatic Call Distribution (ACD) ◆ 7
Step 1: Arrange Extensions into ACD Groups
Setting Up ACD for the First Time
How many ACD Groups do you need?
Your first step in setting up ACD is to find out how many ACD Groups you need and which extensions should be in each group. Use the ACD Group Worksheet on page 11 and the sample below when completing this step.
1. Select the ACD Group Number
The system allows up to 64 ACD Groups. You can have up to 512 ACD agents. You can put any agent in any group. In addition, an agent can be logged into only one group at a time, but a Call Coverage key can be programmed for other groups. This allows, for example, a Technical Service representa-tion to answer Customer Service calls at lunch time when many of the Customer Service reps are unavailable.
In the ACD Group Worksheet (page 9):
In the Member Extensions column, write in the extensions that will be in each ACD Group. (If you put an extension in more than one group, be sure to check when you get to Step 3 that the groups are not active at the same time.) The sample worksheet below shows extensions 305, 307, 317 and 339 in ACD Group 1. Extensions 309, 311 and 315 are in ACD Group 2.
2. Choose an ACD Master Number
The ACD Master Number is the "extension number" of the whole group. Calls transferred to the ACD Master number enter the group and are routed accordingly. Although the master number can be any valid extension number, you should choose a number that is out of the normal extension range.
In the ACD Group Worksheet (page 9):
Enter the Master Number for each of your ACD Groups. The sample worksheet below uses 650 for ACD Group 1 and 651 for ACD Group 2.
3. Write in an ACD Group Name
To make it easier to remember what each of your groups are for, assign a name to each ACD Group.
In the ACD Group Worksheet (page 9):
Enter a name for each group. The sample worksheet below uses Tech Service for ACD Group 1 and Customer Support for ACD Group 2.
Aspire System
Available - ACD requires the Basic NTCPU (P/N 0891002) with the PAL Upgrade or the Enhanced NTCPU (P/N 0891038).
Step 1: Arrange Extensions into ACD Groups
4. Set the Skip Time
When a call comes into an ACD Group, it rings each available ACD Agent for a preset time and then routes to the next agent. This preset time is called the Skip Time. The default Skip Time setting is 10 seconds. In ACD Group 1, for example, a call would ring the ACD Agent at extension 305 before try-ing the next available extension. If 10 seconds is too long to keep callers waittry-ing, shorten the interval. If you want callers to ring for more than 10 seconds, lengthen the Skip Time interval. Your Skip Time setting is the same for all ACD Groups.
In the ACD Group Worksheet (page 9):
Enter the Skip Time interval. The sample worksheet below uses 10 seconds for the Skip Time.
Sample Worksheet
Sample ACD Group Worksheet
ACD Group Number (1-64)
(41-02-01)
ACD Master Number (11-17)
ACD Group Name
Member Extensions (41-02-01)1
1 650 Tech Service 305, 307, 317, 339
2 651 Customer Support 309, 311, 315
Skip Time Interval (41-14-10) 10
5
Step 1: Arrange Extensions into ACD Groups
Automatic Call Distribution (ACD) ◆ 9
Table 1: ACD Group Worksheet
ACD Group Number (1-64)
(41-02-01)
ACD Master Number (11-17)
ACD Group Name
Member Extensions (41-02-01)1
Skip Time Interval (41-14-10)
Step 2: Set Up Work Schedules and Work Periods
Step 2: Set Up Work Schedules and Work Periods
What are Work Schedules?
A Work Schedule lets you divide a day into segments (called Work Periods) for scheduling the activity in your ACD Groups. You can set up four distinct Work Schedules, with up to eight Work Periods in each Work Schedule. Each day of the week has one Work Schedule, but different days can share the same schedule. For example, your Monday through Friday Work Schedule could consist of only two Work Periods. Work Period 1 could be from 8:00 AM to 5:00 PM — when your business is open. Work Period 2 could be from 5:00 PM to 8:00 AM — which covers those times when your business is closed. Use the
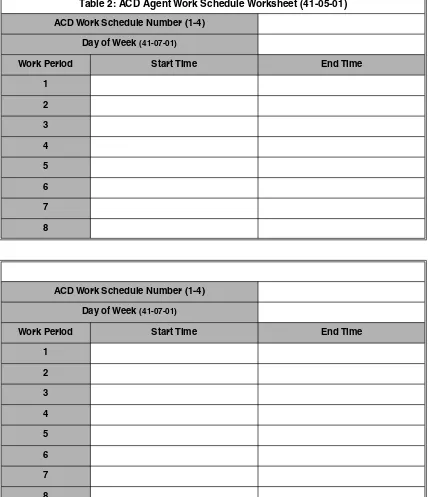
ACD Agent Work Schedule Worksheet (41-05-01) (page 11)
and the sample below when completing this step. (To set up the work schedule for trunks, refer to Step 5: Determine Trunk
Work Schedules (page 17).)
1. Designate a worksheet for each Work Schedule.
Make additional copies of the ACD Agent Work
Sched-ule Worksheet (41-05-01) (page 11) so you’ll have enough for all your Work Schedules. In the ACD Agent Work Schedule Worksheet (41-05-01) (page 11):
In the upper right corner of each worksheet, write the number of the corresponding Work Schedule. The sample worksheet below is for Work Schedule 1.
2. Assign Days of the Week to each Work Schedule.
In the ACD Agent Work Schedule Worksheet (41-05-01) (page 11):
In the Day of Week row of each worksheet, indicate which days of the week use the Work Schedule. The sample worksheet below is for Monday through Friday.
3. Set the start and stop time of each work Period.
In the ACD Agent Work Schedule Worksheet (41-05-01) (page 11):
Enter a start and stop time for each Work Period. Keep in mind that if you leave "holes" in your Work Schedule there will be periods during the day when there is no ACD service available. Also, try to accom-modate the normal divisions during your day. For example, the sample worksheet below shows five Work Periods corresponding to mornings (1), lunch (2), afternoons (3), evenings (4) and late night (5).
Sample Worksheet
Aspire System
4 Work Schedules with 8 Work Periods per schedule.
Sample ACD Agent Work Schedule Worksheet (41-05-01)
ACD Work Schedule Number (1-4) 1
Day of Week (41-07-01) Monday-Friday
Work Period Start Time End Time
1 8:00 AM Noon
2 Noon 1:00 PM
3 1:00 PM 5:00 PM
4 5:00 PM Midnight
Step 2: Set Up Work Schedules and Work Periods
Automatic Call Distribution (ACD) ◆ 11
Table 2: ACD Agent Work Schedule Worksheet (41-05-01)
ACD Work Schedule Number (1-4)
Day of Week (41-07-01)
Work Period Start Time End Time
1
2
3
4
5
6
7
8
ACD Work Schedule Number (1-4)
Day of Week (41-07-01)
Work Period Start Time End Time
1
2
3
4
5
6
7
Step 3: Assign Extensions to ACD Groups for Each Work Period
Step 3: Assign Extensions to ACD Groups for Each Work Period
Customize ACD for Each Work Period
In this step you'll assign extensions (using ACD numbers) to ACD Groups for each daily Work Period. ACD will use the Work Schedules and Work Period durations you set up in Step 2. Since the system always knows the day of the week, ACD implements the schedules and periods you program automatically. All you have to do in this step is decide which ACD Group the extension is a member of for each work period. Use the ACD
Assignment Worksheet (41-02-01) (page 14) and the sample on the next page when completing this step.
Note that when the system automatically removes, moves, or adds an ACD agent to another ACD Group, the agent must log out and log back in. The system will not automatically log agent's in or out of service.
1. Enter the port for each extension to be in an ACD Group. In the ACD Assignment Worksheet (41-02-01) (page 14):
In the Extension Port column of the worksheet, enter the port that corresponds to each extension you entered in the ACD Group Worksheet (page 9). Make additional copies of the ACD Assignment Worksheet as required. The sample worksheet below includes ports 5, 7, 17, 39, 9, 11 and 15. To make it easier to visualize the groups, the extensions are entered consecutively by ACD Group.
2. Enter an ACD Number for each extension port.
ACD numbers are software assignments the system needs when configuring ACD. There are 512 pos-sible ACD numbers. Wherever pospos-sible, try to make your ACD numbers in consecutive order.
In the ACD Assignment Worksheet (41-02-01) (page 14):
In the ACD Number column of the worksheet, enter the ACD number for each extension port. In the sample below, the ACD numbers are consecutive within each basic ACD Group.
3. Assign Extensions to ACD Groups for each Work Period
You set up the ACD groups by assigning extensions to ACD Groups for each Work Period. For exam-ple, if you assign four extensions to the same ACD Group for the same Work Period, the extensions function together as an integrated ACD group. You have great flexibility in which extensions are in each group for different times of the day.
In the ACD Assignment Worksheet (41-02-01) (page 14):
For each available Work Period WP1-WP8 (see the ACD Agent Work Schedule Worksheet (41-05-01) (page 11) ), enter the ACD Group number (1-64) to which each extension should belong. In the sample below, extension ports 305, 307 and 317 and in ACD Group 1 for WP1 (morning) and WP3 (afternoon). These extensions are not part of the group during lunch, evenings or late night. Extension 339 covers group 1’s calls during the evenings. ACD Group 1 is unavailable during lunch.
Extensions 309, 311 and 315 are in ACD Group 2 from 8:00 AM to 5:00 PM. Extension 309 is part of ACD Group 1 in the evening, and extension 339 is part of ACD Group 2 during lunch.
4. For each extension, assign an ACD Group for each Work Period (WP1-WP8).
Aspire System
Step 3: Assign Extensions to ACD Groups for Each Work Period
Automatic Call Distribution (ACD) ◆ 13
Sample Worksheet
Sample ACD Assignment Worksheet (41-02-01)
ACD Number
(1-512)
Extension Port
For each port, enter ACD Group for each work period (WP) (set in 41-05-01)
WP 1 WP 2 WP 3 WP 4 WP 5 WP 6 WP 7 WP 8
1 5 1 1
2 7 1 1
3 17 1 1
4 39 2 1
5 9 2 2 2 1
6 11 2 2 2
Step 3: Assign Extensions to ACD Groups for Each Work Period
Table 3: ACD Assignment Worksheet (41-02-01)
ACD Number
(1-512)
Extension Port
For each port, enter ACD Group for each work period (WP) (set in 41-05-01)
Step 4: Arrange Trunks Into Incoming Ring Groups
Automatic Call Distribution (ACD) ◆ 15
Step 4: Arrange Trunks Into Incoming Ring Groups
ACD Can Automatically Answer Incoming Calls
Incoming trunk calls can automatically route to specific ACD Groups. These types of calls ring directly into the ACD Group without being transferred by a co-worker or the Automated Attendant. There are two steps to having calls route directly to ACD:
● Assign the trunk to an Incoming Trunk Ring Group (in this step).
● Set up the trunk work schedules (in Step 5).
● Assign Incoming Ring Groups to ACD Groups (in Step 6).
Note: DISA, DID and tie trunks can ring an ACD master number directly.
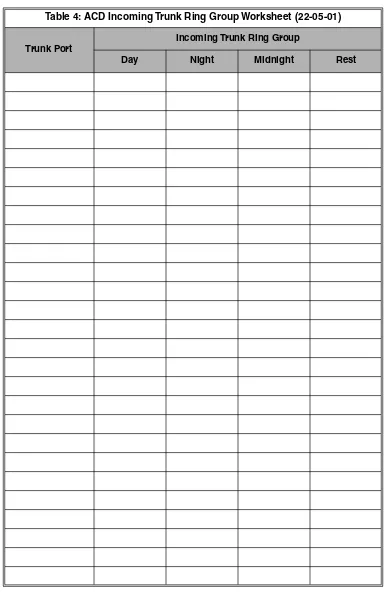
Use the ACD Incoming Trunk Ring Group Worksheet
(22-05-01) (page 16) and the sample below when
complet-ing this step.
1. Determine which trunks you want answered by ACD Groups.
In the ACD Incoming Trunk Ring Group Worksheet (22-05-01) (page 16):
In the Trunk Port column of the worksheet, enter the number of each trunk that you want ACD to automatically answer. In the example below, trunks 1 and 2 will be automatically answered by ACD.
2. Assign the trunk ports to Incoming Ring Groups.
In the ACD Incoming Trunk Ring Group Worksheet (22-05-01) (page 16):
In the Incoming Trunk Ring Group columns, enter the Incoming Trunk Ring Group for each trunk port for each Night Service mode. Trunks that have the same basic function and which will be assigned the same priority in Step 6 should be in the same incoming Ring Group. For example, if you have trunks 1-4 that will be primarily answered by the same ACD Group, put trunks 1-4 in the same incoming group. (You can mix assignments if the trunks have different functions during the different Night Service modes.)In the example below, trunk 1 is in incoming group 2, while trunk 2 is in incoming group 3.
Note: Step 6 on page 19 sets the Incoming Trunk Ring Group's priority. Priority groups always have precedence over normal groups. For example, if a call from a priority group rings in when while a normal group call is already ringing, ACD services the priority call first. ACD services multiple priority calls on a first-come, first-served basis. Keep this in mind when assigning the trunk ports to incoming Ring Groups.
Sample Worksheet
Aspire System
200 trunk ports and 100 Ring Groups (, 102 routes to In-Skin/External Voice Mail, and 103 routes to the Centralized Voie Mail).
ACD Incoming Trunk Ring Group Worksheet (22-05-01)
Trunk Port Incoming Trunk Ring Group
Day Night Midnight Rest
1 2 2 2 2
Step 4: Arrange Trunks Into Incoming Ring Groups
Table 4: ACD Incoming Trunk Ring Group Worksheet (22-05-01)
Trunk Port
Incoming Trunk Ring Group
Step 5: Determine Trunk Work Schedules
Automatic Call Distribution (ACD) ◆ 17
Step 5: Determine Trunk Work Schedules
What are Trunk Work Schedules?
Trunk Work Schedules are similar to normal ACD Work Schedules except that they apply only to trunks assigned to ACD groups (in Step 6). The Trunk Work Schedule lets you divide a day into segments (called Work Periods) to determine when trunks route to ACD Groups. You can set up to four Work Schedules, with up to eight Work Periods in each Work Schedule. Each day of the week has one Trunk Work Schedule, but different days can share the same schedule. For example, Monday-Friday could have the same schedule where Work Period 1 lasts all day long (8:00 AM to 5:00 PM). Saturday could have a Work Period 1 last only until noon. Use the Trunk Work Schedule Worksheet (41-06-01) (page 18) and the sample below when completing this step. (To set Work Schedules for ACD Groups, refer to page 10.)
1. Designate a worksheet for each Trunk Work Schedule.
Make additional copies of the Trunk Work Schedule Worksheet (41-06-01) (page 18) so you’ll have one worksheet for each Work Schedule.
In the Trunk Work Schedule Worksheet (41-06-01) (page 18):
In the upper right corner of each worksheet, write the number of the corresponding Trunk Work Schedule (1-8). The sample worksheet below is for Trunk Work Schedule 1.
2. Assign Days of the week to each Work Schedule.
In the Trunk Work Schedule Worksheet (41-06-01) (page 18):
The Day of Week entry must be the same as the entry you made in the Step 2: Set Up Work Sched-ules and Work Periods (page 10). For example, if Work Schedule 1 is for Monday through Friday in Step 2, it is automatically assigned to Monday through Friday in this step.
3. Set the start and stop time of each work period.
In the Trunk Work Schedule Worksheet (41-06-01) (page 18):
Enter a start and stop time for each Work Period. Keep in mind that if you leave "holes" in your Work Schedule there will be periods during the day when the trunk does not ring the ACD Group. Also, try to accommodate the normal divisions during your day. For example, the sample worksheet below shows two Work Periods corresponding to day (1) and night (2).
Sample Worksheet
Aspire System
4 Work Schedules with 8 Work Periods per schedule.
Sample Trunk Work Schedule Worksheet (41-06-01)
Trunk Work Schedule Number (1-4) 1
Day of Week (41-07-01) Monday-Friday
Work Period Start Time End Time
1 8:00 AM 5:00 PM
Step 5: Determine Trunk Work Schedules
Table 5: Trunk Work Schedule Worksheet (41-06-01)
Trunk Work Schedule Number (1-4)
Day of Week (41-07-01)
Work Period Start Time End Time
1
2
3
4
5
6
7
8
Trunk Work Schedule Number (1-4)
Day of Week (41-07-01)
Work Period Start Time End Time
1
2
3
4
5
6
7
Step 6: Assign Incoming Ring Groups to ACD Groups
Automatic Call Distribution (ACD) ◆ 19
Step 6: Assign Incoming Ring Groups to ACD Groups
Customize How Trunks Ring ACD Groups for Each Work Period
In Step 6 you assign Incoming Trunk Ring Groups to ACD Groups for each daily Work Period. If a trunk within the incoming group is assigned to an ACD Group, incoming calls on that trunk directly ring the first available ACD agent. The system always knows the day of the week, so ACD can implement the schedules and periods you program automatically. Use the ACD Incoming Trunk Ring Group Assignment
Work-sheet (41-03-xx) (page 20) and the sample below when completing this step.
This step also determines whether the night announcement is used for the ring group. The night announce-ment function is not available for ACD pilot number calls.
Use this step to also set the Incoming Trunk Ring Group's priority. Priority groups always have precedence over normal groups. For example, if a call from a priority group rings in when while a normal group call is already ringing, ACD services the priority call first. ACD services multiple priority calls on a first-come, first-served basis.
Select the Incoming Trunk Ring Group you want to program.
In the ACD Incoming Trunk Ring Group Assignment Worksheet (41-03-xx) (page 20):
In the Incoming Trunk Ring Group field at the top of the worksheet, enter the number of the incoming group you are programming. To see which trunks you assigned to the ring group, go back to Step 5. The sample worksheets on the next page are for Incoming Ring Groups 2 and 3.
Enter the Incoming Trunk Ring Group for each Work Period.
In the ACD Incoming Trunk Ring Group Assignment Worksheet (41-03-xx) (page 20):
In the ACD column for each Work Period, enter the number of the ACD group (1-64) that will answer the Incoming Ring Group's calls. Only one ACD Group can answer an Incoming Ring Group's calls during any single Work Period. In the sample worksheet on the next page for Ring Group 2, for example, Incoming Trunk Ring Group 1 rings into ACD Group 1 during Work Periods 1 and 3. It rings into ACD Group 2 during Work Period 2.
Set whether or not the Incoming Trunk Ring Group entered in the previous step should play the Night Announcement.
In the ACD Incoming Trunk Ring Group Assignment Worksheet (41-03-xx) (page 20):
Select wheher the Incoming Trunk Ring Group should have the Night Announcement enabled. The Night Announcement used is selected from either an ACI port or the VRS.
Set the priority of the Incoming Trunk Ring Group being defined.
In the ACD Incoming Trunk Ring Group Assignment Worksheet (41-03-xx) (page 20):
Set the Incoming Trunk Ring Group for Priority or Normal operation. Priority Ring Groups have precedence over Normal Ring Groups. For example, if a normal trunk is already ringing an ACD group when a priority trunk rings in, the new call starts ringing and the normal trunk waits in queue behind it. (Two priority trunks ringing at the same time will ring the ACD Group on a first-come, first-served basis.)
Aspire System
Step 6: Assign Incoming Ring Groups to ACD Groups
Sample Worksheets
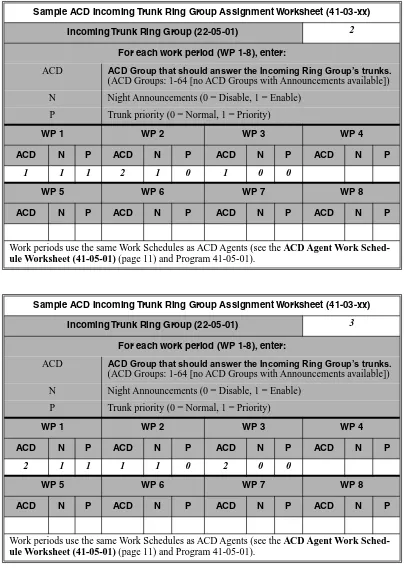
Sample ACD Incoming Trunk Ring Group Assignment Worksheet (41-03-xx)
Incoming Trunk Ring Group (22-05-01) 2
For each work period (WP 1-8), enter:
ACD ACD Group that should answer the Incoming Ring Group’s trunks.
(ACD Groups: 1-64 [no ACD Groups with Announcements available])
N Night Announcements (0 = Disable, 1 = Enable)
P Trunk priority (0 = Normal, 1 = Priority)
WP 1 WP 2 WP 3 WP 4
ACD N P ACD N P ACD N P ACD N P
1 1 1 2 1 0 1 0 0
WP 5 WP 6 WP 7 WP 8
ACD N P ACD N P ACD N P ACD N P
Work periods use the same Work Schedules as ACD Agents (see the ACD Agent Work
Sched-ule Worksheet (41-05-01) (page 11) and Program 41-05-01).
Sample ACD Incoming Trunk Ring Group Assignment Worksheet (41-03-xx)
Incoming Trunk Ring Group (22-05-01) 3
For each work period (WP 1-8), enter:
ACD ACD Group that should answer the Incoming Ring Group’s trunks.
(ACD Groups: 1-64 [no ACD Groups with Announcements available])
N Night Announcements (0 = Disable, 1 = Enable)
P Trunk priority (0 = Normal, 1 = Priority)
WP 1 WP 2 WP 3 WP 4
ACD N P ACD N P ACD N P ACD N P
2 1 1 1 1 0 2 0 0
WP 5 WP 6 WP 7 WP 8
ACD N P ACD N P ACD N P ACD N P
Work periods use the same Work Schedules as ACD Agents (see the ACD Agent Work
Sched-ule Worksheet (41-05-01) (page 11) and Program 41-05-01).
Step 6: Assign Incoming Ring Groups to ACD Groups
Automatic Call Distribution (ACD) ◆ 21
Incoming Trunk Ring Group (22-05-01)
For each work period (WP 1-8), enter:
ACD ACD Group that should answer the Incoming Ring Group’s trunks.
(ACD Groups: 1-64 [no ACD Groups with Announcements available])
N Night Announcements (0 = Disable, 1 = Enable)
P Trunk priority (0 = Normal, 1 = Priority)
WP 1 WP 2 WP 3 WP 4
ACD N P ACD N P ACD N P ACD N P
WP 5 WP 6 WP 7 WP 8
ACD N P ACD N P ACD N P ACD N P
Work periods use the same Work Schedules as ACD Agents (see the ACD Agent Work
Sched-ule Worksheet (41-05-01) (page 11) and Program 41-05-01).
Incoming Trunk Ring Group (22-05-01)
For each work period (WP 1-8), enter:
ACD ACD Group that should answer the Incoming Ring Group’s trunks.
(ACD Groups: 1-64 [no ACD Groups with Announcements available])
N Night Announcements (0 = Disable, 1 = Enable)
P Trunk priority (0 = Normal, 1 = Priority)
WP 1 WP 2 WP 3 WP 4
ACD N P ACD N P ACD N P ACD N P
WP 5 WP 6 WP 7 WP 8
ACD N P ACD N P ACD N P ACD N P
Work periods use the same Work Schedules as ACD Agents (see the ACD Agent Work
Basic Programming
Basic Programming
Programming
➻
11-13-01 - 11-13-12 : Service Code Setup (For ACD)If required, customize the service codes which are used with the ACD feature.
Note that when using service code 169 to change an agent’s ACD group, the supervisor must enter a 2-digit number for the group. For example, to change to ACD group 4, the entry would be ‘169 04’.
➻
11-13-13 : Service Code Setup (for ACD), ACD Agent Change Own ACD GroupThis Service Code (normally 170) allows an ACD Agent to reassign themselves to another ACD Group. Also see Program 20-13-33.
➻
11-17-01 : ACD Group Pilot NumberEnter the master number, up to 8 digits, for each ACD Group (1-64). Try to use entries that are not part of your normal extension numbering range.
➻
15-07-01 : Programmable Function KeysAssign an ACD Log In/Log Out key (code *10) for one-button Log In/Log Out operation.
➻
20-06-01 : Class of Service for ExtensionsAssign a Class of Service (1-15) to an extension.
➻
20-13-33 : Class of Service Options (Supplementary Service), ACD Supervisor’s Position EnhancementIn an extension's Class of Service, enable this option (1) to allow agents to change their own ACD Group assignment. This option also allows the System Supervisor to change the login and ACD Group assignment for an agent. See the Supervisor, ACD System (page 75) feature for more.
➻
22-05-01 : Incoming Trunk Ring Group AssignmentAssign each trunk that should directly ring an ACD Group to an Incoming Trunk Ring Group (1-103). Then, use Program 41-03-xx to assign Incoming Trunk Ring Groups to ACD Groups for each Work Period.
➻
41-02-01 : ACD Group and Agent AssignmentsFor each ACD extension number, assign an ACD Group (1-64). An ACD Group number is assigned to each Work Period number (1-8).
➻
41-03-01 : Incoming Ring Group Assignment for ACD Group, ACD Group NumberFor each Incoming Trunk Ring Group (1-100) set up in Program 22-05-01, designate into which ACD Group (1-64) the trunks should ring for each of the eight Work Periods.
➻
41-03-02 : Incoming Ring Group Assignment for ACD Group, Night Announcement ServiceFor each Incoming Trunk Ring Group (1-100) set up in Program 22-05-01, designate whether the Night Announcement Service should be enabled (1) or disabled (0).
➻
41-03-03 : Incoming Ring Group Assignment for ACD Group, PriorityFor each Incoming Trunk Ring Group (1-100) set up in Program 22-05-01, assign an Incom-ing Trunk RIncom-ing Group as normal (0) or define the priority (1-7). Use Program 05 and 41-06 to set up the Work Schedules and Work Periods for trunks. Use Program 41-07 to assign the Work Schedules to the days of the week.
➻
41-05-01 : ACD Agent Work SchedulesSet up the Work Schedules for ACD Agents and Groups. For each ACD Work Schedule (1-4), designate the start and stop times for each of the eight Work Periods. Once you set up the schedules, assign them to days of the week in Program 41-07-01. (This is the same program used by the Trunk Work Schedules.)
➻
41-06-01 : Trunk Work SchedulesBasic Programming
Automatic Call Distribution (ACD) ◆ 23
Programming (Cont'd)
➻
41-07-01 : ACD Weekly Schedule SetupAssign the four Work Schedules (1-4) to days of the week (1=Sunday, 7=Saturday). The assignments you make in this program apply to both the ACD Agent Work Schedules (Pro-gram 41-05) and the Trunk Work Schedules (Pro(Pro-gram 41-06).
➻
41-12-01 : Night Announcement Setup - Night Announcement Source TypeDefine the night announce voice resource (0=ACI, 1=VRS [DSPDB]) for each ACD group (01-64). Night announcement availability depends on the setting in Program 41-03-02. The night announcement function is not available for ACD pilot number call.
➻
41-12-02 : Night Announcement Setup - Night Announcement ACI Port NumberIf Program 41-12-01 is set to ‘0’, define the port number for the ACI night announce voice resource for each ACD group (01-64).
➻
41-12-03 : Night Announcement Setup - ACD Night Announce Sending TimeDefine the night announce sending time (0-64800) for each ACD group (01-64).
➻
41-13-01 : VRS Message Number for Night Announcement - VRS Message NumberFor each ACD Group (01-64), define the VRS message number (0-48) to be used as the night announcement. This program is activated when the night announcement source is assigned as VRS in Program 41-12-01.
➻
41-13-02 : VRS Message Number for Night Announcement - Tone Kind at Message IntervalFor each ACD Group (01-64), define the what the caller will hear between the night announcements (0=ring back tone, 1=MOH, 2=BGM).
➻
41-14-10 : ACD Options - ACD No Answer Skip TimeFor each ACD Group (01-64), set how long the system waits before transferring an unan-swered call to the next ACD agent (0=disabled or 1-64800 seconds). This timer is also used to determine when an unanswered call is transferred to the Group Supervisor if Program 41-04-01 is set to 1 or 2.
Default Setting
ACD is not set up.
Caution
Basic Operation
Basic Operation
Transferring Calls to an ACD Group
To Transfer a call to an ACD Group:
1. At keyset or DSL, press HOLD.
OR
At SLT, hookflash
You hear Transfer dial tone.
2. Dial ACD Group Master Number.
You can press a One-Touch Key for the master instead.
3. Hang up.
Answering Outside Calls that Ring Your ACD Group
To answer an outside call that rings your ACD Group:
DISA, DID and tie trunks can ring an ACD master number directly. Other trunk types can ring ACD Groups if set up in Steps 4, 5 and 6 (beginning on page 15). Trunks can also be transferred to ACD master numbers.
1. Lift handset.
2. If you don’t automatically answer the call, press the flashing line key.
Agent Log In and Log Out
To log your extension into the ACD Group: Keyset
Your display shows: WAIT ACD LOGIN. If Program 12-07-01 has a customized Day/Night mode message defined, the ACD agent’s display will not indicate the WAIT ACD LOGIN status (however, the agent may still log in using the following procedure).
1. Press idle CALL key.
2. Dial *5.
You hear confirmation tone. OR
Press ACD Log On/Off key (PGM 15-07-01 or SC 852: code *10). You hear a single beep.
Your display will show the ACD Group to which you are logged in.
If your system has ACD Identification Codes enabled, enter it now. Turn to page 41 for more.
DSL or SLT
1. Lift handset. 2. Dial *5.
You hear confirmation tone.
Basic Operation
Automatic Call Distribution (ACD) ◆ 25
To log your extension out of an ACD Group: Keyset
Your display shows the ACD Group to which you are logged in.
1. Press idle CALL key.
2. Dial *5.
OR
Press ACD Log On/Off key (PGM 15-07-01 or SC 852: code *10). Your display shows: ACD LOGOUT (1:Yes, 0:No)
3. Dial 1 to log out.
You hear confirmation tone (if you dialed *5) or a single beep (if you pressed the ACD Log On/ Log Off key.
OR
Dial 0 to cancel the log out and return to the group.
DSL
1. Lift handset. 2. Dial *5. 3. Dial 1 to log out.
You hear confirmation tone. OR
Dial 0 to cancel the log out and return to the group.
SLT
1. Lift handset. 2. Dial 155.
Changing ACD Group Assignment
To change your ACD Group Assignment:
1. Log out of your ACD Group (see the instructions above). 2. Press idle CALL key.
3. Dial 170.
4. Dial the number of the ACD Group (1-64) into which you want to log.
You hear confirmation tone.
Automatic Call Distribution (ACD) ◆ 27
Advanced ACD Features
Section 2:
Advanced Feature Guide
Automatic Call Distribution (ACD) ◆ 29
Advanced Feature Guide
Advanced ACD Features
Which Advanced Features Do I Really Need?
Now that you have your basic ACD Groups up and running, you may want to "fine tune" their operation. The chart below lists the Advanced ACD Features that will help you get the most out of your system. Review each capability below and then turn to the indicated page if the feature is something you need.
Advanced Features Guide
If you need this ACD capability . . . Turn to this Advanced Feature . . . On page . . .
A supervisory extension that can manage an individual ACD Group.
"Supervisor, ACD Group" 71
A supervisory extension that can log an ACD Agent into or out of the group.
"Supervisor, ACD Group" 74
A supervisory extension that can manage an individual ACD Group.
"Supervisor, ACD Group" 71
A DSS Console that can show at a glance the status of ACD Groups and agents.
"Supervisor, DSS Console" 79
As a Group or System Supervisor, listen in on an ACD Agent's call "Supervisor Monitor" 83
When all agents are busy, incoming calls can route to other extensions, ACD groups or Voice Mail.
"Overflow Options" 52
Set various options for ACD Groups. "Class of Service, ACD" 31
Temporarily log out an ACD Agent. "Off Duty Mode" 49
Press a key to have your ACD Group Supervisor monitor your call. "Emergency Call" 33
See the status of your ACD Group's calls at a glance. "Queue Status Display" 67
Set up Call Coverage keys for ACD Groups. "Multiple Directory Number / Call Coverage for ACD Groups"
46
Get one-button ACD Group calling and Transfer as well as a unique BLF for ACD agents.
"Hotline for ACD Agents" 38
Temporarily busy out your phone to the ACD Group when you need to work at your desk.
"Wrap-Up Time" 87
Use a headset for privacy and convenience, and optionally answer calls automatically.
"Headset Operation (with Automatic Answer)"
35
For systems with inDepth ACD/MIS installed, allow the Reporter and Real Time products to sort based on ACD Agent number. Set up AIC log-in for specific agents using a verified code. This
also allows for multiple group log-ins by an agent.
"Identification Codes for ACD Agents"
41
ACD Queue Announcement
ACD Queue Announcement
Description
ACD offers extensive overflow options for each ACD Group. For example, a caller ringing in when all agents are unavailable can hear an initial announcement (called the 1st Announcement). This announcement can be a general greeting like, "Thank you for calling. All of our agents are currently busy helping other cus-tomers. Please stay on the line and we will help you shortly." If the caller continues to wait, you can have them hear another announcement (called the 2nd Announcement) like, "Your business is important to us. Your call will be automatically answered by the first available agent. Please stay on the line." If all the ACD Group's agents still are unavailable, the call can automatically overflow to another ACD Group or the Voice Mail Automated Attendant. If all agents in the overflow ACD Group are busy, Lookback Routing automati-cally ensures that the waiting call will ring into the first agent in either group that becomes free.
Refer to Overflow Options (page 52) for complete details on programming overflow with announcements.
Conditions
Currently, you can not use centralized voice mail for ACD queue messages as the voice mail will not answer.
Default Setting
ACD not set up.
Aspire System
ACD Setup Options
Automatic Call Distribution (ACD) ◆ 31
ACD Setup Options
Description
Use the ACD Setup Options to set various functions for ACD Groups. Each ACD Group can have a unique setup. When you set an option for an ACD Group, the setting is in force (if applicable) for all agents within the group. The chart below shows each of the ACD options and the ACD feature to which that option relates.
Aspire System
Available — system has 64 ACD Groups.
ACD Setup Options (Program 41-14)
Item Name This option . . . Is used with . . . Default
01 Emergency Call Overflow Enables (0) or disables (1) Emer-gency Call Overflow to ACD Sys-tem Supervisors.
"Emergency Call" 0 (Enabled)
02 Automatic Wrap-Up Enables (1) or disables (0) Auto-matic Wrap-Up.
"Wrap-Up Time" 0 (Disabled)
03 ACD Priority for Over-flow Calls
Defines whether the ACD group should use its own priority assign-ment or if it should follow the prior-ity assigned in Program 41-03-03.
- 0
(Own Group’s Priority)
04 Auto Answer Enables (1) or disables (0) Auto-matic Answer for agents using headsets.
"Headset Operation (with Automatic
Answer)"
0 (Disabled)
05 Not Used
-06 Call Queuing after 2nd Announcement1
Enables (0) or disables (1) Call Queuing after the 2nd Announce-ment
- 0 (Enabled)
07 Automatic Off Duty for SLT
Enables (1) or disables (0) Auto-matic Off Duty Mode for SLTs.
"Off Duty Mode" 0 (Disabled)
08 ACD Off Duty Mode Determines whether an agent in Off Duty Mode can receive internal calls.
"Off Duty Mode" 0 (No Internal Calls)
09 Automatic Wrap-Up End Time
Defines how long the system waits before automatically ending Wrap-Up time.
"Wrap-Up Time" 0 (Disabled)
10 ACD No Answer Skip Time
Sets how long a call into an ACD Group will ring an idle extension before routing to the next agent.
- 10 Seconds
11 Cancel Headset Ringing for Keyset
Sets how long the system waits before cancelling headset ringing for keysets.
"Headset Operation (with Automatic
Answer)"
0 (Disabled)
12 Start Headset Ringing for SLT
Sets how long the system waits before starting headset ringing for single line sets.
"Headset Operation (with Automatic
Answer)"
ACD Setup Options
Conditions
None
Default Setting
Refer to the chart above.
Programming
➻
41-14-01 - 41-14-12 : ACD OptionsSet various options for each ACD Group. Refer to the chart on the previous page for the specifics.
Related Features
Class of Service
Many extension Class of Service options apply to ACD operation. Refer to Class of Service in your Software Manual or review the Advanced Features in this manual for more.
Operation
Emergency Call
Automatic Call Distribution (ACD) ◆ 33
Emergency Call
Description
If an ACD Agent needs assistance with a caller, they can place and Emergency Call to their ACD Group Supervisor. Once the supervisor answers the Emergency Call, they automatically monitor both the ACD Agent and the caller. If the agent needs assistance, the supervisor can press their Emergency Call key and join in the conversation. Emergency Call can be a big help to inexperienced ACD Agents that need technical advise or assistance with a difficult caller. The supervisor can easily listen to the conversation and then "jump in" if the situation gets out of hand.
If an ACD Supervisor is on an Emergency Call, you can allow calls to the ACD Supervisor to be transferred to the System Supervisor by setting Program 41-14-01 to '0' (The System Supervisor can be programmed to have an Emergency Call key and Supervisor Split key assigned).
Conditions
None
Default Setting
● Emergency Call Overflow enabled (Program 41-14-01 = 0)
● No Emergency Call keys assigned (Program 15-07-01: *12)
● No Supervisor Split keys assigned (Program 15-07-01: *16)
Programming
➻
15-07-01 : Programmable Function Keys● Assign an Emergency Call key (code *12) to both the ACD Group Supervisor and the ACD Agent.
● Assign a Supervisor Split key (code *16) to the ACD Group Supervisor.
➻
41-14-01 : ACD Options - EMG Call Operation ModeSet the EMG Call Operation Mode (0=Call system supervisory extension when group super-visory extension is busy, 1=No call to system supersuper-visory extension when group supersuper-visory extension is busy) for ACD Groups (01-64). Note that the supervisor must be logged in and have an Emergency Key programmed. By pressing the key once, the supervisor can monitor the call - pressing twice barges in on the call.
Related Features
Barge In
Emergency Call does not interact with Barge In operation or programming.
Aspire System
Emergency Call
Operation
To place an Emergency Call to your ACD Group Supervisor:
1. While talking to your caller, press Emergency Call Key (PGM 15-07-01 or SC 852: *12).
Your Emergency Call key lights steadily. You display shows: EMG CALL CALLING The Emergency Call key on your ACD Group Supervisor's telephone flashes fast.
To answer an Emergency Call (from an agent in the ACD Group you supervise):
Your Emergency Call key flashes fast and your phone rings. Your display shows: EMG CALL CALL FROM
1. Lift handset.
2. Press flashing Emergency Call Key (PGM 15-07-01 or SC 852: *12).
You can hear both your ACD Agent and the outside caller, but you cannot talk to either party. The display on both your phone and your agent's phone changes to: EMG CALL MONITOR
To break into you ACD Agent's call (after answering their Emergency Call):
1. Press Emergency Call Key again.
The display on both your phone and your agent's phone changes to : EMG CALL BREAK IN You can converse with all three parties simultaneously.
The initial call will continue if you hang up.
To split away from your ACD Agent and talk to the outside caller (after breaking into the Emergency Call):
1. Press your Supervisor Split key (PGM 15-07-01 or SC 852: *16).
The Supervisor Split key lights.
The display on both your phone and your agent's phone changes to EMG CALL WAIT. The ACD Agent goes on Hold and you talk to the outside caller.
To end the Supervisor Split:
1. Press your Supervisor Split key (PGM 15-07-01 or SC 852: *16).
You see: RELEASE ACD TEL? (1:YES, 0:NO)
2. Dial 0 to return to the Break In mode (where you were talking with the agent and the outside caller). OR
Dial 1 to hang up on the ACD Agent and talk privately with the outside caller.
Headset Operation (with Automatic Answer)
Automatic Call Distribution (ACD) ◆ 35
Headset Operation (with Automatic Answer)
Description
An ACD Agent or ACD Group Supervisor can utilize a customer-provided headset in place of the handset. The headset conveniently frees up the user's hands for other work and provides privacy while on the call. In addition, an ACD Agent with a headset can have Automatic Answer. This allows an agent busy on a call to automatically connect to the next waiting call when they hang up.
Like any other system keyset, an ACD Agent in the headset mode has two options for when it appears busy to incoming callers. The headset extension can be:
● Busy to incoming callers when only one extension appearance is busy (i.e., Off Hook Signal-ing prevented). This would allow an agent to receive an off-hook signal or announcement from a co-worker when they are talking to a caller.
● Busy to incoming callers only when both extension appearances are busy (i.e., Off Hook Sig-naling allowed). In this mode, co-worker's could not call an agent who was already talking to a caller.
Conditions
Examples of a compatible headset are:
● Polaris Supra Monaural Noise Cancelling, P/N 750036
● Polaris Supra Binaural Noise Cancelling, P/N 750033
● Polaris Encore Binaural Noise Cancelling, P/N 750035
Default Setting
● No headset keys defined (Program 15-07-01 = 05).
● Agent with a headset is busy to incoming callers when only one extension appearance is busy (Program 20-02-05 = 0).
● Automatic Answer disabled (Program 41-14-04 = 0).
Aspire System
Headset Operation (with Automatic Answer)
Programming
➻
15-07-01 : Programmable Function KeysAssign a function key for Headset operation (05).
➻
20-02-05 : System Options for Multi-Line Telephones, Headset Busy ModeSet the conditions under which a headset extension is busy to incoming callers:
● The headset extension is busy to incoming callers when only one extension appearance is busy (0).
OR
● The headset extension is busy to incoming callers only when both extension appearances are busy (1).
➻
41-14-04 : ACD Options, Auto AnswerFor each ACD Group, enable (1) or disable (0) Automatic Answer for headset extensions.
➻
41-14-11 : ACD Options - Cancel Headset Ear Piece Ringing (KST)For each ACD Group (01-64), set how long the system waits before cancelling headset ear piece ringing for keysets (0=disabled or 1-64800 seconds).
➻
41-14-12 : ACD Options - Start Headset Ear Piece Ringing (SLT)For each ACD Group (01-64), set how long the system waits before starting headset ear piece ringing for single line sets (0=disabled or 1-64800 seconds).
Related Features
Handsfree and Monitor
While in the headset mode, do not use the Speakerphone for calls.
Handsfree Answerback/Forced Intercom Ringing
An extension with a Headset can still receive voice-announced Intercom calls and respond Handsfree.
Single Line Telephones
Headset Operation (with Automatic Answer)
Automatic Call Distribution (ACD) ◆ 37
Operation
Note: While in the headset mode, the hook switch is not functional.
To enable the headset:
1. Plug in the headset into the headset jack on the bottom of the phone. 2. Program a Headset Key (PGM 15-07-01 or SC 851: 05).
To use the headset:
1. Press the Headset Key (PGM 15-07-01 or SC 851: 05). 2. Press a line key to make a trunk call.
OR
Press SPK to get Intercom dial tone. OR
If on a call, press SPK to hang up.
The Headset Key lights when you are in the headset mode.
If your ACD Group has Automatic Answer enabled and the mode is enabled on the keyset, the next waiting call is automatically answered by the agent.
To Enable Automatic Answer for an Agent:
1. Press the CHECK key and then press the Headset Key (PGM 15-07-01 or SC 851: 05) twice.
The Headset key flashes while Automatic Answer is active. Program 41-14-04 must also be set to allow Automatic Answer for the ACD group.
2. Press the CLEAR key.
Incoming CO calls to the agent will automatically be answered. Ringing intercom calls are not automatically answered and if not answered manually (by pressing the Headset Key), the call will overflow to agent’s voice mail. Voice-announced intercom calls can be responded to handsfree.
To Disable Automatic Answer for an Agent:
1. Press the CHECK key and then press the Headset Key (PGM 15-07-01 or SC 851: 05) twice.
The Headset key goes out.
Hotline for ACD Agents
Hotline for ACD Agents
Description
Hotline gives a keyset user one-button calling and Transfer to another extension (the Hotline partner). Hot-line helps co-workers that work closely together. The HotHot-line partners can call or Transfer calls to each other just by pressing a single key.
Enhanced for ACD applications, Hotline provides a unique Busy Lamp Field for ACD agents as well as a BLF for co-workers that are not ACD agents. The charts below show both sets of BLF indications.
Conditions
An extension user cannot use Hotline to pick up a call ringing their Hotline partner's extension.
Default Setting
No Hotline keys programmed (no keys assigned code 01 in Program 15-07-01).
Aspire System
Available.
BLF For ACD Agents
When the key is . . . The ACD Agent is . . .
Off Idle and is not an ACD Agent
On Busy
Double Wink Off Making an Emergency Call
Wink Off Logged off or not installed
Double Wink On Logged on
BLF For Co-workers That Are Not ACD Agents
When the key is . . . Your co-worker is . . .
Off Idle
On Busy or ringing
Fast Flash In Do Not Disturb — All calls (option 3) or Intercom calls
Hotline for ACD Agents
Automatic Call Distribution (ACD) ◆ 39
Programming
➻
15-07-01 : Programmable Function KeysAssign a function key for Hotline (code 01 + partner's extension number).
➻
20-02-03 : System Options for Multi-Line Setup, BLF Control and20-13-06 : Class of Service Options (Supplementary Service), Automatic Off Hook Signaling
Programs 20-02-03 and 20-13-06 set the conditions under which a Hotline key for a non-ACD Agent indicates that the covered extension is busy. (This also applies to Reverse Voice Over and DSS Console keys for all co-workers). With condition 1 in the following chart, the BLF LED is on only when both extension line appearances are busy. In conditions 2-4, the BLF LED is on when one line appearance is busy.
➻
30-05-01 - 30-05-20 : DSS Console Lamp TableCustomize the flash rates for the system's DSS console.
Related Features
Direct Station Selection (DSS) Console
The 110-Button DSS Console will show agent status only if it is programmed as a ACD DSS Console in Program 30-01-01.
Do Not Disturb
Hotline does not override Do Not Disturb.
Handsfree Answerback/Forced Intercom Ringing
Hotline always follows the Handsfree Answerback/Forced Intercom Ringing mode set at the called extension. The Hotline caller can override the setting, if desired.
Off Hook Signaling
If the partner's extension is busy, Hotline does not automatically activate Off Hook Signaling.
Programmable Function Keys
A Hotline is a uniquely programmed function key. Program
20-13-06
Program 20-02-03
BLF1 Status
Busy Status
1 1 0 Off No
2 1 1 On Yes
3 0 0 On Yes
4 0 1 On Yes
Hotline for ACD Agents
Operation
To place a call to your Hotline partner:
1. Press Hotline key (PGM 15-07-01 or SC 851: 01 + partner’s extension number).
You can optionally lift the handset after this step for privacy.
To transfer your outside call to your Hotline partner:
1. Press Hotline key.
2. Announce call and hang up.
OR
Hang up to have the call wait at your Hotline partner unannounced. If unanswered, the call recalls like a regular transferred call.
To answer a call from your Hotline partner:
1. If you hear two beeps, speak toward the phone.
OR
Identification Codes for ACD Agents
Automatic Call Distribution (ACD) ◆ 41
Identification Codes for ACD Agents
Description
If the system has an inDepth ACD/MIS installed, Identification Codes give the ACD administrator the ability to set up the inDepth Reporter and Real Time products based on ACD Agent Number. With ID Codes enabled, each ACD Agent must enter an identifying code each time they log onto their ACD Group. This unique code becomes their Agent Number while they are logged on. The screen shot below is a typical inDepth Real Time view sorted by Agent Number.
The capability to view ACD Agent activity by Agent Number simplifies administration of ACD Groups where agents are frequently not at their desks. For example, if an agent must temporarily go to a computer lab to help a customer, they can:
● Log out of the group from the extension on their desk.
● Log in (using their ID code) at the extension in the lab.
● Assist new callers from the lab. The inDepth will keep track of their ACD activity while using the lab telephone.
InDepth Real Time View Sorted by Agent Number
Agent Identity Code (AIC)
An Agent Identity Code (AIC) allows ACD agents to log in any extension without setting Program 41-02 (AIC Log In). AIC also allows ACD agents to log in to multiple ACD groups at the same time. AIC and ACD groups for each work period (mode pattern number) can be set in Program 41-18 as shown in the following example.