ABSTRACT
PORTERFIELD, JANE ANNE. Exploring 3D Garment Simulation as a Prototype Validation Tool for Costume Design. (Under the direction of Dr. Traci A. M. Lamar).
This research examines the potential of 3D garment simulation technology in the context of costume design and production, specifically as a prototype validation tool for costume designers and makers. Three-dimensional garment simulation, though still a relatively new technology, has potential to be a time and resource-saving device in the apparel industry. In the performing arts, where time and resources are often scarce, costume designers and
makers often choose to fall back on familiar but time-intensive methods. This research asked costume designers and makers to consider whether the quality of their product and the
efficiency of their process can be enhanced by introducing 3D garment visualization
technology into the prototype validation phase of costume design. This research employed a qualitative approach in which costume designers and makers were asked to participate in and respond to “virtual fitting sessions.” Research subjects were solicited from among
technology in costume design and production. Interview responses were used to create a preliminary framework describing the essential elements of the collaborative process of costume fitting and production. These elements were divided into early mid, and late stage design communication. Each of these stages was characterized by interactive fit and design decisions, and interactive design communication. The majority of participants felt that early stage design decisions could be accommodated with a virtual fitting. Participants were divided on the potential of virtual fitting to accommodate interactive fit and design decisions. This was due in part to limitations of the currently available software, but also in part to the lack of involvement from a key stakeholder in the process, the performer. All participants felt that virtual fittings could contribute in some way to interactive design communication, either at early or mid-stages of the design and production process. These results were used to revise the preliminary framework to show potential for incorporation of 3D apparel simulation technology into the costume design and production process. It is expected that this framework will benefit both costume designers and makers, as well as those involved in development and implementation of 3D apparel CAD software. Additional benefit may be found in applicability to the apparel design process, particularly in areas of mass
Exploring 3D Garment Simulation as a Prototype Validation Tool for Costume Design
by
Jane Anne Porterfield
A dissertation submitted to the Graduate Faculty of North Carolina State University
in partial fulfillment of the requirements for the degree of
Doctor of Philosophy
Textile Technology Management
Raleigh, North Carolina 2015
APPROVED BY:
_______________________________ ______________________________
Traci A.M. Lamar A. Blanton Godfrey Committee Chair
BIOGRAPHY
ACKNOWLEDGMENTS
I would like to acknowledge the time and support of many individuals who have encouraged, supported, and inspired me in this work. First I would like to express my thanks to my committee chair, Dr. Traci Lamar who has patiently guided me through this process. I would also like to thank my other committee members, Dr. A. Blanton Godfrey, Dr. Kate Annett-Hitchcock, and Dr. Sharon Joines. Your enthusiastic support and advice on this project has been invaluable.
The experience that formed the foundation of this project would not have existed without the teaching and example of many individuals. I would like to especially thank Susan Tsu, Judy Adamson, and Jan Chambers for their support and advice, and Robert Weiss for the opportunity that led me to the College of Textiles in the first place.
I would like to express my appreciation for the opportunities I have had to work and teach in the College of Textiles. My studies here would not have been possible without that support. I would like in particular to thank Dr. Godfrey, Dr. Nancy Cassill, and Dr. Karen Leonas for those opportunities.
TABLE OF CONTENTS
LIST OF TABLES ... vii
LIST OF FIGURES ... viii
1. Introduction ... 1
Making Costumes ... 2
3D Apparel CAD ... 3
Purpose of the Study ... 4
2. Literature Review... 5
Costume Design ... 5
The role of the costume designer ... 5
The role of the costume maker... 7
The costume fitting process ... 8
Digital technology in the performing arts costume shop ... 10
3D Apparel Visualization Technology ... 11
Translating the pattern into a 3D shape. ... 12
Simulation methods. ... 13
Physically based simulation. ... 14
Collision detection and tension mapping ... 15
Garment assembly in 3D ... 16
Testing the accuracy of 3D simulation. ... 19
Acceptance of CAD technology in the apparel industry ... 24
Research in creating patterns directly in a 3D environment ... 25
The problem of pattern modification ... 29
Incorporating user input ... 31
3. Methodology ... 33
Research Questions ... 33
Overview ... 34
Qualitative Approach ... 36
Role of the Researcher ... 36
Sample Selection ... 37
Measurement manipulation ... 41
Posture adjustments ... 44
3D Fit simulations ... 45
Research Interviews ... 45
Expert interviews ... 45
Virtual fitting interviews ... 46
Coding and Analysis ... 47
Expert Interviews ... 47
Virtual Fitting Interviews ... 48
4. Results and Discussion ... 49
Overview ... 49
The Preliminary Costume Design and Production Process Framework ... 50
Early stage design communication. ... 51
Mid-stage design communication ... 53
Late stage design communication. ... 55
Preparation of Virtual Fittings ... 59
Digitization and Simulation Process ... 59
Measurement issues ... 59
Fabric selection ... 60
Representation of layers ... 63
Virtual Fitting Interviews ... 68
Best representation of fit. ... 72
Participant Evaluation of Virtual Fitting Experience... 73
Making design decisions ... 73
Making fit decisions ... 74
Designer’s intention for the costume ... 75
How a virtual fitting might be used ... 76
Suggestions for improvements to the virtual fitting ... 78
Suggestions for use of the virtual fitting ... 80
5. Conclusions ... 82
Revised Costume Design and Production Framework ... 82
6. Suggestions for Future Research ... 90
REFERENCES ... 93
APPENDICES ... 101
Appendix A, Expert Interview Script ... 102
Appendix B, Costume Designer Interview Script... 103
LIST OF TABLES
Table 1 Costume production personnel (adapted from Ingham & Covey, 1992b) ... 8
Table 2 Expert interview subjects ... 37
Table 3 Brief description of research sample ... 39
Table 4 Standard avatar measurements and actress measurements in inches ... 42
Table 5 3D fit simulation attempts and adjustments ... 45
Table 6 Participant selection for best overall fit ... 72
Table 7 Designer responses to the question “Can you make design decisions based on this virtual fitting?” ... 74
Table 8 Designer responses to the question “Can you make fit decisions based on this virtual fitting?” ... 75
LIST OF FIGURES
Figure 1. The costume design and production process (synthesized from Anderson &
Anderson, 1984; Cunningham, 2009; Ingham & Covey, 1992a and b). ... 1
Figure 2. Detailed components in stages 2 and 3 of the costume design and production process (synthesized from Anderson & Anderson, 1984; Cunningham, 2009; Ingham & Covey, 1992a and b). ... 6
Figure 3. Detailed components in stage 4 of the costume design and production process (synthesized from Anderson & Anderson, 1984; Cunningham, 2009; Ingham & Covey, 1992a and b). ... 9
Figure 4. Simulated garment on a 3D avatar in Lectra Modaris 3D Fit showing tension map. ... 16
Figure 5. Pattern pieces sewn together in Lectra Modaris, ... 18
Figure 6. Comparison of virtual (left) and real (right) pants fit, (Kim & Labat 2012, p.178). 23 Figure 7. Back view of skirt created from triangulated 3D body scan data. (Daanen & Hong, 2007, p.19). ... 27
Figure 8. Segmentation of body model, (Huang 2011, p. 179). ... 28
Figure 9. Development of patterns from defined segments, (Huang 2011, p. 192). ... 29
Figure 10. Arm feature points and contour sketches, (Geng et al 2008 p. 712). ... 30
Figure 11. Sleeve modification through cross section, (Geng et al. 2008 p. 713). ... 30
Figure 12. Pattern scan showing extraneous lines and points. ... 40
Figure 13. Pattern scan showing skewed piece. ... 41
Figure 14. Virtual avatar showing modified shoulder, across back, and across front measurements for Actress 4. ... 43
Figure 15. Virtual avatar showing modified basic measurements for Actress 4. ... 43
Figure 16. Posture modifications on the 3D avatar: a. neutral; b. posture adjustments +1; c. posture adjustments -.5. ... 44
Figure 17. Preliminary costume design and production framework ... 58
Figure 18. Simulation of Garment 1 showing poor fit through midriff and hips. ... 61
Figure 19. Unsuccessful simulation of Garment 4 using standard fabric. ... 61
Figure 20. Final simulation of Garment 4 in alternate fabric. ... 62
Figure 21. Simulation of Garment 3 showing poor fit through hip and midriff. ... 62
Figure 22. Successful simulation of collar and placket opening on Garment 2. ... 64
Figure 23. Unsuccessful simulation of sleeve cuffs on Garment 2. ... 64
Figure 24. Simulation showing only seven of eight flounces on Garment 1. ... 65
Figure 25. Simulation showing two of eight flounces on Garment 1. ... 66
Figure 26. Simulations showing unsuccessful belt placement on Garment 3 (top), and marked outline of belt in final simulation of garment (bottom). ... 67
Figure 27. Garment 1, fittings A, B, and C (left to right). ... 68
Figure 28. Garment 3 showing belt alteration as directed by D3 Top arrow indicates original belt line. Bottom arrow indicates alteration. ... 69
1. Introduction
The costume design and production process is an iterative, hands-on, collaborative one that involves input from several stakeholders at multiple stages. It is a time-delimited project-specific activity that results in apparel and apparel-related items that are not considered “products” in and of themselves, but rather are contributing components of a performance event that will be experienced from different points of view by performers, audience members, directors, producers and designers. Costumes can give the audience clues as to the time period and location of the play, opera or ballet. They can help to visually establish the age, economic background, and personality of a character. At the same time they must satisfy the director’s vision for the piece, and they must give the performer a sense of their character while enabling that performer to move in certain prescribed ways. They must be made within a certain window of time according to restrictions of budget,
availability of materials, and abilities of the team of makers. The work of the costume designer is defined by all of these factors in addition to other aesthetic considerations, and he or she must satisfy these needs in collaboration with the team of directors, performers, producers, and makers involved in the production.
Figure 1. The costume design and production process (synthesized from Anderson & Anderson, 1984; Cunningham, 2009; Ingham & Covey, 1992a and b).
1. Definition of needs
2. Research and inspiration
3. Creation and presentation of
designs
4. Prototyping and design
validation
The iterative nature of the costume design process is outlined in Figure 1, synthesized from several works on the subject. Each of these steps can be further broken down into detailed processes that involve a number of participants. In steps one and two, the definition of needs for a particular play or production involves input from the director or
choreographer, analysis of the script, and input from the actor or performer. The costume designer manages the needs and opinions of all these stakeholders alongside his or her own vision to create designs that will be presented for approval by the director and producers in stage three of the process. In stage four the costume designer works closely with the makers and artisans who will build the costumes through a series of discussions and fittings. This stage typically involves one or more iterations of costume prototypes crafted by costume makers. These prototypes are presented in fittings with the performer in which costume makers, designers, and assistants examine the fit, line, color, and wearability of the costume. Stage four in this model, prototyping and design validation, is the focus of this research, which will examine how digital technology might play a role in this stage of the costume design and production process.
Making Costumes
Costume designers and makers in the performing arts rely on draping and flat pattern-making methods to create patterns for costumes (Cunningham, 2009; Ingham & Covey, 1992b). Their choice of methods is influenced somewhat by tradition; however this model of hands-on design and production makes some practical sense as well. In the United States, many if not most professional theaters are operated as not-for-profit or educational
different plays that run for a period of weeks or months but are not repeated. The training that costume designers and makers receive focuses on creating one-of-a kind garments that may or may not be used again, rather than on designing garments for mass production. Because of these factors, and because of an industry preference for traditional methods, it appears that the majority of costume designers and builders in the US have not adopted computer aided design (CAD) and computer aided manufacturing (CAM) systems into their costume development and production processes.
3D Apparel CAD
is intended to assist apparel product developers in the late stage design process when fit and design of their products must be evaluated prior to manufacturing. In addition to allowing quick viewing of garment shapes and features, 3D simulation has the potential to allow design consultation over long distance through virtual prototyping and fit sessions. Purpose of the Study
2. Literature Review Costume Design
It is difficult to separate the task of designing a costume from the overall process of creating a work of theatre, dance, or opera. Although a costume designer’s work often
begins with a script or libretto, the involvement of the director, the design team, and the performers influences the costume designer’s work from an early stage. The director provides an overarching concept or “direction” for the piece, and the costume, set and lighting designers follow that concept in their work. At the same time this team of designers works closely with one another to ensure that all the elements function as a whole. It could be stated that there are many stakeholders in the costume design process. For the director the costume must support his or her vision of how the piece should be presented. For the actor the costume helps to establish a sense of character, both physically and aesthetically. Finally, for the audience, the costume helps to tell the story by representing the age, social standing, historical period, and personality of the character. In their still widely referenced 1984 book on costume design, Anderson and Anderson state that a costume must “…produce a result that is at once visually creative and integrated so firmly into a whole that it cannot be extracted as a separate entity” (Anderson & Anderson, 1984, p.29). The costume designer must attempt to satisfy all of the stakeholders in the project while contributing his or her own creative vision to the final product. For this reason the process of costume prototyping and design validation is particularly involved and complex.
from head to toe in each scene. This information is communicated to the director through design drawings, which are also used to communicate with the team of costume makers who will work to make the desired costumes. The available literature on this topic describes a process that most costume designers follow: read and analyze the script, discuss the overall concept with the director, make a list of the costume needs for each character, then begin drawing sketches of possible looks for each performer (Anderson & Anderson, 1984;
Cunningham, 2009; DiBenedetto, 2012; Pectal, 1999). Figure 2 shows how the next steps in the design process may vary among designers, or according to the nature of the production.
Figure 2. Detailed components in stages 2 and 3 of the costume design and production process (synthesized from Anderson & Anderson, 1984; Cunningham, 2009; Ingham &
Covey, 1992a and b).
1. Definition of needs
2. Research and inspiration
•Historical images related to the time period of the piece •Contemporaty images
related to the characters in the piece •Art images related to
color, style, emotional reaction
•Miscelaneous images related to the director's vision for the piece
3. Creation and presentation of
designs •Quick initial sketches
of characters in costume pieces •Painted character
sketches that indicate a feeling or an approach to a costume
•Detailed drawings of characters in costume pieces that include color, texture, style lines, back views •Collage presentations
with several options for a character's costume
•Collage presentations with specifically curated images of a character's many different "looks"
4. Prototyping and
In stage two, research and inspiration, a designer may pull images from all the sources listed, or may use a combination of these types of sources for their research. Similarly in stage 3, a designer may choose one or more methods of presenting his or her ideas to the director. While there is no agreement as to the “best” way of approaching these stages, costume design experts agree that the final sketch should be a balanced presentation of the designer’s artistic interpretation of the costume and the information needed by the director, actor and costume maker (Ingham & Covey, 1992a). These drawings, with the accompanying notes and fabric swatches, help to establish the working relationship between the costume designer and the rest of the production team, including the director and the team of costume makers. It is important to note that while the costume sketch becomes a kind of blueprint for the finished costume, it is not itself an end point. Discoveries are often made in rehearsal and fittings that require changes to the finished design (Cunningham, 2009). The amount of information contained in the costume sketch can communicate to the costume maker the extent to which their input will be required and serves as a jumping off point for the creative give-and-take that characterizes the collaboration between a costume designer and a costume maker.
The role of the costume maker. The costume maker’s role is to interpret the work of the costume designer. Typically the person who is responsible for all aspects of making the costume, including development of patterns, creation and fit of prototypes, and creation and fit of final costumes is referred to as the draper (for women’s costumes) or the tailor (for
tasks, but it is their job to see that those things are done to the satisfaction of the costume designer and performer, and according to the standards established by their costume shop manager. The titles and responsibilities of typical costume production team members are listed in Table 1. Not every production is staffed by this many people and in some cases one person may take on several or even all these roles.
Table 1
Costume production personnel (adapted from Ingham & Covey, 1992b)
Title Primary Responsibilities
Costumer or costume shop supervisor Oversees the work of the costume
production team; manages the resources of the production (time, money, personnel, etc.)
Draper/Cutter or Tailor Develops garment patterns based on the information provided by the costume designer; supervises creation and fitting of prototypes and final costumes
First Hand Cuts prototypes and final costumes based
on patterns developed by the Draper/Cutter; supervises the sewing of costume pieces
Stitcher Sews the prototype and final costume pieces
Costume Painter/Dyer Dyes or otherwise modifies fabric for
costume according to the designs
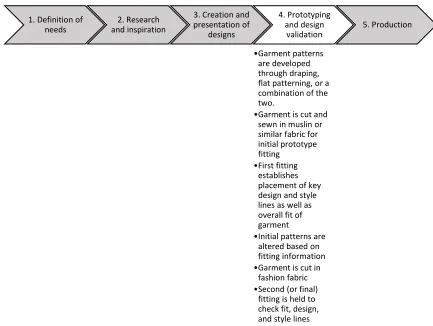
The costume fitting process. Figure 3 shows the steps in stage 4 (prototype
judgment of the designer. Features such as lapel roll lines, button placement, and trim may be shown by marking in stitched lines called “thread marking” so that they may be easily altered if not correct.
Figure 3. Detailed components in stage 4 of the costume design and production process (synthesized from Anderson & Anderson, 1984; Cunningham, 2009; Ingham & Covey,
1992a and b).
In the costume fitting, the costume designer gives detailed feedback to the costume maker on all of the features of the costume as they are presented. Alterations to the prototype are marked with pins or drawn with pencil so that they can be transferred to the final pattern.
1. Definition of
needs and inspiration2. Research
3. Creation and presentation of designs 4. Prototyping and design validation •Garment patterns are developed through draping, flat patterning, or a combination of the two.
•Garment is cut and sewn in muslin or similar fabric for initial prototype fitting
•First fitting establishes placement of key design and style lines as well as overall fit of garment
•Initial patterns are altered based on fitting information •Garment is cut in
fashion fabric •Second (or final)
fitting is held to check fit, design, and style lines
The performer may be asked to show the range of motion required for the performance to ensure that the costume will accommodate what is needed.
In stage 5 of the above model (Production) the costumes are altered and finished based on the fitting notes. Further adjustment often takes place during the dress rehearsal period, in which the costumes are worn on stage for the first time. At this stage movement issues may be discovered or design decisions may be reconsidered. Once the show opens for an audience the costumes are typically considered finished and no further design and fit adjustments are made.
Digital technology in the performing arts costume shop. While there is very little formal research in this field anecdotal evidence suggests that costume designers can be resistant to incorporating digital technology in some aspects of their work (Cunningham, 2009). Costume designer Judith Dolan, when discussing the process of preparing a costume plot says:
The computer isn’t just a tool; you have to be aware that it alters your perceptions.
Doing plots by hand with pencils and rulers and pasting together papers slows the designer and the director down, allows them to think about the play more carefully and thoughtfully, instills pride of ownership, and gives them a strong handle on the piece (Judith Dolan in Cunningham, 2009, p.141).
and costume makers. Costume designers report use of software such as Adobe Photoshop and Adobe Illustrator for creating costume drawings and collages (Bradley, 2009;
Cunningham, 2009). Additionally costume designers have embraced the use of computer software to create textile patterns for digital fabric printing (Pollock, 2014). These digital technologies that have been embraced by costume designers and makers add both efficiency and scope to the process of costume design. Sourcing fabrics is one of the primary functions of a costume designer. When a fabric can be created with little effort and printed quickly and easily it makes the task of sourcing easier and opens up opportunities for enhanced creative output. Similarly the use of digital technology to create and enhance costume sketches may offer opportunities for quicker communication between the costume designer and the costume production team. The supposed resistance felt by costume designers against computer technology may be swept away as other apparel CAD software becomes more accessible.
3D Apparel Visualization Technology
design and production process (Collier & Collier, 1990; Hardaker & Fozzard, 1998). Three-dimensional visualization technology has, in effect, revolutionized other industries, enabling automotive and engineering product developers to design, view, modify, and validate product specifications in 3D simulation (Kim & Park, 2007). It is unclear at this time to what extent the current garment simulation technology has been adopted by the apparel industry. Review of the available literature on this topic reveals that questions remain about whether the
complex process of apparel design can be supported by garment simulation software. The integration of this 3D component in apparel CAD will be the focus of the next section.
Unlike 3D simulation for machinery and durable goods, 3D simulation for apparel presents special challenges that initially slowed its adoption in industry. One is the problem of translating complex flat pattern data into a 3D shape that takes into account the varying and unpredictable nature of cloth as well as the force exerted by the body model underneath the garment (Magnenat-Thalman & Volino, 2005). Another issue arises due to the fact that garment assembly steps differ depending on the garment type and components involved; therefore the assembly phase of garment simulation cannot be based on a standardized model (Liu, Zhang, & Yuen, 2010). Research that incorporates 3D simulation into apparel CAD has made progress in addressing these issues, as discussed in the next section.
other methods of manipulating fabric to fit the desired form. Garment patterns are essentially polygons made up of straight and curved lines. In apparel CAD software pattern technicians input line lengths and curve shapes to create pieces that can be sewn together as garments. Points can be moved to alter line lengths and curve shapes that influence both the size of the garment piece and the style. For example, a sleeve may be made fuller by deepening the curve at the sleeve cap where it will be sewn to the armscye. These shaping features and others such as pleats, darts, and gathers can be specified by the pattern designer in 2D pattern-making software such as Lectra’s Modaris, Gerber Accumark, and Optitex (Gerber, 2014; Lectra, 2014; Optitex, 2014).
To develop 2D patterns with all of their features into a 3D simulation there must be some way of relating the data contained in those 2D pieces to the data that represents the 3D body form. This is most frequently done by creating a triangular mesh to represent each piece. A triangular mesh structure, in computing terms, is a list of triangles containing information about the number and relationships of vertices, edges, and faces (Dunn & Parberry, 2002). To create a 3D view of the garment piece each triangle can be moved in relation to the others within the defined coordinates of 3D space (x, y, and z) of the software. A 3D mesh can be made up of any type of polygon; however in many cases a triangular mesh presents more efficient opportunities for operations such as moving and scaling of 3D mesh form (Dunn & Parberry, 2002).
mesh elements, but this will not present an accurate visual picture of how fabric behaves under forces of drape, stretch, and shear (Bao, Ni, Wang, & Zhu, 2011; Fontana, Rizzi, & Cugini, 2005; Volino, Cordier & Magnenat-Thalman, 2005). Simulation methods that take into account these mechanical properties of fabric are much more computationally complex but can give the designer more visual information about how the garment looks and interacts with the body in terms of mechanical forces (Fontana et al., 2005; Yang &
Magnenat-Thalman, 1992).
Physically based simulation. Both geometric and physical data are used for a physically based simulation. A physically based simulation adds data based on the mechanical properties of fabric and the forces operating on it. Fontana et al. (2006) described two types of physically based simulations; continuous and discrete. Discrete formulations “…describe cloth by a finite number of consecutive mechanical entities” (Fontatna et al., 2006, p.391). They can be thought of in very simple terms as corresponding to the warp and weft interactions of woven cloth. Breen (1992) worked on a particle model of physically based simulation in which each warp/weft intersection was represented as a separate particle. This method was computationally expensive and not very accurate (Bao et al., 2011). Provot (1994) proposed a method of representing the forces that stretch and repel the fibers at these intersections. In these discrete interactions the forces of stretching,
Collision detection and tension mapping. Garments in 3D simulation must be prevented from appearing to fall through the underlying body model as they are simulated. This problem calls for a method of detecting collision between the fabric and the body, or between individual fabric layers (as in folded collars, cuffs, pockets, etc.), and creating a repelling effect between those layers. One method for handling this issue is called the bounding box method. In this method boxes are drawn around units of the objects in question (fabric mesh units and body model units). Where these boxes are intersecting, correction is made to repel the colliding objects (Bao et al., 2011). Related to this issue, a key offering in most of the current apparel CAD software systems is the ability to view a “tension map” that displays the amount of strain on the simulated fabric based on interaction with the underlying body model. In some software the tension map can be used to indicate the distance between the garment and the body (ease) as well as the amount of physical tension in the cloth in either the warp or weft direction. Figure 4 shows amount of ease present in a garment simulated using Lectra Modaris 3D Fit software. In this system, areas of ease are shown in blue, with darker blue signifying greater ease, while yellow to red shades show degrees of tightening. In this figure the fabric around the 3D model’s waist is fairly loose, while some tightening is present in the hip and thigh area. This type of
Figure 4. Simulated garment on a 3D avatar in Lectra Modaris 3D Fit showing tension map.
form; however it is not sufficient for the visualization of garment with layers, folds, and gathers.
Fontana et al. (2006) built on the idea of adding complexity to the 3D simulation. They proposed a method of describing the relationships between pieces as they are sewn together that would allow the simulation to show features such as seaming, layering, pleating, fastening, cutting, and reinforcement. They divided these relationships into “panel” features (pleating, cutting, reinforcement) and “assembly’ features (seaming and fastening). Both types of relationships were represented as functions:
Panel Features: fd:PP* where P is the main panel and P* is the modified panel Assembly features: fa:PxQR where P and Q are two main panels, or disjoint
sub-regions of the same panel, and R is the resulting assembled panel or region (Fontana et al., 2006, p. 395)
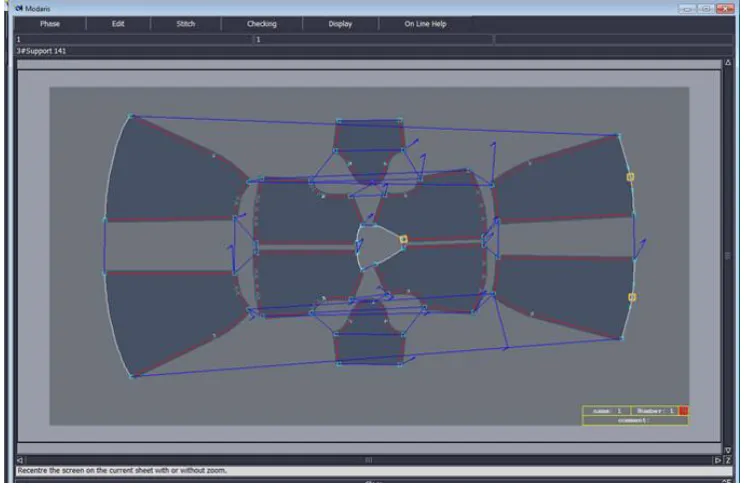
Sul (2012) proposed a method of making garment pieces interchangeable by creating name-based sewing rules. In this system pattern pieces are grouped according to their position on the garment. Sleeves, for example, would be grouped together, and each seam edge would be given an identifying number and position, describing its placement and direction. It is not clear if this method is currently in use by any commercially available software. While this method was developed to give the pattern developer options for interchanging garment pieces to create new styles, the user input involved in defining each seam edge may cancel out any time and productivity benefits. Current software systems such as Lectra Modaris already require extensive user input in defining seams, ordering pieces to be sewn, and defining connection points from the garment to the body model (Figure 5).
Testing the accuracy of 3D simulation. Software developers rather than apparel experts have driven much of the research in 3D apparel CAD. As a result, meaningful assessment of 3D simulation as an accurate tool for validating garment fit has been limited. Pioneers in this area have demonstrated valid methodologies for approaching such research. Apparel design is a complex and iterative process, and it is simply not sufficient to say that a particular software can produce 3D garment simulations. Apparel design and development experts who have contributed to research in the area of testing the capabilities of apparel simulation software bring an important user perspective resulting in an understanding of not only what the software can do but also what the user needs from the technology in terms of both results and interaction.
Otieno and Apeagyei (2006) compared the fit of real garments with virtual ones using Gerber Garment Technology software. They created patterns for two jacket and skirt sets, which they cut and sewed in fabric and modeled in 3D. The garments were sewn in two different sizes and tried on nine human models. From this test two human models were selected and their measurements were used to test the garments in 3D simulation.
Lim (2009) also compared fit and appearance of real and simulated garments. Among other contributions this study shed light on the issue presented by garment simulations in which the appearance of the virtual fabric does not match that of the real fabric. This issue has implications not only for garment developers but also for marketers who wish to accurately represent their apparel products in a virtual try-on setting. Lim tested the mechanical properties of the two fabrics used in the study using the Fabric Analysis by Simple Testing (FAST) system. These properties were input into the apparel simulation software used in the experiment (Optitex and V-Stitcher). The importance of fabric simulation accuracy was shown in one key finding of this study. Because the two systems allowed different fabric properties to be input, both appearance and fit differences were shown between garment simulations of the same fabric obtained in the different systems used. Garments simulated in Optitex showed both fit and appearance close to the fit and appearance of the live garment, while garments simulated in V-Stitcher showed excessive wrinkling. Optitex allowed the input of extensibility, bending rigidity, surface thickness, and weight, while V-Stitcher allowed for input of relaxation shrinkage, extensibility, bending rigidity, shear rigidity, thickness, and weight. The differences obtained in findings between the two systems suggest that user input is still necessary to ensure that the fabric simulation satisfies the necessary parameters for accurate visualization and fit.
subjects. In this comparison Lim found greater similarity between the fit of virtual garments on the direct avatar and the live fitting. Lim attributed this difference to the realistic posture achieved in the direct avatars based on 3D scan data. Lim’s research is important because it showed the influence of multiple elements on the success of the virtual fitting. Further study on the accuracy of fabric simulation and on the best method of avatar development is
indicated in these results.
Wu et al. (2011) examined quantitative comparisons between real and simulated garments through a slightly different method. They took photographs of their actual
garments on a dress form, and using a technique that translated pixels into inches (based on the resolution of the photograph), derived measurements for a skirt in specific areas. They compared these to garment measurements obtained using tools in the 3D simulation software. Their results showed similarities between the real and simulated garments; however their study was limited in their use of a simple skirt as their study garment. Wu et al. (2011) also used measures of the mechanical properties of fabrics to enhance their study. Of twenty fabrics they measured using the FAST system, they discarded several due to the inability of the software to accurately simulate them. While they did not provide detailed information about these discarded fabrics, this result shows that further research is needed in the accuracy of fabric simulation for 3D garment visualization.
framework of functional realism in computer graphics. Ferwerda (2003) argued that when the viewer needs to be able to perform a task using or based on a given computer graphic, neither physical realism nor photo-realism provide the most useful visual information. Functional realism, in Ferwerda’s (2003) definition, captures the elements of the visual
presentation that allow the user to perform tasks with the computer graphic as efficiently as they would be able to perform them with the real object. The measures of functional realism, according to Ferwerda are accuracy, based on physical measures, and fidelity, based on the viewer’s ability to perform specific tasks with the graphic.
In their comparison of the virtual (3D simulated) and live fit evaluations, Kim and Labat used qualitative and quantitative data to measure the fidelity of their computer simulations. They recruited research subjects who were used as fit models, and who also contributed feedback on the real and simulated garments. They first took measurements of their research subjects using 3D body scanning technology and developed a pattern for a pair of pants based on each subject’s measurements. Real samples of pants were sewn from these
virtual fitting that they judged to fit badly in the actual fitting. Kim and Labat attributed this partly to the visual appearance of the simulated fabric, which did not accurately represent visible folds and wrinkles in the simulated garment as shown in figure 6.
Figure 6. Comparison of virtual (left) and real (right) pants fit, (Kim & Labat 2012, p.178).
analyzing a 3D apparel prototype in comparison with a live garment fitting, and it is clear that more such studies are needed.
Another approach to fit evaluation using 3D technology is not directly related to 3D garment simulation, but offers some useful insights. Several research teams have explored the use of 3D scanning technology as a fit evaluation tool (Ashdown, Slocum, & Lee, 2005; Bye and McKinney, 2010; Loker, Ashdown, & Carnrite, 2008). This research involves dressing a live model in a prototype garment; scanning the model in a 3D body scanner; then using images from the 3D scan to assess the fit of the garment. Researchers in this area have discovered issues with this process, among them the inability of evaluators to view design details such as darts in the 3D scanned images (Bye & McKinney, 2010). Loker et al. (2008) pointed out a feature of this method that by itself changes the perception of the research participant. Many apparel design experts are accustomed to viewing 2D images of people on a computer screen. The very act of viewing a 3D image and the ability to view that image from different angles will alter what the evaluator can determine from the fit session. When this is compounded by issues in accuracy and fabric simulation, the need for further research in the use of 3D garment simulation technology for fit evaluation is further reinforced.
Acceptance of CAD technology in the apparel industry. Some of the resistance to CAD that is demonstrated in the artistic community has also been observed in the apparel industry. Studies of CAD acceptance in apparel companies have shown that several factors influence the attitudes taken by workers toward using and adopting CAD, including
production efficiency, and management attempts to streamline production through the use of CAD may result in worker dissatisfaction (Bertolotti et al., 2004). Many researchers claim that the training required to efficiently use the 2D CAD interface in currently available garment pattern development software is too complex and time consuming (Decaudin et al., 2006; Li et al., 2010; Wang, Wang, & Yuen, 2002; Liu, Zhang & Yuen, 2010). Some feel the need for even more rapid “prototyping” in the apparel design process. Others have concerns about the accuracy of 3D simulation engines in representing the fit of a garment that was created from 2D pattern pieces (Huang et al., 2010; Huang, 2011). One approach to addressing complexity, training, and speed concerns is exemplified by attempts to develop software that allows a user to create garment designs directly in a simulated 3D environment.
cut from fabric and sewn together into an actual garment (Huang, 2011). It is unclear at this time whether an accurate method of flattening 3D garment patterns has been developed. Most of the direct-to-3D garment development methods follow one of two directions; they either involve drawing points directly no a 3D body form or defining garments based on segmented features of the 3D body form.
Wang et al (2002 and 2004), Wang et al (2007) and Zhong (2011) all developed methods for drawing 3D garments based on identification of feature points on a 3D body model. This process involves establishing points in key areas that could be connected to serve as boundary lines for garment pieces. These methods all relied on geometric methods of fabric simulation and produced very simple fitted garments. While feature based drawing methods may allow for establishment of fitting ease in the garment through the relationship of feature points on the body and on the garment, design ease and fullness could not be shown through these methods. Additionally, Wang et al. (2004) and Zhong (2011) reported that extensive user input and expertise were required for the creation of even a single garment, showing that these researchers were not able to eliminate the need for training in garment pattern development.
Using live models, they compared the fit of this skirt with the fit of a skirt pattern derived from circumference measurements at key points in the lower torso and found their triangulated method to be the more successful of the two in terms of fit. While this method does create easily flattenable pattern “pieces”, the resulting multi-piece garment is not typical
of apparel that is produced and worn.
Figure 7. Back view of skirt created from triangulated 3D body scan data. (Daanen & Hong, 2007, p.19).
In one stage of their research, Daanen and Hong compared their triangulated skirt pattern to their skirts derived from measurements by superimposing the two. Perhaps at this stage an expert user could analyze the fit information derived from the triangulated pieces to improve the fit of a skirt pattern derived from more traditional methods, however this
approach does not seem to offer increased productivity or efficiency.
amounts of data, but does not automatically recognize body features. Such recognition must be programmed into the software that translates the points found by the body scanner into a recognizable model. To develop a measurable 3D body model, Huang first used a smoothing process on the 3D point cloud to remove redundant points. A triangulation method was then applied to the remaining points to derive a mesh structure in which was recorded the indices of all the triangle vertices. To segment the mesh body model into measurable features, Huang then divided the body into horizontal cross sections, and created B-Spline curves from the resulting points. B-Spline curves are poly-lines whose points control the degree of curve through their relative positions. Surfaces made up of B-Spline curves (either non-uniform, or as in this model, horizontal) are often used in modeling hard structures, such as automobiles or furniture. Using recognized industry standards; Huang then defined and measured key areas of the body model, including bust, waist, and hip. These features were recorded as an interdependent hierarchy. Huang used these features to divide the body model into bounded segments, (Figure 8) which then essentially became pattern pieces (Figure 9).
Figure 9. Development of patterns from defined segments, (Huang 2011, p. 192).
Huang used the B-spline curve structure of his body model to distribute ease throughout his garment. He compared garment prototypes based on his 3D developed patterns with garments developed from traditional flat patterning methods using live fit models.
The results of this testing were mixed. While some test models preferred the garment developed by Huang’s method, others had issues with the amount of ease in the garment. Huang’s parameterization method may enable distribution of ease throughout a garment,
however ease is a subjective requirement, and must be adjusted according to many factors, including wearer preference, fabric type, and garment style. Huang’s contribution also requires further testing with different types of garments to see how much detail and complexity may be achieved.
Researchers in direct-to-3D garment systems have looked at different ways of approaching this task. Geng et al. (2008) presented a method for sketching a sleeve onto a 3D garment design, and reusing that sleeve in multiple garments. They identified feature points on the arm based on 3D body scan data. They started by drawing the armscye, and from there drew lines to the elbow and wrist. These three points became the location for cross-sections in the 3D mesh “sleeve” (Figure 10). By rotating the cross section to appear “flat” on the screen, they were able to modify the sleeve shape by moving control points on each cross section (Figure 11).
Figure 10. Arm feature points and contour sketches, (Geng et al 2008 p. 712).
The researchers used intersection points in their different bodice patterns that corresponded to points on each sleeve. When a sleeve was attached to a different bodice, the points were modified according to corresponding points on the new bodice. This method seemed to offer possibilities for creation of different garment styles; however since the fabric simulation method is purely geometric the resulting physical garments would be vastly different from their 3D representations. For example, the sleeve alteration pictured here did not show how the fabric would drape or fall under this amount of alteration.
Incorporating user input. While some of the research into creating garments directly in 3D is driven by the perception that the 2D to 3D process requires too much expertise, some of the interesting research in creating 3D garment patterns actually incorporates expert user involvement at key points during the process. Griffey and Ashdown (2006) used 3D body scan data to create a topographic map of the lower torso of a human body. They identified landmarks on the body to create side seams and darts for a skirt pattern. This operation required expert knowledge of the typical placement of seams on a skirt. Griffey and Ashdown reported that their fit results were mostly satisfactory. Their goal was to create a skirt “block”, a basic pattern that can be manipulated and altered to create many different styles. They acknowledge that the manipulation of the pattern block may be beyond the capabilities of 3D pattern development technology, yet the ability to create a block to fit a specific body form in 3D may prove beneficial to flat pattern developers.
change” (Kim et al., 2010, p.143). Using this method, they created a fitted bodice with 22 separate pieces. While this method may not be appropriate for all types of garments, it may hold possibilities for development of a system that is closer to the activity of physically draping fabric and pinning curved seams. Also, because they were working with specific body scans; their work may have implications for customization of garments using 3D pattern development technology.
At present, 3D to 2D pattern development technology is not ready for use by either trained or untrained practitioners in garment development applications. Limitations are also present in the available 2D to 3D garment visualization software; however the commercial availability of this software presents possibilities for testing by apparel product development experts. Existing studies have focused on the accuracy of these products. Three-dimensional simulation of garments that are developed from 2D patterns is still a relatively new
3. Methodology Research Questions
As demonstrated from the review of literature, the field of 3D garment simulation is relatively new, and approaches to using it continue to emerge. The potential effectiveness of 3D garment simulation as a tool for use by costume designers and makers relates to a basic design concept. As noted by Wang and Zhang (2007) in their exploration of a new approach to garment visualization, a garment simulation needs to work “interactively, intuitively, realistically, and efficiently” (p. 363). These four qualities could be stated as requirements for either a live or virtual garment fitting system, and they have informed the examination of this technology in the context of costume design and production. Specifically the Research Question guiding this investigation was:
RQ: Can a 3D simulated costume fitting replace one or more components of the prototyping and validation stages of the costume design process?
The research approach followed on Kim and Labat’s (2012) use of Ferwerda’s (2003) framework that informed analysis of functional realism in computer graphics. Functional realism is defined by how well a graphic representation enables the user to perform needed tasks or make required judgments. To address the Research Question three key strategies were employed:
of the tasks and judgments costume designers and makers need to be able to carry out during the fitting process.
2. Virtual fittings were conducted with costume designers and costume makers, and their assessments related to the experience of a virtual fitting session using a 3D simulation were obtained. These interviews were used to gauge the effectiveness of virtual fitting in the context of the functional realism criteria generated by the expert interviews.
3. The process of working from an existing paper pattern to develop a 3D garment simulation and prepare for each virtual fitting session was documented. This data facilitated understanding of issues that are specific to the process of costume simulation in the context of Wang and Zhang’s (2007) statement that a garment simulation should work “interactively, intuitively, realistically, and efficiently” (p. 363).
Implementation of these strategies is discussed in detail in the following section. Overview
be able to use the results of a fitting in later steps in the costume design and production process.
Research subjects for the virtual fitting phase of the research were solicited from among professional costume designers who were asked to submit a costume sketch of a woman’s dress that was made-to-order for a recent production. Patterns for these costumes were also requested, and these were scanned using the N-Scan Pattern Digitizing System. Scanning allowed the two dimensional pattern data to be translated to data usable in Lectra Modaris to create three simulated fittings of each costume. One simulated fitting showed the costume on an avatar that had been modified according to the measurements of the actress for whom the costume had originally been made. The other two fittings showed the same costume on the same avatar with altered shoulder posture as discussed in detail in the posture modification section. The goal of the virtual fitting was to elicit descriptive comments from both designers and makers in the nature of fit and design notes, such as would be given in a live fitting (the sleeve needs to be lengthened; the neckline is too low; the dress is puckering along the shoulder, etc.).
Both the designer and maker for each costume were asked to participate in a Web-based interaction (via WebEx) in which they were able to view the 3D simulation and
format allowed the interviewee to make observations about fit and design features of a virtually simulated costume.
Qualitative Approach
A qualitative approach was selected for this research for multiple reasons. While it is understood by many practitioners, very little formal study has been made of the costume design process. It was anticipated, therefore that issues would emerge from this examination of technology in the context of costume design that could not be predicted. A qualitative approach is thought to be an effective method of teasing out emerging issues while thoroughly examining a complex problem or activity (Creswell, 2013; Tracy, 2012). Qualitative study provides opportunities for gathering rich insights through open-ended questions and in-depth interviews. Such insights are particularly necessary for understanding previously unexamined processes (Creswell, 2013).
Role of the Researcher
is especially important for the researcher to have an understanding of the issues or activities being studied for effective research design and interpretation (Creswell, 2013; Tracy, 2012). Sample Selection
A purposeful sampling approach was used in this study. Purposeful sampling is frequently used in qualitative enquiry, as it allows the researcher to select subjects whose expert knowledge and experience can offer useful insights into an area of specialized activity (Creswell, 2013). For this reason professional experience was a key criterion in sample selection for both phases of this research. Participants in the expert interview phase of the project were initially solicited from among researcher contacts at professional theaters and theater training programs. Additional participants in this phase were added based on
suggestions obtained during interviews, and from a call made using the social media platform Facebook among a closed group called “Costume People”. Table 2 lists details about the experts who participated in this research.
Table 2
Expert interview subjects
E1. A costume shop manager at a university theater department in the northeastern US E2. An owner/manager of an independent for-profit costume shop in the northeastern US E3. A costume shop manager at a professional not-for-profit regional theater in the southwestern US
E4. A costume shop employee at a large for-profit performing arts company in the southwestern US
E5. A costume department manager at a large for-profit performing arts company in the southwestern US
E6. The head of a costume production M.F.A. program at a university in the northeastern US (also a working costume maker)
Sample selection for the virtual fitting phase of the research project was based on four criteria: professional experience, participation in a recent applicable project, availability, and willingness to participate in a ninety minute virtual fitting/interview. Potential subjects were solicited from among contacts at professional theaters and among recent graduates of theater training (M.F.A.) programs. The goal in selecting the sample was to identify professional costume designers and makers who could participate in virtual fittings. While comparison between live and simulated fittings would be desirable following Ferwerda’s (2003) framework as used in Kim and Labat (2012), limitations of time and resources precluded working with costume designs that were in production at the time of the study. A costume shop may have as few as three weeks to pattern, fit and produce costumes for a production. It would be impractical to try to gain access to garment patterns during that short window of time since they are typically not completed until midway through that production period, and scheduling virtual fitting sessions with the busy designer and maker would be very
challenging. Instead, by working with costumes that were previously produced, the
researcher was able to draw on the experience of the research subjects with the actual fitting of the costumes to assess the usefulness of the simulated fitting in relation to the needs of the designers and makers.
simplicity. Of the four rejected garments, three involved complex layered components such as a jacket, cape, or apron, while the fourth contained irregular draped elements and
openings. While it is possible to simulate layered pieces, the process is complicated and does not always produce satisfactory results. Garment openings are key in creating a 3D
simulation, because points on the avatar must be identified for association with these openings. Garments with irregular openings present a challenge in simulation because the options for creating these point associations are limited to some standard body reference points (neck, arm, ankle, etc). For these reasons, the four rejected garments were determined to be too complex for the simulation software to handle efficiently. The final participants in the virtual fitting phase of the research and their associated garments are listed in Table 3.
Table 3
Brief description of research sample
Costume Designer (# years experience)
Maker (# years experience)
Brief description
A 10 3 1930’s evening gown
B 20+ 3 1960’s day dress
C 20+ 20+ 1910’s day dress
D 3 3 1930’s evening gown
E 3 3 Dress of unspecified
era
Pattern Digitization and Simulation
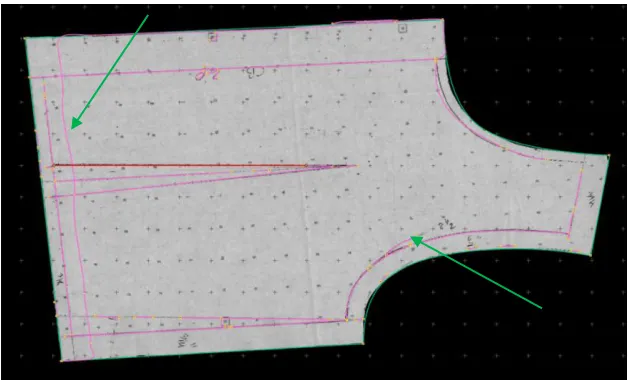
software did not distinguish between the outer edges of the piece and the internal markings (examples highlighted with green arrows). Extraneous marks were deleted and the perimeter of the piece was identified manually. In some cases pattern pieces were copied onto clean white paper so that the scanner could record the pattern piece outline cleanly and clearly. Oversized pieces presented a challenge, due to a tendency of the scanner to warp or skew them. Figure 13 shows a long skirt piece from Garment 3 that was distorted by the scanner (warped area circled in green). Long, narrow pattern pieces such as this one were attached to larger pieces of paper to feed through the scanner to eliminate warping.
Figure 13. Pattern scan showing skewed piece.
Manual measurements of each piece were taken prior to scanning, and pieces were measured again using the Length Measure function in Lectra Modaris. Manual and digital
measurements were compared and digital points adjusted using tools in the software where they did not agree within a tenth of an inch of the manual measurements.
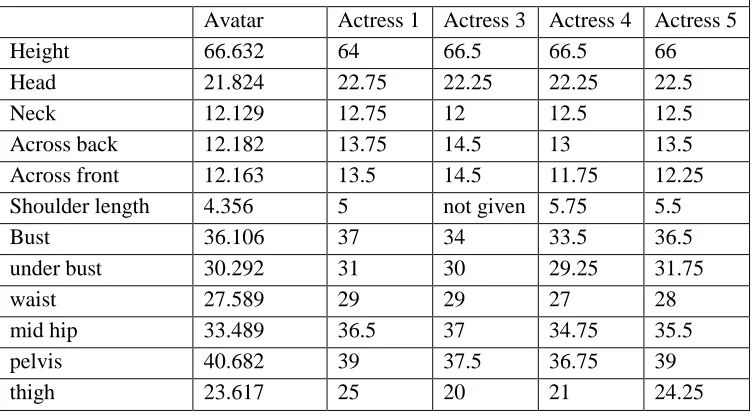
Table 4
Standard avatar measurements and actress measurements in inches Avatar Actress 1 Actress 3 Actress 4 Actress 5
Height 66.632 64 66.5 66.5 66
Head 21.824 22.75 22.25 22.25 22.5
Neck 12.129 12.75 12 12.5 12.5
Across back 12.182 13.75 14.5 13 13.5
Across front 12.163 13.5 14.5 11.75 12.25
Shoulder length 4.356 5 not given 5.75 5.5
Bust 36.106 37 34 33.5 36.5
under bust 30.292 31 30 29.25 31.75
waist 27.589 29 29 27 28
mid hip 33.489 36.5 37 34.75 35.5
pelvis 40.682 39 37.5 36.75 39
thigh 23.617 25 20 21 24.25
Figure 14. Virtual avatar showing modified shoulder, across back, and across front measurements for Actress 4.
The adjustments of across front and across back caused distortion in the avatar, therefore these adjustments were not used to create avatars for each actress. Instead, adjustments of height, bust, waist, mid hip, pelvis, and thigh were made. There were limitations, therefore, in the accuracy of the avatars used for the 3D simulation. Figure 15 shows the avatar adjusted with these basic measurements for Actress 4.
a. b. c.
Figure 16. Posture modifications on the 3D avatar: a. neutral; b. posture adjustments +1; c. posture adjustments -.5.
neutral position. Figure 15b shows the avatar with a “shoulders posture” and “posture” adjustment of +1. Figure 15c shows the same avatar with a “shoulders posture” and “posture” adjustment of -.5.
3D Fit simulations. Simulations were developed for each interview showing the costume on each of the three posture variants of the avatar. These simulations were labeled Fitting A, B, or C. For four of the five garments, adjustments had to be made to either the pattern pieces or the number of components shown in the simulation. These adjustments will be discussed in greater detail in the results section. They are summarized in Table 5, which also shows the number of simulation attempts that were made before the final simulation was achieved.
Table 5
3D fit simulation attempts and adjustments Simulation
Attempts
Modifications made to achieve final simulation
Garment 1 9 Number of flounces reduced from 8 to 2
Garment 2 9 Sleeve cuffs not shown
Garment 3 23 Belt not shown, marked with stitching
Garment 4 3 Fabric was changed to achieve fit of bias cut dress
Garment 5 2 No modifications
Research Interviews
in the costume industry. These interviews did not involve demonstrations of the 3D
simulation software. Questions were general and open-ended, and the researcher was able to prompt for more detail where needed according to the interview instrument found in
Appendix A.
Virtual fitting interviews. Virtual fitting interviews were conducted according to a script based on the costume fitting process (see Appendices B and C). The goal of the interview was to elicit the types of responses participants would give in an actual fitting. Virtual fitting interviews were divided into five sections:
Participant Information: questions on the participant’s training and experience Virtual Fitting Demonstration: in which participants were shown a generic 3D
simulated costume that the researcher used to describe the capabilities of the
software, including the ability to rotate the virtual model, mark the garment, highlight seams, and view a tension map showing areas of ease and tightness.
Virtual Fittings: in which the participant was asked to evaluate the fit and design
features of their costume on avatars with three different posture variations.
Comparison: in which the participant was asked to identify the variation (fitting A, B,
or C) that showed the best overall fit.
Yes/No questions: in which participants were asked “Based on this virtual fitting
session, can you make fit decisions/design decisions in a virtual fitting?”
General Impressions: in which the participant was asked to evaluate the experience of
improvements to and uses for the technology, and describe their experience with computers in the costume industry.
During the virtual fitting section, the researcher prompted subjects for feedback on 3D simulations of their costumes, both in terms of fit and design. At the beginning of this part of each interview the researcher asked the designers to “Please respond as you would to the draper or tailor who would be making this costume” and the makers to “Please respond as you would if this “virtual fitting session” was going to be presented to the costume designer.” This part of the interview was interactive; the researcher responded to participant’s fitting and design feedback by rotating the model, zooming in and out on specific areas, and
marking the virtual costume using tools in the software. Each of the three “virtual fittings” in the interview was dealt with in the same manner.
Coding and Analysis
Expert Interviews. Expert interviews were examined for recurring concepts and patterns. These transcripts were coded for responses relating to:
Design development
Early stage design communication Mockup development
Fitting process
Additional insights into novel practices in the fitting process, use of computers in the
costume production process, and attitudes towards computers in the industry were also noted. In some instances these observations were single instances based on the unique experience of the interviewee. Some of these observations on computer use in the costume industry are discussed in the conclusions and inform suggestions on future research.
Virtual Fitting Interviews. Interviews were also transcribed, coded, and analyzed for patterns and themes. First the virtual fitting portions of each interview were coded for responses showing:
Fit evaluation,
Design evaluation, and Costume fitting process steps
After the initial marking of transcripts, recurring themes suggested additional categories for coding, and the interviews were read again for comments on:
Measurement issues, Fabric type,
Fabric appearance, and Software issues
4. Results and Discussion Overview
Results are reported in three general areas, including expert interviews, the
preliminary framework, and virtual fitting interviews. The seven costume design and
production experts who participated in the Expert Interview phase of the research were asked
to describe their process for costume design and production. Their responses helped to
define what designers and makers should be able to do in a fitting, and how they should be
able to use the results of a fitting in later steps in the costume design and production
process. Together, these elements were used to create a framework for a more thorough and
comprehensive understanding of what participants require from the costume fitting and
production process. The framework informs the analysis of responses from the virtual fitting
phase of the research, which focused on evaluating the “functional realism” of a virtual
fitting, or the extent to which a virtual fitting enables the user to perform needed tasks or
make required judgments.
Following details regarding framework development, the virtual fitting phase of the
research will be discussed. First, issues encountered during the pre-fitting stages of the
research are described. Next, fit and design feedback given during the virtual fitting sessions
are examined. Responses to specific questions that show participant opinions about the
virtual fitting experience are detailed in three sections, moving from more specific feedback
about their confidence in the process to more general suggestions about use of and possible
improvements to the virtual fitting. Finally, participants’ attitudes toward computer use in the
these sections were synthesized to create a revised Costume Design and Production
Framework that illustrates how virtual fitting could be incorporated into the costume design
and production process.
The Preliminary Costume Design and Production Process Framework
The steps in the costume design and production process were listed in Figure 1, (page 1) and discussed in some detail in the literature review. This research focused on stage four in that diagram, prototyping and design validation. The purpose of the expert interviews was to further explore this stage to discern what is essential about it. Seven costume design and production experts were interviewed (Table 2). Quotations reference this table; for example E6 refers to expert number six as listed in Table 2. Experts were asked to describe their training, range of experience, and their process for costume design and production. Themes discovered in their responses suggested that the one of the primary activities in costume design and production is communication. Three major interactive communication phases were identified. They are:
1. Early stage design communication, which involves exchange of ideas through consultation and the sharing of research and drawings
2. Mid-stage design communication in which design concepts are translated into three dimensional garments through a process of patterning, prototyping, and fitting 3. Late stage design communication in which design decisions are confirmed through
final fittings and rehearsals