3Com
®
eXchange Call Center
Agent User Guide
Version 4.33
3Com Corporation, 350 Campus Drive, Marlborough MA 01752-3064
Copyright © 2004, 3Com Corporation. All rights reserved. No part of this documentation may be reproduced in any form or by any means or used to make any derivative work (such as translation, transformation, or adaptation) without written permission from 3Com Corporation.
3Com Corporation reserves the right to revise this documentation and to make changes in content from time to time without obligation on the part of 3Com Corporation to provide notification of such revision or change.
3Com Corporation provides this documentation without warranty, term, or condition of any kind, either implied or expressed, including, but not limited to, the implied warranties, terms, or conditions of merchantability, satisfactory quality, and fitness for a particular purpose. 3Com may make improvements or changes in the product(s) and/or the program(s) described in this documentation at any time.
If there is any software on removable media described in this documentation, it is furnished under a license agreement included with the product as a separate document, in the hardcopy documentation, or on the removable media in a directory file named LICENSE.TXT or !LICENSE.TXT. If you are unable to locate a copy, please contact 3Com and a copy will be provided to you.
UNITED STATES GOVERNMENT LEGEND
If you are a United States government agency, then this documentation and the software described herein are provided to you subject to the following:
All technical data and computer software are commercial in nature and developed solely at private expense. Software is delivered as “Commercial Computer Software” as defined in DFARS 252.227-7014 (June 1995) or as a “commercial item” as defined in FAR 2.101(a) and as such is provided with only such rights as are provided in 3Com’s standard commercial license for the Software. Technical data is provided with limited rights only as provided in DFAR 252.227-7015 (Nov 1995) or FAR 52.227-14 (June 1987), whichever is applicable. You agree not to remove or deface any portion of any legend provided on any licensed program or documentation contained in, or delivered to you in conjunction with, this guide.
Unless otherwise indicated, 3Com registered trademarks are registered in the United States and may or may not be registered in other countries.
3Com, the 3Com logo, NBX, and SuperStack are registered trademarks of 3Com Corporation. NBX NetSet, pcXset, and VCX are trademarks of 3Com Corporation.
Adobe is a trademark and Adobe Acrobat is a registered trademark of Adobe Systems Incorporated. Microsoft, Windows, Windows 2000, Windows NT, and Microsoft Word are registered trademarks of Microsoft Corporation.
C
ONTENTS
A
BOUTT
HISG
UIDE5
Conventions 5Related Documentation 5 Documentation Comments 6 Disclaimers 6
C
HAPTER1:
EX
CHANGEA
GENTO
VERVIEW7
Features 7C
HAPTER2:
T
HE EX
CHANGEA
GENTL
OGONW
INDOW ANDT
OOLBAR9
The eXchange Agent Application Logon Window 9The eXchange Agent Application Toolbar 10 Telephony Operations 10
ACD Operations 12 Window Operations 14 Other Operations 14
C
HAPTER3:
C
USTOMIZING THE EX
CHANGEA
GENTA
PPLICATIONT
OOLBAR15
The Setup Window Toolbar Tab 15
Accessing the Setup Window Toolbar Tab 15 Using the Setup Window Toolbar Tab 16 Additional Actions for Toolbar Buttons 17
C
HAPTER4:
W
INDOWS19
Accessing the Calls Status Window 22 Columns in the Calls Status Window 23
Procedures Available from the Calls Status Window 24 The Telephony Window 25
Accessing the Telephony Window 25
Procedures Available from the Telephony Window 25
C
HAPTER5:
D
IALOGB
OXES29
A
BOUT
T
HIS
G
UIDE
This guide describes how to use the eXchange Agent application. Its audience is the
3Com® eXchange Call Center administrators and agents. The guide details the components that comprise the system and explains how to use the application.
For hands-on information regarding the eXchange Agent application, see the Help for each screen.
Conventions
Table 1 lists conventions that are used throughout this guide.
Table 1 Notice Icons
Icon Notice Type Description
Information note Information that describes important features or instructions
Caution Information that alerts you to potential loss of data or potential damage to an application, device, system, or network
Warning Information that alerts you to potential personal injury or death
Related Documentation
These documents are available for the 3Com eXchange Call Center system: 3Com eXchange Release Notes
3Com eXchange Call Center Hardware and Software Guidelines
3Com eXchange Call Center Setup Worksheets
3Com eXchange Call Center Quick Installation Guide
3Com eXchange Call Center Installation and Getting Started Guide
The context-sensitive Help
Documentation Comments
Your suggestions are important to us because we want to make our documentation more useful to you.
Please send e-mail comments about this guide or any of the eXchange Call Center documentation and Help systems to:
Please include the following information with your comments: Document title
Document part number (usually found on the front page) Page number
Your name and organization (optional)
Example:
3Com eXchange Call Center Agent User Guide Part Number 900-0147-01 Rev AA
Page 25
See the Appendix “Obtaining Support for Your Product” in the eXchange Call Center Installation Guide for details on how to register your product and get support from 3Com.
Disclaimers
The illustrations and other views, telephone displays, and screen captures appearing in this manual are examples used to explain how the application’s features and controls are used. What appears in the illustrations may differ from what appears on your actual equipment and may not represent something that is possible in actual operation. The functions that you can use and the information that you can display may differ depending on the telephony state and external equipment connected in your network and eXchange system. Therefore, use the illustrations only as guidelines.
C
HAPTER
1:
E
X
CHANGE
A
GENT
O
VERVIEW
The illustrations in this guide may not represent exactly what you see on your monitor in all details. Use them only as guidelines.
The eXchange Agent is a powerful yet easy-to-use call center software application with a rich set of telephony capabilities, including Answer Call, Hold Call, Transfer Call, as well as specific ACD capabilities, including Call Results, Queued Calls List, and Queued Calls Pickup.
Features
The eXchange Agent application:
Interacts with the 3Com eXchange Call Center's eXchange Visor and eXchange Engine modules to enable the agent to maximize performance in the Call Center environment. Has a library of services that enable the application to be integrated with the
organization's existing services and database using a Windows DDE interface. This integration allows information to be shared between the systems whenever an ACD call is handled.
Contains a customizable toolbar, which provides quick access to frequently performed telephony operations, and application windows.
The eXchange Agent application has these features:
Administrators can customize the application by adding more buttons to the toolbar or by creating shortcut keys to telephony operations.
Telephony functions can be assigned to an almost unlimited number of programmable buttons (soft keys).
Agents can view the status of all waiting calls.
C
HAPTER
2:
T
HE E
X
CHANGE
A
GENT
L
OGON
W
INDOW AND
T
OOLBAR
The illustrations in this guide may not represent exactly what you see on your monitor in all details. Use them only as guidelines.
The eXchange Agent Application Logon Window
From the Windows Start Menu, select Programs > eXchange Agent Program Menu, and then double-click the eXchange Agent Application icon.
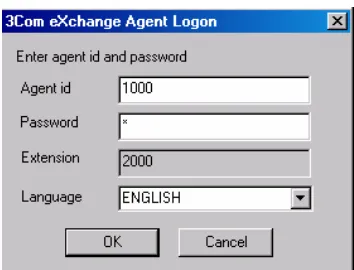
A logon dialog box appears, prompting you to specify three parameters: your agent ID, your password and the user interface language. See Figure 1.
The third parameter, the agent extension, is usually defined only once, during the first time that you log on. In some environments, such as thin terminals, there is no way to save this parameter internally, so you must fill it in at every log on.
Figure 1 eXchange Agent Logon Window
Pay careful attention to the details that you enter in the eXchange Agent Logon window. Enter the exact Agent ID and password that you received from the System Administrator to prevent confusion between agents and extensions.
The eXchange Agent Application Toolbar
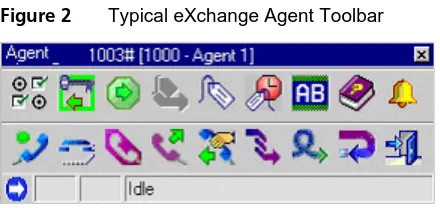
When you have successfully logged on, the application displays the eXchange Agent Application Toolbar, shown in Figure 2. Its buttons provide quick access to frequently used operations and application windows. See Chapter 3: Customizing the eXchange Agent Application Toolbar for more information.
Figure 2 Typical eXchange Agent Toolbar
Use the toolbar to perform any telephony and ACD operations from your desktop with a quick click of a button. Use it also to access special features of the eXchange Agent Application, such as the Calls Log Window.
The status bar along the bottom of the toolbar shows information about current activities. Example: When a call is coming in, the status bar displays information about the source and destination of the call. It also changes color to give you a visual indication of the current activity. For example, the bar turns yellow to indicate an incoming call.
You can perform these types of operations from the toolbar, as described in this chapter: Telephony Operations
ACD Operations Window Operations Other Operations
Telephony Operations
You can use the buttons shown in Table 2 to perform a number of telephony operations from the eXchange Agent Application Toolbar. See also Chapter 3: Customizing the
Some buttons request that you give additional information in a dialog box before they can complete their operation. See Chapter 5: Dialog Boxes for more information.
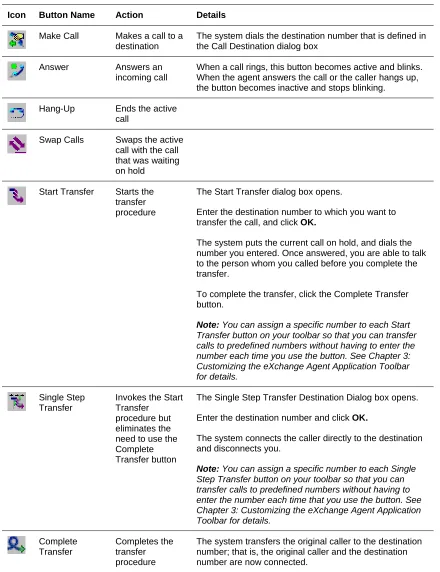
Table 2 Buttons for Available Telephony Operations
Icon Button Name Action Details
Make Call Makes a call to a destination
The system dials the destination number that is defined in the Call Destination dialog box
Answer Answers an incoming call
When a call rings, this button becomes active and blinks. When the agent answers the call or the caller hangs up, the button becomes inactive and stops blinking.
Hang-Up Ends the active call
Swap Calls Swaps the active call with the call that was waiting on hold
Start Transfer Starts the transfer procedure
The Start Transfer dialog box opens.
Enter the destination number to which you want to transfer the call, and click OK.
The system puts the current call on hold, and dials the number you entered. Once answered, you are able to talk to the person whom you called before you complete the transfer.
To complete the transfer, click the Complete Transfer button.
Note: You can assign a specific number to each Start Transfer button on your toolbar so that you can transfer calls to predefined numbers without having to enter the number each time you use the button. See Chapter 3: Customizing the eXchange Agent Application Toolbar for details.
Single Step Transfer
Invokes the Start Transfer
procedure but eliminates the need to use the Complete Transfer button
The Single Step Transfer Destination Dialog box opens.
Enter the destination number and click OK.
The system connects the caller directly to the destination and disconnects you.
Start Conference
Starts the conference call procedure
The Start Conference dialog box opens.
Enter the destination number to which you want to conference the call, and click OK.
The system puts the current call on hold and dials the number that you entered. Once the call is answered, you can talk to the person whom you called before you complete the conference call. To complete the conference call, click the Complete Conference button.
Note: You can assign a specific number to each Start Conference button on your toolbar so that you can connect calls to predefined numbers without having to enter the number each time that you use the button. See Chapter 3: Customizing the eXchange Agent Application Toolbar. Complete Conference Completes the conference procedure
The system connects the three members in a conference call.
Divert Call Diverts an incoming call to the number defined in the Divert Call Destination dialog box
The system opens the Divert Call Destination dialog box.
Enter the number to which you want to divert your call, and click OK.
Note: You can assign a specific number to each Divert Call button on your toolbar so that you can divert calls to predefined numbers without having to enter the number each time that you use the button. See Chapter 3: Customizing the eXchange Agent Application Toolbar.
Hold Puts a call on hold
Retrieve Retrieves a call from hold
Reconnect Disconnects the active call and reconnects the call on hold
ACD Operations
The buttons listed in Table 3 can be used to perform a number of ACD operations from the eXchange Agent Application Toolbar. See Chapter 3: Customizing the eXchange Agent Application Toolbar for more information.
Table 3 Buttons for Available ACD Operations
Icon Button Name Action Details
Login Primary Groups
Logs you in to the Primary Groups:
Logout Primary Groups
Logs you out from the Primary Groups:
Note: The icon on this button changes according to the state. It toggles between Login (green) and Logout (red). When in Login state, pressing the button changes the icon to Logout, and vice-versa.
Login Specific Group
Logs you in to a specific ACD Group:
If this button is preprogrammed with a specific group, click it to log you in to that group. The icon on the button then changes to the Logout ACD Group icon.
If this button is not preprogrammed with a group, click it to view the Login Group dialog box and select the ACD group to which you want to log in.
Logout Specific Group
Performs logout from a specific ACD Group:
If this button is preprogrammed with a specific group, click it to log you out of that group. The icon on the button changes to the Login ACD Group icon.
If this button is not preprogrammed with a group, click it to view the Logout Group dialog box and select the ACD group that you want to logout from.
Groups Manager
Manages the list of Login or Logout groups
The Groups Manager dialog box opens.
Release Sets the station to Release state:
In Release state, the eXchange Agent does not route ACD calls to your phone. You may still receive calls through transfer from another agent or private calls.
Note: The icon on this button changes according to the state. It toggles between Release (red) and Resume (green). When it is in Release state, press the button changes the icon changes to Resume and vice-versa.
Resume Toggles the station between normal ACD mode (in Release) and Resume
Note: The icon on this button changes according to the state. It toggles between Release (red) and Resume (green). When it is in Release state, pressing the button changes the icon to Resume, and vice-versa.
Wrap-Up Code Enables you to enter a Wrap-Up code:
The Wrap-Up Code dialog box opens.
Select the appropriate Wrap-Up code from the drop-down list and click OK.
Controlled Wrap-Up Code
Enables you to control or extend the Wrap-Up period when the automatic Wrap-Up time is not sufficient:
When you are ready to take more calls, click the Ready button.
Help Sends a help request to the Supervisor:
This button alerts the Supervisor that you need assistance. It toggles between On and Off.
Window Operations
The buttons listed in Table 4 can be used in the eXchange Agent Application Toolbar to perform window operations. See Chapter 4: Windows for more information.
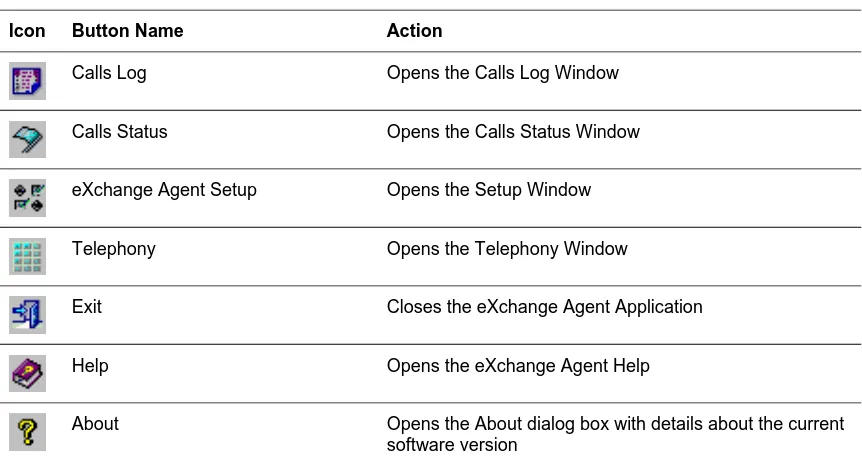
Table 4 Buttons for Available Windows Operations
Icon Button Name Action
Calls Log Opens the Calls Log Window
Calls Status Opens the Calls Status Window
eXchange Agent Setup Opens the Setup Window
Telephony Opens the Telephony Window
Exit Closes the eXchange Agent Application
Help Opens the eXchange Agent Help
About Opens the About dialog box with details about the current software version
Other Operations
The button listed in Table 5 can be used in the eXchange Agent Application Toolbar to create an Agent Board.
Table 5 The Button Available for “Other Operations”
Icon Button Name Action
Agent Board
(shown in the next table row)
C
HAPTER
3:
C
USTOMIZING THE
E
X
CHANGE
A
GENT
A
PPLICATION
T
OOLBAR
The illustrations in this guide may not represent exactly what you see on your monitor in all details. Use them only as guidelines.
By adding and removing buttons, the Administrator can customize the eXchange Agent Application Toolbar to suit each agent's requirements.
The Setup Window Toolbar Tab
In the Toolbar tab of the Setup window, the agent can view all available buttons and their functionality, and select the ones that you want to add to the toolbar.
Accessing the Setup Window Toolbar Tab
1 Click the eXchange Agent Setup button in the Agent Application Toolbar. This button is also in the window category of the eXchange Agent Setup.
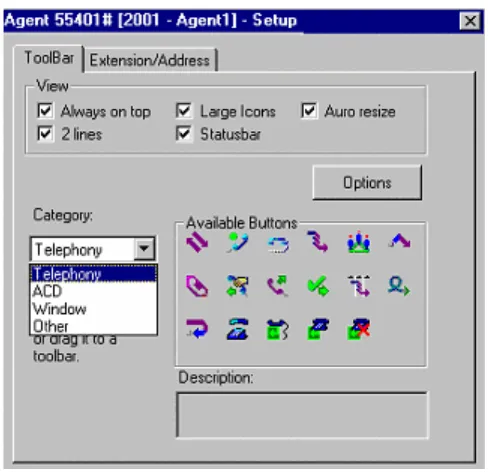
2 Click the Toolbar tab to bring the Toolbar page forward. See Figure 3.
Using the Setup Window Toolbar Tab
There is no limit to the number of buttons that you can add, and the same button may appear more than once. For example, if your Toolbar contains three Divert Call buttons, you can allocate three destination numbers to which calls can be diverted. See Chapter 5: Dialog Boxes for more information.
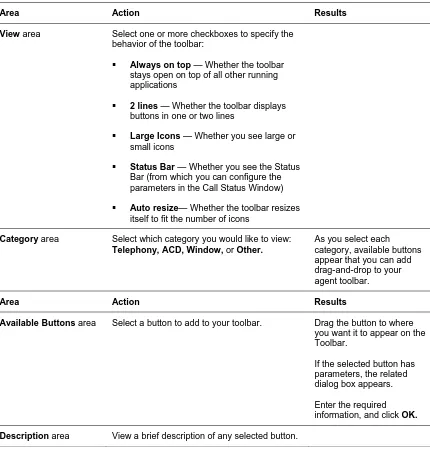
Use the Setup tab, shown in Figure 3, to define the toolbar behavior, as described in Table 6.
Table 6 Actions Possible in the eXchange Agent Toolbar Configuration Window
Area Action Results
View area Select one or more checkboxes to specify the behavior of the toolbar:
Always on top — Whether the toolbar stays open on top of all other running applications
2 lines — Whether the toolbar displays buttons in one or two lines
Large Icons — Whether you see large or small icons
Status Bar — Whether you see the Status Bar (from which you can configure the parameters in the Call Status Window)
Auto resize— Whether the toolbar resizes itself to fit the number of icons
Category area Select which category you would like to view:
Telephony, ACD, Window, or Other.
As you select each category, available buttons appear that you can add drag-and-drop to your agent toolbar.
Area Action Results
Available Buttons area Select a button to add to your toolbar. Drag the button to where you want it to appear on the Toolbar.
If the selected button has parameters, the related dialog box appears.
Enter the required information, and click OK.
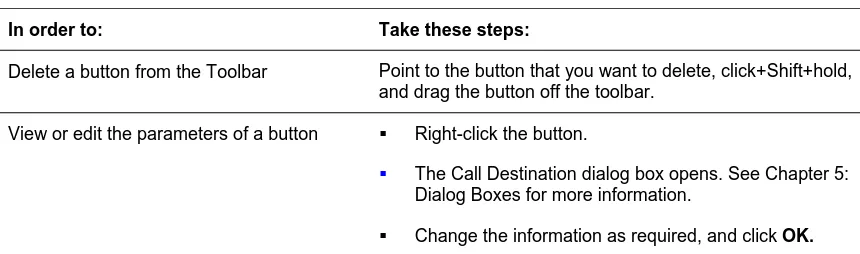
Additional Actions for Toolbar Buttons
You can change the parameters of a button or delete it, as described in Table 7.
Table 7 Managing Toolbar Buttons
In order to: Take these steps:
Delete a button from the Toolbar Point to the button that you want to delete, click+Shift+hold, and drag the button off the toolbar.
View or edit the parameters of a button Right-click the button.
The Call Destination dialog box opens. See Chapter 5: Dialog Boxes for more information.
Change the information as required, and click OK.
The Option button offers several more customization options:
To start the agent minimized, check the Start minimized check box.
To enable closing the agent via the X button, check the Enable closing via the system menu "X" button check box.
To cause the agent to pop up in forced release state when minimized, check the Pop Up toolbar in "Forced release" state check box.
C
HAPTER
4:
W
INDOWS
The illustrations in this guide may not represent exactly what you see on your monitor in all details. Use them only as guidelines.
The Setup Window Extension and Address Tab
Use the Extension and Server IP Address of the Setup window to define the extension number of your station and the server address.
Extension and Address Tab of the Setup Window
Pay careful attention to the details that you enter in the Setup window’s Extension/Address tab. Enter the exact information that you receive from the System Administrator to prevent confusion.
Accessing the Setup Extension or Address Tab
1 Click the Setup button in the eXchange Agent Application Toolbar. This button is also in the Window category of the eXchange Agent Setup.
Defining the Extension Number or Server Address
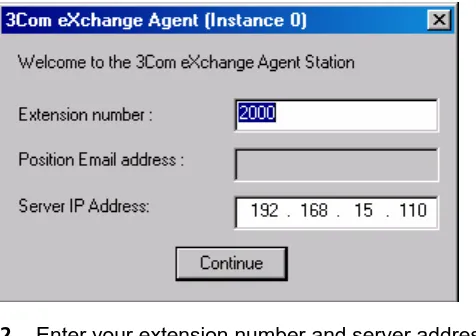
1 Click the Set New Values button to open the Set Extension & Server IP Address.
Figure 4 Agent Extension/Address Window
2 Enter your extension number and server address in the dialog box.
3 Click Continue to assign the new values. The new values take effect the next time that you log on.
The Calls Log Window
The Calls Log window displays a record of all calls that were handled during the current logon period. You can view the properties of any event in this window and attach notes to the record, for example, to remind yourself to follow up on a certain call. You can also delete an individual record from the list, or clear the whole log.
Accessing the Calls Log Window
Click the Calls Log button in the eXchange Agent Application Toolbar. This button is also in the Window category of eXchange Agent Setup. The Calls Log window appears (Figure 5).
Figure 5 Calls Log Window
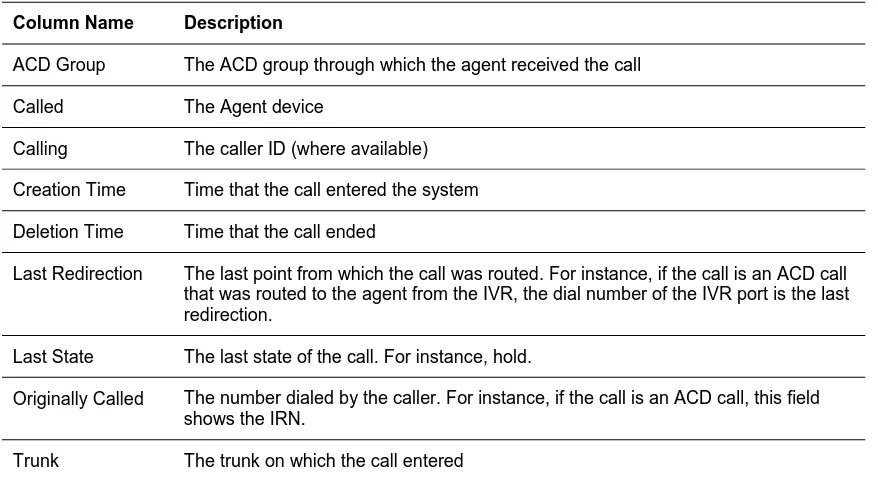
Table 8 Available Columns for the Call Logs Window (Arranged Alphabetically)
Column Name Description
ACD Group The ACD group through which the agent received the call
Called The Agent device
Calling The caller ID (where available)
Creation Time Time that the call entered the system
Deletion Time Time that the call ended
Last Redirection The last point from which the call was routed. For instance, if the call is an ACD call that was routed to the agent from the IVR, the dial number of the IVR port is the last redirection.
Last State The last state of the call. For instance, hold.
Originally Called The number dialed by the caller. For instance, if the call is an ACD call, this field shows the IRN.
Trunk The trunk on which the call entered
Procedures Using the Calls Log Window
In the Calls Log window, you can perform several procedures, as described in this section.
Insert a Column:
1 Right-click inside one of the column headings in the Calls Log window and select Insert Column from the pop-up menu.
The Insert Column dialog box opens.
Delete a Column:
1 Right-click the column that you want to delete. 2 Select Delete Column from the pop-up menu.
View the Properties of a Call:
1 Right-click the required call in the Calls Log Window. 2 Select Properties from the pop-up menu.
Add a Note to a Call:
1 Right-click the required call in the Calls Log Window. 2 Select Properties from the pop-up menu.
3 When the Calls Properties dialog box opens, enter a note to accompany the selected call.
Sort the Records According to One of the Column Headings:
1 Click the required column heading. The list is sorted according to the selected field. 2 Select the same column again to toggle the sort order between ascending and
descending.
Delete a Call:
1 Right-click the required call in the Calls Log Window. 2 Select Delete from the pop-up menu.
Clear All Records from the Log:
1 Right-click in the Calls Log window. 2 Select Clear Log from the pop-up menu.
The Calls Status Window
The Calls Status window shows the status of all calls that are currently waiting on your phone. You can view the properties of any call listed in this window.
Accessing the Calls Status Window
The Call Status window appears. See Figure 6.
Figure 6 Call Status Window
Columns in the Calls Status Window
The Calls Status window displays information in column format. You can sort the records according to a specific field. Most of the columns are textual except for Call Type and the Call Media columns, which display icons as described in Table 9.
Table 9 Call Type and Call Media Icons
Icon Description
An incoming ACD call
A voice call
The Columns displayed in the Calls Status window in Figure 6 are only some examples. You can use any of the columns described in Table 10. The selected columns are also displayed in the status bar that shows the active call.
Table 10 Available Columns for the Call Status Window
Column Name Description
ACD Group The ACD group through which the agent received the call
Called The destination number dialed by the caller
Calling The caller ID (where available)
Elapsed The running time since the call began
Last Redirection The last point from which the call was routed
Originally Called The number dialed by the caller
Status Current status
Trunk The trunk on which the call entered
Procedures Available from the Calls Status Window
In the Calls Status window, you can perform the procedures described in this section.
Insert a Column:
1 Right-click inside the one of the column headings in the Calls Status window and select Insert Column from the pop-up menu. The Insert Column dialog box opens.
2 From the drop-down list, select the column that you want to insert.
3 Edit the Header if you want to change the title name that will appear on the column. 4 Specify the Alignment to determine the position of the text for this column.
5 Adjust the Width if required.
Alternatively, you can change the width manually by dragging column sides to the desired position.
Delete a Column:
1 Right-click the column that you want to delete. 2 Select Delete Column from the pop-up menu.
View the Properties of a Call:
1 Right-click the required call in the Calls Status window. 2 Select Properties from the pop-up menu.
Sort the Records According to one of the Column Headings:
1 Click the required column heading. The list is sorted according to the selected field. 2 Select the same column again to toggle the sort order between ascending and
The Telephony Window
The Telephony window is a picture of an actual telephone. You can use it to perform all telephony operations from your desktop. Use the keypad on the left side of the window to dial numbers, or enter them in the available field and click the Send button.
The rest of the buttons act like speed-dial buttons on a telephone. You may add as many additional buttons as required and program them to perform a number of different actions. You can also activate any of the eXchange Agent toolbar functions.
Accessing the Telephony Window
Click the Telephony button in the eXchange Agent Application Toolbar or in the Window category of the eXchange Agent Setup. The Telephony window appears. See Figure 7.
Figure 7 Telephony Window
Procedures Available from the Telephony Window
The window shown in Figure 7 displays the default page (Telephony), containing the keypad and nine buttons. You can add and remove pages from the Telephony Window and rename them as required. By assigning properties to each button, you can define its function and related information, for example, the name that displayed on a button.
The rest of this section describes the actions available in the Telephony Window.
Make a Call:
Define the Properties of a New Button:
1 Right-click an empty button and select Properties from the pop-up menu. The Button Properties dialog box opens, as shown in Figure 8.
Figure 8 Button Properties Window
2 From the drop-down lists, select the required Category (Telephony, ACD, Window or Other) and select the Function that you want to assign to this button.
3 If the selected function requires you to define parameters (e.g. a number to dial), the Setup button is enabled. You may click this button to open the relevant dialog box (e.g. the Call Destination dialog box) and define the required parameters.
4 Enter the Caption (the name that you want to appear on the button), and click OK. The new speed-dial button appears in the telephony window with the caption name that you entered.
Edit the Properties of a Button:
1 Right-click the button and select Properties from the pop-up menu. The Button Properties dialog box opens.
2 Edit the properties as required, and click OK.
Clear the Properties of a Button:
1 Right-click the button.
2 Select Clear from the pop-up menu.
Add a New Page of Buttons:
2 Enter a unique name for the page, and click OK.
A new page is created displaying 20 new empty buttons. You can add as many pages as you want.
Rename a page:
1 Right-click the tab and select Rename from the pop-up menu. The Rename Page dialog box opens.
2 Enter a unique name, and click OK.
Remove a page:
1 Right-click the tab and select Remove from the pop-up menu.
A dialog box opens warning you that removing the page will remove all of the associated buttons on that page. For example:
C
HAPTER
5:
D
IALOG
B
OXES
The illustrations in this guide may not represent exactly what you see on your monitor in all details. Use them only as guidelines.
Certain buttons require additional information, which may be saved in the button or entered every time the button is pressed. The additional information may be edited any time.
Nature of a Dialog Box in eXchange Call Center
When a button that requires additional information is placed on the toolbar, the eXchange Agent opens a dialog box so that you can fill in the required information:
If you fill in information and click OK, the button is placed with the information stored in it. If you click OK without filling in the information, the button has no information in it.
Whenever you press the button, the dialog box asks you for the required information. Figure 9 shows one example of the kinds of actions that require additional information.
Figure 9 Button Properties Dialog Box for the Execute Program and Divert Call Buttons
These telephony actions require additional information (also called “parameters”): Divert Call