WIN W1500 / W500 HANDSET
USER GUIDE
©August 2003
WIN® Communications Corporation
KHS3040 Wireless Handset User Guide
H
ANDSET
B
ATTERIES
Battery installation
Before using the handset the battery must be connected to the connector in the battery box. Assemble the back cover as described, and place the handset into the charger.
1. Push the back cover 5mm towards the headset plug using your thumbs. 2. Lift off the back cover.
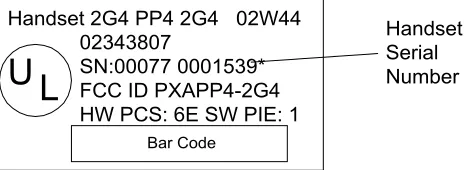
3. Write down the serial number of the handset. (If the battery is already installed, lift the battery up to view the serial number.)
4. If the battery is not already installed, inset the battery plug in the slot in the battery box. 5. Insert battery with the label facing outwards, and replace the cover.
Figure 1 Push the back cover 5mm towards the headset plug using your thumbs. Battery
Battery Connector
Figure 2 Place the battery plug in the slot. Handset 2G4 PP4 2G4 02W44
02343807
SN:00077 0001539* FCC ID PXAPP4-2G4 HW PCS: 6E SW PIE: 1
L
U
Bar Code
Handset Serial Number
Charging
IMPORTANT: All KHS3040 Wireless Handsets must be fully charged before first use. It takes approximately 3½ hours to charge the handset from fully discharged to its full capacity.
After installing the battery and replacing the cover, place the handset into the charger. The display shows the charging status in line 3. For correct charging the room temperature should be between 32°F and 77°F. The handset must not be placed in direct sunlight. The battery has a built-in heat sensor that will stop charging if the battery temperature is too hot. It is necessary to charge the battery anytime the display shows “BATTERY LOW”, or it cannot be powered on. The LED flashes slowly while charging and lights constantly when the charging is completed. When charging begins the charging status is shown in the third line of the display and the LED flashes slowly. The display goes back to normal mode when fully charged.
Note: When the handset is in the charger, vibrate and B-answer features are not active.
Note: If the battery is fully discharged, up to 10 minutes may pass before the display lights up and charging begins.
WIN Communications
Figure 4 Charging Status Display
H
ANDSET
U
SAGE
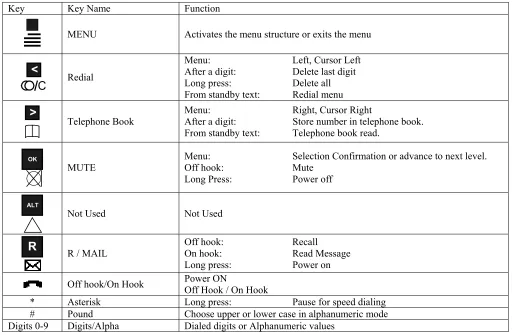
Key Functions
The handset has 21 keys.
Two keys are placed at the right side of the handset for volume control. Press the upper or lower key to adjust the volume. Each press adjusts the volume one step up or down.
Key Key Name Function
MENU Activates the menu structure or exits the menu
C
<
Redial
Menu: Left, Cursor Left
After a digit: Delete last digit
Long press: Delete all
From standby text: Redial menu
>
Telephone Book Menu: After a digit: Right, Cursor Right Store number in telephone book. From standby text: Telephone book read.
OK
MUTE Menu: Off hook: Selection Confirmation or advance to next level. Mute
Long Press: Power off
ALT
Not Used Not Used
R
R / MAIL Off hook: On hook: Recall Read MessageLong press: Power on
Off hook/On Hook Power ON Off Hook / On Hook
* Asterisk Long press: Pause for speed dialing
# Pound Choose upper or lower case in alphanumeric mode
Powering the Handset Off and On
To power on the handset press and hold the key for one second. When the handset is turned on, and subscribed to a Base Control Unit (CCFP), the symbol is shown in the lower left corner of the display.
To power off the handset press and hold the OK key for 3 seconds.
Note: when the handset has been outside the coverage area, it may take up to 30 seconds after re-entering the coverage before the handset will power on.
Placing calls
Note: For making or receiving calls the handset must be subscribed to a Base Control Unit (CCFP). The symbol is shown in the display of the handset to indicate subscription.
Internal Calls
1. Press the key, to take the handset off hook 2. Enter the extension number to be dialed. 3. Converse
4. Press the key, to place the handset on hook.
External Calls
1. Press the key, to take the handset off hook 2. Dial Trunk Group Access Code (i.e. 9)
3. Enter the number to be dialed. 4. Converse
5. Press the key, to place the handset on hook.
Pre-dial
1. Enter the number to be dialed. (Press and hold the “*” key to enter a pause.) 2. Press the key, to take the handset off hook
3. Digits are dialed automatically. 4. Converse
5. Press the key, to place the handset on hook.
Forced Account Code Dialing
1. Press the key, to take the handset off hook
2. Enter Forced Account Code feature access code (set by telephone system administrator) 3. Enter Forced Account Code
4. Press #
5. Dial Trunk Group Access Code (i.e. 9) 6. Enter the number to be dialed. 7. Converse
8. Press the key, to place the handset on hook.
Last Number Redial
1. Press the key, to take the handset off hook 2. Dial #7
3. Digits are dialed automatically. 4. Converse
5. Press the key, to place the handset on hook.
Speed Dialing
1. Press the key, to take the handset off hook
2. Dial Speed Dial access code (set by telephone system administrator) 3. Enter 4 digit Speed Dial Code (System: 0000-4999, Station: 9000-9499) 4. Digits are dialed automatically.
5. Converse
Busy Queue
Busy Queue allows a station to queue to a busy internal extension or an outside line. Stations performing a Busy Queue will be notified by ring indication when the internal extension or outside line becomes available.
Set
While receiving busy signal:
1. Press R
2. Dial #1
3. Hear confirmation tone
4. Press the key, to place the handset on hook. 5. Wait for ringing indication
When internal extension or outside line becomes available:
1. Press the key, to take the handset off hook
2. Wait for called internal extension to answer –OR- hear dial tone and place call. 3. Converse
4. Press the key, to place the handset on hook.
Cancel
1. Press the key, to take the handset off hook 2. Dial #1
3. Hear confirmation tone
Answering Calls
When a call is received the display will show “INCOMING CALL” and the phone will ring and/or vibrate. Answer the call by pressing the key.
It is possible to stop the ring signal without answering the call.
Press MUTE and the ring signal will be muted. The display will show “RINGER MUTED”
Internal Calls
1. Receiving ringing on handset
2. Press the key, to take the handset off hook 3. Converse
4. Press the key, to place the handset on hook
External Calls
1. Receiving ringing on handset
2. Press the key, to take the handset off hook 3. Converse
4. Press the key, to place the handset on hook
Selected Trunk/Line Answer
1. Press the key, to take the handset off hook
2. Dial Access Code (set by telephone system administrator) 3. Enter Trunk/Line number
4. Converse
5. Press the key, to place the handset on hook
Page Answer
During Page
1. Press the key, to take the handset off hook 2. Dial #68
3. Converse
4. Press the key, to place the handset on hook
Calls in Progress
Volume Adjustment
Microphone mute
Press the MUTE key. The display will show “MIC. MUTED” Press the MUTE key to enable the microphone again.
Holding Calls
Exclusive Hold
With call in progress 1. Press R
2. Hear new internal dial tone 3. Dial ##
4. Press the key, to place the handset on hook
Retrieve Call
1. Press the key, to take the handset off hook 2. Dial ##
3. Converse
4. Press the key, to place the handset on hook
Transferring Calls
During a call transfer it is always possible to return to the original call by pressing the R key.
Screened Transfer
With call in progress
1. Press R
2. Hear new internal dial tone 3. Dial internal extension number 4. Announce call
5. Press the key, to complete the transfer and place the handset on hook
Unscreened/Blind Transfer
With call in progress
1. Press R
2. Hear new internal dial tone 3. Dial internal extension number
4. Press the key, to complete the transfer and place the handset on hook
Transfer via Paging
With call in progress
1. Press R
2. Hear new internal dial tone 3. Dial #6
4. Enter paging zone (00=All Page, or 01-32 for specific group) 5. Announce call over page
6. Wait for page answer
7. Press the key, to complete the transfer and place the handset on hook
Trunk-To-Trunk (Transfer to Outside Line)
With call in progress
1. Press R
2. Hear new internal dial tone
3. Dial Trunk Group Access Code (i.e. 9) 4. Enter the number to be dialed. 5. Announce Call
Conferencing Calls
Depending on system configuration up to 8 parties may be conferenced. Initiating a new conference call:
With call in progress
1. Press R
2. Hear new internal dial tone
3. Dial Trunk Group Access Code (i.e. 9, proceed to step 4) –OR– Dial internal extension number (skip step 4) 4. Enter the number to be dialed.
5. Announce Call 6. Press R
7. Dial *2 8. Converse
9. Press the key, to place the handset on hook Repeat procedure to add more parties to the conference.
Parking Calls
Call Park
With call in progress Park
1. Press R
2. Hear new internal dial tone 3. Dial *6
4. Hear confirmation tone
5. Press the key, to place the handset on hook
Retrieve from any handset
1. Press the key, to take the handset off hook
2. Dial *6 (add extension number if retrieving station is different from parking station) 3. Converse
4. Press the key, to place the handset on hook
Group Park
With call in progress Park
1. Press R
2. Hear new internal dial tone
3. Enter Group Park Set Access Code (set by telephone system administrator) 4. Dial park orbit number (01-16)
5. Hear confirmation tone
6. Press the key, to place the handset on hook
Retrieve from any handset within the Pick-Up-Group
1. Press the key, to take the handset off hook
2. Enter Group Park Answer Access Code (set by telephone system administrator) 3. Dial park orbit number (01-16)
4. Converse
Direct Group Park
With call in progress Park
1. Press R
2. Hear new internal dial tone
3. Enter Direct Group Park Set Access Code (set by telephone system administrator) 4. Enter Pick-Up-Group number (01-32)
5. Enter park orbit number (01-16) 6. Hear confirmation tone
7. Press the key, to place the handset on hook
Retrieve from any handset
1. Press the key, to take the handset off hook
2. Enter Direct Group Park Answer Access Code (set by telephone system administrator) 3. Enter Pick-Up-Group number (01-32)
4. Enter park orbit number (01-16) 5. Converse
6. Press the key, to place the handset on hook
Call Forwarding
All handsets will provide stutter internal dial tone while forwarded.
Direct Forwarding
Set
1. Press the key, to take the handset off hook 2. Dial #91 for Direct Forwarding
3. Dial 0 for day forward or 1 for night forward 4. Enter internal extension to forward to. 5. Hear confirmation tone
6. Press the key, to place the handset on hook
Cancel
1. Press the key, to take the handset off hook 2. Dial #90
3. Dial 0 for day forward or 1 for night forward 4. Hear confirmation tone
5. Press the key, to place the handset on hook
Follow-Me Forwarding
Follow-Me Forwarding allows a user to forward a handset from the destination extension.
Set from destination
1. Press the key, to take the handset off hook 2. Dial #92 for Follow-Me Forwarding
3. Dial 0 for day forward or 1 for night forward 4. Enter internal extension to forward.
5. Hear confirmation tone
6. Press the key, to place the handset on hook
Cancel from forwarded station
1. Press the key, to take the handset off hook 2. Dial #99
3. Dial 0 for day forward or 1 for night forward 4. Hear confirmation tone
External Forwarding
External Forwarding allows a user to forward a handset to an outside number.
Set
1. Press the key, to take the handset off hook 2. Dial #93 for Follow-Me Forwarding
3. Enter outside number 4. Dial #9.
5. Hear confirmation tone
6. Press the key, to place the handset on hook
Cancel
1. Press the key, to take the handset off hook 2. Dial #93
3. Dial 0 4. Dial #9
5. Hear confirmation tone
6. Press the key, to place the handset on hook
Call Pick-Up
Allows a user to answer a call that is in a ringing condition on another handset.
Direct
Upon hearing ringing indication
1. Press the key, to take the handset off hook 2. Dial *3
3. Dial number of internal ringing extension number 4. Converse
5. Press the key, to place the handset on hook
Group
Upon hearing ringing indication
1. Press the key, to take the handset off hook 2. Dial *9
3. Converse
4. Press the key, to place the handset on hook
Selected Trunk Hold Answer
1. Press the key, to take the handset off hook
2. Dial Selected Trunk Hold Answer Access Code (set by telephone system administrator) 3. Enter Trunk/Line number
4. Converse
5. Press the key, to place the handset on hook
Account Code Registry
With call in progress
1. Press R, original caller is placed on hold. 2. Hear new internal dial tone
3. Dial #3
4. Enter Account Code 5. Enter #
6. Press R to return to original caller 7. Converse
Paging
Page
1. Press the key, to take the handset off hook 2. Dial #6
3. Enter paging zone (00=All Page, or 01-32 for specific group) 4. Perform paging announcement
5. Press the key, to place the handset on hook
Answer During Page
1. Press the key, to take the handset off hook 2. Dial #68
3. Converse
4. Press the key, to place the handset on hook
Do Not Disturb
When Do Not Disturb is active the handset will provide a stutter dial tone.
Set
1. Press the key, to take the handset off hook 2. Dial *84
3. Hear confirmation tone
4. Press the key, to place the handset on hook
Cancel
1. Press the key, to take the handset off hook 2. Dial **84
3. Hear confirmation tone
A
GENT
F
EATURES
Log On
5. Press the key, to take the handset off hook 6. Dial **85
7. Enter 4 digit agent code 8. Hear confirmation tone
9. Press the key, to place the handset on hook
Log Off
10. Press the key, to take the handset off hook 11. Dial *85
12. Hear confirmation tone
13. Press the key, to place the handset on hook
Unavailable
14. Press the key, to take the handset off hook 15. Dial *868
16. Hear confirmation tone
17. Press the key, to place the handset on hook
Wrap-Up
18. Press the key, to take the handset off hook 19. Dial *869
20. Hear confirmation tone
21. Press the key, to place the handset on hook
Available
22. Press the key, to take the handset off hook 23. Dial **97
24. Hear confirmation tone
H
ANDSET
M
ENUS
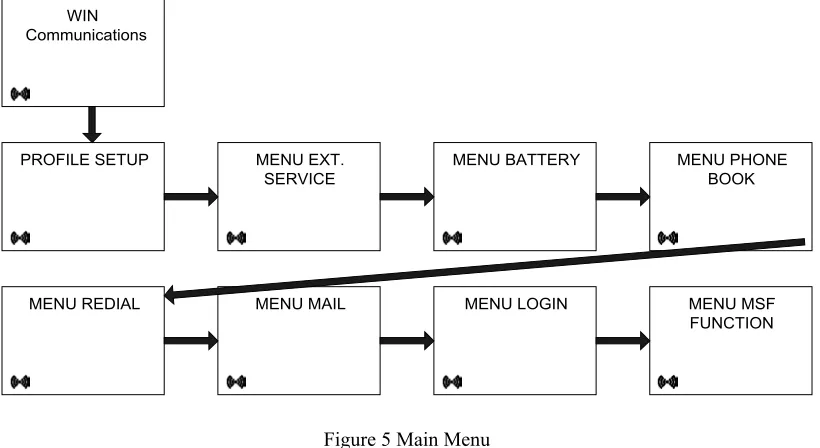
Menu Structure
Pressing the MENU key enters or exits the menu tree. It has to be used if a NO or a CLEAR is wanted in the menu tree. Pressing the OK key advances to the next level of a menu. When the lowest menu level is reached, the 9 key stores the setting and advances to the next highest menu tree level. The OK key is used to enter a YES when necessary.
MENU PHONE BOOK
MENU MSF FUNCTION WIN
Communications
PROFILE SETUP MENU EXT. SERVICE
MENU BATTERY
MENU REDIAL MENU MAIL MENU LOGIN
Figure 5 Main Menu
The phonebook and redial menus may be accessed directly. Access the phonebook by pressing the > key. Access the redial menu by pressing the < key.
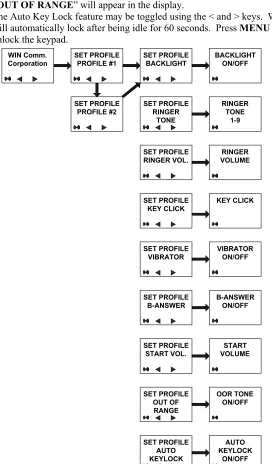
Profiles
In the Profile menu you will find a description of how to set up one of the 2 profiles. To enter the Profile Setup menu press
MENU, then press OK. Use < and > to find the profile you wish to change and confirm the selection by pressing OK. You are now able to switch between the different settings. Press OK when you find the setting to be edited or viewed. Change the setting as needed, confirm changes by pressing the OK key and automatically advance to the next setting. Press MENU to confirm all changes.
A quick way of choosing a profile is to press MENU and then 1, 2, or #. 1 = Profile 1
2 = Profile 2 # = SILENT
Profile Features
Note: Confirm all selections by pressing the OK key.
Backlight Can be toggled off or on using the < and > keys.
Ringer Tone Select one of 9 different tones by pressing the < and > keys.
Ringer Volume Select the volume level by pressing the < and > keys.
Key Tones Select the volume level by pressing the < and > keys.
Vibrator Toggle the vibrating mode off or on by pressing the < and > keys.
B-Answer Toggle the B-answer mode off or on by pressing the < and > keys When active, the handset automatically answers incoming calls.
Remark Auto on hook
Start Volume Select the starting volume level by pressing the < and > keys.
Out of Range The Out of Range indication can be toggled using the < and > keys. When activated, a “beep” tone will be audible when the handset is moving out of range of the Base Station (RFP) and “OUT OF RANGE” will appear in the display.
Auto Key-lock The Auto Key Lock feature may be toggled using the < and > keys. When activated, the keypad will automatically lock after being idle for 60 seconds. Press MENU followed by the “*” key to unlock the keypad.
WIN Comm.
Corporation SET PROFILEPROFILE #1
SET PROFILE PROFILE #2 SET PROFILE BACKLIGHT SET PROFILE RINGER TONE SET PROFILE RINGER VOL. SET PROFILE KEY CLICK SET PROFILE VIBRATOR SET PROFILE B-ANSWER SET PROFILE START VOL. SET PROFILE OUT OF RANGE SET PROFILE AUTO KEYLOCK BACKLIGHT ON/OFF RINGER TONE 1-9 RINGER VOLUME KEY CLICK VIBRATOR ON/OFF B-ANSWER ON/OFF START VOLUME OOR TONE ON/OFF AUTO KEYLOCK ON/OFF
External Services
External Services are facilities placed in the main system, and are only available when a handset is subscribed to a Base Control Unit (CCFP).
Battery Capacity
In the Battery Menu it is possible to see the remaining battery capacity. For the correct capacity the handset must be placed into the charger for at least one hour.
1. Press MENU
2. Use the > and < keys to scroll to the Battery Menu. 3. Press OK
4. The current battery capacity is displayed.
5. Press OK to return to the menu tree, or press MENU to quit.
The indication on the display is not necessarily an exact reflection on the remaining speech time, but only an indication of the remaining voltage of the battery.
MENU BATTERY
BATTERY CAPACITY
Figure 7 Battery Menu
Telephone book
1. Press the > key to enter the telephone book
2. Search for the number using the < and > keys to search or by pressing the first letter in the name using digits 1-9 on the keypad.
3. Press the key, to take the handset off hook 4. Converse
5. Press the key, to place the handset on hook.
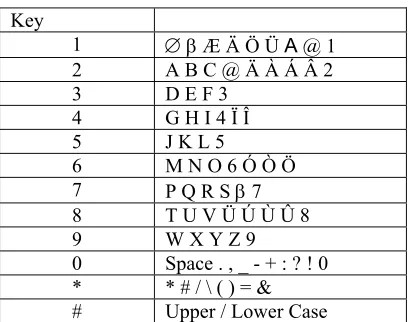
The normal dialing keys (0-9) are used for entering the name to be placed in the telephone book. By pressing the keys a certain number if times the related letters or digits will appear in the display. Spaces are entered by using the 0 key. Key # alternates between upper and lower case letters. The < and > keys move the cursor left and right. Press and hold the < key for 1 second to delete a character.
Change of key press and pauses lasting longer than 1 second automatically advances the cursor to the next position.
Alphanumeric Keyboard Functions
Key
1 ∅β Æ Ä Ö Ü Α @ 1
2 A B C @ Ä À Á Â 2
3 D E F 3
4 G H I 4 Ï Î
5 J K L 5
6 M N O 6 Ó Ò Ö
7 P Q R S β 7
8 T U V Ü Ú Ù Û 8
9 W X Y Z 9
0 Space . , _ - + : ? ! 0 * * # / \ ( ) = &
Edit the Phone Book
1. Press the > key.
2. For quick search press the first letter of the desired name by using the keypad. 3. Press the key to place a call to the displayed number.
Note: Viewing and editing of the Telephone Book can be done while off hook.
Handset Redial Memory
1. Press the < key to enter the redial stack
2. Search for the desired number by using the < and > keys. 3. Press the key, to take the handset off hook
4. Digits are dialed automatically. 5. Converse
6. Press the key, to place the handset on hook.
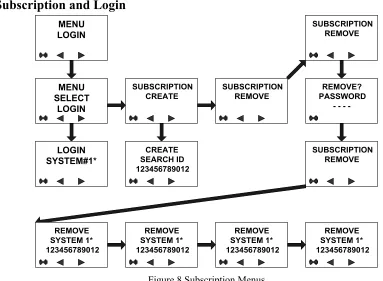
Menu Subscription and Login
MENU LOGIN MENU SELECT LOGIN SUBSCRIPTION CREATE SUBSCRIPTION REMOVE LOGIN SYSTEM#1* CREATE SEARCH ID 123456789012 REMOVE? PASSWORD -SUBSCRIPTION REMOVE SUBSCRIPTION REMOVE REMOVE SYSTEM 1* 123456789012 REMOVE SYSTEM 1* 123456789012 REMOVE SYSTEM 1* 123456789012 REMOVE SYSTEM 1* 123456789012
Figure 8 Subscription Menus
Create Subscription
To receive subscriptions from a handset, The Base Control Unit (CCFP), the must be configured to allow subscriptions in the Administration Program. Some Base Control Units (CCFP) also require and Account Code (AC). If more that one Base Control Unit (CCFP) currently accepts subscriptions, the Base Control Unit (CCFP) ID number is required. The system administrator can provide Account Codes (AC) and Base Control Unit (CCFP) ID numbers.
1. Choose the SUBSCRIPTIONCREATE menu to subscribe your handset to a Base Control Unit. 2. Use the < and > keys to scroll between all active Base Control Unit ID numbers available.
3. During subscription the handset will search for free positions and perform subscription on the first position available.
4. An alternative position can be chosen using the < and > keys. 5. Enter the AC using the keypad and press OK to confirm.
6. If the subscription was successful, the startup text will be replaced by the standby text as entered by the system programmer and the symbol will be displayed.
Login
The handset can be subscribed to 10 different Base Control Units (CCFP). Enabling the user to roam between systems. To change to another Base Control Unit use the login menu to connect to another system number. The actual chosen system is being displayed when the red LED is lit solid. To change to another system, us the < and > keys. Press the OK key to confirm the selection.
The Base Control Unit (CCFP) must be configured to accept subscriptions.
Auto Login
The handset can be subscribed to 10 different Base Control Units (CCFP). If Auto Login is enabled, the handset automatically selects a base control unit (CCFP) and performs a login.
Note: Auto Login should only be used in separate systems without coverage overlaps.
Removing Subscriptions
Subscriptions can be removed from the system and from the other 9 systems, if connected. Removing a subscription requires a password. The password is factory defaulted to 0000. If the system in use is removed, it is necessary to login to another remaining system or to create a new system and login. If a new system is not chosen, the handset will remain connected to the system in use.
Text Messages
Text messages may be sent between handsets and may contain a total of 72 characters. Up to 14 messages can be “stored” within each handset. Messages are delivered in a First In First Out sequence. Up to 7 messages can be “locked” within each handset. Once 14 messages have been received to the handset and a new message is received, the oldest, unlocked message will be deleted. When a text message is received the envelope icon appears in the display. The icon indicates one or more unread messages. Once all messages are read the icon will disappear from the display. The first letter in the display indicates the message status
• R Read
• N Unread/New
• L Locked
Reading Text Messages
1. Open the MAIL menu by pressing the R key followed by the OK key. 2. Use the > key to scroll if the message contains more than 36 characters. 3. To view sender information, press the OK key.
4. To exit press MENU
Reply to a Text Message
1. Open the MAIL menu by pressing the R key followed by the OK key. 2. Press the OK key again.
3. Use < and > to select a reply.
4. Press the OK key and write a reply using the keypad. 5. Press the OK key to confirm and send the Text Message.
Forward a Text Message
1. Open the MAIL menu by pressing the R key followed by the OK key. 2. Press the OK key again.
3. Use < and > to select Forward 4. Press the OK key twice. 5. Write preface with the keypad
6. Press the OK key again to confirm and send.
Delete All Text Messages.
1. Open the MAIL menu by pressing the R key followed by the OK key. 2. Press the OK key again.
3. Use < and > to select Delete 4. Press the OK key to confirm.
Menu Language
• English
• Italian
• Spanish
• Dutch
• French
• German
Menu Shortcuts
Note: Shortcuts are performed while the handset is idle unless noted.
Destination Menu Shortcut
PROFILE 1 Press MENU 1
PROFILE 2 Press MENU 2
SILENT MODE Press MENU #
KEY LOCKED Press MENU *
PHONE BOOK Press the > key
REDIAL Press the < key
TEXT MESSAGES Press the R key
MUTE RINGER Press the OK key while handset is ringing (temporary)
MUTE MICROPHONE Press the OK key**
** While off hook
Error Codes
Problem Possible Solution
Handset Freezes Remove and replace the battery pack. Press
to power on the handset.
Handset does not ring Check is ringer is set to SILENT or if the RINGER
VOL. is OFF
Handset cannot find a system ID at
“SUBSCRIPTIONCREATE” Check if the Base Control Unit is set to allow subscriptions. The handset cannot subscribe after the Base Control
Unit ID has been found.
Check if Access Code (AC) is necessary.
Not able to Power Up the handset Check if the handset battery is connected. If yes, recharge the battery.
Handset turns off while receiving calls and going