4 1 0 0 0 2 7
TB40-0011 Page 1 of 15
August 26, 1996
Toshiba America Information Systems, Inc.
Telecommunication Systems Division
9740 Irvine Blvd., Irvine, CA 92618-1697 (714) 583-3700
Stratagy 4 Lite Voice Processing System
This bulletin describes the new Stratagy 4 Lite Voice Processing system. The Stratagy 4 Lite is a more cost-effective hardware platform that utilizes enhanced Stratagy System Software. This new system continues to offer virtually all of the features of the original Stratagy 4, but at a more competitive price.
Hardware Description
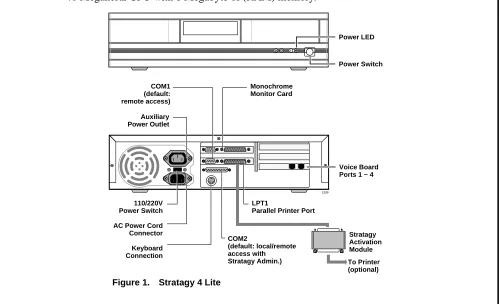
The Stratagy 4 Lite is a PC-based system like all of the other Stratagy products and carries Toshiba’s two-year warranty. The Stratagy 4 Lite utilizes the same hardware platform as the Stratagy 6 Lite. This platform supports 2 voice boards for a maximum of 4 ports, and provides 33 hours of voice storage. The motherboard, like the Stratagy 6 Lite, incorporates a 386 DX-40 Megahertz CPU with 1 Megabyte of (RAM) memory.
1399
COM2
(default: local/remote access with Stratagy Admin.)
LPT1
Parallel Printer Port
Stratagy Activation Module To Printer (optional) Auxiliary
Power Outlet
110/220V Power Switch AC Power Cord Connector Keyboard Connection COM1 (default: remote access)
Voice Board Ports 1 ~ 4 Monochrome
Monitor Card
;; ;
Power LED
Power Switch
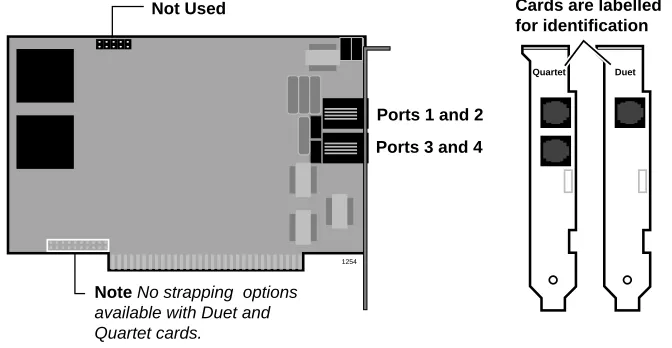
The Stratagy 4 Lite system is factory equipped with either a Duet (two ports) or Quartet (four ports) voice board.
The Duet and Quartet voice boards from Rhetorex are half-size cards that are more cost-effective than our standard voice boards. These new boards have no strapping options and are
fixed configured as the first voice board in a system. Therefore, only one Duet (two ports)
or Quartet (four ports) voice board may be used in a system. Additional port capacity can be obtained in the Stratagy 4 Lite by adding standard half-size voice boards.
CAUTION! Be careful when mixing standard and duet/quartet voice boards. The Duet and Quartet voice boards cannot perform the Alternate Rate (Message and Prompt Speed Control) feature introduced with Release 2 software, whereas the standard voice boards in the Stratagy 4 Lite allow Alternate Rate.
Software Description
The Stratagy 4 Lite uses a new release of software called Stratagy System Software Version V4.2B.
Note Beginning with the release of Stratagy 4 Lite, Stratagy software titles will have a new format that enables more versatility between software and hardware platforms. As the
Stratagy product family evolves there may be various platforms that use the same software and a more versatile format was required. The format is: V = Version; 4 = Stratagy 4 feature level; 2 = Release 2 system software level; B = Version level.
The Stratagy 4 Lite implements a different method for accessing programming. This new method requires the use of a program called Stratagy Admin Version VSA.2C which must be loaded on a separate computer. (For more details see “Installation Procedure” on Page 3.) All communication and programming with the Stratagy 4 Lite is done through an RS-232 connection to a remote PC.
1254
Quartet Duet Not Used
Ports 1 and 2
Cards are labelled for identification
Ports 3 and 4
Note No strapping options
available with Duet and Quartet cards.
The same Stratagy Activation Module (SAM) used for a Stratagy 4 will now be used with the new Stratagy 4 Lite system.
Feature Description
All Release 2 features function the same on the Stratagy 4 Lite as they do on the existing Release 2 Stratagy 4 system, except for the Alternate Rate (Message and Prompt Speed Control) feature. For details on Release 2 features and options, see the Release 2 General Description, Installation and Maintenance Manual, and User Guide.
Upgrade Capability
The Stratagy 4 Lite can be upgraded to a Stratagy 6 Lite. The Stratagy 6 Lite System Upgrade Kit (SG-4LUP6L) includes an additional 1 MB RAM memory, a floppy-disk drive, a Stratagy 6 SAM, and Stratagy 6 System Software 2.09E or higher.
Important! A monitor and keyboard are required for the upgrade procedure.
Installation Procedure
To program the Stratagy 4 Lite system, a remote IBM-compatible PC must be connected to the Stratagy and must have the following:
♦ 3.5” 1.44 (high-density) floppy drive
♦ Hard drive with a minimum of 1 MB of memory free
♦ DOS V6.2 or higher must be resident on the hard drive
In addition, a standard error correcting modem (e.g., Zoom/FaxModem®) is required for accessing Stratagy 4 Lite remotely.
Important! Generic 2400 baud modems may not work properly with the software and are not recommended. A modem available from Toshiba (SG-RMOD) is recommended.
Note The Stratagy Admin software communicates with the Stratagy 4 Lite at a maximum of 2400 baud.
Prior to Installation
➤ Connect the remote PC to the Stratagy 4 Lite using a prefabricated cable available from Toshiba (SG-ADMCBL). This cable is designed expressly for Stratagy Admin
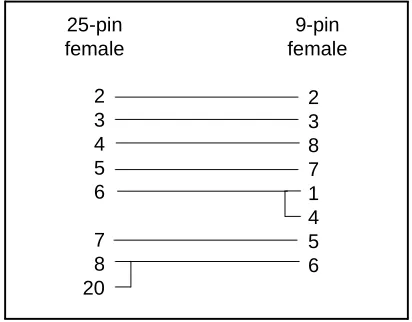
Note For those who wish to purchase individual cabling/connectors/adapters in lieu of purchasing the Toshiba Stratagy Admin cable, we have provided the following wiring diagrams. 1 2 3 4 5 6 7 8 20 1 3 2 5 4 8 20 7 6
Figure 3. RS-232 DB25 to DB25 Cabling
DB25 female DB25 female
1 4 2 3 5 6 7 8 6 3 2 5 1 4 8 7 9-pin female 9-pin female
Figure 4. RS-232 DB9 to DB9 Cabling
2 3 4 5 6 7 8 20 2 3 8 7 1 4 5 6 25-pin female 9-pin female
Installation
1. Insert disk 1 of 1 of the Stratagy Admin VSA.2C into the floppy drive of the remote PC.
2. Type a:install c:\admin to begin the installation procedure. (If your hard drive is not C:, substitute the appropriate letter in the entry.)
Note If a directory is not specified, the default directory is C:\STRATAGY. To avoid any confusion with the C:\STRATAGY directory on the Stratagy 4 Lite PC, it is recommended you not use the default.
3. A directory called C:\ADMIN is created on the PC hard drive and the following messages are displayed:
4. Press any key to continue and the Stratagy Admin program is installed on drive C: in subdirectory ADMIN.
As part of the installation, a file called admin.cfg is installed in the ADMIN subdirectory. This file consists of parameters which must be set for the remote PC to communicate with the Stratagy.
Important! The parameters of the admin.cfg file must match the parameters set in the install.cfg file for the Stratagy system. For more details see “Configuring Stratagy” on Page 10.
Accessing Stratagy
Important! To access the Stratagy 4 Lite system, the password in both the install.cfg file on the Stratagy system and the admin.cfg file in the Stratagy Admin directory on the remote PC must be the same. See “Configuring Stratagy” on Page 10 for details on setting the
parameters.
Prior to Accessing Stratagy
➤ Verify that Stratagy is operational by making a test call into the system.
Note Local and remote access utilize the same designated COM port on the Stratagy 4 Lite. To change from local to remote access, a modem must be connected to this designated port.
Local Access
➤
To access Stratagy 4 Lite locallyImportant! If you are running Microsoft® Windows®, exit Windows; do not use Windows MS-DOS® Prompt option.
Install Remote Stratagy Admin software package to C:\Admin ???
1. From the DOS prompt (C:\), type: admin /p1 /wStratagy and press Enter.
where:
2. The following messages are displayed. Press any key to continue.
3. A version of the standard Main Menu displays.
admin = the executable program
/p = COM port on remote PC
1 = Number of COM port
/w = Stratagy 4 password (in this example “Stratagy”)
STRATAGY V4.2B/5.5 Jun 19 1996 10:40:43
Copyright (c) 1994-5 Toshiba America Information Systems, Inc.
Portions copyright (c) 1991-1995 The Automatic Answer, Inc.
All Rights Reserved.
Press any key to continue...
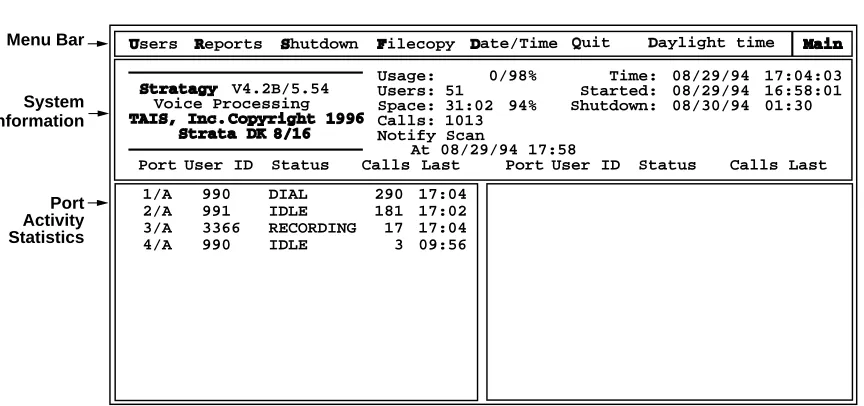
Users Reports
Port User ID Status Calls Last Port User ID Status Calls Last
Shutdown Filecopy Date/Time
Usage: Users: Space: Calls: Notify Scan V4.2B/5.54
Voice Processing 5131:02 1013 0/98% 94% Time: Started: Shutdown: 08/29/94 08/29/94 08/30/94 17:04:03 16:58:01 01:30
At 08/29/94 17:58
1/A 2/A 3/A 4/A 990 991 3366 990 DIAL IDLE RECORDING IDLE 290 181 17 3 17:04 17:02 17:04 09:56 Menu Bar System Information Port Activity Statistics
Quit Daylight time
1449
Remote Access
➤
To access Stratagy 4 Lite remotelyImportant! If you are running Microsoft Windows, exit Windows; do not use Windows MS-DOS Prompt option.
1. From the DOS prompt (C:\), type: admin /p1 /mx,xxxxxxx /wStratagy and press Enter.
where:
2. The following messages are displayed. Press any key to continue.
3. A version of the standard Main Menu displays (see Figure 6 on Page 6).
Using Stratagy
Main Menu
The following changes have been made to the menu bar of the Main Menu (see Figure 6):
♦ The Shutdown and Filecopy functions operate differently in the V4.2B software.
♦ A Quit function has been added.
♦ Standard or Daylight Time displays. A new configuration parameter for setting the system
automatically to daylight savings time has been added. (For more details see “New Parameters” on Page 12.)
admin = the executable program
/p = COM port on remote PC
1 = Number of COM port
/m = Connected modem
x,xxxxxxx = Telephone number of Stratagy modem (e.g., 9,5833700)
/w = Stratagy 4 password (in this example “Stratagy”)
STRATAGY V4.2B/5.5 Jun 19 1996 10:40:43
Copyright (c) 1994-5 Toshiba America Information Systems, Inc.
Portions copyright (c) 1991-1995 The Automatic Answer, Inc.
All Rights Reserved.
Shutdown
➤
To perform shutdown1. From the Main Menu, select Shutdown by pressing Alt+S. 2. Enter the password (the default is “Stratagy”) and press Enter. 3. The following screen displays:
The screen enables you to select one of the following options:
4. Highlight your selection and press Enter.
Shutdown and Restart CURRENT Version Shutdown and Trace Current Version Shutdown and Start NEW Version Shutdown and Start OLD Version
Shutdown, SCANDISK, DEFRAG and Restart Shutdown and STOP for power off
Shutdown and Restart CURRENT Version Restarts Stratagy (equivalent to pressing the Esc key on the current Stratagy platform).
Shutdown and Trace CURRENT Version Shuts down, then restarts Stratagy in the TRACE mode (TRACE.OUT file is created) on Stratagy hard drive.
Shutdown and Start NEW Version Not used at this time.
Shutdown and Start OLD Version Not used at this time.
Shutdown, SCANDISK, DEFRAG and Restart
Shuts down, then runs SCANDISK and DEFRAG programs and then restarts Stratagy.
Shutdown and STOP for power off
(This feature is not available when accessing Stratagy remotely.)
Filecopy
Use the Filecopy Main Menu option to copy files to and from the Stratagy 4 Lite and remote PC hard drives.
➤
To copy files to and from Stratagy1. From the Main Menu, select Filecopy by pressing Alt+F. 2. Enter the password (the default is “Stratagy”) and press Enter. 3. The following screen displays:
4. In the Source System field (where the file currently resides), type ST for Stratagy or PC for the remote PC and press Enter.
5. In the Copy From field, type the directory name, if necessary, and the file name.
Note If a directory name is not entered, Filecopy searches the Stratagy or Admin directory (remote PC) for the file to be copied.
6. Press Enter when finished.
7. In the Copy To field, type the directory name, if necessary, and the file name.
Note If a directory name is not entered, Filecopy assigns the destination for the file to the Stratagy or Admin directory.
8. Press Enter when finished.While the file is being copied, the following dialog status box is displayed:
9. When the copy is complete, the following status box is displayed:
10. Press any key to continue.
Copy a file Source System: Copy From: Copy To:
ST for Stratagy PC for Remote PC
File copying: Stratagy
➞
Local, Received 1024 bytes (33%)Quit
Important! This function quits the Stratagy Admin program and does not shut down Stratagy.
1. Press Alt+Q.
2. The remote PC exits Admin and returns to the DOS prompt.
Configuring Stratagy
Two files must be configured when using Stratagy 4 Lite:
♦ Install.cfg — resident in the Stratagy directory on the Stratagy 4 Lite. This file is identical
to the configuration file on all Stratagy systems.
♦ Admin.cfg — resident in the Admin directory on the remote PC. This file is needed to
communicate with the Stratagy. Parameters in this file must match the corresponding parameters set in the install.cfg file.
For example, if using COM1 on the remote PC and COM2 on Stratagy 4 Lite, the serial port definitions in admin.cfg for COM1 must be identical to the serial port definitions for COM2 in the install.cfg.
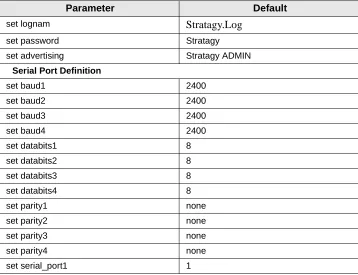
Admin.cfg
The following table lists parameters available in the admin.cfg file:
Table 1. Admin.cfg Parameters
Parameter Default
set lognam Stratagy.Log set password Stratagy set advertising Stratagy ADMIN
Serial Port Definition
set baud1 2400
set baud2 2400
set baud3 2400
set baud4 2400
set databits1 8
set databits2 8
set databits3 8
set databits4 8
set parity1 none
set parity2 none
set parity3 none
set parity4 none
➤
To edit the remote PC’s configuration parameters➤ Use any DOS editor program (e.g., Microsoft’s EDIT®) to change the configuration parameters.
Install.cfg
As part of the Stratagy Admin program, a file named Setup enables you to edit Stratagy configuration parameters from the remote PC. The configuration parameters are defined in a file called install.cfg which must first be copied from the Stratagy to the remote PC, then edited and copied back to Stratagy. Stratagy must then be restarted for the changes to take effect.
Note The standard Stratagy Configuration Utility is not currently available for use with the Stratagy 4 Lite system.
➤
To edit Stratagy’s system configuration parametersImportant! Steps 1 through 5 of this procedure should always be performed. Editing a pre-existing configuration file on the PC and copying it back to the Stratagy 4 Lite is not
advisable. The pre-existing file may not be the most current one or, if you use the PC for other Stratagy systems, the file may not even coincide with the system with which you are working.
1. Press ALT+F.
2. In the Source System field, type st and press Enter.
3. In the Copy From field, type install.cfg and press Enter. 4. In the Copy To field, type install.cfg and press Enter.
5. While the file is being copied, a dialog box displays the status of the process.
6. When the copy is complete, press Alt+Q to quit Admin.
Important! The Quit function only shuts down the Stratagy Admin program and does not shut down Stratagy.
7. At the DOS prompt, type setup install.cfg and press Enter.
Important! If you are running Windows, exit Windows; do not use Windows MS-DOS Prompt option.
set serial_port2 2
set serial_port3 0
set serial_port4 0
set stopbits1 1
set stopbits2 1
set stopbits3 1
set stopbits4 1
Table 1. Admin.cfg Parameters (continued)
The standard Stratagy Configuration screen displays. See Page 4-4 in the Release 2 Stratagy Installation and Maintenance Manual for instructions on using the function.
8. When you have finished editing the parameters, press Esc to return to the DOS prompt. 9. From the DOS prompt type admin /p1 /wStratagy.
Note If COM2 is being used, change p1 to p2 and if the password has been changed, type the new password in place of “Stratagy.”
10. Copy the file back to Stratagy, using the Filecopy function. For more details see “Filecopy” on Page 9.
11. Using the Shutdown procedure, highlight the Shutdown and Restart CURRENT Version option and press Enter. For more details see “Shutdown” on Page 8.
Note For Stratagy to recognize the new parameter changes, you must restart the Stratagy system using the Shutdown function.
12. Stratagy shuts down and restarts with any changes made to the file.
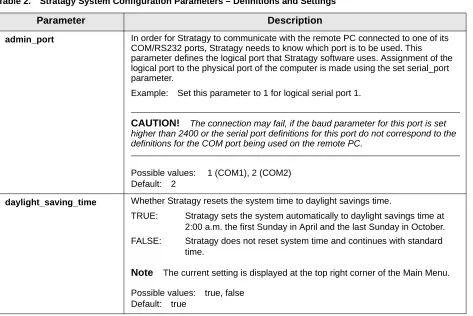
New Parameters
The following are new parameters:
Table 2. Stratagy System Configuration Parameters – Definitions and Settings
Parameter Description
admin_port In order for Stratagy to communicate with the remote PC connected to one of its COM/RS232 ports, Stratagy needs to know which port is to be used. This parameter defines the logical port that Stratagy software uses. Assignment of the logical port to the physical port of the computer is made using the set serial_port parameter.
Example: Set this parameter to 1 for logical serial port 1.
CAUTION! The connection may fail, if the baud parameter for this port is set higher than 2400 or the serial port definitions for this port do not correspond to the definitions for the COM port being used on the remote PC.
Possible values: 1 (COM1), 2 (COM2) Default: 2
daylight_saving_time Whether Stratagy resets the system time to daylight savings time.
TRUE: Stratagy sets the system automatically to daylight savings time at 2:00 a.m. the first Sunday in April and the last Sunday in October. FALSE: Stratagy does not reset system time and continues with standard
time.
Note The current setting is displayed at the top right corner of the Main Menu.
System Administrator User ID
The following functions have been added to the System Administration Submenu (8) of the System Administrator’s Main Menu. (See “System Administration Menu” on Page 12-2 of Release 2 Stratagy Installation and Maintenance Manual for additional information.)
♦ Add User ID
♦ Delete User ID
♦ Set date and time
Important! The selections offered on the System Administration Submenu is designed so that the System Administrator can manage system-wide functions and perform minor user
administration. The Submenu is not intended to take the place of the actual programming and/ or configuration functions of Stratagy that must be performed through the Main Menu (see “Main Menu” on Page 7) or the Setup file (see “Configuring Stratagy” on Page 10) of the system.
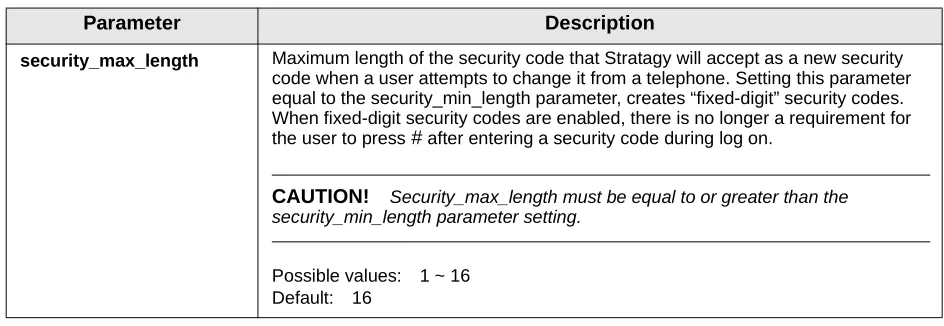
security_max_length Maximum length of the security code that Stratagy will accept as a new security code when a user attempts to change it from a telephone. Setting this parameter equal to the security_min_length parameter, creates “fixed-digit” security codes. When fixed-digit security codes are enabled, there is no longer a requirement for the user to press # after entering a security code during log on.
CAUTION! Security_max_length must be equal to or greater than the security_min_length parameter setting.
Possible values: 1 ~ 16 Default: 16
Table 2. Stratagy System Configuration Parameters – Definitions and Settings (continued)
Add User ID
➤
To add a User ID mailbox1. Access the System Administration Mailbox (999).
2. Press 8 to select System Administration.
3. Press 5 to add a User ID.
4. Enter the User ID to be added and press #.
5. Stratagy repeats the User ID entered and prompts you for the following:
6. If you choose selection 3 above, you must enter the extension number and press #. Stratagy repeats the extension number entered and prompts you for the following:
Delete User ID
➤
To delete a User ID mailbox1. Access the System Administration Mailbox (999).
2. Press 8 to select System Administration.
3. Press 4 to manage User IDs.
4. Press 4 to delete a User ID.
5. Enter User ID to be deleted and press #. 6. You are asked to confirm the number:
1 - Confirms and assigns the User ID, and returns you to the System Administration Menu.
2 - Erases first entry and prompts you to re-enter the correct number.
3 - Changes the extension number for the User ID.
*
- Cancels function and returns to the previous menu.1 - Confirms and assigns the extension number with a supervised transfer and returns you to previous menu.
2 - Erases first entry and prompts you to re-enter the correct number.
3 - Marks the extension for blind transfer.
4 - Marks extension for blind transfer with supervised busy.
*
- Cancels function and returns to previous menu.1 - Confirms entry and returns you to the previous menu.
Set Date
➤
To set the date of the system1. Access the System Administration Mailbox (999).
2. Press 8 to select System Administration.
3. Press 6 to set the date and time.
4. Press 1 to set the date or 9 to return to previous menu.
5. Enter the date in the following format MM/DD/YY (MM = month, DD = day, YY = year) and press #.
6. You are asked to confirm:
Set Time
➤
To set the time of the system1. Access the System Administration Mailbox (999).
2. Press 8 to select System Administration.
3. Press 6 to set the date and time.
4. Press 2 to set the time or 9 to return to previous menu.
5. Enter the time in the following format HH/MM (HH = hour, MM = minutes) and press #.
6. You are asked to confirm:
1 - Confirms entry.
2 - Erases entry and enables you to re-enter the date.
9 - Cancels function and returns you to the previous menu.
1 - Confirms entry.
2 - Erases entry and enables you to re-enter the date.