Scenix™ and the Scenix logo are trademarks of Scenix Semiconductor, Inc. All other trademarks mentioned in this document are property of their respec-tive componies.
SCENIX
Application Note 32 Christopher Waters Jud Bond December 1999eSX Email Client and
iSX Web Server
Evaluation Board
1.0
Overview
This tutorial is intended to provide information on the eSX email client and the iSX Web server. The tutorial covers how to connect the demonstration hardware, how to figure the Virtual Peripheral on the SX, and how to con-figure email server software on a PC.
Section 2.5 contains answers to some of the frequently asked questions about the eSX.
2.0
eSX Email Client
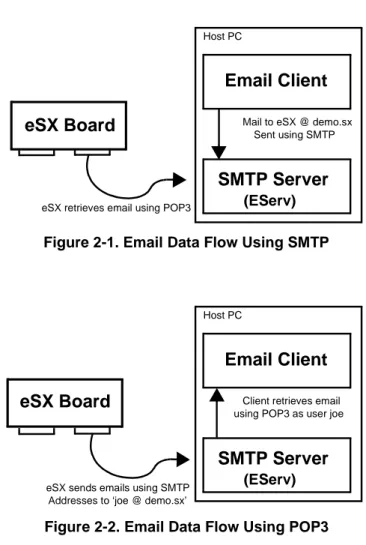
Internet email uses two protocols to deliver email to, and from, an email client. These protocols are the Post Office Protocol (POP or POP31) and the Simple Message Transfer Protocol (SMTP). POP3 is used by the client to receive email and SMTP is used by the client to send email.
Any email transaction requires a client and a server. Usu-ally the client is an email program such as Microsoft Out-look, Eudora, or Netscape Messenger. The server is usually located at an Internet Service provider (ISP). SMTP is used by the client to connect to the ISP's mail server to send emails. When the client want to receive email it uses the POP3 protocol to ask the ISP's mail server if there are any emails waiting, and if there are then POP3 is also used to retrieve them.
If a client is sending an email to another client connected to the same ISP (e.g. between two users within the same company), then once the email message has been sent to the server from the first client with SMTP, it can be retrieved by the second client using POP3. Most of the time, however, the destination address of an email is not on the local server. To send an email to a client which does not connect to the local SMTP server requires a feature called “SMTP relay”. When an SMTP server relays, it sends the message on to another server on behalf of the requesting client. Since relaying can be used by spammers to send email using other peoples SMTP server it is a feature which is often restricted or turned off.
Both SMTP and POP3 are client-server, transaction ori-ented, text based protocols. They proceed lock-step, with the client sending requests to the server and modifying its behaviour based upon response codes.
Figure 2-1. Email Data Flow Using SMTP
Figure 2-2. Email Data Flow Using POP3
1. Since version 3 is the current, and most widely used,
version of POP, it is usually referred to as POP3.
Email Client
SMTP Server
Host PC
Mail to eSX @ demo.sx Sent using SMTP
(EServ)
eSX Board
eSX retrieves email using POP3
Email Client
SMTP Server
Host PC
Client retrieves email using POP3 as user joe
(EServ)
eSX Board
eSX sends emails using SMTP Addresses to ‘joe @ demo.sx’
2.1 Connecting the eSX
The eSX/iSX demonstration board requires two external connections:
• Power - A 9-15V AC or DC supply.
• Serial - The PPP port on the eSX port should be con-nected to a PC serial port.
2.2 Configuring the eSX
The eSX demo board should be programmed with the eSX source code. The definitions statements at the top of the source code file determine which components of the stack and which application layer protocols will be used. These options have the following meanings:
• DEBUG - Enable debugging messages. At many points in the code special debugging messages will be sent to the debug serial port. If this option is disabled no debug messages will be generated and the overall code length will increase.
• WIN32 - This should be set if the host PC is running Windows (95, 98 or NT). Windows Dial-up Networking needs to be fooled into thinking that it is communicating with a modem. When this option is set, code is included which responds to some of the AT command set, mak-ing the PC think that it is diallmak-ing a modem. If the option is not set then PPP negotiation can start immediately. This would be the case under Unix operating systems, or if a real modem were being used as the physical in-terface.
• WIN98 - This option should be set if the host PC is Win-dows 98.
• UDP - Include the UDP protocol in the stack. If this op-tion is not set then UDP will not be included. Note that UDP should be included if the JAVADEMO option is used.
• TCP - Include the TCP protocol in the stack. Note that TCP is required for HTTPDEMO and SMTPDEMO. • HTTPDEMO - Include the HTTP protocol. This option
requires TCP.
• JAVADEMO - Include code for the Java demonstration program. This option requires the HTTPDEMO, TCP and UDP.
• SMTPDEMO - Include code for SMTP. This option re-quires TCP.
• ADCDEMO - Include code for the Analog to digital con-version daughter board. This option requires SMTP-DEMO and TCP.
• POP3DEMO - Include the POP3 protocol. This option requires TCP.
• POP3DEBUG - Include debugging code for the POP3 protocol. This option implies that POP3DEMO and TCP are set.
• UDPDEMO - Enables the UDP code described in AN23 (cannot be used with JAVADEMO).
The eSX can be configured to either send email with SMTP or to receive email with POP3. Currently these options are mutually exclusive, so either the POP3 options or the SMTP options should be set, but not both.
2.2.1 SMTP Configuration
In the source code you should change the email address of the recipient to the address you want to receive the emails from the eSX. This address could be a real email address if you will be connecting to a network, or a dummy address like ‘[email protected]’ if you will be using the host PC standalone. The recipient address is on a line which starts with ‘_SMTPRCPT’ in about the middle of the file.
2.2.2 POP3 Configuration
In the source code you should configure the IP address of the POP3 server, user name and password that will be used.
The POP3 server address is set by the POP3Address constant. If EServ is being used this should be set to 192.168.11.2.
The POP3 user name and password should be set in the _POP3USER and _POP3PASS constants. If you follow the EServ instructions in Section 2.3.1 then these should both be set to ‘eSX’.
2.3 Configuring the Host PC
Sending an email from the eSX requires a methd of rout-ing the email from the SX, through the host PC used for the demonstration, to the final destination. There are sev-eral different scenarios:
1. The host PC does IP packet forwarding and an SMTP server is available elsewhere on the network.
2. An SMTP server is running on the host PC, the desti-nation address of the email messages is the host PC2 and the host PC is not connected to a network. 3. An SMTP server is running on the host PC and the
des-tination address of the email messages is elsewhere on the Internet.
Scenario 1 is the configuration most likely to be used in practice. However it has two drawbacks: it requires an operating system capable of IP packet forwarding; and it requires a system administrator to modify the network routing tables. For experiemental, and demonstration purposes, scenarios 2 and 3 are more appropriate. Both of these scenarios require an SMTP server to be running on the host PC. Any SMTP server can be used for the task. The instructions that follow are for the EServ share-ware SMTP server3 version 2.50.
The remainder of this document focuses on scenario 2.
2.3.1 Installing and Configuring EServ
Install Eserv on the host PC in any directory. EServ is only active while the application program is running. This is different from some SMTP servers which install them-selves as services which run at startup. Several parame-ters in EServ need to be set. To be able to send emails to any address on the Internet do the following4:
2. This is the simplest scenario to configure and should
be a starting point.
• Under Scheduler/Tasks/SMTPSEND the command-Line property needs to be modified to reflect the SMTP server which will be used to deliver email to non-local addresses. Non-local addresses can be thought of as any existing email address. In the commandLine prop-erty, after the ‘-s’ switch, change the name of the SMTP server to the name of the SMTP server you normally use to send email. To see what this is you can look in the ‘Options...’ or ‘Accounts...’ dialog box in your nor-mal email client.
• Under Scheduler/Tasks/SMTPSEND the Active prop-erty should be changed to ‘Yes’.
To be able to receive emails on the host PC without being connected to a network, and to be able to use POP3 on the eSX, change the following:
• Under MailServer/SMTPServer/LocalDomains enter the name of a domain into the edit box and click add. The domain that you add to the list of local domains should not exist elsewhere on the Internet so choose a made up name like ‘demo.sx’. This domain is the part of the mail address after the ‘@’ sign.
• Create a new user in the CommonSettings/Users sec-tion. Type in the user’s name and click the ‘Add’ button. The name could be your name, but should not contain any spaces or puntuation characters. For example it could be ‘joe’. This means that the address the eSX will be sending emails to will be ‘[email protected]’.
• Set the password for the new user you just created to also be ‘joe’.
2.3.2 Configuring Email Client Software
To configure your email software to receive emails from the eSX using the EServ SMTP server you will need to follow these instructions. If you will be using an external SMTP server (i.e. scenarios 1 and 2 from Section 2.3 ) then this step is not necessary since you can use an existing email address and POP3 account.
• You need to tell your email program how to retrieve emails from EServ. This is done in the ‘Options...’, ‘Preferences...’ or ‘Accounts...’ dialog box depending on the Email client software you are using (Microsoft Outlook, Netscape Messenger, etc). You should use the following settings: POP3 server: ‘localhost’, User name: ‘joe’ (or whatever name you created in EServ), and Password ‘joe’ (or whatever password you created in EServ).
To use POP3 on the eSX it is also necessary to be able to send emails to EServ, where they wait for the eSX to retrieve them. To do this:
1. In the email client program, in the same place you set the POP3 server, also set the SMTP server to be local-host.
2. Create a new user in the EServ CommonSettings/Us-ers section. Type in the user’s name and click the ‘Add’ button. Make the user’s name ‘eSX’.
3. Set the password for the new user you just created to also be ‘eSX’.
2.4 Running the Demonstrations 2.4.1 SMTP
You need to tell the eSX the IP address of the SMTP server it should use. If you are going to be using EServ (or any other SMTP software) on the PC as an SMTP server then the IP address will be 192.168.11.2. If you are using an SMTP server elsewhere on the network then use that email address. The IP address of the SMTP server is stored in a constant called ‘SMTPAddress1’ in the eSX source code.
Once you have programmed the SX, configured Dial-up Networking and the EServ software you are ready to start sending emails. The following description is for scenarios 2 and 3, and assumes you have not used the ADCDEMO source code option. For more information about the dif-ferent demo configurations see Section 2.4.1.1 and Section 2.4.1.2.
Connect to the eSX using Dial-up networking. When the ADCDEMO option is not used the eSX will generate an email in response to a ping packet. However, you can still use ping to check that the eSX is running. First make sure the EServ is not running. Then type the following into a DOS window:
ping 192.168.11.1
You should see something like the following:
Pinging 192.168.11.1 with 32 bytes of data: Reply from 192.168.11.1: bytes=32 time=51ms TTL=15 Reply from 192.168.11.1: bytes=32 time=56ms TTL=15 Reply from 192.168.11.1: bytes=32 time=51ms TTL=15 Reply from 192.168.11.1: bytes=32 time=51ms TTL=15 Ping statistics for 192.168.11.1:
Packets: Sent = 4, Received = 4, Lost = 0 (0% loss), Approximate round trip times in milli-seconds:
Minimum = 51ms, Maximum = 56ms, Average = 52ms
To receive an email you need to start EServ on the host PC. Now when you ping the eSX it will send an email. Type the following into a DOS window:
ping -n 1 192.168.11.1
You should see the transmit and receive lights on the eSX flash for about two seconds. Also, LED1 will light up during this time to show that a TCP connection is open. To receive the email on the host PC, go into the email cli-ent program and do a ‘Send and Receive’. You should see the email from the eSX. Note that if the email is being routed to a real email address through an external SMTP server there might be a delay of up to two minutes while the email is forwarded.
4. In the support files distributed with the eSX is a copy
of the EServ configuration file. This file is called Es-erv.ini. If it is coppied to the conf subdirectory where EServ is install there is no need to follow the configu-ration instructions here.
2.4.1.1 Ping Demo
To configure the eSX for the ping demo, the ADCDEMO option should not be set. Every time the eSX receives a ping packet it will transmit an email message. The code is structured so that each ping restarts the email transmit code. This means that if a ping is received while an email is already being sent the first email will be aborted.
2.4.1.2 ADC Board Demo
As a second demonstration of the eSX there is a design for a daughter board using analog to digital conversion. To enable the code for this daughter board the ADC-DEMO option should be set. The ADC demonstration code uses sigma-delta ADC to measure the value of an external potentiometer. When that value crosses a threshold the email transmit process is initiated.
2.4.2 POP3
To demonstrate the POP3 code set the POP3DEMO option at the top of the eSX source code. The debug port of the eSX board should be connected to a PC running a terminal program, such as Hyperterminal. The serial set-tings are 57600,N,1 with no-handshaking.
The POP3 code checks for new messages when a PPP connection is made. If any messages are available, the text for each message is sent out the debug port. Start EServ so it is ready to receive the email you will send.
So that the eSX has a message to receive, you should send it a message. In the email client create a new mes-sage addressed to ‘[email protected]’. It doesn’t matter what you put in the subject or body of the message. Send the message. You can send more that one message at a time if you like.
Initiate a PPP connection. As soon as the eSX is nected you should see LED1 light up to show a TCP con-nection is active. The Tx and Rx lights will flash briefly and you will see any messages received displayed in the terminal program.
2.5 FREQUENTLY ASKED QUESTIONS
2.5.1 Why do I receive 2, 3 or 4 emails when I ping the eSX?
The ping command normally sends four ping packets. The eSX starts transmitting an email in response to the first ping. When the second ping arrives the first email is aborted and another is begun. If there is enough time between each ping for the entire SMTP transaction then all four emails will be received. If there is not enough time then some of the emails will haev been aborted. To have the eSX send exactly one email used the -n option to ping:
ping -n 1 192.168.11.1
2.5.2 Using POP3 why doesn’t the eSX receive any messages?
You can check to see if EServ has any emails waiting for the eSX to receive by looking in the directory where you installed EServ. In the subdirectory mail\in there should
be a file called eSX. This file should contain the email message that you sent to the eSX. If the file is empty this means that the email never got to EServ. Check that: • EServ is running.
• In your email client program the SMTP server is set to localhost.
• You have followed the instructions in Section 2.3.1 to configure EServ.
2.5.3 Why do I get the “cannot bind socket to port 110” message?
If you have an existing mail server running on your PC, or if you have installed the Eserv program more than once, this is the message that you will have. You should have only one mail server installed on the PC.
2.5.4 How do I change the password in eServe?
For the SMTP demo, you can just click on the password property of the user Joe under Common Settings, type in the new password in the password box and click ok. Don’t forget to change it in the email client that you use to retrieve the messages.
For the POP3 demo, the password needs to be change in both the Eserv program and in the eSX source code under the _POP3PASS string.
2.5.5 Can you have more than 1 account?
Yes. You can have multiple accounts in Eserv. In fact, you need to set up an account for the SMTP demo (user-name: Joe) and an account for POP3 demo (user(user-name: eSX, password: eSX).
2.5.6 What’s the name of the mail server to be used in my email client?
Use localhost as both the SMTP server and POP3 server.
2.5.7 What’s a ping? Why do I get 3 emails with 4 pings?
A ping is an echo request. In the SMTP demo, the code is designed so that it will send an email upon receipt of a ping packet. When these pings come consecutively, an email message may be cut by the ping packet. You can issue exactly one ping by typing “ping 192.168.11.1 –n 1”.
2.5.8 I got a “SMTP send” message on the status of Eserv, why?
If you have not changed the email receipient, then the domain has not been set to demo.sx and Eserv thinks that this message should be relayed out.
2.5.9 Can I have both demos run at the same time?
Yes, but it needs code modification. We will consider that when there is significant customer demand to combine them.
3.0
iSX Web Server
The iSX demo board is intended to demonstrate the Scenix TCP/IP stack and HTTP application software in a web server environment. In order to function as a web server, both the iSX Demo Board and a Microsoft Win-dows 95/98 equipped PC need to be properly configured. The purpose of this guide is to assist the user in setting up the iSX demo board and PC so as to enable web server operation. The iSX demo board is preloaded with the web server application program.
3.1 Hardware and Software Requirements
The following hardware and software are required to operate the iSX demo board as a web server:
• ISX Demonstration Board
• DC Power Converter (7.5V - 12V) • 9 Pin Serial Cable
• Windows 95/98 PC
• Tcp_52 Application Software
3.2 Establishing a TCP/IP Connection
Communication between the iSX board and the PC are established using Microsoft Dial-Up-Networking facility. In order to use dial-up-networking, the PC must be con-figured with a 19.2 Kbps modem and have TCP/IP net-working enabled.
3.2.1 Installing the Modem
The following steps have to be followed to install the modem:
1. Click Start, point to Settings, click Control Panel, and double-click Modems
2. In the Modems Properties dialog box, click Add 3. In the Install New Modem dialog box, click Other, then
click Next
4. In the next dialog box, click Don't detect my modem, I will select it from a list, then click Next
5. In the next dialog box select Standard 19200 bps Mo-dem from the Standard MoMo-dem Types, then click Next 6. In the next dialog box select Communications Port
(COM1), then click Next
7. After Windows installs the Modem, click Finish
8. Configure the modem properties by clicking Properties in the Modem Properties dialog box
9. Under the General tab, ensure that Communications Port (COM1) is selected as the Port. Change the Max-imum Speed to 57600.
10.Under the Connection tab ensure that the modem is set for 8 data bits, no parity, and one stop bit
11.Under the Connection tab, click Advanced
12.In the Advanced Connection Settings dialog box, click Use flow control and Hardware (RTS/CTS), and click OK
13.Under the Connection tab, click Port Settings
14.In the Port Settings dialog box, make sure that the Use FIFO Buffers box is unchecked
3.3 Configuring Dial-Up Networking
1. Click Start, point to Programs, point to Accessories, point to Communications, and then click Dial-Up-Net-working
2. In the Dial-Up Networking dialog box, click the Make New Connection icon
3. In the Make New Connection dialog box give the con-nection a name such as "TCP/IP Demo", select Stan-dard 19200 bps Modem as the device, then click Next 4. In the next dialog box type in any phone number (e.g.
1), then click Next
5. In the next dialog box, click Finish
6. In the Dial-Up Networking dialog box, right click over the connection icon that you just made and select Prop-erties
7. Under the General tab, ensure that Standard 19200 bps Modem is selected under Connect using
8. Under the Server Types tab, select PPP: Internet, Win-dows NT Server, WinWin-dows 98 under Type of Dial-Up Server, do not select any Advanced options, and select TCP/IP under Allowed Network Protocols (Note: make sure that only the TCP/IP box is checked and all other boxes are unchecked.)
9. Under the Server Types tab click TCP/IP Settings 10.In the TCP/IP Settings dialog box, click Specify an IP
address and type in the following IP address:
192.168.11.2. Select Server assigned name server ad-dresses, uncheck boxes that says use IP header com-pression and use default gateway on remote network and click OK
11.Under the Scripting tab, select Start terminal screen minimized and click OK
12.Under the Multilink tab select Do not use additional de-vices and click OK
13.A shortcut may be made by right clicking the connec-tion icon and selecting Create shortcut.
3.4 Connecting iSX to the PC
1. Using a 9-pin serial cable, connect one end to COM1 port of the PC and the other end of the cable to the con-nector labeled PPP on the iSX demo board
2. Apply power to the iSX demo board by plugging the AC adaptor into the power jack. The green power LED should light.
3. Ensure that the iSX demo board oscillator is enabled by checking that jumper J1 is installed.
4. Reset the iSX board by pressing the reset switch on the iSXdemo board
5. If a Dial-Up Networking shortcut was established, click on the shortcut icon, otherwise click Start, point to Pro-grams, point to Accessories, point to Communications, and click on Dial-Up Networking. Double click on the connect icon.
6. In the Connect to dialog box, click OK to establish a connection to the iSX demo board.
7. While connecting, the Tx and Rx LEDs of the iSX demo board should flash. When connected, both the
PWR and the UP LEDs should be lit. A valid connection is also indicated in icon form on the status bar of the PC.
3.5 Viewing Web Pages From the iSX Web Server
Once a TCP/IP connection is made with the iSX demo board, web pages may be viewed with a standard web browser such as Netscape or Internet Explorer. To view the web pages the following steps should be taken: 1. Launch the Windows web browser
2. Enter the URL of the iSX demo board: ht-tp://192.168.11.1/index.html
3. The transmit and receive LEDs of the iSX demo board should flash and the SX Web Server home page should appear in the browser window
4. The various links may be browsed using the standard features of the web browser
5. The URL of the iSX demo board may be bookmarked for future use.
3.6 LOADING WEB PAGES TO THE ISX DEMO BOARD
The iSX Web Server displays content on standard we browsers such as Netscape or Internet Explorer. The content (web pages, graphics, files, etc.) are stored in EEPROM on the iSX demo board. In order to display the content it is first necessary to load the EEPROM with the deires web content. Two programs, e2file.exe which runs under windows, and e2file, an SX application program, have been provided to facilitate the loading of the EEPROM. The following steps should be followed to load web content onto the iSX demo board:
• Using an SX programmer, program the SX52 on the iSX demo board with the e2file program. Note that this erases the program residing in the SX52 and will ne-cessitate reprogramming the SX52 with application code.
• Run the application program e2file.exe under windows on the PC
• In the E2Send dialog box specify the path name to the directory containing the web content to be downloaded. The demo web content is distributed in the HTML direc-tory. The e2file utility will send hierarchical content to the EEPROM preserving directory structure.
• Click the Find Files button in the E2Send dialog box to display the files that will be sent.
• Click the Build data button in the E2Send dialog box to build the data packet that will be sent
• Select the appropriate Com port that will transmit the data to the iSX demo board
• Using a 9-pin serial cable, connect one end to COM port of the PC| and the other end of the cable to the connector labeled DEBUG on the iSX demo board • Press the reset button on the iSX demo board to start
the e2send code
• Click the Send Data button in the E2Send dialog box. A popup dialog box will appear and report the size of the target EEPROM. Click the OK button to initiate the
download process. A status bar will appear in the E2Send dialog box to indicate progress.
• Upon completion of the download, the serial cable should be removed from the DEBUG port on the iSX demo board
·NOTE - The SX52 residing on the iSX demo board must be reprogrammed with the SX web server application software to function properly
3.7 FREQUENTLY ASKED QUESTIONS 3.7.1 Are the two source codes the same?
They are the same except that the flags are set differ-ently.
3.7.2 Where do the log files reside?
The Standard 19200 bps Modem.log and ppplog.txt both reside in the c:\Windows directory.
3.7.3 What is the IP address of the board?
It is 192.168.11.1.
3.7.4 How come that the Win98 directive has to be uncommented for Win95 towork?
Later versions of Windows 95 TCP/IP stack behaves like that of Windows 98. So the Win98 needs to be uncom-mented for it to work.
3.7.5 What is this test.dat file created by the E2file program?
It is the file being generated by E2file and sent to the SX for programming the EEPROM.
3.7.6 How big can the EEPROM be?
Since we use 16 bit pointer in the program, the maximum addressable sizewill be 64K. But the EEPROM on the demonstration board is 32K bytes.
3.7.7 How are the contents of the EEPROM stored?
The contents of EEPROM is just raw data. There is no encryption, so text will still be text, and gif files will be composed of binary data.
3.7.8 How come that I cannot fit 32K worth of files into the EEPROM?
The reason is that There are overhead associated with each file.
3.7.9 Will the demo behave the same under different browsers?
Yes.
3.7.10 Why do I need to change the hosts table?
Java security requires that the host serving Java applets has a domain name.
3.7.11 What is the hosts table extension?
The extension of the hosts table example is .sam. You need to copy this file to hosts, with no extension. Then add the entry “192.168.11.1 SX”. Windows will only look at the hosts file with no extension.
3.7.12 Can I have both the hosts.sam and hosts?
Yes, Windows will only use the one with no extension.
3.7.13 Why does Netscape take a long time to load web pages?
It may be looking at a default route and takes a long time to switch to the iSX route when the LAN is not connected.
Lit#:SXL-AN32-04
For the latest contact and support information on SX devices, please visit the Scenix Semiconductor website at
www.scenix.com. The site contains technical literature, local sales contacts, tech support and many other features.
Scenix Semiconductor, Inc.
1330 Charleston RoadMountain View, CA 94043 Tel: (650) 210-1500 Fax : (650) 210-8715 http://www.scenix.com