UCLA Academic Recruit
USER MANUAL
Produced by the Academic Pesonnel Office at UCLA and UCIrvine’s Office of Information
Technology — January, 2015
ABOUT RECRUIT
Faculty recruitment has long been a paper-intensive process, creating an unnecessary administrative burden both to increasingly over-assigned staff and faculty committees juggling multiple priorities. In 2011, the University of California selected UCI’s AP Recruit system—used on that campus since 2006—for system-wide deployment at all ten UC campuses.
Recruit provides for secure online academic employment recruitment management, supporting the entire recruitment workflow from early approvals, opening recruitments, applications, reference gathering, reviewing by the search committee, and, finally, selecting a hired candidate. Reports are built-in to the system, providing for an easy way to create the reports that the University of California’s Office of the President uses to ensure all campuses meet their requirements as equal opportunity employers. Recruit also ensures the security and integrity of all applicant, reference, and related recruitment data.
How To Use This Manual
The purpose of this manual is to document RECRUIT’s functionality in order to aid Recruit
Administrators and for trainers to help other users of the system. Please refer to the UC Recruit Project Website at http://sites.uci.edu/ucrecruit for recent product updates that may not be included in this edition of the guide.
The screenshots in this manual are taken from the UC Irvine site, but the layout and functionality is the exact same in UCLA Academic Recruit.
-What You Need to Know Before You Start
Operating Systems & Browsers
Recommended operating systems:
Microsoft Windows (7, 8) and Apple Mac OS X 10+
Other: Recruit's responsive design is compatible with up-to-date mobile devices.
Supported browsers:
Automatic updates are always recommended to ensure a secure and modern browsing experience, as certain technologies may lead to a degraded or otherwise suboptimal browsing experience. Each of the latest browsers are supported along with backwards compatibility for one full version still supported by the vendor:
Google Chrome Mozilla Firefox Apple - Safari Internet Explorer
How to Log Into Recruit
To access Recruit you must have a UCLA Logon (a.k.a. a Bruin OnLine ID). If you do not have a UCLA Logon, you can create one at https://logon.ucla.edu
Log into to Recruit here — https://recruit.apo.ucla.edu
A link to Recruit is also available on the Academic Personnel Office’s homepage —
http://www.apo.ucla.edu
1. Click on “UCLA Faculty & Administrators.”
The News & Updates Page
The Home page with news and updates is the same for all faculty and administrator roles.
All users know they are logged into Recruit by looking to the right on the menu bar. This is also how users log out of the system:
The top menu choices will differ depending on the user’s role in Recruit. For example, Analysts and Recruit Administrators will have the Recruitments menu while other users will not. If you only see News & Updates, you have not been assigned any role and should contact your department’s or school’s academic personnel coordinator for help.
User Roles in Recruit
Recruit Administrators and User Managers are the primary supporters for end-users and they will manage most role assignments. Committee chairs, editors, reviewers, and approvers are assigned their roles on a recruitment-by-recruitment basis by the departmentanalyst who is in charge of administering the recruitment.
The role you are assigned in Recruit determines the tasks you can perform.
Recruit Administrators are the primary supporters for all other users and have the most Admin tool access and all the access rights of the roles listed below.
Recruit User Managers act as gatekeepers, assigning, editing and removing user roles for others. At UCLA, the academic personnel coordinator in the Dean’s Office has this role and can provision access for their departmental staff.
Department Analysts administer all aspects of the recruitment from start to finish. They create the recruitments for their departments, complete the search plan, publish the recruitment, assign search committee roles, manage the applicant files and generate reports.
School Analysts have the same access rights as the Department Analyst but on the School level.
Committee Chairs review the applicants. Chairs have slightly more access rights to the applicant pool than the committee reviewers. Chairs can review incomplete applications and can manage applicant files (although this is generally left to the Analyst).
Committee Editors have the same access rights as Chairs. Editors are generally staff and assist the department analyst in managing the applications.
Search Committee Reviewers have viewing rights to completedapplications for a given recruitmentand may comment on them and flag applicants.
Equity Advisors have access to view completed applications for a given recruitment and can create diversity reports. These roles are often part of the approval workflow for the search plan and reports.
Central AP Analysts have access to download a number of reports to provide to UCOP.
Diversity Analysts have viewing rights to completed applications for given recruitment. They may also view and create diversity analysis reports.
Trainer is a role that gives permission to create fake recruitments for use in the Recruit training site. This timesaving admin tool also creates a pool of fake applicants along with sample applicant files to help emulate the online application process.
Approvers are the newest roles in Recruit and are responsible for overseeing the Search Plan, Diversity Reports, and the final Search Report. Approvers are either system-assigned or assigned by analysts on a recruitment-by-recruitment basis. Listed below are the Approver titles that may be chosen for a workflow:
Committee Chair, Faculty Principal Investigator, Affirmative Action Reviewer, Department Chair, Department Director, Equity Advisor, Dean’s Analyst, Dean, University Librarian, Diversity Office, Central AP Office, Academic Senate, Budget Office, Vice Provost, Provost, Executive Vice Chancellor, Chancellor.
Operating Systems & Browsers ... 2
How to Log Into Recruit... 2
User Roles in Recruit ... 4
Part 1: Recruitment Management ... 8
Create the Basic Recruitment ... 8
Open/Closed/Final Recruitments vs. Pool Recruitments ... 9
Configure the Recruitment for Online Applications ... 13
Find and View Recruitments ... 16
Working with the Search Plan ... 17
Details ... 17
Diversity ... 19
Advertisements ... 19
Qualifications ... 22
Selection Process ... 22
Committee ... 22
Documentation ... 24
Disposition Reasons ... 26
Search Plan Approvals ... 27
Submit the Plan for Approvals ... 27
Monitor Approvals In Progress ... 30
Publish the Approved Plan ... 30
Editing the Recruitment ... 31
Editing Department Names: Cross-listing Recruitments ... 31
Editing Submission Dates: Changing the Recruitment Type ... 32
Editing an Approved Plan ... 32
Editing a Published Recruitment ... 32
Part 2: Applicants & Applications ... 34
Tools to Use with the Applicant Lists ... 34
Manually Add an Applicant ... 37
Basic Qualifications ... 39
Disposition Reasons ... 41
Assign disposition reasons to qualified applicants ... 42
Assign reasons to unqualified applicants ... 42
Statuses and Shortlisting ... 42
Updating Applicants’ Statuses... 42
Offer Proposals ... 44
Manage the Applications ... 45
Overview ... 45
Information ... 45
Documents & References ... 46
Manage the Applicant’s Comments & Flags ... 48
Schedule a Visit or Seminar. ... 49
Part 3: Reporting ... 51
Applicant Pool and Shortlist Reports ... 51
The Applicant Pool Report ... 51
The Shortlist Report ... 51
Search Reports ... 53
Generating a Search Report ... 53
Search Report Components: ... 53
Submitting a First Round of Approvals ... 54
Submitting New Reports ... 54
Correcting Reports and Updating the Approvals ... 55
The End of the Search ... 56
Inactivate the Recruitment ... 56
Re-activate the Recruitment ... 56
Appendix A ... 57
How Applicants Use Recruit... 57
How References Use Recruit ... 60
How Approvers Use Recruit ... 61
How Committee Reviewers Use Recruit ... 62
Reviewing the Applications ... 63
Appendix B ... 65
Notifications Sent to Applicants ... 65
Notifications Sent to References ... 68
Notifications Sent to Approvers ... 70
Supporting Recruit’s End-Users ... 71
Appendix C ... 74
Special Tools for Recruit Administrators ... 74
Proxy as User: Assume the role of any user in Recruit. ... 75
Manage Users: ... 76
Administrative Reports ... 79
Faculty Search Report: ... 80
Recruitment and Retention Report: ... 81
Create the Basic Recruitment
The analyst begins by creating the Basic recruitment — inputting the position name, application
submission dates, title codes, specialties, etc. This simultaneously builds the survey on diversity, an important component of Recruit.
1. Click Recruitments in the top menu bar.
2. Click the button, Create New Recruitment Plan.
3. Read the Basic Overview page and then click the Next button.
4. Fill in the basic information about the recruitment:
Recruitment name: Type in the name of the recruitment. This should match your ad. The name will help distinguish similar recruitments from each other. For example, you may want to hire multiple HS Clinical Professors and each position is specialty specific. If each recruitment has an identifying name, you (and the applicants) will be able to distinguish the positions by the specialties.
Description: Insert the ad text. This appears on the corresponding ad page for applicants. Your description text will also be used when posted to HERC.org, InsideHigherEd.com, etc.
Remember to include the URL for Applicants that the system will auto-assign. Then return to this section to add the URL for applicants once your recruitment is set up.
Approved search area: Optional, editable field to document the area in which the FTE will be approved. (e.g. Medieval Studies)
Department: Select your department from the drop-down menu. If this is a cross-listed position (multiple departments or schools), finish creating the recruitment and edit the department field afterward.
Academic year: Refers to the academic year in which the search is conducted. This field is not editable, as it ties into reports. Contact Recruit support ([email protected]) if you make the wrong selection.
Salary control #: This optional field may help you with tracking.
Open/Closed/Final Recruitments vs. Pool Recruitments
Open/Close/Final Recruitments
—are one-time searches that will complete when the vacant spot(s) are successfully filled. The most common type of recruitment. Easily editable.Open date: (editable field )The anticipated date when applicants can begin applying.
Close date: (editable field )The date that no new applications will be accepted.
Final date: (editable field )The last date for existing applicants to modify their applications. Use this as an optional grace period, otherwise make it the same as the close date.
IRD/ Open Until Filled
— a long-running search in which pools of applicants are gathered and evaluated separately at different times. When applicants apply to an IRD recruitment, they are told that they must complete before their review window closes in order to receive full consideration by the committee.Open date: (editable field) The anticipated date when applicants can begin applying.
Initial review date: Marks the closing of the first pool of applicants. Once the recruitment is posted, the IRD cannot be changed —this is designed to keep the advertisement and submission dates in sync.
Review dateAfter the Initial review data has passed, subsequent review dates may be set. See next section, “Specifying Additional Review Dates”
Private date (checkbox)Optionally add an internal review date that will not be shown to applicants.
Final date: The last date when applicants can apply. If you add an additional review date that is after the final date, the final date automatically moves forward to accommodate it.
Specifying Additional Review Dates (IRD Recruitments Only)
Open Until Filled, or “IRD” As you learned in the section above, these types of recruitments are an ongoing and collect pools of applicants separated by review dates. Once a review date has lapsed, analysts can then add additional review dates.
Find the recruitment and click on the link, “Recruitment Details”.
Click the button, Edit Basic Recruitment.
In the Application Submission Dates field, click the link, “Add new review date.” If this link doesn’t
show, then the initial review date has not lapsed and you will have to wait to specify additional review dates.
Specify a new review date in the field provided. If you check the “Private date” box, the new review date will not be shown to applicants.In the example shown above, the new review date will place any new applications completed by Oct 25, 2013 into the existing pool of applicants already in the review bin. Oct 25 acts as the last modification date for this new group of applicants and Recruit will automatically send reminders to applicants in this group about the last day to modify their applications. If they ignore the date and complete their application after Oct 25, they will be told on their application dashboard that they may not be reviewed or considered for the position.
Search Information
After completing the dates section above, now complete the Search Information section: 1. Choose whether this position advertised broadly or specifically targeted.
2. Choose whether thisrecruitment is newly allocated or if it is being re-listed from a previous academic year. This is for UCOP and the need to analyze applicant diversity data.
Optional Information Link
Provide the URL if this recruitment is advertised on your school or department jobs website and Recruit will display the link to applicants when they apply.
5. When satisfied with the Information section, click the Next button. 6. Fill in the Title Codes and Specialties.
Title Codes: Start typing a title code in the box. You may also enter part of the code’s name, for
example, “Prof”, and the system will provide a menu of title codes to select. There is no limit on the number of title codes. Click the ‘x’ to remove a title code.
Hiring Type: This section is automatically filled in for you, based on the Title Code(s) chosen.
Specialties: The specialties are used when generating the diversity reports, a core feature of Recruit. All applicant pools must be compared against national averages, which is associated via the
specialties. Start typing a specialty into the box. Recruit will present you with a list to select from. Add up to 5 specialties. Click the ‘x’ to remove a specialty.
If you can’t find a specialty needed: Choose a more general category. This data originates from the Survey of Earned Doctorates (provided by NORC). Specialties with smaller numbers are purposely folded into larger ones.
7. Click the Next button.
8. Complete the Contacts & Notes page.
Contact Email & Department Mailing Address: Complete your contact name and email address. Verify your department mailing address (shown to applicants).
9. Internal Notes: Use the Internal Notes field as you would a Post-It note on a paper file. Other analysts assigned to this recruitment can see your note.
Basic Recruitment Completed
The Basic recruitment is completed but you will need to configure it for applicants to apply online! All recruitments will need to be configured for online applicant management except for those using MathJobs, an outside recruitment site. For Mathematics (and sometimes Economics), you may stop here and jump to the Search Plan, which appears later in this guide.
Configure the Recruitment for Online Applications
After entering the basic recruitment information, click Yes, Configure for Online Applicant Management in the confirmation box:
1. Read the Online Overview page and click the Next button.
2. Define the required and optional documents, as well as the number and type of requested references.
Documents Requirements.
Define the required or optional documents to be provided by the applicants. The applicants will see any description you decide to provide (204 characters limit).Add: Define any additional documents, make them required or optional, and add a description.
Reorder: Adjust the order in which the requirements are listed for the applicants.
Delete: Remove a document from the requirements.
IMPORTANT:
Once the first applicant has applied, editing the requirements is purposely
restricted! It will only be possible to add optional documents if you need to collect additional
data from applicants. You have been warned!
Adding an Optional Document (after applicants have applied)
After your first applicant has applied, you can onlyaddoptional documents. The newly added document requirement cannot be edited/changed after being added.
1. Find the recruitment and go to the Recruitment Details screen. 2. Click the button, Update Online Applicant Requirements.
3. Click the Unlock button …and read the following warning:
4. Name the new document requirement and add a description. We strongly recommend that you send the email to applicants notifying applicants that a new document is needed. You may add custom text to the email template.
5. Click the Add button. The new document appears in the requirements list.
References Requirements.
You may choose to have your applicants provide self-solicited reference letters OR reference contact information with their application OR nothing at all. The reference requirements cannot be changed once the first applicant applies.Type: Choose None, Only contact information, or Letters of recommendation.
Number: For contact information or letters, choose the minimum-to-maximum range required.
Search Committee Reference Viewing Rights: You may restrict who sees contact information or letters to certain search committee members: (1) All reviewers, (2) Only faculty members, (3) Only assistant, associate & full professors, (4) Only associate & full professors, or (5) Only full professors. This flexibility is important if departments wish to exclude any graduate students who may be serving on their search committee.
3. Click the Next button and complete the information on the next page:
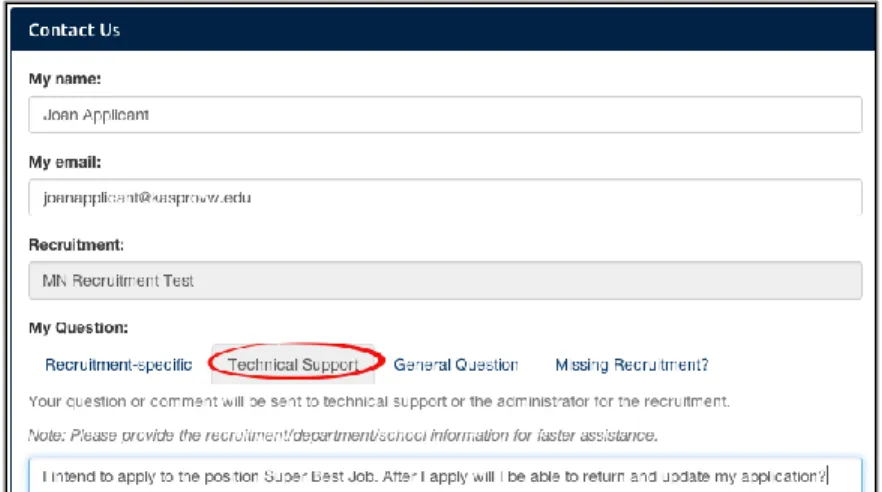
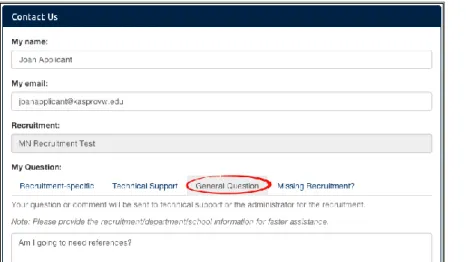
Help Email Address is the address where questions from applicants will be directed. This address is also used in the “From” line in a number of other correspondences between the department, applicants, and references. Refer to the text on the screen for those specific situations.
“Thank You” Email Sent to References is a fully customizable template that Recruit sends to references after their letters of recommendation are uploaded into the system. See Appendix B for the default wording of this email sent to References.
4. Look over the information for accuracy and then click the Save & Done button. A green, success box appears next, alerting you of what to do next.
Find and View Recruitments
1. Click the Recruitments in the top menu bar. Analysts will always find their recruitments listed here.
A new recruitment remains in a Draft state until it is approved & published. This is indicated by the icon.
Submission Dates: Check which recruitments you want displayed. By default, you will see all, regardless of the submission date status.
Dates: This filter displays all recruitments based on their open, close, or final dates.
Academic Year: This filter shows all your recruitments by their academic year. By default, the two most recent academic years will be checked.
Recruitment Type: Do you want to display only recruitments that have been configured for online applicants or only basic
recruitments? By default, both will be checked.
Hiring Type: Decide whether you display recruitments with Tenured title codes or those without. By default, both are checked.
Other: Filter for those recruitments with applicants vs. those without. Or filter for all Inactive recruitments.
Reset: Your recruitment filters stay the same on this page as you move throughout Recruit. Click Reset when necessary.
Other Tools to Find Recruitments
Use the toolbar at the top of the columns:
Change Columns. Add or reduce the information about the recruitments. Hint: Click directly on the column headers to sort the list.
Download as CSV. Recruit will create a comma-delimited file, “recruitments-yyyymmdd.csv”
consisting of all the data within the columns on the page. Depending on your web browser, the file will: (1) open automatically in Excel, (2) go to a download directory on your computer, or (3) present a message asking you to either open or save the file.
Search. Zero in on the Recruitment you are looking for by typing in a search word and pressing return.
Working with the Search Plan
Find your recruitment and click either the “Search Info” link or the Job number.
Details
The Details section summarizes the recruitment. Other analysts, committee chairs, editors, reviewers, and any approver named in the search Plan and/or search Report can view this section.
The Details section includes:
URL for Applicants: A unique URL is revealed for all recruitments that have been configured for online applicants. Use this link for job ads, postings, electronic mailings, and links on other websites. OEOD requires the link in the text in the Description field if the recruitment is going to be posted on
SoCalHERC.org or InsideHigherEd.com.
The Status of the Plan: Dynamically changing status boxes appear at the top of the Details screen. The following show various states for a recruitment.
In this example, the Plan was not submitted, not approved, and not published. Note that a specific URL has been assigned.
In this example, the Plan was submitted and waiting for approval(s). Not published.
In this example the Plan was submitted, approved, and published! Applications are being accepted.
Note: All sections beyond Details display “badges.” These are indicators telling you whether the
information is part of the search Plan or search Report. Roll over a badge with your mouse to reveal the helper text as shown here:
Diversity
Committee chairs, editors, reviewers, and any approver named in the search plan can view this information but cannot edit it.
The Diversity section includes:
1. Specialties and Benchmark Data: lists the recruitment’s specialties and the corresponding
national availability data that is provided via the UC Office of the President to Recruit. 2. Pool Diversity: This table enables search committees charged with ensuring a diverse
applicant pool to better perform that task. Note: When there are less than 5 responses to the first two rows, the percentages are suppressed. Equity Advisors, Diversity Analysts, and Recruit Admins have access to personally identifiable race and ethnicity via their “See candidates” link. 3. Affirmative Action Goal: Identify the affirmative action goal for the title series in the campus
academic affirmative action plan by indicating which groups are underutilized on the campus for the specific job grouping.
4. Equity Advisors: The name(s) of the department and/or school Equity Advisor that has been designated by a Recruit administrator will appear here. If not designated, this area will be blank. 5. Equity advisor role: Use this field to write a description of the role the above stated equity
advisor will play in this search.
Advertisements
This section is for all documentation related to advertising. Approvers who are named in the search
The Advertisement section includes:
1. Planned Search and Recruitment Efforts: As part of the Search plan, describe all planned
efforts to reach a broad and inclusive applicant pool. (Help caption is included in this field.) 2. Actual Search & Recruitment Efforts: Return to this field later to enumerate all efforts taken to
reach a broad and inclusive applicant pool.The information here will be included as part of the Search report.(Help caption is included in this field.)
3. Ad Documents:Upload your ad drafts and final ad copy here. Files must be a PDF, TXT, or an image. The comments field may be used in any way that may be helpful for your approvers. Navigate to your file on your computer, optionally add a comment, and click Upload file.
4. HERC Categories: Select which category and area of expertise best fits the recruitment from the list of choices. This selection ensures the best visibility for your job posting in HERC. 5. Ad Sources: Simply list the various places where your recruitment will be advertised.
6. Ad Evidence: Return to this area when you can provide proof that an advertisement was placed. For OFCCP (Federal audits), copies of actual ads will be needed. Note: The badge indicates this information will be included in the recruitment’s search report.
Choose your ad source from the drop-down menu.
Navigate to your file on your computer,
optionally describe the file and add a comment if you want. Then click
Upload file
.
7. Search Sources: This hard-coded list corresponds to the choices on the applicants’ diversity
surveys. As applicants submit their surveys, the number of responses displayed here will change dynamically, assisting you in your outreach efforts.
Qualifications
This section is an area for analysts to document the basic qualifications, additional, and preferred qualifications along with the selection process for the search plan. Committee chairs, editors, reviewers, and any approver named in the search plan can view this information but cannot edit it.
Selection Process
This section is for analysts to document the job related criteria and the committee’s plan for the selection of candidates. This information can often be found within the position’s description. Committee chairs, editors, reviewers, and any approver named in the search plan can view this information but cannot edit it.
The Selection Process section includes:
1. Selection criteria: This area is to provide a detailed description of the selection criteria to be used in evaluating candidates in priority order.
2. Selection plan: This is a free-form field to document how the search committee will evaluate the applicants and select the shortlist and finalist (screening process, interview procedures, role of the search committee, etc.
Committee
Analysts assign committee roles on a recruitment-by-recruitment basis so when the members log into Recruit, they will have access to review the applications. Any committee member and any approver named in the search plan can view this section but cannot edit it.
The designation between “Core” members and “Additional” members helps to satisfy annual reporting requirements for the Office of the President regarding applicant pools and search committee demographics. Identify the core committee as part of the Search plan.
Committee Chairs will see all applicants, regardless of whether the applications are complete or not. Chairs have complete management rights to the applicant’s files, although these tasks are generally left to the analyst and editor. Add’l Chairs may be added later (e.g. after plan approval) and will have the same access rights as their counterpart.
Faculty Editors have the same access rights as committee chairs and are able to assist the analyst in managing the applications. Add’l (Staff) Editors may be added later (e.g. after plan approval) and will have the same access rights as their counterpart.
Reviewers have read-only rights to only completed applications. Add’l Reviewersmay be added later and will have the same access rights as their counterpart.
Setting up the Search Committee—Quick Add
The Add button is a quick way toadd members one at a time. Click the Add button in the Core Committee part of the page.
1. Choose a role and then start entering the person’s first or last name, email address, or campus ID into the search box.
2. Click the Add Button after selecting a role and a finding a user. 3. The name will be added in the appropriate section.
Setting up the Search Committee – Adding members in bulk
1. To add members using an extended search click the Add members button. In this view, you can add faculty from entire Schools and Departments at once.
An extended search allows for quick assignment of all faculty roles by school/department.
2. Designate each person’s role in the committee using the drop-down selector. Click Save & Done
when finished.
To edit, click “Change role” or “Remove” below the names OR click, Manage existing members.
Documentation
Archive and retrieve various materials associated with the recruitment. Approvers who are named in the search plan and/or can view this information but cannot edit it.
Accepted file types: Files must be PDF, TXT, or images.
1. Search Plan Documents: Store any miscellaneous documents associated with the search that needs to be kept for the electronic record. As the badge indicates, this section will be included in the search plan.
2. Letters & Memos: The documents you upload here will be part of the permanent record and included in the final search report, viewable by any approver named.
a. Click Upload and choose the file from your computer. b. Enter the name of the letter/memo.
c. Add a comment if needed.
d. Optionally associate the letter/memo with an applicant. e. Click Upload File.
3. Interview Materials: Include materials such as: interview questions, committee notes from interviews, interview schedules for on-campus visits, notes about meetings, etc. The
documents you upload here will be part of the permanent record and included in the final search report, viewable by any approver named.
a. Click Upload and choose the file from your computer. b. Give the item a name.
c. Add a comment if needed.
d. Optionally associate the item with an applicant’s name using the drop-down selector. e. Click Upload File.
Disposition Reasons
This section displays the system’s default disposition reasons that will be used later to assign to
applicants. Disposition reasons justify why applicants didn’t move forward in the hiring process and will be an important component of the final Search Report. Any approver named in the recruitment can view this information but cannot edit it.
Customize disposition reasons: Analyst may customize the lists per recruitment if the default reasons do not meet their needs. After the first applicant applies, only the Recruit administrator may customize the lists.
1. Click the button, Add custom disposition reasons.
3. Type a customized disposition reason and click the “Add” button beside it. 4. Add up to 5 custom reasons.
5. Save Changes.
6. The custom reason appears at the top of the list of disposition reasons. 7. To edit, click “Manage custom reasons.”
Suppress disposition reasons: Analysts may suppress any of the reasons to trim the list if needed. After the first applicant applies, only the Recruit administrator may suppress reasons.
1. Click “Manage suppressed reasons.”
2. Uncheck a reason to suppress.
3. Save Changes.
4.
To edit the disposition reasons click “Manage suppressed reasons.”Search Plan Approvals
After you provide all necessary information based on your search business practices, submit the search plan for approval(s).
Submit the Plan for Approvals
1.
Return to the recruitment’s Details section and click the button, Submit plan for approval.
2. On the confirmation box, Click Yes, submit for approval.
3. The system may assign approval workflows containing lists of steps. When this has been done, a chain of approver’s roles will be displayed (see next image below.)
4. Click Yes, submit for approval. If you think this is not the correct workflow, stop here and report this using the contact link.
The Plan Approval Request screen opens:
Specify person. Each step must have at least one specified person. In some cases, the system automatically assigns the person. For those steps not assigned:
1. Click the link, “Specify person.”
2. Enter the person’s email address or UCInetID into the box. 3. Click Add.
Remove specified person. (ex: “I typed the wrong user name here; let me fix that.”) To remove a name
you have specified:
1. Click the “Remove” link beside the person’s name.
2. Note: Analysts cannot remove those users that were automatically assigned by the system.
Assign alternates (ex: “I know he’s on sabbatical; let me fill in the interim chair.”) If you name an
alternate approver, only one person needs to approve. In other words, both “signatures” are not necessary.
1. Click the link, “Add alternate approver.”
3. Click Add.
Augment steps with additional steps (ex: “we also need the Principal Investigator’s vote”).
1. Click the link “Add step.”
2. Choose a role from the list and place into position within the workflow.
3. Once added, don’t forget to specify a person for the new step!
Reorder Steps. (ex: “let’s not bother the Dean until the Principal Investigator says yes”).
1. Click the link, “Reorder steps.”
2. Place your cursor over the icons and drag the step into place. 3. Click “Save changes.”
Comments. Communicate with approvers via the comments section.
Download Plan. Take a look at the PDF of the plan. This is what your approvers will be reviewing.
Approver Emails. Automatic email notifications are sent to approvers and cc’d to analysts submitting
the plan. The notifications include a direct link to the approval screen where approvers may download the plan, comment, and approve. See Appendix A, “How Approvers Use Recruit” and Appendix B, “Notifications Sent to Approvers.” Here are other details about how the approval emails work:
Approvers who are next in line in the workflow receive an email. (The arrow points out the
step.) A copy is also sent to the analyst who submitted the approval.
If a step is approved before it is the current step, the email is suppressed.
If there are multiple people listed in a step (alternates), all receive the email simultaneously. The email template for optional approvers have slightly different wording: “Your approval
is requested” rather than “required.”
When a current step is approved and if the next step is marked as optional, all approvers
for the subsequent mandatory step are sent an email.
Recruit doesn't nag! Approvers are never emailed twice for the same request. It remains up
Monitor Approvals In Progress
Use the top menu Approvals link to monitor approvals in progress:
Publish the Approved Plan
Publishing will control whether the recruitment is in a Draft state, or ready to be shown to applicants. When a recruitment is not published, it will not be shown to applicants under any circumstances. If it is, then the recruitment will be shown to applicants within the specified open/closed dates.
1. Return to the recruitment’s Details screen. If the plan has completed its approvals workflow, a
2. Confirm that you would like to publish the recruitment.
Do not forget to publish! Unpublished recruitments mean that the recruitment will
languish! Unpublished recruitments make the URL for applicants unreachable, leaving
applicants no way to apply through Recruit.
Editing the Recruitment
To edit the search Plan fields, return to the sections described earlier in this guide.
Use the inline edit buttons on the Details page to quickly edit any field surrounding the basic recruitment.
Edit the position name, department, title codes, salary control #, etc.
Customize how various parties can inquire about the recruitment.
Update that public-facing, important field.
Edit the open, close, final dates, add review dates, or change submission date type.
Edit your recruitment notes field.
Editing Department Names: Cross-listing Recruitments
Sometimes academic positions are shared between units (Departments, Schools, Divisions, etc.) and this is often described in the advertisement. Recruit can “cross-list” recruitments, which will result in:
The recruitment is displayed beneath the name of the home department and also beneath the cross-listed unit(s) on Recruit’s Apply page.
The applicant’s dashboard displays the name of the home department and also the cross-listed unit(s).
Once a candidate is selected, Recruit’s Offer Proposal form displays each unit for the analyst to indicate the allotment of salaried time. This information will be part of the Search Report.
Analysts may cross-list between units for which they have access. For example, School analysts may cross-list between any departments within their school.
1. A lead analyst first creates the recruitment. This recruitment now belongs to a home department. 2. Return to the Details section of the recruitment.
3. Use the inline Edit button beside General Information.
4. Click the link, “Add crosslisted unit.”
5. Place the cursor in field and select from the drop-down list of unit names. 6. Click Save Changes.
7. Note: If the list doesn’t show the unit you wish to cross-list, contact a Recruit Administrator at the
Academic Personnel Office for assistance.
Editing Submission Dates: Changing the Recruitment Type
Be sure to review the section Open/Closed/Final Recruitments vs. Pool Recruitments to learn the difference between types of recruitments in regards to their submission dates. Once applicants have applied to the position, only Recruit Administrators may switch between OCF and IRD.
1. Click the inline Edit button beside Dates.
2. The Edit Dates modal editor opens. Click the link, "Change recruitment type." You may roll your mouse over the tool tip to learn the difference between the types.
3. You'll be required to enter a Close date when changing from an IRD to an OCF.
4. You'll be required to enter an Initial Review Date when changing from an OCF to an IRD.
5. Once the dates are set, click the button "Change to Open/Close/Final" or vice versa to make the switch.
6. The Details screen will note the new type in the Dates section - either Open Closed Final or Review Dates.
7. The changed submission dates will display correctly to applicants on the Apply page and on application dashboards.
8. You may also use "Change recruitment type" as a toggle. For example, if the IRD dates are amiss, try changing the type to OCF, then back to an IRD and fix the dates accordingly.
Note: Changing the recruitment type may have an impact on the applicants. Please consider carefully before making the switch and consider notifying existing applicants using Recruit's bulk email feature.
Editing an Approved Plan
The flexibility of Recruit allows the analyst to edit any area of the plan, even after approvals — and the PDF will be updated accordingly. But be advised, once a role has approved the plan, there is no re-approving it for that role. In other words, if your Dean has approved the plan and then you make a change, Recruit does not provide a way for you to resubmit the plan for approval to the Dean a second time.
Once published, the final PDF of the approved plan is available for download. This is a snapshot in time; a historical record of what was approved. If you make changes to the recruitment of any kind after it is published, the change will not be reflected in the PDF unless you first Unpublish the recruitment. Your own department’s business practices should dictate when it is prudent and necessary to edit information that has already been approved and/or published, just as you would in a paper process.
To Unpublish a Recruitment
This action pulls the recruitment back to a draft state. Unpublishing does not remove any prior approvals. The “Unpublish” button appears up until the first applicant applies.
1. Return to the Details section of the recruitment.
The Search Plan has been approved, published and applicants have begun applying. Analysts locate the applicant pool either on the Recruitments page or the Applications page.
Reaching the Applicant List from theRecruitmentspage (Analysts only).
Analysts can reach the applicant list directly from their recruitments page via the link beneath the name of the recruitment. The number in parenthesis is the total number of people who have applied.
Locating the applicants from the main Recruitments page.
Reaching the Applicant List from theApplicationspage (Reviewers). Committee reviewers will use their top applications menu link to see all recruitments in their purview. The number in parenthesis is the total number of people who have completed their application.
Locating the applicants from the Applications page.
Tools to Use with the Applicant List s
Column Sorting.Click directly on most column headers to sort the applicant list.
Search Box. Zero in on the applicant you are looking for by typing in a search word and pressing return.
Change Columns. Add or reduce the information about the applicants.
Click the button at the top of the list of names, “Change Columns”.
Check information you want to display on your screen
Click the button, Save Columns:
Download Applicant Data: Thisis a useful tool used to create lists of applicant names, addresses, and other column criteria to take to a meeting or use for mail merges.
Recruit will build a comma-delimited file consisting of the applicant/applications list and the data fields that have been pre-selected from the column options.
Click the button, Download This Data for all column data displayed.
Or for a simpler list, click Download Names & Addresses. Depending on the web browser —
• the file will download to the usual download area on the user’s computer OR • the file will open automatically in Excel OR
• the browser will present a message asking the user to either OPEN or SAVE it.
The Filter Panel: Use the advanced filter panel to fine-tune your list of applicants. 1. Use “Reset” when you want to restore the applicant list to the default state. 2. If you click away from this screen, your filters will persist.
3. Committee reviewers do not have the Show Hidden filter.
Show: Set a filter to show applications that have been hidden from the committee.
Check the box and click the Filter button at the bottom of the panel.
Status: This filter allows you to pick and choose which applicants to display based on the applicants’ various statuses.
Make your selection
Click the Filter button at the bottom of the panel.
Review Window Slider Mechanism (available only for IRD recruitments): Adjust the sliders if you want to see only those applicants who applied by a certain review date. If you want to see everyone, move the two thumbs as far apart as you can – as illustrated here. Think of it like opening the window to see the widest possible view. Remember, Committee Reviewers see only completed applicants.
Dates:
Choose: Last Updated, Applied On, or Completed Date.
Choose a date range: On or before, On or after, On, or Between.
Choose a date.
Click the Filter button at the bottom of the panel.
Adjust the columns to see the results of the date filters.
NOTE: The following actions will trigger the time/date stamp change in the “Last Updated
column”:
1.Any change made to the documents provided.
2.Any change made to the references (removal, contact info changed, etc). 3.When a reference letter has been uploaded into the system.
4.Any change made to an applicant’s personal information.
5.If you manually complete the applicant (and if you revert back again).
Filtering the list of applicants.
Mark as Read: This is a way to quickly put a checkmark next to applicants that have been reviewed. The feature is available to all users with applicant viewing rights but the checkmarks are private and not viewable by one another.
1. Locate the applicant or applicants in the list and put a check in the empty box beside the name(s). 2. Then click the "Read" button in the row at the top of the list of names.
3. A green indicator will appear in the applicant’s row.
Application modified since marked as read: If an application was updated since you marked it as read, an alert icon will cue you.
Locate the applicant in the list.
If modified since you marked it as read, an alert icon will appear:
Hide / Unhide an applicant: Occasionally an applicant will contact Recruit or the department
requesting we remove their application.While it is not possible to permanently remove an applicant’s application, analysts can hide it from the committee reviewers. Chairs and editors also have this tool.
1. Locate the applicant in the list and put a check in the empty box beside the name. 2. Then click the "Hide" button in the row at the top of the list of names.
3. Committee reviewers will no longer see this applicant.
Send bulk email:
1. First, put a check in the empty box beside the name(s) of applicants you wish to email. 2. Then click the “Send Email” button in the row at the top of the list of names.
3. A template will open where you will be able to compose one message to send to a group of people. 4. You may insert optional variables into the subject line and message body: ApplicantFirstLastName,
UserName, CompletionDate, RecruitmentName, ApplicantAddress, RecruitmentAddress, ContactAddress.
Add Personal Note: This is a way to jot yourself a note about an applicant. The feature is available to all users with applicant viewing rights but notes are private and not viewable by one another.
2. Notes may have up to 255 characters. 3. Click "Save".
4. To read the entire note, roll over it with the mouse. 5. To edit the note, roll over it with the mouse and click. 6. Click "Remove" to delete the note.
Manage the applicant/application: Only analysts, chairs, and editors have the manage link below the name of each applicant. Managing applicants/applications is covered in another part of this manual.
Check the Applicant’s Log: Check the time-stamps of all the actions that have taken place on/within an applicant’s application.
•Click the “Log” link below an applicant’s name. •Read the log and close it when you are finished.
Download the applicant’s documents: Obtain a PDF bundle of all an applicant’s documents with one click. Click the “Download” link found beneath their name.
Progress dots: Roll over the color-coded dots beneath an applicant’s name for a list of what
requirements are in and what is still missing.
A Cue to Know When an Applicant is not visible to the Reviewers: Roll over this icon to quickly determine why that applicant is not being shown to the search committee.
Manually Add an Applicant
Occasionally Analysts may need to create an application on behalf of someone. For example, this may be useful for high-level searches, such as those for Deans.
1. Locate the recruitment’s list of applicants.
3. Fill in the form: Applicant’s contact information, degree information, current employment, etc:
4. Optional: At the bottom of the form, check the box to send a notification to the applicant that an application has been established on their behalf. See Appendix B, “Application is in the system.”
5. Finally, click the button, Add & Manage Now.
Bottom section of the Add Applicant form.
Granting Access to the Applicant. This important action sends another email to the applicant that grants the applicant access with login and Diversity Survey instructions. See Appendix B, “Access your
application.”
1. At the top of the applicant’s screen, click the link, Activate now.
Notifying the applicant that an application has been submitted in their behalf sends the login information and Survey instructions.
3. Before the email is sent, verify the email address for the applicant is correct.
Basic Qualifications
Because of the proliferation of online applications that exist throughout the nation, the U.S. Department of Labor/ Office of Federal Contractor Compliance Programs considers only those individuals who meet the advertised basic qualifications as “applicants.” You will need to mark your applicants in order to produce an accurate Diversity Report that meets the requirements of the OFCCP.
IMPORTANT! Always use objective, non-comparative, relevant, and verifiable criteria. Contact UCI’s Office of Equal Opportunity & Diversity for any help deciding which applicants meet or do not meet basic qualifications.
Entire Pool view: The entire pool tab, color-coded blue, lists all applicants. (Committee reviewers will see only completed applicants).
You may mark applicants from the Entire Pool view. Say, for example a PhD is a basic qualification. Look in the Highest Degree column, then…
1. Find a completed applicant (only completed applicants’ qualifications can be judged). 2. Put a check in the empty box in the applicant's row.
3. You may select multiple names and click the master checkbox at the top of the row.
The Entire Pool view respects any filters the user has set. If you see unexpected results, then take a look at your filters and clear them if necessary. At the bottom of the list, you’ll be reminded about any filters you may have set and you can clear them with the button, Remove all Filters.
All applicants will be found on the Blue tab.
Unknown applicants view: As soon an applicant applies, Recruit places them in the Unknown
category, color-coded Orange. The Unknown view respects any filters the user has set. If you see unexpected results, then take a look at your filters and clear them if necessary. At the bottom of the list, you’ll be reminded about any filters you may have set and you can clear them with the button, Remove all Filters.
Applicants who have not yet been marked appear on the Orange tab.
To mark applicants as Qualified or Unqualified from the Unknown view:
1. Find a completed applicant (only completed applicants’ qualifications can be judged). 2. Put a check in the empty box in the applicant's row.
3. You may select multiple names and click the master checkbox at the top of the row.
4. Click the button at the top of the list of names Meets or Does Not Meet to move the applicant to the appropriate category.
Qualified applicants view: Applicants found in the Qualified/Green category are those who have been marked as meeting the basic qualifications. These applicants' diversity data will be used in the diversity analysis reports produced later.
Applicants marked “Meets” appear on the Green tab.
To move an applicant back to Unknown or to mark them as Unqualified:
1. Put a check in the empty box in the applicant's row. 2. Click "Unknown" or "Does Not Meet.”
Note: You can revert a Qualified applicant back to Unknown if you discover required documents have been deleted from the application. If the required document is re-uploaded, the applicant will
automatically move back to “Qualified.”
Unqualified applicants view: The Unqualified/Grey category contains applicants who have been marked as "Does not meet basic qualifications.”
Applicants marked “Does Not Meet” appear on the grey tab.
To move an applicant back to Unknown or to mark them as Qualified:
1. Put a check in the empty box in the applicant's row. 2. Click Meets or Unknown.
What does the search committee see? Reviewers will have the same color-coded categories. They will see all applicants who are completed and categorized accordingly. However, reviewers will not have the ability to mark the applicants as Meets/Does Not Meet or move them to a different category.
Assign reasons why applicants did not move forward in the hiring process. Disposition reasons are an important component of the final Search Report.
Assign disposition reasons to qualified applicants
1. Go to the “Qualified” tab and click the button at the top of the list, “Disposition Reasons: Assign Reasons.”
2. For each applicant, place your cursor in the box and choose from the drop-down menu of reasons. 3. Optionally add one comment per applicant.
Assign reasons to unqualified applicants
1. Go to the “Unqualified” tab and click the button at the top of the list, “Disposition Reasons: Assign Reasons.”
2. Place your cursor in the box for each applicant and choose from the drop-down menu of reasons. 3. Optionally add one comment per applicant.
Statuses and Shortlisting
Updating Applicants’ Statuses
Keeping an applicant's status up to date will make sure that the search committee is always aware of the current status and it also satisfies annual reporting requirements by the Office of the President. Definitions of statuses are clearly defined by rolling over the applicant’s status in the status column:
Which status is considered “shortlisted?” Shortlist consists of all statuses beyond Serious consideration. Those include: Recommend for interview, Interviewed, Proposed candidate, Offered, Accepted offer, Declined offer, Hired, Withdrawn, and Campus declined.
* Serious consideration is NOT a shortlist status.
1. Find the applicant in the list and click the “Manage” link:
2. Click the Update status button at the top of the application:
3. Recruit suggests the next logical status:
4. Or click “Choose another status…" and select a status from the defined list. Note: You may only select statuses in a forward-moving progression. If a mistake has been made and you are unable to roll back, contact a Recruit Administrator at the Academic Personnel Office to unlock the statuses.
If a status is changed from Selected candidate to Withdrawn, choose a reason from the list provided. The same choice list appears when updating the status to Declined.
Select a reason why the selected candidate withdrew.
Offer Proposals
When updating to Proposed Candidate and beyond, click Enter proposed offer information.
Fill in the form and Save Changes. When multiple title codes have been assigned to the recruitment, you will be able to select the title code to associate with the applicant. If the recruitment was cross-listed between departments, you will be able to select the main department to associate with the applicant.
Manage the Applications
Analysts, chairs, and editors all have the ability to manage the applications although the analyst and editor generally do the tasks that are involved.
Click the Manage link below the name of each applicant:
Overview
Click “Manage” beneath an applicant’s name and the application’s Overview screen opens:
Manage applicant:The overview of an applicant’s file.
The Overview section includes:
Applicant Documents.Click the hyperlinked filename to download them to your computer. Letters of Reference. Click the hyperlinked name of the reference to download their letter. Comments. View, post, or update a comment to share with your search committee peers.
Flags.View, add, or update one or multiple flags and decide whether to display it to reviewers.
Information
View or update the applicant’s address, email, username, personal web site, employment, and degree information.
The Overview section also includes:
Manage applicant: The information screen.
Documents & References
Manage the Applicant’s Documents.Fully manage the applicant’s required documents; View,
Upload or Delete them if necessary. Documents may be uploaded as PDF files. Other valid file types include: zip, jpg, rar, tif, mov, bmp, 3gp, png, wmv, m4v, mp3, mp4, psd, swf, tiff.
Manage applicant: Full control over documents and references.
Upload. Click the “Upload” link and navigate to the electronic file on your system. Or else, check the
box “Document received outside of the UC Recruit application.” This will create a placeholder document with a notation that the actual physical document is housed outside of Recruit. A description field is provided to cue the committee that the material exists and where to physically locate it. This action will be logged and time-stamped.
Delete. Click the “Delete” link to permanently remove an applicant’s document from their application.
This action will be logged and time-stamped. Manage the References & Letters
Recall when your recruitment was configured, references requirements were set to one of the following:
None (the applicant is not required to provide references)
Only contact information (the applicant is required to provide their reference’s names, etc) Letters of recommendation (the applicant is required to provide references AND notify their
references that a letter of recommendation is requested)
Department analysts, chairs, and editors have complete manage rights regarding references and the letters of recommendation per applicant. You may Add, Edit, or Delete a reference. You may Upload
letters that arrive outside the system. You may Send a letter requestto references if the requirements are “Contact Information Only” or “None”. See Appendix B: Notifications Sent to References
(department-initiated).
Send a letter request to references in cases #1 and #2 outlined above. 1. First, add the reference using the Add reference button.
2. Next, click the link Send letter request.
3. The following email template opens. All fields are editable except the Confidentiality Statement (The University of California confidentiality policy).
Adda reference for an applicant using the Add reference button. This button appears in all 3 cases outlined above.
Viewthe details of any reference and edit this information. This capability is possible in all 3 cases outlined above.
Deletea reference or a letter in any of the 3 cases outlined above. A confirmation/warning appears:
Uploada letter into the applicant’s file if the letter arrives outside of Recruit (via U.S. Post or via email)
in any of the 3 cases outlined above. Please remember to thank the letter-writer and send a copy of the confidentiality statement, which you will find via a link on the upload screen.
Manage applicant: Comments, and Flags
Flags. To flag an applicant, type a descriptor. Remember to click the button, Add Flag. Analysts, Committee Chairs, and Editors can view this information. Use the checkbox if you wish to hide the flag from reviewers.
Comments. Comments should be written as considerately as words spoken in face-to-face meetings.
Analysts, Committee Chairs, Editors, and Committee Reviewers may always view one another’s
comments. Click Add Comment. Schedule a Visit or Seminar.
Schedule or edit applicant visits for viewing by the search committee. Add abstracts and biographies into the summaries. Optionally schedule additional events associated with the visit.
1. Click the link, “Schedule a visit/seminar” link.
Manage applicant: Optionally schedule the candidate’s visit/seminar in Recruit.
2. In the form that follows, add a title, summary, bio of the applicant, and the main event date and click Next.
4. After saving, you are returned to the main Visit/Seminar screen. This is where you find links to a flyer and a formatted itinerary that you may print and distribute.
Applicant Pool and Shortlist Reports
Analysts may generate two types of diversity analysis reports and solicit approvals by key people whom they will identify through a roles list. Analysts, equity advisors, and diversity analysts may create the reports at any time or multiple times, even after the recruitment is closed.
1. Find the Reports link on the main Recruitment screen, the applicant’s screen, or on any of the
Search Info screens.
2. Click the corresponding button to create the report you want. Or click the down arrow to preview.
The Applicant Pool Report
The Applicant Pool report may be thought of as an interim report. It shows aggregated results from the diversity data collected from applicants who completed their applications, took the survey, and have been marked as “Meets Basic Qualifications.” Their responses are compared against national averages. This report is intended to be reviewed and approved before anyone is put on the shortlist.
The Shortlist Report
The Shortlist diversity report shows the same results that are in the Applicant Pool Report plus the aggregated diversity data for the short listed applicants. Any approver will have access to this confidential information on this report.
3. Click the Create New Report button and a summary appears:
Report Type. Drop down menu shows either Applicant Pool or Shortlist.
Applicant Pool Statistics. This region displays the number of
completed applicants who have been marked as “Meets Basic Qualifications” and have submitted their survey on diversity. These survey-takers will be the only applicants in aggregated results, making this report in compliance with the US Department of Labor. If the count is zero, you must go back and mark the applicants who meet the basic qualifications. The count for shortlisted applicants is shown in this region too.
Note: For Basic recruitments (those that have not been configured for online application management), a field is provided for the Analyst to type in the number of applications received outside of Recruit:
4. Back on the Reports page, Applicant Pool, Shortlist, and Search Report tabs separate the various reports.
Color-coded boxes at the top indicate the status of the particular report’s approvals.
The “Date Generated” column keeps a running tally of all reports created throughout the search.
The “Download” link opens a PDF of the report. The samples below show the two types of diversity reports: Applicant Pool report (left) and the Shortlist report (right).
Note: The minority total column in the Diversity Benchmark section includes applicants who reported multiple race/ethnicity. That is a separate category in the data derived from The National Opinion Research Center (NORC). Those who selected multiple
race/ethnicity are not included in the other individual race/ethnicity groups (not in AfAm, Hisp, Asian, NaAm), so the only place they are counted is in the minority total. Therefore:
Search Reports
Generating a Search Report
1. Click the button, Create New Search Report. Or click the down arrow to preview before creating it.
2. When creating a new report, you’ll be asked to name the report. 3. Then click Create Search Report.
4. A running tally is kept of all Search reports generated throughout the search. 5. The “Download” link opens a PDF of the Search report.
6. Color-coded boxes at the top of the screen cue you to the report’s approval status.
Search Report Components:
The following is a list of the components to be bundled into a Search Report. Much of this information will have been input as part of the Search Plan.
1. The recruitment details: General information including the recruitment name, department name,
and recruitment period, etc will be automatically pulled into the Search report from the Plan.
2. Information about selected candidates: Salary control number assigned (senate positions),
school/college, department, discipline/field (senate positions), anticipated start date, percent time, level of appointment (senate positions), title/rank/step senate positions), salary (non-senate positions) and candidate’s CV will be included in the report.
3. Evidence of advertisements: The list of all locations where the advertisement was published,
posted, or distributed, as part of the search will be included in the report. This field is in the Advertisement section of the recruitment’s Search Info. (For senate searches, provide verification of ad publication and payment in a national professional journal (online or in print)).
4. Letters & Memos: All letters/memos/written recommendations etc that have been uploaded
into the Documents section of the recruitment’s Search Info will be included in the report.
5. Interview materials: All interview documents or other notes from the interview process