Kaspersky Security 8.0 for Linux Mail Server
APPLICATION VERSION: 8.0 MAINTENANCE PACK 1
Administrator's Guide
2
Dear User,
Thank you for choosing our product. We hope that you will find this documentation useful and that it will provide answers to most questions that may arise.
Attention! This document is the property of Kaspersky Lab ZAO (herein also referred to as Kaspersky Lab): all rights to this document are reserved by the copyright laws of the Russian Federation, and by international treaties. Illegal reproduction or distribution of this document or parts hereof will result in civil, administrative, or criminal liability under applicable law.
Any type of reproduction or distribution of any materials, including translations, is allowed only with the written permission of Kaspersky Lab.
This document and related graphic images can be used exclusively for informational, non-commercial, or personal use. This document may be amended without prior notice. You can find the latest version of this document on the Kaspersky Lab website, at http://www.kaspersky.com/docs.
Kaspersky Lab assumes no liability for the content, quality, relevance, or accuracy of any materials used herein the rights to which are owned by third parties, or for any potential damages associated with the use of such documents.
Document revision date: 12/22/2014 © 2014 Kaspersky Lab ZAO. All Rights Reserved.
http://www.kaspersky.com http://support.kaspersky.com
3
TABLE OF CONTENTS
ABOUT THIS GUIDE ... 8
In this document ... 8
Document conventions ... 11
SOURCES OF INFORMATION ABOUT THE APPLICATION ... 12
Sources of information for independent research ... 12
Discussing Kaspersky Lab applications on the forum ... 13
Contacting the Sales Department ... 13
Contacting the Localization and Technical Documentation Unit ... 13
KASPERSKY SECURITY 8.0 FOR LINUX MAIL SERVER ... 14
Hardware and software requirements ... 15
Distribution kit ... 16
APPLICATION ARCHITECTURE ... 17
Main components ... 17
Operation algorithm ... 18
INSTALLING AND REMOVING THE APPLICATION ... 19
Preparing to install ... 19
Upgrading from a previous version of the application ... 20
Installing Kaspersky Security on top of the previous version ... 21
Updating Kaspersky Security settings ... 22
Installing the Kaspersky Security web interface on top of the previous version ... 22
Updating Kaspersky Security web interface settings ... 23
Installing the application ... 24
Step 1. Installing the Kaspersky Security package ... 24
Step 2. Installing the Kaspersky Security web interface package ... 24
Preparing Kaspersky Security for operation ... 26
Step 1. Selecting the language for viewing the License Agreement and the Kaspersky Security Network Statement... 27
Step 2. Reviewing the License Agreement ... 27
Step 3. Participating in Kaspersky Security Network ... 28
Step 4. Selecting the backup directory ... 29
Step 5. Backup connection settings ... 29
Step 6. Selecting the socket... 29
Step 7. Managing Kaspersky Security via the web interface ... 30
Step 8. Selecting the TCP port for interaction with the Apache module ... 30
Step 9. Assigning a password to access the web interface ... 30
Step 10. Selecting the type of integration with the mail server ... 31
Step 11. Configuring the proxy server settings ... 34
Step 12. Adding a key ... 35
Step 13. Updating databases ... 35
Starting automatic initial configuration of Kaspersky Security ... 35
Preparing Kaspersky Security web interface for operation ... 39
Step 1. Selecting the License Agreement language ... 40
Step 2. Reviewing the License Agreement ... 40
AD M I N I S T R A T O R'S GU I D E
4
Step 4. Selecting an Apache server virtual host ... 41
Step 5. Selecting a socket to interact with Kaspersky Security ... 42
Step 6. Selecting a certificate to access the web interface ... 42
Starting automatic initial configuration of the web interface of Kaspersky Security ... 43
Configuring administration of the application through Kaspersky Security Center ... 44
Installing Network Agent ... 45
Configuring Network Agent settings ... 45
Checking the connection to Kaspersky Security Center ... 46
Removing Kaspersky Security ... 46
Actions after removing Kaspersky Security ... 47
MANUAL INTEGRATION OF KASPERSKY SECURITY WITH MAIL SERVERS AND AMAVIS INTERFACE ... 48
About manual integration ... 48
Manual Integration with Sendmail server ... 49
Integration using the .mc file ... 50
Integration using the .cf file ... 51
Manual Integration with Exim mail server ... 52
After-queue integration by rerouting ... 52
Before-queue integration using dynamic linking ... 55
Manual Integration with qmail server ... 58
Manual integration with a Postfix mail server... 59
After-queue integration ... 59
Before-queue integration ... 61
Integration using the Milter protocol ... 63
Manual integration with the Amavis interface ... 64
Integration by means of user scripts ... 65
Types of user scripts ... 66
General requirements for user scripts ... 66
Searchemail script ... 67
Searchusers script ... 67
Getuseraccount script ... 68
Login script... 68
APPLICATION LICENSING ... 69
About the End User License Agreement ... 69
About the license ... 69
About the key file ... 70
About the key ... 70
Viewing information about the license and added keys ... 71
About data provision ... 71
Adding a key ... 72
Removing a key ... 72
STARTING AND STOPPING THE APPLICATION ... 73
SERVER PROTECTION STATUS ... 74
BASIC PRINCIPLES ... 75
About scan and content filtering statuses ... 75
About message processing rules ... 76
Message processing algorithm ... 76
TA B L E O F CO N T E N T S
5
Creating message processing rules ... 78
Viewing the list of message processing rules ... 80
About actions on objects... 80
About Kaspersky Security tasks ... 81
Viewing the list of application tasks ... 82
About information X-headers ... 83
ANTI-SPAM PROTECTION ... 84
About Anti-Spam protection ... 84
About external Anti-Spam message scanning services ... 85
Enabling and disabling the Anti-Spam engine ... 85
Enabling and disabling Anti-Spam scanning of messages for a rule ... 86
Configuring general Anti-Spam scan settings ... 86
Configuring Anti-Spam scan settings for a rule ... 87
Using reputation filtering ... 90
Limiting the size of messages to be scanned for spam ... 91
ANTI-VIRUS PROTECTION ... 92
About Anti-Virus protection ... 92
About ZETA Shield technology ... 93
Enabling and disabling the Anti-Virus engine ... 93
Enabling and disabling the Zeta Shield technology ... 93
Enabling and disabling Anti-Virus scanning for a rule ... 94
Configuring general Anti-Virus scan settings ... 95
Configuring the processing of a message that cannot be disinfected ... 96
Configuring Anti-Virus scan settings for a rule ... 97
Excluding messages from Anti-Virus scanning by attachment format ... 98
Excluding messages from Anti-Virus scanning by attachment name ... 99
Limiting the size of objects to be scanned for viruses ... 100
ANTI-PHISHING PROTECTION ... 101
About Anti-Phishing protection ... 101
Enabling and disabling the Anti-Phishing engine ... 101
Enabling and disabling Anti-Phishing scanning of messages for a rule ... 102
Configuring general Anti-Phishing scan settings ... 103
Configuring Anti-Phishing scan message processing settings... 103
CONTENT FILTERING ... 105
About content filtering ... 105
Enabling and disabling content filtering of messages ... 105
Enabling and disabling content filtering of messages for a rule ... 106
Configuring content filtering by message size ... 107
Configuring content filtering by attachment name ... 108
Configuring content filtering by attachment format ... 109
UPDATING KASPERSKY SECURITY DATABASES ... 110
About database updates ... 110
Checking database state ... 111
About update sources ... 112
Select update source ... 112
Configuring the proxy server settings ... 114
AD M I N I S T R A T O R'S GU I D E
6
Update task schedule settings ... 115
Manual database update ... 117
ADVANCED CONFIGURATION OF KASPERSKY SECURITY ... 118
Configuring global black and white lists of addresses ... 118
Setting the number of scanning streams ... 120
Importing / exporting settings ... 120
INTEGRATING THE APPLICATION WITH AN EXTERNAL USER SERVICE USING THE LDAP PROTOCOL ... 121
About integration with an external user service via LDAP ... 121
Configuring the application connection to an external user service using LDAP ... 121
Checking the server connection using LDAP... 123
Adding senders / recipients from an external user service to rules ... 123
Adding personal black and white lists of addresses ... 124
Setting up integration with the custom directory service ... 125
Managing untrusted certificates ... 126
USING THE APPLICATION VIA THE SNMP PROTOCOL ... 127
About receiving runtime information via the SNMP protocol ... 127
Configuring interaction with the application via the SNMP protocol ... 127
Getting the ID of the SNMP process ... 128
Enabling information exchange via the SNMP protocol ... 128
Calling MIB objects ... 129
Enabling / disabling event traps ... 129
Viewing the MIB structure using the snmpwalk command ... 129
MANAGING COMPANY EMPLOYEE ACCOUNTS ... 130
About a company employee account ... 130
Activating and deactivating a company employee account... 130
Configuring settings of a company employee account ... 131
Configuring the transmission of infected messages placed in Backup to users... 131
BACKUP ... 133
About Backup ... 133
Viewing statistics of message copies in Backup ... 134
Filtering the details of message copies in Backup ... 134
Deleting message copies from Backup ... 135
Saving messages from Backup to file ... 135
Delivering messages from Backup to recipients ... 135
Configuring the Backup settings ... 136
EMAIL NOTIFICATIONS ... 137
About email notifications ... 137
Enabling delivery of email notifications about objects ... 138
Specifying additional email addresses for delivery of email notifications about objects ... 139
Configuring delivery of email event notifications to the administrator ... 140
Editing templates of email event notifications ... 141
Using macros in templates of email event notifications ... 142
RUNTIME REPORTS AND STATISTICS ... 144
Viewing runtime statistics ... 144
Creating reports ... 144
TA B L E O F CO N T E N T S
7
Configuring scheduled reports ... 147
EVENT LOG ... 148
Event log... 148
Changing the system log category for storing events ... 149
Configuring event logging in the event log ... 150
TRACE LOG ... 151
About the trace log ... 151
Enabling the trace log ... 152
Configuring the level of detail of the trace log ... 152
Configuring the location of the trace log ... 153
Configuring the rotation of trace files ... 153
TESTING THE APPLICATION OPERATION ... 155
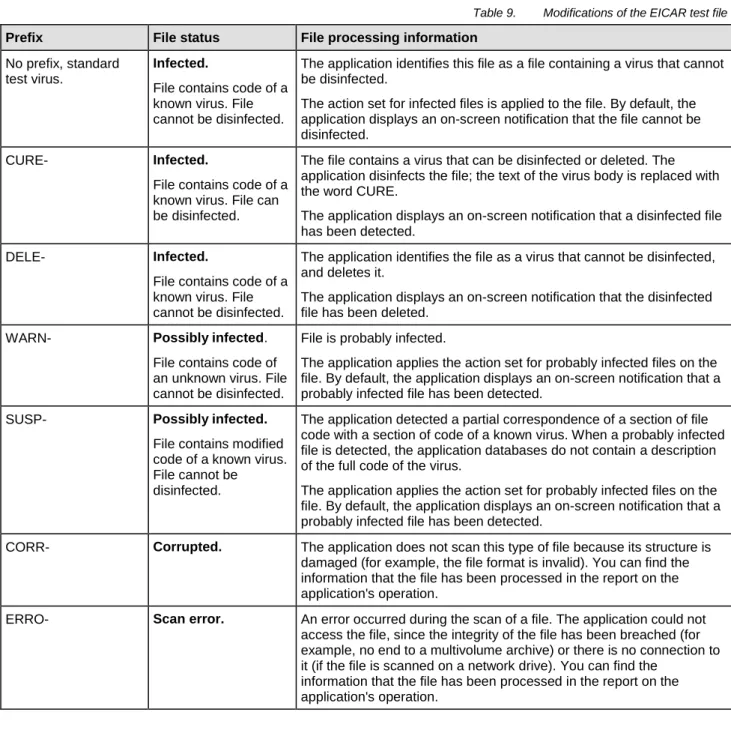
About the EICAR test file ... 155
About the types of the EICAR test file ... 155
Testing application performance using the EICAR test file ... 156
ADMINISTRATION OF THE APPLICATION THROUGH KASPERSKY SECURITY CENTER ... 158
Starting and stopping Kaspersky Security on a client computer ... 158
Managing tasks ... 159
About tasks for Kaspersky Security 8.0 for Linux Mail Server ... 159
Creating a local task ... 160
Creating a group task ... 160
Creating a task for a set of computers ... 160
Starting a task ... 161
Viewing general information on the operation of Kaspersky Security in a computer cluster ... 161
CONTACTING THE TECHNICAL SUPPORT SERVICE ... 162
How to obtain technical support ... 162
Technical support by phone ... 162
Obtaining technical support via Personal Cabinet ... 163
Using a trace file ... 164
Extended diagnostics of application operation ... 164
APPENDICES ... 165
Application file locations on a computer running Linux ... 165
Application file locations on a computer running FreeBSD ... 166
KASPERSKY LAB ZAO ... 168
INFORMATION ABOUT THIRD-PARTY CODE ... 169
TRADEMARK NOTICES ... 170
INDEX ... 171
8
ABOUT THIS GUIDE
This document is the Administrator's Guide to installing, configuring, and using the Kaspersky Security 8.0 for Linux® Mail Server (hereinafter also "Kaspersky Security"). This document is intended for application administrators. The Guide is intended for technical specialists who carry out the installation and administration of Kaspersky Security and provide support for organizations that use Kaspersky Security.
This Guide is intended to:
Explain how to install and use Kaspersky Security.
Provide readily available information on issues related to the operation of Kaspersky Security.
Describe additional sources of information about the application and ways of receiving technical support.
IN THIS SECTION
In this document ... 8
Document conventions ... 11
I
N THIS DOCUMENT
This document includes the following sections:
Sources of information about the application (see page 12)
This section describes sources of information about the application and lists websites that you can use to discuss the application's operation.
Kaspersky Security 8.0 for Linux Mail Server (on page 14)
This section contains information on the purpose, key features, and composition of the application. It shows the function of each part of the package supplied and a range of services available to registered users of the application. This section contains hardware and software requirements which the computer must meet for the installation of Kaspersky Security.
Application architecture (see page 17)
This section describes Kaspersky Security and the logic of their interaction.
Installing and removing the application (see page 19)
This section contains step-by-step instructions for application installation and removal.
Manual integration of Kaspersky Security with mail servers and Amavis interface (see page 48)
This section contains information about how to manually integrate Kaspersky Security for Linux Mail Server with Exim, Postfix, Sendmail, qmail, and Amavis.
AB O U T T H I S GU I D E
9
Application licensing (see page 69)
This section provides information about general terms related to the application activation. Read this section to learn more about the purpose of the License Agreement, ways of activating the application, and license renewal.
Starting and stopping the application (see page 73)
This section describes how you can start and stop the application.
Mail server protection status (see page 74)
This section contains information about how to check the level of protection of the mail server and related problems.
Basic operating principles (see page 75)
This section contains a description of the basic concepts and principles of using the application, and information about how to configure it.
Anti-Spam email protection (see page 84)
This section contains information about Anti-Spam protection of messages and how to configure it.
Anti-Virus email protection (see page 92)
This section contains information about Anti-Virus protection of messages and how to configure it.
Anti-Phishing email protection (see page 101)
This section contains information about Anti-Phishing protection of messages and how to configure it.
Content filtering of email (see page 105)
This section contains information about content filtering of messages and how to configure it.
Kaspersky Security updates (see page 110)
This section contains information on how to update application databases.
Kaspersky Security advanced settings (see page 118)
This section contains information on how to configure additional settings for the application.
Integration with an external user service via LDAP (see page 121)
This section contains information about how to integrate Kaspersky Security with an external user service using the LDAP protocol.
Managing the application via SNMP (see page 127)
This section contains information about how to use Kaspersky Linux Mail Security via the SNMP protocol and configure runtime trap events.
Managing company employee accounts (see page 130)
AD M I N I S T R A T O R'S GU I D E
10
Backup (see page 133)
This section contains information about Backup and how to use it.
Email notifications (see page 137)
This section contains information about mail notifications and how to configure them.
Runtime reports and statistics (see page 144)
This section contains information about reports and statistics on the operation of the application.
Event log (see page 148)
This section contains information about the Event log and how to configure it.
Trace log (see page 151)
This section contains information about the Trace log and how to configure it.
Application testing (see page 155)
This section provides information about how to ensure that the application detects viruses and their modifications and performs the correct actions on them.
Administering the application through Kaspersky Security Center (see page 158)
This section describes how you can manage Kaspersky Security 8.0 for Linux Mail Server through Kaspersky Security Center.
Contacting Technical Support (see page 162)
This section provides information about how to obtain technical support and the requirements for receiving help from Technical Support.
Annexes (see page 165)
This section provides information that complements the document text.
Kaspersky Lab ZAO (see page 168)
This section provides information about Kaspersky Lab ZAO.
Information on third-party code (see page 169)
This section provides information about the third-party code used in the application.
Trademark notices
This section lists trademarks of third-party manufacturers that were used in the document.
Index
AB O U T T H I S GU I D E
11
D
OCUMENT CONVENTIONS
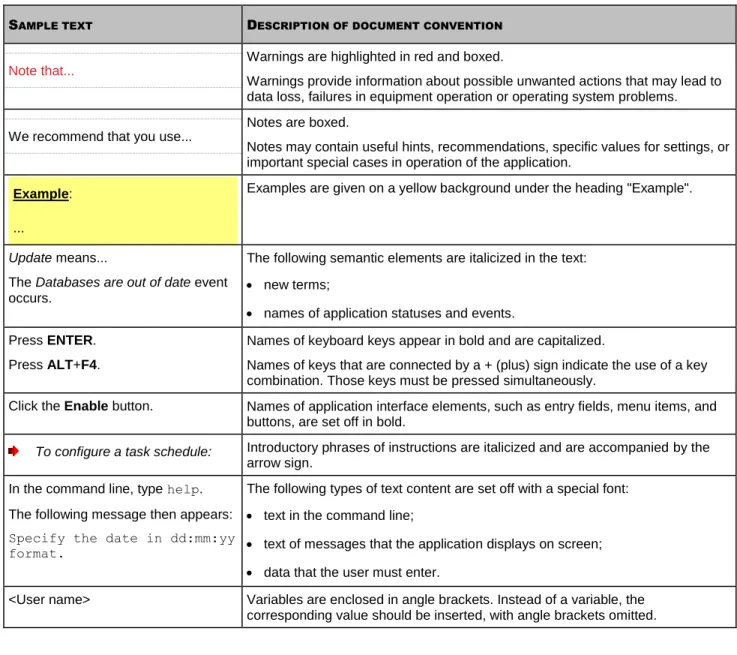
The document text is accompanied by semantic elements to which we recommend paying particular attention: warnings, hints, and examples.
Document conventions are used to highlight semantic elements. Document conventions and examples of their use are shown in the table below.
Table 1. Document conventions
SAMPLE TEXT DESCRIPTION OF DOCUMENT CONVENTION
Note that...
Warnings are highlighted in red and boxed.
Warnings provide information about possible unwanted actions that may lead to data loss, failures in equipment operation or operating system problems. We recommend that you use...
Notes are boxed.
Notes may contain useful hints, recommendations, specific values for settings, or important special cases in operation of the application.
Example: ...
Examples are given on a yellow background under the heading "Example".
Update means...
The Databases are out of date event occurs.
The following semantic elements are italicized in the text:
new terms;
names of application statuses and events. Press ENTER.
Press ALT+F4.
Names of keyboard keys appear in bold and are capitalized.
Names of keys that are connected by a + (plus) sign indicate the use of a key combination. Those keys must be pressed simultaneously.
Click the Enable button. Names of application interface elements, such as entry fields, menu items, and buttons, are set off in bold.
To configure a task schedule: Introductory phrases of instructions are italicized and are accompanied by the
arrow sign. In the command line, type help.
The following message then appears:
Specify the date in dd:mm:yy format.
The following types of text content are set off with a special font:
text in the command line;
text of messages that the application displays on screen;
data that the user must enter.
<User name> Variables are enclosed in angle brackets. Instead of a variable, the corresponding value should be inserted, with angle brackets omitted.
12
SOURCES OF INFORMATION ABOUT THE
APPLICATION
This section describes sources of information about the application and lists websites that you can use to discuss the application's operation.
You can select the most suitable information source, depending on the issue's level of importance and urgency.
IN THIS SECTION
Sources of information for independent research ... 12
Discussing Kaspersky Lab applications on the forum ... 13
Contacting the Sales Department ... 13
Contacting the Localization and Technical Documentation Unit ... 13
S
OURCES OF INFORMATION FOR INDEPENDENT RESEARCH
You can use the following sources to find information about the application:
application page on the Kaspersky Lab website;
application page on the Technical Support website (Knowledge Base);
online help;
documentation.
If you cannot find a solution for your issue, we recommend that you contact Kaspersky Lab Technical Support (see the section "Technical support by phone" on page 162).
To use information sources on the Kaspersky Lab website, an Internet connection should be established.
Application page on the Kaspersky Lab website
The Kaspersky Lab website features an individual page for each application.
On the page (http://www.kaspersky.com/linux-mail-security), you can view general information about the application, its functions and features.
The http://www.kaspersky.com web page contains a link to a section describing the product and how to obtain a license or extend an existing one.
The application's Knowledge Base page at the Technical Support Service website
Knowledge Base is a section on the Technical Support website that provides advice on using Kaspersky Lab applications. The Knowledge Base comprises reference articles grouped by topics.
On the page of the application in the Knowledge Base (http://support.kaspersky.com/klms8), you can read articles that provide useful information, recommendations, and answers to frequently asked questions on how to purchase, install, and use the application.
SO U R C E S O F I N F O R M A T I O N A B O U T T H E A P P L I C A T I O N
13
Articles may provide answers to questions that are out of scope of Kaspersky Linux Mail Security, being related to other Kaspersky Lab applications. They also may contain news from the Technical Support Service.
Web interface help
Help provides information on managing protection, configuring the application, and performing common user tasks using the web-interface of Kaspersky Security 8.0 for Linux Mail Server (hereinafter the "web interface").
Documentation
The distribution kit includes documents that help you to install and activate the application on the computers of a local area network, configure its settings, and find information about the basic techniques for using the application.
To connect Kaspersky Security manual pages under the Linux operating system,
add the following string to the /etc/manpath.config configuration file:
MANPATH /opt/kaspersky/klms/share/man
To connect Kaspersky Security manual pages under the FreeBSD™ operating system,
add the following string to the /etc/manpath.config (or man.conf) configuration file:
MANDATORY_MANPATH /usr/local/man
D
ISCUSSING
K
ASPERSKY
L
AB APPLICATIONS ON THE
FORUM
If your question does not require an immediate answer, you can discuss it with the Kaspersky Lab experts and other users in our forum (http://forum.kaspersky.com).
In this forum you can view existing topics, leave your comments, create new topics.
C
ONTACTING THE
S
ALES
D
EPARTMENT
If you have any questions on how to select, purchase, or renew the application, you can contact our Sales Department specialists in one of the following ways:
By calling our central office in Moscow by phone (http://www.kaspersky.com/about/contactinfo).
By emailing your question to [email protected]. The service is provided in Russian and English.
C
ONTACTING THE
L
OCALIZATION AND
T
ECHNICAL
D
OCUMENTATION
U
NIT
To contact the Technical Writing and Localization Unit, send an email to [email protected]. Please use "Kaspersky Help Feedback: Kaspersky Security 8.0 for Linux Mail Server” as the subject of your message.
14
KASPERSKY SECURITY 8.0 FOR LINUX
MAIL SERVER
Kaspersky Security 8.0 for Linux Mail Server Maintenance Pack 1 protects incoming and outgoing email messages (or "messages") against malware, spam and phishing, and provides content filtering. Kaspersky Security runs under Linux and FreeBSD operating systems, and can be used on high-load mail servers.
The Application allows:
Anti-Spam and Anti-Phishing scanning of incoming and outgoing mail.
Detecting objects that are infected, probably infected, password-protected, or inaccessible for scanning.
Neutralizing the threats revealed in files and mail messages; disinfecting objects.
Saving Backup copies of messages before Anti-Virus scanning and filtering in Backup; saving messages from Backup to a file on the hard drive and delivering messages from Backup to recipients.
Processing mail in accordance with the rules defined for existing groups of senders and recipients.
Performing content filtering of messages by size, name, and type of attachments.
Notifying the sender, recipients, and administrator of detected messages containing objects that are infected, probably infected, password-protected, or inaccessible for scanning.
Updating the application databases (Anti-Virus, Anti-Spam, and Anti-Phishing databases) from the update servers of Kaspersky Lab according to schedule or on demand.
Generating application runtime statistics and reports.
Getting application runtime info and statistics via SNMP as well as enabling / disabling event traps.
Scanning mail server file systems for threats on demand.
Configuring the settings and managing the application using the standard tools of the operating system from the command line or using a web-based interface.
All commands and paths in the document are specified for the Linux operating system. Information about application file locations on computers with the FreeBSD operating system is available in the "Application file locations on a computer
running FreeBSD section (see page 166)".
If you copy any code strings from the Guide to the mail server configuration file, be sure to delete the backslashes (\) and their trailing LFs.
IN THIS SECTION
Hardware and software requirements ... 15
KA S P E R S K Y SE C U R I T Y 8 . 0 F O R LI N U X MA I L SE R V E R
15
H
ARDWARE AND SOFTWARE REQUIREMENTS
To ensure the functioning of Kaspersky Security, your computer should meet the following requirements:
Minimum hardware requirements:
Intel® Xeon® 3040 or Intel Core™ 2 Duo 1.86 GHz or faster processor;
2 GB RAM;
at least 4 GB available for swap;
4 GB available on the hard drive to install application and store temporary and log files.
Software requirements:
One of the following 32-bit operating systems:
Red Hat Enterprise Linux® 6.4 Server.
SUSE Linux Enterprise Server 11 SP3.
CentOS-6.4.
Ubuntu Server 10.04.4 LTS.
Ubuntu Server 12.04 LTS.
Debian GNU / Linux 6.0.5.
Debian GNU / Linux 7.1.
FreeBSD 8.4.
FreeBSD 9.1.
Canaima 3.0.
Asianux Server 4 SP1.
One of the following 64-bit operating systems:
Red Hat Enterprise Linux 6.4 Server.
SUSE Linux Enterprise Server 11 SP3.
CentOS-6.4.
Novell® Open Enterprise Server 11.
Ubuntu Server 10.04.4 LTS.
Ubuntu Server 12.04 LTS.
Debian GNU / Linux 6.0.5.
Debian GNU / Linux 7.1.
AD M I N I S T R A T O R'S GU I D E
16
FreeBSD 9.1.
Canaima 3.0.
Asianux Server 4 SP1.
Availability of the following packages of 32-bit libraries on 64-bit operating systems:
ia32-libs for Debian and Ubuntu;
libgcc.i686, glibc.i686 for RHEL and CentOS;
libgcc-32bit, glibc-32bit for SUSE.
Kaspersky Security requires the Perl 5 programming language of version 5.8.5 or later. Kaspersky Security supports integration with the following mail servers:
exim-4.71 or later;
postfix-2.5 or later;
qmail-1.03;
sendmail-8.14 or later.
To run the Kaspersky Security web interface, one of the following browsers must be installed on the computer:
Mozilla™ Firefox™ 24.
Internet Explorer® 10.
Google Chrome™ 30.
To enable the operation of the Kaspersky Security web interface, an Apache web server must be installed on the computer hosting the web interface.
D
ISTRIBUTION KIT
You can purchase the application through Kaspersky Lab's online stores (for example, http://www.kaspersky.com, in the
Online Shop section) or partner companies.
The content of the distribution kit may differ depending on the region, in which the application is distributed.
If Kaspersky Security is purchased through an online store, the application is copied from the store's website. Information required to activate the application is sent to you by email after payment.
For more details on ways of purchasing and the distribution kit, contact the Sales Department by the
17
APPLICATION ARCHITECTURE
This section describes Kaspersky Security and the logic of their interaction.
IN THIS SECTION
Main components ... 17
Operation algorithm ... 18
M
AIN COMPONENTS
Kaspersky Security includes the following components:
Filter – receives and forwards mail messages to/from the application's mail server. Kaspersky Security includes
several filters used in accordance with the mail server and the type of integration with Kaspersky Security:
Milter.
Smtp-proxy.
Dlfunc.
Qmail-queue binary.
Klms-watchdog – the main component for processing mail messages. It consists of the following modules:
Scan Logic is a module that controls message scanning (hereinafter also "Scan Logic module"). It includes a MIME parser and content filter.
AV-engine – scans messages for viruses (hereinafter "the Anti-Virus engine").
AS-engine – scans messages for spam (hereinafter "the Anti-Spam engine").
AP-engine – scans messages for phishing threats (hereinafter "the Anti-Phishing engine").
Updater – updates Anti-Virus, Anti-Spam, and Anti-Phishing databases.
Backup – allows messages to be restored to their original form with no changes.
Auth – interfaces with user registration systems.
Statistics – collects statistical information.
Settings-manager – stores task and rule settings for processing messages in the database; exports and imports these settings and notifies other modules of any changes.
Facade – allows the application to interface with utilities and administration systems.
Licenser – manages keys.
Notifier – generates messages with notifications of importance to the administrator.
AD M I N I S T R A T O R'S GU I D E
18
Smtp_sender – sends notifications.
Task manager – controls the start/stop sequence of other modules.
Klms-postgres – a database storing application settings, statistics for reports, and metadata of objects in Backup. Metadata of objects in backup may be stored in a database that is stored externally (outside the application).
Klms-control– a utility used to set application settings (task settings and message processing rules (see section "About message processing rules" on page 76)), view runtime statistics, manage Backup, and run tasks.
O
PERATION ALGORITHM
The application runs according to the following algorithm:
1. The filter receives a message from the mail server and forwards it to the Scan Logic module.
2. The Scan Logic message scanning control module determines the rule by which the application will process the email message (see section "About message processing rules" on page 76).
3. The application scans the message in accordance with the settings for the rule. If all scans are set to run in accordance with the rule settings, the application performs them in the following order:
a. Anti-Spam scan;
b. Anti-Virus scan (see section "About Anti-Virus email protection" on page 92); c. Anti-Phishing scan (see section "About Anti-Phishing email protection" on page 101); d. content filtering (see section "About content filtering of messages" on page 105).
4. Based on the results of message scanning, Scan Logic adds a status tag at the beginning of the message subject (Subject field) and adds an information X-header (see section "About information X-headers" on page 83) to the message header.
5. After completing all scans, depending on the message status (see section "About scan and content filtering statuses" on page 75) the application takes the action (see section "About actions on objects" on page 80) configured in the message processing rule settings on the message. Infected objects are treated by default, and cured if possible.
6. After scanning and processing, Scan Logic forwards the message to the filter.
7. The filter forwards the processed message with notifications on the scan and disinfection results to the mail server.
19
INSTALLING AND REMOVING THE
APPLICATION
This section contains step-by-step instructions for application installation and removal.
IN THIS SECTION
Preparing to install ... 19
Upgrading from a previous version of the application ... 20
Installing the application ... 24
Preparing Kaspersky Security for operation ... 26
Preparing Kaspersky Security web interface for operation ... 39
Configuring administration of the application through Kaspersky Security Center ... 44
Removing Kaspersky Security ... 46
Actions after removing Kaspersky Security ... 47
P
REPARING TO INSTALL
Before you install Kaspersky Security:
make sure that your computer meets hardware and software requirements (see section "Hardware and software requirements" on page 15);
download the Kaspersky Security installation package in .tgz, .deb, or .rpm format from the website of the online store to your computer (see section "Distribution kit" on page 16);
install the glibc package (64-bit operating systems require the 32-bit version of glibc).
Before installing Kaspersky Security on a computer running the Debian or Ubuntu operating system, you need to execute
the following command: # locale-gen en_US.UTF-8.
The installation package for the Kaspersky Security web interface is required only if you want to manage the application through the browser.
Before you install the Kaspersky Security web interface:
make sure that your computer meets the hardware and software requirements;
download the installation package for the Kaspersky Security web interface in .deb or .rpm format from the Online Shop (the installation package for the web interface is required only if you want to manage the application through the browser);
AD M I N I S T R A T O R'S GU I D E
20
install the following Apache modules: mod_ssl, mod_include, mod_dir, mod_expires (if not already installed) and enable them using the command: # a2enmod (if not already enabled):
# a2enmod ssl # a2enmod include # a2enmod dir # a2enmod expires
For the localization packages to work correctly, the system has to support the corresponding languages.
For example, if you need to install the Russian localization package klms-l10n-ru_<version_number>_i386.deb
under Debian GNU/Linux 6.0, make sure that the system supports the Russian language before installing it.
To do so, execute the following command that shows the list of languages supported by the system: # locale -a
If Russian is not on this list, you have to install it.
Execute the following command: # dpkg-reconfigure locales
Only then can you install the klms-l10n-ru_<version_number>_i386.deb package. Follow the same steps for the Chinese language or any other localization.
U
PGRADING FROM A PREVIOUS VERSION OF THE
APPLICATION
The process of upgrading Kaspersky Security 8.0 for Linux Mail Server Critical Fix 1 to Kaspersky Security 8.0 for Linux Mail Server Maintenance Pack 1 includes several stages:
1. Installing the Kaspersky Security 8.0 for Linux Mail Server Maintenance Pack 1 package (see section "Installing Kaspersky Security on top of the previous version" on page 21) on top the Kaspersky Security 8.0 for Linux Mail Server Critical Fix 1 package.
2. Updating Kaspersky Security settings (see page 22) using the application settings update script.
3. Installing the Kaspersky Security 8.0 for Linux Mail Server Maintenance Pack 1 web interface package (see section "Installing the Kaspersky Security web interface on top of the previous version" on page 22) on top of the Kaspersky Security 8.0 for Linux Mail Server Critical Fix 1 web interface package.
Steps 1 and 3 can be performed simultaneously if Kaspersky Security and the application web interface are installed on the same mail server.
4. Updating Kaspersky Security web interface settings (see page 23) using the application web interface settings update script.
5. Installing Kaspersky Security language packages (see section "Preparing to install" on page 19) over the language packages of the previous application version.
After Kaspersky Security is upgraded, the threat detection statistics, reports, and objects in Backup and Anti-Spam Quarantine are preserved.
IN S T A L L I N G A N D R E M O V I N G T H E A P P L I C A T I O N
21
If Kaspersky Security localization packages were installed for the previous version of the application, it is required to delete localization packages prior to upgrading by executing the following command:
# rpm -e klms_<localization>
IN THIS SECTION
Installing Kaspersky Security on top of the previous version ... 21
Updating Kaspersky Security settings ... 22
Installing the Kaspersky Security web interface on top of the previous version ... 22
Updating Kaspersky Security web interface settings ... 23
I
NSTALLING
K
ASPERSKY
S
ECURITY ON TOP OF THE PREVIOUS
VERSION
This section describes the procedure for installing the Kaspersky Security 8.0 for Linux Mail Server Maintenance Pack 1 package on top of the Kaspersky Security 8.0 for Linux Mail Server Critical Fix 1 package on computers running under Linux and FreeBSD operating systems.
Installing Kaspersky Security 8.0 for Linux Mail Server Maintenance Pack 1 on a computer running under the Linux operating system
To install Kaspersky Security 8.0 for Linux Mail Server Maintenance Pack 1 from an RPM package, execute the following command:
# rpm -U klms-<version number>.i386.rpm
To install Kaspersky Security 8.0 for Linux Mail Server Maintenance Pack 1 from a DEB package on a 32-bit operating system, execute the following command:
# dpkg -i klms_<version_number>_i386.deb
To install Kaspersky Security 8.0 for Linux Mail Server Maintenance Pack 1 from a DEB package on a 64-bit operating system, execute the following command:
# dpkg --force-architecture -i klms_<version_number>_i386.deb
After running the command, the application is installed automatically.
Installing Kaspersky Security 8.0 for Linux Mail Server Maintenance Pack 1 on a computer running under the FreeBSD operating system
Prior to installing Kaspersky Security 8.0 for Linux Mail Server Maintenance Pack 1 on a computer running under the FreeBSD operating system, remove the previous version of Kaspersky Security 8.0 for Linux Mail Server Critical Fix 1.
To remove the previous version of Kaspersky Security 8.0 for Linux Mail Server Critical Fix 1, execute the following command:
# pkg_delete klms_<version_number>
Do not run the klms-cleanup script after removing the previous version of Kaspersky Security 8.0 for Linux Mail Server Critical Fix 1, as doing so will erase information about the configured application settings.
AD M I N I S T R A T O R'S GU I D E
22
To install Kaspersky Security 8.0 for Linux Mail Server Maintenance Pack 1, execute the following command: # pkg_add klms_<version_number>.tgz
After running the command, the application is installed automatically.
After installing Kaspersky Security 8.0 for Linux Mail Server Maintenance Pack 1, run the Kaspersky Security settings update script (see section "Updating Kaspersky Security settings" on page 22).
U
PDATING
K
ASPERSKY
S
ECURITY SETTINGS
After installing Kaspersky Security 8.0 for Linux Mail Server Maintenance Pack 1, run the Kaspersky Security settings update script. The Kaspersky Security settings update script is included in the Kaspersky Security installation package. The configured application settings and mail server integration settings are preserved on computers running under the Linux operating system after Kaspersky Security 8.0 for Linux Mail Server Critical Fix 1 is upgraded to Kaspersky Security 8.0 for Linux Mail Server Maintenance Pack 1. You have to update the Kaspersky Security settings in order to apply the values of settings that have been added or modified in Kaspersky Security 8.0 for Linux Mail Server
Maintenance Pack 1.
The application has to be integrated with the mail server again manually or automatically on computers running under the FreeBSD operating system after Kaspersky Security 8.0 for Linux Mail Server Critical Fix 1 is upgraded to Kaspersky Security 8.0 for Linux Mail Server Maintenance Pack 1.
To run the Kaspersky Security settings update script, execute the following command: under Linux:
# /opt/kaspersky/klms/bin/klms-upgrade.pl under FreeBSD:
# /usr/local/bin/klms-upgrade.pl
The script will prompt you to specify the values of Kaspersky Security settings one step at a time.
When upgrading Kaspersky Security 8.0 for Linux Mail Server Critical Fix 1 to Kaspersky Security 8.0 for Linux Mail Server Maintenance Pack 1, automatic update of application settings via the auto-reply file is not possible.
I
NSTALLING THE
K
ASPERSKY
S
ECURITY WEB INTERFACE ON TOP OF
THE PREVIOUS VERSION
This section describes the procedure for installing the Kaspersky Security 8.0 for Linux Mail Server Maintenance Pack 1 web interface package on top of the Kaspersky Security 8.0 for Linux Mail Server Critical Fix 1 web interface package on computers running under Linux and FreeBSD operating systems.
Installing the Kaspersky Security 8.0 for Linux Mail Server Maintenance Pack 1 web interface on a computer running under the Linux operating system
To install the Kaspersky Security web interface from an RPM package on a 32-bit operating system, execute the following command:
IN S T A L L I N G A N D R E M O V I N G T H E A P P L I C A T I O N
23
To install the Kaspersky Security web interface from an RPM package on a 64-bit operating system, execute the following command:
# rpm -U klmsui-<version_number>.x86_64.rpm
To install the Kaspersky Security web interface from a DEB package on a 32-bit operating system, execute the following command:
# dpkg -i klmsui_<version_number>_i386.deb
To install the Kaspersky Security web interface from a DEB package on a 64-bit operating system, execute the following command:
# dpkg -i klmsui_<version_number>_amd64.deb
After the command is executed, the application web interface is installed automatically.
Installing the Kaspersky Security 8.0 for Linux Mail Server Maintenance Pack 1 web interface on a computer running under the FreeBSD operating system
Prior to installing the Kaspersky Security 8.0 for Linux Mail Server Maintenance Pack 1 web interface on a computer running under the FreeBSD operating system, remove the Kaspersky Security 8.0 for Linux Mail Server Critical Fix 1 web interface.
To remove the Kaspersky Security 8.0 for Linux Mail Server Critical Fix 1 web interface, execute the following command:
# pkg_delete klmsui-<version_number>
To install the Kaspersky Security 8.0 for Linux Mail Server Maintenance Pack 1 web interface, execute the following command:
# pkg_add klmsui-<version_number>.tgz
After the command is executed, the application web interface is installed automatically.
After installing the Kaspersky Security 8.0 for Linux Mail Server Maintenance Pack 1 web interface, run the Kaspersky Security web interface settings update script (see section "Updating Kaspersky Security web interface settings" on page 23).
U
PDATING
K
ASPERSKY
S
ECURITY WEB INTERFACE SETTINGS
After installing the Kaspersky Security 8.0 for Linux Mail Server Maintenance Pack 1 web interface, run the Kaspersky Security web interface settings update script. The Kaspersky Security web interface settings update script is included in the Kaspersky Security web interface installation package.
To run the Kaspersky Security web interface settings update script, execute the following command: under Linux:
# /opt/kaspersky/klmsui/bin/klmsui-upgrade.pl under FreeBSD:
# /usr/local/bin/klmsui-upgrade.pl
When updating web interface of Kaspersky Security 8.0 for Linux Mail Server Critical Fix 1 to Kaspersky Security 8.0 for Linux Mail Server Maintenance Pack 1, automatic update of application settings via the auto-reply file is not possible.
AD M I N I S T R A T O R'S GU I D E
24
I
NSTALLING THE APPLICATION
The installation includes several steps:
1. Installing the Kaspersky Security package (see section "Step 1. Installing the Kaspersky Security package" on page 24).
You must have root privileges to initiate installation of the Kaspersky Security package.
2. Installing the Kaspersky Security web interface package (see section "Step 2. Installing the Kaspersky Security web interface package" on page 24).
Installation of this package is required only if you want to manage the application through the browser. 3. Installing localization packages. Installation packages must be installed prior to running initial application
configuration scripts of Kaspersky Security. Only in this case will you be able to read the License Agreement and the Kaspersky Security Network Statement in the right language.
IN THIS SECTION
Step 1. Installing the Kaspersky Security package ... 24
Step 2. Installing the Kaspersky Security web interface package ... 24
S
TEP
1.
I
NSTALLING THE
K
ASPERSKY
S
ECURITY PACKAGE
Kaspersky Security is distributed in packages in .tgz, .deb, and .rpm format.
To install Kaspersky Security from an .rpm package, execute the following command: # rpm -i klms-<version_number>.i386.rpm
To install Kaspersky Security from a .deb package on a 32-bit operating system, execute the following command: # dpkg -i klms_<version_number>_i386.deb
To install Kaspersky Security from a .deb package on a 64-bit operating system, execute the following command: # dpkg --force-architecture -i klms_<version_number>_i386.deb
After running the command, the application is installed automatically.
After Kaspersky Security has been installed, run the Kaspersky Security initial configuration script (see section "Preparing Kaspersky Security for operation" on page 26).
S
TEP
2.
I
NSTALLING THE
K
ASPERSKY
S
ECURITY WEB INTERFACE
PACKAGE
The Kaspersky Security web interface can be installed from a .deb or .rpm package.
To install the web interface from a .deb package on a 32-bit operating system, execute the following command: # rpm -i klmsui-<version_number>.i386.rpm
IN S T A L L I N G A N D R E M O V I N G T H E A P P L I C A T I O N
25
To install the web interface from a .deb package on a 64-bit operating system, execute the following command: # rpm -i klmsui-<version_number>.x86_64.rpm
To install the web interface from a .deb package on a 32-bit operating system, execute the following command: # dpkg -i klmsui_<version_number>_i386.deb
To install the web interface from a .deb package on a 64-bit operating system, execute the following command: # dpkg -i klmsui_<version_number>_amd64.deb
To install the web interface on a computer running under the FreeBSD operating system, execute the following command:
# pkg_add klmsui-<version_number>.tgz
After the Kaspersky Security web interface has been installed, run the Kaspersky Security web interface initial configuration script (see section "Preparing Kaspersky Security web interface for operation" on page 39).
I
NSTALLING THE WEB INTERFACE PACKAGE ON A DIFFERENT COMPUTER
This section describes the case when the web server and the mail server are installed on different computers. The Kaspersky Security web interface can be installed from a .deb or .rpm package.
To install the web interface from a .deb package on a 32-bit operating system, execute the following command: # rpm -i klmsui-<version_number>.i386.rpm
To install the web interface from a .deb package on a 64-bit operating system, execute the following command: # rpm -i klmsui-<version_number>.x86_64.rpm
To install the web interface from a .deb package on a 32-bit operating system, execute the following command: # dpkg -i klmsui_<version_number>_i386.deb
To install the web interface from a .deb package on a 64-bit operating system, execute the following command: # dpkg -i klmsui_<version_number>_amd64.deb
To install the web interface on a computer running under the FreeBSD operating system, execute the following command:
# pkg_add klmsui-<version_number>.tgz
To configure the Facade module that enables the application to interact with utilities and administration systems:
1. Export the Facade task settings to an XML file using the command:
# /opt/kaspersky/klms/bin/klms-control \
--get-settings <Facade task ID> -f <settings file name> or
# /opt/kaspersky/klms/bin/klms-control \
--get-settings Facade -n -f <name of the settings file>
AD M I N I S T R A T O R'S GU I D E
26
3. In the <port> </port> section, specify the port for interaction with the web interface.
4. In the <interfaceAddress> </interfaceAddress> section, specify the IP address of the computer where the web interface is installed.
5. Save the changes made.
6. Import the Facade task settings from an XML file using the command:
# /opt/kaspersky/klms/bin/klms-control \
--set-settings <Facade task ID> -f <name of the settings file>
or
# /opt/kaspersky/klms/bin/klms-control \
--get-settings Facade -n -f <name of the settings file> To configure the connection to the Apache web server:
1. Open the /etc/apache2/conf.d/klmsui.conf file with web interface settings. 2. Specify the IP address of the mail server and the port of the Facade module in the line
FastCgiExternalServer /opt/kaspersky/klmsui/share/htdocs/cgi-bin/klwi -host 127.0.0.1:2711.
After the Kaspersky Security web interface has been installed, run the Kaspersky Security web interface initial configuration script (see section "Preparing Kaspersky Security web interface for operation" on page 39).
P
REPARING
K
ASPERSKY
S
ECURITY FOR OPERATION
After the installation, Kaspersky Security needs to be configured.
Kaspersky Security initial configuration consists of a series of steps in the form of a script for the user's convenience. The initial configuration script should be started after Kaspersky Security has been installed. The initial configuration script for Kaspersky Security is included in the installation package.
To run the Kaspersky Security initial configuration script, execute the following command: under Linux:
# /opt/kaspersky/klms/bin/klms-setup.pl under FreeBSD:
IN S T A L L I N G A N D R E M O V I N G T H E A P P L I C A T I O N
27
IN THIS SECTION
Step 1. Selecting the language for viewing the License Agreement and the Kaspersky Security Network Statement .... 27
Step 2. Reviewing the License Agreement... 27
Step 3. Participating in Kaspersky Security Network ... 28
Step 4. Selecting the backup directory ... 29
Step 5. Backup connection settings ... 29
Step 6. Selecting the socket ... 29
Step 7. Managing Kaspersky Security via the web interface ... 30
Step 8. Selecting the TCP port for interaction with the Apache module ... 30
Step 9. Assigning a password to access the web interface ... 30
Step 10. Selecting the type of integration with the mail server ... 31
Step 11. Configuring the proxy server settings ... 34
Step 12. Adding a key ... 35
Step 13. Updating databases ... 35
Starting automatic initial configuration of Kaspersky Security ... 35
S
TEP
1.
S
ELECTING THE LANGUAGE FOR VIEWING THE
L
ICENSE
A
GREEMENT AND THE
K
ASPERSKY
S
ECURITY
N
ETWORK
S
TATEMENT
At this step you can select the language in which the text of the License Agreement and the Kaspersky Security Network Statement will be displayed.
Language selection is available if additional localization packages are installed in the system. If no additional localization packages have been installed, the text of the License Agreement and the Kaspersky Security Network Statement are displayed in the English language.
S
TEP
2.
R
EVIEWING THE
L
ICENSE
A
GREEMENT
At this step, you have to accept or decline the terms of the License Agreement.
To view the License Agreement:
1. Press ENTER.
The text of the License Agreement is displayed. To move through the text, use the cursor control keys or the B
and F keys (to move backward or forward one screen, respectively). To view help, press the H key. 2. Press the Q key to exit the viewing mode.
AD M I N I S T R A T O R'S GU I D E
28
3. Do one of the following:
To accept the License Agreement, enter yes (or y).
To reject the License Agreement, enter no (or n). 4. Press ENTER.
If you rejected the License Agreement, initial configuration is discontinued.
You can also view the text of the License Agreement by opening the relevant file. The file with the text of the End User License Agreement is located at the following path:
for the application installed on a computer running under Linux: /opt/kaspersky/klms/share/doc/LICENSE, for the web interface: /opt/kaspersky/klmsui/share/doc/LICENSE;
for the application installed on a computer running under FreeBSD: /usr/local/share/doc/klms/LICENSE, for the web interface: /opt/kaspersky/klmsui/share/doc/LICENSE.
S
TEP
3.
P
ARTICIPATING IN
K
ASPERSKY
S
ECURITY
N
ETWORK
At this step you need to accept or decline participation in Kaspersky Security Network (KSN).
Kaspersky Security Network (KSN) is an infrastructure of online services that provides access to the online Kaspersky Lab Knowledge Base, which contains information about the reputation of files, web resources, and software. Data from Kaspersky Security Network ensures faster response by Kaspersky Security to new threats, improves the performance of some protection components, and reduces the risk of false positives.
Thanks to users who participate in Kaspersky Security Network, Kaspersky Lab is able to promptly gather information about types and sources of new threats, develop solutions for neutralizing them, and minimize the number of false positives. Participation in Kaspersky Security Network also lets you access reputation statistics for applications and websites. When you participate in the Kaspersky Security Network, certain statistics collected while Kaspersky Linux Mail Security protects your computer are sent to Kaspersky Lab automatically.
No personal data is collected, processed, or stored.
Participation in Kaspersky Security Network is voluntary. You are prompted to decide during initial configuration of Kaspersky Security, but you can change your decision at any time later.
To check the connection to the KSN Participation Agreement:
1. Press ENTER.
The text of the agreement is displayed. To move through the text, use the cursor control keys or the B and F
keys (to move backward or forward one screen, respectively). To view help, press the H key. 2. Press the Q key to exit the viewing mode.
3. Do one of the following:
To accept the terms of the Kaspersky Security Network Statement, type yes (or y).
To reject the terms of the Kaspersky Security Network Statement, type no (or n). 4. Press ENTER.
IN S T A L L I N G A N D R E M O V I N G T H E A P P L I C A T I O N
29
You can also view the text of the Kaspersky Security Network Statement straight from the file. The file with the text of the Kaspersky Security Network Statement is located at the following path:
for the application installed on a computer running under Linux: /opt/kaspersky/klms/share/doc/LICENSE_ksn.
for the application installed on a computer running under FreeBSD: /usr/local/share/doc/klms/LICENSE_ksn.
S
TEP
4.
S
ELECTING THE BACKUP DIRECTORY
At this step, you can specify the directory where backup copies of mail messages processed by Kaspersky Security are to be stored, or select the default directory.
To specify the backup directory:
1. Specify the full path to the directory for storing the backup copies of mail messages. 2. Press ENTER.
To accept the default backup directory,
press ENTER.
The default path is/var/opt/kaspersky/klms/backup.
S
TEP
5.
B
ACKUP CONNECTION SETTINGS
At this step, you can specify the settings for connecting the application to Backup database or select the default connection settings.
You can use an external database as Backup. Kaspersky Security supports PostgreSQL databases of version 9.1 or later.
To specify Backup connection settings:
1. Specify Backup connection settings in the following format:
[dbname=<database name> user=<user name> host=<database socket>]
2. Press ENTER.
To select default Backup connection settings,
press ENTER.
The proposed default connection settings are as follows: [dbname=backup user=kluser host=/var/run/klms].
S
TEP
6.
S
ELECTING THE SOCKET
During this step, you need to specify the socket that Scan Logic uses to listen for incoming connections from the filter.
To specify the socket:
1. Specify the IP address and port number or the UNIX socket that Scan Logic will use to listen for incoming connections as follows: inet:<port>@<IP address>(for network sockets) or unix:<path to UNIX socket> (for UNIX sockets).
The default UNIX socket is: unix: /var/run/klms/klms_scanner_sock
AD M I N I S T R A T O R'S GU I D E
30
S
TEP
7.
M
ANAGING
K
ASPERSKY
S
ECURITY VIA THE WEB
INTERFACE
At this step, you can specify whether or not the web interface will be used for managing Kaspersky Security.
To specify that the web interface will be used,
type yes (or y) and press Enter. The web interface is disabled by default.
S
TEP
8.
S
ELECTING THE
TCP
PORT FOR INTERACTION WITH THE
A
PACHE MODULE
This step is displayed if you enabled the web interface for managing Kaspersky Security at the previous step.
At this step, you can specify the number of the TCP port to be used by Kaspersky Security for interaction with the web interface.
To specify the TCP port number,
enter the port number and press ENTER. The default option is 2711.
S
TEP
9.
A
SSIGNING A PASSWORD TO ACCESS THE WEB INTERFACE
At this step, you can specify the Administrator account password for access to the web-based interface of the application.
If you do not specify a password for access to the web interface at this step, you can do so later using the utility
/opt/kaspersky/klms/bin/klms-control --set-web-admin-password.
To enter a password for access to the web-interface, perform the following steps:
1. Enter yes.
The default option is no. 2. Press ENTER.
3. Specify the password for the Administrator account.
The password must contain at least eight characters and meet at least three of the following four requirements:
Contain at least one upper-case character.
Contain at least one lower-case character.
Contain at least one special character.
Contain at least one numeral. 4. Confirm the password.
IN S T A L L I N G A N D R E M O V I N G T H E A P P L I C A T I O N
31
S
TEP
10.
S
ELECTING THE TYPE OF INTEGRATION WITH THE MAIL
SERVER
At this step you need to run the setting scenario.
To run the setting scenario execute the following command: # /opt/kaspersky/klms/bin/klms-setup.pl
After that you need to select the type of integration of Kaspersky Security with the mail server: automatic or manual. Kaspersky Security can be integrated with the following mail servers:
Exim.
Postfix.
Sendmail
qmail.
To perform automatic integration of Kaspersky Security with the mail server:
1. Enter the number specified next to the name of the mail server. 2. Press ENTER.
3. Depending on which server you selected at step 1 of the instructions, perform the actions described in the sections that follow:
integration with Sendmail server (see page 32);
integration with Exim server (see page 33);
integration with Postfix server (see page 33);
integration with qmail server (see page 32).
If you choose not to integrate the application with the mail server at this step automatically, you can perform manual integration later (see section "Manual integration of Kaspersky Security with mail servers and Amavis interface" on page 48).
To decline automatic integration of Kaspersky Security with the mail server:
1. Enter the number specified next to the option Manual integration. 2. Press ENTER.
IN THIS SECTION
Integrating with qmail server ... 32
Integrating with Sendmail server ... 32
Integrating with Exim mail server ... 33
AD M I N I S T R A T O R'S GU I D E
32
I
NTEGRATING WITH QMAIL SERVER
The application performs integration with the qmail server automatically.
If the initial configuration script cannot find the path to the directory containing the qmail executable file during installation, perform the following instructions.
To specify the path to the directory containing the qmail executable file:
1. Specify the full path to the directory containing the qmail executable file. 2. Press ENTER.
If the initial configuration script cannot find the standard qmailq user account during installation, specify the user account with the rights to start the qmail service.
To specify the qmail user account:
1. Specify the user account with the rights to start the qmail service. 2. Press ENTER.
I
NTEGRATING WITH
S
ENDMAIL SERVER
To integrate Kaspersky Security with Sendmail:
1. Select the method for integration with the Sendmail server:
If you want changes to be made to the .mc file and then use that file to create the .cf file during integration, enter 1.
If you want changes to be made to the .cf configuration file during integration, enter 2. The default option is 1.
2. Press ENTER.
3. Specify the IP address and port number or the UNIX socket that the filter will use to listen for incoming connections as follows: inet:<port>@<IP address> (for network sockets) or unix:<path to UNIX socket> (for UNIX sockets).
The default UNIX socket is unix:/var/opt/kaspersky/klms/klms_milter. 4. Press ENTER.
5. Select the action that the Sendmail server must take on the message in case of filter error:
If you want Sendmail to accept the message without scanning, enter 2 to select the accept option.
If you want Sendmail to reject the message, enter 1 to select the reject option.
If you want Sendmail to notify the sender of the temporary inability to accept the message, enter 3 to select the tempfail option.
The default option is tempfail. 6. Press ENTER.