Document Management System (DMS) (version 1.0)
The Gato Document Management System (DMS) will allow you to easily upload, manage and share documents throughout your Gato website. Like the Gato content management system, the DMS is designed to be easy to use. It works very much like the rest of Gato, with document management taking place in Admin Central and display of documents taking place through Gato Edit and the Documents paragraph type.
Once a document is contained in the DMS, you can display it on various web pages throughout your website. When you update the document, your web pages will be
updated automatically. Using the Documents paragraph type you will be able to choose a folder in your DMS and display all, or selected files, contained therein.
Before you start adding documents to the DMS, we recommend that you plan your system carefully. Organizing the storage structure of your documents will allow you to display them in a variety of useful ways in your website.
Accessing and Managing Your Documents in the DMS
The DMS is accessed through your website’s Admin Central (Figure 1). Click on Documents to access your DMS (Figure 2)
Figure 1. Access the DMS via the Documents folder in Admin Central.
The DMS works very much like your website’s Admin Central. Folders can have sub-folders in an unlimited parent-child relationship (Figure 3). You can create new sub-folders by clicking the “new folder” icon at the bottom of the page. You can also “right-click” (control-click on a Mac) to create new folders. New folders should be given meaningful titles and URLs. Folders are not displayed on your Gato website but meaningful names will help you when you access your documents from Gato Edit.
Figure 3. DMS folder tree with files. Add A Document
To add individual documents to your DMS create or choose a folder and choose “New Document” from the bottom of the page, or right-click (control-click on a Mac). A new window will open (Figure 4).
Figure 4. File upload window.
In the “File” field choose “Browse”. Browse your local hard drive and select a file to upload.
Next, fill in the “Subject” field. This information will be displayed along with your document when the file is included in your Gato site.
The Description field is not yet in use by the DMS, but can be used for internal notes among those managing the DMS.
The document Meta Data tab allows you to add additional information about each document in the DMS. None of these fields are required but are helpful on large websites or sites with many editors.
To finish adding the document hit “Save” in the lower right hand corner of the new document window. The DMS will refresh and show your new document.
If you want to make changes to the document simply double-click it or select it and choose “Edit Document” from the bottom of the DMS page or by right-clicking your mouse.
Replace/Update an Existing Document
You can replace an existing document in the DMS with a new version at any time. Simply double-click the document or select it and choose “Edit Document” from the bottom of the DMS page, or by right-clicking your mouse.
In the editing window, click the green "Upload a New Version” button. Your current file will be removed as the editing window refreshes. Choose “browse” to access your local hard drive and select the new file you would like to use.
To finish updating the document hit “Save” in the lower right hand corner of the edit document window. The DMS will refresh and show your updated document.
Adding Multiple Documents
Using the DMS you can add multiple documents into your site. In the DMS choose a folder and right-click (control-click on a Mac) and choose “Upload Zipfile” (Figure 5). You must have your documents compressed together in a .zip format. After uploading, the DMS will unzip your files into the folder you have specified. If you have compressed folders and files their order will be retained by the system after they are unzipped.
Depending on the size of your files, it may take a few minutes for all the documents to be unzipped. The DMS window will refresh once it is finished.
File Size Restrictions
While Gato websites have no size restrictions, we recommend keeping individual files under 50MB. Files over this size often have time-out problems and do not
upload/download successfully. If you have files over 50MB you need to display on your Gato website please email gato@txstate.edu for assistance.
Activating Your Documents
Just like web pages in Gato, you must activate your documents to make them available on your website.
To activate a document select the document in the DMS and click the “Activate this Node” button at the bottom of the page or right-click (control-click on a Mac) and choose “Activate this Node”.
To activate multiple documents at once select the folder in the DMS you would like to activate, right-click (control-click on a Mac) and select “Activate incl. Sub Nodes”. Depending on the size of your files, it may take a few minutes for all the documents to be published. The DMS window will refresh once it is finished.
Deactivating/Deleting a Document
To remove a document from the DMS you can De-activate or Delete it.
Deactivating a document will remove it from your public site, but not remove it from your DMS. To deactivate a document or folder of documents select the document or folder in the DMS and click the “De-activate” button at the bottom of the page or right-click (control-right-click on a Mac) and choose “De-activate”.
Deleting a document will remove it from your public site and remove it from your DMS. To delete a document or folder of documents select the document or folder in the DMS and click the “Delete” button at the bottom of the page or right-click (control-click on a Mac) and choose “Delete”.
Accessing and Displaying Your Documents in Gato Edit
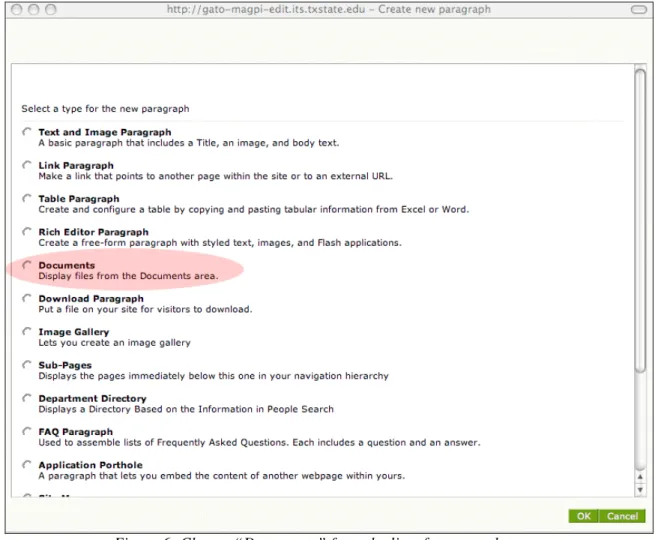
To add documents to your website navigate to the page in Gato Edit you wish to work on and choose “New Paragraph”. From the list of paragraph types choose “Documents” (Figure 6).
Figure 6: Choose “Documents” from the list of paragraph types.
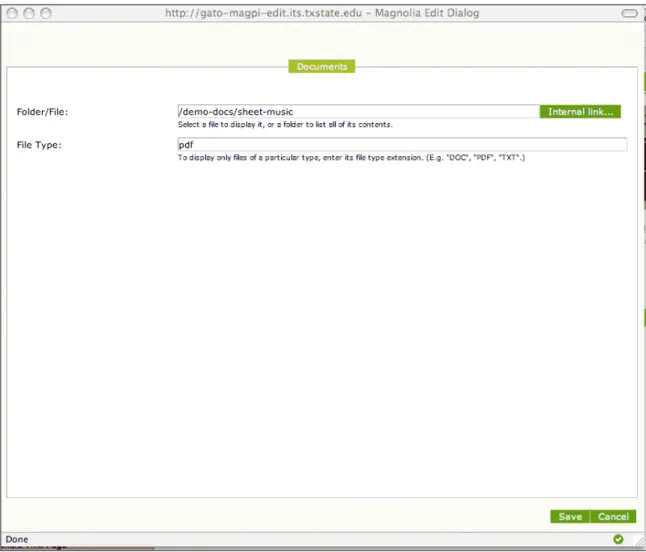
A new window will open. In the Folder/File field click on the green “Internal Link” button (figure 7). You will be presented with a mini-version of your DMS file browser (Figure 8).
Figure 7. Document paragraph type selection window.
Navigate through the DMS to select an individual document or a document folder. Once you have selected a document or folder click “OK”.
If you have chosen an individual document simply click “Save” on the documents window and your document will be displayed on your web page.
If you have chosen a folder you may also click “Save” on the documents window and all the documents contained in that folder and its subfolders will be displayed on your web page.
If you have chosen a folder you have the additional option of choosing to display only documents of a specific file type – doc, xls, ppt, txt, rtf, jpg, gif among others. (Figure 9).
Figure 9. The folder “sheet-music” has been selected but only pdf files will be displayed. Documents will display with their associated file icon, name, subject and date uploaded (Figure 10).
Figure 10. In this instance, all files from the folder “sheet music” are displayed. Activating Pages
After adding a new document paragraph you must activate the page in Admin Central before it will be displayed publicly.
Updating Pages After Activation
Pages which employ the Document paragraph type are automatically updated as your DMS and it’s associated files are updated. There is a delay of about 5 minutes between any changes in Admin Central/DMS Central and your public website.