Programming Assignment 2: Using Mininet and Mininet
Python API: Instructions
In this exercise, you will be learning how to build custom topologies using Mininet Python API and how certain parameters like bandwidth, delay, loss and queue size can be set individually for different links in the topology. You’ll also learn how to do performance testing of these custom topologies using ping and iperf.
After the overview, you will be asked to create and submit your own custom topology based on the most common 3-tier Datacenter architecture i.e., core, aggregation and edge. More details on creating and submitting the code will be provided later on in the instructions. So, make sure that you follow each step carefully.
Overview
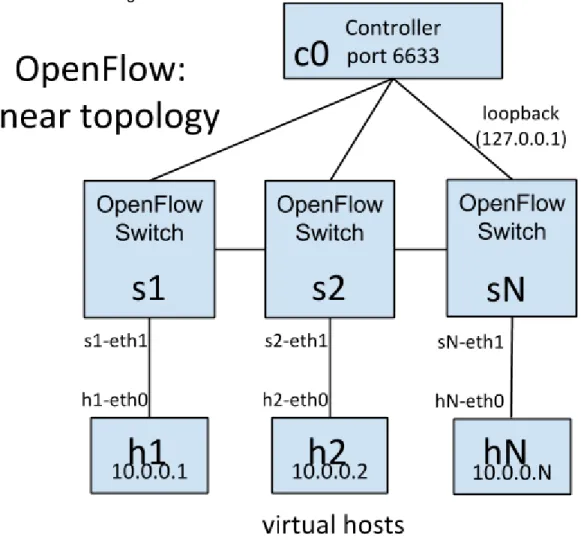
The network you'll use in this exercise includes hosts and switches connected in a linear topology, as shown in the figure below.
Figure 1: hosts and switches connected in a linear topology
Creating Topology
Mininet supports parametrized topologies. With a few lines of Python code, you can create a flexible topology which can be configured based on the parameters you pass into it, and reused for multiple experiments.
For example, here is a simple network topology (based on Figure 1) which consists of a specified number of hosts (h1 through hN) connected to their individual switches (s1 through sN):
Linear Topology (without Performance Settings)
#!/usr/bin/python
from mininet.topo import Topo from mininet.net import Mininet
from mininet.util import irange,dumpNodeConnections from mininet.log import setLogLevel
class LinearTopo(Topo):
"Linear topology of k switches, with one host per switch."
def __init__(self, k=2, **opts): """Init.
k: number of switches (and hosts) hconf: host configuration options lconf: link configuration options"""
super(LinearTopo, self).__init__(**opts) self.k = k
lastSwitch = None
for i in irange(1, k):
host = self.addHost('h%s' % i) switch = self.addSwitch('s%s' % i) self.addLink( host, switch)
if lastSwitch:
self.addLink( switch, lastSwitch) lastSwitch = switch
def simpleTest():
"Create and test a simple network"
topo = LinearTopo(k=4) net = Mininet(topo) net.start()
print "Dumping host connections"
dumpNodeConnections(net.hosts) print "Testing network connectivity"
net.pingAll() net.stop()
if __name__ == '__main__':
setLogLevel('info') simpleTest()
The important classes, methods, functions and variables in the above code include: Topo: the base class for Mininet topologies addSwitch(): adds a switch to a topology and
returns the switch name
addHost(): adds a host to a topology and returns the host name
addLink(): adds a bidirectional link to a topology (and returns a link key, but this is not important). Links in Mininet are bidirectional unless noted otherwise.
Mininet: main class to create and manage a network
start(): starts your network
pingAll(): tests connectivity by trying to have all nodes ping each other
stop(): stops your network
net.hosts: all the hosts in a network
dumpNodeConnections(): dumps connections to/from a set of nodes.
setLogLevel( 'info' | 'debug' | 'output' ): set Mininet's default output level; 'info' is recommended as it provides useful information.
Additional example code may be found in mininet/examples.
Setting Performance Parameters
In addition to basic behavioral networking, Mininet provides performance limiting and isolation features, through the CPULimitedHost and TCLink classes.
There are multiple ways that these classes may be used, but one simple way is to specify them as the default host and link classes/constructors to Mininet(), and then to specify the
appropriate parameters in the topology.
#!/usr/bin/python
from mininet.topo import Topo from mininet.net import Mininet
from mininet.node import CPULimitedHost from mininet.link import TCLink
from mininet.util import irange,dumpNodeConnections from mininet.log import setLogLevel
class LinearTopo(Topo):
"Linear topology of k switches, with one host per switch."
def __init__(self, k=2, **opts): """Init.
k: number of switches (and hosts) hconf: host configuration options lconf: link configuration options"""
super(LinearTopo, self).__init__(**opts)
self.k = k
lastSwitch = None
for i in irange(1, k):
host = self.addHost('h%s' % i, cpu=.5/k) switch = self.addSwitch('s%s' % i)
# 10 Mbps, 5ms delay, 1% loss, 1000 packet queue
self.addLink( host, switch, bw=10, delay='5ms', loss=1, max_queue_size=1000, use_htb=True)
if lastSwitch:
self.addLink(switch, lastSwitch, bw=10, delay='5ms', loss=1, max_queue_size=1000, use_htb=True)
lastSwitch = switch
def perfTest():
"Create network and run simple performance test"
topo = LinearTopo(k=4) net = Mininet(topo=topo,
host=CPULimitedHost, link=TCLink) net.start()
print "Dumping host connections"
dumpNodeConnections(net.hosts) print "Testing network connectivity"
net.pingAll()
print "Testing bandwidth between h1 and h4"
h1, h4 = net.get('h1', 'h4') net.iperf((h1, h4)) net.stop() if __name__ == '__main__': setLogLevel('info') perfTest()
Some important methods and parameters:
self.addHost(name, cpu=f): This allows you to specify a fraction of overall system CPU resources which will be allocated to the virtual host.
self.addLink( node1, node2, bw=10, delay='5ms', max_queue_size=1000, loss=1, use_htb=True): adds a bidirectional link with bandwidth, delay and loss
characteristics, with a maximum queue size of 1000 packets using the Hierarchical Token Bucket rate limiter and netem delay/loss emulator. The parameter bw is expressed as a number in Mb/s; delay is expressed as a string with units in place (e.g. '5ms', '100us', '1s'); loss is
expressed as a percentage (between 0 and 100); and max_queue_size is expressed in packets. You may find it useful to create a Python dictionary to make it easy to pass the same
parameters into multiple method calls, for example:
linkopts = dict(bw=10, delay='5ms', loss=1, max_queue_size=1000, use_htb=True)
’’’
alternately: linkopts = {'bw':10, 'delay':'5ms', 'loss':1, 'max_queue_size':1000, 'use_htb':True}
’’’
self.addLink(node1, node2, **linkopts)
Running in Mininet
To run the custom topology you have created above, follow the instructions below:
Create a LinearTopo.py script on your Mininet VM and copy the contents of Linear Topology (without Performance Settings), listed above in it.
$ chmod u+x LinearTopo.py
Execute the script $ sudo ./LinearTopo.py
Output
*** Creating network *** Adding controller *** Adding hosts: h1 h2 h3 h4 *** Adding switches: s1 s2 s3 s4 *** Adding links: (h1, s1) (h2, s2) (h3, s3) (h4, s4) (s1, s2) (s2, s3) (s3, s4) *** Configuring hosts h1 h2 h3 h4 *** Starting controller *** Starting 4 switches s1 s2 s3 s4Dumping host connections h1 h1-eth0:s1-eth1
h2 h2-eth0:s2-eth1 h3 h3-eth0:s3-eth1 h4 h4-eth0:s4-eth1
Testing network connectivity *** Ping: testing ping reachability h1 -> h2 h3 h4
h2 -> h1 h3 h4 h3 -> h1 h2 h4 h4 -> h1 h2 h3
*** Results: 0% dropped (0/12 lost) *** Stopping 4 hosts h1 h2 h3 h4 *** Stopping 4 switches s1 ...s2 ....s3 ....s4 ... *** Stopping 1 controllers c0 *** Done
Assignment
Background
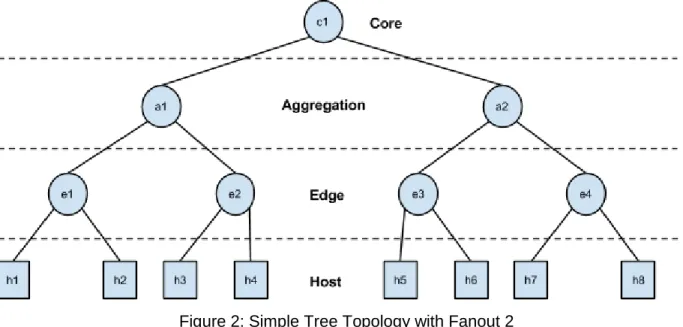
Data center networks typically have a tree-like topology. End-hosts connect to top-of-rack switches, which form the leaves (edges) of the tree; one or more core switches form the root; and one or more layers of aggregation switches form the middle of the tree. In a basic tree topology, each switch (except the core switch) has a single parent switch. Additional switches and links may be added to construct more complex tree topologies (e.g., fat tree) in an effort to improve fault tolerance or increase inter-rack bandwidth.
In this assignment, your task is to create a simple tree topology. You will assume each level i.e., core, aggregation, edge and host to be composed of a single layer of switches/hosts with a configurable fanout value (k). For example, a simple tree network having a single layer per each level and a fanout of 2 looks like:
Figure 2: Simple Tree Topology with Fanout 2
To start this exercise, download programming-assignment-2.zip. It consists of two files: CustomTopo.py: a sekleton class which you will
update with the logic for creating the datacenter topology described above.
submit.py: used to submit your code and output to the course servers for grading. You don’t have to do any modifications in here.
CustomTopo.py
The skeleton class takes following arguments as input:
linkopts1: for specifying performance parameters for the links between core and aggregation
linkopts2: for specifying performance parameters for the links between aggregation and edge
switches.
linkopts3: for specifying performance parameters for the links between edge switches and host
Fanout: to specify fanout value i.e., number of childs per node.
Your logic should support setting at least bw and delay parameters for each link.
Submitting your Code
To submit your code, run the submit.py script: $ sudo python submit.py
Make sure that CustomTopo.py is in the same directory as submit.py. Your mininet VM should have internet access by default, but still verify that it has internet connectivity (i.e., eth0 set up as NAT). Otherwise submit.py will not be able to post your code and output to our course servers.
The submission script will ask for your login and password. This password is not the general account password, but an assignment-specific password that is uniquely generated for each student. You can get this from the assignments listing page.
Once finished, it will prompt the results on the terminal (either passed or failed).
Note, if during the execution submit.py script crashes for some reason or you terminate it using CTRL+C, make sure to clean mininet environment using:
$ sudo mn -c
Also, if it still complains about the controller running. Execute the following command to kill it: $ sudo fuser -k 6633/tcp