Eclipse.net Installation Guide
Eclipse.net Installation Guide ID: 217 Version Number: 3.01 Date: 18/02/2016 1
Table of Contents
Introduction and Pre-requisites ... 2Minimum system requirements and Compatibility... 3
Guide Pre-requisites ... 4
Chapter 1: Installing SQL Server ... 5
Chapter 2: Installing the Application ... 8
Chapter 3: Entering the Application Settings ... 12
License Tab ... 12
Proxy Tab ... 13
Library and Scheduler Database Tabs ... 14
Database Upgrade ... 16
Chapter 4: IIS Settings ... 16
Authentication Settings ... 16
Application Pool Settings ... 17
Active Directory (Optional) ... 20
Email Reminders (Optional) ... 23
Chapter 5: Post Installation Tasks and Considerations ... 24
Database Conversion ... 24
Silverlight Installation ... 24
Browser Settings ... 24
IE Favourite / Shortcut ... 24
Library Quick Start Guide ... 24
Eclipse.net Installation Guide
ID: 217
Version Number: 3.01 Date: 18/02/2016
2
Introduction and Pre-requisites
This guide explains how to install Eclipse or Junior.Net onto a new server. The latest version includes both a back end and front end that is based on Microsoft Silverlight.
The minimum hardware and software requirements are shown below. Before starting, ensure that both the server and client computers meet these requirements.
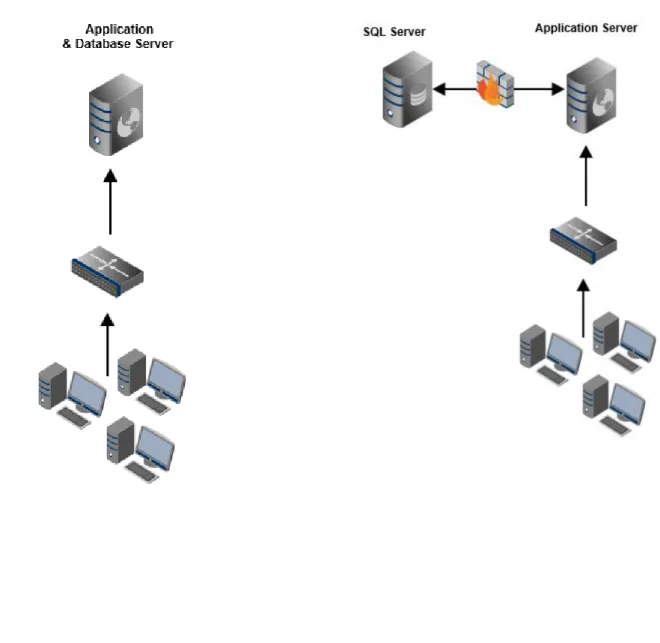
This document is mainly split between two sections; installing the SQL Server and installing the application.
Although it is common that these are installed onto the same server (as shown in Fig 0.1 below) this is not a
requirement. It is possible to have SQL Server installed onto one and the application installed onto another like in Fig 0.2 below. The latter is common in environments where there is an already existing SQL Server installed or environments where the application server is available on the internet and is in a DMZ.
Eclipse.net Installation Guide
ID: 217
Version Number: 3.01 Date: 18/02/2016
3
Minimum system requirements and Compatibility
The table below shows the computer requirements for the server hosting the application and the SQL database.
Component
Requirement
Computer and Processor 2.3 gigahertz (GHz) or faster x86 or x64 Dual Core CPU or better
Memory (RAM) 4 gigabytes (GB) RAM (8GB is highly recommended)
Hard Disk 10 gigabytes (GB) available
Server Operating System Windows Server 2008 R2
Windows Server 2012 / R2**
Any version of windows Server Core is not supported
SQL Server Express or Full Microsoft SQL 2005*
Microsoft SQL 2008 / R2 Microsoft SQL 2012 Microsoft SQL 2014
*SQL 2005 express has a 2 gigabyte (GB) database limit. Microsoft .NET
Frameworks, including latest Service Packs
.NET 2.0 .NET 3.5 .NET 4.0 .NET 4.5
Other An Internet connection is required on the server for product activation and to
take full advantage of functionality.
The table below shows the requirements for the client computers accessing the software.
Component
Requirement
Computer and Processor 1.5 gigahertz (GHz) Dual Core CPU or better
Memory (RAM) 1 gigabyte (GB) RAM
Client Operating System Windows Vista
Windows 7 / x64 Windows 8
Eclipse.net Installation Guide ID: 217 Version Number: 3.01 Date: 18/02/2016 4
Guide Pre-requisites
Before starting to follow the instructions in this guide, it is advisable to ensure that the prerequisites in the table below have been met. Making sure that the below has been carried out before the update is started, increases the likelihood that the installation will be successful and issue-free.
Prerequisites
IMPORTA
NT
!
This guide details how to install SQL Server if it is not already installed. (See the notes in
the introduction above). However, if an existing SQL server is being used then ensure
that the following component is installed:
SQL Server Full Text
It is imperative that this is installed as otherwise searching will not function.
In addition, although the Management studio is considered an optional component, having
this installed when needing to troubleshoot an issue (or taking backups/running scripts) is very helpful.
Make sure the latest service packs and windows updates have been installed on the
application and SQL server.
Make sure the appropriate roles and services are installed before running the Installer.
Have a copy of the installation files / disc to hand.
Install Microsoft .NET Framework 4.0 onto the application server.
Ensure that the latest version of Microsoft Silverlight is installed onto both the client
machines and server accessing the application.
The user number and postcode are required for product activation so make sure that
these are known beforehand.
Make a note of the default administrator login for the application.
Username: administrator
Password: microlib
They will be needed in this guide!
Eclipse.net Installation Guide
ID: 217
Version Number: 3.01 Date: 18/02/2016
5
Chapter 1: Installing SQL Server
Any version and edition of SQL above 2000 is supported for use with the library system. Be mindful however, that SQL 2005 employs a 4GB database limit. This means that if this limit is reached, no further transactions (i.e. books circulated, resources added) will be stored in the data and will be discarded. As a result, it is recommended to use a full version of SQL server or an express version that has a higher database limit, such as 2008 or 2012.
Our installation disc includes SQL Server 2012 express so the steps below explain how to install the SQL engine
from our installation disc. Should you wish to install SQL yourself from scratch, see the dedicated guide here.
1. Insert the DVD disc into the disc drive and the splash screen should automatically be shown.
Fi
g 1
.1
Eclipse.net Installation Guide ID: 217 Version Number: 3.01 Date: 18/02/2016 6 Fi g 1 .2 NOTE
The default SA account/login password is shown in the command prompt window. Take a note of this password as you will need it later in the installation.
d0tNETl1bPWD
3. Press any key on the keyboard to continue. You will now be asked whether you wish to install the 64-bit
version of SQL. Should you type yes (or y) then the 64-bit version will be installed. If you type no (or n)
then the 32-bit version will be installed.
Fi
g 1
Eclipse.net Installation Guide
ID: 217
Version Number: 3.01 Date: 18/02/2016
7
4. The installation of SQL will then begin.
Fi
g 1
.3
When the installation has finished, you may want to install the SQL Management studio, which is a utility that can be used to administer your SQL installation and databases. To install the Management studio, you can run the installer from the installation disc or download this free, from Microsoft.
To install the SQL Management studio from our installation disc, click one of: SQL Server Management Studio x86
SQL Server Management Studio x64
After the Management studio has installed, you should be able to log into the SQL instance we created earlier
Eclipse.net Installation Guide
ID: 217
Version Number: 3.01 Date: 18/02/2016
8
Chapter 2: Installing the Application
The instructions in this chapter explain how to install the application once SQL Server has been installed.
1. Start by running the application installer (Silverlight Management.exe) on the application server. The installer
will begin to check that the pre-requisites are installed.
Fi
g 2
.1
2. If all the prerequisites are installed, the welcome page will display. Click Next to begin the installation.
Fi
g 2
.2
3. The license agreement will display on the next screen. Read and accept the license agreement by scrolling to the
Eclipse.net Installation Guide ID: 217 Version Number: 3.01 Date: 18/02/2016 9 Fi g 2 .3
4. Choose or type the location to install the application to.
ig
2
Eclipse.net Installation Guide
ID: 217
Version Number: 3.01 Date: 18/02/2016
10
5. The next step is to define the site configuration. The default is Default Web Site and MLS.NET but if you prefer to
have the site listed elsewhere in IIS, select or type that using the text boxes. Click Next to continue.
Fi
g 2
.5
6. Click Next to the following box and the installation will begin.
Fi
g 2
Eclipse.net Installation Guide
ID: 217
Version Number: 3.01 Date: 18/02/2016
11 The installer will begin copying files and making the necessary configuration.
Fi
g 2
.7
7. Once the installation wizard has completed, make sure Run Server Configuration Tool Now is ticked to open the
configuration tool. Click Finish.
Fi
g 2
Eclipse.net Installation Guide
ID: 217
Version Number: 3.01 Date: 18/02/2016
12
Chapter 3: Entering the Application Settings
The instructions that follow explain what settings can be entered onto each tab of the ServerConnectionSettings, which is where you configure the application settings, database connection, proxy and more. Once all settings
have been confirmed and checked, click Save to initiate the database upgrade then continue with this guide.
License Tab
The details that can be entered onto the License tab are shown below. Type in the Customer Number and
organisation Post Code then click Activate. When activating the product, the application tries to connect to
Service.microlib.co.uk so HTTP traffic to this internet address will need to be allowed on any proxies or firewalls.
Enter the user number and postcode then click Activate.
Fi
g 3
.1
NOTE
If there are problems activating the application, the proxy server details may need to be entered (if the server
connects to the internet through a proxy server). See the instructions surrounding the Proxy Tab that describe
Eclipse.net Installation Guide ID: 217 Version Number: 3.01 Date: 18/02/2016 13
Proxy Tab
If your organization connects to the internet through an intermediary server / proxy, the settings on this tab can be used to enter the details of this.
Fi
g 3
.2
Use the table below for details on what to enter in to each text box.
Server Name Enter the host name of the proxy server or IP address, e.g. Proxy1 or 10.10.0.1 Port Specify the port used to connect to the proxy server.
Username Type in a user authenticated to access the proxy, if authentication is required. If no user is entered then a connection will attempt to be made without one.
Password Enter the password associated with the user entered above.
Domain Enter the domain that the user belongs to. For example, school.local
Protocol Version Choose the Protocol Version either 1.0 or 1.1 to match the version that the proxy server is expecting. If unsure, try toggling between both versions. If both options work, select 1.1. Test Connection
(Button)
This button can be used to test the connection to the services out on the Internet. Click the Test Connection button (followed by Go) to check the connection. If an image and book details are correctly returned then the connection to MLS services is established.
Eclipse.net Installation Guide
ID: 217
Version Number: 3.01 Date: 18/02/2016
14
Library and Scheduler Database Tabs
Once the system is activated, the LibraryDatabase and Scheduler Database tabs will become active. The Library
Database tab is used to enter the connection details to the main library database whereas the Scheduler database is separate database used to track the scheduled tasks.
NOTE
It is a good idea to use the Test Connection function to confirm that the application can communicate with
the SQL Server. If the test is successful, the following should show:
Library Database
The following table describes what to enter on to the Library Database tab.
Server Specify the name of the SQL server followed by the instance name. The \SQL2012 in the below image refers to the instance where the database is held. It is possible to have multiple instances on one server so ensure the correct one is entered.
Database Type the name of the existing database in this text box. You can type any database name into this box but normally MLS recommend entering “WBLS” (web-based library system). Note that you must not create this database beforehand; it is created automatically for you.
Port Only enter a port number into the Port text box if a custom port has been defined on the SQL Server. In the nearly all configurations, this is left blank.
Username The SQL user account that makes a connection to the SQL Server/instance as specified in the Server text box.
Password The password associated with the user that has been entered in the Username box. Network Library Leave the Network Library selected as Automatic unless troubleshooting an issue. Test Connection
(Button)
When clicking Test Connection, the app will try to establish a connection to the SQL
Server using the details that have been entered in the boxes above. They do not need to be saved before testing the connection.
Eclipse.net Installation Guide
ID: 217
Version Number: 3.01 Date: 18/02/2016
15 An example showing some demonstration settings entered on this tab are shown in the screenshot below.
Fi
g 3
.3
Scheduler Database
The settings on the Scheduler Database tab are identical to the Library Database tab apart from the database
name. This should be the name of the scheduler database rather than the library database. If you would prefer to hold the scheduler database on a separate SQL server / instance then enter these into the configuration as per the above.
WARNING
The name of the scheduler database must be labelled MLSSYS.
Eclipse.net Installation Guide ID: 217 Version Number: 3.01 Date: 18/02/2016 16
Database Upgrade
A database upgrade check will occur each time the Save button is clicked (even if it is a new database). This is to ensure the database is compatible with the latest version of the application. Once the settings on each tab have been entered correctly, click Save and the database upgrade will occur if necessary.
Fi
g 3
.5
There are multiple factors that determine how long the database takes to upgrade and as a result it may take several minutes to complete.
Chapter 4: IIS Settings
The instructions in this section explain some of the options that we recommend you look to configure on the website or Virtual Directory from within IIS (Internet Information Services).
Authentication Settings
From the Authentication section on the website you are configuring, you can select the authtentication options
you wish to use to secure the access of content on that website. Commonly, two types of authentication are used; Anonymous and Windows.
When you use Anonymous (only), this means that anyone who knows the URL of the library site can load the home page. In this mode, the borrowers will need to log on to their account by entering their credentials in the logon box. This is useful when the site is made accessible over the Internet as it allows ‘anyone’ to access the application without authenticating.
Often, when only used on the Intranet, Windows Authentication is desirable because this allows the user
accessing the website to be logged in to their borrower account automatically. In addition to only selecting
Windows Authentication from the Authentication section in IIS, this functionality is dependant on several factors
that are discussed in the section relating to Active Directory.
NOTE
In the event you have both Anonyomous and Windows authentication set on the root website/virtual
directory the AD integration will not work because Anonymous takes presedence. See this article on MSDN
Eclipse.net Installation Guide
ID: 217
Version Number: 3.01 Date: 18/02/2016
17
Application Pool Settings
The Application Pool defines an area where web applications can be grouped together, before being routed to the program that handles the requests of the respective website, known as the worker process. Every web application in IIS is assigned to an application pool.
MLS recommended that you make certain configuration changes to the Application Pool settings during
installation. Unfortunately, it is not possible for these settings to be changed by the installation package and you will need to manually intervene. The settings for the Application Pool can be changed using the Management
Console, by selecting Application Pools on the left:
Fi
g 3
.6
Then select the name of the application pool and click Advanced Settings… on the right menu (alternatively right
click and select Advanced Settings…).
Each setting that MLS recommend you change is described below.
Rapid-Fail Protection
IIS Rapid-Fail Protection is a feature that will shut down the application pool if there are a specified number of
hard-failures, within the specified period of time. The default setting for this is 5 failures in 5 minutes. This can
sometimes cause problems with Eclipse, specifically when the images are being retrieved from multiple sources on the internet and under some circumstances IIS internally interprets this as a hard-failure. Should there be many users using the system at one time, the maximum can quickly be reach which may cause the application pool to stop and an error 503 shown in the browser.
The recommendation is to set the Failure Interval to 1 minute and to set the Maximum Failures to 1000, as
Eclipse.net Installation Guide ID: 217 Version Number: 3.01 Date: 18/02/2016 18 Fi g 3 .7 Recycling
As part of the settings, you can configure the application pool to recycle at a regular interval. By default, this is set by IIS to 1740 minutes. MLS recommend that you change this to a lower value of 30 minutes, which should ensure that should there be a memory leak, it is resolved without affecting the end user experience. Note that with Eclipse, recycling the pool will not disrupt existing requests made to the site and the end user will not even notice that it happens.
Eclipse.net Installation Guide ID: 217 Version Number: 3.01 Date: 18/02/2016 19 Fi g 3 .8
Enable 32-Bit Applications
Finally, it is recommended to ensure that Enable 32-bit Applications is set to False because the latest version is a
64-bit compatible application. Should you set this to True, the application will run, but under a worker process in 32-bit compatibility mode.
Fi
g 3
Eclipse.net Installation Guide
ID: 217
Version Number: 3.01 Date: 18/02/2016
20
Active Directory (Optional)
The next part of the upgrade looks at Active Directory integration. This functionality allows pupils to be automatically logged in to their accounts when they access the system. If you do not use AD integration (and another method of logging on is being used) this part can be skipped.
The instructions below explain how to enter the Directory Services settings into the application.
1. Log in to the Management area as an administrative user and click Settings / Directory Services from the menu at
the top.
Fi
g 3
.10
2. Click the New button at the bottom of this box to start entering configuration settings if none are specified
already. To change existing settings, highlight the details to change and click Edit. The following box will open.
Fi
g 3
Eclipse.net Installation Guide
ID: 217
Version Number: 3.01 Date: 18/02/2016
21
3. Enter the details into the appropriate field. Each field is described below. Be mindful that all are mandatory apart
from the Path field.
Fi
g 3
.12
Server/Domain Entered into the Server/Domain field should be the name of the domain or the FQDN of a domain controller. It is recommended to enter the domain, only so DNS can locate an appropriate DC. An example of the domain entered into this field might be
"MYDOMAIN.LOCAL" without quotation marks.
Username Enter a username of a user who has read permission over the OU(s) that are queried. Often an administrative user is used when troubleshooting.
Password Enter the associated password of the user that is entered in the previous field.
Path The Path is the only optional field. This can be entered to query a designated OU in the Active Directory in a UNC-type format.
4. Click Save to store these settings. The task can then be scheduled by clicking Schedule and running the Directory
Services task.
Although the above explains how to configure the AD task, in order for the automatic login to work it is also
dependant on other factors, such as:
Anonymous access must not be enabled on the IIS site / virtual directory.
The borrowers must be Active Directory linked.
Eclipse.net Installation Guide
ID: 217
Version Number: 3.01 Date: 18/02/2016
22 In addition to the method where pupils are automatically logged in when they access the home page, it is also possible to configure the system so that the pupils can manually type in their AD credentials.
When this is setup, the application queries the LDAP server at the point of the user typing in their credentials and validates the user. If the user has provided the correct credentials that are validated by the directory server (and their logon name corresponds to a logon name in the Borrowers table) then they are logged in to their accounts. Similarly to the above, this also depends on the borrowers being linked to Active Directory. The instructions below explain how to configure this method.
1. Load the settings window in Management, from Settings / Directory Services and click New to add a new entry to
the table.
Fi
g 3
.13
2. In the server/domain box, enter the text localldap:// followed by the name of the domain. For instance, if
your internal AD domain is labelled “school.local”, you would enter localldap://school.local
Eclipse.net Installation Guide
ID: 217
Version Number: 3.01 Date: 18/02/2016
23
Email Reminders (Optional)
It is possible to configure the application to send reminders via email. Previously, it was required to install additional roles (in particular, the IIS 6 Compatibility including SMTP relay) in order to get this to function. In the latest version, the configuration on the application server has been simplified, greatly. This is because the emails can be relayed directly from the application to your SMTP server rather than being sent from the application to IIS and then using the IIS relay agent.
To configure email reminders in this version, follow the instructions below once the software has been installed.
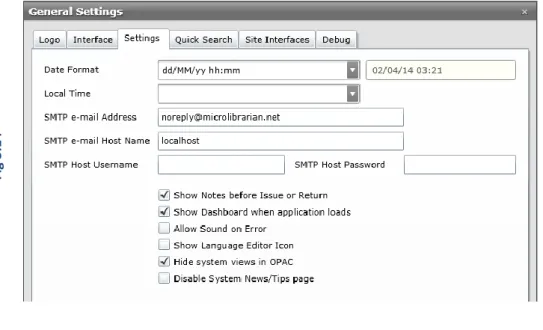
1. Open the library Management page and click Settings \ General. In the settings box that opens, click the Settings
tab.
2. Amongst the settings are the SMTP settings. Enter the appropriate options in to the text boxes. The configurable
options are described in the table (under fig 2.4) below.
Fi g 3 .1 4 Fi g 3 .1 5
SMTP e-mail The email address that the emails will be sent from. SMTP e-mail
Host Name
Enter the host name where the emails should be relayed to and sent from. e.g.
SMTPserver.mydomain.com
SMTP Host username
Enter a user that is authenticated to send e-mail. Note that depending on the configuration of your SMTP server, this may not be required.
SMTP Host Password
Enter the corresponding password for the user above. This is not required if no username has been specified.
Eclipse.net Installation Guide
ID: 217
Version Number: 3.01 Date: 18/02/2016
24
Chapter 5: Post Installation Tasks and Considerations
If the installation has been successful then you should be able to launch the website by typing the address into the address bar from a new IE window. The URL used to access the site will vary, depending on where the application has been setup in IIS but the installer intelligently tries to create a shortcut on the desktop of the
server with the URL. Normally, this will be http://servername/MLS.NET/default.aspx. This section lists some
additional tasks and considerations that you may wish to run through once the software has been installed and is working.
Database Conversion
If you’re converting from another library system then it is likely that the MLS conversions team will send you a SQL backup of the library data. This can be restored over the top of the existing library database (as specified in
fig 3.3) or to a newly labelled database and the configuration settings pointed to the new one to reflect this.
We have instructions online that explain how to restore a backup into SQL 2008 R2 Management Studio.
Silverlight Installation
As both the management side and the front end of the system now utilise Microsoft Silverlight, all client machines wishing to use the library system must have this installed. This can be rolled out from the server via windows update and does not need to be done on an individual basis, unless preferred.
Please see the following link for more information about installing Microsoft Silverlight:
http://www.microsoft.com/silverlight/
Browser Settings
Configuring the browser settings to ensure the site functions efficiently is very important. Please follow the below link to our Knowledgebase article to ensure all necessary browser settings are configured prior to using the library system:
Knowledge base article 1630 – Please sign in with your customer number and school postcode.
IE Favourite / Shortcut
Being a web-based system, the application should be accessible from any machine with a connection to the web server. It is recommended to setup a shortcut, either in IE, as a shortcut from the desktop or on the school intranet so that everyone can start using it.
Library Quick Start Guide
To help the library get started with the system, MLS have put together a list of things to get you started.
Eclipse.net Installation Guide
ID: 217
Version Number: 3.01 Date: 18/02/2016
25
Frequently Asked Questions
What Server Roles and Role Services are required on a Windows Server 2008 / R2 machine?
What Server Roles and Role Services are required on a windows Server 2012 server?
Can the application be configured to run over HTTPS?
How is the site configured to be accessed on the Internet?
Q. What Server Roles and Role Services are required on Server 2008 / R2?
A. In the event you are upgrading from a previous version of Eclipse, these should already be installed but they are
shown in the table below for reference.
Role
Feature / Role Services
Application Server .NET Framework 3.5.1 Features
Application Server Foundation
Web Server (IIS) Support
Windows Process Activation Service Support
HTTP Activation Web Server Common HTTP Features Static Content Default Document Directory Browsing HTTP Errors HTTP Redirection Application Development ASP.NET .NET Extensibility ISAPI Extensions ISAPI Filters
Health and Diagnostics
HTTP Logging
Logging Tools
Request Monitor
Eclipse.net Installation Guide ID: 217 Version Number: 3.01 Date: 18/02/2016 26 Security Basic Authentication Windows Authentication Digest Authentication
Client Certificate Mapping Authentication
IIS Client Certificate Mapping Authentication
URL Authorisation
Request Filtering
IP Domain Restrictions
Performance
Static Content Compression
Dynamic Content Compression
Management Tools
IIS Management Console
IIS Management Scripts and Tools
Management Service
Q. Can the application be configured to run over HTTPS?
A. Setting the application up to use HTTPS was possible with the previous version of the library software but in
the latest version the necessary configuration has been vastly improved. Because of changes in the web.config; the bindings are already defined and due to the way that that the authentication has been changed, the necessary configuration can be made solely in IIS rather than in multiple locations.
What is involved with making the library application useable on HTTPS, is obtaining a certificate (either from a local Certificate Authority / one on the web or creating a self-signed certificate) and then assigning this to the website using IIS.
NOTE
A self-signed certificate is only normally used in test environments or in other similar circumstances. It is recommended to use a certificate from a CA on your domain if it is being used internally or a public one purchased from a company that vend them such as Verisign, GeoTrust etc. if it is being used externally.
IMPORTANT
This guide does not explain how to import or install certificates from third parties or how to assign a
certificate to a site in IIS. It is not MLS’s responsibility to implement or provide this solution. There is a lot of information online that explains how to assign a certificate to a website and a server which may help.
Eclipse.net Installation Guide
ID: 217
Version Number: 3.01 Date: 18/02/2016
27
Q. How can the site be configured so it is accessible on the Internet?
A. In order to access the system outside your network you need to make the website routable on the internet.
This essentially involves obtaining a static IP address from your ISP and configuring any web traffic sent to *Your
Library Server Domain*.com (or that IP address)to be routed to the web server available on the internet, much
like other web sites.
IMPORTANT
The configuration of the public-facing aspect and any security implications of this as a result are not the responsibility of MLS to implement, support or maintain at any point.
Q. what Server Roles and Role Services are required on Server 2012?
A. The necessary Roles and Services and listed below.
Role
Feature / Role Services
Application Server .NET Framework 4.5 Windows Process Activation Service Support
HTTP Activation
Web Server (IIS) Support and all related features
Web Server (IIS)
Common HTTP Features Static Content Default Document Directory Browsing HTTP Errors HTTP Redirection Application Development .NET Extensibility 4.5 ASP.NET 4.5 ISAPI Extensions ISAPI Filters
Health and Diagnostics
HTTP Logging
Logging Tools
Request Monitor
Eclipse.net Installation Guide ID: 217 Version Number: 3.01 Date: 18/02/2016 28 Basic Authentication Windows Authentication Digest Authentication
Client Certificate Mapping Authentication
IIS Client Certificate Mapping Authentication
URL Authorisation
Request Filtering
IP and Domain Restrictions
Performance
Static Content Compression
Dynamic Content Compression
Management Tools
IIS Management Console