Training courses from the book’s author:
http://courses.coreservlets.com/
• Personally developed and taught by Marty Hall • Available onsite at your organization (any country) • Topics and pace can be customized for your developers • Also available periodically at public venues
• Topics include Java programming, beginning/intermediate servlets and JSP, advanced servlets and JSP, Struts, JSF/MyFaces, Ajax, GWT, Ruby/Rails and more. Ask for custom courses!
AND
O
RACLE
9
I
Topics in This Chapter
• Configuring a DSN to connect to Microsoft Access
• Installing and configuring MySQL
• Creating databases and users in MySQL
• Installing and configuring Oracle9i
• Using the Database Configuration Assistant to create a
database in Oracle9i
• Manually creating a database in Oracle9i
• Creating users in Oracle9i
• Testing your database through a JDBC connection
• Determining the JDBC version of your database driver
• Setting up the example
music
table
Training courses from the book’s author:
http://courses.coreservlets.com/
• Personally developed and taught by Marty Hall • Available onsite at your organization (any country) • Topics and pace can be customized for your developers • Also available periodically at public venues
• Topics include Java programming, beginning/intermediate servlets and JSP, advanced servlets and JSP, Struts, JSF/MyFaces, Ajax, GWT, Ruby/Rails and more. Ask for custom courses!
In this chapter, we provide details for configuring three popular databases for use with JDBC: Microsoft Access, MySQL, and Oracle9i.
The first database, Microsoft Access, is an excellent database for practice and experimentation because the Java SDK (or JDK) already includes the appropriate JDBC driver and many developers already have Access installed. However, you would be unlikely to use Microsoft Access for serious applications, since it is not designed to handle a large number of concurrent connections. For details on config-uring Microsoft Access, see Section 18.1.
The second database, MySQL, is a production-quality database and probably the best free option. In Section 18.2 we provide details for installing and configuring MySQL. In addition, we provide information for downloading and using the appro-priate MySQL JDBC driver in your Web applications.
The third database, Oracle9i, though not free, is an excellent production database. See Section 18.3 for details on installing and configuring Oracle9i. The installation and database creation process is quite lengthy. However, Oracle9i is widely used in industry, so taking the time to gain experience with the product is well worth the effort. After the installation and database creation, we provide information for install-ing the correct Oracle JDBC driver for use with various versions of the Java SDK.
Lastly, we provide programs to test your database and load the example database table used in this book.
18.1 Configuring Microsoft Access
for Use with JDBC
If you have Microsoft Office, Microsoft Access and the required Open DataBase Connectivity (ODBC) driver are probably already installed on your machine. So, although we don’t recommend Microsoft Access for a high-end production Web site, we think that Microsoft Access is excellent for learning and testing JDBC code. For instance, the examples in Chapter 17 connect to the preinstalled Northwind database of Microsoft Access. For a production site, you should use a more robust product like Oracle9i, DB2, Sybase, Microsoft SQL Server, or MySQL.
To connect to a Microsoft Access database from the Java platform, you can use the JDBC-ODBC bridge, sun.jdbc.odbc.JdbcOdbcDriver, included with the JDK. The bridge permits JDBC to communicate with the database by using ODBC, with-out requiring a native-format driver. However, you will need to configure an ODBC Data Source Name (DSN) to map a name to a physical database.
The URL to connect to a Microsoft Access database does not specify a host. Instead, the URL points to a DSN, for example, jdbc:odbc:dsn., where dsn is the name of the database assigned through the ODBC DSN wizard. Note that the Sun driver, sun.jdbc.odbc.JdbcOdbcDriver, is not fully compliant with JDBC 2.0 and thus does not support all the advanced JDBC features introduced in JDBC 2.0. However, it is more than adequate for the capabilities discussed in this chapter. You can find JDBC 2.0 drivers for Microsoft Access at http://industry.java.sun.com/ products/jdbc/drivers/.
For your application to connect to a database on a server, ODBC Version 3.x needs to be installed on that server. Fortunately, ODBC is installed with many Microsoft products. If you don’t have ODBC, you can easily install it separately on your system. ODBC is bundled with Microsoft Data Access Components (MDAC). See http://www.microsoft.com/data/download.htm for the correct MDAC version to install on your system.
Configuring a System DSN through the ODBC Administration Tool requires four steps, which we outline here and describe in detail in the subsections following the outline.
1. Select a System DSN from the ODBC Data Source Adminis-trator. The Data Source Administrator, located in the system Admin-istrative Tools, allows you to create a new data source name.
2. Select a driver for the new System DSN. Multiple ODBC data-base drivers are available to map to your DSN. Most likely, you will select the Microsoft Access Driver.
3. Select a data source. Locate and select the database file on your computer as the data source for your ODBC connection. Here, you also specify the name of the source to use when connecting to the ODBC driver.
4. Select OK to accept the new DSN. Selecting OK completes the configuration of the ODBC System data source. Afterwards, you can connect to the data source from Java through the JDBC-ODBC bridge.
Select a System DSN from the
ODBC Data Source Administrator
On Windows 2000, you can configure the data sources (ODBC) by selecting Start, Settings, then Control Panel. Next, select Administrative Tools and then Data Sources. Lastly, select the System DSN tab, and select Add to create a new DSN. Other versions of Windows are similar; for instance, on Windows XP, the steps are identical except that you select the Control Panel directly from the Start menu. Figure 18–1 shows the System DSN tab in the ODBC Data Source Administrator window.
Figure 18–1 First window displayed when you are configuring an ODBC data source. Select the System DSN tab and then click the Add button to create a new DSN.
Select a Driver for the New System DSN
In the Create New Data Source window, Figure 18–2, choose the Microsoft Access Driver (*.mdb) and then select Finish.
Select a Data Source
In the ODBC Microsoft Access Setup window, enter a data source name (with an optional description). The DSN will be the same name used in the JDBC URL,
jdbc:odbc:dsn. For example, if you choose Test as the DSN, you would supply "jdbc:odbc:Test" as the first argument to DriverManager.getConnection.
Next, click the Select button, as shown in Figure 18–3, to select the physical database file to bind to the data source name. After that step, click the OK button.
If you are using the Northwind sample database provided with Microsoft Access, the location of the database file is most likely C:\Program Files\Microsoft Office\Office\Samples\Northwind.mdb or something very similar, depending on the
version of Microsoft Access you have installed. If the Northwind file is not available,
Figure 18–2 Second window presented when you are creating a System DSN. Before continuing the configuration, choose the driver for the data source by clicking Finish.
you may need to install the sample database by opening Microsoft Access and select-ing the Northwind Sample Database from the opened window. Alternatively, you can download the sample database from http://office.microsoft.com/downloads/2000/ Nwind2K.aspx.
Select OK to Accept the New DSN
At this point, the newly defined DSN should be listed in the System DSN tab, as shown in Figure 18–4. Finish the configuration by clicking the OK button.
Figure 18–3 Third window for setting up a System DSN to a Microsoft Access database. Specify the name of the data source (with an optional description) and then select the physical database file to bind to the source name.
18.2 Installing and Configuring MySQL
MySQL is a popular and free open source database available for Unix (Solaris, Linux, etc.), MacOS, and Windows. When this book went to press, Version 4.0 was the cur-rent stable version of MySQL. Version 4.0 of MySQL does not support stored proce-dures and a few other advanced database features, but it is free and has surprisingly high performance.
Below are details for downloading and installing MySQL on Windows. These instructions provide the minimal installation for MySQL. For security issues (e.g., setting the root password) and postconfiguration guidelines, see the instructions at
http://www.mysql.com/documentation/mysql/bychapter/. The online documenta-tion also provides installadocumenta-tion instrucdocumenta-tions for Unix (including Linux) and MacOS.
To use MySQL, you must install the product, set up a database, and configure users’ rights. Here, we outline the four steps required to set up MySQL, followed by a detailed description of the steps.
Figure 18–4 Fourth window presented after you have added a new system data source. Click OK to accept the change.
1. Download and install MySQL. Download MySQL from
http://www.mysql.com/downloads/ and install as a service.
2. Create a database. Add a new database to MySQL by entering a simple CREATE DATABASE command.
3. Create a user. To create a user, use GRANT to assign database
privileges to the user.
4. Install the JDBC driver. Download the appropriate driver for MySQL, bundled as a JAR file. During development, include the JAR file in your CLASSPATH. For deployment, place the JAR file in the
WEB-INF/lib directory of your Web application.
Download and Install MySQL
You can download MySQL from http://www.mysql.com/downloads/. Download
mysql-4.0.xx-win.zip (or later), unzip, and run the setup.exe program to
install MySQL. We recommend installing MySQL in the C:\mysql directory. Note that before installing MySQL on Windows, you must log in to the computer with administrative rights.
Core Warning
To install MySQL on Windows NT/2000/XP, you must have local administrator rights on the machine.
On Windows NT/2000/XP, to configure MySQL as a service, run the following command in DOS from the C:\mysql\bin directory.
C:\mysql\bin> mysqld-max-nt --install
For more details, see the online documentation at http://www.mysql.com/documen-tation/.
Create a Database
Before creating a database, you must start the MySQL server. You can start the ser-vice from the command line by entering the net start command as shown.
C:\mysql\bin> net start MySql
If the server is already running, you will receive a warning message.
Next, to create a new database, start the MySQL monitor as the root user by
C:\mysql\bin> mysql.exe --user=root
Then create the database by entering the CREATE DATABASE command as
follows.
mysql> CREATE DATABASE database_name;
where database_name is the name of the database you want to create. For the code in this chapter, we created a database named csajsp. To see a listing of the
current databases, enter the following command. mysql> SHOW DATABASES;
If you prefer graphical interfaces over command-line utilities, use MySQL Control Center for managing your server. MySQL Control Center is available at
http://www.mysql.com/downloads/mysqlcc.html.
Create a User
You can create a user at the same time you grant privileges to that user. To grant a user access to the database from the local host, use the command
mysql> GRANT ALL PRIVILEGES ON database.* TO user@localhost IDENTIFIED BY 'password';
where database is the name of the database and user is the name of the new user. To grant the user rights to the database from other client machines, use the command
mysql> GRANT ALL PRIVILEGES ON database.* TO user@"%" IDENTIFIED BY 'password';
where @"%" acts as a wildcard for access to the database from any client machine. If you have problems creating new users, check that you started the MySQL monitor as the root user.
Install the JDBC Driver
Two JDBC drivers are commonly used to access MySQL: MySQL Connector/J and the Caucho Resin driver.
MySQL recommends the MySQL Connector/J driver, which is available at
http://www.mysql.com/products/connector-j/. In our examples, we use version 3.0
of the Connector/J driver. The driver is bundled in a JAR file named mysql-connec-tor-java-3.0.6-stable-bin.jar with a class name of com.mysql.jdbc.Driver. The
URL to use with the MySQL Connector/J driver is jdbc:mysql://host:3306/dbName,
where dbName is the name of the database on the MySQL server.
Caucho Resin also provides a MySQL driver at http://www.caucho.com/projects/ jdbc-mysql/index.xtp. The driver is bundled in the JAR file named caucho-jdbc-mysql-2.1.0.jar with a class name of com.caucho.jdbc.mysql.Driver.
The URL to use with the Caucho Resin driver is jdbc:mysql-caucho://host:3306/
dbName, where, again, dbName is the name of the database on the MySQL server. Neither driver is fully JDBC 2.0 compliant since MySQL is not fully ANSI SQL-92 compliant.
For development, place the JAR file in your CLASSPATH; for deployment, place
the JAR file in the Web application’s WEB-INF/lib directory. However, if multiple applications on the server are using MySQL databases, the Web administrator may choose to move the JAR file to a common lib directory on the container. For exam-ple, with Tomcat 4.x, JAR files used by multiple applications can be placed in the
install_dir/common/lib directory.
18.3 Installing and Configuring
Oracle9i Database
Oracle9i Database is a high-volume, production database deployed in many corpo-rate enterprises for both Internet and intranet applications. Oracle9i Database pro-vides all the functionality you would expect in a production database server, including stored procedures, views, triggers, enhanced security, and data recovery.
Three different editions of Oracle9i Database Release 2 are available from Oracle, as described below. Oracle9i includes a large family of products (including Oracle9i Application Server and Oracle9i Developer Suite), but in the remaining sections we use “Oracle9i” to refer to Oracle9i Database.
• Enterprise Edition. Oracle9i Enterprise Edition delivers an efficient, reliable solution for both Internet and intranet applications. The Enterprise Edition is suitable for high-volume transaction processing and data warehousing. The Enterprise Edition includes a preconfigured database, networking services, database management tools, and utilities. In addition, multiple product options are licensable with the Enterprise Edition.
• Standard Edition. Oracle9i Standard Edition is a scaled-down version of the Enterprise Edition and can be licensed only for servers with a maximum of four processors. The Standard Edition is suitable for workgroup, department, intranet, and Internet applications. The Standard Edition includes a preconfigured database, networking
services, database management tools, and utilities; however, the Standard Edition does not support all features available in the Enterprise Edition.
• Personal Edition. Oracle9i Personal Edition is suitable for a single-user, desktop environment. The Personal Edition is intended for educational purposes, providing a cost-effective, yearly licensing fee. The Personal Edition supports all the features and options available in the Enterprise Edition, with the exception of Oracle Real Application Clusters.
For a more detailed summary of the three Oracle9i Database editions, see
http://otn.oracle.com/products/oracle9i/pdf/9idb_rel2_prod_fam.pdf.
To use Oracle9i, you must install the product, set up a database, and configure users’ rights. In this section we provide information for downloading and installing Oracle9i Release 2 on Windows XP. For other platforms, you can find platform-spe-cific installation instructions at http://otn.oracle.com/docs/products/oracle9i/.
Below, we outline the four steps required to set up an Oracle9i, followed by a detailed description of each step.
1. Download and install Oracle9i. Download Oracle9i Database Release 2 from http://otn.oracle.com/software/products/oracle9i/
and install by using the Oracle Universal Installer.
2. Create a database. Typically, a database is created during the instal-lation of Oracle9i; however, if Oracle9i is already installed on the com-puter you are using, you can create a new database manually or use the Database Configuration Assistant.
3. Create a user. To access the database from a Web application, you need to create a new user and then grant connection and table rights to the user.
4. Install the JDBC driver. To access an Oracle database from a Web application, download the appropriate JDBC driver from
http://otn.oracle.com/software/tech/java/sqlj_jdbc/. During devel-opment, include the JAR file in your CLASSPATH. For deployment,
place the JAR file in the WEB-INF/lib directory of your Web application.
Download and Install Oracle9i
You can download Oracle9i Database Release 2 from http://otn.oracle.com/soft-ware/products/oracle9i/. A registration is required for download of Oracle software; however, the registration is free. Be sure to read the license agreement if you plan on using Oracle9i for production purposes. Oracle products are free to download for a 30-day evaluation period. After 30 days, you must purchase a license.
In the following instructions, we show you how to install Oracle9i Database Release 2 Personal Edition on the Windows XP platform. For installation instruc-tions for other platforms, see the documentation at http://otn.oracle.com/docs/ products/oracle9i/.
Oracle9i Database Release 2 for Windows NT/2000/XP is bundled in three ZIP files: 92010NT_Disk1.zip (612,802,971 bytes), 92010NT_Disk2.zip (537,604,934
bytes), and 92010NT_Disk3.zip (254,458,106 bytes). The same install files are used
for the Enterprise, Standard, and Personal editions. Follow the instructions on the download page and unzip the three files into corresponding directories named Disk1, Disk2, and Disk3. Alternatively, instead of downloading the software, you can
pur-chase a CD pack at http://oraclestore.oracle.com/.
Oracle recommends the following minimum hardware requirements: Pentium 266, 256 Mbytes of RAM, and approximately 3 Gbytes of disk space for an NTFS partition. Exact requirements are available at http://otn.oracle.com/docs/products/ oracle9i/doc_library/release2/A95493-01/html/reqs.htm.
Following are the instructions to install Oracle9i Database Personal Edition on the C:\ drive of a Windows XP computer. To perform this installation, you must log in
to the machine with local administrator rights.
Core Warning
To install Oracle9i on Windows NT/2000/XP, you must have local administrator rights on the machine.
Steps to Install Oracle9i
1. Start the Oracle Universal Installer. You can start the Oracle Uni-versal Installer 2.2 from the setup.exe program located in the Disk1
directory. If the installer fails to start, try the setup.exe program located in the Disk1\install\win32 directory. When you start the installer, you will momentarily see the copyright screen, followed by a Welcome screen as shown Figure 18–5. Click the Next button.
2. Specify file locations. On the third screen displayed (Figure 18–6), you specify the location of the installation program and the directory on which to install Oracle9i. Accept the default values. The Oracle Home, OraHome92, is used in the name for all Oracle services
cre-ated during the installation process. Click Next to continue.
Figure 18–5 Second Oracle install window: Welcome message.
Figure 18–6 Third Oracle install window: summarizes the location of source and destination files for the installation process.
3. Select a product to install. On the fourth screen displayed (Figure 18–7), you select which product to install. Accept the default product, Oracle9i Database, and then click Next.
4. Select the installation type. On the fifth screen displayed (Figure 18–8), you select the database edition to install. For a single-user environment, we recom-mend the Personal Edition, which requires 2.53 Gbytes of disk space on Win-dows XP. For more details on the three editions, see http://otn.oracle.com/ products/oracle9i/pdf/9idb_rel2_prod_fam.pdf. Click Next.
Figure 18–7 Fourth Oracle install window: for selecting a product to install.
Figure 18–8 Fifth Oracle install window: for selecting an installation type. For a single user, select the Personal Edition.
5. Select a database configuration. On the sixth screen displayed (Figure 18–9), you specify the database configuration. We recom-mend the default selection, General Purpose, because the installation process for this selection automatically creates a starter database. Accept the default database configuration and click Next.
6. Specify the port for the Oracle MTS Recovery Service. On the seventh screen displayed (Figure 18–10), you specify the port for the Oracle MTS Recovery Service, which is automatically installed with Oracle Services for Microsoft Transaction Server. This service helps resolve requests for distributed transaction coordinated by the Microsoft DTC (MS DTC exposes COM objects that allow clients to initiate and participate in coordinated transactions across multiple connections to various data stores). You might not use this capability, so simply accept the default port number of 2030 and click Next.
Figure 18–9 Sixth Oracle install window: for selecting a database configuration.
7. Provide a database system identification (SID). On the eighth screen displayed (Figure 18–11), you uniquely identify your database. Oracle configuration and utility tools use the SID to identify the database to operate upon. For the JDBC examples presented in this book, we sug-gest a Global Database Name of csajsp.coreservlets.com.
Enter-ing this name will autogenerate a SID of csajsp. Click Next.
Figure 18–10Seventh Oracle install window: for specifying a port for the Oracle MTS Recovery Service.
Figure 18–11Eighth Oracle install window: for specifying the name of the global database and SID.
8. Specify a database location. The ninth screen displayed (Figure 18–12) defines the physical location of the database. In a production environment, Oracle recommends placing the database on a disk other than the one on which the Oracle9i software is installed. In a develop-ment environdevelop-ment, you might have only a single disk available. We used the default suggested location, C:\oracle\oradata. Click Next.
9. Specify a default character set. On the tenth screen displayed (Figure 18–13), you select a character set for your database. Accept the default char-acter set in accordance with the language setting of the operating system.
Figure 18–12Ninth Oracle install window: for specifying the physical location of the database.
Figure 18–13Tenth Oracle install window: for selecting the default character set to use for the database.
10. Review list of products.The eleventh screen displayed (Figure 18–14) summarizes which Oracle products are about to be installed on the computer. After reviewing this list, click the Install button.
11. Install Oracle9i. At this point, the Oracle Universal Installer will install Oracle9i. The installer (Figure 18–15) indicates the progress of the installation and provides a brief message about each component as it is installed. All installation activity is recorded to a log file located at
C:\Program Files\Oracle\Inventory\logs. You can examine the log file for details if the installation fails.
Figure 18–14Eleventh Oracle install window: summarizes the products to be installed on the computer.
Figure 18–15Twelfth Oracle install window: during the installation of the Oracle components.
12. Install configuration tools. After the core Oracle9i software is installed, you can optionally install configuration tools to manage your database. We recommend that you install the configuration tools. Click Next. Progress of the tool installations is indicated by the Oracle Universal Installer, as shown in Figure 18–16.
13. Specify passwords. After the configuration tools are installed, the Database Configuration Assistant will prompt you for new SYS and SYSTEM passwords to manage the database (Figure 18–17). The
default passwords used in many Oracle database products are
change_on_install for SYS and manager for SYSTEM. Don’t use
these commonly known passwords. After specifying new passwords, click OK.
Core Warning
The default passwords for the SYS and SYSTEM administrative accounts are commonly known. For secure administration of your database, specify different passwords.
Figure 18–16Thirteenth Oracle install window: during the installation of configuration tools.
14. Complete the installation. The last screen displayed (Figure 18–18) is the end of the installation process. At this point, Oracle9i Database Release 2 is successfully installed on your computer with a starter database named csajsp. Click Exit to end the Oracle Universal
Installer program.
Figure 18–17Fourteenth Oracle install window: for specifying passwords. Use the Database Configuration Assistant to specify a password for the SYS and SYSTEM
administrative accounts.
Figure 18–18Fifteenth Oracle install window: completes the installation of Oracle9i.
Create a Database
Typically, you would create a starter database during installation of Oracle9i. How-ever, if Oracle9i is already installed on the computer you are using, you may want to create a new database. You have two choices for creating a new database. The first choice is to use the Oracle Database Configuration Assistant, which is a graphical configuration tool. The second choice is to manually create the database. To give a better understanding of Oracle9i, we present both approaches for creating a new database. As with the Oracle9i installation, you must have local Windows administra-tive rights to create a new database.
Core Warning
To create a new Oracle9i database on Windows NT/2000/XP, you must have local administrator rights on the machine.
Create a Database with the
Configuration Assistant
The process to create a new database is complicated, so Oracle strongly recommends using the Database Configuration Assistant (DBCA). Following are the steps to cre-ate a database with the DBCA.
1. Start the Oracle Database Configuration Assistant. The DBCA is included with the Oracle9i database installation. To start the DBCA on Windows XP, from the Start menu, select Start, then Pro-grams, then Oracle - OraHome92, then Configuration and Migration Tools, and last, Database Configuration Assistant. When the DBCA starts, a Welcome screen is displayed, as shown in Figure 18–19. Click Next.
2. Select an operation. On the second screen displayed (Figure 18–20), you select an operation to perform. Select the first option: Create a database. Click Next.
Figure 18–19First DBCA window: Welcome message.
3. Select a database template. On the third screen displayed (Figure 18–21), you select a template for creating the database. Select the template for a new database. Click Next.
4. Provide a database identification. On the fourth screen displayed (Figure 18–22), you specify a Global Database Name and SID to iden-tify your new database. Oracle configuration and utility tools use the SID to identify the database to operate upon. For the JDBC examples presented in this book, we suggest a Global Database Name of csa-jsp.coreservlets.com. Entering this choice will autogenerate a
SID of csajsp. Click Next.
5. Select the database features to install. On the fifth screen displayed (Fig-ure 18–23), you select the feat(Fig-ures you want to config(Fig-ure for use in your data-base. To create a simple database for testing, you do not need the optional features; uncheck each of them. If you are prompted with a question to con-firm deletion of an associated tablespace, answer Yes. Also, select the Stan-dard database features button and uncheck the four options. Click Next.
Figure 18–22Fourth DBCA window: for specifying the name of the global database and SID.
6. Select a database connection option. On the sixth screen displayed (Figure 18–24), you select the mode in which you want your database to operate. Select the Dedicated Server Mode option. Click Next.
7. Specify initialization parameters. On the seventh screen displayed (Fig-ure 18–25), you can customize the database. The default parameters are suf-ficient, so you don’t need to customize any of the tab settings. Click Next.
Figure 18–24Sixth DBCA window: for selecting the operational mode of the database.
8. Specify storage parameters. On the eighth screen displayed (Figure 18–26) you specify storage parameters for the database creation. The default storage files and locations are sufficient and require no modification. Click Next.
9. Select database creation options. On the ninth screen displayed (Figure 18–27), you specify the database creation options. Here, you simply want to create a new database, so check the Create Database option. Click Next.
Figure 18–26Eighth DBCA window: for specifying database storage parameters.
10. Review the database configuration. At this point, the DBCA pre-sents a summary of all the selected options to create the database, as shown in Figure 18–28. After you have reviewed the options, click OK.
11. Monitor the database creation process. The eleventh screen dis-played (Figure 18–29) indicates activities as the database is created. You can monitor this process if so desired.
Figure 18–28Tenth DBCA window: summarizes the configuration options before the database is created.
Figure 18–29Eleventh DBCA window: during the creation of the database.
12. Specify passwords. After the database is installed, the Database Configuration Assistant will prompt you for SYS and SYSTEM
pass-words to manage the database (Figure 18–30). After specifying new passwords, click OK to complete the database creation process.
Create a Database Manually
You usually use the Database Configuration Assistant (described in the previous sub-section) to create new databases. However, for more complete control of the process, you occasionally want to do it manually. This section describes that manual process. The following list briefly outlines the steps to manually create an Oracle9i database. Detailed instructions follow the list.
1. Set up database directories. Before you can create a new database, you must first set up the necessary directories for both administrative and database files.
2. Create an initialization parameter file. An initialization parameter file is required for configuration and startup of the database. In addi-tion to other informaaddi-tion, the parameter file contains informaaddi-tion about the block size and the number of processes permitted. 3. Create a password file. A password file containing user
authoriza-tion informaauthoriza-tion is required for management of the database. Admin-istrators can be authenticated either through a password file or through OS system groups. For this configuration, we use a password file.
Figure 18–30Twelfth DBCA window: for specifying the SYS and
4. Create a service for the database. On Windows NT/2000/XP, the database runs as a service. This approach prevents the database from shutting down when the administrator logs off the computer. 5. Declare the ORACLE_SID value. The ORACLE_SID is an
environ-ment variable to declare which database to use when running Oracle tools, such as SQL*Plus.
6. Connect to the Oracle service as SYSDBA. To manage and create a database from SQL*Plus, you must connect to the Oracle service as the system database administrator (SYSDBA).
7. Start the database instance. Starting the instance initializes the memory and processes to permit creation and management of a data-base. If the database instance is not started, the database cannot be created.
8. Create the database. Issue a command in SQL*Plus to create the database, allocating log and temp files.
9. Create a user tablespace. The tablespace stores the tables created by a user of the database.
10. Run scripts to build data dictionary views. Two scripts, cata-log.sql and catproc.sql, must be run to set up views and synonyms in the database. The first script, catproc.sql, also configures the database for use with PL/SQL.
Next, we provide detailed information about each step.
Set Up Database Directories
Before creating a new database, set up the directories for both the administrative and database files. Assuming that Oracle9i is installed on the C:\ drive, create the follow-ing directories: C:\oracle\admin\csajsp C:\oracle\admin\csajsp\bdump C:\oracle\admin\csajsp\cdump C:\oracle\admin\csajsp\pfile C:\oracle\admin\csajsp\udump C:\oracle\oradata\csajsp
The bdump directory holds alert and trace files on behalf of background pro-cesses. The cdump directory stores a core dump file should the Oracle server fail and be unrecoverable. The udump directory holds trace files used on behalf of a user process. The oradata\csajsp directory contains the physical database.
Create an Initialization Parameter File
For the database to start up, Oracle must read an initialization parameter file. The parameters in this file initialize many of the memory and process settings of the Ora-cle instance. The standard naming convention for an initialization parameter file is
initSID.ora, where SID is the system identifier for the database.
An instance is a combination of the memory and background processes associated with the database. A significant component of the instance is the System Global Area (SGA) that is allocated when the instance is started. The SGA is a memory area that stores and processes data retrieved from the physical database.
Core Note
An Oracle instance consists of the memory structure and background processes to manage the database. An initialization parameter file is required for starting an instance.
In practice, most database administrators simply copy and modify an existing parameter file when they need to create a new database. Listing 18.1 presents an example initialization parameter file that creates a database named csajsp on
Win-dows XP. Place this file in the C:\oracle\admin\csajsp\pfile directory.
For more information on initialization parameters, see Chapter 1 of the online Oracle9i Database Reference at http://download-west.oracle.com/docs/cd/ B10501_01/server.920/a96536/toc.htm. The minimum parameters that must be specified in an initialization parameter file are background_dump_dest, compati-ble, control_files, db_block_buffers, db_name, shared_pool_size, and user_dump_dest.
Listing 18.1
initCSAJSP.ora
(database initialization parameter file)
# Initialization parameter file for Oracle9i database # on Windows XP. # Database Identification db_domain=coreservlets.com db_name=csajsp # Instance Identification instance_name=csajsp# Cache and I/O db_block_size=8192 db_cache_size=25165824
db_file_multiblock_read_count=16
# Cursors and Library Cache open_cursors=300
# Diagnostics and Statistics
background_dump_dest=C:\oracle\admin\csajsp\bdump core_dump_dest=C:\oracle\admin\csajsp\cdump timed_statistics=TRUE user_dump_dest=C:\oracle\admin\csajsp\udump # File Configuration control_files=("C:\oracle\oradata\csajsp\CONTROL01.CTL", "C:\oracle\oradata\csajsp\CONTROL02.CTL", "C:\oracle\oradata\csajsp\CONTROL03.CTL") # Job Queues job_queue_processes=10 # MTS dispatchers="(PROTOCOL=TCP) (SERVICE=csajspXDB)" # Miscellaneous aq_tm_processes=1 compatible=9.2.0.0.0 # Optimizer hash_join_enabled=TRUE query_rewrite_enabled=FALSE star_transformation_enabled=FALSE # Pools java_pool_size=33554432 large_pool_size=8388608 shared_pool_size=50331648
# Processes and Sessions processes=150
# Redo Log and Recovery fast_start_mttr_target=300
Listing 18.1
initCSAJSP.ora
Create a Password File
If the initialization parameter REMOTE_LOGIN_PASSWORDFILE is set to EXCLU-SIVE, a password file must be created to authenticate administrators that have SYS-DBA privileges. Connecting to an Oracle service with SYSDBA privileges gives the
administrator unrestricted ability to perform any operation on the database. Using a password file to authenticate the administrator provides the greatest level of security. Use the ORAPWD command-line tool to create a password file. The command
accepts three arguments: FILE, which specifies the location and filename of the
password file; PASSWORD, which specifies the password to assign to user SYS for
administering the database; and ENTRIES, which specifies the maximum number of
users to whom you intend to grant SYSDBA privileges for administering the database
(the user SYS already has SYSDBA privileges).
For example, the following command,
Prompt> ORAPWD FILE="C:\oracle\ora92\DATABASE\PWDcsajsp.ora" PASSWORD=csajspDBA ENTRIES=5
creates the password file named PWDcsajsp.ora, with csajspDBA as the SYS user
password to administrate the database. The ENTRIES value of 5 defines a total of 5
users (administrators) with SYSDBA privileges in the password file.
By convention, for Oracle9i, the password file is placed in the C:\ora-cle\ora92\DATABASE directory and the name of the password file is PWD data-base.ora, where database is the name (SID) of the database associated with the password file.
# Security and Auditing
remote_login_passwordfile=EXCLUSIVE
# Sort, Hash Joins, Bitmap Indexes pga_aggregate_target=25165824 sort_area_size=524288
# System Managed Undo and Rollback Segments undo_management=AUTO
undo_retention=10800 undo_tablespace=undotbs
Listing 18.1
initCSAJSP.ora
Create an Oracle Service for the Database
Before creating the database on Windows NT/2000/XP, you need to create an Oracle service to run the database. Creating an Oracle service avoids process termination of the database when the administrator logs out of the computer. To accomplish this step, use the oradim command-line utility.
Assuming that the SID for your database is csajsp and the initialization
parame-ter file is initCSAJSP.ora, located in C:\oracle\admin\csajsp\pfile, use the following command to create the Oracle service.
Prompt> oradim -NEW -SID CSAJSP -STARTMODE MANUAL
-PFILE "C:\oracle\admin\csajsp\pfile\initCSAJSP.ora"
This command will create a service named OracleServiceCSAJSP, configured
to start up manually. When first created, however, the service should start. To check that the service has started, issue the following command.
Prompt> net start OracleServiceCSAJSP
If you want the database service to start when the computer is rebooted, change the service startup type to automatic. To change the startup type on Windows XP, go to the Start menu, then Control Panel, then Performance and Maintenance, then Administrative Tools, Services, then right-click the service to change and select Prop-erties. Next, simply change the Startup type from the available dropdown list.
Declare the
ORACLE_SID
Value
The ORACLE_SID is an environment variable used by various Oracle tools (e.g.,
SQL*Plus) to identify which database to operate upon. To set the ORACLE_SID to
the csajsp database, enter the following command.
Prompt> set ORACLE_SID=csajsp
Note that there should be no spaces around the equal (=) character.
Connect to the Oracle Service as
SYSDBA
The next step is to use SQL*Plus to connect to the database service as a system DBA (SYSDBA) before creating the new database. First, start SQL*Plus with the nolog
option, as below.
Prompt> SQLPLUS /nolog
Then, connect to the Oracle service as SYSDBA, using the following command,
where password is the SYS password you specified when creating the password file
earlier. Note: by your setting of the ORACLE_SID environment variable, SQL*Plus
automatically knows the database service in which to connect ( OracleService-CSAJSP, in this case).
Start the Oracle Instance
The Oracle instance must be started to create a new database. To start the instance without mounting the database, issue the following command in SQL*Plus.
SQL> STARTUP NOMOUNT
PFILE="C:\oracle\admin\csajsp\pfile\initCSAJSP.ora"
The PFILE must refer to the file containing the initialization parameters for the
database. Starting the instance in NOMOUNT creates the SGA and starts background
processes. However, the database cannot be accessed. Typically, you start a database in NOMOUNT only during creation of the database or during maintenance of the
data-base (e.g., creating control files).
Create the Database
To create a new database, you issue the CREATEDATABASE SQL command in
SQL*Plus. Listing 18.2 provides a CREATEDATABASE command to create the csa-jsp database on a Windows NT/2000/XP platform. To create the database, simply
type (cut and paste) this command to SQL*Plus. Or alternatively, you can create the database by running the create_csajsp.sql script from SQL*Plus. To execute the script, use the following command.
SQL> @create_csajsp.sql
Note that you may need to specify the full path after the @ for SQL*Plus to find
the script.
Execution of this command (or script) creates the csajsp database in the
C:\oracle\oradata\csajsp directory and automatically creates two user accounts, SYS
and SYSTEM, to administer the database. SYS is the owner of the database dictionary
(information about structure and users of the database), and SYSTEM is the owner of
additional tables and views used by Oracle tools.
If the database creation fails, examine the alert log file, C:\oracle\admin\csa-jsp\bdump\alert_csajsp.log, for errors. Correct the problem, delete all the files in the C:\oracle\oradata\csajsp directory, and reissue the command.
Create a User Tablespace
Before users can store information in a database, you must create a tablespace for them. All tables created by the user are placed in the tablespace. To create a user tablespace, enter the following command in SQL*Plus.
SQL> CREATE TABLESPACE users
DATAFILE 'C:\oracle\oradata\csajsp\users01.dbf' SIZE 15M REUSE
AUTOEXTEND ON NEXT 1280K MAXSIZE UNLIMITED EXTENT MANAGEMENT LOCAL;
This command creates a tablespace named users with an initial size of 15
Mbytes. The data is physically stored in the file users01.dbf.
Listing 18.2
create_csajsp.sql
/* SQL command to create an Oracle9i database named csajsp. */
CREATE DATABASE csajsp
USER SYS IDENTIFIED BY csajspDBA USER SYSTEM IDENTIFIED BY csajspMAN LOGFILE
GROUP 1 ('C:\oracle\oradata\csajsp\redo01.log') SIZE 100M, GROUP 2 ('C:\oracle\oradata\csajsp\redo02.log') SIZE 100M, GROUP 3 ('C:\oracle\oradata\csajsp\redo03.log') SIZE 100M MAXLOGFILES 5
MAXDATAFILES 100 MAXINSTANCES 1
CHARACTER SET WE8MSWIN1252 NATIONAL CHARACTER SET AL16UTF16
DATAFILE 'C:\oracle\oradata\csajsp\system01.dbf' SIZE 325M REUSE
AUTOEXTEND ON NEXT 10240K MAXSIZE UNLIMITED EXTENT MANAGEMENT LOCAL
DEFAULT TEMPORARY TABLESPACE temp
TEMPFILE 'C:\oracle\oradata\csajsp\temptbs01.dbf' SIZE 20M REUSE
EXTENT MANAGEMENT LOCAL UNDO TABLESPACE undotbs
DATAFILE 'C:\oracle\oradata\csajsp\undotbs01.dbf' SIZE 200M REUSE
Run Scripts to Build Data Dictionary Views
The last step in creating the database is to run the catalog.sql and catproc.sql scripts from SQL*Plus. Enter the full path to the script preceded by an @.
SQL> @C:\oracle\rdbms\admin\catalog.sql
SQL> @C:\oracle\rdbms\admin\catproc.sql
The catalog.sql script creates views and synonyms for the data dictionary tables.
The catproc.sql script runs all scripts required or used with Oracle PL/SQL. Both of
these scripts generate considerable output, which can be ignored; error messages may occur as tables and views are first dropped before being created.
Create a User
To access the database from a Web application, you’ll need to create a new user with the appropriate rights. From SQL*Plus, enter the following CREATE USER command,
SQL> CREATE USER username IDENTIFIED BY password
DEFAULT TABLESPACE users QUOTA UNLIMITED ON users TEMPORARY TABLESPACE temp;
where username is the login name for the new user and password is the password for the new user. The default tablespace is where tables created by the user are placed, and the QUOTA clause grants unlimited use to store information in the users
tablespace. If a QUOTA is not specified for the default tablespace, then the user
can-not create any tables. A temporary tablespace is also assigned to the user for sorting data if required by the SQL query.
Next, you need to grant the new user rights to connect to the database service and to create new tables. Issue the following SQL*Plus command,
SQL> GRANT CREATE SESSION, CREATE TABLE TO username;
where username is the user requiring access to the database. Granting the CREATE TABLE privilege also enables the user to drop tables.
Install the JDBC Driver
In our JDBC examples, we use the Oracle Thin JDBC driver, which establishes a direct TCP connection to the Oracle database server. Oracle JDBC drivers are down-loadable from http://otn.oracle.com/software/tech/java/sqlj_jdbc/. Download the appropriate version, bundled as classes12.zip (for use with JDK 1.2 and JDK 1.3) or
ojdbc14.jar (for use with the JDK 1.4) and place it in your CLASSPATH for
If multiple applications on the Web server access Oracle databases, the Web administrator may choose to move the JAR file to a common directory on the con-tainer. For example, with Tomcat, JAR files used by multiple applications can be placed in the install_dir/common/lib directory.
If your Web application server does not recognize ZIP files located in the WEB-INF/ lib directory, you can change the extension of the file to .jar; ZIP and JAR compression
algorithms are compatible (JAR files simply include a manifest with metainformation about the archive). However, some developers choose to unzip the file and then create an uncompressed JAR file by using the jar tool with the -0 command option. Both
compressed and uncompressed JAR files are supported in a CLASSPATH, but classes
from an uncompressed JAR file can load faster. See http://java.sun.com/j2se/1.4.1/ docs/tooldocs/tools.html for platform-specific documentation on the Java archive tool.
As a final note, if security is also important in your database transmissions, see
http://download-west.oracle.com/docs/cd/B10501_01/java.920/a96654/ advanc.htm, for ways to encrypt traffic over your JDBC connections. To encrypt the
traffic from the Web server to the client browser, use SSL (for details, see the chap-ters on Web application security in Volume 2 of this book).
18.4 Testing Your Database Through
a JDBC Connection
After installing and configuring your database, you will want to test your database for JDBC connectivity. In Listing 18.3, we provide a program to perform the following database tests.
• Establish a JDBC connection to the database and report the product name and version.
• Create a simple “authors” table containing the ID, first name, and last name of the two authors of Core Servlets and JavaServer Pages,
Second Edition.
• Query the “authors” table, summarizing the ID, first name, and last name for each author.
• Perform a nonrigorous test to determine the JDBC version. Use the reported JDBC version with caution: the reported JDBC version does not mean that the driver is certified to support all classes and methods defined by that JDBC version.
Since TestDatabase is in the coreservlets package, it must reside in a
sub-directory called coreservlets. Before compiling the file, set the CLASSPATH to
Your Development Environment) for details. With this setup, simply compile the program by running javac TestDatabase.java from within the coreservlets
subdirectory (or by selecting “build” or “compile” in your IDE). However, to run
TestDatabase, you need to refer to the full package name as shown in the
follow-ing command,
Prompt> java coreservlets.TestDatabase host dbName username password vendor
where host is the hostname of the database server, dbName is the name of the data-base you want to test, username and password are those of the user configured to access the database, and vendor is a keyword identifying the vendor driver.
This program uses the class DriverUtilities from Chapter 17 (Listing 17.5)
to load the vendor’s driver information and to create a URL to the database. Cur-rently, DriverUtilities supports Microsoft Access, MySQL, and Oracle
data-bases. If you use a different database vendor, you will need to modify
DriverUtilities and add the vendor information. See Section 17.3 (Simplifying
Database Access with JDBC Utilities) for details.
The following shows the output when TestDatabase is run against a MySQL
database named csajsp, using the MySQL Connector/J 3.0 driver.
Prompt> java coreservlets.TestDatabase localhost csajsp brown larry MYSQL
Testing database connection ...
Driver: com.mysql.jdbc.Driver
URL: jdbc:mysql://localhost:3306/csajsp Username: brown
Password: larry Product name: MySQL
Product version: 4.0.12-max-nt Driver Name: MySQL-AB JDBC Driver
Driver Version: 3.0.6-stable ( $Date: 2003/02/17 17:01:34 $, $Revision: 1.27.2.1
3 $ )
Creating authors table ... successful
Querying authors table ...
+---+---+---+ | id | first_name | last_name | +---+---+---+ | 1 | Marty | Hall | | 2 | Larry | Brown | +---+---+---+
Checking JDBC version ...
JDBC Version: 3.0
Interestingly, the MySQL Connector/J 3.0 driver used with MySQL 4.0.12 reports a JDBC version of 3.0. However, MySQL is not fully ANSI SQL-92 compliant and the driver cannot be JDBC 3.0 certified. Therefore, you should always check the vendor’s documentation closely for the JDBC version and always thoroughly test your product before releasing to production.
Core Warning
The JDBC version reported by DatabaseMetaData is unofficial. The driver is not necessarily certified at the level reported. Check the vendor documentation.
Listing 18.3
TestDatabase.java
package coreservlets;
import java.sql.*;
/** Perform the following tests on a database: * <OL>
* <LI>Create a JDBC connection to the database and report * the product name and version.
* <LI>Create a simple "authors" table containing the * ID, first name, and last name for the two authors * of Core Servlets and JavaServer Pages, 2nd Edition. * <LI>Query the "authors" table for all rows.
* <LI>Determine the JDBC version. Use with caution: * the reported JDBC version does not mean that the * driver has been certified.
* </OL> */
public class TestDatabase { private String driver; private String url; private String username; private String password;
public TestDatabase(String driver, String url,
String username, String password) { this.driver = driver;
this.url = url;
this.username = username; this.password = password; }
/** Test the JDBC connection to the database and report the * product name and product version.
*/
public void testConnection() { System.out.println();
System.out.println("Testing database connection ...\n"); Connection connection = getConnection();
if (connection == null) {
System.out.println("Test failed."); return;
} try {
DatabaseMetaData dbMetaData = connection.getMetaData(); String productName =
dbMetaData.getDatabaseProductName(); String productVersion =
dbMetaData.getDatabaseProductVersion(); String driverName = dbMetaData.getDriverName(); String driverVersion = dbMetaData.getDriverVersion(); System.out.println("Driver: " + driver);
System.out.println("URL: " + url);
System.out.println("Username: " + username); System.out.println("Password: " + password);
System.out.println("Product name: " + productName); System.out.println("Product version: " + productVersion); System.out.println("Driver Name: " + driverName);
System.out.println("Driver Version: " + driverVersion); } catch(SQLException sqle) {
System.err.println("Error connecting: " + sqle); } finally {
closeConnection(connection); }
System.out.println(); }
/** Create a simple table (authors) containing the ID, * first_name, and last_name for the two authors of * Core Servlets and JavaServer Pages, 2nd Edition. */
public void createTable() {
System.out.print("Creating authors table ... "); Connection connection = getConnection();
if (connection == null) { System.out.println("failure"); return; } try { String format =
"(id INTEGER, first_name VARCHAR(12), " + " last_name VARCHAR(12))";
String[] rows = { "(1, 'Marty', 'Hall')", "(2, 'Larry', 'Brown')" };
Statement statement = connection.createStatement(); // Drop previous table if it exists, but don't get // error if not. Thus, the separate try/catch here. try {
statement.execute("DROP TABLE authors"); } catch(SQLException sqle) {}
String createCommand =
"CREATE TABLE authors " + format; statement.execute(createCommand); String insertPrefix =
"INSERT INTO authors VALUES"; for(int i=0; i<rows.length; i++) {
statement.execute(insertPrefix + rows[i]); }
System.out.println("successful"); } catch(SQLException sqle) {
System.out.println("failure");
System.err.println("Error creating table: " + sqle); } finally {
closeConnection(connection); }
System.out.println(); }
/** Query all rows in the "authors" table. */
public void executeQuery() {
System.out.println("Querying authors table ... "); Connection connection = getConnection();
if (connection == null) {
System.out.println("Query failed."); return;
} try {
Statement statement = connection.createStatement(); String query = "SELECT * FROM authors";
ResultSet resultSet = statement.executeQuery(query); ResultSetMetaData resultSetMetaData =
resultSet.getMetaData();
int columnCount = resultSetMetaData.getColumnCount(); // Print out columns
String[] columns = new String[columnCount]; int[] widths = new int[columnCount];
for(int i=1; i <= columnCount; i++) {
columns[i-1] = resultSetMetaData.getColumnName(i); widths[i-1] = resultSetMetaData.getColumnDisplaySize(i); }
System.out.println(makeSeparator(widths)); System.out.println(makeRow(columns, widths)); // Print out rows
System.out.println(makeSeparator(widths)); String[] rowData = new String[columnCount]; while(resultSet.next()) {
for(int i=1; i <= columnCount; i++) { rowData[i-1] = resultSet.getString(i); } System.out.println(makeRow(rowData, widths)); } System.out.println(makeSeparator(widths)); } catch(SQLException sqle) {
System.err.println("Error executing query: " + sqle); } finally {
closeConnection(connection); }
System.out.println(); }
/** Perform a nonrigorous test for the JDBC version. * Initially, a last() operation is attempted for * JDBC 2.0. Then, calls to getJDBCMajorVersion and * getJDBCMinorVersion are attempted for JDBC 3.0. */
public void checkJDBCVersion() { System.out.println();
System.out.println("Checking JDBC version ...\n"); Connection connection = getConnection();
if (connection == null) { System.out.println("Check failed."); return; } int majorVersion = 1; int minorVersion = 0; try {
Statement statement = connection.createStatement(
ResultSet.TYPE_SCROLL_INSENSITIVE, ResultSet.CONCUR_READ_ONLY); String query = "SELECT * FROM authors";
ResultSet resultSet = statement.executeQuery(query); resultSet.last(); // JDBC 2.0
majorVersion = 2;
} catch(SQLException sqle) { // Ignore - last() not supported }
try {
DatabaseMetaData dbMetaData = connection.getMetaData(); majorVersion = dbMetaData.getJDBCMajorVersion(); // JDBC 3.0 minorVersion = dbMetaData.getJDBCMinorVersion(); // JDBC 3.0
} catch(Throwable throwable) { // Ignore - methods not supported } finally { closeConnection(connection); } System.out.println("JDBC Version: " + majorVersion + "." + minorVersion); }
// A String of the form "| xxx | xxx | xxx |"
private String makeRow(String[] entries, int[] widths) { String row = "|";
for(int i=0; i<entries.length; i++) {
row = row + padString(entries[i], widths[i], " ");
Listing 18.3
TestDatabase.java
(continued)
row = row + " |"; }
return(row); }
// A String of the form "+---+---+---+"
private String makeSeparator(int[] widths) { String separator = "+";
for(int i=0; i<widths.length; i++) {
separator += padString("", widths[i] + 1, "-") + "+"; }
return(separator); }
private String padString(String orig, int size, String padChar) { if (orig == null) {
orig = "<null>"; }
// Use StringBuffer, not just repeated String concatenation // to avoid creating too many temporary Strings.
StringBuffer buffer = new StringBuffer(padChar); int extraChars = size - orig.length();
buffer.append(orig);
for(int i=0; i<extraChars; i++) { buffer.append(padChar);
}
return(buffer.toString()); }
/** Obtain a new connection to the database or return * null on failure.
*/
public Connection getConnection() { try { Class.forName(driver); Connection connection = DriverManager.getConnection(url, username, password); return(connection); } catch(ClassNotFoundException cnfe) {
System.err.println("Error loading driver: " + cnfe); return(null);
} catch(SQLException sqle) {
System.err.println("Error connecting: " + sqle); return(null);
} }
/** Close the database connection. */
private void closeConnection(Connection connection) { try {
connection.close();
} catch(SQLException sqle) {
System.err.println("Error closing connection: " + sqle); connection = null;
} }
public static void main(String[] args) { if (args.length < 5) {
printUsage(); return; }
String vendor = args[4];
// Change to DriverUtilities2.loadDrivers() to // load the drivers from an XML file.
DriverUtilities.loadDrivers();
if (!DriverUtilities.isValidVendor(vendor)) { printUsage();
return; }
String driver = DriverUtilities.getDriver(vendor); String host = args[0];
String dbName = args[1]; String url =
DriverUtilities.makeURL(host, dbName, vendor); String username = args[2];
String password = args[3];
TestDatabase database =
new TestDatabase(driver, url, username, password); database.testConnection();
database.createTable(); database.executeQuery(); database.checkJDBCVersion(); }
18.5 Setting Up the music Table
The JDBC examples in this book use the Employees table from the Microsoft
Access Northwind database (see Section 17.2) and the custom music table, shown in
Table 18.1.
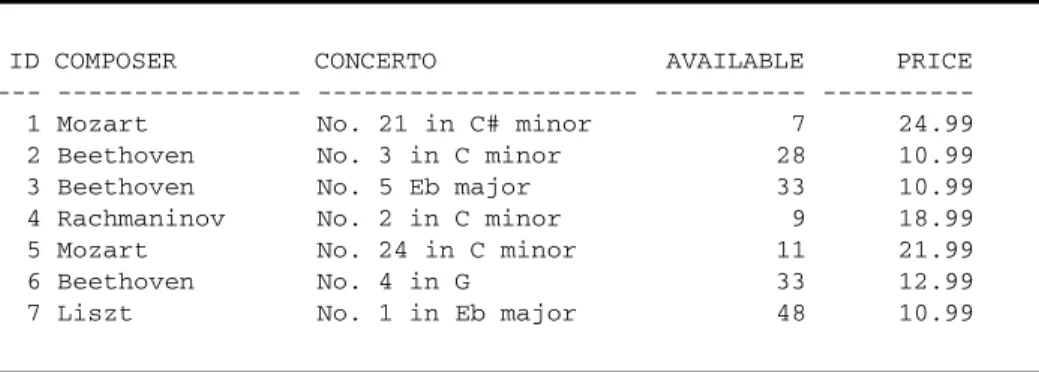
The music table summarizes the price and availability of concerto recordings for
various classical composers. To create the music table in your database, you can run
either of the two programs CreateMusicTable.java or create_music_table.sql, as explained in the following subsections.
Using CreateMusicTable.java
to Create the music Table
The Java program CreateMusicTable.java, for creating the music table, is shown in
Listing 18.4. Since CreateMusicTable is in the coreservlets package, the file
must reside in a subdirectory called coreservlets. Before compiling the file, set the
private static void printUsage() {
System.out.println("Usage: TestDatabase host dbName " + "username password vendor.");
} }
Table 18.1 Music Table
ID COMPOSER CONCERTO AVAILABLE PRICE --- --- - 1 Mozart No. 21 in C# minor 7 24.99 2 Beethoven No. 3 in C minor 28 10.99 3 Beethoven No. 5 Eb major 33 10.99 4 Rachmaninov No. 2 in C minor 9 18.99 5 Mozart No. 24 in C minor 11 21.99 6 Beethoven No. 4 in G 33 12.99 7 Liszt No. 1 in Eb major 48 10.99
CLASSPATH to include the directory containing the coreservlets directory (see
Sec-tion 2.7, “Set Up Your Development Environment”) and compile the program by running javac CreateMusicTable.java from within the coreservlets
subdirec-tory. However, to create the music table, you must refer to the full package name
when executing CreateMusicTable, as shown in the following command,
Prompt> java coreservlets.CreateMusicTable host dbName username password vendor
where host is the hostname of the database server, dbName is the name of the data-base in which to load the table, username and password are those of the user con-figured to access the database, and vendor is a keyword identifying the vendor driver (MSACCESS, MYSQL, ORACLE). Thus, if running MySQL on the local host with
a database name of csajsp, you might enter the command
Prompt> java coreservlets.CreateMusicTable localhost CSAJSP brown larry MYSQL
where brown is the username and larry is the password to access the database.
This program uses two classes from Chapter 17: DriverUtilities in Listing
17.5 and ConnectionInfoBean in Listing 17.9. DriverUtilities loads the
driver information and creates a URL to the database. ConnectionInfoBean
stores connection information to a database and can create a database connection. Currently, DriverUtilities supports Microsoft Access, MySQL, and Oracle
databases. If using a different database vendor, you must modify Driver-Utilities and add your specific vendor information. See Section 17.3 (Simplifying
Database Access with JDBC Utilities) for details.
Listing 18.4
CreateMusicTable.java
package coreservlets;
import java.sql.*;
import coreservlets.beans.*;
/** Create a simple table named "music" in the
* database specified on the command line. The driver * for the database is loaded from the utility class * DriverUtilities.
public class CreateMusicTable {
public static void main(String[] args) { if (args.length < 5) {
printUsage(); return; }
String vendor = args[4];
// Change to DriverUtilities2.loadDrivers() to // load the drivers from an XML file.
DriverUtilities.loadDrivers();
if (!DriverUtilities.isValidVendor(vendor)) { printUsage();
return; }
String driver = DriverUtilities.getDriver(vendor); String host = args[0];
String dbName = args[1]; String url =
DriverUtilities.makeURL(host, dbName, vendor); String username = args[2];
String password = args[3]; String format =
"(id INTEGER, composer VARCHAR(16), " +
" concerto VARCHAR(24), available INTEGER, " + " price FLOAT)";
String[] rows = {
"(1, 'Mozart', 'No. 21 in C# minor', 7, 24.99)", "(2, 'Beethoven', 'No. 3 in C minor', 28, 10.99)", "(3, 'Beethoven', 'No. 5 Eb major', 33, 10.99)", "(4, 'Rachmaninov', 'No. 2 in C minor', 9, 18.99)", "(5, 'Mozart', 'No. 24 in C minor', 11, 21.99)", "(6, 'Beethoven', 'No. 4 in G', 33, 12.99)", "(7, 'Liszt', 'No. 1 in Eb major', 48, 10.99)" }; Connection connection =
ConnectionInfoBean.getConnection(driver, url,
username, password); createTable(connection, "music", format, rows);
try {
connection.close();
} catch(SQLException sqle) {
System.err.println("Problem closing connection: " + sqle); }
}