Microsoft
®
Office Access
™
2007 - Level 1
(Second Edition)
Microsoft
®
Office Access
™
2007
-Level 1 (Second Edition)
Microsoft
®
Office Access
™
2007
-Level 1 (Second Edition)
Course Edition: 1.0
A
CKNOWLEDGMENTS
Project Team
Content Developer:Divyalakshmi P, Ramesh Krishnan, Sangeetha KS and Sriram K•Content Manager:Harleen S•Graphic Designer:Venkateshwarulu Jede and Manoj Praveena•Project Manager:Janet Dorothy•Media Instructional Designer:• Content Editor:Erin Brazofsky and Gopalakrishnan V•Materials Editor:Banu Priya•Business Matter Expert:•Technical Reviewer:Tom Stone•Project Technical Support:Mike Toscano
NOTICES
DISCLAIMER:While Element K Content LLC takes care to ensure the accuracy and quality of these materials, we cannot guarantee their accuracy, and all materials are provided without any warranty whatsoever, including, but not limited to, the implied warranties of merchantability or fitness for a particular purpose. The name used in the data files for this course is that of a fictitious company. Any resemblance to current or future companies is purely coincidental. We do not believe we have used anyone’s name in creating this course, but if we have, please notify us and we will change the name in the next revision of the course. Element K is an independent provider of integrated training solutions for individuals, businesses, educational institutions, and government agencies. Use of screenshots, photographs of another entity’s products, or another entity’s product name or service in this book is for editorial purposes only. No such use should be construed to imply sponsorship or endorsement of the book by, nor any affiliation of such entity with Element K. This courseware may contain links to sites on the Internet that are owned and operated by third parties (the″External Sites″). Element K is not responsible for the availability of, or the content located on or through, any External Site. Please contact Element K if you have any concerns regarding such links or External Sites.
TRADEMARK NOTICES:Element K and the Element K logo are trademarks of Element K LLC and its affiliates.
Microsoft®Office Access™2007 is a registered trademark of Microsoft®Corporation in the U.S. and other countries; the Microsoft®Corporation products and services discussed or described may be
trademarks of Microsoft®Corporation . All other product names and services used throughout this course may be common law or registered trademarks of their respective proprietors.
Copyright © 2007 © 2007 Element K Content LLC. All rights reserved. Screenshots used for illustrative purposes are the property of the software proprietor. This publication, or any part thereof, may not be reproduced or transmitted in any form or by any means, electronic or mechanical, including photocopying, recording, storage in an information retrieval system, or otherwise, without express written permission of Element K, 500 Canal View Boulevard, Rochester, NY 14623, (585) 240-7500, (800) 478-7788. Element K Courseware’s World Wide Web site is located at
www.elementkcourseware.com.
This book conveys no rights in the software or other products about which it was written; all use or licensing of such software or other products is the responsibility of the user according to terms and conditions of the owner. Do not make illegal copies of books or software. If you believe that this book, related materials, or any other Element K materials are being reproduced or transmitted without permission, please call (800) 478-7788.
Reference Material
Please Do Not Copy
M
ICROSOFT
®
O
FFICE
A
CCESS
™
2007
-L
EVEL
1 (S
ECOND
E
DITION
)
L
ESSON1 - E
XPLORING THEM
ICROSOFT®O
FFICEA
CCESS™2007
E
NVIRONMENTA. Examine Database Concepts . . . . 2
Databases . . . 2
Database Terminology. . . 3
Relational Databases. . . 4
B. Explore the User Interface. . . . 5
Microsoft Office Access 2007 . . . 6
The Getting Started With Microsoft Office Access Window. . . 6
The Access Application Window. . . 6
The Office Button . . . 7
The Quick Access Toolbar. . . 7
The Ribbon . . . 7
The Navigation Pane. . . 8
The Tabbed Document Window Viewing Feature. . . 8
The Microsoft Office Window Frame . . . 9
Galleries . . . 9
C. Use an Existing Access Database . . . 13
Tables . . . 13
Queries . . . 13
Recordsets . . . 14
Forms. . . 15
Reports . . . 16
D. Customize the Access Environment . . . 21
The Access Options Dialog Box . . . 21
C
ONTENTS
E. Obtain Help. . . 25
Access 2007 Help. . . 25
L
ESSON2 - D
ESIGNING AD
ATABASE A. Describe the Relational Database Design Process . . . 32The Relational Database Design Process . . . 32
B. Define Database Purpose. . . 34
The Statement of Purpose. . . 34
C. Review Existing Data. . . 36
Existing Data. . . 36
D. Determine Fields . . . 38
E. Group Fields into Tables. . . 40
Business Rules . . . 40
Field and Table Names . . . 40
F. Normalize Data. . . 43
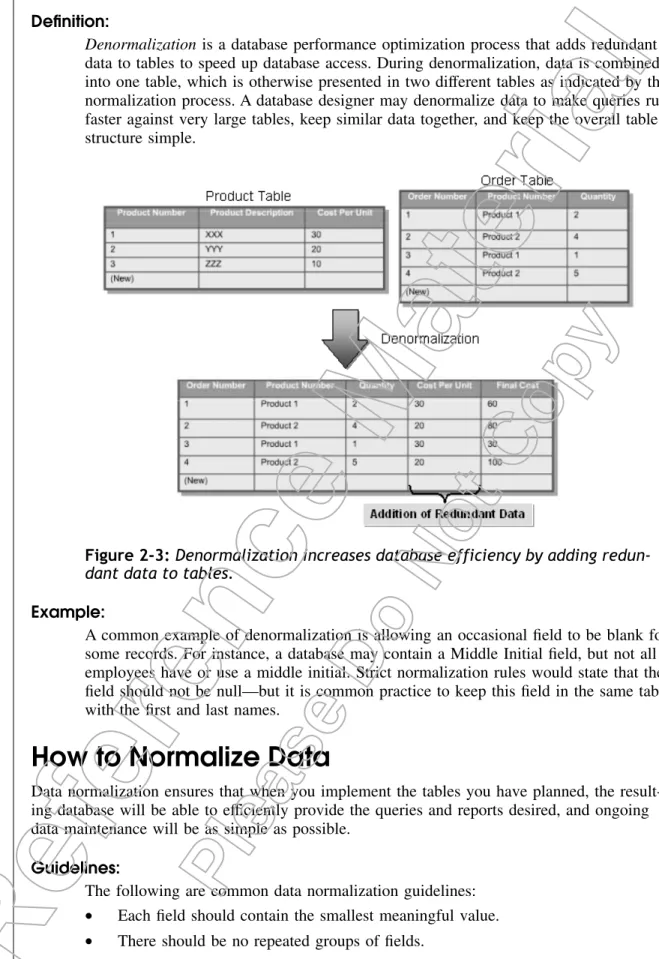
Normalization. . . 43
Denormalization . . . 44
G. Designate Primary and Foreign Keys . . . 49
Primary Keys . . . 49
Composite Keys. . . 50
Foreign Keys . . . 50
Need for Primary and Foreign Keys . . . 51
H. Determine Table Relationships. . . 53
Table Relationships . . . 53
The One-to-One Relationship. . . 53
The One-to-Many Relationship. . . 54
L
ESSON3 - B
UILDING AD
ATABASE A. Create a New Database. . . 58Access Database Templates. . . 58
C
ONTENTS
B. Create a Table . . . 62
Table Views. . . 62
The Field Insertion Feature. . . 62
Data Types . . . 62
Multivalued Fields . . . 63
File Types. . . 64
C. Manage Tables . . . 77
The Table Properties Dialog Box. . . 78
Table Design Options. . . 78
D. Create a Table Relationship. . . 81
Referential Integrity. . . 81
Guidelines to Enforcing Referential Integrity. . . 81
The Relationships Window. . . 82
The Edit Relationships Dialog Box. . . 82
Join Lines. . . 83
E. Save a Database as a Previous Version. . . 86
The Save As Option . . . 86
L
ESSON4 - M
ANAGINGD
ATA IN AT
ABLE A. Modify Table Data. . . 90The Find Command. . . 90
The Replace Command. . . 91
The Totals Feature. . . 91
B. Sort Records . . . 96
Sorting Records . . . 96
C. Work with Subdatasheets. . . 99
Subdatasheets. . . 99
L
ESSON5 - Q
UERYING AD
ATABASE A. Filter Records. . . 104Filter Feature. . . 104
C
ONTENTS
B. Create a Query. . . 108
The Query Wizard. . . 108
Types of Queries. . . 108
The Query Design Feature. . . 108
Query Object Views. . . 109
The Show Table Dialog Box . . . 109
C. Add Criteria to a Query. . . 113
Query Criteria. . . 113
Comparison Operators. . . 114
List of Comparison Operators. . . 114
Conditional Operators . . . 115
List of Conditional Operators . . . 115
D. Add a Calculated Field to a Query . . . 120
The Calculated Field. . . 120
Arithmetic Operators. . . 121
Expressions . . . 121
The Expression Builder . . . 122
The Zoom Dialog Box. . . 122
The Property Sheet Pane. . . 122
E. Perform Calculations on a Record Grouping . . . 126
Group By Functions . . . 126
L
ESSON6 - D
ESIGNINGF
ORMS A. View Data Using an Access Form. . . 132Form Views . . . 132
Form Sections. . . 133
Form Contextual Tabs . . . 133
The Record Navigation Bar. . . 133
B. Create a Form. . . 139
Form Creation Tools. . . 139
C
ONTENTS
C. Modify the Design of a Form. . . 145
The Tab Order. . . 145
Controls. . . 145
Types of Controls . . . 146
L
ESSON7 - G
ENERATINGR
EPORTS A. View an Access Report. . . 154Report Views. . . 154
Report Sections . . . 155
Report Contextual Tabs. . . 155
B. Create a Report . . . 159
Report Creation Tools . . . 159
Summary Options . . . 159
C. Add a Custom Calculated Field to a Report. . . 164
D. Format the Controls in a Report . . . 169
Control Properties . . . 169
E. Apply an AutoFormat Style to a Report . . . 172
AutoFormat . . . 172
F. Prepare a Report for Print. . . 175
Page Setup Options. . . 175
Print Preview. . . 175
Proofing Options . . . 175
L
ESSON8 - C
ONTROLLINGD
ATAE
NTRY A. Restrict Data Entry Using Field Properties. . . 180Field Properties. . . 180
B. Establish a Pattern for Entering Field Values. . . 187
Input Masks. . . 187
The Input Mask Wizard. . . 187
C. Create a List of Values for a Field . . . 193
The Lookup List. . . 194
C
ONTENTS
L
ESSON9 - J
OININGT
ABLESA. Create Query Joins . . . 200
Query Joins. . . 200
Inner Joins. . . 200
Outer Joins . . . 201
The Join Properties Dialog Box . . . 202
B. Join Unrelated Tables. . . 207
C. Relate Data Within a Table . . . 209
Self Joins . . . 209
Alias. . . 209
L
ESSON10 - C
REATINGF
LEXIBLEQ
UERIES A. Set Select Query Properties . . . 214Select Query Properties. . . 214
B. Create Parameter Queries . . . 219
Parameter Queries . . . 219
The Like Operator and Wildcards. . . 219
The Ampersand . . . 220
C. Create Action Queries . . . 224
The Action Query. . . 225
L
ESSON11 - I
MPROVINGF
ORMS A. Design a Form Layout . . . 236Form Layouts . . . 236
The WYSIWYG Interface . . . 237
The Anchoring Tool . . . 237
B. Enhance the Appearance of a Form . . . 242
Grouped Controls . . . 242
Conditional Formatting. . . 242
C
ONTENTS
C. Restrict Data Entry in Forms. . . 250
Control Wizards . . . 250
The Combo Box Control . . . 250
The List Box Control. . . 251
The Option Group Control . . . 251
D. Add a Command Button to a Form . . . 258
Command Buttons . . . 258
E. Create a Subform. . . 261
Subforms. . . 261
L
ESSON12 - C
USTOMIZINGR
EPORTS A. Organize Report Information. . . 268Report Design. . . 268
Report Design Tools . . . 269
The Group, Sort, And Total Pane. . . 270
Group Headers . . . 270
The Totals Feature. . . 270
The Field List Pane. . . 270
B. Format the Report. . . 279
The Rich Text Support Feature. . . 279
Report Format Tools. . . 280
C. Set Report Control Properties. . . 284
Report Control Properties. . . 284
D. Control Report Pagination. . . 290
The Keep Together Property. . . 290
The Force New Page Property . . . 290
E. Summarize Report Information. . . 295
The Summary Field. . . 295
The Control Source Property. . . 295
F. Add a Subreport to an Existing Report . . . 299
Subreports. . . 299
C
ONTENTS
L
ESSON13 - S
HARINGD
ATAA
CROSSA
PPLICATIONSA. Import Data into Access. . . 308
Importing Data. . . 308
Options for Importing Data. . . 308
The Get External Data Dialog Box . . . 309
Delimiters . . . 309
Comma-Separated Values . . . 309
B. Export Data. . . 317
Exporting Data. . . 317
Options for Exporting Data. . . 318
C. Analyze Access Data in Excel . . . 324
D. Export Data to a Text File . . . 326
E. Merge Access Data with a Word Document . . . 330
The Microsoft Word Mail Merge Wizard. . . 330
Merge Fields. . . 330
The Mail Merge Task Pane. . . 330
L
ESSONL
ABS . . . 339S
OLUTIONS . . . 353I
NDEX . . . 359C
ONTENTS
A
BOUT
T
HIS
C
OURSE
Most organizations maintain and manage large amounts of information. One of the most effi-cient and powerful ways of managing data is by using relational databases. Information can be stored, linked, and managed using a single relational database application and its associated tools. In this course, you will examine the basic database concepts, and create and modify databases and their various objects using the Microsoft®Office Access™ 2007 relational data-base application.
Managing large amounts of complex information is common in today’s business environment and, if done properly, can provide any business an edge over the competition. However, mis-managed and lost information can cause you to fall behind. Managing data using the Access 2007 database application can give your business that positive edge.
Course Description
Target Student
This course is designed for students who wish to learn the basic operations of the Microsoft Access database application to perform their day-to-day responsibilities, and to understand the advantages that using a relational database application can bring to their business processes. The Level 1 course is for the individual whose job responsibilities include designing and creat-ing new databases, tables, and relationships; creatcreat-ing and maintaincreat-ing records; locatcreat-ing records; and producing reports based on the information in the database.
Course Prerequisites
Students should have completed the following courses or possess equivalent knowledge before starting this course:
• Windows 2000 - Introduction
• Windows XP - Introduction
• Windows XP - Level 1
• Windows XP - Level 2
I
NTRODUCTION
How to Use This Book
As a Learning Guide
Each lesson covers one broad topic or set of related topics. Lessons are arranged in order of increasing proficiency withMicrosoft® Offıce Access 2007; skills you acquire in one lesson are used and developed in subsequent lessons. For this reason, you should work through the les-sons in sequence.
We organized each lesson into results-oriented topics. Topics include all the relevant and sup-porting information you need to masterMicrosoft®Offıce Access 2007, and activities allow you to apply this information to practical hands-on examples.
You get to try out each new skill on a specially prepared sample file. This saves you typing time and allows you to concentrate on the skill at hand. Through the use of sample files, hands-on activities, illustrations that give you feedback at crucial steps, and supporting back-ground information, this book provides you with the foundation and structure to learn
Microsoft®Offıce Access 2007quickly and easily.
As a Review Tool
Any method of instruction is only as effective as the time and effort you are willing to invest in it. In addition, some of the information that you learn in class may not be important to you immediately, but it may become important later on. For this reason, we encourage you to spend some time reviewing the topics and activities after the course. For an additional chal-lenge when reviewing activities, try the″What You Do″column before looking at the ″How You Do It″ column.
As a Reference
The organization and layout of the book make it easy to use as a learning tool and as an after-class reference. You can use this book as a first source for definitions of terms, background information on given topics, and summaries of procedures.
This course is one of a series of New Horizons courseware titles that addresses Microsoft Cer-tified Applications Specialist (MCAS) skill sets. The MCAS program is for individuals who use Microsoft’s business desktop software and who seek recognition for their expertise with specific Microsoft products. Certification candidates must pass one or more proficiency exams in order to earn Microsoft Certified Applications Specialist certification.
Course Objectives
In this course, you will create and modify new databases and their various objects. You will:
• examine the basic database concepts and explore the Microsoft Office Access 2007 envi-ronment.
• design a simple database.
• build a new database with related tables.
I
NTRODUCTION
• query a database using different methods.
• design forms.
• generate reports.
• modify the design and field properties of a table to streamline data entry and maintain data integrity.
• retrieve data from tables using joins.
• create flexible queries to display specified records, allow for user-determined query crite-ria, and modify data using queries.
• enhance the capabilities of a form.
• customize reports to organize the displayed information and produce specific print layouts.
• share data across different applications.
I
NTRODUCTION
N
OTES
Exploring the Microsoft
®
Office Access
™
2007
Environment
In this lesson, you will examine the basic database concepts and explore the Microsoft Office Access 2007 environment.
You will:
• Examine database concepts.
• Explore the user interface of Microsoft Access 2007.
• Use an existing Access database.
• Customize the Access environment.
• Obtain help using the Access 2007 Help feature.
Lesson Time
50 minutes
L
ESSON
1
L
ESSON
1
Introduction
In most businesses, working with large amounts of varying types of data is a daily require-ment. Understanding the concepts of databases and their components will provide you with a foundation for using Microsoft®Office Access™ 2007 to organize your data. In this lesson, you will examine basic database concepts and explore the Access 2007 environment.
Imagine using a computer without having a basic understanding of its components and how it operates. Similarly, using a database application such as Access without understanding its com-ponents would make your job tedious. Exploring the Access environment will introduce you to some of its basic tools and functions, which will help you get started with Access.
T
OPIC
A
Examine Database Concepts
If you work with large amounts of data, you know that it is important to logically group data and store it for future use. A database is a useful tool for organizing, storing, and retrieving data efficiently. If you have never used a database, understanding what a database is and know-ing the terms used to describe a database are the first steps to becomknow-ing a competent database user. In this topic, you will be introduced to database concepts.
Working with databases has become inevitable in any business environment. Familiarizing yourself with the basic concepts of a database will help you work with them easily.
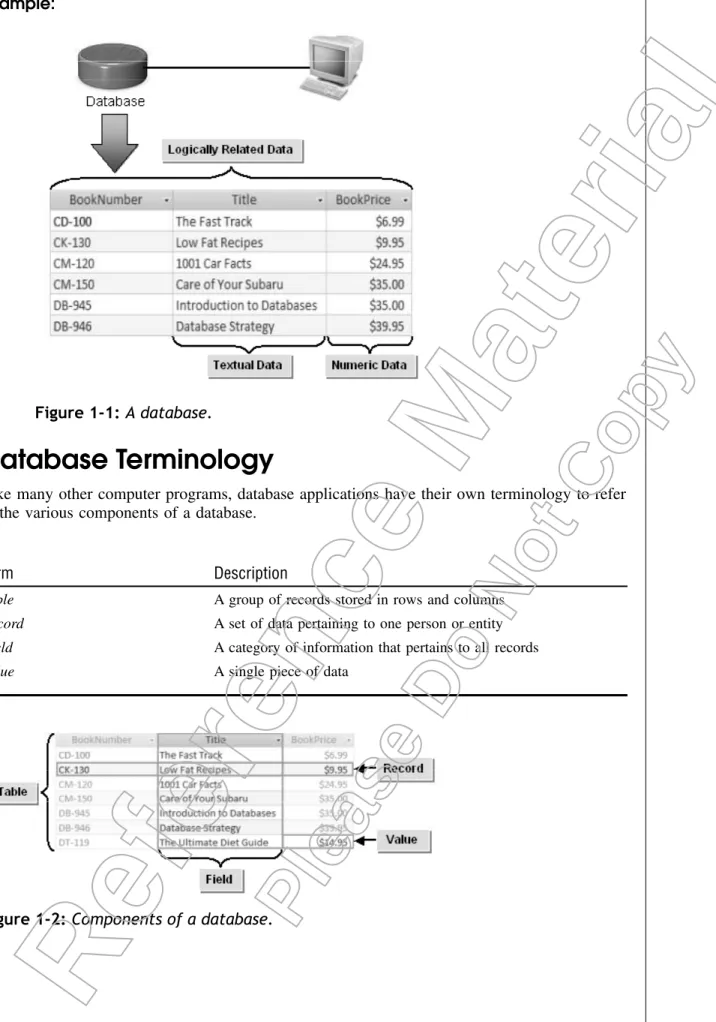
Databases
Definition:
Adatabase is a collection of data that is logically related and organized so that a com-puter program can access the desired information quickly. The data contained in a database can be textual, numeric, or graphical. The data in the database can be searched, retrieved, and manipulated.
L
ESSON
1
Example:
Figure 1-1:A database.
Database Terminology
Like many other computer programs, database applications have their own terminology to refer to the various components of a database.
Term Description
Table A group of records stored in rows and columns
Record A set of data pertaining to one person or entity
Field A category of information that pertains to all records
Value A single piece of data
Figure 1-2:Components of a database.
L
ESSON
1
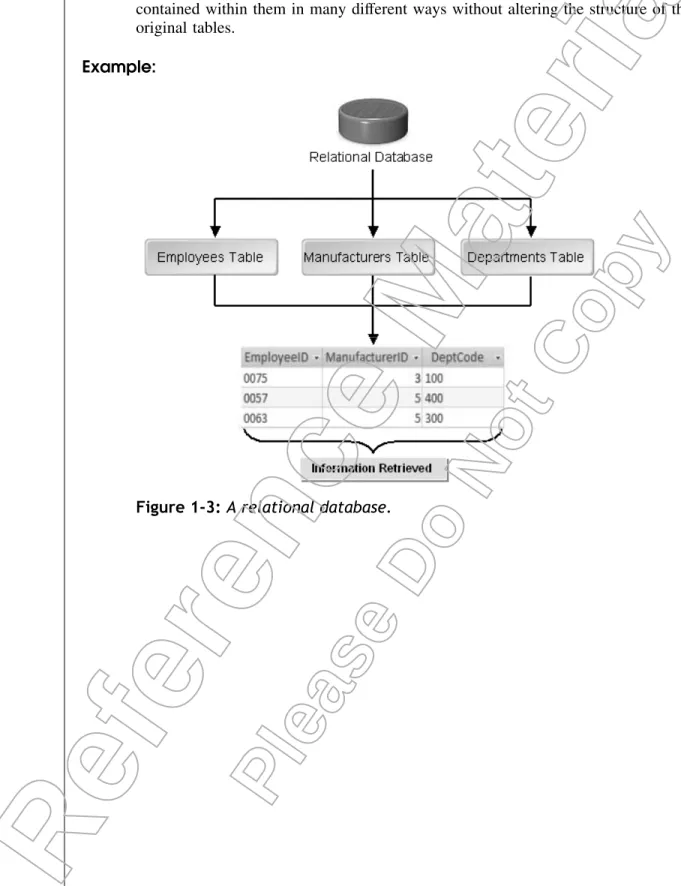
Relational Databases
Definition:
Relational databases are databases that store information in multiple tables that are interrelated. Each table stores one specific category of information. Relational data-bases can access these tables and extract, reorganize, and display the information contained within them in many different ways without altering the structure of the original tables.
Example:
Figure 1-3: A relational database.
L
ESSON
1
A
CTIVITY
1-1
Examining Database Concepts
Scenario:You have started working as a customer relations executive in a travel agency. The agency stores all its customer and travel information in a database. As you interact with customers, you may need to use the database for storing and retrieving data. Before starting off with your work, you want to make sure that you understand the basic concepts of databases and the ter-minology used to refer to their various components.
1. Which term is used to refer to a single piece of data?
a) Table b) Field c) Value d) Record
2. What does the term record refer to?
a) Set of data pertaining to one person or entity b) Single piece of data
c) Category of information that pertains to all records d) Group of records stored in rows and columns
T
OPIC
B
Explore the User Interface
Having examined the concepts of databases and their components, you are now ready to work with a database application. Microsoft Office Access 2007 is a robust and easy-to-use applica-tion that even beginners can learn quickly. In order to start working with Access 2007, you first need to be familiar with the various elements of its interface. In this topic, you will explore the user interface of Access 2007.
Starting to work with a software application without having explored its environment is much like entering a house without knowing how to open any of the doors to the rooms. Working with Access can become easier if you first understand the utilities of the various elements of its interface. Also, while managing or creating a database, you will not waste time searching for commands if you are sure about their locations.
L
ESSON
1
Microsoft Office Access 2007
Microsoft Offıce Access 2007is a database application used for creating and managing data-bases. By using this application, you can quickly retrieve the desired information from a database and also update it. It provides you with various features for creating and editing tables, forms, and reports. You can display sorted, filtered, and grouped data. Additionally, Access 2007 allows you to import and export data from external applications and from the web.
The Getting Started With Microsoft Office Access
Window
TheGetting Started With Microsoft Offıce Access windowis the first window that appears when you start Access 2007. Using this window, you can choose either a blank database, or one of the ready-to-use database templates, through which you can start working on databases without much effort. There are many template categories available, such as Education and Business. From this window, you can also connect to Microsoft Office online for finding help and downloading templates across various categories. The templates can be customized to suit your requirements. You can also access recently opened databases from the right pane of the window.
The Access Application Window
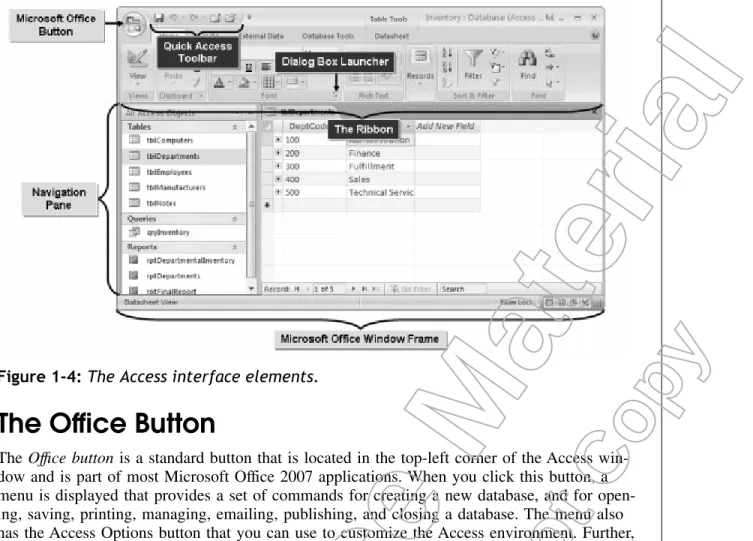
When you create a new database or open an existing database, the Access application window is displayed. The Access application window consists of various interface elements to assist you while you are working on a database.
Window Element Description
The Office button A standard button that displays a menu containing various functions to open, save, print, and close an Access database. The Quick Access toolbar A toolbar that provides easy access to frequently used
com-mands in the application.
The Ribbon A panel that contains task-specific commands grouped under
different command tabs.
The Navigation Pane A pane that displays the database objects such as tables, que-ries, forms, and reports.
The Microsoft Office Window Frame A window element that enables you to switch between differ-ent views in which the database objects can be viewed. Dialog Box Launcher Are miniature buttons that accompany groups on the
com-mand tabs. When you click a button, a dialog box that provides additional commands and tools associated with the group is launched.
L
ESSON
1
Figure 1-4:The Access interface elements.
The Office Button
TheOffıce buttonis a standard button that is located in the top-left corner of the Access win-dow and is part of most Microsoft Office 2007 applications. When you click this button, a menu is displayed that provides a set of commands for creating a new database, and for open-ing, savopen-ing, printopen-ing, managopen-ing, emailopen-ing, publishopen-ing, and closing a database. The menu also has the Access Options button that you can use to customize the Access environment. Further, a list of recently opened databases is retained in the Office button menu enabling you to quickly access the databases you have been working on.
The Quick Access Toolbar
TheQuick Access toolbar is a toolbar that holds frequently used commands such as Save, Undo, and Redo, and is located above the Ribbon as an integrated component of the title bar. The commands on the Quick Access toolbar are available regardless of which command tab you select on the Ribbon. You can, however, customize the Quick Access toolbar to include additional commands that you frequently use. You can also place the Quick Access toolbar below the Ribbon.
The Ribbon
TheRibbonis a new interface component that contains task-specific commands grouped together under different command tabs. It has been designed to be the primary location for accessing various commands. The Ribbon enables you to easily identify the desired tools or functions, and perform both simple and advanced operations without having to navigate exten-sively.
L
ESSON
1
ScreenTip
AScreenTip is a label that appears when you place the mouse pointer over a command or control in the interface. It contains a description of the task performed by the con-trol or command. This feature has been incorporated for most of the common options that you may work with. However, the ScreenTip for other options and command but-tons provides only the name of the component.
Command Tabs
The following table lists the command tabs on the Ribbon in Access.
Command Tab Contains Commands For
Home Organizing and manipulating data present in
the database objects.
Create Creating database objects.
External Data Importing and exporting data.
Database Tools Manipulating macros, defining relationships,
showing or hiding specific tools, analyzing data, moving data to a server, and accessing database tools.
Contextual Tabs
Contextual tabs are tabs with specialized commands that are displayed on the Ribbon when you select an object such as a table, form, or report. They are displayed along with the core tabs that exist by default on the Ribbon, and you can use them to modify and format the selected object. You can switch between the contextual tabs and the core tabs as needed. However, when you deselect the object, the contextual tabs disap-pear.
The Navigation Pane
TheNavigation Pane is located on the left side of the Access window and displays database objects such as tables, forms, queries, and reports. Using the Navigation Pane, you can navi-gate between database objects. You can also customize the Navigation Pane to display the navigation items to suit your requirements.
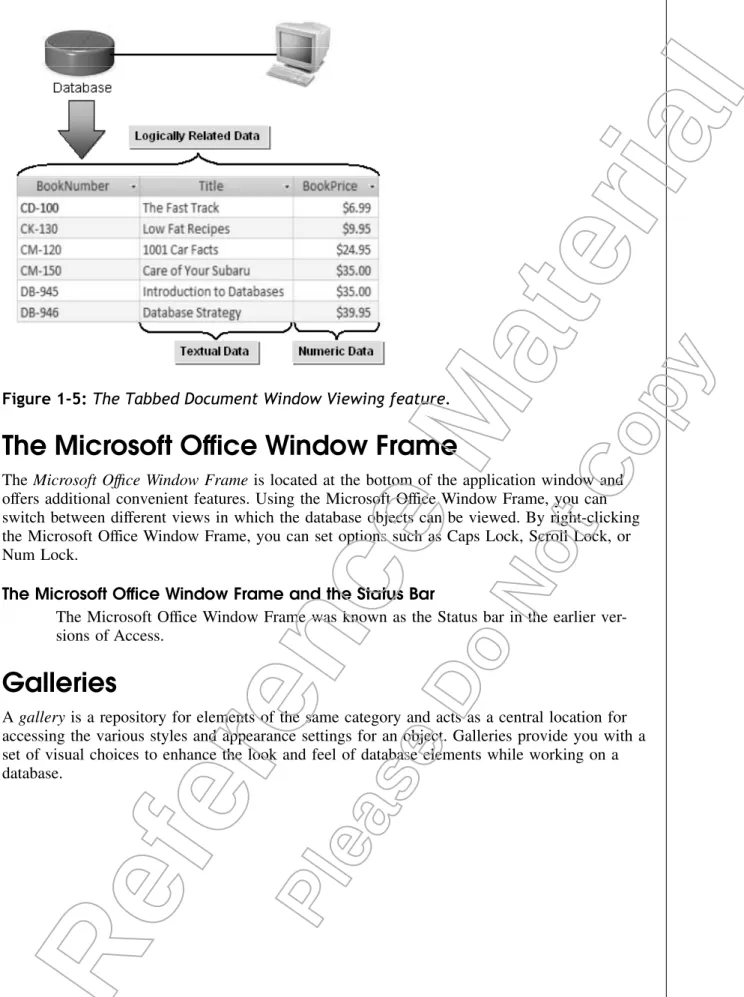
The Tabbed Document Window Viewing Feature
TheTabbed Document Window Viewingfeature displays the open database objects such as tables, queries, and forms as tabs in the same window. This feature enables you to easily navi-gate between the objects.
L
ESSON
1
Figure 1-5:The Tabbed Document Window Viewing feature.
The Microsoft Office Window Frame
TheMicrosoft Offıce Window Frame is located at the bottom of the application window and offers additional convenient features. Using the Microsoft Office Window Frame, you can switch between different views in which the database objects can be viewed. By right-clicking the Microsoft Office Window Frame, you can set options such as Caps Lock, Scroll Lock, or Num Lock.
The Microsoft Office Window Frame and the Status Bar
The Microsoft Office Window Frame was known as the Status bar in the earlier ver-sions of Access.
Galleries
Agalleryis a repository for elements of the same category and acts as a central location for accessing the various styles and appearance settings for an object. Galleries provide you with a set of visual choices to enhance the look and feel of database elements while working on a database.
L
ESSON
1
A
CTIVITY
1-2
Exploring the User Interface
Data Files:• Books.accdb
Scenario:
Your company has just purchased and installed the Microsoft Office 2007 package. As you will be working with Access frequently, you decide to spend some time exploring the new user interface elements of the Access environment.
What You Do How You Do It
1. Explore the Getting Started With Microsoft Access window.
a. Choose Start→All Programs→Microsoft Office→Microsoft Office Access 2007to launch the Microsoft Office Access 2007 application.
b. In the left pane, in the From Microsoft Office Online section,click a category.
c. Observe that the middle pane displays the templates available in the selected cat-egory.
2. Explore the Office button. a. Click the Office button.
b. Notice that the menu displays the options for creating, saving, printing, managing, emailing, publishing, and closing the data-base.
c. Click outside the menuto close it. 3. Open an existing database using the
Office button.
a. Click the Office button and choose Open.
b. In the Open dialog box,navigate to the C:\084887Data\Exploring The Access Environment folder.
c. In the Open dialog box,select Books.accdb and click Open.
d. In the Navigation Pane,double-click tblBookOrdersto open the tblBookOrders table.
L
ESSON
1
4. Explore the Quick Access toolbar. a. On the Quick Access toolbar,place the mouse pointer over each buttonto view the ScreenTip.
b. Click the Customize Quick Access Toolbar drop-down arrowto view the options.
c. Click anywhere outside the drop-down listto close it.
5. Explore the Ribbon. a. Observe the various groups of commands on the Home tab such as Views, Clip-board, Font, Rich Text, Records, Sort & Filter, and Find.
b. On the Ribbon,select a tabto view the commands.
c. Observe the various commands and but-tons that perform functions specific to the selected tab.
6. Explore the Microsoft Office Win-dow Frame.
a. In the lower-right corner, on the Microsoft Office Window Frame,position the mouse pointer over each buttonto view the ScreenTip.
b. Right-click the Microsoft Office Window Frame and view the options.
c. Click anywhere outside the menuto close it.
7. Explore the Navigation Pane. a. In the Navigation Pane,click the Shutter Bar Open/Close button to collapse the Navigation Pane.
b. At the top of the Navigation Pane,click the Shutter Bar Open/Close buttonto expand the Navigation Pane.
L
ESSON
1
c. Place the mouse pointer on the separa-tor line between the Navigation Pane and the Tabbed Document.When the pointer changes to a double-headed arrow,click and drag the mouse pointer approximately one inch to the leftto decrease the size of the Navigation Pane.
8. Explore the Dialog Box Launcher button on the Home tab.
a. On the Ribbon,select the Home tab.
b. At the bottom-right corner of the Font group,click the Dialog Box Launcher button.
c. Observe that the Datasheet Formatting dialog box is displayed.
d. In the Datasheet Formatting dialog box,
click the Close buttonto close the dialog box.
9. Display the Font Color gallery. a. In the Font group,click the Font Color drop-down arrow to display the Font color gallery.
b. At the top right of the Tabbed Document window, click the Close button to close the tblBookOrders table.
L
ESSON
1
T
OPIC
C
Use an Existing Access Database
In the previous topic, you explored the various interface components of the Access application. Before designing and creating your own database, you want to explore an existing database and its various objects. In this topic, you will use an existing Access database.
In order to effectively design and create your own databases in Access 2007, it is important to have first used the application and some existing databases. Compared with spreadsheets or word processing applications, a database application, such as Access, is a little more compli-cated. Having experience with the objects available in an existing database will enable you to make the right decision in designing and creating your own databases.
Tables
Definition:
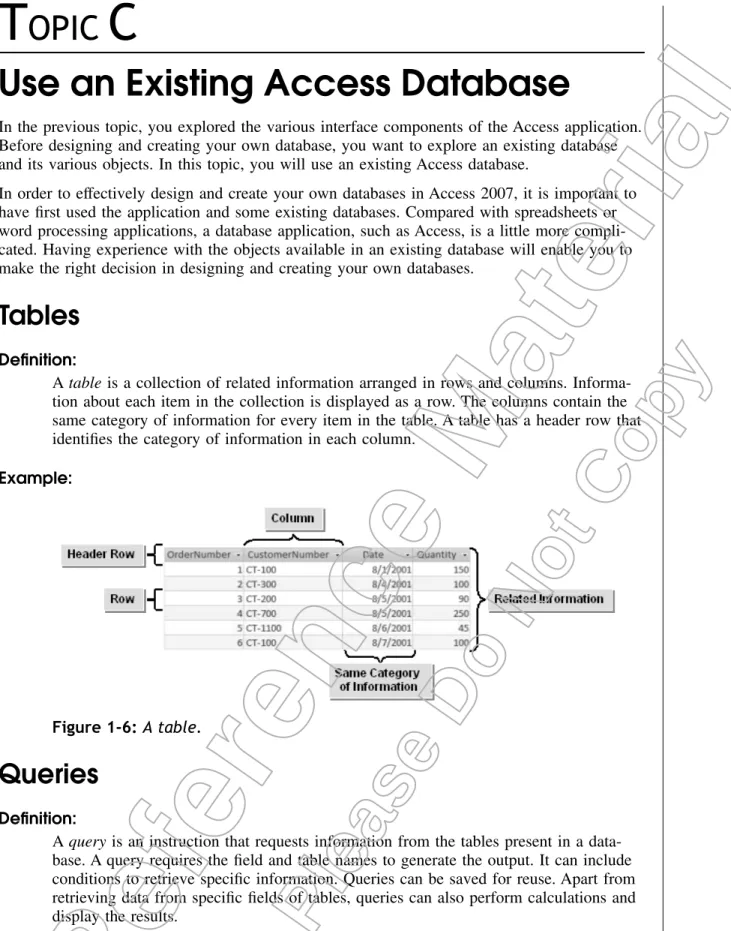
Atable is a collection of related information arranged in rows and columns. Informa-tion about each item in the collecInforma-tion is displayed as a row. The columns contain the same category of information for every item in the table. A table has a header row that identifies the category of information in each column.
Example:
Figure 1-6:A table.
Queries
Definition:
Aquery is an instruction that requests information from the tables present in a data-base. A query requires the field and table names to generate the output. It can include conditions to retrieve specific information. Queries can be saved for reuse. Apart from retrieving data from specific fields of tables, queries can also perform calculations and display the results.
L
ESSON
1
Example:
Figure 1-7: A query.
Recordsets
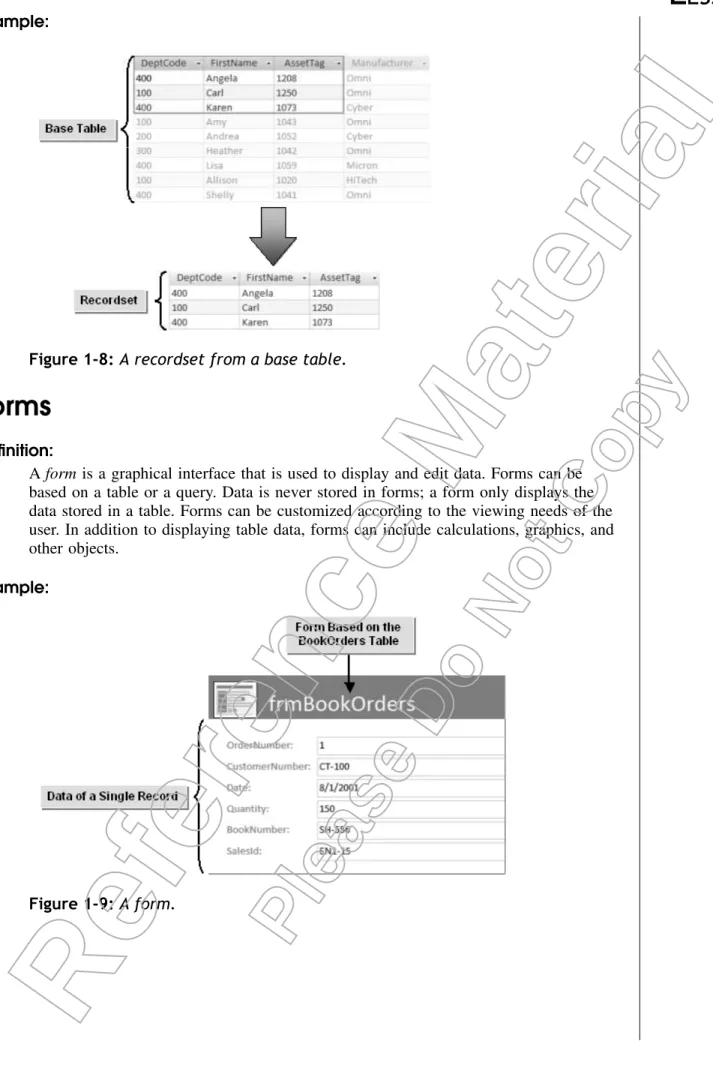
Definition:
Arecordsetis a table that displays groups of records either from a base table or as the result of an executed query. The data displayed in a recordset is physically located within a larger source, such as a table.
L
ESSON
1
Example:
Figure 1-8:A recordset from a base table.
Forms
Definition:
Aform is a graphical interface that is used to display and edit data. Forms can be based on a table or a query. Data is never stored in forms; a form only displays the data stored in a table. Forms can be customized according to the viewing needs of the user. In addition to displaying table data, forms can include calculations, graphics, and other objects.
Example:
Figure 1-9:A form.
L
ESSON
1
Reports
Definition:
Areportis a screen output of data arranged in an order specified by the user. It con-sists of information retrieved from tables or queries. Reports can also perform
calculations and display the results. Reports are often created for the purpose of print-ing data.
Example:
Figure 1-10:A report. Naming Conventions in Access
Naming conventions in Access are widely accepted guidelines for naming database objects in order to identify them easily. The guidelines call for a unique prefix to be assigned to an object name. Naming conventions are optional and the type of naming convention utilized is strictly based on the discretion of the user.
Object Prefix Example
Table tbl tblSampleTable
Select Queries qry qrySampleQuery
Form frm frmSampleForm
Subform fsub fsubSampleSubform
Report rpt rptSampleReport
Subreport rsub rsubSampleSubReport
L
ESSON
1
How to Use an Existing Access Database
Procedure Reference: View Data in a Table
To view data in a table:
1. If necessary, click the Navigation Pane drop-down arrow and select Tables to dis-play the list of tables in the database.
2. Open the desired table to view data contained in it.
• In the Navigation Pane, right-click the desired table and choose Open.
• Or, double-click the desired table.
3. If necessary, close the table.
• Right-click the table document tab and choose Close.
• Or, at the top-right corner of the Tabbed Document window, click the Close button.
Procedure Reference: Run a Query
To run a query:
1. If necessary, click the Navigation Pane drop-down arrow and select Queries to display the list of existing queries in the database.
2. Run the desired query.
• In the Navigation Pane, right-click the desired query and choose Open.
• Or, double-click the desired query.
3. If necessary, close the query.
• Right-click the query document tab and choose Close.
• Or, at the top-right corner of the Tabbed Document window, click the Close button.
Procedure Reference: View Data Using a Form
To view data using a form:
1. If necessary, click the Navigation Pane drop-down arrow and select Forms to dis-play the list of existing forms in the database.
2. Open the desired form to view data contained in the table, record by record.
3. If necessary, close the form.
Procedure Reference: View a Report
To view the data in a report:
1. If necessary, click the Navigation Pane drop-down arrow and select Reports to display the list of reports in the database.
2. Open the desired report to view the print format of data.
3. If necessary, close the report.
L
ESSON
1
A
CTIVITY
1-3
Using an Existing Access Database
Data Files:• Books.accdb
Before You Begin:
From the C:\084887Data\Exploring the Access Environment folder, open the Books.accdb file.
Scenario:
You have been asked to retrieve certain data from a database and update it. Also, you want to prepare a hard copy of the updated data. However, you are still unsure about how to use the various database objects to get your job done.
What You Do How You Do It
1. View the data in a table. a. In the Navigation Pane,right-click tblBooks and choose Opento open the table.
b. Observe that the data is stored in three different fields in the table.
c. Right-click the tblBooks document tab and choose Closeto close the table.
L
ESSON
1
2. Run a query. a. Click the Navigation Pane drop-down arrow and select Queries.
b. In the Navigation Pane, observe that the list of existing queries in the database is displayed.
c. In the Navigation Pane,double-click qryBookOrdersto run the query. d. Observe that the query displays only the
CustomerNumber, BookNumber, and the SalesId fields.
e. At the top-right corner of the Tabbed Document window,click the Close button
to close the query.
L
ESSON
1
3. View a form. a. Click the Navigation Pane drop-down arrow and select Forms.
b. In the Navigation Pane, observe that the list of existing forms in the database is displayed.
c. In the Navigation Pane,right-click
frmBookOrders and choose Opento open the form.
d. Observe that all data pertaining to the first record of the table is displayed in the form.
e. Right-click the FrmBookOrders docu-ment tab and choose Closeto close the form.
4. View a report. a. Click the Navigation Pane drop-down arrow and select Reports.
b. In the Navigation Pane, observe that the list of existing reports in the database is displayed.
c. In the Navigation Pane,double-click rptBooksto open the report.
d. Observe that the print format of the data is displayed in the report.
e. At the top-right corner of the document window,click the Close buttonto close the report.
f. Click the Navigation Pane drop-down arrow and select All Access Objects.
g. Verify that all the tables, queries, forms, and reports are now all visible at one time.
L
ESSON
1
T
OPIC
D
Customize the Access Environment
Having worked with the various objects of an existing database, you can now manipulate the database to suit your needs. Before you begin, you may want to alter the default settings of the interface elements to suit your workflow and preferences. In this topic, you will customize the Access environment.
When you work with a software application, you may have to use certain tools and commands more frequently. Making those tools and commands quickly accessible will help you work effi-ciently. In Access 2007, it is possible to customize the user interface and its elements to suit your work requirements.
The Access Options Dialog Box
The Access Options dialog box provides you with various categories of options to customize the Access environment. You can use the various options under different categories to change the default settings of the various database objects. There are also options for proofing and security, which you can customize according to your requirements. You can also customize the Quick Access toolbar using the options in the Customize category.
How to Customize the Access Environment
Procedure Reference: Customize the Access Environment Using the Access Options Dialog Box
To customize the Access Environment using the Access Options dialog box:
1. Click the Office button and then click Access Options.
2. In the Access Options dialog box, in the left pane, select the desired category.
3. In the Access Options dialog box, in the right pane, select the desired commands.
4. Click OK to apply the changes.
Procedure Reference: Customize the Quick Access Toolbar
To customize the Quick Access toolbar:
1. If desired, on the Quick Access toolbar, click the Customize Quick Access Toolbar drop-down arrow and select Show Below The Ribbon to place the Quick Access toolbar below the Ribbon.
To place the Quick Access toolbar below the Ribbon, you can also display the Customize category in the Access Options dialog box and check the Show Quick Access Toolbar Below The Ribbon check box.
2. Display the Customize category in the Access Options dialog box.
• On the Quick Access toolbar, click the Customize Quick Access Toolbar drop-down arrow and select More Commands.
L
ESSON
1
3. Customize the Quick Access toolbar.
a. In the Access Options dialog box, in the right pane, from the Choose Com-mands From drop-down list, select an option.
b. From the Customize Quick Access Toolbar drop-down list, select an option for specifying that the changes need to be applied to all databases or to the active database only.
c. Customize commands on the Quick Access toolbar.
• In the Choose Commands From section, in the list box, select a com-mand and click Add to add the comcom-mand to the Quick Access toolbar.
• In the Customize Quick Access Toolbar section, in the list box, select a command and click Remove to remove the command from the Quick Access toolbar.
d. Position items on the Quick Access toolbar.
• In the Customize Quick Access Toolbar section, in the list box, select a command and click the Move Up button to move the item up in the list.
• In the Customize Quick Access Toolbar section, in the list box, select a command and click the Move Down button to move the item down in the list.
4. In the Access Options dialog box, click OK to apply the changes.
Procedure Reference: Customize the Microsoft Office Window Frame
To customize the Microsoft Office Window Frame:
1. Right-click the Microsoft Office Window Frame to display the context menu.
2. On the context menu, select or deselect an option for adding or removing it, respectively, from the Microsoft Office Window Frame.
A
CTIVITY
1-4
Customizing the Access Environment
Before You Begin:The Books.accdb file is open.
Scenario:
You are familiar with the Access environment and are set to begin work. However, before you start working on your project, you would like to make some changes to the interface so that you can access commands and options in order to suit your needs. You would also like to change the default appearance of the datasheet.
L
ESSON
1
What You Do How You Do It
1. Customize the appearance of datasheets using the Access Options dialog box.
a. Click the Office button and then click Access Options.
b. In the Access Options dialog box, in the left pane,select Datasheet.
c. In the right pane, in the Default Colors section,click the Font Color button,and in the Standard Colors section, in the first row, in the sixth column,select Maroon.
d. Click the Background Color button,and in the Standard Colors section, in the fourth row, in the seventh column,select Green 3.
e. In the Access Options dialog box,click OK.
f. In the Navigation Pane,double-click tblCustomersto open the table. g. Observe that the datasheet displays the
colors that were selected.
L
ESSON
1
2. Customize the Quick Access toolbar.
a. On the Quick Access toolbar,click the Customize Quick Access Toolbar drop-down arrow and select More Commands.
b. In the Access Options dialog box, from the Choose Commands From drop-down list,
select All Commands.
c. In the list box below the Choose Com-mands From drop-down list,scroll down and select Close Database.
d. Click Add.
e. In the Choose Commands From section, in the list box,scroll down and select Open.
f. Click Add.
g. In the Access Options dialog box,click OK.
h. On the Quick Access toolbar, observe that the added options are displayed.
3. Customize the Microsoft Office Win-dow Frame.
a. Right-click the Microsoft Office Window Frame and deselect View Shortcuts.
b. Click away from the menuto close it. c. Observe that the shortcut buttons are
removed from the Microsoft Office Win-dow Frame.
d. Right-click the Microsoft Office Window Frame and select View Shortcuts.
e. On the Quick Access toolbar,click the Close Database button to close the database.
L
ESSON
1
T
OPIC
E
Obtain Help
Having customized the Access environment to suit your work requirements, you can now begin working with Access. As you work, you may come across tools and options that are unfamiliar to you and might need some help in discovering how to use them. In this topic, you will obtain help using the Access 2007 Help feature.
When testing new equipment, you would refer to the product manual and catalog to learn about the various features and functionality. Similarly, as a new user using the Access applica-tion, you may want to try out some new tasks. The Access 2007 Help feature provides you with comprehensive offline and online links to answer your questions.
Access 2007 Help
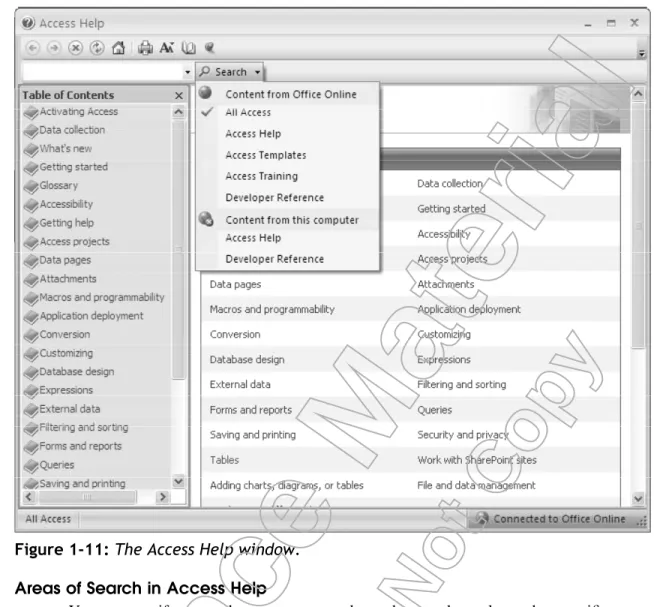
TheAccess Help feature is a complete user manual on the functionality of the various features of Microsoft Access 2007. The Access Help window provides a quick and easy way to find answers to Access-related queries, online or offline. The Access Help window has various ele-ments.
Window Element Allows You To
Access Help toolbar Access commands for navigating through the
vari-ous Help topics.
Type Words To Search For text box Search for information on any topic in Access by specifying a query.
Search drop-down list Specify that the search has to be performed online or offline.
Browse Access Help pane Browse through various Help topics organized under different categories.
Table Of Contents pane Access the Table Of Contents for all Access Help topics.
L
ESSON
1
Figure 1-11:The Access Help window. Areas of Search in Access Help
You can specify a search area to narrow down the search results to that specific area. You can either use the Help feature within the application or select an option from the Content From Office Online section to search the web for help on the desired topic.
Area of Search Description
All Access Lists information on the query from the
built-in Help feature and provides help links from the Microsoft Office website, if required.
Access Help Lists information on the query from the
built-in Help feature as well as the Microsoft Office website, but does not take you to the Office website.
Access Templates Lists sample templates that are available from
the Microsoft Office website.
Access Training Lists sample training information links from
the Microsoft Office website.
Developer Reference Lists programming tasks, samples, and refer-ences to guide you in developing customized
L
ESSON
1
How to Obtain Help
Procedure Reference: Obtain Help
To find information in Access Help:
1. To open the Access Help window, click the Microsoft Office Access Help button on the Ribbon, or press F1.
2. If desired, on the Access Help toolbar, click the Show Table Of Contents button to display the Table Of Contents pane.
3. Click a link to view its details.
• In the Table Of Contents pane, click a link to view its details.
• Or, in the Browse Access Help pane, click a link to view its details.
4. If desired, search for information.
a. To narrow the search to a particular area, select an option from the Search drop-down list.
b. In the Type Words To Search For text box, type a keyword. c. Click Search to display the search results.
5. If desired, at the top-right corner of the Access Help window, click the Close but-ton to close the window.
Keeping the Access Help Window on Top
You can set the Access Help window so that it stays on top of the Access window or other Microsoft Office windows. To determine the current mode, point to the Not On Top/Keep On Top button. The ScreenTip should tell you the mode the Help window is in. To toggle to the other mode, click the button.
L
ESSON
1
A
CTIVITY
1-5
Obtaining Help
Before You Begin:Launch the Access 2007 application.
Scenario:
You need to create a new table in your company’s employee information database and generate a report based on that table. Being a first-time user, you are not very clear on how to proceed with this job. You think it would be helpful if you can obtain some additional information on the various methods and commands used to create a table and a report.
What You Do How You Do It
1. View the content of a Help topic. a. At the top-right corner of the Ribbon,
click the Microsoft Office Access Help button.
b. At the top-right corner of the Access Help window,click the Maximize buttonto maximize the window.
c. In the Browse Access Help pane,click the Tables link.
d. Observe that the various Help topics under the selected category are dis-played.
e. In the Topics In “Tables” section,click the Create A Table link.
f. Scroll downto view the entire content of the “Create A Table” topic.
L
ESSON
1
2. Search for a Help topic. a. At the top-left corner of the Access Help window, in the Type Words To Search For text box,typecreate a report.
b. Click Search.
c. Observe that the search results for the keywords “create a report” have been displayed.
d. In the Results section,click the Create A Simple Report linkto view its content. e. At the top-right corner of the Access Help
window,click the Close buttonto close the window.
Lesson 1 Follow-up
In this lesson, you examined the basic database concepts and explored the Access 2007 envi-ronment. In addition, you opened an existing Access database and examined the various database objects. Getting acquainted with the Access environment and the database objects will help you use the application with ease.
1. For what kind of information would you build a database?
2. Which of the user interface components of the Access 2007 application do you think you will use most frequently on the job? Why?
L
ESSON
1
N
OTES
Designing a Database
In this lesson, you will design a simple database. You will:
• Examine the relational database design process.
• Define the purpose of a new database.
• Review the existing data.
• Determine the fields to be included in the tables of the database.
• Group fields into tables.
• Normalize the data in a database.
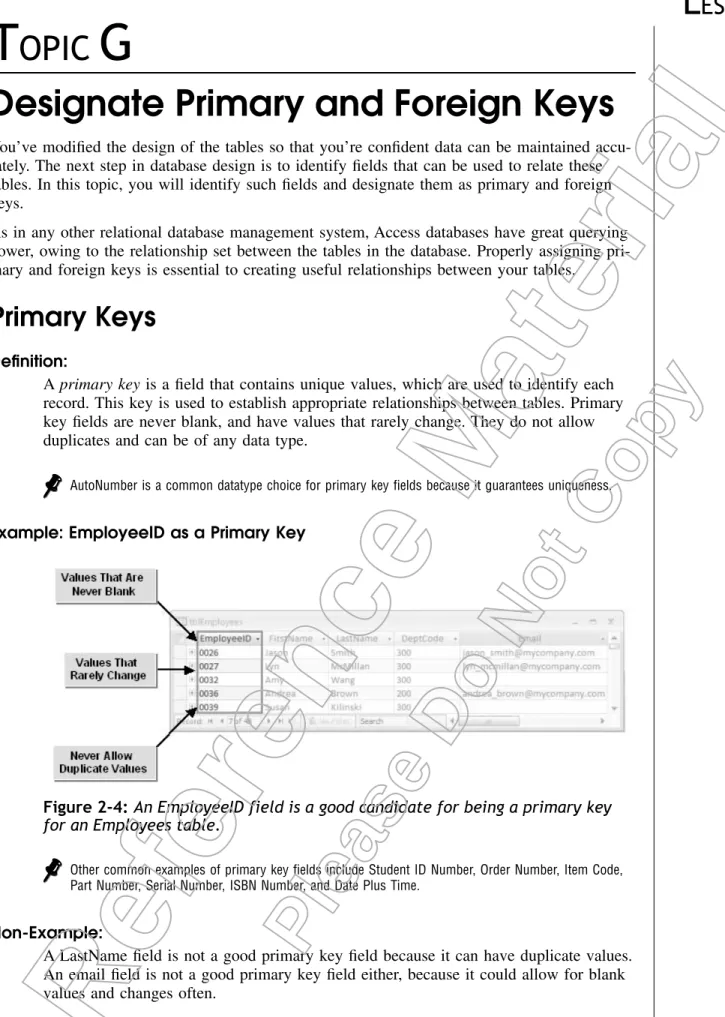
• Designate primary and foreign keys.
• Determine table relationships.
Lesson Time
1 hour(s)
L
ESSON
2
L
ESSON
2
Introduction
In the previous lesson, you examined the various objects within a database. But before creating your first database and using these objects, it is important that you consider the key aspects of good database design. In this lesson, you will examine the steps required to design a database. Just as you wouldn’t attempt to build a house without a blueprint, you shouldn’t create a data-base without a plan. For a simple department Intranet datadata-base, this design phase may not take very long or require input from very many stakeholders. A large financial or human resources database, on the other hand, would require a lengthy planning phase with input from numerous groups in your organization.
T
OPIC
A
Describe the Relational Database
Design Process
You examined an Microsoft®Office Access™2007 database and its components. The structure and design of databases will differ depending on the purpose for which they are created and the data that they contain. However, most well-designed databases are created using a set data-base design process. In this topic, you will examine the steps in the datadata-base design process in order to create databases that will suit your needs.
With any complicated activity, following a well-defined process will help you to stay on track, include all the appropriate inputs, and produce the best possible output. Designing a new data-base is no different—adhering to the phases of the relational datadata-base design process will ensure that your database will do what you want it to and be able to be easily maintained.
The Relational Database Design Process
The relational database design process is a sequential process that can be used to create a design plan for a relational database. It consists of seven stages:
1. Identify the purpose of the database. 2. Review existing data.
3. Make a preliminary list of fields. 4. Organize the fields into tables.
5. Enter sample data, review for possible data maintenance problems, and revise the table design as necessary.
6. Designate primary and foreign keys that can be used to relate your tables together. 7. Determine table relationships.
L
ESSON
2
Figure 2-1:The seven stages of database design.
A
CTIVITY
2-1
Describing the Database Design Process
Scenario:You are designing a database for a client and want to ensure that the database you are creating for them will suit their needs, and is easy to use and maintain. You want to explain the design process to them, so they can be confident of the outcome.
1. In relational database design, what is the task that is performed after review of exist-ing data is completed?
a) Organize fields into tables
b) Designate primary and foreign keys c) Identify the purpose of the database d) Make a preliminary list of fields
2. Why should you enter sample data into tables after creating them?
a) To check for potential data maintenance problems b) To identify primary and foreign keys
c) To create a preliminary list of fields d) To review existing data
L
ESSON
2
T
OPIC
B
Define Database Purpose
In the previous topic, you examined the steps in the database design process. You now want to implement the first step in the design process. In this topic, you will determine the purpose you want the database to serve.
As with any activity, if you don’t have a clear purpose, you run the risk of going off track, doing too much or too little, or creating something that may not be suitable for your needs. Determining a clear statement of purpose for the database you are designing will keep you on track and help reduce these risks. You can come back to it throughout the design process to help you answer questions that might arise.
The Statement of Purpose
Definition:
Astatement of purposeis a clear statement that defines the scope of a database and helps to guide its design. It should imply the kinds of data that will be included in the database, but not state specific table or field names. It can describe who the likely types of users of the database will be, but not state specific queries or reports they intend to run. It is sometimes useful to include a statement of what the database will not do.
Example:
L
ESSON
2
A
CTIVITY
2-2
Writing a Statement of Purpose
Scenario:In your new position as head of Information Management for your company, you’ve decided to create a custom database to track your company’s computers and the employees assigned to each of them.
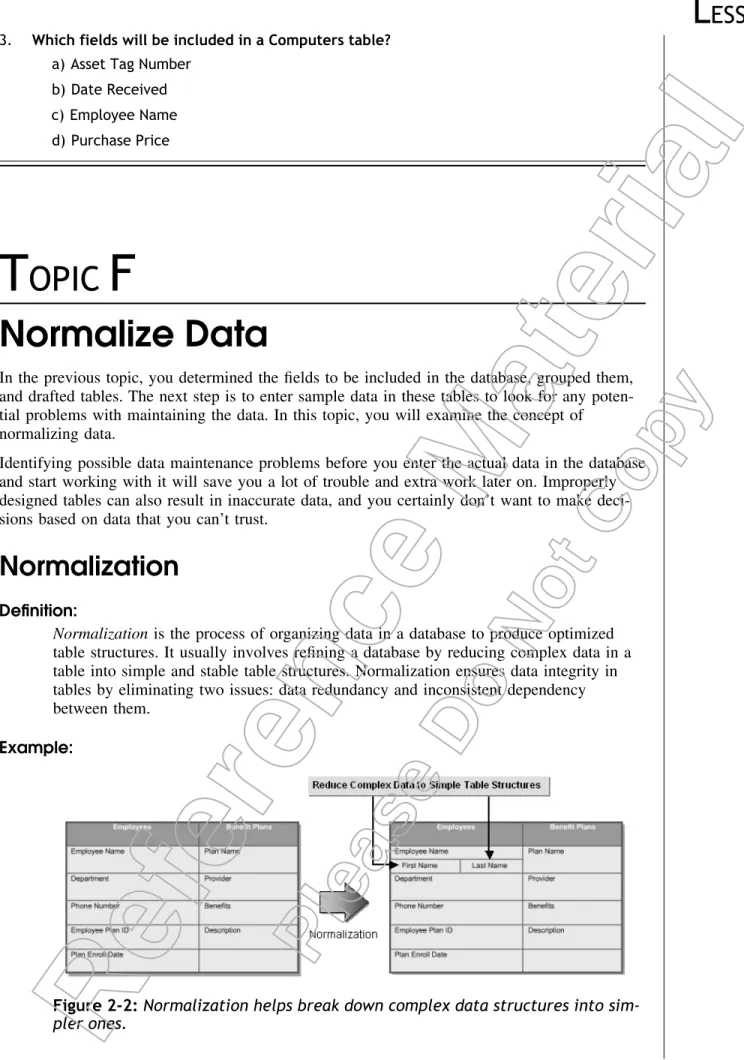
1. What is wrong with the following statement of purpose?
The database will have tables for computers, personnel, manufacturers, product, sales, salaries, and company suggestions.
a) The statement of purpose should not attempt to list specific tables. b) The statement of purpose is too specific.
c) There is nothing wrong with this statement of purpose.
d) The statement does not include statements on what the database will not do. 2. What is wrong with the following statement of purpose?
The database will allow the user to generate reports that list the computers used by each employee, as well as queries that sort records by date on which the computer was purchased and the manufacturer of the computer.
a) It does not discuss the scope of the database.
b) It does not mention or imply how individual entities in the database will be related. c) It discusses specific features (queries and reports) that you would like to see
pro-vided.
d) There is nothing wrong with this statement of purpose.
L
ESSON
2
T
OPIC
C
Review Existing Data
In the previous topic, you identified the purpose of the database. The next step is to examine the existing data and determine which of it needs to be included in the database to fulfill that purpose. In this topic, you will review existing data.
Although you may think you know exactly what data should be included in the database you are designing, you’ll be surprised how often you’ll miss something. By considering pre-existing data sources such as paper forms and spreadsheets of data, you can reduce the risk of missing essential data for your database. Also, if any of the data is available in electronic for-mat, you can use it directly in the database.
Existing Data
Existing data is information available for you to review that falls within the scope of your database as defined in your statement of purpose. This data can be in paper or electronic for-mat. Existing data in paper format could include internal business forms or documents; third-party or government forms or documents; and printed invoices, bills, or sales slips.
Existing data in an electronic format could include spreadsheets such as Microsoft Excel; word processing documents such as Microsoft Word; databases such as Access, SQL Server, or Oracle; and web pages.
An existing data source may also contain information that is outside the scope of the planned database. Use your statement of purpose to determine this as necessary.
A
CTIVITY
2-3
Gathering and Reviewing Existing Data
Scenario:The statement of purpose for your database is “The database will hold information on the com-pany’s inventory of computers and their allocation to employees.” In your search for existing data, you find that the Receiving department fills out a ticket for each item that is delivered.
L
ESSON
2
1. What are the pieces of data from the sample ticket that you think should be included in your database?
a) Company name b) Manufacturer name c) Asset tag number
d) Department of employee
2. What are the pieces of information found on a receiving ticket that will not be neces-sary to build a database with this statement of purpose?
a) Employee’s first and last name b) Description of the computer c) Employee’s hire date
d) Computer warranty information
L
ESSON
2
T
OPIC
D
Determine Fields
If you have reviewed existing data, you should have a good start on your field list. To com-plete the third step in the database design process, you need to determine if any additional fields need to be added to satisfy the statement of purpose. In this topic, you will determine the fields to be included in your database.
You don’t want to spend a lot of time creating a database and designing beautiful forms and reports only to find that they don’t meet the needs of the consumers of the information. You can prevent this by involving these people in the design and getting as many details as pos-sible about their information needs.
How to Determine Additional Fields
When you appropriately determine additional fields, you will meet your users’ needs while staying within the scope of your statement of purpose.
Guidelines:
When interviewing the potential users of a database to determine additional fields, be sure to:
• State your database’s statement of purpose at the beginning of each conversation to help everyone stay focused.
• Ask questions to gain a better understanding of the fields that will be required: — What sort of data do you expect the database to contain?
— What kinds of reports would you like to be able to generate from the data-base?
— What types of summary information do you expect the database to produce? — What kind of data analysis needs to be done using the database?
If you are the only potential user of the database you are designing, then you will need to consider these questions yourself. It is still an essential stage in the process and should not be skipped.
Example:
You are designing a database to track enrollment of employees in benefit plans. You have reviewed existing data and now need to determine additional fields. In interview-ing other members of the Human Resources department, you begin by makinterview-ing clear your statement of purpose. You then ask them what kinds of reports they will need to run and what kind of summary information they will need to obtain. They have indi-cated that they would like to know the number of employees enrolled in a particular plan and how many have joined each plan during each month. As a result of these interviews, you know that you will need to include the Employee Plan and Plan Enroll Date fields.
L
ESSON
2
D
ISCOVERY
A
CTIVITY
2-4
Completing the List of Fields
Scenario:In your search for existing data, you find that the Receiving department fills out a ticket for each item that is delivered. From the Receiving ticket and other sources, you have been able to arrive at the following list of pre-existing data:
• Employee department
• Purchase date of computer
• Manufacturer
• Note about each computer
The manager of Technical Services would like to get a weekly report of all new computers received and to whom they are assigned, so that she can arrange to set up the hardware. She would also like to know if the system is covered by a warranty. Additionally, the Finance man-ager would like to obtain a monthly summary of departmental computer hardware purchases.
1. What additional data will you need to include about each employee?
a) Name b) Salary c) Date of birth d) Asset tag
2. What additional fields will you need to include in the database to enable the Technical Services manager and the Finance manager to view the weekly and monthly reports, respectively?
a) Warranty coverage b) Purchase price
c) Software games included d) Configuration of the computer