Netcool/OMNIbus
Version 7 Release 3
User's Guide
Netcool/OMNIbus
Version 7 Release 3
User's Guide
Note
Before using this information and the product it supports, read the information in “Notices” on page 149.
This edition applies to version 7, release 3, modification 1 of IBM Tivoli Netcool/OMNIbus (product number 5724-S44) and to all subsequent releases and modifications until otherwise indicated in new editions. © Copyright IBM Corporation 1994, 2011.
Contents
About this publication
. . . v
Intended audience . . . v
What this publication contains . . . v
Publications . . . vi
Accessibility . . . vii
Tivoli technical training . . . viii
Support information . . . viii
Conventions used in this publication . . . viii
Chapter 1. Desktop tools overview . . . 1
Conductor . . . 1
Event list . . . 1
Filter Builder . . . 2
View Builder . . . 2
Multicultural support . . . 2
Chapter 2. Accessing the desktop tools
3
Starting the Conductor . . . 3Windows Conductor command-line options . . . 4
About the UNIX Conductor . . . 5
About the Windows Conductor . . . 8
Changing your password on the ObjectServer . . . 9
Setting global preferences for the UNIX Conductor 10 Setting global preferences for the Windows Conductor . . . 12
Accessing online help on UNIX. . . 14
Accessing online help on Windows . . . 16
Stopping the Conductor . . . 17
Chapter 3. Monitoring and managing
events in the event list . . . 19
Starting the event list . . . 19
UNIX event list command-line options . . . . 20
Windows event list command-line options . . . 22
About the Event List monitor box window . . . . 23
Monitor box overview . . . 25
Managing events using the event list . . . 27
About the event list . . . 27
Event list security . . . 29
Event severity levels . . . 29
Setting preferences for the UNIX event list . . . 30
Setting preferences for the Windows event list . . 32
Customizing the appearance of the event list . . 35
Displaying the severity colors configured for event lists . . . 38
Working with events . . . 39
Performing collective actions on event lists . . . . 53
Refreshing all event lists . . . 53
Resynchronizing all event lists . . . 53
Freezing all event lists . . . 54
Closing all event list windows . . . 54
Working with event list configurations . . . 54
Saving local event list configurations . . . 54
Opening local event list configurations . . . . 55
Saving remote event list configurations . . . . 57
Creating and editing event list configurations on UNIX . . . 57
Creating and editing event list configurations on Windows . . . 59
Internet service monitors in the event list . . . . 62
Viewing services in the event list . . . 62
Monitoring service-affected events in the event list 63 Monitoring predictive events in the event list . . . 64
Monitoring TADDM events in the event list . . . 65
Running transient event lists from the command-line, scripts, and tools . . . 66
Starting the transient event list from the command line . . . 66
Example: Starting a transient event list from a command line or script . . . 70
Example: Starting a transient event list from a tool . . . 70
Chapter 4. Using filters and views to
display custom event information . . . 73
Setting up filters for event list data . . . 73
Components of a filter. . . 74
Filter metrics . . . 75
Best practices for filters . . . 76
Starting the Filter Builder. . . 76
Creating or editing a filter on UNIX . . . 78
Creating or editing a filter on Windows . . . . 81
Specifying comparison values for filter conditions 84 Specifying operators for filter conditions. . . . 88
Creating filters on UNIX by dragging and dropping . . . 90
Opening a filter . . . 90
Filter examples . . . 92
Setting up views for event lists . . . 94
Starting the View Builder . . . 94
Creating or editing a view on UNIX . . . 96
Creating or editing a view on Windows . . . 100
Dragging and dropping views on UNIX . . . 103
Opening a view . . . 103
Chapter 5. Configuring quick access
to filters, views, and event list
configurations on UNIX . . . 105
About the personal library . . . 105
Working with your local system directories . . . 106
Maintaining a personal library of frequently-used files . . . 107
Adding files to the personal library . . . 107
Creating symbolic links in the personal library 107 Starting an application from the personal library 108 Removing files from the personal library . . . 108 Viewing the full contents of the personal library 109 Automatically opening an event list configuration
Chapter 6. Configuring properties,
server communication, and settings
. 111
Configuring properties . . . 111
Configuring server communication information . . 113
Configuring Tivoli Netcool/OMNIbus settings on Windows . . . 116
Changing the date format in the event list on UNIX . . . 119
Chapter 7. Monitoring accelerated
events . . . 121
Starting the Accelerated Event Notification client 121 Accelerated event notification states . . . 122
About pop-up notifiers . . . 123
Configuring property settings for the Accelerated Event Notification client . . . 124
Viewing historical information for accelerated events . . . 130
Saving accelerated event notification details to log files . . . 131
Accelerated event notification message logging . . 132
Signing out of the Accelerated Event Notification client . . . 132
Signing in to the Accelerated Event Notification client . . . 133
Exiting the Accelerated Event Notification client 134
Appendix A. Regular expressions
. . 135
NETCOOL regular expression library . . . 135
TRE regular expression library . . . 137
Metacharacters . . . 137
Minimal or non-greedy quantifiers . . . 139
Bracket expressions . . . 140
Constructs for multicultural support. . . 141
Backslash sequences . . . 141
Appendix B. SQL commands, variable
expressions, and helper buttons in
tools, automations, and transient
event lists . . . 145
Notices . . . 149
Trademarks . . . 151
About this publication
Tivoli Netcool/OMNIbus is a service level management (SLM) system that delivers real-time, centralized monitoring of complex networks and IT domains.
TheIBM Tivoli Netcool/OMNIbus User's Guideprovides an overview of the Tivoli Netcool/OMNIbus desktop tools, and describes the operator tasks for managing events from the desktop.
Intended audience
This publication is intended for anyone who needs to use Tivoli
Netcool/OMNIbus, including operators and administrators. It describes Tivoli Netcool/OMNIbus and how to use the desktop tools.
What this publication contains
This publication contains the following sections: v Chapter 1, “Desktop tools overview,” on page 1
Describes the desktop tools that can be used for event management. v Chapter 2, “Accessing the desktop tools,” on page 3
Describes how to access the desktop tools.
v Chapter 3, “Monitoring and managing events in the event list,” on page 19 Describes how to monitor and manage events.
v Chapter 4, “Using filters and views to display custom event information,” on page 73
Describes how to set up filters and views for event list data.
v Chapter 5, “Configuring quick access to filters, views, and event list configurations on UNIX,” on page 105
Describes how to configure the desktop to obtain ready access to filter files, view files, and event list configuration files.
v Chapter 6, “Configuring properties, server communication, and settings,” on page 111
Describes how to configure Tivoli Netcool/OMNIbus settings, properties, and server communication.
v Chapter 7, “Monitoring accelerated events,” on page 121
Describes how to configure the Accelerated Event Notification client, and how to monitor and manage accelerated events.
v Appendix A, “Regular expressions,” on page 135
Provides reference information about regular expressions.
v Appendix B, “SQL commands, variable expressions, and helper buttons in tools, automations, and transient event lists,” on page 145
Provides reference information about common SQL commands, variable expressions, and helper buttons that are used in tools, automations, and transient event lists.
Publications
This section lists publications in the Tivoli Netcool/OMNIbus library and related documents. This section also describes how to access Tivoli publications online and how to order Tivoli publications.
Your Tivoli Netcool/OMNIbus library
The following documents are available in the Tivoli Netcool/OMNIbus library: v IBM Tivoli Netcool/OMNIbus Installation and Deployment Guide, SC14-7604
Includes installation and upgrade procedures for Tivoli Netcool/OMNIbus, and describes how to configure security and component communications. The
publication also includes examples of Tivoli Netcool/OMNIbus architectures and describes how to implement them.
v IBM Tivoli Netcool/OMNIbus Administration Guide, SC14-7605 Describes how to perform administrative tasks using the Tivoli
Netcool/OMNIbus Administrator GUI, command-line tools, and process control. The publication also contains descriptions and examples of ObjectServer SQL syntax and automations.
v IBM Tivoli Netcool/OMNIbus Web GUI Administration and User's Guide, SC14-7606 Describes how to perform administrative and event visualization tasks using the Tivoli Netcool/OMNIbus Web GUI.
v IBM Tivoli Netcool/OMNIbus User's Guide, SC14-7607
Provides an overview of the desktop tools and describes the operator tasks related to event management using these tools.
v IBM Tivoli Netcool/OMNIbus Probe and Gateway Guide, SC14-7608
Contains introductory and reference information about probes and gateways, including probe rules file syntax and gateway commands.
v IBM Tivoli Monitoring for Tivoli Netcool/OMNIbus Agent User's Guide, SC14-7610 Describes how to install the health monitoring agent for Tivoli
Netcool/OMNIbus and contains reference information about the agent. v IBM Tivoli Netcool/OMNIbus Event Integration Facility Reference, SC14-7611
Describes how to develop event adapters that are tailored to your network environment and the specific needs of your enterprise. This publication also describes how to filter events at the source.
v IBM Tivoli Netcool/OMNIbus Error Messages Guide, SC14-7612
Describes system messages in Tivoli Netcool/OMNIbus and how to respond to those messages.
v IBM Tivoli Netcool/OMNIbus Web GUI Administration API (WAAPI) User's Guide, SC22-5403-00
Shows how to administer the Tivoli Netcool/OMNIbus Web GUI using the XML application programming interface named WAAPI.
Accessing terminology online
The Tivoli Software Glossaryincludes definitions for many of the technical terms related to Tivoli software. TheTivoli Software Glossaryis available at the following Tivoli software library Web site:
The IBM Terminology Web site consolidates the terminology from IBM product libraries in one convenient location. You can access the Terminology Web site at the following Web address:
http://www.ibm.com/software/globalization/terminology
Accessing publications online
IBM posts publications for this and all other Tivoli products, as they become available and whenever they are updated, to the Tivoli Information Center Web site at:
http://publib.boulder.ibm.com/infocenter/tivihelp/v3r1/index.jsp
Note: If you print PDF documents on other than letter-sized paper, set the option in theFile>Printwindow that allows Adobe Reader to print letter-sized pages on your local paper.
Ordering publications
You can order many Tivoli publications online at the following Web site: http://www.elink.ibmlink.ibm.com/publications/servlet/pbi.wss You can also order by telephone by calling one of these numbers: v In the United States: 800-879-2755
v In Canada: 800-426-4968
In other countries, contact your software account representative to order Tivoli publications. To locate the telephone number of your local representative, perform the following steps:
1. Go to the following Web site:
http://www.elink.ibmlink.ibm.com/publications/servlet/pbi.wss 2. Select your country from the list and click Go. The Welcome to the IBM
Publications Center page is displayed for your country.
3. On the left side of the page, click About this siteto see an information page that includes the telephone number of your local representative.
Accessibility
Accessibility features help users with a physical disability, such as restricted mobility or limited vision, to use software products successfully.
With this product, you can use assistive technologies to hear and navigate the interface. You can also use the keyboard instead of the mouse to operate some features of the graphical user interface.
Tivoli technical training
For Tivoli technical training information, refer to the following IBM Tivoli Education Web site:
http://www.ibm.com/software/tivoli/education
Support information
If you have a problem with your IBM software, you want to resolve it quickly. IBM provides the following ways for you to obtain the support you need:
Online
Go to the IBM Software Support site at http://www.ibm.com/software/ support/probsub.html and follow the instructions.
IBM Support Assistant
The IBM Support Assistant (ISA) is a free local software serviceability workbench that helps you resolve questions and problems with IBM software products. The ISA provides quick access to support-related information and serviceability tools for problem determination. To install the ISA software, go to http://www.ibm.com/software/support/isa. Documentation
If you have a suggestion for improving the content or organization of this guide, send it to the Tivoli Netcool/OMNIbus Information Development team at:
mailto://[email protected]
Conventions used in this publication
This publication uses several conventions for special terms and actions and operating system-dependent commands and paths.
Typeface conventions
This publication uses the following typeface conventions: Bold
v Lowercase commands and mixed case commands that are otherwise difficult to distinguish from surrounding text
v Interface controls (check boxes, push buttons, radio buttons, spin buttons, fields, folders, icons, list boxes, items inside list boxes,
multicolumn lists, containers, menu choices, menu names, tabs, property sheets), labels (such asTip:and Operating system considerations:) v Keywords and parameters in text
Italic
v Citations (examples: titles of publications, diskettes, and CDs) v Words defined in text (example: a nonswitched line is called a
point-to-pointline)
v Emphasis of words and letters (words as words example: "Use the word thatto introduce a restrictive clause."; letters as letters example: "The LUN address must start with the letterL.")
v New terms in text (except in a definition list): a viewis a frame in a workspace that contains data
v Variables and values you must provide: ... wheremynamerepresents.... Monospace
v Examples and code examples
v File names, programming keywords, and other elements that are difficult to distinguish from surrounding text
v Message text and prompts addressed to the user v Text that the user must type
v Values for arguments or command options
Operating system-dependent variables and paths
This publication uses the UNIX convention for specifying environment variables and for directory notation.
When using the Windows command line, replace$variablewith %variable%for environment variables, and replace each forward slash (/) with a backslash (\) in directory paths. For example, on UNIX systems, the $NCHOME environment variable specifies the path of the Netcool®home directory. On Windows systems,
the %NCHOME% environment variable specifies the path of the Netcool home directory. The names of environment variables are not always the same in the Windows and UNIX environments. For example, %TEMP% in Windows environments is equivalent to $TMPDIR in UNIX environments.
If you are using the bash shell on a Windows system, you can use the UNIX conventions.
Operating system-specific directory names
Where Tivoli Netcool/OMNIbus files are identified as located within anarch
directory under NCHOME, archis a variable that represents your operating system directory, as shown in the following table.
Table 1. Directory names for the arch variable
Directory name represented byarch Operating system
aix5 AIX®
systems
hpux11 HP-UX PA-RISC-based systems
hpux11hpia HP-UX Integrity-based systems
linux2x86 Red Hat Linux and SUSE systems
linux2s390 Linux for System z®
solaris2 Solaris systems
Chapter 1. Desktop tools overview
A number of standard desktop tools are installed with Tivoli Netcool/OMNIbus to enable you to manipulate the events stored in the ObjectServer.
These desktop tools include the following applications: v Conductor
v Event List v Filter Builder v View Builder
These applications retrieve information from an ObjectServer and allow you to view the current state of the database, which in turn reflects the status of the systems being managed.
Note: Desktop tools are not supported on Linux on System z or HP-UX Integrity systems. You can install and configure the Web GUI component, and then use Web GUI clients to view, manage, and configure events in a similar manner to the desktop tools.
Conductor
The Conductor is the desktop entry point for Tivoli Netcool/OMNIbus.
You can use the Conductor to open the other client applications, and to display configurations such as filter or view files for event lists.
Related concepts:
“About the UNIX Conductor” on page 5 “About the Windows Conductor” on page 8
Event list
Tivoli Netcool/OMNIbus uses event lists to present information about the event data that is forwarded to the ObjectServer.
The event list displays a filtered view of color-coded events in a scrolling list. You can set up multiple event list clients, each with different priorities and filters. You can also use the event list to reprioritize alerts, and to assign or reassign problems to other users. When an alert has been assigned to a user, the user can
acknowledge it, or deacknowledge it so that it can be picked up by another user. Related concepts:
“About the event list” on page 27
Filter Builder
You can use filters to choose which events to display in the event list. The Filter Builder allows you to build simple or complex event filters.
Related concepts:
“Setting up filters for event list data” on page 73
View Builder
You can use the View Builder to create event list views. Views enable you to choose which fields to display in the event list.
Related concepts:
“Setting up views for event lists” on page 94
Multicultural support
Tivoli Netcool/OMNIbus supports a variety of single-byte and multi-byte character encodings for use in different locales.
Note: If your user name and password are being verified against an external authentication source, you must check whether this source also supports multi-byte characters. If multi-byte characters are not supported, you must specify user names and passwords using ASCII characters.
Chapter 2. Accessing the desktop tools
You can use the Conductor to manage the Tivoli Netcool/OMNIbus desktop tools (or client applications).
You can use the Conductor to perform the following tasks:
v Run all the desktop tools without having to log in every time you start one. v Set preferences for all of the desktop tools.
v Set up communications for the Tivoli Netcool/OMNIbus server components by using the Server Editor.
v Change your password.
v Maintain a personal library that stores frequently-used Tivoli Netcool/OMNIbus files, such as event list configurations, filters, and views.
v Browse directories to select files to add to the personal library or the Conductor button bar.
v Access tools that are defined by your system administrator for managing events in the event list.
Starting the Conductor
The Conductor provides single sign-on access to all the Tivoli Netcool/OMNIbus desktop tools that you can use to view and manage alerts.
To use the desktop tools, you must connect to a running ObjectServer by using valid authentication credentials.
Tip: You can optionally start desktop tools individually from the command line in UNIX or from the Windows Startmenu. However, every time you start a desktop tool in this way, you need to enter your user name and password for
authentication and connection to a selected ObjectServer. To start the Conductor:
1. Perform the appropriate action for your operating system:
Option Description
UNIX From a command prompt, type:$NCHOME/omnibus/bin/nco &
Windows v From the WindowsStartmenu, clickNetcool Conductor. v From a command prompt, enter:
%NCHOME%\omnibus\desktop\NCOConductor.exe
The Login window for the Conductor opens. 2. Complete this window as follows:
Username
Type your user name. Password
Type your password. Asterisk (*) characters are shown in place of the text that you type.
Note: If your user name and password are being verified against an external authentication source (rather than an ObjectServer), you must check whether this source supports multi-byte characters. If multi-byte characters are not supported, you must specify the user name and password using ASCII characters.
Server The ObjectServer name defaults to NCOMS (Netcool/OMNIbus Master Server). If multiple ObjectServers have been configured for your environment, all available ObjectServers are shown in this drop-down list. Select the ObjectServer to which you want to connect.
OK Click this button to authenticate your login details.
Note: You are allowed three attempts to log in. On each attempt, the Passwordfield is cleared. If you fail to log in correctly at the third attempt, the program terminates.
Cancel
Click this button to cancel your login attempt.
Results
On successful login:
v The UNIX Conductor opens as a window.
v The Windows Conductor is represented as a bus icon in the Windows system tray. Right-click this icon to view the WindowsConductormenu.
You can start a Conductor for each running ObjectServer. On Windows, each Conductor is allocated an icon in the system tray.
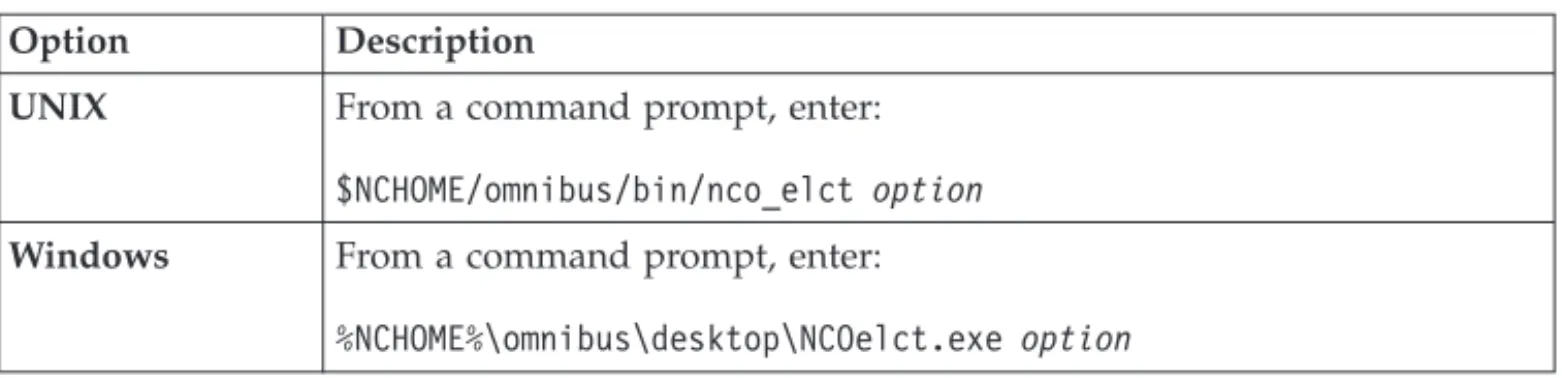
Windows Conductor command-line options
When you use the NCOConductor.execommand to start the Conductor on Windows, you can specify a number of command-line options to modify the configuration of all the event lists that are started from that Conductor instance. You can run this command from the%NCHOME%\omnibus\desktopdirectory.
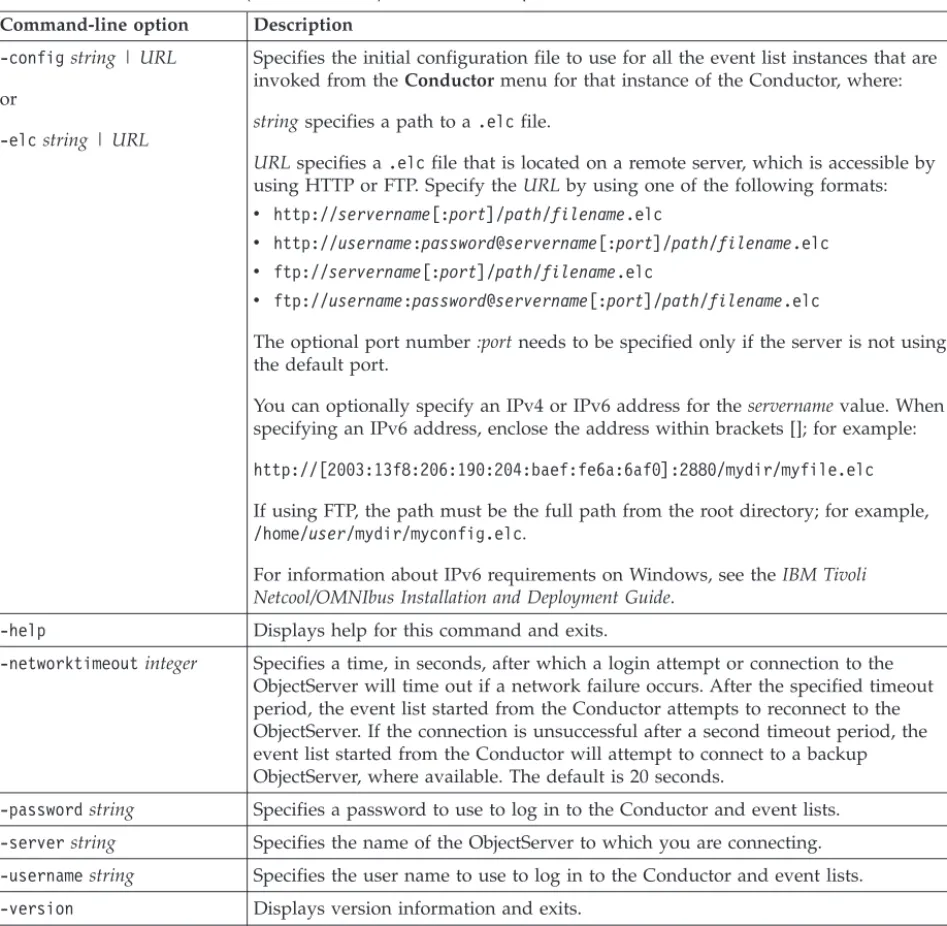
The following table describes the command-line options for starting the Windows Conductor.
Table 2. Windows Conductor (NCOConductor) command-line options Command-line option Description
-configstring | URL
or
-elcstring | URL
Specifies the initial configuration file to use for all the event list instances that are invoked from theConductormenu for that instance of the Conductor, where:
stringspecifies a path to a.elcfile.
URLspecifies a.elcfile that is located on a remote server, which is accessible by
using HTTP or FTP. Specify theURLby using one of the following formats:
v http://servername[:port]/path/filename.elc
v http://username:password@servername[:port]/path/filename.elc
v ftp://servername[:port]/path/filename.elc
v ftp://username:password@servername[:port]/path/filename.elc
The optional port number:portneeds to be specified only if the server is not using the default port.
You can optionally specify an IPv4 or IPv6 address for theservernamevalue. When specifying an IPv6 address, enclose the address within brackets []; for example:
http://[2003:13f8:206:190:204:baef:fe6a:6af0]:2880/mydir/myfile.elc
If using FTP, the path must be the full path from the root directory; for example,
/home/user/mydir/myconfig.elc.
For information about IPv6 requirements on Windows, see theIBM Tivoli Netcool/OMNIbus Installation and Deployment Guide.
-help Displays help for this command and exits.
-networktimeoutinteger Specifies a time, in seconds, after which a login attempt or connection to the ObjectServer will time out if a network failure occurs. After the specified timeout period, the event list started from the Conductor attempts to reconnect to the ObjectServer. If the connection is unsuccessful after a second timeout period, the event list started from the Conductor will attempt to connect to a backup ObjectServer, where available. The default is 20 seconds.
-passwordstring Specifies a password to use to log in to the Conductor and event lists. -serverstring Specifies the name of the ObjectServer to which you are connecting.
-usernamestring Specifies the user name to use to log in to the Conductor and event lists.
-version Displays version information and exits.
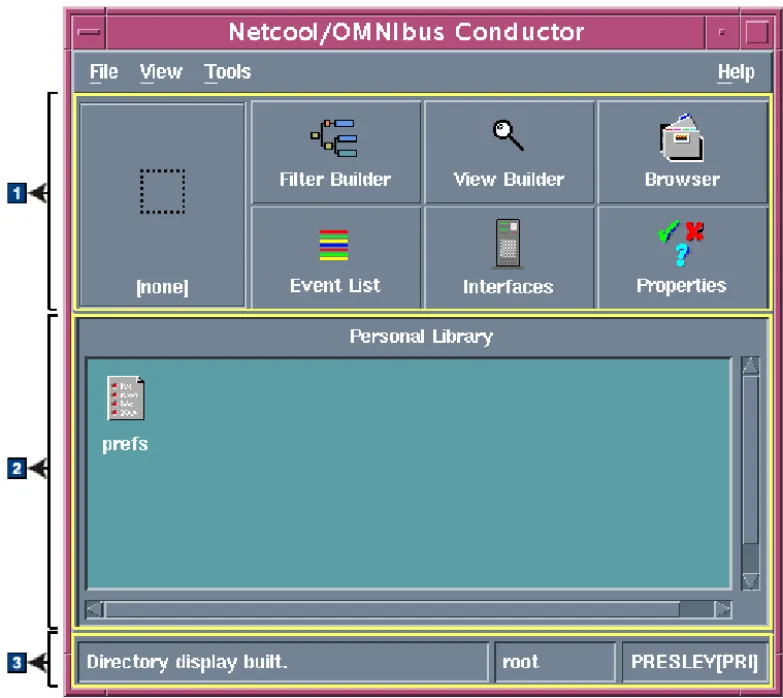
About the UNIX Conductor
The desktop tools and options that are available to you from the UNIX Conductor will depend on the privileges granted to you by your system administrator. The UNIX Conductor is shown in the following figure.
The Conductor window contains the following areas:
1Button bar
2Personal library
3Status bar
Button bar
The Conductor button bar consists of one configurable button and six pre-configured buttons. These buttons represent all the desktop tools that are installed, and which are available to you based on your access privileges. The buttons in the button bar are described in the following table.
Table 3. Conductor buttons Button Description Configurable
button (leftmost button)
Use the configurable button to start a custom event list configuration automatically whenever you start the Conductor. This button requires user customization, and is shown as a dotted rectangle (with anone label), which acts as a placeholder if the button is not yet linked to an event list configuration. To configure this button, you must select the icon for an event list configuration file from the personal library or the Directory Browser window, and then drop the icon over this button. Filter Builder ClickFilter Builderto start the Filter Builder with the default filter
loaded. You can use the Filter Builder to create new filters or edit existing filters.
Table 3. Conductor buttons (continued) Button Description
View Builder ClickView Builderto start the View Builder with the default view loaded. You can use the View Builder to create new views or edit existing views.
Browser ClickBrowserto open a directory browser utility that allows you to navigate file systems, and find filter files, view files, and event list configuration files, which you can add to your personal library of frequently-used Tivoli Netcool/OMNIbus files.
Event List ClickEvent Listto start the event list with a default configuration; that is, with a default view and default filter. If an event list has already been started from the Conductor, this button is not available, in order to prevent multiple event lists from being started.
Interfaces ClickInterfacesto start the Server Editor, which is used to set up communication details that enable Tivoli Netcool/OMNIbus server components to communicate with each other.
Properties ClickPropertiesto start the Properties Editor, which can be used to edit the configuration information in the properties files for
ObjectServers, proxy servers, process agents, the database initialization utility (nco_dbinit), probes, and gateways.
To run a desktop tool from the Conductor, click the relevant button. The tool starts automatically; you do not need to enter a user name or password.
Personal library
The personal library provides an easily-accessible location from which to open frequently-used Tivoli Netcool/OMNIbus files that are held in your.omnibus
directory. This includes event list configuration files (.elc), view files (.elv), and filter files (.elf). You can double-click icons in the personal library to open their associated applications.
The personal library also contains aprefsicon, which represents a preference file. You double-click this icon to specify global preferences for the Conductor, event list, and alert notifications.
Status bar
The status bar displays: v The status message
v The user name used to log into the current session
v The ObjectServer to which you are currently connected and whether it is the primary (PRI) or backup (BAK) server
Related tasks:
About the Windows Conductor
The desktop tools and options that are available to you from the Windows Conductor menu will depend on the privileges granted to you by your system administrator.
You can open the Windows Conductor by right-clicking the bus icon in the Windows system tray. The Windows Conductor is shown in the following figure.
You can display information about the login details for the Conductor by moving the cursor over the bus icon to see the user name and ObjectServer details in a ToolTip. To run a tool from the Conductor, select an option from the menu. The tool starts automatically; you do not need to enter a user name or password. Use the Conductor menu options as follows:
Event List
Click this option to start the event list with a default configuration; that is, with a default view and default filter.
Servers
Click this option to start the Server Editor, which is used to set up communication details that enable Tivoli Netcool/OMNIbus server components to communicate with each other.
Properties
Click this option to start the Properties Editor, which you can use to edit the configuration information in the properties files for ObjectServers, proxy servers, process agents, the database initialization utility (nco_dbinit), probes, and gateways.
Tools Click this option to start tools that have been configured by your system administrator.
Preferences
Click this option to configure global preferences for Tivoli Netcool/OMNIbus.
Password
Click this option to change your password.
Help Click this option to access help on using the desktop tools. About Conductor
Click this option to display the Conductor version.
Exit Click this option to close the Conductor.
Changing your password on the ObjectServer
If you are authenticated against any external source other than an ObjectServer, you must always request a password change from the system administrator of the external source.
rev="v731r1"The password for the ObjectServer server user cannot start with any of the following characters: hyphen (-), forward slash (/), or double quotation mark (").
To change your password on the ObjectServer:
1. Perform the appropriate action for your operating system:
Option Description
UNIX From the Conductor window on UNIX, clickFile>Change Password. Note: On UNIX, theChange Passwordmenu option is not available if your organization uses external authorization. This is because
externally-authenticated passwords are not stored in the ObjectServer. Windows From theConductormenu on Windows, clickPassword.
The Change Password window opens. 2. Complete this window as follows:
Current® Password
Type your current password. Any text entered is replaced with asterisk (*) characters.
New Password
Type the new password. Verify Password
Retype the new password.
OK Click this button to save the new password.
Note: If you type an invalid current password, or if the entries in the New PasswordandVerify Passwordfields do not match, an error message is displayed. In both cases, you can close the error message window and correct the error.
Cancel
Click this button to cancel any password changes and retain your old password.
Related tasks:
Setting global preferences for the UNIX Conductor
From the UNIX Conductor, you can set global preferences for the Conductor window, event list, and event notifications.
To set global preferences:
1. From the Conductor window on UNIX, double-click theprefsicon in the personal library. The Preferences window opens.
2. From theConductor tab, configure global settings for the Conductor. Complete the tab as follows:
Timed Directory Update
Select this check box to indicate that the Conductor directory information should be updated at regular intervals. In the adjacent field, enter a value (in seconds) for the update interval. Clear this check box if you prefer to await notification of updates from the ObjectServer. 3. From theEvent Listtab, configure global settings for the event list. Complete
the tab as follows: Show Count
Select this check box to display the number of alerts that match the filter on monitor boxes.
Show Highest Severity
Select this check box to display the highest severity among the alerts that match the filter on monitor boxes.
Show Lowest Severity
Select this check box to display the lowest severity among the alerts that match the filter on monitor boxes.
Show Metric
Select this check box to display the selected filter metric value on monitor boxes.
Show Lavalamp
Click this option to display the distribution indicator as a horizontal bar on monitor boxes.
Show Histogram
Click this option to display the distribution indicator as a bar graph on monitor boxes.
Show Event List Colors
Select this check box to use color to depict the severity of alerts in the event list. Clear this check box to use a grey background for all event list rows.
Sort Information Details
Select this check box to sort the detail fields in the Event Information window alphabetically by name of field. When this check box is clear, the detail fields are displayed in an order determined by the
ObjectServer. Timed Refresh
Use these fields to indicate whether alert information should be updated at a specified time interval, or whether you prefer to await notification of updates from the ObjectServer. To specify an update frequency, select theTimed Refresh check box and then enter a time (in seconds) in the adjacent field.
All the latest data from the ObjectServer will be sent to the event list at the specified frequency.
Tip: Timed Refresh forces the event list to reload all its data at a set interval. Do not set the refresh to a low value (for example, less than 60 seconds) because this has an impact on ObjectServer performance and network traffic.
Note: If your system administrator has set the AllowTimedRefresh ObjectServer property toFALSE, refresh timers are disabled and updates occur based on notification from the ObjectServer.
Enable Flashing
Select this check box to enable event list flashing. Use theFast/Slow slider to indicate how quickly the event list flashes. Use the
Bright/Darkslider to indicate the degree of brightness of the flashing. 4. From theNotificationtab, configure global settings for alert notifications.
Complete the tab as follows: Notify When Iconised
Select this check box to receive notification of new, changed, or deleted alerts when the event list is minimized. Notification is received only on desktop environments that display an icon when the event list is minimized. Use theWhenand Howoptions to set the notification method.
When Select each check box to receive notification as follows:
v SelectNew to receive a notification when a new alert is added to the event list.
v SelectChange to receive a notification when an existing alert changes in the event list.
v SelectDeleteto receive a notification when an existing alert is deleted from the event list.
How Select each check box to indicate how a notification should occur: v SelectRing Bellto sound the workstation or terminal bell once. v SelectAlert Iconto flash an exclamation mark over the event list
icon (UNIX), or flash the minimized event list (Windows).
v SelectOpen Windowto open the event list on the screen. If you use a window manager with interactive placement, the event list opens as the active window.
v SelectRun External Commandto run a command. If you select this check box, you must type the command name. This function must be used only for simple desktop notification, and is not designed for handling paging applications.
5. Apply, save, or cancel your changes as follows:
Apply Click this button to apply changes without saving them. This button enables you to test how your changes affect the desktop.
Save Click this button to save any changes made to your preferences. Tip: To view any changes made to preferences in the event list, you must close and reopen any open event lists.
Undo Click this button to undo any changes that you have made to each of the tabs.
Related concepts:
“About the personal library” on page 105 Related tasks:
“Starting the Conductor” on page 3
Setting global preferences for the Windows Conductor
From the Windows Conductor, you can set global preferences for the event list and alert notifications.
To set global preferences:
1. From theConductor menu on Windows, selectPreferences. The Preferences window opens.
2. From theEvent Listtab, configure global settings for the event list. Complete the tab as follows:
Monitors
Use this area to configure settings for the Event List monitor box window.
Show Number of Alerts
Select this check box to display the number of alerts that match the filter on monitor boxes.
Show Highest Severity
Select this check box to display the highest severity among the alerts that match the filter on monitor boxes.
Show Lowest Severity
Select this check box to display the lowest severity among the alerts that match the filter on monitor boxes.
Show Metric
Select this check box to display the selected filter metric value on monitor boxes.
Show Lavalamp
Click this option to display the distribution indicator as a horizontal bar on monitor boxes.
Show Histogram
Click this option to display the distribution indicator as a bar graph on monitor boxes.
You cannot select bothShow Lavalampand Show Histogram. Event Window
Use this area to configure settings for the event list. Show Colours
Select this check box to use color to depict the severity of alerts in the event list. Clear this check box to use a grey background for all event list rows.
Show Distribution Summary Bar
Select this check box to display the distribution summary bar in the event list. This bar displays the number of alerts that match each severity color.
Show Toolbars
Select this check box to make the toolbars available on the event list.
Jump Button On By Default
Select this check box to enable the Jump To Top feature, by default, for all event lists. The Jump to Top feature causes the event list to scroll to the top whenever new events are added, and can help you to quickly review updated events.
Tip: You can also enable the Jump To Top feature for individual event lists so that you can automatically view updates to an event list, or you can disable this feature for individual event lists.
Information Dialog
Use this area to configure settings for the Event Information window. Sort Information Details
Select this check box to sort the detail fields in the Event Information window alphabetically by name of field. When this check box is clear, the detail fields are displayed in an order determined by the ObjectServer.
Timed Refresh
Use these fields to indicate whether alert information should be updated at a specified time interval, or whether you prefer to await notification of updates from the ObjectServer. To specify an update frequency, select theEnabledcheck box, and then specify a time (in seconds) in theTime (secs) field.
All the latest data from the ObjectServer will be sent to the event list at the specified frequency.
Tip: Timed Refresh forces the event list to reload all its data at a set interval. Do not set the refresh to a low value (for example, less than 60 seconds) because this has an impact on ObjectServer performance and network traffic.
Note: If your system administrator has set the AllowTimedRefresh ObjectServer property toFALSE, refresh timers are disabled and updates occur based on notification from the ObjectServer.
Flashing
Use this area to cause the event list to flash when it receives new events.
Enabled
Select this check box to enable event list flashing. Use the Fast/Slowslider to indicate how quickly the event list flashes. Use theBright/Darkslider to indicate the degree of brightness of the flashing.
3. From theNotificationtab, configure global settings for alert notifications. Complete the tab as follows:
Notify When Iconised
Select this check box to receive notification of new, changed, or deleted alerts when the event list is minimized. Notification is received only on
desktop environments that display an icon when the event list is minimized. Use theWhenand Howoptions to set the notification method.
When Select each check box to receive notification as follows:
v SelectNew to receive a notification when a new alert is added to the event list.
v SelectChange to receive a notification when an existing alert changes in the event list.
v SelectDeleteto receive a notification when an existing alert is deleted from the event list.
How Select each check box or option to indicate how a notification should occur:
v SelectRing Bellto sound the workstation or terminal bell once. v Click Alert Iconto flash an exclamation mark over the event list icon
(UNIX), or flash the minimized event list (Windows).
v Click Open Windowto open the event list on the screen. If you use a window manager with interactive placement, the event list opens as the active window.
Note: You cannot select bothAlert Iconand Open Window. v SelectRun External Commandto run a command. If you select this
check box, you must type the command name in the Commandfield. This function must only be used for simple desktop notification, and is not designed for handling paging applications. To run the
command at the current time, click Execute Command Now. 4. Apply, save, or cancel your changes as follows:
Apply Click this button to apply changes without saving them. This button enables you to test how your changes affect the desktop.
Save Click this button to save any changes made to your preferences. Tip: To view any changes made to preferences in the event list, you must close and reopen any open event lists.
Close Click this button to close the window without saving your changes. Related tasks:
“Starting the Conductor” on page 3
Accessing online help on UNIX
The online help is deployed using IBM® Eclipse Help System (IEHS), which is a Web application. Based on your installation and configuration settings, you can access the online help in either standalone mode or information center mode. To configure and access online help, proceed as described in the following table.
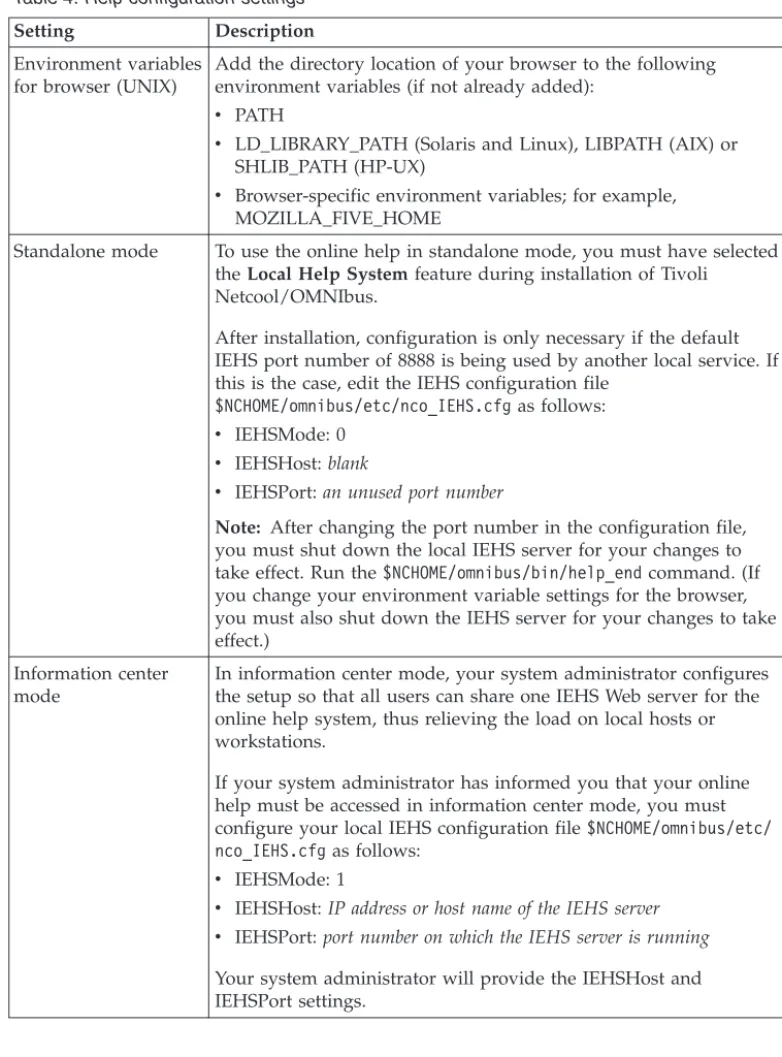
Table 4. Help configuration settings
Setting Description
Environment variables for browser (UNIX)
Add the directory location of your browser to the following environment variables (if not already added):
v PATH
v LD_LIBRARY_PATH (Solaris and Linux), LIBPATH (AIX) or
SHLIB_PATH (HP-UX)
v Browser-specific environment variables; for example,
MOZILLA_FIVE_HOME
Standalone mode To use the online help in standalone mode, you must have selected theLocal Help Systemfeature during installation of Tivoli
Netcool/OMNIbus.
After installation, configuration is only necessary if the default IEHS port number of 8888 is being used by another local service. If this is the case, edit the IEHS configuration file
$NCHOME/omnibus/etc/nco_IEHS.cfgas follows:
v IEHSMode: 0 v IEHSHost:blank
v IEHSPort:an unused port number
Note: After changing the port number in the configuration file, you must shut down the local IEHS server for your changes to take effect. Run the$NCHOME/omnibus/bin/help_endcommand. (If you change your environment variable settings for the browser, you must also shut down the IEHS server for your changes to take effect.)
Information center mode
In information center mode, your system administrator configures the setup so that all users can share one IEHS Web server for the online help system, thus relieving the load on local hosts or workstations.
If your system administrator has informed you that your online help must be accessed in information center mode, you must configure your local IEHS configuration file$NCHOME/omnibus/etc/ nco_IEHS.cfgas follows:
v IEHSMode: 1
v IEHSHost:IP address or host name of the IEHS server v IEHSPort:port number on which the IEHS server is running
Your system administrator will provide the IEHSHost and IEHSPort settings.
When you access online help in standalone mode, your default help browser window automatically opens with the relevant text. The local IEHS server starts with the first help request and continues to run until you shut it down. To shut down the local IEHS server, run the following command:
$NCHOME/omnibus/bin/help_end
In general, run thehelp_endcommand only before rebooting your computer. Before you can access online help in information center mode, your system administrator must start the designated remote IEHS server.
Note: In standalone mode, only the browser that is running on the local computer can display a help topic. If there is an open browser running on another host, the help system attempts to use that browser to display the online help. This results in the following error message:
The connection was refused when attempting to connect to localhost:name
Close the window to display the help in the correct browser.
Accessing online help on Windows
The online help is deployed using IBM Eclipse Help System (IEHS), which is a Web application. Based on your installation and configuration settings, you can access the online help in either standalone or information center mode.
To configure and access online help, proceed as described in the following table.
Table 5. Help configuration settings
Setting Description
Standalone mode To use the online help in standalone mode, you must have selected theLocal Help Systemfeature during installation of Tivoli
Netcool/OMNIbus.
After installation, configuration is only necessary if the default IEHS port number of 8888 is being used by another local service. If this is the case, edit the IEHS configuration file
%NCHOME%\omnibus\ini\nco_IEHS.cfgas follows:
v IEHSMode: 0 v IEHSHost:blank
v IEHSPort:an unused port number
Note: After changing the port number in the configuration file, you must shut down the local IEHS server for your changes to take effect. Run the%NCHOME%\omnibus\bin\help_end.bat
command. Information center
mode
In information center mode, your system administrator configures the setup so that all users can share one IEHS Web server for the online help system, thus relieving the load on local hosts or workstations.
If your system administrator has informed you that your online help must be accessed in information center mode, you must configure your local IEHS configuration file%NCHOME%\omnibus\ini\ nco_IEHS.cfgas follows:
v IEHSMode: 1
v IEHSHost:IP address or host name of the IEHS server v IEHSPort:port number on which the IEHS server is running
Your system administrator will provide the IEHSHost and IEHSPort settings.
When you access online help in standalone mode, your default help browser window automatically opens with the relevant text. The local IEHS server starts with the first help request and continues to run until you shut it down. To shut down the local IEHS server, run the following command:
In general, run thehelp_end.batcommand only before rebooting your computer. Before you can access online help in information center mode, your system administrator must start the designated remote IEHS server.
Note: On Windows, some temporary files that are generated by the IEHS server are not removed if you reboot the system or stop the javaw process of IEHS (using the Task Manager), without first shutting down the IEHS server. This might result in difficulty accessing the online help. In both standalone mode and information center mode, you must run help_end.batorIC_end.batto shut down the IEHS serverbeforerebooting the system, and you must not stop the IEHS javaw process manually. If you cannot access the help in standalone mode or cannot start the IEHS server in information center mode, runhelp_end.batorIC_end.batto clear the temporary files, and then try again.
Stopping the Conductor
When you close the Conductor on UNIX or Windows, any tools that were started with the Conductor remain open. You must close all other open windows
manually when no longer needed.
To exit from the Conductor on UNIX, click File>Exit.
To exit from the Conductor on Windows, right-click the bus icon on the system tray and click Exitfrom theConductorpop-up menu.
Chapter 3. Monitoring and managing events in the event list
You can use the event list to monitor and manage alerts. An alert is created when the ObjectServer receives an event, alarm, message, or data item. Each alert is made up of columns (or fields) of information that are held in a row in the ObjectServer alerts.status table.The alert information that is displayed in the event list is determined with the use of filters and views.Filtersenable you to display a subset of alerts based on specific criteria.Views enable you to choose which alert fields to display.
Starting the event list
To monitor and manage alerts in the event list, you must connect to a running ObjectServer by using valid authentication credentials. You can start the event list from the Conductor, from the command line, or from the Windows Startmenu. To start an event list:
1. Perform the appropriate action for your operating system:
Option Description
UNIX v From the Conductor window, clickEvent Listin the button bar. v From a command prompt, enter:
$NCHOME/omnibus/bin/nco_event &
Windows v From the Conductor menu, selectEvent List.
v From the WindowsStartmenu, selectPrograms>Netcool Suite>
Event List.
v From a command prompt, enter:
%NCHOME%\omnibus\desktop\NCOEvent.exe
When starting the event list from the command line, you can specify additional command-line options with thenco_eventand NCOEvent.execommands. 2. If you start the event list from the command line or the WindowsStart menu,
and you had not previously started the Conductor, you are prompted to provide authentication details for connecting to a running ObjectServer. You must complete the Login window for the event list as follows:
Username
Type your user name. Password
Type your password. Asterisk (*) characters are shown in place of the text that you type.
Note: If your user name and password are being verified against an external authentication source (rather than an ObjectServer), you must check whether this source supports multi-byte characters. If multi-byte characters are not supported, you must specify the user name and password using ASCII characters.
Server The ObjectServer name defaults to NCOMS (Netcool/OMNIbus Master Server). If multiple ObjectServers have been configured for your
environment, all available ObjectServers are shown in this drop-down list. Select the ObjectServer to which you want to connect.
OK Click this button to authenticate your login details.
Note: You are allowed three attempts to log in. On each attempt, the Passwordfield is cleared. If you fail to log in correctly at the third attempt, the program terminates.
Cancel
Click this button to cancel your login attempt.
Results
If an instance of the event list (nco_event) is running, thenco_event command opens a new event list window. If there is no running instance of nco_event, the nco_event command starts one, and displays the monitor box window.
When you start an event list, the Event List monitor box window opens. From this window, you can monitor and manage all alerts that are generated when the ObjectServer receives an event, alarm, message, or data item.
In general, when you start the event list, the default event list configuration (default.elc) is shown within the Event List monitor box window. You can also choose to open a customized event list configuration file. Customized
configurations can be specified at the command line or by using theFile>Open window. These customized configurations can be on your file system or located on a remote server that is accessible by using HTTP or FTP.
Failover login: If the event list loses its connection to the primary ObjectServer and a secondary or failover ObjectServer exists, you are prompted to log in to the secondary ObjectServer. When the primary ObjectServer becomes available again, a message appears indicating that the event list is reconnecting to the primary ObjectServer. You do not need to log in again to the primary ObjectServer.
UNIX event list command-line options
When you use the nco_eventcommand to start the event list on UNIX, you can specify a number of command-line options to modify the configuration. You can run this command from the $NCHOME/omnibus/bindirectory.
The following table describes the command-line options for starting the UNIX event list.
Table 6. UNIX event list (nco_event) command-line options Command-line option Description
Table 6. UNIX event list (nco_event) command-line options (continued) Command-line option Description
-configstring | URL
or
-elcstring | URL
Specifies the initial configuration file to use, where: stringspecifies a path to a.elcfile.
URLspecifies a.elcfile that is located on a remote server, which is accessible by using HTTP or FTP. Specify theURLby using one of the following formats:
v http://servername[:port]/path/filename.elc
v http://username:password@servername[:port]/path/filename.elc
v ftp://servername[:port]/path/filename.elc
v ftp://username:password@servername[:port]/path/filename.elc
The optional port number:portneeds to be specified only if the server is not using the default port.
You can optionally specify an IPv4 or IPv6 address for theservernamevalue. When specifying an IPv6 address, enclose the address within brackets []; for example:
http://[2003:13f8:206:190:204:baef:fe6a:6af0]:2880/mydir/myfile.elc -diagnostic Displays extended diagnostic messages.
This option is only useful for detecting problems with the event list. Do not use this command-line option unless you are advised by IBM Software Support.
-dualwrite 0 | 1 Indicates whether to enable or disable dual-write mode when operating in a desktop ObjectServer architecture. Valid options are as follows:
v 0: Disable dual-write mode
v 1: Enable dual-write mode
The-dualwritecommand-line option overrides the DualWrite field entry in the
master.national table of the desktop ObjectServer.
-failbackpolltimeinteger If connected to a backup ObjectServer because failover occurred, the event list periodically attempts to reconnect to the primary ObjectServer. This command-line option specifies the frequency, in seconds, at which the event list polls for the return of the primary ObjectServer. If it is detected that the primary ObjectServer has restarted, the event list disconnects from the backup ObjectServer and reconnects to the primary ObjectServer. The default is30seconds. When set to0, no polling occurs.
When an event list connects to an ObjectServer, the event list checks the
BackupObjectServerproperty setting of the ObjectServer to which it is connecting. Polling occurs only if this property is set toTRUE, indicating a backup ObjectServer.
-help Displays help for this command and exits.
-masterserverstring Indicates the master ObjectServer to use in a desktop ObjectServer architecture.
The-masterservercommand-line option overrides the MasterServer field entry in the master.national table of the desktop ObjectServer.
-networktimeoutinteger Specifies a time in seconds after which a login attempt or connection to the
ObjectServer will time out, if a network failure occurs. After the specified timeout period, the event list attempts to reconnect to the ObjectServer. If the connection is unsuccessful after a second timeout period, the event list will attempt to connect to a backup ObjectServer, where available. The default is 20 seconds.
-passwordstring Specifies the password to use to log in to the event list.
Table 6. UNIX event list (nco_event) command-line options (continued) Command-line option Description
-uneditable Does not allow the event list configuration to be edited. When this option is used, the Filter BuilderandView Builderbuttons and theSaveandSave Asmenu items are disabled.
-usernamestring Specifies the user name to use to log in to the event list.
-version Displays version information and exits.
Tip: You can abbreviate the command-line options for the event list to their shortest unique abbreviation. For example, -uneditablecan be abbreviated to-un. Related tasks:
“Working with event list configurations” on page 54
Windows event list command-line options
When you use the NCOEvent.execommand to start the event list on Windows, you can specify a number of command-line options to modify the configuration. You can run this command from the%NCHOME%\omnibus\desktopdirectory.
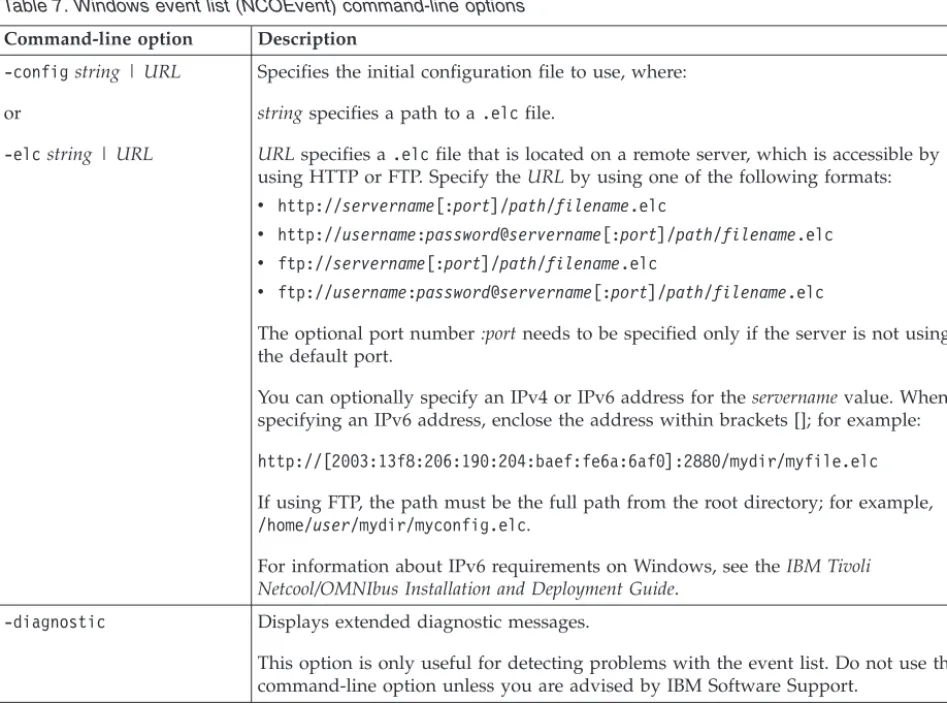
The following table describes the command-line options for starting the Windows event list.
Table 7. Windows event list (NCOEvent) command-line options Command-line option Description
-configstring | URL
or
-elcstring | URL
Specifies the initial configuration file to use, where: stringspecifies a path to a.elcfile.
URLspecifies a.elcfile that is located on a remote server, which is accessible by using HTTP or FTP. Specify theURLby using one of the following formats:
v http://servername[:port]/path/filename.elc
v http://username:password@servername[:port]/path/filename.elc
v ftp://servername[:port]/path/filename.elc
v ftp://username:password@servername[:port]/path/filename.elc
The optional port number:portneeds to be specified only if the server is not using the default port.
You can optionally specify an IPv4 or IPv6 address for theservernamevalue. When specifying an IPv6 address, enclose the address within brackets []; for example:
http://[2003:13f8:206:190:204:baef:fe6a:6af0]:2880/mydir/myfile.elc
If using FTP, the path must be the full path from the root directory; for example,
/home/user/mydir/myconfig.elc.
For information about IPv6 requirements on Windows, see theIBM Tivoli Netcool/OMNIbus Installation and Deployment Guide.
-diagnostic Displays extended diagnostic messages.
This option is only useful for detecting problems with the event list. Do not use this command-line option unless you are advised by IBM Software Support.
Table 7. Windows event list (NCOEvent) command-line options (continued) Command-line option Description
-dualwrite 0 | 1 Indicates whether to enable or disable dual-write mode when operating in a desktop ObjectServer architecture. Valid options are as follows:
v 0: Disable dual-write mode
v 1: Enable dual-write mode
The-dualwritecommand-line option overrides the DualWrite field entry in the
master.national table of the desktop ObjectServer.
-failbackpolltimeinteger If connected to a backup ObjectServer because failover occurred, the event list periodically attempts to reconnect to the primary ObjectServer. This command-line option specifies the frequency, in seconds, at which the event list polls for the return of the primary ObjectServer. If it is detected that the primary ObjectServer has restarted, the event list disconnects from the backup ObjectServer and reconnects to the primary ObjectServer. The default is30seconds. When set to0, no polling occurs.
When an event list connects to an ObjectServer, the event list checks the
BackupObjectServerproperty setting of the ObjectServer to which it is connecting.
Polling occurs only if this property is set toTRUE, indicating a backup ObjectServer.
-help Displays help for this command and exits.
-masterserverstring Indicates the master ObjectServer to use in a desktop ObjectServer architecture.
The-masterservercommand-line option overrides the MasterServer field entry in the master.national table of the desktop ObjectServer.
-networktimeoutinteger Specifies a time in seconds after which a login attempt or connection to the ObjectServer will time out, if a network failure occurs. After the specified timeout period, the event list attempts to reconnect to the ObjectServer. If the connection is unsuccessful after a second timeout period, the event list will attempt to connect to a backup ObjectServer, where available. The default is 20 seconds.
-passwordstring Specifies a password to use to log in to the event list.
-serverstring Specifies the name of the ObjectServer to which you are connecting.
-usernamestring Specifies the user name to use to log in to the event list.
-version Displays version information and exits.
Related tasks:
“Working with event list configurations” on page 54
About the Event List monitor box window
Use this window to view one or more categories of alert information, as configured by your system administrator. Each alert category is depicted by amonitor box, which represents a filter and view that have been created for the event list. Filters enable you to display a subset of alerts based on specific criteria. Views enable you to choose which alert fields to display.
The Event List monitor box window contains the following areas:
1Monitor box area
2Status bar
Tip: The title bar of the Event List monitor box window displays the current event list configuration name.
Monitor box area
This area displays the monitor boxes, which represent specific filters and a selection of views that can be applied to an associated event list. The monitor boxes that appear on your system may differ, depending on how your system administrator has configured your system. The default Event List monitor box window contains the following filter definitions for individual monitor boxes: Last 10 Min.
This filter displays all alerts except ProbeWatch, TSMWatch, and
ConnectionWatch alerts. The results are identical to those for theDefault filter, except that theLast 10 Min.filter only displays alerts that occurred in the last 10 minutes.
In Maintenance
This filter displays alerts that have been indicated as being "in maintenance" by the operator.
Escalated
This filter displays alerts that have been escalated by the operator. Information
This filter displays alerts that have been identified as Information alerts. Information alerts are:
v Alerts that have been designated as Information alerts by probes v Alerts that are not ProbeWatch, TSMWatch, or ConnectionWatch alerts v Alerts for which an escalation level has been set
Task List
This filter displays alerts that have been added to the operator's task list. Netcool Status
This filter displays only ProbeWatch, TSMWatch, and ConnectionWatch alerts.
Default
This filter displays all alerts except ProbeWatch, TSMWatch, and ConnectionWatch alerts.
All Events
This filter displays all alerts.
Status bar
The status bar displays: v The status message
v The current user name used to log into the session
v The ObjectServer to which you are currently connected and whether it is the primary (PRI) or backup (BAK) server
Monitor box overview
A monitor box on the Event List monitor box window represents a filter and a selection of views that are created to determine which alert records and columns are displayed in an event list. A monitor box is named after its associated filter. You can configure preferences to determine what type of information is displayed in monitor boxes.
A monitor box on UNIX is shown in the following figure. In this figure, different preferences have been configured for the monitor box.
The components of a monitor box are as follows:
1 Filter name button
This button displays the name of the filter that is associated with the event list that you can access from this monitor box. You can click this button to start the Filter Builder, and view or edit the filter details.
2 Number
This value represents the total number of alerts that match the filter. Highest
If configured as a preference, this value is displayed betweenNumber and Metric. This value represents the highest severity among the alerts that match the filter.
Lowest
If configured as a preference, this value is displayed betweenNumber and Metric. This value represents the lowest severity among the alerts that match the filter.
3 Metric
This value represents a calculation that is applied to the alerts that match the filter. This derived value shows the average, sum, lowest, or highest value of a selected column in thealertsdatabase table that is being queried by the filter.
4 Distribution indicator
This area uses a lavalamp or bar chart to show the severity distribution of the alerts that match the filter. The colors used in the lavalamp segments or bar chart bars are preconfigured to identify the different severity levels.
5 View button (UNIX) or ... button (Windows)
Click this button to open the event list that contains alerts that match the currently-selected filter and view.
6 Select view drop-down list
This drop-down list contains the names of all the views that have been set up, and displays the name of the view that is currently associated with the event list. You can select a different view from this drop-down list in order to change the selection of columns that are shown in the event list.