OPERATION / SERVICE MANUAL
TABLE OF CONTENTS
FOREWORD ...iv
A WORD OF THANKS...IV COMPUTER DATE INFORMATION...V Device Labeling Information...vi
INDICATIONS FOR USE...VI Intended Use ... vi
I. General Information ...1
A. DESCRIPTION...1
B. NECESSARY COMPUTER SKILLS...1
C. CONFIGURATION...1
Thin Client Configurations ... 2
D. SYSTEM SPECIFICATIONS...6
II. System Installation ...7
A. HARDWARE AND SOFTWARE REQUIREMENTS...7
B. HARDWARE INSTALLATION...7
C. SOFTWARE INSTALLATION...8
Updating from older Brentwood Diagnostic Workstation versions... 9
Installing the IQmark Digital Spirometer (and Diagnostic Workstation)... 9
D. CONFIGURING THE SPIROMETER...10
Spirometry Settings ... 10
Com Port Spirometer – Auto Detect ... 12
USB Spirometer – Auto Detect... 12
Thin Client Channel Setting ... 13
Configuration Profile... 13
Reports Tab ... 15
Cover Page Settings Tab... 18
Interpretation Tab... 20
Primary Care Practitioner (PCP) Mode... 21
Measurements Tab... 22
Incentive/Miscellaneous Tab ... 24
Trending Tab... 25
Ethnic Adjustments Tab ... 26
E. CALIBRATION...27
Starting a New Calibration ... 29
Social Security Disability – 3 Flow Calibration... 31
OSHA Regulations ... 31
F. SPIROMETER HANDLE...32
III. Operation ...33
A. INTRODUCTORY NOTES...33
Prescription Device... 33
B. PATIENT PREPARATION...33
C. STARTING THE PROGRAM...34
E. TESTING A NEW PATIENT... 36
Vital Signs Tab ...38
Medications tab; History tab...40
Contact Info tab; Risk Factors tab...40
Smoking History tab ...40
F. INSTRUCTIONS FOR PERFORMING A SPIROMETRY TEST... 41
FVC or FVC Loop...42
Acceptability Statements ...45
Flow Volume Loops – Why Inhale?...46
Post-Bronchodilator Tests ...47
VC or SVC ...48
MVV ...48
G. REVIEWING PATIENT REPORTS... 49
H. REVIEW SPIROMETRY REPORTS... 49
I. PRINTED SPIROMETRY REPORTS – ANALYSIS OF RESULTS... 51
COPD Risk Assessment...51
Lung Age ...51
J. REVIEWING DATA FOR OTHER PATIENTS... 51
K. TRENDING... 53
Selecting Reports to Trend ...54
Volume Parameters ...55
Flow and Percentage Parameters ...55
Report Selection ...56
Default F/V Display...57
Trend Display Screen...57
Side by Side F/V Loops ...59
Overlay F/V Loops...60
IV. Appendix ... 61
A. SCREEN SUMMARY... 61
B. TROUBLESHOOTING... 63
C. MAINTENANCE AND STORAGE... 65
Cleaning ...65
D. SAFETY AND INTERNATIONAL SYMBOLS... 66
E. INTERPRETATION – ATS... 67
Lower Limit of Normal (LLN) ...68
F. INTERPRETATION – NHANES III... 68
G. REFERENCE VALUES - ADULT... 69
Crapo - Adult ...70
Knudson - Adult...72
European Community For Coal And Steel (ECCS) - Adult ...74
NHANES III (Hankinson, NLHEP) - Adult ...75
Morris - Adult ...77
Roca - Adult ...78
H. REFERENCE VALUES - PEDIATRIC... 79
Polgar – Pediatric ... 82
Hsu – Pediatric ... 83
NHANES III (Hankinson, NLHEP) – Pediatric... 84
Zapletal – Pediatric... 86
Eigen – Pediatric... 86
I. ADJUSTMENTS TO REFERENCE VALUES EQUATIONS...88
J. SPIROMETRY MEASUREMENT PARAMETERS DEFINED...89
K. REFERENCES...91
L. TECHNICAL SERVICE MANUAL...93
Service Manual Introduction ... 93
Theory of Operation ... 94
System Maintenance and Obtaining Service ... 95
M. SPIROMETRY TESTING AT A GLANCE...98
N. PERFORMING AN FVC TEST - QUICK REFERENCE USER’S GUIDE...99
O. PERFORMING A PRE/POST FVC TEST - QUICK REFERENCE USER’S GUIDE...100
TESTING ONE PATIENT AT A TIME ... 100
P. PERFORMING A PRE/POST FVC TEST – QUICK REFERENCE USER’S GUIDE...101
TESTING MULTIPLE PATIENTS... 101
Q. GLOSSARY...102
R. CUSTOMER SERVICE AND CONTACT INFORMATION...105
Warranty... 105
Return Goods Authorization ... 105
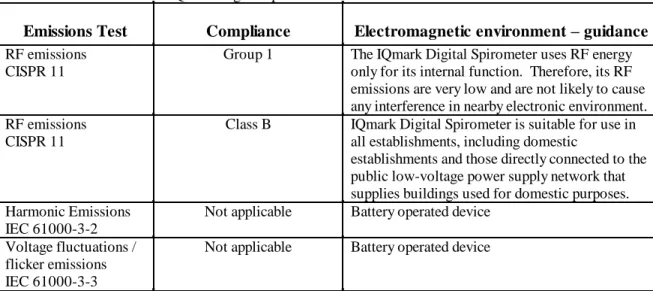
GUIDANCE AND MANUFACTURER’S DECLARATION –ELECTROMAGNETIC EMISSIONS...2
EMISSIONS TEST...2
COMPLIANCE...2
ELECTROMAGNETIC ENVIRONMENT –GUIDANCE...2
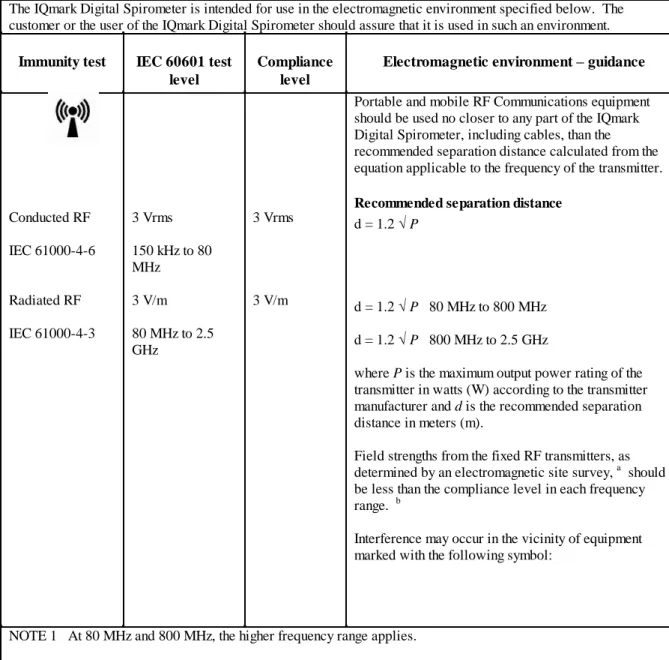
GUIDANCE AND MANUFACTURER’S DECLARATION –ELECTROMAGNETIC IMMUNITY...3
IMMUNITY TEST...3
IEC 60601 TEST LEVEL...3
GUIDANCE AND MANUFACTURER’S DECLARATION –ELECTROMAGNETIC IMMUNITY...4
IMMUNITY TEST...4
IEC 60601 TEST LEVEL...4
RECOMMENDED SEPARATION DISTANCE...4
RECOMMENDED SEPARATION DISTANCES BETWEEN PORTABLE AND MOBILE RF COMMUNICATIONS EQUIPMENT AND THE IQMARK DIGITAL SPIROMETER...5
W... 5
80 MHz to 800 MHz... 5
IQmark is a registered trademark of Midmark.
Windows is a registered trademark of Microsoft Corporation. Pentium is a registered trademark of Intel Corporation.
Physician’s Responsibility
The IQmark Digital Spirometer can provide test interpretations if the user enables the Auto Interpretation feature. These interpretations are for the exclusive use of licensed physicians or personnel under their direct supervision. The suggested interpretation and the numerical and graphical results should be examined with respect to the patient’s overall clinical condition. Final analysis should always be determined and verified by a physician.
Spirometry is an effort dependent test. Proper administration of the test is the physician’s responsibility, as is making a diagnosis, obtaining expert opinions on the results, and implementing the correct treatment, if indicated.
FOREWORD
A Word of Thanks
Thank you for purchasing the IQmark Digital Spirometer and IQmark Diagnostic Workstation. Midmark Diagnostics Group has used the latest microelectronic and computer software technology to develop a fast, efficient, and accurate Spirometry system. We trust our product will enable you to use office-based Spirometry tests to diagnose and enhance your patient’s pulmonary health.
Midmark Diagnostics Group provides a range of diagnostic products, including ECG and Holter, which are accessed using the Diagnostic Workstation program.
We believe you will be pleased with the user-friendly operation of our product and with your results. As your partner in patient care, we look forward to working with you in the coming years as we develop even more sophisticated diagnostic technology for the medical field. Your thoughts, questions and comments about our product and direction are welcomed.
Midmark Diagnostics Group PH (800) 624-8950. www.midmarkdiagnostics.com
Computer Date Information
The IQmark Digital Spirometer uses the current date from the computer and the patient’s birth date (entered by the user) to calculate the patient’s age. Since the Spirometer’s equations and interpretive analysis use the patient’s age to produce appropriate diagnostic statements, it is important that your computer’s current date is accurate. Contact your system administrator if your computer’s date is incorrect.
Notice
The information in this operation manual is subject to change without notice.
Brentwood Medical Technology Corp. (dba Midmark Diagnostics Group) shall not be liable for technical or editorial omissions made herein, nor for incidental or consequential damages resulting from the furnishing, performance, or use of information in this
operation manual.
This document contains proprietary information protected by copyright. No part of this document may be photocopied or reproduced in any form without prior written consent from Brentwood Medical Technology Corp.
Device Labeling Information
Indications For Use
The IQmark Digital Spirometer is indicated for use with male/female adult patients and male/female pediatric patients to evaluate, assess, describe, measure, or monitor the status of pulmonary health, diseases, or conditions.
Intended Use
The IQmark Digital Spirometer is intended for use as a prescription-use-only clinical diagnostic Spirometer for pulmonary function evaluation and data management. The Spirometer is for use in hospitals or physician/clinician offices.
Contraindications
The Disposable Pneumotach Mouthpieces are clean but not sterile and should not be placed over open wounds that are prone to infection. There are no other known medical contraindications other than the physical limitations of the patient.
Warnings
To ensure accurate patient testing, you must replace the Midmark Diagnostics Group accessories used with this device with accessories manufactured by Midmark Diagnostics Group.
The American Thoracic Society (ATS) Standardization of Spirometry recommends the use of rubber gloves when replacing Disposable Pneumotach Mouthpieces (DPM), and hand washing after touching DPMs.
Precautions
Read and observe the following precautions to ensure the proper operation of this device. 1. Familiarize yourself thoroughly with the operational procedures of the device prior to use. It
is recommended that the user be trained in the methods of administrating Spirometry tests to a patient by an organization that is certified by a recognized agency.
2. Installation location and maintenance of the device.
a) Avoid installing the device in direct sunlight. Install and keep the device away from splashing fluids.
b) Do not install the device where it may be affected by significant or extreme changes in humidity, ventilation, airborne particles containing dust, salt, sulfur, etc.
3. Prepare the device for operation according to instructions in this operation manual.
4. Precaution while using device - Observe the patient closely. If any abnormality is observed, proper action, which may include stopping the test, should be taken immediately.
5. Precaution after using device - The software turns off the device power according to
programmed procedures. Keep the device clean at all times to ensure trouble-free operation. 6. In case of a malfunction, call Customer Service and precisely describe the problem.
7. Perform routine inspection on the device. Keep all items in a clean environment.
9. Do not open the device handle. Refer servicing to qualified service personnel.
Adverse Reactions
The IQmark Digital Spirometer is a non-invasive device and is safe in both construction and use. This has been confirmed by the performance of Verification and Validation Testing, Biocompatibility Testing, Risk Assessment Analysis, and ATS testing.
The following minor complications can occur with all diagnostic Spirometers:
1. Infection or injury due to the use of a non-sterile mouthpiece over open wounds
2. Skin or mucous membrane abrasion caused by prolonged rubbing or excessive use of the mouthpiece (not related to biocompatibility issues)
3. Nasal, oral, or dental pain
4. Drying of oral or pharyngeal mucosa 5. Congestion or irritation of Eustachian tubes 6. Gastric distention or flatulence from ingested air 7. Slight discomfort during test procedures
8. Decreased secretion clearance during test procedures 9. Aspiration of secretions
10. Hyperventilation and possible dizziness
Patients may become light-headed, dizzy, or even faint during a test maneuver. Be sure to watch the patient closely and place a chair behind the patient before beginning any procedure.
Electrical, Safety, Biocompatibility Standards
This Spirometer has been tested to comply with the following standards:
UL STD 2601-1 CAN/CSA STD C22.2 601.1-M90
IEC 601-1 (Electrical) IEC 60601-1-1 (Safety)
EN 60601-1-2 (EMC, 2nd Ed. 2001)
I. General Information
A. Description
The IQmark Digital Spirometer is a portable device that converts a Microsoft Windows-based personal computer (PC), be it desktop, laptop, notebook, or pen-Windows-based, to a fully functional diagnostic Spirometer with interpretive capability. The device is electronically isolated from the PC and connects to it through the serial port (USB or RS232).
Together with the Diagnostic Workstation, the Spirometer makes it easy to record Spirometry efforts, interpret them, and archive them for future reference.
B. Necessary Computer Skills
This manual assumes that you are already capable of using Windows-based applications, that you have some understanding of how a PC works, and that you are familiar with the basic operations of Windows. If this is true, you will have no problem using the product. However, in the event that you have any technical questions or problems, please refer to the Troubleshooting Guide (Appendix B) or the Technical Service Manual (Appendix L) of this manual for immediate troubleshooting assistance. Customer Service contact information is listed in Appendix R.
C. Configuration
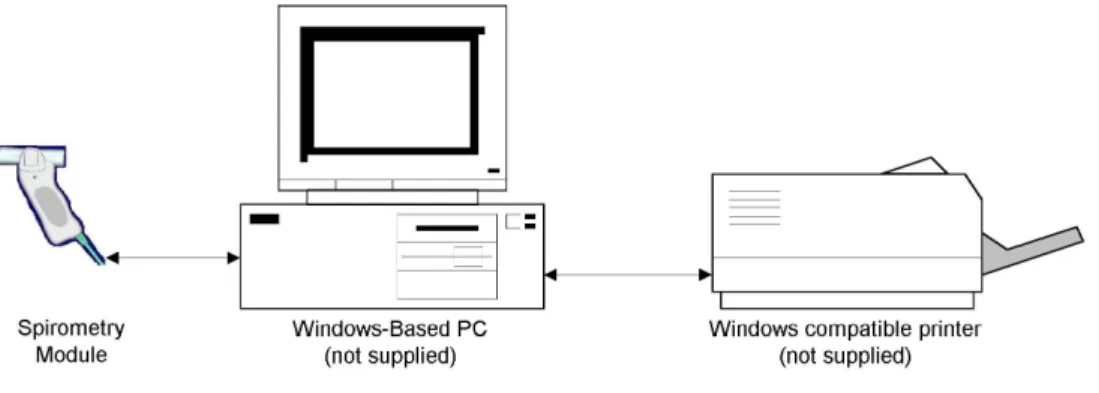
Block Diagram
The block diagram below illustrates the configuration of the system. The primary components are a Windows-based PC, a printer, and the IQmark Digital Spirometer handle. A portable computer is recommended if mobility is a consideration.
Thin Client Configurations
If you have a thin client environment, you can install the software on the Terminal Server and operate the IQmark Digital Spirometer through a thin client terminal.
There are two thin client configurations. The IQmark Virtual Channel Solution is appropriate when using Microsoft Windows based PCs as clients. In this configuration, you can use either the USB or serial port versions of the IQmark Digital Spirometer product in high latency, limited bandwidth network configurations. The following section describes the virtual channel solution. The second possible configuration is to use the serial port version of the IQmark Digital Spirometer product and connect it to client devices via COM port mapping. This configuration is appropriate when using non-Windows thin client devices on low latency high-speed networks. The section entitled Thin Client Using COM Port Mapping discusses this solution.
Setting up any application on a network environment typically requires special access rights and knowledge of the network. Please have your network administrator install and setup the software to fit your office environment.
Thin Client Using the IQmark Virtual Channel Solution
The IQmark Thin Client Virtual Channel software provides the following advantages over COM port mapping.
1. Operation over high latency, low bandwidth, high loss networks. For Microsoft Terminal Services, the virtual channel provides a 10 to 1 improvement in performance in latency tolerance over COM port mapping. For Citrix ICA the performance improvement is approximately 40 to 1 in latency tolerance. 2. No COM port mapping is required.
3. It is possible to use the USB versions of the Spirometer module. 4. Improved device auto-configuration and diagnostics.
NOTE: The IQmark Virtual Channel Solution has specific requirements for computer hardware, software and network performance. System
administrators must read the document entitled Application Note: Using the IQmark Thin Client Virtual Channel Software before installing, configuring and using this software in a thin client environment.
The following block diagram describes the IQmark Virtual Channel Solution. In this thin client environment, the client computers must be running Windows XP SP2 or Windows Vista.
Network Terminal Server
Windows Client PC Windows Client PC USB
Or Serial IQmark Digital
Spirometer
Windows Client PC
To use the IQmark Virtual Channel Solution, load the IQmark Diagnostic Workstation software on the terminal server and install one of the following software components on each Windows client PC that you intend to use for Spirometry data acquisition.
1. IQmark Virtual Channel Client for Microsoft Terminal Services (part number 4-100-1420) if you are using Microsoft Terminal Services (also called Microsoft RDP).
2. IQmark Virtual Channel Client for Citrix ICA (part number 4-100-1430) if you are using Citrix software on your clients and servers.
The above software products are provided separately and may be obtained by contacting Midmark Diagnostic Group’s customer service department at (800) 624-8950.
Once you have installed the software on the server and client computers, you must configure the software for virtual channel operation as described in the “Configuring the IQmark Diagnostic Workstation” section of the IQmark Diagnostic Workstation
Thin Client Using COM Port Mapping
COM port mapping refers to a configuration in which the Midmark Spirometer devices connect to a serial port of the client and the server is configured so that logical COM ports on the terminal server are mapped to the physical COM ports of the client.
If you are using non-Windows based thin client terminal devices on a low-latency, high-speed network you must use the serial port versions of the IQmark Digital Spirometer and configure the thin client server for COM port mapping.
NOTE: In order to use the COM port mapping solution in a thin client
environment, the computer hardware and software as well as the network must meet stringent performance requirements. System administrators must read the document entitled Application Note: IQmark Products Over Thin Client Environments before installing, configuring and using this software in a thin client environment using COM port mapping. The following block diagram illustrates the use of the IQmark Digital Spirometer product in a thin client environment using COM port mapping.
Network Term inal Server
Client Client Serial
IQmark Digital Spirometer
To use the IQmark products in this configuration, install the IQmark Diagnostic
Workstation on the terminal server and configure the server to map to the COM port on the client terminal.
System administrators should configure the terminal server for COM port mapping as described in the document entitled Application Note: IQmark Products Over Thin Client Environments.
D. System Specifications
The following are the physical and performance specifications for the Spirometer. Spirometer Specifications
Performance Specifications
Category Specification
Intended Use To provide diagnostic Spirometry results that a licensed practitioner can use to interpret the current condition of a patient’s lungs.
Approximately 7” (178mm) x 2 1/4” (57mm) x 1.5” (38mm) (HxWxD)
Physical Characteristics (Handle)
RS232 (serial) Weight – 10 oz. (w/batteries) Batteries – Two 1.5V AAA alkaline Plugs into standard serial port
DB9 or DB25 w/adapter
USB (serial) 8.5 oz.
N/A USB Anatomical Sites Non-invasive device
Patient Contact Disposable Pneumotach Mouthpiece (DPM) Safety Parameters Double insulated handle
Spirometry Acquisition Fleisch Pneumotach – differential pressure reading of flow with a DPM
Volume determined by flow integration
Ranges +/- 14 L/s – Flow
+/- 8 L – Volume
30 s – Maximum Measuring Time Environmental Conditions
(temperature and humidity)
15C to 40C
10% to 90% Humidity, non-condensing
BTPS Automatic BTPS Correction
Analysis & Measurement Automatic Back Extrapolation calculation Automatic Spirometry parameter calculation Automatic comparison to published Spirometry
Predicted Equations (Reference Values) Automatic interpretation of test results Parameters Measured See Appendix J
Reference Values Sets See Appendix G & H Interpretations ATS (1991) - Appendix E
NHANES III (NLHEP 1999) - Appendix F Printer Windows supported ink jet or laser printer
Paper 8.5” x 11” (Letter size) or
II. System Installation
A. Hardware and Software Requirements
Both the Diagnostic Workstation and the IQmark Digital Spirometer are 32-bit Windows-based software. The software will occupy 90 megabytes (MB) of disk space. Additional disk space is required if you choose to store the results of the Spirometry tests performed. Storing the data is optional. This software shall run on a personal computer using a
Pentium 500 MHz or faster processor, running Windows 2000, Windows XP or Windows Vista. For each operating system listed, the Spirometry program will run on the minimum RAM requirements as recommended by Microsoft:
Windows 2000 128 MB of RAM Windows XP 256 MB of RAM Windows Vista 512 MB of RAM
In order to install and successfully use the Spirometer, your computer must meet the following minimum requirements:
1. Windows-based PC with Windows 2000, Windows XP or Windows Vista.
Precaution: The Workstation and Spirometer have been tested for proper function with the Off-The-Shelf (OTS) Operating Systems (OS) specified in this manual. Do not operate the Workstation and Spirometer with an operating system other than the OTS OS specified. Future releases of currently approved operating systems should not be used until Midmark Diagnostics Group has had an opportunity to test the Spirometer with them. Before updating your operating system, contact Midmark Diagnostics Group for the latest OTS OS information.
2. Keyboard, mouse, and a CD-ROM drive.
3. VGA display accommodating 800x600, 1024x768, 1280x1024, or higher resolution. Minimum 256 colors (16-bit color recommended).
4. One (1) serial port (RS232C port, usually COM1 or COM2) or a USB port (use a USB to Serial Port adapter for the Spirometer handle with the 9-pin connector).
B. Hardware Installation
1. Remove the items from the packaging and verify that you have the following: IQmark Digital Spirometry software installation CD
(Diagnostic Workstation software is included on CD)
IQmark Digital Spirometer Handle with built-in serial cable (USB or 9-pin) 10 Single Patient Use, Disposable Pneumotach Mouthpieces and nose clips Four (4) AAA alkaline batteries (Spirometers provided with a USB connector do
2. For 9-pin (COM) port handles, hold the handle upside down (so that the cable is aiming upward); push the battery compartment cover from the middle of the device towards the edge until the cover slides approximately ¼ of an inch. Remove your finger from the cover, the cover will pop upward when released. Insert two (2) AAA batteries into the battery holder, negative end in first, making sure to follow the battery polarity diagram (negative end towards the top) located on the lower side of the handle. Close the battery compartment cover.
3. For COM port handles, attach the female end of the 9-pin communication cable to an available PC serial port. You may also use a 9-pin-to-25-pin adapter as necessary (see note below). Secure the connections with the thumbscrews. Do not over-tighten. If using a 25-pin serial port (e.g., COM 2), connect the 25-pin (female) -to- 9-pin (male) adapter to the port on back of the computer. Then connect the female end of the 9-pin connector on the communication cable to the 9-pin port on the adapter. 4. If you received a USB Spirometer, no batteries are needed. DO NOT plug the USB
Spirometer in to the computer until the Workstation and Spirometry software has been installed. Once the software is installed, simply plug the USB connector into any available USB port and the software will automatically detect the Spirometer.
NOTE: For IQmark Holter and ECG users only: If one of these IQmark programs is already installed and its security key on the same PC, you will not need to adjust the security key.
C. Software Installation
Before installing the IQmark Digital Spirometry software on your computer, it is important that you understand and carry out the following tasks appropriately. Windows Taskbar
The Diagnostic Workstation is designed to run as a full-screen program. For best results, the Windows Taskbar should be set to Auto hide to provide maximum display area. To do so, position the mouse pointer on the gray portion of the Taskbar on bottom of the screen. Press on the right mouse button and select Properties. Make sure the Auto hide
box is checked. Click OK. Screen Saver
If screen saver or any energy saving feature is enabled on the computer, disable it. Refer to your computer or software manual to find and change these settings.
Updating from older Brentwood Diagnostic Workstation versions
If you are updating from a version of Brentwood Diagnostic Workstation earlier than version 4.0 and have ECG or Holter records that you would like to retain and transfer to the new version, you must first archive those records. Then you must uninstall the old Diagnostic Workstation version, install this new version and restore the archived records. Refer to the Diagnostic Workstation Operation Manual for instructions on updating. Installing the IQmark Digital Spirometer (and Diagnostic Workstation)
Close all Windows programs before running this software installation. Once the installation program is initiated, it should not be interrupted until completed. The approximate installation time is five minutes.
1. Insert the Midmark Diagnostics Group software CD into the CD-ROM drive. 2. Follow the instructions on the screen.
Refer to the Diagnostic Workstation Operation Manual if you have any questions. The installation CD will install both Workstation and Spirometry software.
You can access the online IQmark Digital Spirometer Operation Manual from the Windows Task Bar through the following sequence:
Start Programs Midmark Diagnostics IQmark Spirometry Manual
3. The installation program adds at least three shortcuts to your Windows desktop: one for the IQmark Workstation; one for theIQmark Configuration; one for the Spirometry Calibration. You can use the IQmark Configuration or the
Spirometry Calibration program to set the communications port that the Spirometer uses or to set up your network database. If you installed the Adobe Reader, this icon is also added to your Windows desktop.
NOTES:
The IQmark Digital Spirometer application uses the IQmark Diagnostic Workstation to manage patient records. When you install or upgrade the Spirometer, the IQmark Diagnostic Workstation is automatically installed or upgraded accordingly.
You may also access other Midmark Diagnostics Group PC-based products, such as the Holter or ECG, from the IQmark Diagnostic Workstation, if the product is installed on the same computer. Call Midmark Diagnostics Group for the latest information on additional PC-based diagnostic products.
The IQmark Diagnostic Workstation is called the Diagnostic Workstation or Workstation for the remainder of this manual.
D. Configuring The Spirometer
The Diagnostic Workstation can be configured to meet your individual needs. Refer to the Diagnostic Workstation Operation Manual for Workstation configuration questions. Spirometry Settings
Within the Spirometry application program, a configuration program is installed that enables you to individualize the Spirometer for your operation. To open this box, click on the Settings button.
The Settings button can be found in several locations. It can be accessed through the Spirometry Calibration icon, IQmark Configuration icon, the New Test screen, and the Spirometry Review and Edit screen within the Workstation program. Click the Settings button to display the following configuration menu.
If the profile listed in the Configuration Profile box is Default, highlight Default and click Add New. Create a new name for the profile and click OK. The Default profile cannot be modified. Global settings (Institution Name, etc) must be set in Workstation.
Com Port Spirometer – Auto Detect
NOTE: The default Communications Port is COM 1. If you have connected the COM port Spirometry handle to COM 1 on the computer, as is the case for most Laptop or Notebook users, you will not need to change the port setting through the IQmark Configuration program. If COM1 is not available, you can use Auto Detect to locate the Spirometer.
Click the Auto Detect button to find the port that the Spirometry handle is connected to. To use Auto Detect, you must have the Spirometry Module connected to an available serial port on the computer and then click the Auto Detect button. If Auto Detect cannot find the Spirometer, the following screen will appear:
Auto Detect Screen
Check the items listed and click OK. When the software finds the Spirometry handle, click OK to select the correct port.
USB Spirometer – Auto Detect
If you ordered a Spirometer with a USB connector, the Auto Detect button will not display. The USB driver for the Spirometer is installed when the software is installed. The software will detect the USB Spirometer automatically when it is connected. DO NOT connect the USB Spirometer until the Workstation and Spirometry software is
successfully installed. The software must be installed before the Spirometer is connected.
Thin Client Channel Setting
The Thin Client Channel setting applies only if you are using the IQmark Diagnostic Workstation in a thin client environment. This setting is ignored when the software is not running in a thin client environment. The drop down combo box contains the following selections.
1. COM port mapping (default) 2. Microsoft RDP
3. Citrix
Select “COM port mapping” if you are using the IQmark Diagnostic Workstation product in a thin client and are not using the IQmark Virtual Channel Solution. If you are using the IQmark Virtual Channel Solution, select Microsoft RDP if your clients and servers are using Microsoft Terminal Services or select Citrix if your clients and servers are using Citrix software. Please refer to the document entitled “Application Note: Using the IQmark Thin client Virtual Channel Software” for more information.
Configuration Profile
Click the Add New button in the Configuration Profile area of this tab. Assign a name, e.g. My Config, and click OK. You can now modify the selections in the setup menu. Changing the Institution Name and Institution Address will change the header of your reports. Both fields are optional.
NOTE: The original configuration profile may be set to Default. The Default profile cannot be changed. You must click the Add New button to create a new profile to change these settings. Once a new profile is added, you can change the settings on the other tabs. Other preset profiles are shipped with the instrument. Any of the other profiles can be modified or deleted.
Manage Lists
The Manage Lists button enables you to modify the Indications List and the Bronchodilator List. You can add or delete items from either list.
To add to a list, click the Add button under the appropriate list and type a new item. To delete an item, highlight the item you wish to delete and click the Delete button.
Managed Lists Dialog Box
For example, if a doctor uses only Albuterol for a bronchodilator, this list can be modified so that Albuterol is the only selection available. The list always appears in alphabetical order.
Reports Tab
From this tab, you can select which reports to print whenever Print is selected. For each additional check box selected in any one of the Reports areas, the printed the report will include an additional page.
In the Reports Tab shown below, the Cover Page box is selected and three report boxes are selected (Best 3 Pre-BD FVC; Pre and Post BD FVC; Pre and Post BD MVV). If a test session only contains Pre-BD FVC tests, clicking on Print will print a three page report. The first page is the Cover Page, the second page is the Best 3 Pre-BD FVC tests performed and the third page is the best Pre-BD test.
If the Cover Page box is selected and no boxes within the Reports area are selected, only a one-page report will print because no additional Reports boxes are selected.
Spirometry Settings – Reports Tab
If the patient has Pre- and Post-Bronchodilator, FVC, VC and MVV tests saved, all applicable selected reports will print when the Print button is clicked.
Cover Page, Best 3 Pre and Best 3 Post Selected
Another feature of this tab enables you to select the Calibration Report. If this option is selected, every time you print a patient’s report, the calibration that was performed prior to that test is printed with the report. This is helpful if proof of calibration is required. There are five options at the bottom left of this tab. Four of these selections –Vol/Time Predicted Curve, Flow/Vol Predicted Curve, Use ATS Graph Scales, Print Using Color, affect all reports, including the cover page. Print Test Quality Statements only affect the reports selected in the Report areas – they do not affect the cover page. For example, if the Predicted Curve boxes are selected, the predicted Volume/Time and predicted Flow/Volume graphs for the patient are printed on the secondary report pages and will also print on the cover page graphs.
The Cover Page Settings tab has separate selections for Smoking History, COPD Risk, Lung Age and Test Quality Statements. Please see the Cover Page Settings tab section for additional information about the cover page.
ATS Recommended Graph Size
The ATS recommends that a Volume Time graph be at least 20 mm per second and 10 mm per liter when hand measurements are required. Some government agencies and insurance carriers require this for reimbursement.
In order to create a one page report, all cover page graphs will not print to this scale size. However, all reports from the Reports tab will if Use ATS Graph Scales is selected here. These graphs will print on the pages following the cover page.
Please use this setting if requested from your carrier or for government agencies.
Cover Page Settings Tab
This tab enables you to customize your cover page. Selections on this tab only change the look of the cover page: they do not affect additional report pages. The first selection determines whether the volume-time and flow-volume graphs are printed on this page. The Pre and Post BD Table Format selections determine whether the report includes only the Best Pre and Best Post BD test or the Best 3 Pre and Best 3 Post BD tests. This option is available when both Pre and Post BD tests have been saved.
If the patient has performed only Pre or only Post BD tests, the Pre Or Post BD Table Format selections will take effect.
The check box selections at the bottom of this page (Print Smoking History; Print COPD Risk; Print Lung Age: Print Test Quality Statements) determine what additional
information appears in the patient demographics field and graph section of the cover page. These selections do not affect any of the additional report pages.
Interpretation Tab
From this tab, you can select which Reference Equations set to use as the default for Adults and Pediatrics. Not every Spirometry measurement (FVC, FEV1, etc) are
calculated by every Reference Equation. The Secondary reference equations can be used to “fill in” missing measurements. For example, if your primary reference equation does not have an equation for FEF25, you can select a secondary reference equation that does to “fill in” your report.
Spirometry Settings – Interpretation Tab
You can also turn on or off the Auto. Interpretation feature. If the Auto. Interpretation box is selected, you can select the ATS Logic or the NHANES III logic. If you do not wish to have the software automatically interpret the Spirometry tests, clear the Auto. Interpretation box. The Primary Care Practitioner (PCP) Mode overrides Reference Equation and Interpretation selection. It is discussed on the next page.
The third area on this tab, FVC Settings, enables you to define the acceptable length of test required. Reducing this number will affect the length of test acceptability error code. The ATS recommends that the minimum length of test be set to 6 seconds.
Primary Care Practitioner (PCP) Mode
The PCP Mode automatically selects the NHANES III reference equations and
interpretation logic. It also modifies the test acquisition screen, the test review screen and the printed reports. To set the Spirometer into the PCP Mode, the user selects PCP Mode from the pull-down list in the Configuration Profile box and clicks OK.
As recommended by the National Lung Health Education Program (NLHEP), this mode simplifies the test procedure, measurements displayed and report options. For the test procedure, it eliminates the inhalation side of the flow volume loop and stops the test at 6 seconds of exhalation. It also eliminates the VC and MVV test selection.
For the measurements and reports, it only displays values for FEV1, FEV6 and FEV1/FEV6 and limits the number of digits displayed to two (FEV1 and FEV6 is displayed as X.X Liters and FEV1/FEV6 is displayed as YY %). Any measured values that fall below the Lower Limit of Normal (LLN) will be displayed in red (bold in black and white).
After each test maneuver is performed, the software will grade the test session. The quality control grade displayed will be A, B, C, D, or F. A test session must be graded A, B, or C to generate an interpretation and the results of Pre-FVC and Post-FVC tests are only compared if both the Pre and Post sessions are graded A, B, or C. To have the software display “Good Test Session”, you must acquire two acceptable tests that match according to the criteria listed here.
QC Grade Criteria
A At least two acceptable maneuvers with the largest FEV1 values matching within 100 ml and the largest two FEV6 values matching within 100 ml. B At least two acceptable maneuvers with FEV1 measurements that match
between 101 and 150 ml.
C At least two acceptable maneuvers with FEV1 measurements that match between 151 and 200 ml.
D Only one acceptable maneuver or more than one acceptable maneuver, but the FEV1 values don’t match within 200 ml.
F No acceptable maneuvers
If the FVC maneuver is less than 6 seconds (because the operator ended the test) but the end of test volume is less than 100 ml during the last 0.5 seconds, then the software will set the FEV6 value equal to the FVC value (if the FVC measurement is valid).
Placing a check mark in the Primary Care Practitioner (PCP) Mode box with another profile selected (not PCP Mode) will enable test grading, remove VC and MVV from the test screen but will not limit the measurement parameters displayed. This allows you to customize the report if desired. To remain in the PCP Mode without customization, simply select the PCP Mode from the Configuration Profile box.
Measurements Tab
This tab enables you to customize which measurements you want to appear on the cover page, the test screen and the review screen. You must select at least one measurement. If you have selected the Tables and Graphs setting for your Cover Page, the cover page report displays only the first 9 measurements selected. If Table Only is selected, the cover page displays up to 28 measurements.
Spirometry Settings – Measurement Tab
You can place the measurements in any order you wish by using the Add, Insert, and Remove buttons. Highlight the measurement with your mouse and then choose the desired function.
Choose the Add button to place the newly selected Available Measurements at the bottom of the Selected Measurements list.
Choose the Insert button to place the newly selected Available Measurements above the currently highlighted item in the Selected Measurements list.
Choose the Remove button to remove an item from the Selected
Measurements list. To use the Delete button, highlight a measurement from the Selected Measurements list and click the Delete button. The
Incentive/Miscellaneous Tab
This tab enables you to customize the incentive that the patient will see when performing a test. Since Spirometry is a patient effort dependant test, these incentives can help some patients perform the test properly and complete their exhalation.
Spirometry Settings – Incentive/Miscellaneous Tab
The user can select from the following choices: Thermometer
Tree and Leaves
Tree, Leaves and Monkeys Tree, Leaves and Pinwheel Candles
Trending Tab
This tab enables you to customize the Trending report. You can select which volume, flow and/or percent parameters to display. For additional information on this feature, please refer to the section on Trending.
Ethnic Adjustments Tab
This tab enables you to customize the percentages that the predicted value equations are adjusted when testing a specific ethnic code. These percentages can only be adjusted if the Use Default Settings box in not selected, as show below. When this box is selected, the program will set the percentages as stated in the Adjustments to Reference Values Equations set in the Appendix.
It is highly recommended that you use the default ethnic settings for testing.
Spirometry Settings – Ethnic Adjustments Tab
Additional information on these percentages is discussed in the Adjustments To Reference Values Equations appendix.
E.
Calibration
The ATS recommends daily calibration of any Spirometer. The IQmark Digital
Spirometer automates this process for quick and accurate preparation of the instrument. Calibrating the Spirometer requires a 3-Liter syringe. Midmark Diagnostics Group strongly recommends a Midmark Diagnostics Group 3-Liter syringe with the Midmark Diagnostics Group Calibration Adapter.
NOTE: The Spirometer handle must be calibrated with a Disposable Pneumotach Mouthpiece (DPM). The DPM must be calibrated with a Calibration Adapter that fits OVER the outside diameter of the mouthpiece. Never calibrate the device with a syringe that fits within the DPM.
You can access the Calibration program from the Windows Task Bar through the following sequence:
Start Programs Diagnostic Workstation Spirometry Calibration
or Double-click the Spirometry Calibration icon:
The following screen is displayed. Click the handle icon in the upper left corner to start calibration. Clicking OK will close this screen and return to the desktop. It is
recommended that you place the DPM into the handle before you enter the Calibration or Test screen.
Clicking on the handle will display the following calibration screen.
Calibration Screen
Check to see if Sensor: Ready is displayed in the upper right hand corner of the graph window. If you are using a Spirometer with a COM connector (DB9) with a model/serial number beginning with 51xxxx, you must place the DPM in the handle to turn it on. Please note that the handle will remain on whenever the DPM is inserted. Be sure to remove the DPM after calibration or testing to conserve the life of your batteries. Barometric Pressure
The Pressure must be set prior to the first time you calibrate the system. It must be changed only if you change the location of the instrument and the altitude changes. Click the Settings button to open Spirometry Settings. Select the Calibration tab and enter the Barometric Pressure in the Default Barometric Pressure box. If you do not know the barometric pressure, you can select Calculate Barometric Pressure From Altitude and enter your altitude. The software will automatically calculate and store the usual barometric pressure for that altitude.
NOTE: The proper Barometric Pressure or altitude MUST be entered to assure a proper calibration.
Spirometry Settings – Calibration Tab
Select the Calibration Reminder box to remind the user when the Spirometer has not been calibrated for the interval set in the Calibration Expiration Interval box.
Starting a New Calibration
Click New Cal on the Calibration screen to begin a new calibration. Attach the 3-liter syringe to the Calibration Adapter, and then attach the adapter to the mouthpiece. Check that the mouthpiece is properly attached to the handle. The first time you calibrate your Spirometry handle, you must type your name in the Performed by box, the Syringe SN (serial number) and Spirometer SN (handle serial number) in the appropriate boxes. Click Start Cal. The sensor will zero itself and then the following screen appears.
Calibration Pump Window
Follow the instructions displayed. Use the red dotted line and/or the blue timer arrow as a target flow rate. Try to inject the air from the syringe at a rate close to that of the red line. Remember that the syringe handle attached to the plunger must be pulled all the way out before you inject. Once the handle is all the way out, inject the air from the syringe until the handle is all the way in. PUSH THE HANDLE IN AND DRAW THE HANDLE OUT SMOOTHLY – TRY NOT TO “BANG” THE PLUNGER AS YOU PERFORM THE MANEUVER. “Banging” the plunger can cause the timer arrow to start to count. If it does, just wait for the timer to reset and inject the plunger. This will not affect the calibration results.
If the pump is performed correctly, the program will prompt you to begin a second injection. Repeat the process, injecting all of the air in the syringe. If the injection is not performed correctly, the system will discard the attempt and prompt you to inject again. After three correctly performed injections, the system will automatically calculate a correction factor and prompt you to perform a verification pump. ALWAYS VERIFY YOUR CALIBRATION. After a verification injection, the software will display the measured volume and the percentage difference from 3.0 Liters. The ATS recommends that the verified volume should be between 2.91 and 3.09 (+/- 3.0 %) to be accepted. Be sure to check these numbers before accepting the verification.
The verification acceptance dialog box will display those numbers for quick and easy comparison. Click Yes if the verification flow is within the recommended parameters. If the flow is not within the parameters, click No and repeat the verification flow.
Verification Acceptance Dialog Box
After you accept the verification, the system automatically saves the calibration. To print the calibration report, click Print and select PRINT from the menu. To view the
After you have printed or reviewed the calibration report, click Exit to start testing.
Social Security Disability – 3 Flow Calibration
SSD and OSHA require a calibration at three different flow rates. Midmark Diagnostics Group has incorporated a feature that requires calibration at 0.5 L/s, 1.5 L/s and 3.0 L/s. On the Calibration Tab of Spirometry Settings, there is a check box for Multi-Flow Calibration. If this box is selected, you must calibrate at three different flow rates. The program will display the Multi-Flow Calibration window and will measure the flow rates as the user injects the 3 liters. If the flow is too fast, the program will reject the injection and ask the user to try again with a slower injection. If the flow is too slow, the program will reject the injection and ask the user to try again with a faster injection.
When injecting the 3 liters, try to keep the graph on the left hand side in line with the dotted red line, or, on the right hand side, try to keep the bar moving at the same speed as the blue arrow.
Multi-Flow Calibration Window OSHA Regulations
OSHA Regulations are outlined in the Recommended Standardized Procedures for Pulmonary Function Testing published in the Federal Register. At a minimum, OSHA requires:
Calibrate with both Spirometer and syringe at the same temperature. Proper calibration of the Spirometer daily. (three different flow rates)
Calibrate for volume and time or flow and time (we provide volume and time). Calibrate before each shift.
Calibrate whenever the Spirometer is transported.
Please refer to the Federal Register or your OSHA representative for additional details about occupational testing.
F. Spirometer Handle
There are different versions of the Spirometer handle available.
Midmark Diagnostics Group offers USB and COM port versions of the handle. The USB handle is designed to operate with a computer.
There are two versions of the COM port handle (COM port handles have a DB9 female connector). One version is designed to operate with a Pocket PC device (like a
Compaq/HP iPAQ) and the other version is designed to operate with a computer. The model/serial number is listed on the label on the top of the Spirometer handle (under the DPM). This should be used to identify the version of the handle.
The model/serial number defines the handle as follows:
03xxx COM port handle for use with a desktop or laptop computer 50xxxx COM port handle for use with a desktop or laptop computer 51xxxx COM port handle for use with a Pocket PC, hand-held device 52xxxx USB port handle for use with a desktop or laptop computer
NOTE: 51xxxx handles are switched on when the DPM is in place. To conserve the life of your batteries, be sure to remove the DPM after calibration or testing. In addition, place the DPM in the handle BEFORE entering the test or calibration screen. This will turn the handle on and allow the software to detect the handle.
Please contact Midmark Diagnostics Group Customer Service at 800-624-8950, if you have any questions about which handle you have.
III. Operation
NOTICE
This Spirometer has been designed and tested to meet the appropriate sections of IEC 60601-1-1, IEC 601-1, IEC 60601-1-2, UL 2601-1 and ETL (CSA and UL).
A. Introductory Notes
This manual describes how to use the various features and the operational sequence most users will follow when operating the IQmark Digital Spirometer. However, you are not restricted to follow this particular sequence. The bottom or right side of each screen has a menu bar that lists other screens that may be accessed. To visit any of these screens, simply click the appropriate button.
Of course, certain sequences must always be followed, such as entering a patient’s demographics and medical data prior to performing a Spirometry test. For your
convenience, a condensed guide to the operation of the Spirometer with new patients is listed in the Appendix under Spirometry Testing at a Glance. Use this guide until you become more familiar with the use and operation of the program. Appendix N, O, and P can be used for more advanced users and for Pre/Post testing.
Pulmonary Function Test or PFT is another term widely used for Spirometry. You may hear people refer to this device as a PFT machine. Technically, a Spirometer is a device used by a patient to perform a PFT. In this manual, the words Spirometer or Spirometry are used when referring to the Midmark Diagnostics Group device and its operation. Prescription Device
“Caution: Federal law restricts this device to sale by or on the order of a medical practitioner licensed by the law of the state in which that person practices.”
B. Patient Preparation
NOTE: The ATS recommends daily calibration of Spirometers using a 3-liter syringe. See Calibration in the Installation section for instructions. Each patient must be prepared for the Spirometer test procedure. It is essential that you comply with the following instructions on patient preparation as closely as possible. Otherwise, the integrity of the Spirometry data may be compromised.
Show every patient the proper way to perform a test. It is recommended that the user perform at least one forced expiratory maneuver to demonstrate the procedure to the patient. This test does not have to be performed on this Spirometer but it should be
performed using a mouthpiece. Remember that Spirometry depends on patient effort – the coaching and enthusiasm displayed towards the patient should emphasize the importance of good performance during the test.
C. Starting The Program
The application that you will use to start the Spirometer is called the IQmark Diagnostic Workstation and is located on your Windows desktop as a shortcut icon. Double click on this icon to start the Diagnostic Workstation program.
OR Starting from the Windows Task Bar, go through the following sequence:
Start Programs Midmark Diagnostics IQmark Workstation
D. Opening Screen
When you start the Diagnostic Workstation application, an opening screen appears. The
IQmark Products Available will list the products installed on your computer. Hardware modules are required for operation of each product. Call Midmark Diagnostics Group Sales for information about available add-on products.
There are six choices on the opening screen:
STAT ECG – Please see the IQmark Digital ECG Operation Manual for information on this feature. It is not part of the IQmark Digital Spirometer program.
New Patient – Enables you to register and proceed with Spirometry or other installed medical testing for a new patient.
Patient List – Enables you to view a list of patients previously tested or previously entered into the database. Selecting a patient from the list enables you to access that patient’s records and data from previous tests.
Configuration – Displays what database is currently selected and enables the user to configure the program to meet their needs. See Configuring The Spirometer and Configuration in the Diagnostic Workstation manual.
Help – Provides on-line assistance regarding the use, operation and
troubleshooting of the IQmark Diagnostic Workstation and other products.
Return to Windows – Exits the program and returns you to the Windows desktop.
E. Testing A New Patient
For a new patient, click the New Patient button in the opening screen. This opens the Patient Data Entry screen.
The Patient Data screen enables you to enter the data that is specific to your patient. Some of this data is of diagnostic value and is used by the Spirometer’s interpretive program when the program analyzes the patient's data.
Patient Data Screen
Each of the data fields on this screen can be accessed by clicking in it with the mouse or pressing the tab key. Although some of this information is not essential for Spirometry, it is important to complete each of these fields as accurately as possible. The accuracy of, Date of Birth, Sex, Height, and Race, is essential since this data is used by the
Spirometer interpretive analysis program to produce predicted measurements and preliminary diagnostic statements. All four digits of the year must be entered for the Date of Birth. The Height is located on the Vital Signs tab.
The following table provides a brief description of the function for each field. Fields that play a diagnostic role in the interpretive program are noted.
Patient Data Fields
Field Diagnostic Role
Description
Last Name First Name Middle Initial
Used for identification. Providing complete
information facilitates easier retrieval of patient data at later dates.
Letters and/or numbers may be used. ID Used for identification.
Patient Data Fields
–
Required for Spirometry
Field Diagnostic Role
Description
Race Yes Used for information and diagnostic analysis in Reference Values equations if ethnic reductions are enabled.
Select one of several pre-labeled choices from the list.
If the patient’s race is not listed, if you do not know
the patient’s race, or if the patient is of multiracial
origin, use Appendix I for assistance. Date of Birth
(age)
( mm/dd/yyyy i.e. 02/14/1961 )
Yes Used for information and diagnostic analysis in Reference Values equations.
Enter using a month/day/year format (this order may be changed in IQmark Configurationsettings). Enter 2 digits each for month and day and all four digits for the year. The Spirometer interpretive program uses this data to calculate the age of the patient.
Sex Yes Used for information and diagnostic analysis in Reference Values equations.
Select the appropriate gender.
Height Yes Used for information and diagnostic analysis in Reference Values equations (in Vital Signs tab). Use only numbers. Data may be entered in either English or Metric units, depending on which option is selected in the IQmark Configuration Settings.
Vital Signs Tab
The Vital Signs tab displays on top when the Patient Data screen is opened. This tab enables the user to enter and track the patient’s vital signs over time. The user can enter the vital signs when entering new patient information. After the patient has been saved, the user can enter additional vital signs by clicking on the New Vital Signs button. This clears the BP, Pulse, Temperature and SpO2 and enables you to enter new vital signs readings.
After vital sign measurements are entered, click the Review Vital Signs button to
display all previously entered vital signs. These measurements will be display in a table as well as on a user defined graph.
The following table provides a brief description of the function for each field. Fields that play a diagnostic role in the interpretive program are noted. Additional information about the Vital Signs tab can be found in the Diagnostic Workstation Operation Manual.
Vital Signs Tab Fields
Field Diagnostic Role
Description
Weight * *Used for information and as a diagnostic tool by a physician in some cases.
Use only numbers. Data may be entered in either English or Metric units, depending on which option is selected in the IQmark ConfigurationSettings. Height Yes Used for information and diagnostic analysis in
Reference Values equations.
BMI * Body Mass Index. Automatically calculated from Height and Weight. Refer to the Workstation Operation Manual for additional information.
BP (Blood Pressure) * *Used for information and is used as a diagnostic tool by a physician in some cases. Enter numbers only. Pulse * *Used for information and is used as a diagnostic tool
by a physician in some cases. Enter numbers only. Temp. * *Used for information and is used as a diagnostic tool
by a physician in some cases. Enter numbers only. SpO2 (Pulse Oximetry) * *Used for information and is used as a diagnostic tool
by a physician in some cases. Enter numbers only.
Medications tab; History tab
Clicking the Medication tab displays a screen that gives you the option of adding, editing or deleting a medication from the patient’s profile. Clicking the History tab displays a screen that gives you the option of adding, editing or deleting medical history from the patient’s profile. Additional information about these tabs can be found in the Diagnostic Workstation Operation Manual.
Contact Info tab; Risk Factors tab
Clicking the Contact Info tab displays a screen that gives you the option of adding, editing or deleting the patient’s contact information (Address and Phone Number). Clicking the Risk Factors tab displays a screen that gives you the option of selecting risk factors for the patient (does not effect Spirometry results). Additional information about this tab can be found in the Diagnostic Workstation Operation Manual.
Smoking History tab
Clicking the Smoking History tab displays a screen that gives you the option of adding the smoking history to the patient’s profile. To add this information, select the Smoker box and then enter the number of cigarettes the patient smokes per day and the number of years they have been smoking.
Smoking History tab
If the patient used to smoke and has since quit, select Smoker as above and then select the Quit box and enter the number of years since they quit.
F. Instructions for Performing a Spirometry Test
To prepare a patient for any Spirometry test, you must explain to the patient the entire procedure for the type of test you want them to perform. Then you should demonstrate for the patient the correct procedure for performing that test. The American Thoracic Society (ATS) states in their Standardization of Spirometry 1994 Update: “Perhaps the most important component in successful Spirometry is a well-motivated, enthusiastic technician.” Coaching and encouraging the patient with body language and with verbal language like “blast out hard and fast”, “continue to blast out”, and “squeeze the air out” will help to ensure a good FVC maneuver with reproducible results.
Throughout of this manual, the user or technician refers to the person instructing the patient and operating the Spirometer.
The Disposable Pneumotach Mouthpiece (DPM) is designed for a single patient use. Multiple tests can be performed on one patient during one testing session. Use new DPM for each future test session on the same patient. Do not attempt to sterilize or disinfect the DPM. Any such attempts would have a high chance of affecting the results of a Spirometry test. Do not attempt to re-use the DPM.
NOTE: PHYSICIAN’S RESPONSIBILITY: It is the physician’s responsibility to ensure that the test is properly administered, evaluated and interpreted. The technician administrating the test should be trained in Spirometry by completing a certified Spirometry Training course. The instructions listed here are only a guide and should not be used to train a technician.
Prepare by requiring the patient to:
Loosen any tight clothing that might constrict lung function.
Remove any foreign objects from the mouth, including dentures if they are likely to become dislodged.
Select a new DPM and place it in the Spirometer handle. Once you are both ready to perform a test, require the patient to:
Place the lips and teeth around the DPM (not near the end), using their lips to seal their mouth to the DPM prior to performing any Spirometry test.
Be careful not to block the flow tube with the tongue. Follow the instructions of the technician.
Allow the patient to place the mouthpiece in their mouth and breathe through it before performing a test. This will help reduce the anxiety of catching their breath and show them there is no resistance when breathing through the DPM.
This Spirometer enables you to choose among FVC, VC, and MVV tests in both the Pre-Bronchodilator (Pre-BD) and Post-Pre-Bronchodilator (Post-BD) modes. Remember, if the
PCP Mode is selected as the configuration profile, only the FVC test is available (see Configuring The Spirometer).
FVC or FVC Loop
The Forced Vital Capacity (FVC) test is usually the first Spirometry test prescribed. Traditionally, the FVC test measures expiratory flow only and the FVC Loop is a FVC test with the inspiratory portion of the test included. However, a full expiratory and inspiratory loop is often referred to as a Flow Volume Loop, an FVC Loop or
occasionally as an FVC test. On this Spirometer, the user can perform a FVC or FVC Loop by simply selecting FVC.
To start a test, click New Test from the Patient Data screen. Click on the lungs icon next to Spirometry. If desired, enter the Technician’s name and the Physician’s name or select
them from the list. The reason for testing the patient can also be selected from the Indication list as shown in the New Test Selection Screen below.
The Spirometry Profile section is used to select different Configuration Profiles, if desired. For example, if the practice has physicians that required different measurement
parameters on their report, a different Configuration Profile can be created and name for each physician.
New Test Selection Screen
Click on OK to open the test acquisition screen. The Spirometry data acquisition, or test, screen appears.
Spirometry Data Acquisition Screen (Test Screen)
By default, the FVC button will be selected. For a BD test, make sure the words Pre-Bronchodilator appear in the blue box in the middle of the screen. Also notice that the Pre and FVC buttons are bold. Do not click the Start New Test button until the patient is ready.
Once the patient is prepared, you must explain the full procedure of the test. Tell the patient to take 2 or 3 normal tidal breaths and then to inspire as deeply as possible. After a complete inhalation, tell the patient to place the mouthpiece in their mouth (as described earlier) and enthusiastically encourage them to blast out the air quickly and completely. Continue to encourage with voice and body language until a visible plateau is evident on the Flow-Volume scale or until the program indicates that no additional flow is being measured (displays: Inhale Now). If a full loop is required, instruct the patient to breathe in quickly and fully to take in as much air as possible.
Demonstrate this procedure for the patient. Let the patient see the effort required for a good test. The technician should carefully watch the entire maneuver ensuring:
Maximal inhalation before starting
Forced expiration - Quick, strong and without hesitation
Inhalation – If a flow volume loop is required, ensure that the patient keeps the DPM in their mouth and takes a maximal inhalation at the end of the forced expiration.
Have the patient hold the handle next to their cheek, not in front of their mouth. To start the test, click the Start New Test button. The device will “zero” itself. BE SURE THAT NO AIR IS TRAVELING THROUGH THE MOUTHPIECE DURING ZEROING. The following box will appear while the Spirometer is zeroing.
Zeroing The Sensor
Once this is done, the following incentive display appears (or the one selected by the user). Have the patient, inhale fully, move the handle sideways towards their mouth, insert the mouthpiece into their mouth and start the test.
Thermometer Incentive Display
For this incentive, note that the color of the “mercury” in the thermometer changes with the percentage of the patient’s predicted FVC value. It will remain red from 0 to 49%, yellow from 51% to 79%, green from 80% to 100% and bright green above 100%. The percentage of their predicted value is also displayed above the thermometer. After the
numbers have stopped rising, instruct the patient to inhale maximally or click the Stop button or press the Enter key to complete the test. Both actions will end the test. The program automatically “grades” the test according to ATS criteria.
Test Accepted Dialog Box
After each completed test, the Test Accepted dialog box appears. The acceptability statement is also displayed with Yes or No automatically selected.
IMPORTANT– The acceptability statements are to be used as recommendations or guidelines and do not mean that a test must be accepted or rejected. It is up to you to decide if the effort performed is acceptable. You can override the software selection and choose Accept if you determine the effort is good. After deciding to accept or reject a test, click Yes to perform another test or No to stop testing.
These acceptability statements are based on the recommendations of the ATS. Acceptability Statements
The following table lists the acceptability statements you might see during FVC testing. Please remember, these are recommendations and not requirements. Please use your own judgment when deciding to accept or reject a test.
ATS Acceptability Statement Criteria Comment Displayed
Good test Meets all the criteria listed below.
Good test! Hesitating start Extrapolated volume > 5% of
FVC, or greater than 0.150 liters, whichever is greater.
Hesitation detected: Blast out faster; blast out harder
Test too short Test did not last at least X seconds from start of expiration