SSL-VPN Creating and Installing Digital Certificates on SonicWALL SSL-VPN Appliances
Introduction
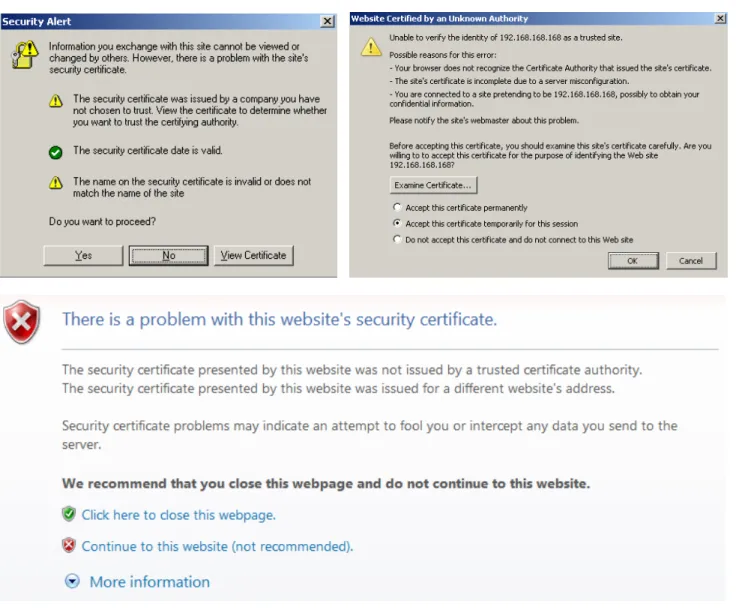
The SonicWALL SSL-VPN appliance comes with a pre-installed signed X509 certificate for SSL functions. A self-signed certificate provides all the same functions as a certificate obtained through a well-known certificate authority (CA), but the user’s web browser will present an "untrusted root CA certificate" security warning until the self-signed certificate is imported into their trusted root store (see Figure 1 below). This import procedure can be performed by the user by clicking the Import Certificate button within the portal after authenticating.
The primary drawback of using untrusted default certificates is that every single user will have to perform this task -- for every browser they use. Also, users tend to be wary (and rightfully so) of security pop-up warnings and may be inclined to click on the No or Cancel buttons. This creates a support hassle for both the administrator(s) of the SSL-VPN appliance and for users of the device alike.
The alternative to using the self-signed certificate is to generate a certificate signing request (CSR) and submit it to a well-known CA for valid certificate issuance. Well-well-known CAs include Verisign (www.verisign.com) and RapidSSL
(www.RapidSSL.com).
Certificate prices range from $75 - $1,000 a year depending on the vendor and option packages. In this whitepaper we will show you how to use RapidSSL to purchase and install trusted certificates onto the SonicWALL SSL-VPN appliance, as RapidSSL is inexpensive and does not use intermediate certificates. You may use certificates from other vendors, or even make your own, as long as they are x509v3-compliant.
Recommended Versions
SonicWALL SSL-VPN Firmware 1.5.0.3 or newer
Customers with current service/software support contracts can obtain updated versions of SonicWALL SSL-VPN
Firmware at https://www.mysonicwall.com. Updated SonicWALL SSL-VPN Firmware is also freely available to customers who have registered the SonicWALL SSL-VPN appliance on MySonicWALL for the first 90 days.
Caveats
SonicWALL SSL-VPN appliances must reboot when activating new certificates. Please make arrangements for network downtime when installing and activating your new certificate.
Certificates and keys are not stored in the preferences file, and cannot be exported once installed. Please keep the original copies of the CSR, ‘server.key’, and ‘server.crt’ in a secure location.
RapidSSL has an option package to display a “SiteSeal” link on the front page of a website. This functionality is not supported in any current version of the SSL-VPN firmware, but will be included in a future release. Please DO NOT attempt to add the SiteSeal code to the Portal Layout Login Message section, as it will corrupt the settings for the Portal Layout.
Deployment Prerequisites
On the SonicWALL SSL-VPN appliance:
Create backup image on SSL-VPN appliance (not supported on SSL-VPN 200) Export settings and store in safe place
Install firmware 1.5.0.3 or newer
Other items to note before you begin:
This process will take about one hour, end to end, and will require reboots. Please plan accordingly with your users for a network downtime window of two hours to be safe.
You will need a valid credit card number to purchase the certificate from RapidSSL
You will need a valid email address so that RapidSSL can email you during the certificate generation process You will need a working phone number so that RapidSSL’s automated system can contact you during the
certificate generation process
You will need a workstation with browser and Internet connectivity
SonicWALL does not provide technical support for any certificate authority vendor. If you encounter issues with the certificate generation process, you will need to contact your certificate vendor.
Deployment Tasklist
Adjust management workstation’s browser settings Create backup image on SSL-VPN appliance Export settings on SSL-VPN appliance
Upload new software onto SSL-VPN appliance
Configure workstation browser to accept pop-ups from SSL-VPN appliance Create CSR and save to desktop
Extract ‘server.csr’ file, save to desktop, open, and copy contents to clipboard Extract ‘server.key’ and save to desktop
Purchase certificate from RapidSSL
Retrieve signed certificate from email and convert to ‘server.crt’ file Create ‘certkey.zip’ file containing ‘server.key’ and ‘server.crt’ file Import ‘certkey.zip’ file into SSL-VPN appliance
Activate new certificate and reboot Test to ensure new certificate is active
Store ‘server.csr’, ‘server.key’, and ‘server.crt’ in safe place
Procedure
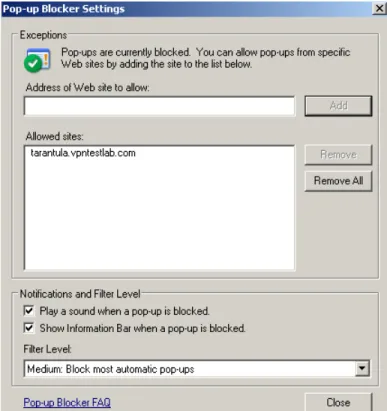
Step 1. On the management workstation, configure the web browser to accept pop-ups from X0 IP address of the SSL-VPN appliance if you will be managing the device from the internal network, or from the mapped public IP address/fully-qualified domain name if managing the device externally. For an example, see Figure 2 below. If you do not complete this step, you will have issues exporting the settings and CSR files from the SSL-VPN appliance.
If your management workstation is Windows XP or Windows 2003, you will also need to configure Microsoft Internet Explorer to allow downloads. This procedure will allow Web sites to automatically prompt you when downloading files and software (bypassing the Information Bar).
a. Open Internet Explorer.
b. On the Tools menu, click Internet Options. c. On the Security tab, click Custom Level.
d. Do one or both of the following: To turn off the Information Bar for file downloads, in the Downloads section of the list, under Automatic prompting for file downloads, click Enable. To turn off the Information Bar for ActiveX controls, in the ActiveX controls and plug-ins section of the list, under Automatic prompting for ActiveX controls, click Enable.
Step 2. Log into the SSL-VPN appliance’s System > Settings page, click on the Store Settings button, and then click on the Create Backup button. This process takes 1-2 minutes to complete.
Step 3. On the same page, click on the Export Settings button. The SonicWALL SSL-VPN appliance will export two settings files into a ZIP file. Save this to the desktop – we will be saving this file, and others, in an upcoming step.
Step 4. Download firmware version 1.5.0.3 or newer for your SSL-VPN 200, SSL-VPN 2000 or SSL-VPN 4000 appliance from the MySonicWALL customer portal. On the SSL-VPN appliance’s System > Settings page, click on the Upload New Firmware button and upload this new firmware to the device. The upload and reboot process may take 5-10 minutes to complete. When the SSL-VPN appliance has rebooted, log back in to ensure the device is functioning, test all
bookmarks and the NetExtender client.
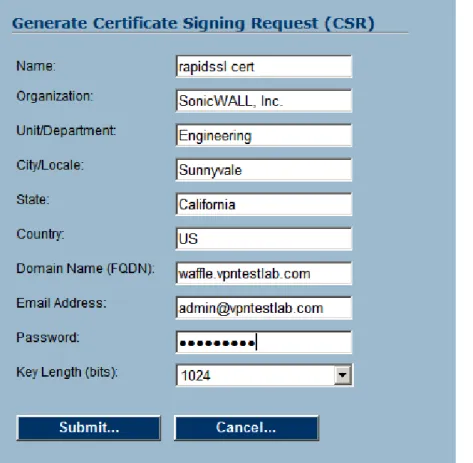
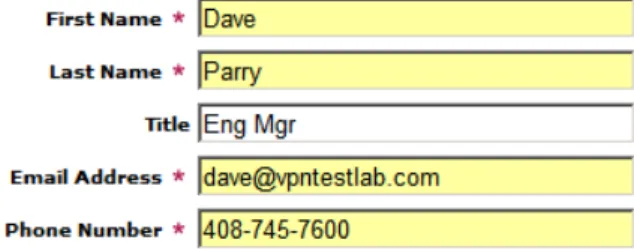
Step 5. Go to the System > Certificates page and click on the Generate CSR button. On the pop-up that appears, fill out all fields – you will need to populate all fields – please note that some Certificate Authorities require that the State: field be filled out with the full state name and not the abbreviation.
NOTE: The most important field is the Domain Name (FQDN): field, as this is the name that needs to be mapped to the VPN appliance’s external public IP address, and is the name that users will use to access the SSL-VPN appliance portal(s).
In the example on the next page (See Figure 1), the SSL-VPN appliance uses a fully-qualified domain name (FQDN) of ‘waffle.vpntestlab.com’, which in the authoritative DNS servers for the ‘vpntestlab.com’ domain is mapped to the SSL-VPN’s external public IP address. You will also need to create a password to protect the key being generated – please note this password as it will be used in an upcoming step, and will be used any time in the future you need to re-import the certificate and key.
Figure 3 – Filling out the CSR before submitting to the CA
Step 6. When done, click on the Submit button. It will prompt you to save ‘csr.zip’ – save this to the desktop.
Step 7. Open up ‘csr.zip’ and copy contents of csr.zip using a text editor such as Notepad (do *not* use WordPad or Microsoft Word), or to the clipboard. The output will look like this:
---BEGIN CERTIFICATE REQUEST---
MIIB5jCCAU8CAQAwgaUxCzAJBgNVBAYTAlVTMRMwEQYDVQQIEwpDYWxpZm9ybmlh MRIwEAYDVQQHEwlTdW5ueXZhbGUxEjAQBgNVBAoTCVNvbmljV0FMTDERMA8GA1UE CxMIU1dFTkdMQUIxITAfBgNVBAMTGHRhcmFudHVsYS52cG50ZXN0bGFiLmNvbTEj MCEGCSqGSIb3DQEJARYUYWRtaW5AdnBudGVzdGxhYi5jb20wgZ8wDQYJKoZIhvcN AQEBBQADgY0AMIGJAoGBAOYzkf4JJ/41RVSrV8JnAAzUINPJqWgpnF/Ecj+QzrhT zXZLC0NQNgX9HqLtbqe3YpNNXj77sd1Ttf/PAJVkb1D4UI/dg4L7t5uJyypvyEY0 g4uZ8gME6es6UclN+WXJ2HTZGd7LM8zQQ9B4P/R0RbnX6eLlVTiVeoPm0VAduDAN AgMBAAGgADANBgkqhkiG9w0BAQQFAAOBgQCdL1G5bjkQgnT02nj08TRhR62vb/76 S3DF9djN1wpjzKg4V9fZEy8dGHYDyEXv8Wh+OrmL6BvyH8nSF0fBBpiejEPUGAe2 wWfzIhruxZeP5WtxTkwDh+i88K+7458Bpz48Onm8dkZ29oaNTjMF1pe/nawtmoCW eUmM2W4RGwr0gw==
REQUEST---Step 8. Now you are ready to purchase and create your digital certificate. Using a web browser, go to: https://products.geotrust.com/orders/rapidssl.do?ref=freesslnsupport
Please note that this step is a fairly complex process involving multiple pages, several emails, and an automated phone call, but if you follow the steps and instructions on their site carefully, it doesn’t take that long. As noted before, you will need credit card, valid email address, and working phone number where you can be reached to complete this step. When you are ready, choose the ‘Validity Period’ for the certificate – this simply means how long the certificate will be good for. We recommend that you purchase a certificate good for two or three years – otherwise you will have to redo this in a year (trust us, you will forget, and one day you’ll get a bunch of confused and/or irate phone calls from users getting certificate warnings from the expired certificate). Under ‘Renewal’ select the radio button next to ‘Initial Order’, and under ‘Competitive Replacement’ select the radio button next to ‘No, I can’t take advantage of this order’. In Figure 4 below, the Starter SSL w/SiteSeal package has been chosen with the ‘2 years’ option.
Step 9. Scroll to the bottom of this page, as there are a few more options. Under ‘Reissue Insurance’, you can either choose to get insurance or not – this is entirely up to you. Under ‘Server Licenses’ select ‘1’ from the drop-down. For an example see Figure 5 below. When you are ready, click on the ‘Continue’ button to move to the next step.
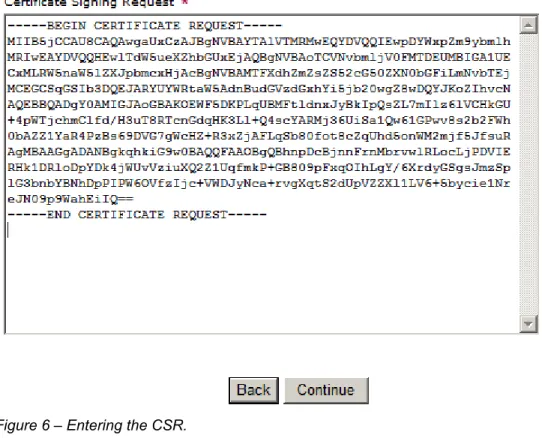
Step 10. Paste the CSR contents from the clipboard into the ‘Certificate Signing Request’ box. For an example see Figure 6 below. When you are ready, click on the ‘Continue’ button to move to the next step.
Step 11. Verify that the FQDN that you desire is listed on the screen. If not, you will need to go back to the SSL-VPN Appliance, redo the CSR, and replace it on this screen. For an example see Figure 7 below.
Figure 7 – Verifying your CSR.
Step 12. Enter the details of your administrative, technical, and billing contact. You can choose to make these the same if you wish.
Step 13. RapidSSL will do a domain lookup and determine the technical and/or administrative contacts. If it cannot find them it will prompt you to choose who will receive your certificate request for process approval.
Step 14. Enter a valid credit card.
Figure 10 - Credit Card details
Check box ‘I agree’, then click on ‘Submit Order’ button.
Step 16. On the next page, enter in a phone number where you can now be reached, as an automated system needs to call you to finalize the certificate generation process. Do exactly what it says and watch the screen. When it verifies you, it will display a thank-you page and an order number. Write this order number down and close the browser.
Step 17. Wait a few minutes, and then check your email – you should have a bunch of emails from RapidSSL. Find the one whose subject line is ‘RapidSSL Certificate Request Confirmation’ and open it – click on the link it contains and click on the ‘I approve’ button. This will finish the order process – you will then receive an email containing the certificate in text format – it will look like this (see below).
---BEGIN CERTIFICATE--- MIIDeDCCAuGgAwIBAgIDAzcOMA0GCSqGSIb3DQEBBAUAMFoxCzAJBgNVBAYTAlVT MRwwGgYDVQQKExNFcXVpZmF4IFNlY3VyZSBJbmMuMS0wKwYDVQQDEyRFcXVpZmF4 IFNlY3VyZSBHbG9iYWwgZUJ1c2luZXNzIENBLTEwHhcNMDYwMjEyMjExMjQ0WhcN MDcwMjEzMjExMjQ0WjCB5zELMAkGA1UEBhMCVVMxITAfBgNVBAoTGHRhcmFudHVs YS52cG50ZXN0bGFiLmNvbTE4MDYGA1UECxMvYnVzaW5lc3Nwcm9maWxlLmdlb3Ry dXN0LmNvbS9nZXQuanNwP0dUMzE0MzU1NzkxJzAlBgNVBAsTHlNlZSB3d3cucmFw aWRzc2wuY29tL2NwcyAoYykwNTEvMC0GA1UECxMmRG9tYWluIENvbnRyb2wgVmFs aWRhdGVkIC0gUmFwaWRTU0woUikxITAfBgNVBAMTGHRhcmFudHVsYS52cG50ZXN0 bGFiLmNvbTCBnzANBgkqhkiG9w0BAQEFAAOBjQAwgYkCgYEA5jOR/gkn/jVFVKtX wmcADNQg08mpaCmcX8RyP5DOuFPNdksLQ1A2Bf0eou1up7dik01ePvux3VO1/88A lWRvUPhQj92Dgvu3m4nLKm/IRjSDi5nyAwTp6zpRyU35ZcnYdNkZ3sszzNBD0Hg/ 9HRFudfp4uVVOJV6g+bRUB24MA0CAwEAAaOBvTCBujAOBgNVHQ8BAf8EBAMCBPAw HQYDVR0OBBYEFN5wVYtLyJ+XC7LBpPggFvfnlhWnMDsGA1UdHwQ0MDIwMKAuoCyG Kmh0dHA6Ly9jcmwuZ2VvdHJ1c3QuY29tL2NybHMvZ2xvYmFsY2ExLmNybDAfBgNV HSMEGDAWgBS+qKB0clBrRLfJI9j7qP+zV2tobDAdBgNVHSUEFjAUBggrBgEFBQcD AQYIKwYBBQUHAwIwDAYDVR0TAQH/BAIwADANBgkqhkiG9w0BAQQFAAOBgQBQuZcW A4B6SsPwbJ8w0nYyc9XH9LaoKGFUQubI0k9wGmJWSfz+RWzNMCX1pW6vwOAZ/t2C dB0gqsxka6t00NCUt9q/NfbCruMKcULjJ0t/wlzHLuXzXwHzclEx/ubXqIi4kQx3 HDxugcjdesG6LLxFtq/WPUC9GToUXXfLXGil+g== ---END CERTIFICATE---
Step 18. Copy the certificate section from the email into a new notepad document and save it as ‘server.crt’ to the desktop.
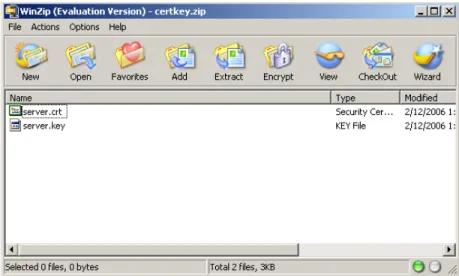
Step 19. Now, open the other ZIP file and extract the ‘server.key’ file. Create a new zipfile called ‘certkey.zip’ and put ‘server.crt’ and ‘server.key’ into it (see Figure 12 below).
Step 20. Login to SSL-VPN appliance and go to System > Certificates. Click on ‘Import certificate…’ button. In the pop-up that appears, select the ‘certkey.zip’ file you just created and click on import.
Figure 13 – Certificate management on SSL-VPN appliance
Step 21. If it is successful, the screen will now say ‘pending’. To activate the certificate, click on Configure icon next to new cert. You will be prompted to enter the password you entered when creating the CSR. Enter this and click on the
Submit button. The screen will now say ‘inactive’ (See Figure 14 below).
Figure 14 – Certificate management on SSL-VPN appliance
NOTE: This next step will reboot the box. Select the Enable radio button next to the new certificate and click on the
Apply button in the upper-right-hand corner.
Step 22. After the reboot, log back in. You should no longer be getting the prompt. If you are using IE, locate the gold lock icon in the lower right hand side of the browser. If you click on this lock, you will see the certificate details.
Step 23. Save all files from the previous steps to a secure location. You will need these files should you ever need to restore the SSL-VPN appliance’s settings from default.
Document created: 01/18/06 Last updated: 05/10/07 Version 1.5