Implementing Microsoft
®Windows
®Server
2008 R2 Foundation on the HP ProLiant
MicroServer
Technical white paper
Table of contents
Abstract... 2
Introduction to Windows Server 2008 R2 Foundation ... 2
Understanding Windows Server 2008 R2 Foundation... 2
Obtaining Windows Server 2008 R2 Foundation ... 3
Comparing Windows Server 2008 R2 editions ... 4
Upgrading Windows Server 2008 R2 Foundation to Windows Server 2008 R2 Standard edition... 5
HP ProLiant MicroServer support for Windows Server 2008 R2 Foundation... 5
Recommended configurations ... 5
Deploying Windows Server 2008 R2 Foundation on HP ProLiant MicroServer ... 6
Pre-installation tasks... 7
Installation of Windows Server 2008 R2 Foundation... 7
Post-installation tasks ... 19
Appendix A: SATA RAID configuration... 45
Appendix B: Creating a bootable USB key ... 56
For more information... 57
2
Abstract
This integration note describes the level of support available for Microsoft® Windows® Server 2008
R2 Foundation for the HP ProLiant MicroServer. The purpose of this paper is to assist customers and resellers during installation of the Windows Server 2008 R2 Foundation operating system (OS) on the latest HP SMB platform.
For more information, visit the HP website: www.hp.com/go/ws08foundationR2
Please refer to the HP ProLiant MicroServer installation sheet found in the box. HP ProLiant MicroServer documentation is available online; visit the HP website:
www.hp.com/servers/microserver
The following topics are addressed in this paper:
• Supported configuration of the HP ProLiant MicroServer for Windows Server 2008 R2 Foundation edition
• Recommended HP ProLiant MicroServer configuration for Windows Server 2008 R2 Foundation edition
• Installation steps for HP ProLiant MicroServer with a DVD
• Installation steps for HP ProLiant MicroServer without a DVD
• Software RAID setup for Windows Server 2008 R2 Foundation on the HP ProLiant MicroServer
• Post-installation tasks such as network setup, auto updates, activation, adding users, and backup
• Additional items to consider when installing Windows Server 2008 R2 Foundation
Introduction to Windows Server 2008 R2 Foundation
Windows Server 2008 R2 Foundation, built on the reliable technology of Windows Server 2008 R2, is a dependable and affordable operating system for running business applications and accessing shared information and resources. Windows Server 2008 R2 Foundation accommodates business growth and provides an easy upgrade path to Windows Server 2008 R2 Standard edition. Windows Server 2008 R2 Foundation is a 64-bit OS for systems with either of the following processors:
• Intel® Xeon® processors with Intel Extended Memory 64 Technology (EM64T)
• AMD Opteron TM series processors (AMD64)
Understanding Windows Server 2008 R2 Foundation
Windows Server 2008 R2 Foundation is a technology that enables core IT resources such as these:
• File and print sharing
• Remote access
• Security
Windows Server 2008 R2 Foundation provides a network foundation to centrally manage operating system–based settings and run business applications. It also provides a familiar Windows user experience that helps manage users and safeguard business information.
3
Windows Server 2008 R2 Foundation is recommended for use in the following environments:
• Core infrastructure: Windows Server 2008 R2 Foundation is an excellent operating system for environments with single or multiple workloads such as file and print sharing, network access, Remote Desktop Services and connections, Web services, and other server roles.
• Active Directory domain controller: Windows Server 2008 R2 Foundation can function as a domain controller or join a domain as a member server.
NOTE:There is a limit of 15 total users in the Active Directory domain.
• Remote Desktop Services (formerly Terminal Services): Windows Server 2008 R2 Foundation is ideal for multiple-user computing, such as sharing Microsoft Office or using Remote Desktop Services.
• Line-of-business applications: Applications for the Windows Server 2008 R2 family of products that have the ”Certified for” or “Works with” accreditation for Windows Server 2008 R2 can be deployed on a Windows Server 2008 R2 Foundation server.
Obtaining Windows Server 2008 R2 Foundation
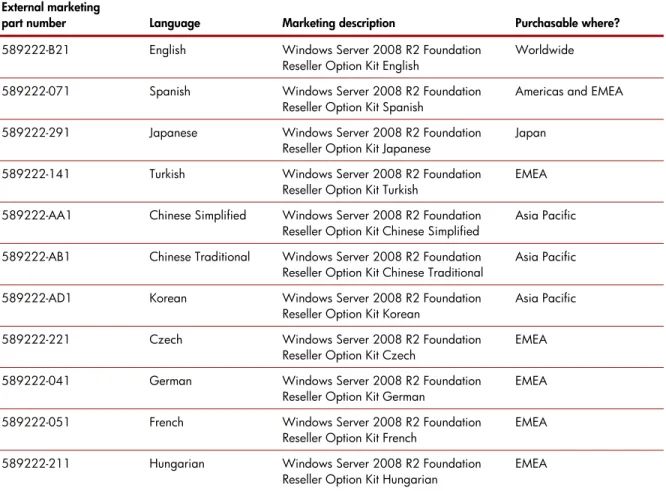
Acquired only through an original equipment manufacturer (OEM) or authorized HP reseller, Windows Server 2008 R2 Foundation is distributed via the Reseller Option Kit (ROK). Customers who wish to acquire Windows Server 2008 R2 Foundation for their HP ProLiant MicroServer should request Windows Server 2008 R2 Foundation at the time of purchase. For resellers, the following Reseller Option Kit (ROK) part numbers are available. For more information about ROKs, see: www.hp.com/go/rok
Table 1.Ordering information forWindows Server 2008 R2 Foundation—Reseller Option Kits External marketing
part number Language Marketing description Purchasable where?
589222-B21 English Windows Server 2008 R2 Foundation
Reseller Option Kit English Worldwide
589222-071 Spanish Windows Server 2008 R2 Foundation
Reseller Option Kit Spanish Americas and EMEA
589222-291 Japanese Windows Server 2008 R2 Foundation
Reseller Option Kit Japanese Japan
589222-141 Turkish Windows Server 2008 R2 Foundation
Reseller Option Kit Turkish EMEA
589222-AA1 Chinese Simplified Windows Server 2008 R2 Foundation
Reseller Option Kit Chinese Simplified Asia Pacific
589222-AB1 Chinese Traditional Windows Server 2008 R2 Foundation
Reseller Option Kit Chinese Traditional Asia Pacific
589222-AD1 Korean Windows Server 2008 R2 Foundation
Reseller Option Kit Korean Asia Pacific
589222-221 Czech Windows Server 2008 R2 Foundation
Reseller Option Kit Czech EMEA
589222-041 German Windows Server 2008 R2 Foundation
Reseller Option Kit German EMEA
589222-051 French Windows Server 2008 R2 Foundation
Reseller Option Kit French EMEA
589222-211 Hungarian Windows Server 2008 R2 Foundation
4
External marketing
part number Language Marketing description Purchasable where?
589222-061 Italian Windows Server 2008 R2 Foundation
Reseller Option Kit Italian EMEA
589222-331 Dutch Windows Server 2008 R2 Foundation
Reseller Option Kit Dutch EMEA
589222-241 Polish Windows Server 2008 R2 Foundation
Reseller Option Kit Polish EMEA
589222-131 Portuguese Windows Server 2008 R2 Foundation
Reseller Option Kit Portuguese EMEA
589222-251 Russian Windows Server 2008 R2 Foundation
Reseller Option Kit Russian EMEA
589222-B71 Swedish Windows Server 2008 R2 Foundation
Reseller Option Kit Swedish EMEA
589222-201 Brazilian Windows Server 2008 R2 Foundation
Reseller Option Kit Brazilian Americas
When purchasing the HP ProLiant MicroServer, request the addition of this operating system.
Comparing Windows Server 2008 R2 editions
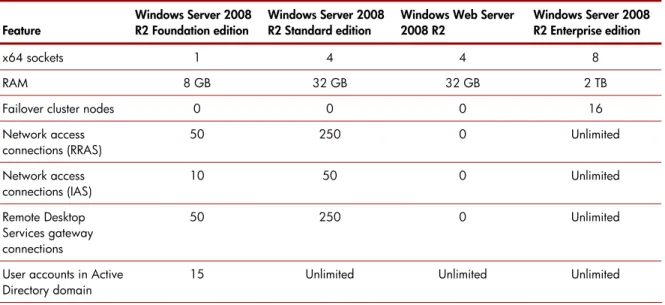
Although the core features are the same, important differences exist between Windows Server 2008 R2 Foundation and other editions of Windows Server 2008 R2.
Table 2 details the key differences between the various Windows Server 2008 R2 editions:
• Microsoft Windows Server 2008 R2 Foundation
• Microsoft Windows Server 2008 R2 Standard edition
• Microsoft Windows Web Server 2008 R2
• Microsoft Windows Server 2008 R2 Enterprise edition
Table 2.Comparison of Windows Server 2008 R2 Foundation with other editions of Windows Server 2008 R2
Feature Windows Server 2008 R2 Foundation edition Windows Server 2008 R2 Standard edition Windows Web Server 2008 R2 Windows Server 2008 R2 Enterprise edition
x64 sockets 1 4 4 8
RAM 8 GB 32 GB 32 GB 2 TB
Failover cluster nodes 0 0 0 16
Network access
connections (RRAS) 50 250 0 Unlimited
Network access
connections (IAS) 10 50 0 Unlimited
Remote Desktop Services gateway connections
50 250 0 Unlimited
User accounts in Active
5
Microsoft provides a comparison of Windows Server 2008 R2 Foundation and other editions of Windows Server 2008 R2 on the Microsoft website at:
www.microsoft.com/windowsserver2008/en/us/r2-differentiated-features.aspx
Upgrading Windows Server 2008 R2 Foundation to Windows Server
2008 R2 Standard edition
Microsoft supports upgrading Windows Server 2008 R2 Foundation to Windows Server 2008 R2 Standard edition. The following restrictions apply to upgrades:
• Cross-architecture (for example, x86 to x64) and cross-language upgrades are not supported
• There are no supported upgrade paths for Windows Server 2008 R2 Foundation to Windows Server 2008 R2 for Itanium-Based Systems edition or Windows Web Server 2008 R2 edition. See the Microsoft Fulfillment site for details:
www.microsoft.com/windowsserver2008/en/us/upgrade-options.aspx
• The customer will need the license key found on the certificate of authenticity (COA) label in order to upgrade.
Microsoft offers two methods for upgrading Windows Server 2008 R2 Foundation:
• An in-place upgrade with media, which will require the customer to run the installer
• An in-place upgrade using the Windows Server 2008 R2 Standard product key
Please visit http://technet.microsoft.com/en-us/library/dd459191(WS.10).aspx for more technical details on upgrading your Foundation Server to Windows Server 2008 R2 Standard.
HP ProLiant MicroServer support for Windows Server 2008
R2 Foundation
The recommended system configurations listed in this section are established by Microsoft for Windows Server 2008 R2 Foundation. The HP ProLiant MicroServer has been certified for Windows Server 2008 R2 offerings. Please see the Windows support matrix for details:
www.hp.com/go/wincert
Recommended configurations
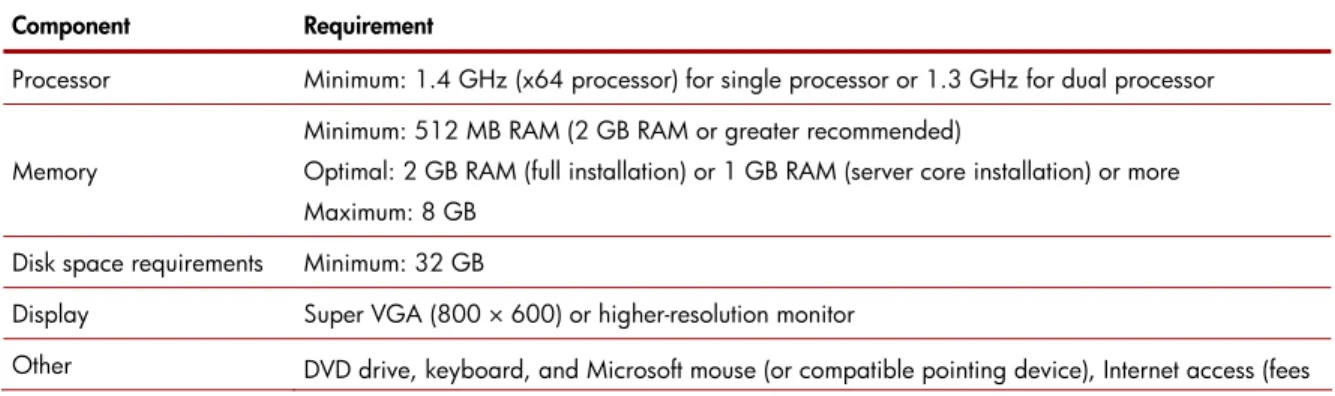
The recommended system configurations established by Microsoft for Windows Server 2008 R2 Foundation base OS installations listed in this section are and are detailed in Table 3. See:
www.microsoft.com/windowsserver2008/en/us/system-requirements.aspx Table 3. Microsoft hardware requirements for Windows Server R2 Foundation
Component Requirement
Processor Minimum: 1.4 GHz (x64 processor) for single processor or 1.3 GHz for dual processor
Memory
Minimum: 512 MB RAM (2 GB RAM or greater recommended)
Optimal: 2 GB RAM (full installation) or 1 GB RAM (server core installation) or more Maximum: 8 GB
Disk space requirements Minimum: 32 GB
Display Super VGA (800 × 600) or higher-resolution monitor
6
Component Requirement may apply)
NOTE: Actual requirements will vary based on your system configuration, and the applications and features you choose to install. Processor performance is dependent upon not only the clock frequency of the processor, but the number of cores and the size of the processor cache. Disk space requirements for the system partition are approximate. Additional available hard disk space may be required if you are installing over a network.
The HP ProLiant MicroServer meets or exceeds all the required specifications for Windows Server 2008 R2 Foundation. At launch, the HP ProLiant MicroServer ships with 1 GB RAM (1x1 GB) and a single SATA hard drive of at least 160 GB. Customers who wish to upgrade the system RAM to the Microsoft recommended configuration may utilize the following part number when ordering:
RAM HP 1GB (1x1GB) Single Rank x8 PC3-10600 (DDR3-1333)
Unbuffered CAS-9 Memory Kit 500668-B21
The HP ProLiant MicroServer default configuration does not include a DVD optical drive. Customers may install Windows Server 2008 R2 Foundation via a DVD drive or by creating a bootable USB key. Customers who prefer to use a DVD for installation may either purchase an external USB DVD drive or may obtain a DVD drive for the server during purchase utilizing one of the part numbers below:
HP optical drive HP Half-Height SATA DVD-RW Optical Kit 624192-B21
HP optical drive HP Half Height SATA DVD ROM Optical Kit 447326-B21
NOTE: Refer to the Microsoft website for any system requirement updates:
www.microsoft.com/windowsserver2008/en/us/system-requirements.aspx
For additional information and updates on supported servers, refer to the following websites:
• Microsoft Windows Server Catalog: www.windowsservercatalog.com/
• Software and drivers: www.hp.com/servers/microserver
• Windows on ProLiant support matrix: www.hp.com/go/wincert
Deploying Windows Server 2008 R2 Foundation on
HP ProLiant MicroServer
Windows Server 2008 R2 Foundation can be installed using the following guidelines. The HP ProLiant MicroServer deployment of Windows Server 2008 R2 Foundation is not supported through SmartStart or the Easy Setup CD; the path of installation described below is recommended.
7
Pre-installation tasks
To prepare for installation, complete the following checklist:
Checklist Action 1.Which method will you be using to install
Windows Server 2008 R2 Foundation?
Internal DVD:
Add a DVD or DVD/RW option kit for your HP ProLiant MicroServer and follow the instructions in the HP ProLiant MicroServer Installation Sheet to add the DVD drive.
External USB DVD:
Connect the USB DVD drive to one of the HP ProLiant MicroServer USB ports. Apply external power to the DVD drive if required.
Bootable USB Key:
Follow the instructions in Appendix B for creating a bootable USB key. 2.Does your configuration need additional
memory?
Add additional memory according to instructions in the HP ProLiant MicroServer installation sheet.
3.Do you plan on using RAID? Add a second hard drive the same size as the one that shipped with
your server and install into drive bay 2 using the instruction in the HP ProLiant MicroServer installation sheet.
Configure the RAID logical drive (see Appendix A).
4.Does your system need additional storage? Add up to 3 additional SATA hard drives and install into bays 2, 3, and 4 according to the instruction in the HP ProLiant MicroServer installation sheet.
If using RAID, drives 1 & 2 must be the same size and drives 3 & 4 must be the same size. Configure the RAID logical drive (see Appendix A). 5.Select an administrator password Create a strong password and store it in a safe place.
Password must meet the following complexity requirements by default (can be changed later); it must:
• Not contain the user’s account name or parts of the user’s full name • Be at least 6 characters in length
• Contain characters from three of the following four categories: – English uppercase characters (A – Z)
– English lowercase characters (a – z) – Base 10 digits (0 – 9)
– Non-alphabetic characters (for example, !, $, #, %) 6.Locate the Windows Server 2008 R2
Foundation product key
The product key is located on the certificate of authenticity (COA) that is part of the Reseller Option Kit (ROK). Adhere the COA sticker to the back of the server, and keep a copy of the product key in a safe place. Use this product key during installation/activation.
Installation of Windows Server 2008 R2 Foundation
To perform an installation of the HP Branded Windows Server 2008 R2 Foundation, follow the installation steps below:
NOTE: If you plan to use RAID, follow the instructions in Appendix A to create the logical disk where
you will install the operating system. Using the RAID controller provides an easy way to protect yourself from a single drive failure, but only if you choose to use RAID 1. RAID 0 does not provide data protection from a drive failure, but does offer speed as the data is stored across multiple drives. RAID 0 is not recommended for servers and is not covered in this document.
1. Boot using the method selected from the checklist above. For internal or external DVD drive, insert the Branded Windows 2008 R2 media. For the bootable USB key, insert the key into one of the USB ports on the HP ProLiant MicroServer. The USB key must be removed during the first reboot of the installation process.
NOTE (DVD methods only): Normally when installing onto a system that has not had the OS installed before the media will boot without interaction. Sometimes, however, it might be necessary to press a key when prompted with the “Press any key” message to boot from the DVD media. You should only need to “press any key” once during the installation process to kick off the initial installation. After that it’s not necessary to “press any key”; doing so will restart the installation process.
2. On the first installation screen, select the following from the drop-down menus:
• Language of choice (1)
• Time and currency format (2)
• Keyboard (3)
3. Click “Next.”
4. Click “Install now.”
5. “Setup is starting” message is displayed.
6. After reading the licensing agreement, click the checkbox next to “I accept the license terms” if you agree with the licensing terms.
7. Click “Next.”
8. When prompted with the “Which type of installation” dialog, select “Custom (advanced)” by clicking it.
9. On the “Where do you want to install Windows?” screen, click “Disk 0 unallocated space” and click “Next.”
10.Windows will start installing. This could take anywhere from 15 to 40 minutes, depending on the system on which the OS is being installed.
NOTE: Before the “Completing installation” step, the server will reboot. If using the USB key
method, remove the USB key at this time. The remainder of the installation process does not require the USB key. If you forget to remove the USB key, the system will simply boot back into the setup process back at step 2. Just remove the USB key and power cycle the server. The installation will continue normally.
11.After the installation is complete, a login screen will be presented. You will be required to enter a password at that time. Click “OK” and proceed with setting the administrator password.
12.Enter the administrator password and confirm the entry in the second field. At this time it’s a good idea to create a password reset disk. It will help in resetting the password in case you forget what it has been set to. Click “Create a password reset disk….” and follow the instructions. When finished, click the blue arrow.
13.The password has been set and an acknowledgment screen will be presented.
14.Click “OK.”
15.The installation will now continue to the “Welcome” screen and then the “Preparing desktop” screen.
16.When the system comes up fully you will be presented with an “Initial configuration tasks” window.
17.From this window you can activate your product if necessary, set the time zone, configure networking, provide computer name and domain, enable automatic updating and feedback, download and install updates, add roles, add features, enable remote desktop, and configure the Windows firewall. The window will continue to be presented each time you reboot the server unless you check the “Do not show this window at logon” box and click the “Close” button. Once the box is checked, the window will no longer be shown. You can get to the configuration tasks later by clicking “Start,” “Administrative tools,” and then the desired task.
Post-installation tasks
Installing the latest HP drivers
• Update the OS with the latest HP drivers that have been developed specifically for this system. These drivers can be found on the HP website. Go to www.hp.com, select the Support & Drivers section, click “Download drivers and software (and firmware),” type in the product name, and click “Go.”
• This will bring up a page similar to the one below (which is only for reference, not the actual page), where you select the OS product and version of choice. Select the desired OS by clicking it.
NOTE: You may be redirected to a website outside of HP to download drivers.
• A page similar to the following sample will be presented that shows all available drivers. Choose the drivers you wish to download. If you are downloading the drivers from a system different than the target server, save them to a USB key so you can easily transfer them to the target server for installation.
• Drivers that typically require updates include the network controller, system ROM, video drivers, processor chipset drivers, and potentially the storage controller, depending on whether or not the RAID controller is enabled.
• Most of the drivers will be in .exe format. This means that once they are transferred to the target server, you can just double-click and the driver package installation will start. Choose to install the driver if prompted, and follow any additional prompts that might be presented.
Setting up networking
• The network is initially set up using default parameters. Contact your networking provider to determine the correct inputs for your network.
• To alter the settings click the “Configure networking” link in the “Initial configuration tasks” window.
• This will bring up a screen that lists the available network connections on the server.
• Double-click the Broadcom NetXtreme Gigabit Ethernet adapter (1).
• This will bring up the “Local area connection status” window (2).
• Click “Properties.”
• This will bring up the “Local area connection properties” window (3).
• Because most of the areas of modification typically occur in the IP address section, that’s the section of focus, but other areas could also need attention, depending upon what your service provider requests. Click “Internet Protocol Version 4” or “Internet Protocol Version 6” (4), depending upon what’s required
• This will bring up the “Internet Protocol Version x properties” page.
• On this page you can select either to use an automatic IP address or to set the IP address to that required by the service provider (static).
Enabling auto updates
• Microsoft provides administrators with an option to “Download and install updates” that will run at a specified time. When enabled, this option will download and install any updates that Microsoft considers important to the continued functionality of your system, ranging from general OS updates to security fixes that address potential security risks. It is a good practice to enable the “Download and install updates” feature. To do so, go to the “Initial configuration tasks” window.
• Click “Download and install updates.”
• To set up the auto setting feature, click “Change settings.” This will allow you specify the settings for auto updates. If you don’t wish to change the settings, then click “Turn on automatic updates.” It’s a good idea to change the settings to a time of least inconvenience; that way your server stays up to date and doesn’t cause network slowdown when you can least afford it.
• When finished changing the settings, click “OK.”
Checking activation status
You can check the status of your operating system activation by clicking “Start,” then right-clicking “Computer” and clicking “Properties.”
• This will bring up the “Computer properties” window, which shows the activation status.
• Click “Activate Windows now.”
• The following screen will come up:
• Click “Type a different product key.”
• The following screen will be presented:
• Type in the product key from the certificate of authenticity (COA) label, which is affixed to the back of your server.
• Click “Next” and follow the process. After completion, your server installation will be activated. Adding users
• If additional users will be accessing the server, then they need to have an account created on the server. Additional considerations are whether you wish to manage the accounts individually or as a group. Typically, if you have multiple people sharing the same access rights, then their rights can be administered more easily if you place them into a group. If others have additional rights, you can either create a group for them or add them to some of the default existing accounts, like “Administrator” (or whatever level of access you deem appropriate).
• To create a new user account, open up the computer management console by clicking “Start,” “Administrative tools,” and ”Computer management.”
• Next, click the “+” next to the “Local users and groups” selection.
• Next, click the “Users” group.
• To add a user, either click the “Action” menu and select “New user” or right-click in the pane where the existing accounts exist and select “New user.” Add the name of the user, enter a description, set the password, and determine whether or not the user will forced to choose a new password at first logon. Once all the desired values are set, click “Create.” This process can be completed for all the users who need to access the system at this time. When you are finished with adding users, click “Close.” You can easily delete users by right clicking the user and selecting “Delete.”
• If group access is desired, then click the “Groups” selection. To create a new group, either click the “Action” menu or right-click in the “Group” area and then select “New group.”
• Supply a name for the group and a description, if desired.
• Next, click the “Add” button to add the desired users to the group. When complete, click “Create.”
• Click “Close” when finished creating groups. You can create multiple groups and add the same user to multiple groups, if desired.
• You can always open the group up later and add more users to it.
• To get additional help on creating users and groups, you can always click “Help” and “Reviewing Microsoft provided details.”
Setting up file sharing
File sharing allows you to share files with other employees via the network. It provides a central location for everyone to store files that others might need. File sharing is the simplest form of sharing. Ftp servers are another way of sharing files, but they take a little bit more work to set up, and require additional security parameters to keep data safe. Microsoft online help and support is a good place to get additional information on setting up an ftp server if you wish to set one up. To set up file sharing:
• Click “Start” and then “Computer.”
• You can choose to create shares at various levels, but a good security practice is to not set up a share at the drive level.
• Click “Computer.”
• This would be a good time to create a new folder that can server as the file share folder for everyone to use.
• To create a new folder, click in the white area; then, on the tool bar, click “New folder.” Assign a name to the new folder. Hit “Enter” to save the name.
• To share the folder, click the folder name you just created. On the toolbar at top, click “Share with.”
• A file-sharing box will come up. From there you can choose who to share the folder with and set access privileges.
• If you click the down arrow next to the “Add” button, you can choose who you wish to grant access to from the list. By default the administrator has access to every share.
• After selecting a user, click “Add.”
• After the user is added, you can change the permission level. The permission level determines whether the user can just read files without modifying (read), or read files as well as write new files/additional files (read/write).
• From this window you can add additional members if you like. You can also add groups using the same process. You will, however, need to know the name of the group you created, as it might not be in the list.
• After you have finished adding all users and setting their permission levels, click the “Share” button.
• A “Network discovery” screen will be presented. Select whether you wish to share the network privately or publicly. For additional information on network discovery, click the link “What is network discovery?” about midway down the window.
• Once you make a selection, the share will be created and a “Summary” screen will be presented. From this screen you can choose to email the link or copy it so that you can easily send it to those who have been added to the share.
• When finished click “Done.”
Setting up backup
Before the backup feature included in Windows 2008 R2 can be used, the feature will need to be set up.
To install the backup service:
• Click “Start.”
• Click “Administrative tools.”
• Click “Server manager.”
• Click “Features.”
• On the right-hand side of the window, click “Add features.”
• Scroll down the list and expand the Windows Server Backup features by clicking the “+” sign. Click the box next to “Windows Server Backup” to select it for installation. The main box will turn gray and the Windows Server Backup selection will show a check box. If you wish to install the command-line feature as well, then click the box for command-line tools.
• Click “Next.”
• Click “Install.”
• The feature will start installing.
• After the installation is complete an “Installation succeeded” message will be presented. You will also see a warning message if Windows automatic updating is not enabled.
• Click “Close.”
• Windows Server Backup will now show up in the “Administrative tools” section of the start programs menu, as well as on the “Server manager” page.
It is a good practice to set up a recurring backup solution, utilizing a weekly complete backup and an incremental backup on a daily basis. This will give you the ability to restore the server to a specific point in time. A tape backup solution with disaster recovery is a better solution, but can be costly. Backing files to a USB key or DVD media are other options available for server backup. USB key or DVD media back up isn’t the best disaster recovery solution, but it will enable you to get the server back to its good state without having to rebuild everything. In the case of a catastrophic failure, the OS would need to be reinstalled with the backup feature, and then you could restore the backup files from the USB key. This would get you back to where you were before the failure.
Additional items to consider
Consider these additional items when setting up your server:
• Ftp access
• Web services
• Remote access
To set up these items you will need to determine what it is you really want to achieve. The online help can be a good starting point for getting additional information on these tasks. To access the online help and support files from Microsoft, click “Start” and then “Help and support.” When the “Help and support” window launches, you can choose from a variety of topics to help guide you through the additional items or roles you wish to set up.
Appendix A: SATA RAID configuration
Configuring SATA RAID is a 2-part process. First, you change the operating mode of the embedded SATA controller to “RAID,” and then you use the AMD RAID Option ROM utility to configure the RAID logical disks. A logical disk (LD) is the unit of storage that will be seen by the operating system. A logical disk can only be created from two same-size hard drives. RAID 0 (zero) is not recommended for server deployments, as it provides no protection against hardware failure.
The recommended approach is to add a second SATA drive (the same size as the one that shipped with the HP ProLiant MicroServer) in the server’s second drive bay, and then to create a RAID 1 logical disk (or “mirror”). The result is that during OS installation, you will see just a single disk presented as “Disk 0 unallocated space.”
If you need to have additional storage on your HP ProLiant MicroServer, it is recommended that you use RAID to protect that storage as well. In this case, you would add two identical drives (such as 1 TB) to drive bays 3 and 4, and then create a second RAID 1 logical disk. This can be done either before the initial installation, or after the operating system is installed.
Changing the embedded SATA controller mode
1. Power on the HP ProLiant MicroServer and, when prompted, hit the F10 key to enter the ROM-based setup utility (RBSU).
2. Arrow over to the “Advanced” tab and then down to “IDE configuration.” Hit “Enter.”
3. Highlight the “SATA controller mode” selection and hit “Enter.” 4. Choose RAID from the drop-down list.
5. Hit F10 to save the settings and exit. The AMD RAID Option ROM is now enabled. The system will now reboot.
Configuring logical disks
6. Press Ctrl+F during post when the RAID settings are displayed.
NOTE: this prompt may be displayed for a very short period of time. If you miss it, reboot the server and be prepared to enter Ctrl+F.
7. Select option 2 (LD View/LD Define) from the list.
8. Press Ctrl+C to enter the “LD creation” view.
9. Use the arrow keys to highlight the RAID level, if not already focused on it. 10.Press the space bar to select RAID 1.
11.Arrow down to the assignment column and select the drives you wish to assign to the logical disk. Press the space bar to toggle the “N” to “Y” to add a drive. Exactly two drives must be used to create a RAID 1 logical disk.
NOTE: Best practice is to use drive bays 1 and 2 for the first RAID logical disk, and bays 3 and 4 for the second logical disk. Also, make sure that “Fast Init” is set to “ON,” or an extended amount of time will be required to create the LD.
12.When finished assigning, press Ctrl+Y to save the settings.
13.You can now set a name for the logical disk. Press Ctrl+Y to assign a name such as “OS,” or any other key to leave the name blank.
14.A warning message about erasing the drives will be presented. Press Ctrl+Y to continue with erasing the drives and creating the logical disk.
15.The “Modify array capacity” screen is presented. Press any key to keep the default (maximum size of the drive) or press Ctrl+Y to modify.
16.The “LD view” screen is presented, updated to show that a RAID logical disk has been created.
17.If you are creating a second RAID logical disk, repeat steps 8 through 16. Press “ESC” if finished setting up RAID.
18.Press “ESC” again to exit.
19.Press “Y” to reboot the server.
56
Appendix B: Creating a bootable USB key
Windows Server 2008 R2 Foundation can be installed on the HP ProLiant MicroServer without a DVD via a USB key method. This method requires the use of command line utilities and should only be undertaken by experienced users. Access to another computer besides the server is required.
NOTE:This process is NOT recommended for the novice user. HP assumes no responsibility and is not liable for
lost data if you use this option. The primary risk is in accidentally selecting a hard drive rather than the USB key during the installation process. Disk numbering starts with zero. If you have more than one hard drive installed, the USB stick will not be “1” as indicated in the example. Carefully examine the resulting output of the “list disk” command to select the right number for the USB drive.
1. At a computer running Windows Vista, Windows 7, or Windows Server 2008, run a command
prompt as administrator and execute the following: C:\> diskpart
DISKPART> list disk [Identify disk # of the USB key] DISKPART> sel disk 1 [assuming 1 was the # from above]
DISKPART> clean [CAUTION—will wipe whichever disk is selected]
DISKPART> cre part pri DISKPART> active DISKPART> assign
DISKPART> format fs=ntfs quick DISKPART> exit
C:\> exit
2. Copy the contents of the Windows Server 2008 R2 Foundation DVD to the USB key.
3. From the system tray, use the “Safely remove hardware” icon to safely remove the USB key from the computer. This helps ensure that all files have been fully written to the USB key.
For more information
For additional information, refer to the resources listed below.
• HP ProLiant MicroServer site: www.hp.com/go/microserver www.hp.com/servers/microserver
• Microsoft website: www.microsoft.com
• Windows Server 2008 R2 Foundation homepage: www.hp.com/go/ws08foundationR2
Call to action
Send comments about this paper to: [email protected]
Share with colleagues
© Copyright 2010 Hewlett-Packard Development Company, L.P. The information contained herein is subject to change without notice. The only warranties for HP products and services are set forth in the express warranty statements accompanying such products and services. Nothing herein should be construed as constituting an additional warranty. HP shall not be liable for technical or editorial errors or omissions contained herein.
AMD is a trademark of Advanced Micro Devices, Inc. Intel and Xeon are trademarks of Intel Corporation in the United States and other countries. Microsoft and Windows are U.S. registered trademarks of Microsoft Corporation.